navigation BMW 750LI 2007 E66 Workshop Manual
[x] Cancel search | Manufacturer: BMW, Model Year: 2007, Model line: 750LI, Model: BMW 750LI 2007 E66Pages: 254, PDF Size: 7.98 MB
Page 99 of 254
Controls
97Reference
At a glance
Driving tips
Communications
Navigation
Entertainment
Mobility
BMW Night Vision*
The concept
BMW Night Vision is a driver assistance system
that is designed to provide enhanced vision for
certain objects at night. This can be especially
helpful for detecting people and larger animals.
When objects are detected, the driver may be
able to take appropriate action sooner. For
example, the driver may identify and detect the
presence of persons or animals in the road
ahead or off to the sides and can be more alert,
slow down or stop, blow the horn, etc. The
driver can decide which actions are appropriate
and then react accordingly.
A certain area in front of the vehicle is viewed by
an infrared camera and a generated image is
shown on the Control Display. The resulting
thermal image shows the relative heat radiation
of the objects present in the camera's field of
view. Warmer objects appear brighter and
cooler objects appear darker. Contrast is
dependent on the temperature difference
between the objects and the background and
on the amount of heat radiation of the object
itself. As a result, it is quite possible that a per-
son is not continually recognizable as a person
in shape, since the thermal radiation can be
affected by different clothing which blocks heat
loss. Objects with little temperature difference
to the surrounding area, or little heat radiation
are less noticeable, for example in cold weather.
Any improvement in detection depends on
many factors such as the object size and tem-
perature compared to the surroundings, or
other nearby objects, the visual recognition
skills of the driver, weather conditions, and
other factors.
Driving hints
With the system active, periodically but briefly,
glance at the thermal image on the Control Dis-
play to notice objects that could be people or
larger animals. The glance should be similar to
glancing at the rear view mirror. Do not stare at
the image for long periods while driving, as this
will take your attention away from the road. If you notice an object of interest ahead, be pre-
pared to slow down or stop, blow the horn, or
take other appropriate action.
System limits
The system is designed to supplement but not
replace forward vision through the windshield.
The driver is responsible for safe driving at
night. BMW Night Vision is not designed to be
used as a continuous viewing window for driv-
ing at night.
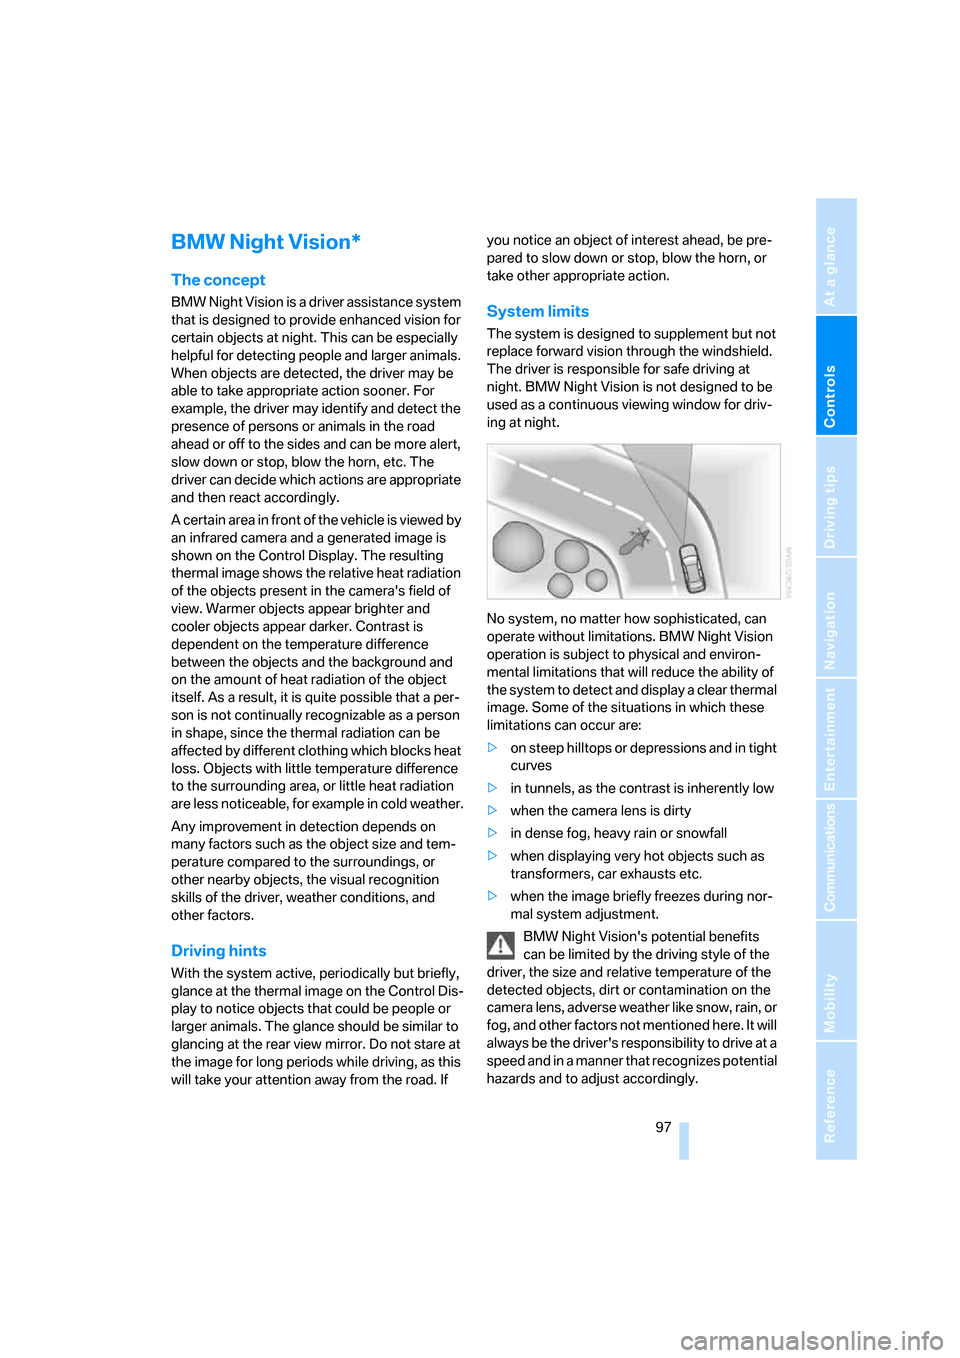
No system, no matter how sophisticated, can
operate without limitations. BMW Night Vision
operation is subject to physical and environ-
mental limitations that will reduce the ability of
the system to detect and display a clear thermal
image. Some of the situations in which these
limitations can occur are:
>on steep hilltops or depressions and in tight
curves
>in tunnels, as the contrast is inherently low
>when the camera lens is dirty
>in dense fog, heavy rain or snowfall
>when displaying very hot objects such as
transformers, car exhausts etc.
>when the image briefly freezes during nor-
mal system adjustment.
BMW Night Vision's potential benefits
can be limited by the driving style of the
driver, the size and relative temperature of the
detected objects, dirt or contamination on the
camera lens, adverse weather like snow, rain, or
fog, and other factors not mentioned here. It will
always be the driver's responsibility to drive at a
speed and in a manner that recognizes potential
hazards and to adjust accordingly.
Page 100 of 254
Technology for comfort, convenience and safety
98 BMW Night Vision is not a substitute or replace-
ment for driver responsibility or for adapting to
the visibility conditions and the traffic situation.
The forward view illuminated by the headlamps
must always be the basis for making safe driv-
ing decisions; otherwise, a safety risk will
result.<
Activating BMW Night Vision
1.Turn the light switch to position2 or3, refer
to page100.
2.When the low beams are switched on:
>Press the button.
>Press the button.
Programming button on the steering
wheel, refer to page52.
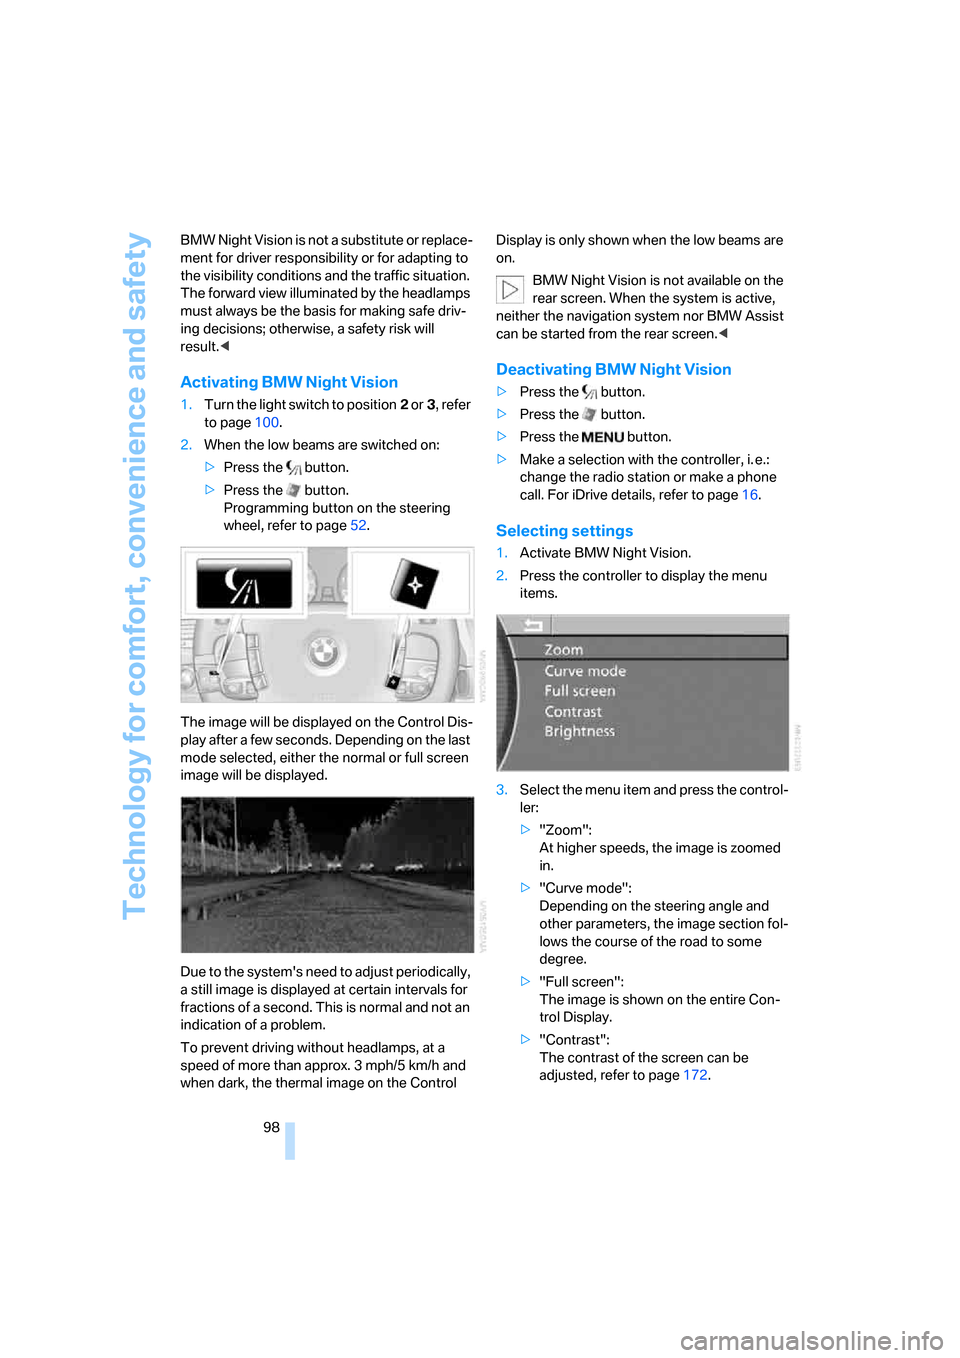
The image will be displayed on the Control Dis-
play after a few seconds. Depending on the last
mode selected, either the normal or full screen
image will be displayed.
Due to the system's need to adjust periodically,
a still image is displayed at certain intervals for
fractions of a second. This is normal and not an
indication of a problem.
To prevent driving without headlamps, at a
speed of more than approx. 3 mph/5 km/h and
when dark, the thermal image on the Control Display is only shown when the low beams are
on.
BMW Night Vision is not available on the
rear screen. When the system is active,
neither the navigation system nor BMW Assist
can be started from the rear screen.<
Deactivating BMW Night Vision
>Press the button.
>Press the button.
>Press the button.
>Make a selection with the controller, i. e.:
change the radio station or make a phone
call. For iDrive details, refer to page16.
Selecting settings
1.Activate BMW Night Vision.
2.Press the controller to display the menu
items.
3.Select the menu item and press the control-
ler:
>"Zoom":
At higher speeds, the image is zoomed
in.
>"Curve mode":
Depending on the steering angle and
other parameters, the image section fol-
lows the course of the road to some
degree.
>"Full screen":
The image is shown on the entire Con-
trol Display.
>"Contrast":
The contrast of the screen can be
adjusted, refer to page172.
Page 101 of 254
Controls
99Reference
At a glance
Driving tips
Communications
Navigation
Entertainment
Mobility
>"Brightness":
The brightness of the screen can be
adjusted, refer to page172.
The settings are stored for the remote control
currently in use.
To exit the menu:
The image will automatically disappear after
a p p r o x . 5 s e c o n d s , o r s e l e c t t h e r e t u r n a r r o w
and press the controller to exit sooner.
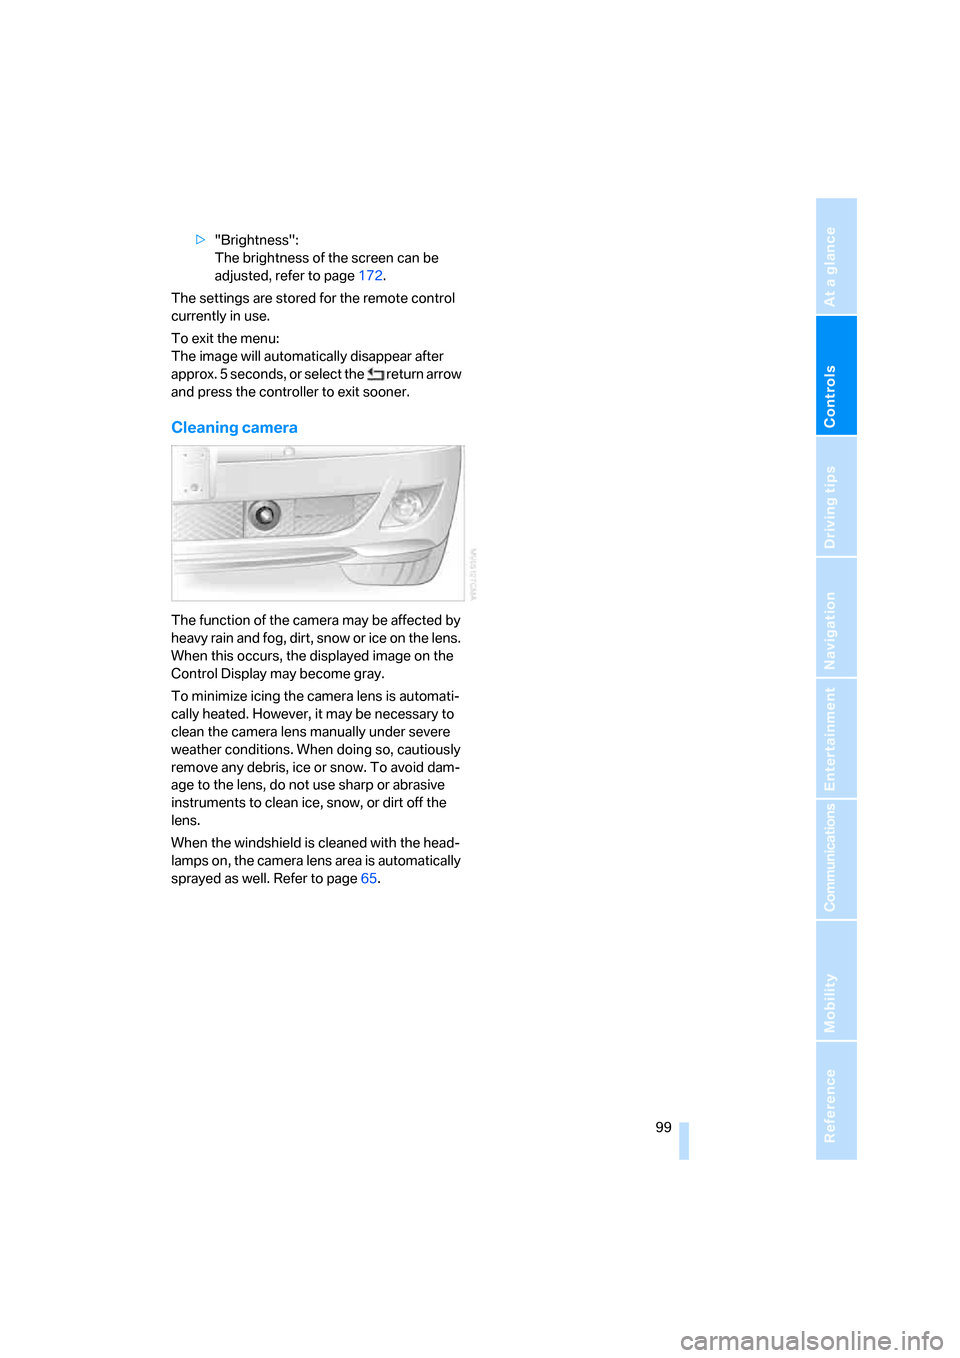
Cleaning camera
The function of the camera may be affected by
heavy rain and fog, dirt, snow or ice on the lens.
When this occurs, the displayed image on the
Control Display may become gray.
To minimize icing the camera lens is automati-
cally heated. However, it may be necessary to
clean the camera lens manually under severe
weather conditions. When doing so, cautiously
remove any debris, ice or snow. To avoid dam-
age to the lens, do not use sharp or abrasive
instruments to clean ice, snow, or dirt off the
lens.
When the windshield is cleaned with the head-
lamps on, the camera lens area is automatically
sprayed as well. Refer to page65.
Page 103 of 254
Controls
101Reference
At a glance
Driving tips
Communications
Navigation
Entertainment
Mobility
from the headlamp follows the course of the
road.
Activating Adaptive Head Light
In switch position3, the Adaptive Head Light is
activated and Automatic headlamp control is
switched on.
In order not to blind oncoming traffic, the Adap-
tive Head Light is not active when driving in
reverse and only points toward the passenger
side when the vehicle is stationary.
Malfunction
The LED above the symbol for automatic head-
lamp control flashes. Adaptive Head Light is
malfunctioning or has failed. Have the system
checked as soon as possible.
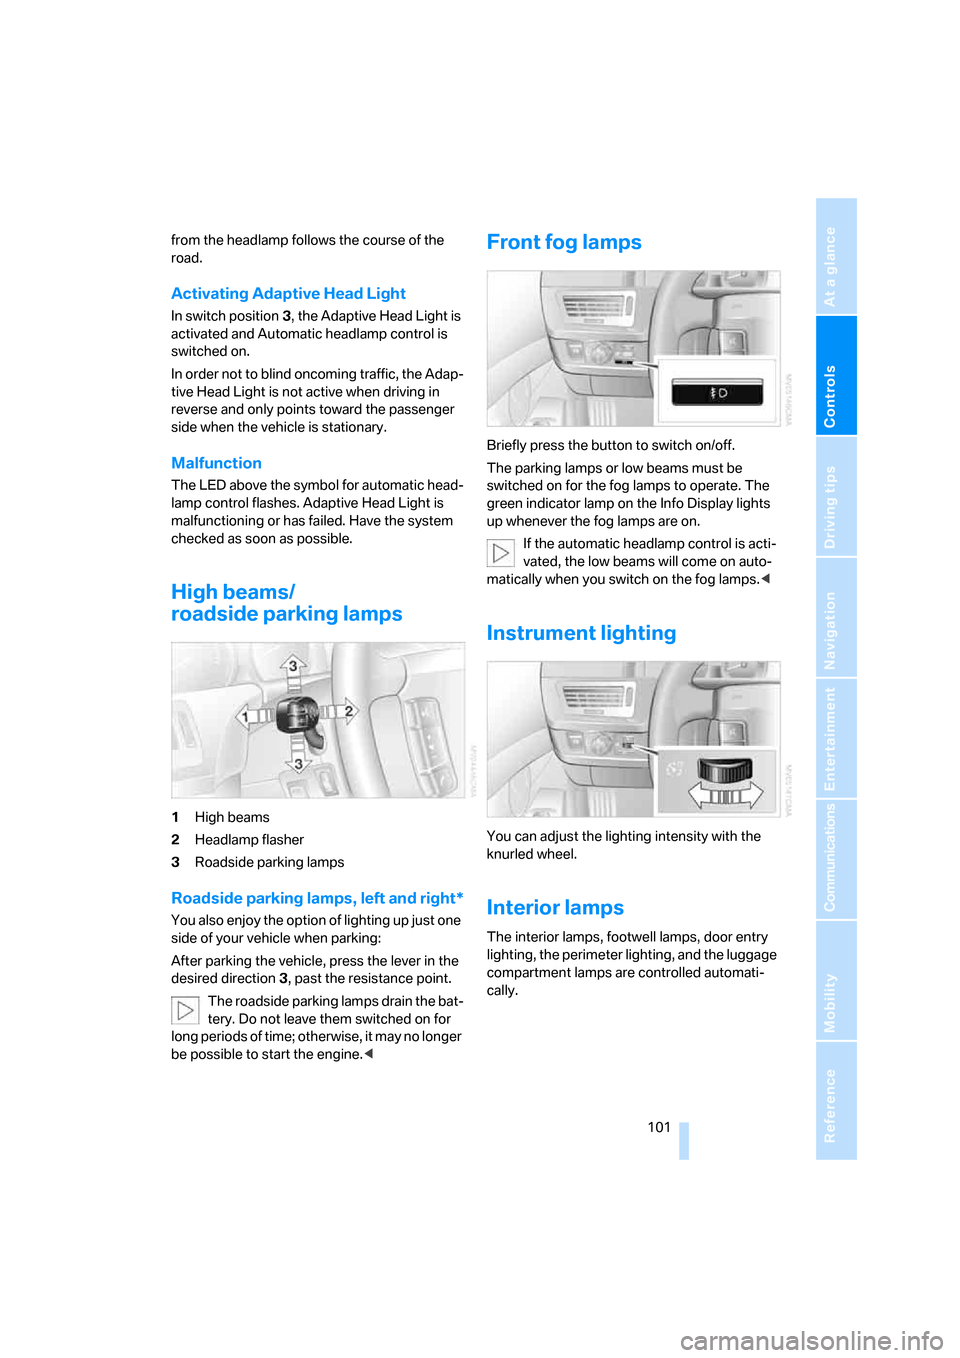
High beams/
roadside parking lamps
1High beams
2Headlamp flasher
3Roadside parking lamps
Roadside parking lamps, left and right*
You also enjoy the option of lighting up just one
side of your vehicle when parking:
After parking the vehicle, press the lever in the
desired direction3, past the resistance point.
The roadside parking lamps drain the bat-
tery. Do not leave them switched on for
long periods of time; otherwise, it may no longer
be possible to start the engine.<
Front fog lamps
Briefly press the button to switch on/off.
The parking lamps or low beams must be
switched on for the fog lamps to operate. The
green indicator lamp on the Info Display lights
up whenever the fog lamps are on.
If the automatic headlamp control is acti-
vated, the low beams will come on auto-
matically when you switch on the fog lamps.<
Instrument lighting
You can adjust the lighting intensity with the
knurled wheel.
Interior lamps
The interior lamps, footwell lamps, door entry
lighting, the perimeter lighting, and the luggage
compartment lamps are controlled automati-
cally.
Page 105 of 254
Controls
103Reference
At a glance
Driving tips
Communications
Navigation
Entertainment
Mobility
Climate
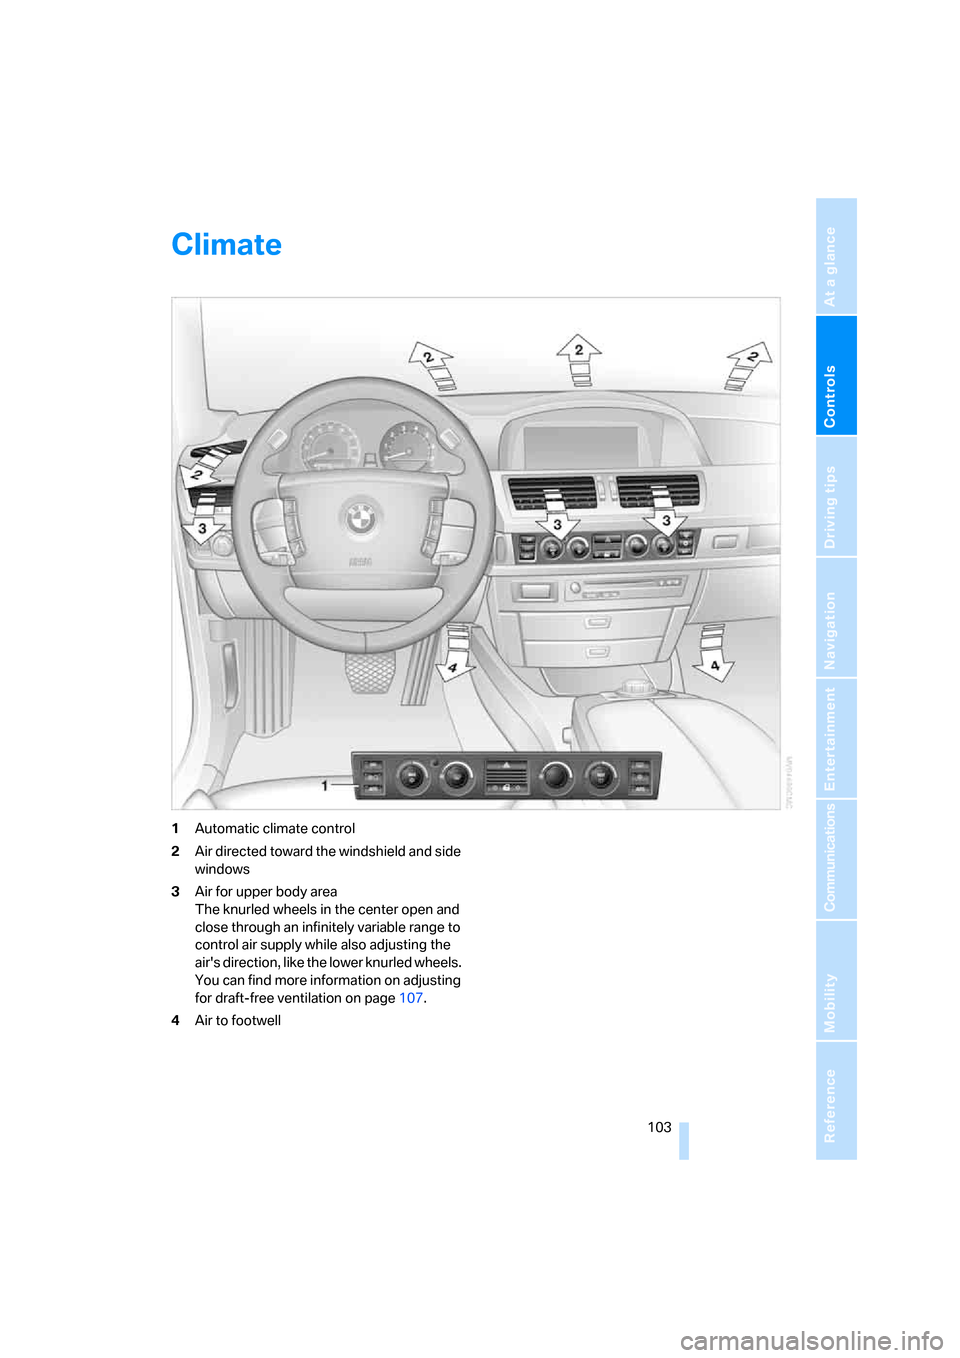
1Automatic climate control
2Air directed toward the windshield and side
windows
3Air for upper body area
The knurled wheels in the center open and
close through an infinitely variable range to
control air supply while also adjusting the
air's direction, like the lower knurled wheels.
You can find more information on adjusting
for draft-free ventilation on page107.
4Air to footwell
Page 107 of 254
Controls
105Reference
At a glance
Driving tips
Communications
Navigation
Entertainment
Mobility
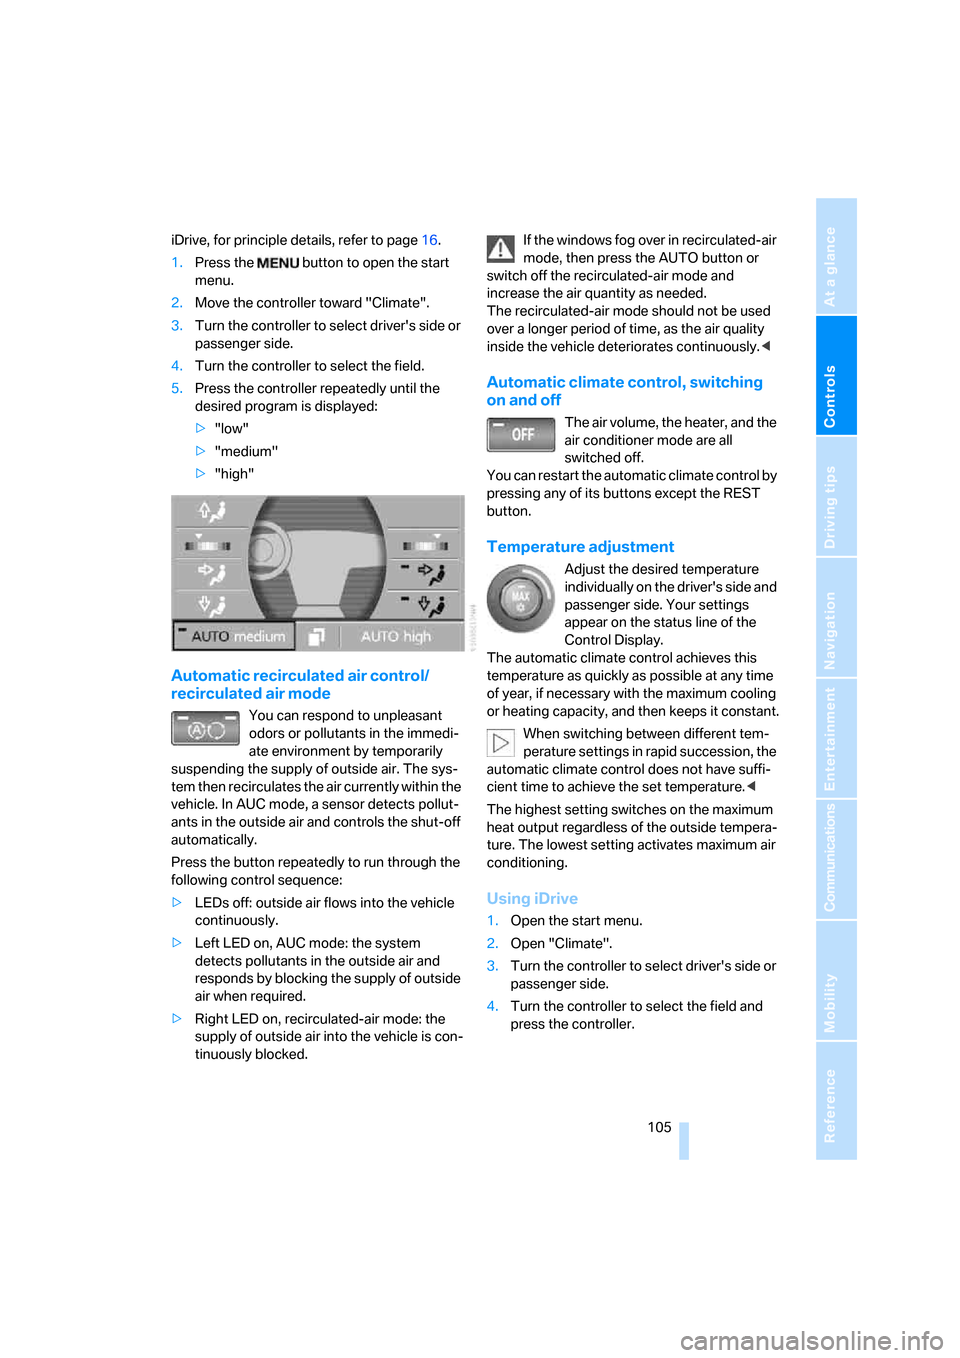
iDrive, for principle details, refer to page16.
1.Press the button to open the start
menu.
2.Move the controller toward "Climate".
3.Turn the controller to select driver's side or
passenger side.
4.Turn the controller to select the field.
5.Press the controller repeatedly until the
desired program is displayed:
>"low"
>"medium"
>"high"
Automatic recirculated air control/
recirculated air mode
You can respond to unpleasant
odors or pollutants in the immedi-
ate environment by temporarily
suspending the supply of outside air. The sys-
tem then recirculates the air currently within the
vehicle. In AUC mode, a sensor detects pollut-
ants in the outside air and controls the shut-off
automatically.
Press the button repeatedly to run through the
following control sequence:
>LEDs off: outside air flows into the vehicle
continuously.
>Left LED on, AUC mode: the system
detects pollutants in the outside air and
responds by blocking the supply of outside
air when required.
>Right LED on, recirculated-air mode: the
supply of outside air into the vehicle is con-
tinuously blocked.If the windows fog over in recirculated-air
mode, then press the AUTO button or
switch off the recirculated-air mode and
increase the air quantity as needed.
The recirculated-air mode should not be used
over a longer period of time, as the air quality
inside the vehicle deteriorates continuously.<
Automatic climate control, switching
on and off
The air volume, the heater, and the
air conditioner mode are all
switched off.
You can restart the automatic climate control by
pressing any of its buttons except the REST
button.
Temperature adjustment
Adjust the desired temperature
individually on the driver's side and
passenger side. Your settings
appear on the status line of the
Control Display.
The automatic climate control achieves this
temperature as quickly as possible at any time
of year, if necessary with the maximum cooling
or heating capacity, and then keeps it constant.
When switching between different tem-
perature settings in rapid succession, the
automatic climate control does not have suffi-
cient time to achieve the set temperature.<
The highest setting switches on the maximum
heat output regardless of the outside tempera-
ture. The lowest setting activates maximum air
conditioning.
Using iDrive
1.Open the start menu.
2.Open "Climate".
3.Turn the controller to select driver's side or
passenger side.
4.Turn the controller to select the field and
press the controller.
Page 109 of 254
Controls
107Reference
At a glance
Driving tips
Communications
Navigation
Entertainment
Mobility
The interior temperature, air volume, and air
distribution can be set starting from the radio
ready state.
Switching cooling function on and off
manually
When activated, the air conditioner
mode cools and dehumidifies the
incoming air, reheating it as
required, depending on the temperature set-
ting. Depending on the weather, the windshield
may fog over briefly when the engine is started.
The cooling function is switched on automati-
cally with the AUTO program. The passenger
compartment can only be cooled with the
engine running.
Rear window defroster
The rear window defroster
switches off automatically after a
while. Depending on your equip-
ment package, the upper wires are used as an
antenna and are not part of the rear window
defroster.
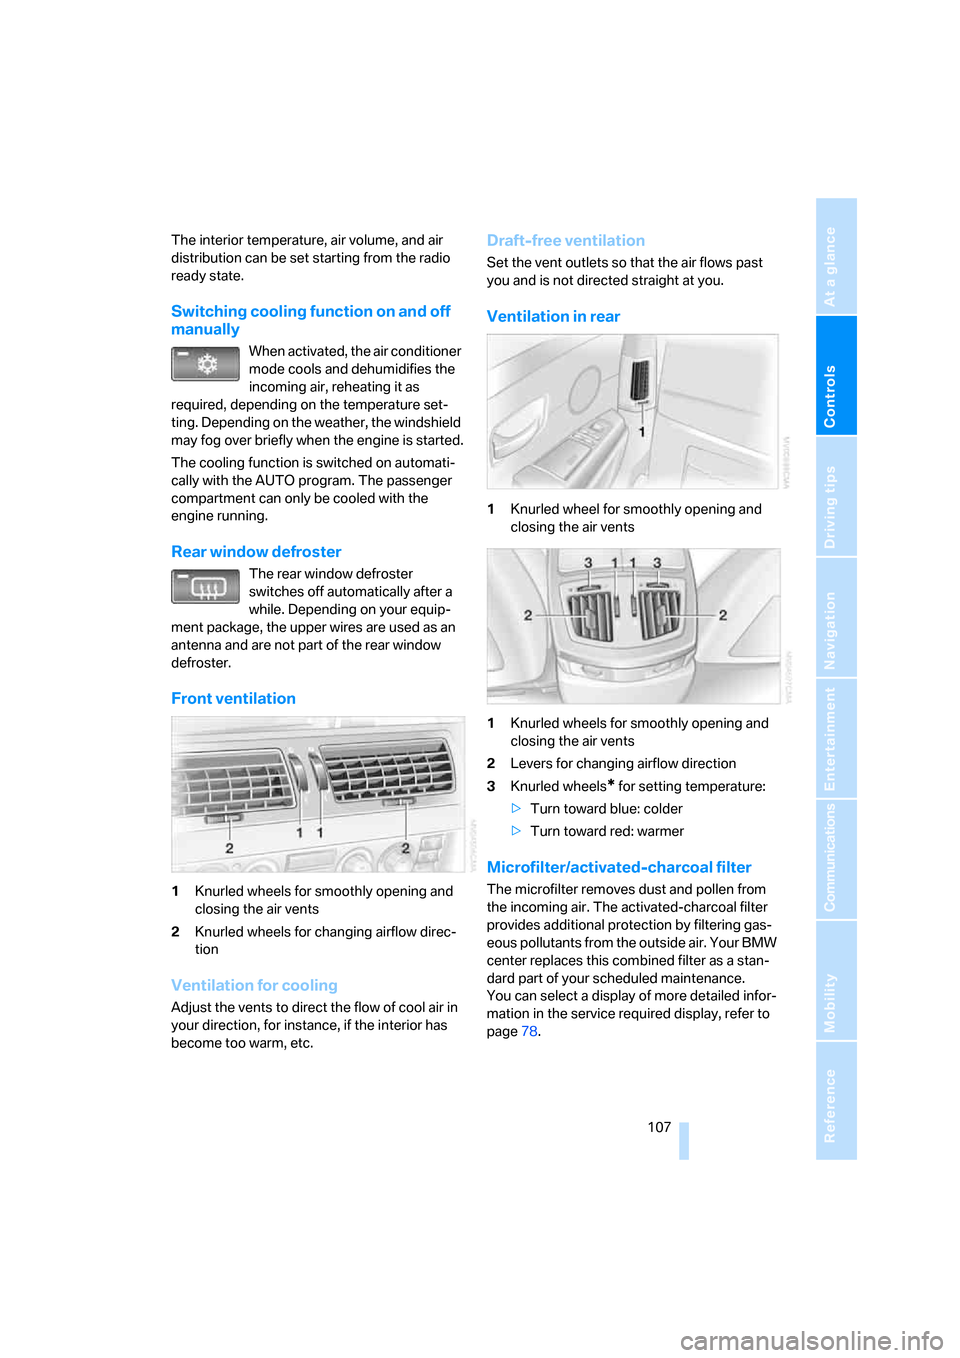
Front ventilation
1Knurled wheels for smoothly opening and
closing the air vents
2Knurled wheels for changing airflow direc-
tion
Ventilation for cooling
Adjust the vents to direct the flow of cool air in
your direction, for instance, if the interior has
become too warm, etc.
Draft-free ventilation
Set the vent outlets so that the air flows past
you and is not directed straight at you.
Ventilation in rear
1Knurled wheel for smoothly opening and
closing the air vents
1Knurled wheels for smoothly opening and
closing the air vents
2Levers for changing airflow direction
3Knurled wheels
* for setting temperature:
>Turn toward blue: colder
>Turn toward red: warmer
Microfilter/activated-charcoal filter
The microfilter removes dust and pollen from
the incoming air. The activated-charcoal filter
provides additional protection by filtering gas-
eous pollutants from the outside air. Your BMW
center replaces this combined filter as a stan-
dard part of your scheduled maintenance.
You can select a display of more detailed infor-
mation in the service required display, refer to
page78.
Page 111 of 254
Controls
109Reference
At a glance
Driving tips
Communications
Navigation
Entertainment
Mobility
Ventilation in rear
Use the lever1 to vary the airflow direction.
For additional information on rear ventilation
options, refer to page107.
Parked car ventilation
The parked car ventilation blows air into the
passenger compartment to reduce interior tem-
peratures.
You can set two different times for the system
to start. The system is operated via iDrive.
It remains switched on for 30 minutes.
Since the system uses a substantial amount of
electrical current, you should refrain from acti-
vating it twice in succession without allowing
the battery to be recharged in normal operation
between uses.
With a preselected switch-on time, the parked
car ventilation is switched on at an outside tem-
perature of 597/156 or greater. When oper-
ated manually, it is ready for use at any outside
temperature, but not during driving.
The air enters the passenger compartment
through the air vents for the upper body in the
dashboard, which can be adjusted for both
direction and airflow. These vents must be
open for the system to operate.
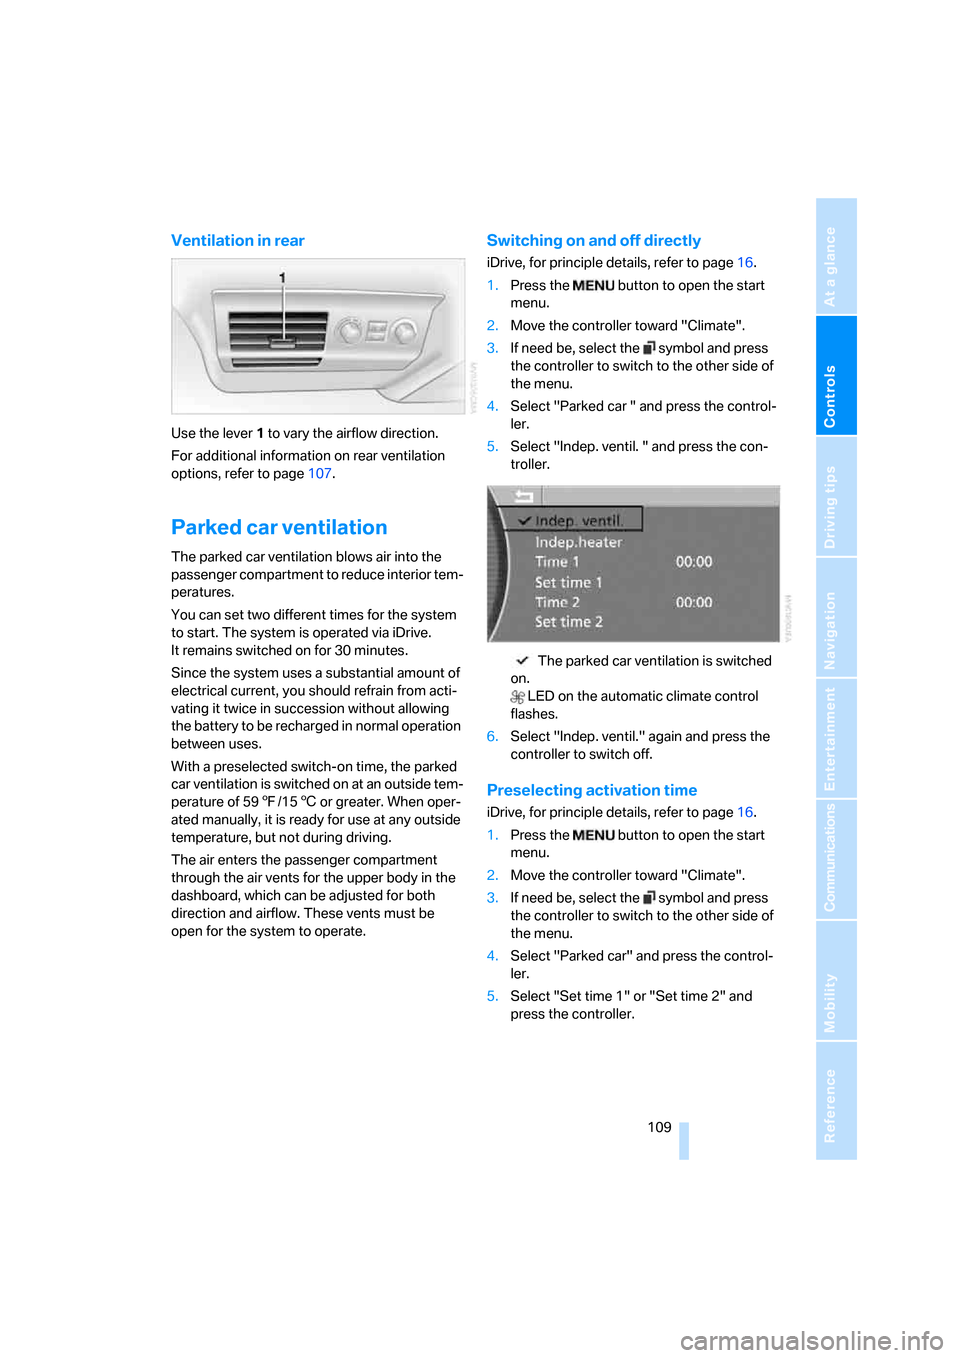
Switching on and off directly
iDrive, for principle details, refer to page16.
1.Press the button to open the start
menu.
2.Move the controller toward "Climate".
3.If need be, select the symbol and press
the controller to switch to the other side of
the menu.
4.Select "Parked car " and press the control-
ler.
5.Select "Indep. ventil. " and press the con-
troller.
The parked car ventilation is switched
on.
LED on the automatic climate control
flashes.
6.Select "Indep. ventil." again and press the
controller to switch off.
Preselecting activation time
iDrive, for principle details, refer to page16.
1.Press the button to open the start
menu.
2.Move the controller toward "Climate".
3.If need be, select the symbol and press
the controller to switch to the other side of
the menu.
4.Select "Parked car" and press the control-
ler.
5.Select "Set time 1" or "Set time 2" and
press the controller.
Page 113 of 254
Controls
111Reference
At a glance
Driving tips
Communications
Navigation
Entertainment
Mobility
Practical interior accessories
Integrated universal remote
control*
The concept
The integrated universal remote control can
replace as many as three hand-held transmit-
ters for various radio-controlled accessories,
such as garage doors, entrance gates, or light-
ing systems. The integrated universal remote
control registers and stores signals from the
original hand-held transmitters.
The signal of an original hand-held transmitter
can be programmed into one of the three mem-
ory buttons1. After this, the programmed
memory button1 will operate the system in
question. The LED2 flashes to confirm trans-
mission of the signal.
Should you sell your vehicle one day, be sure to
delete the stored programs beforehand for your
security, refer to page112.
To prevent possible damage or injury,
during programming or before each use
of the programmed device by the integrated
universal remote control, always inspect the
immediate area to make certain that no people,
animals or objects are within the swiveling and
movement range of the device. Also, comply
with the safety precautions of the original hand-
held transmitter.<
Checking compatibility
If you see this symbol on the packaging
or in the manual supplied with the orig-
inal hand-held transmitter, then it is
safe to assume that it is compatible with the
integrated universal remote control.
If you have additional questions, please
contact your BMW center or call:
1-800-355-3515.
Information is also provided on the Internet at:
www.bmwusa.com or
www.homelink.com. HomeLink is a registered trademark of
Johnson Controls, Inc.<
Programming
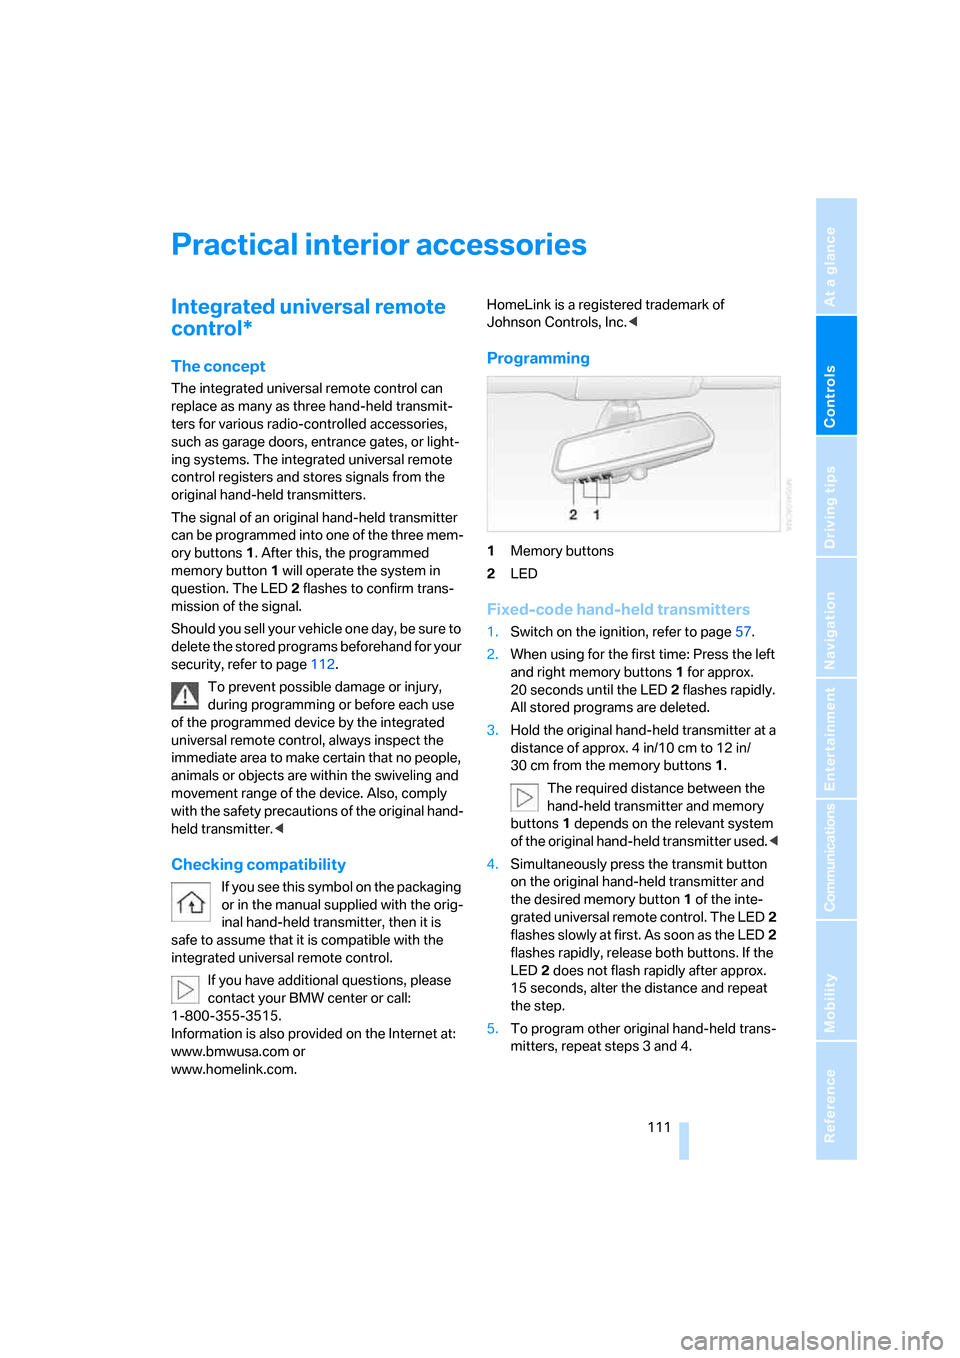
1Memory buttons
2LED
Fixed-code hand-held transmitters
1.Switch on the ignition, refer to page57.
2.When using for the first time: Press the left
and right memory buttons1 for approx.
20 seconds until the LED2 flashes rapidly.
All stored programs are deleted.
3.Hold the original hand-held transmitter at a
distance of approx. 4 in/10 cm to 12 in/
30 cm from the memory buttons1.
The required distance between the
hand-held transmitter and memory
buttons1 depends on the relevant system
of the original hand-held transmitter used.<
4.Simultaneously press the transmit button
on the original hand-held transmitter and
the desired memory button1 of the inte-
grated universal remote control. The LED2
flashes slowly at first. As soon as the LED2
flashes rapidly, release both buttons. If the
LED2 does not flash rapidly after approx.
15 seconds, alter the distance and repeat
the step.
5.To program other original hand-held trans-
mitters, repeat steps 3 and 4.
Page 115 of 254
Controls
113Reference
At a glance
Driving tips
Communications
Navigation
Entertainment
Mobility
4Switching to the other side
Briefly press the corresponding button with the
ignition in radio ready state or higher.
The side window blind can not be
extended unless the side window is
closed. If the side window is open, the blind will
rise slightly prior to immediately retracting to its
original position.<
To avoid injuries, make sure that the clos-
ing region of the roller blind is clear.
Press the safety switch on the driver's door,
refer to page40. The LED must light up. This
precaution prevents children from operating
the sun blinds using the rear switches, etc.
When leaving the vehicle parked, remove the
remote control from the ignition lock and close
the doors; this precaution prevents children
from operating the roller sun blinds and injuring
themselves.<
Automatically extending and retracting
sun blinds
You can run the sun blinds up and down
together when you press and hold the button3
longer.
Glove compartment
Releasing
Press button. The glove compartment opens
automatically and the light comes on.
Closing
Fold the cover up.
To prevent injury in the event of an acci-
dent while the vehicle is being driven,
close the glove compartment immediately after
use.<
Rechargeable flashlight
The flashlight is located on the left side of the
glove compartment.
The flashlight can remain plugged in continu-
ously. Remove the flashlight from the socket
when needed.
Be sure that the flashlight is switched off
when it is inserted into its holder. Failure
to comply with this precaution could lead to
overcharging and damage.<
Front center armrest
A storage compartment is located in the center
armrest between the front seats. Briefly press
the buttons to open.
1Open the right cover
2Open the left cover
The mat inside the compartment can be
removed for cleaning.