ECU BMW 760Li 2004 E66 Owner's Manual
[x] Cancel search | Manufacturer: BMW, Model Year: 2004, Model line: 760Li, Model: BMW 760Li 2004 E66Pages: 232, PDF Size: 5.27 MB
Page 3 of 232

745i
745Li
760Li
Congratulations, and thank you for choosing a BMW.
Thorough familiarity with your vehicle will provide you
with enhanced control and security when you drive it.
We therefore have this request:
Please take the time to read this Owner's Manual and
familiarize yourself with the information that we have
compiled for you before starting off in your new vehicle.
It contains important data and instructions intended to
assist you in gaining maximum use and satisfaction from
your BMW's unique range of technical features.
The manual also contains information on maintenance
designed to enhance operating safety and contribute to
maintaining the value of your BMW throughout an
extended service life.
This Owner's Manual should be considered a permanent
part of this vehicle. It should stay with the vehicle when
sold to provide the next owner with important operating,
safety and maintenance information.
This manual is supplemented by a Service and Warranty
Information Booklet for US models or a Warranty and
Service Guide Booklet for Canadian models.
We wish you an enjoyable driving experience.
BMW AG
Page 35 of 232
Controls
33Reference
At a glance
Driving tips
Communications
Navigation
Entertainment
Mobility
the cover and insert the adapter in the igni-
tion lock.
Central locking system
The concept
The central locking system is ready for
operation whenever the driver's door is
closed. This simultaneously engages and
releases the locks on the following:
>Doors
>Luggage compartment lid
>Fuel filler door.
The central locking system can be oper-
ated from the outside
>via the remote control
>via the driver's door lock
>with Comfort Access via the door han-
dle
and from inside via the button for the cen-
tral locking system.
When the system is locked from inside, the
fuel filler door remains unlocked, refer to
page 36.
The anti-theft system is automatically acti-
vated whenever you activate the central
locking system from outside the vehicle.
The alarm system is armed/disarmed at the
same time.
In an accident, the central locking system
automatically unlocks the vehicle. In addi-
tion, the hazard warning flashers and inte-
rior lamps switch on.
Opening and closing:
from outside
Using the remote control
When you engage/release the vehicle's
locks, you simultaneously activate/deacti-
vate the anti-theft system, arm/disarm the
alarm system
and switch the interior lamps
on/off. In addition, the remote control offers you
another function:
>Panic mode
In case of danger, you can trigger an
alarm.
You can have various confirmation
signals programmed into the system
to verify that the vehicle has been locked
securely.<
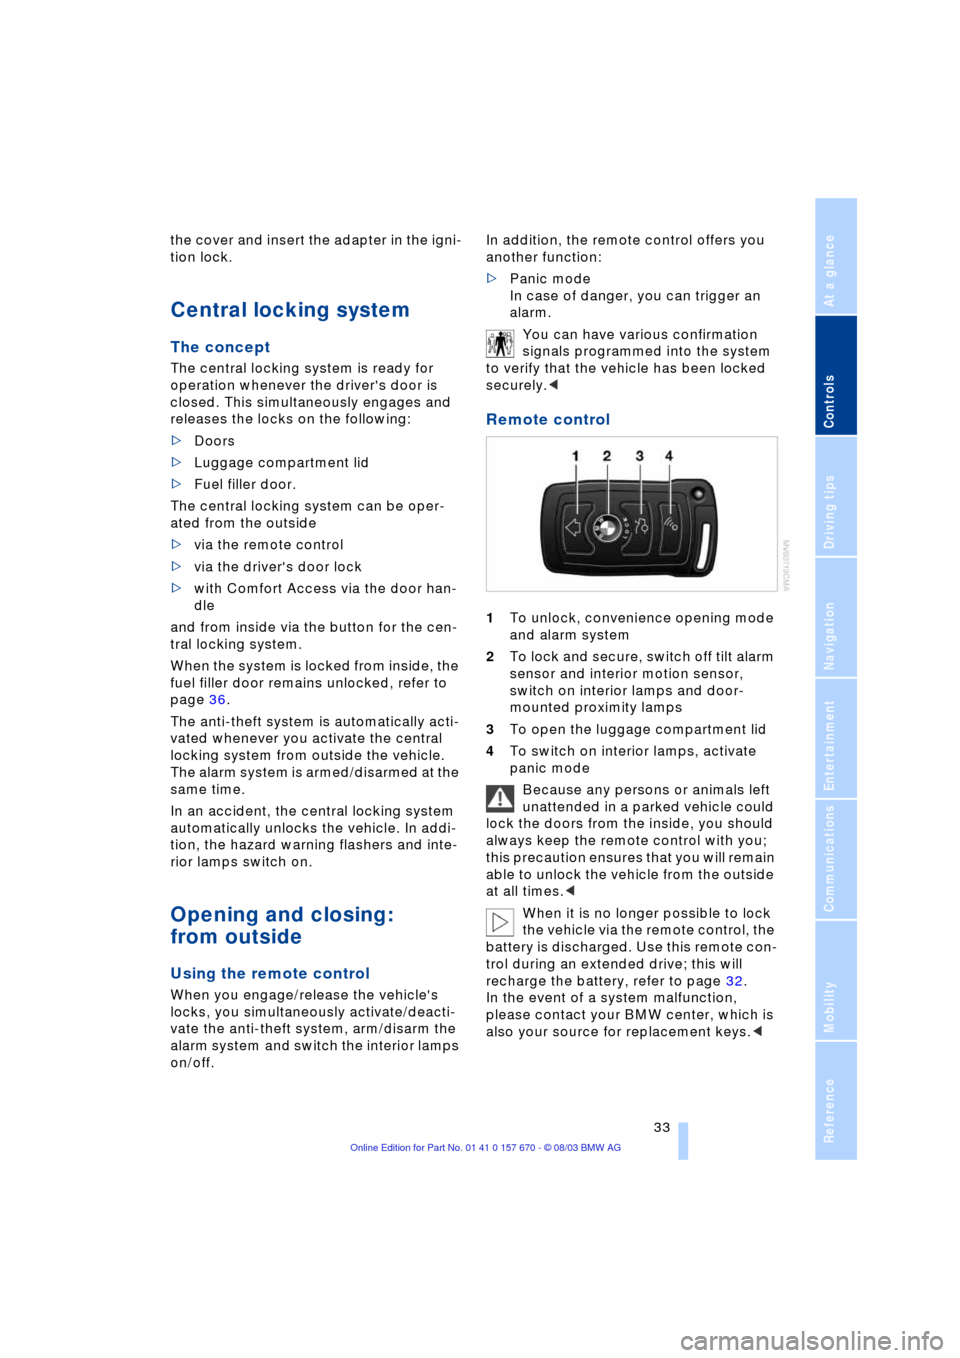
Remote control
1To unlock, convenience opening mode
and alarm system
2To lock and secure, switch off tilt alarm
sensor and interior motion sensor,
switch on interior lamps and door-
mounted proximity lamps
3To open the luggage compartment lid
4To switch on interior lamps, activate
panic mode
Because any persons or animals left
unattended in a parked vehicle could
lock the doors from the inside, you should
always keep the remote control with you;
this precaution ensures that you will remain
able to unlock the vehicle from the outside
at all times.<
When it is no longer possible to lock
the vehicle via the remote control, the
battery is discharged. Use this remote con-
trol during an extended drive; this will
recharge the battery, refer to page 32.
In the event of a system malfunction,
please contact your BMW center, which is
also your source for replacement keys.<
Page 36 of 232
Opening and closing
34
Unlocking
Press button 1 .
The interior lamps and the door-mounted
proximity lamps come on.
Press the button once to unlock the driver's
door only; press a second time to unlock all
remaining doors as well as the luggage
compartment lid and the fuel filler door.
Convenience opening mode
Hold button 1 pressed. The windows and
the glass roof open. The glass roof will not
be retracted if it is already in its raised posi-
tion.
Locking and securing
Press button 2 .
Switching off the tilt alarm sensor
and interior motion sensor
Press button 2 once again directly
after locking.
For more detailed information, refer to
page 40.
Switching on interior lamps and
door-mounted proximity lamps
If the vehicle is locked, press
button 2 .
Switching on the interior lamps
Press button 4 .
You can also use this function to locate
your vehicle in parking garages etc.
Panic mode
By pressing and holding button 4 for
more than approx. two seconds, you can
trigger the alarm system in response to any
impending danger.
To switch off the alarm: press any of the
buttons.
Opening the luggage compartment
lid
Maintain pressure on button 3 for
approx. 1 second. The luggage compartment lid opens,
regardless of whether it was previously
locked or unlocked.
During opening, the luggage com-
partment lid pivots upward and to the
rear. Ensure that adequate clearance is
available before opening.
To avoid being inadvertently locked out,
never lay the remote control down in the
luggage compartment. If the vehicle is
locked, the luggage compartment lid is also
locked again when closed.<
Automatic luggage compartment lid
operation
*
Opening the luggage compartment
lid
Maintain pressure on button 3 for
approx. 1 second.
The luggage compartment lid opens all the
way, regardless of whether it was previ-
ously locked or unlocked.
To interrupt the opening process:
Press the button again while opening is in
progress.
During opening, the luggage com-
partment lid pivots upward and to the
rear. Ensure that adequate clearance is
available before opening.
To avoid being inadvertently locked out,
never lay the remote control down in the
luggage compartment. If the vehicle is
locked, the luggage compartment lid is also
locked again when closed.<
Comfort Access*
Carry the remote control on your person if
you want to use the Comfort Access.
Unlocking
>Pull a door handle or
>press the button on the outside of the
luggage compartment lid.
Only the door of the door handle you
have pulled is opened.
You unlock the other doors from the inside
Page 37 of 232
Controls
35Reference
At a glance
Driving tips
Communications
Navigation
Entertainment
Mobility
using the central locking system button,
refer to page 36.<
Locking and securing
With the driver's door closed, press a door
handle.
You can have various confirmation
signals programmed into the system
to verify that the vehicle has been locked
securely.<
If a remote control is detected in the
interior, the vehicle is unlocked again
or not locked in the first place.<
Opening the luggage compartment
lid
Press the button on the outside of the lug-
gage compartment lid, refer to page 37.
During opening, the luggage com-
partment lid pivots upward and to the
rear. Ensure that adequate clearance is
available before opening.
If a remote control is detected in the lug-
gage compartment after the luggage com-
partment lid has been closed, the luggage
compartment lid opens again.<
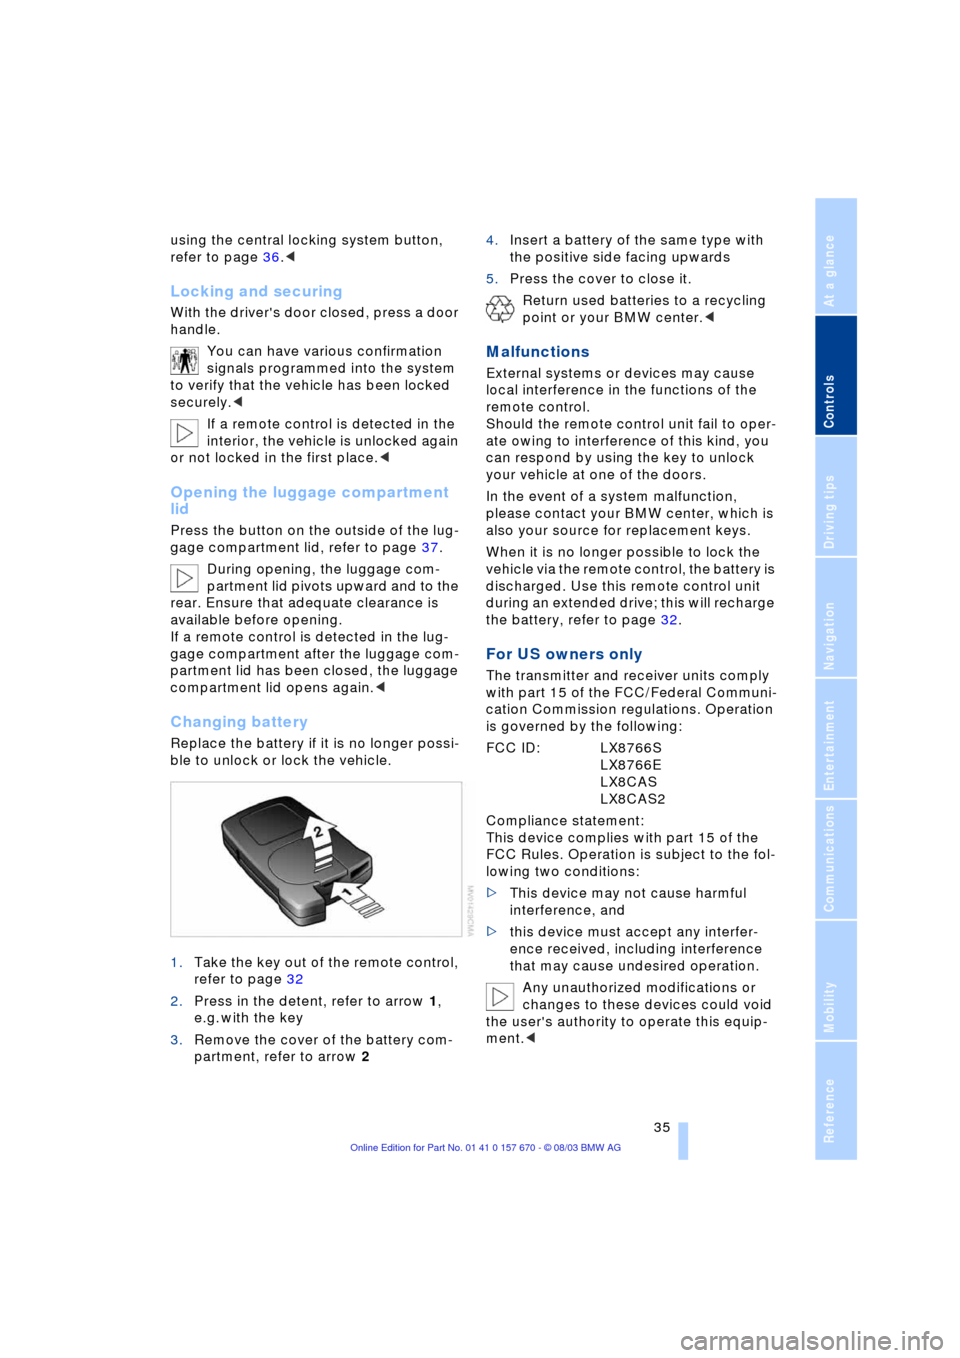
Changing battery
Replace the battery if it is no longer possi-
ble to unlock or lock the vehicle.
1.Take the key out of the remote control,
refer to page 32
2.Press in the detent, refer to arrow 1,
e.g. with the key
3.Remove the cover of the battery com-
partment, refer to arrow 24.Insert a battery of the same type with
the positive side facing upwards
5.Press the cover to close it.
Return used batteries to a recycling
point or your BMW center.<
Malfunctions
External systems or devices may cause
local interference in the functions of the
remote control.
Should the remote control unit fail to oper-
ate owing to interference of this kind, you
can respond by using the key to unlock
your vehicle at one of the doors.
In the event of a system malfunction,
please contact your BMW center, which is
also your source for replacement keys.
When it is no longer possible to lock the
vehicle via the remote control, the battery is
discharged. Use this remote control unit
during an extended drive; this will recharge
the battery, refer to page 32.
For US owners only
The transmitter and receiver units comply
with part 15 of the FCC/Federal Communi-
cation Commission regulations. Operation
is governed by the following:
FCC ID: LX8766S
LX8766E
LX8CAS
LX8CAS2
Compliance statement:
This device complies with part 15 of the
FCC Rules. Operation is subject to the fol-
lowing two conditions:
>This device may not cause harmful
interference, and
>this device must accept any interfer-
ence received, including interference
that may cause undesired operation.
Any unauthorized modifications or
changes to these devices could void
the user's authority to operate this equip-
ment.<
Page 38 of 232
Opening and closing
36
Using the key
One turn of the key in the driver's door lock
unlocks the driver's door only.
Turning the key a second time unlocks all of
the remaining doors, the luggage compart-
ment lid and the fuel filler door.
You can have various confirmation
signals programmed into the system
to verify that the vehicle has been locked
securely.<
Convenience operation
You also have the option of operating the
windows and the glass roof from the
driver's door lock.
>To open:
With the door closed, turn the key to the
Unlock position and hold it there
>To close:
With the door closed, turn the key to the
Lock position and hold it there.
Watch during the closing process to
be sure that no one is injured. Releas-
ing the key stops the operation.<
Manual operation
in the event of an electrical malfunction
You can turn the key all the way to the right
or left in the door lock to engage or release
the locking mechanism in the driver's door.
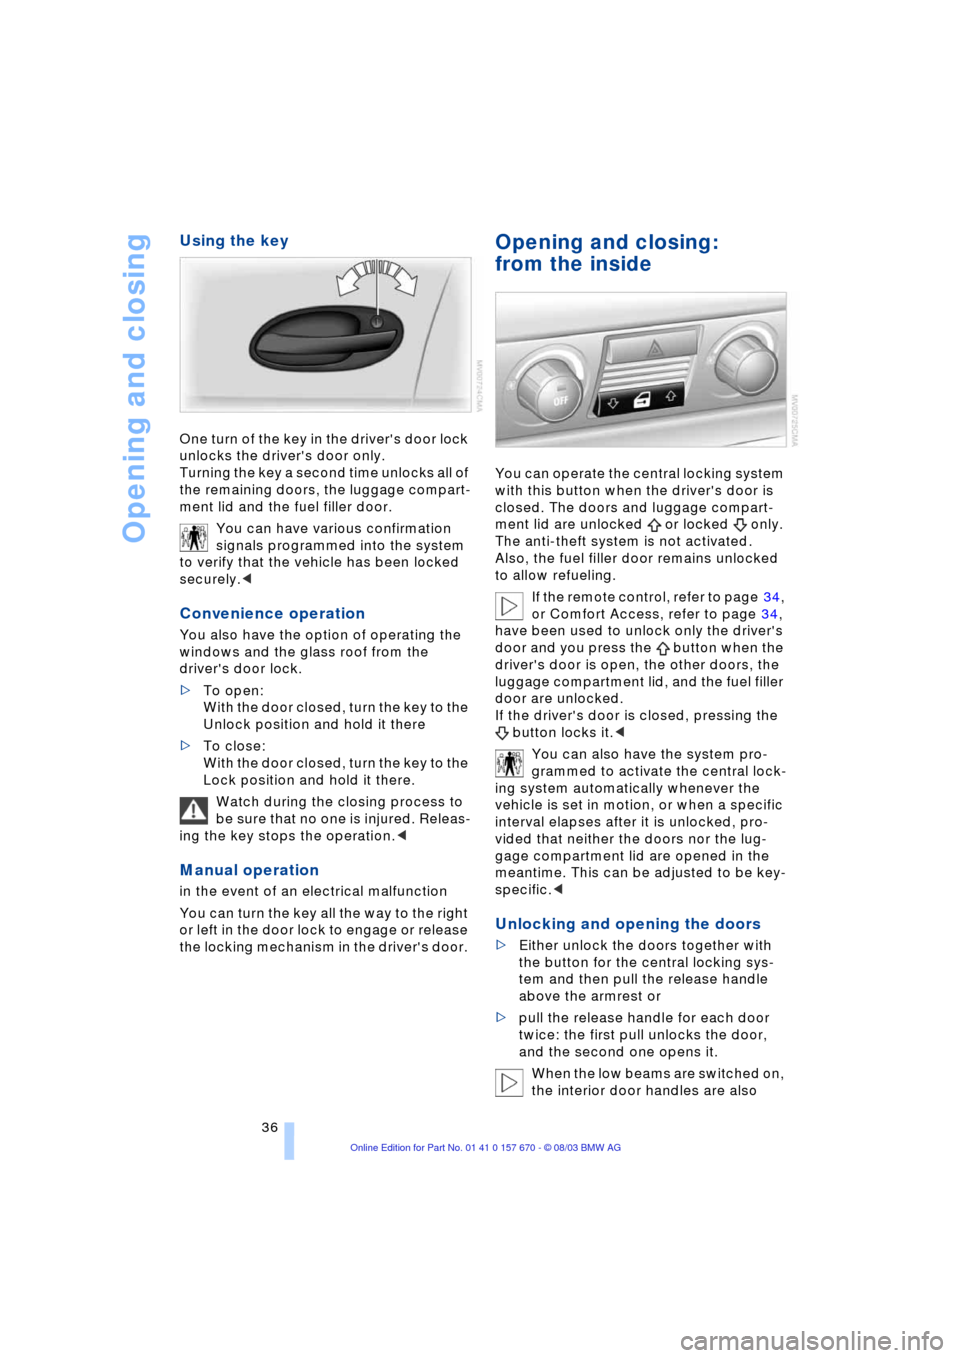
Opening and closing:
from the inside
You can operate the central locking system
with this button when the driver's door is
closed. The doors and luggage compart-
ment lid are unlocked or locked only.
The anti-theft system is not activated.
Also, the fuel filler door remains unlocked
to allow refueling.
If the remote control, refer to page 34,
or Comfort Access, refer to page 34,
have been used to unlock only the driver's
door and you press the button when the
driver's door is open, the other doors, the
luggage compartment lid, and the fuel filler
door are unlocked.
If the driver's door is closed, pressing the
button locks it.<
You can also have the system pro-
grammed to activate the central lock-
ing system automatically whenever the
vehicle is set in motion, or when a specific
interval elapses after it is unlocked, pro-
vided that neither the doors nor the lug-
gage compartment lid are opened in the
meantime. This can be adjusted to be key-
specific.<
Unlocking and opening the doors
>Either unlock the doors together with
the button for the central locking sys-
tem and then pull the release handle
above the armrest or
>pull the release handle for each door
twice: the first pull unlocks the door,
and the second one opens it.
When the low beams are switched on,
the interior door handles are also
Page 39 of 232
Controls
37Reference
At a glance
Driving tips
Communications
Navigation
Entertainment
Mobility
lighted. The intensity of the lighting is
adjusted using the instrument lighting con-
trol, refer to page 100.<
Engaging the locks
>Use the central locking button to lock
all of the doors simultaneously, or
>press the individual safety lock buttons
down. To prevent the driver from being
inadvertently locked out of the vehicle,
the lock button on the driver's door
automatically extends again after a brief
period if the door remains open.
Because any persons or animals left
unattended in a parked vehicle could
lock the doors from the inside, you should
always keep the remote control with you;
this precaution ensures that you will remain
able to unlock the vehicle from the outside
at all times.<
Doors
Soft Close Automatic*
Apply gentle pressure to the door to close
it. The closing process will then be carried
out automatically.
To avoid injuries, ensure that the
door's travel path is completely free
and clear before closing.<
Luggage compartment lid
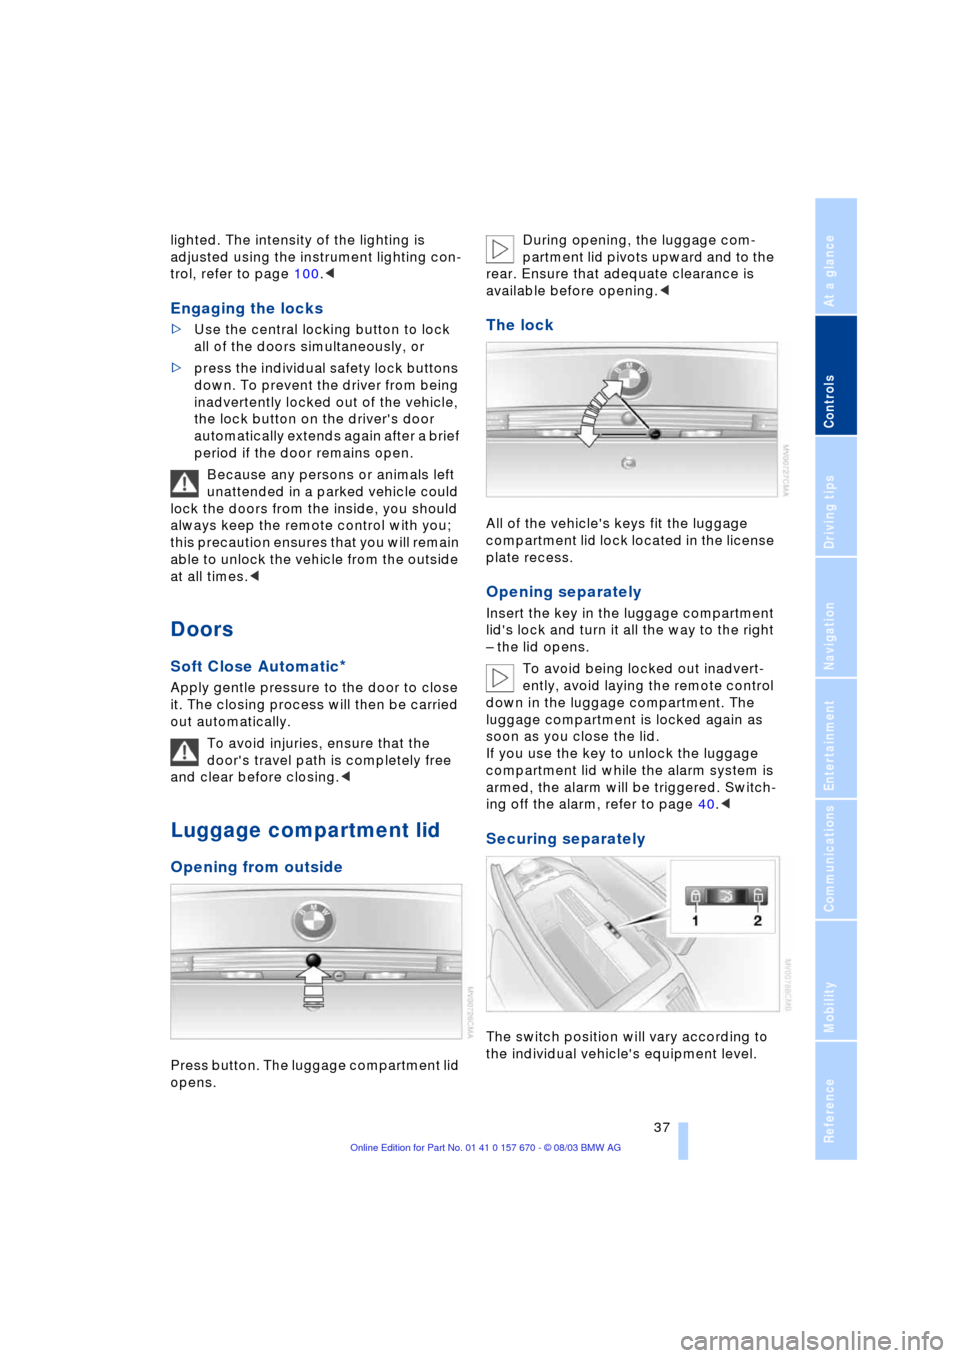
Opening from outside
Press button. The luggage compartment lid
opens. During opening, the luggage com-
partment lid pivots upward and to the
rear. Ensure that adequate clearance is
available before opening.<
The lock
All of the vehicle's keys fit the luggage
compartment lid lock located in the license
plate recess.
Opening separately
Insert the key in the luggage compartment
lid's lock and turn it all the way to the right
Ð the lid opens.
To avoid being locked out inadvert-
ently, avoid laying the remote control
down in the luggage compartment. The
luggage compartment is locked again as
soon as you close the lid.
If you use the key to unlock the luggage
compartment lid while the alarm system is
armed, the alarm will be triggered. Switch-
ing off the alarm, refer to page 40.<
Securing separately
The switch position will vary according to
the individual vehicle's equipment level.
Page 58 of 232
Transporting children safely
56
Transporting children safely
The right place for children
Children always in the rear
Accident research shows that the safest
place for children in a vehicle is in the rear
seat.
Older children should be tightly secured
with a safety belt, after they have outgrown
a booster seat that is appropriate for their
age, height and weight.
A child sitting in the rear seat and not
properly restrained may place his or
her head on or near the airbag, if so
equipped. For example, a child Ñ even
though belted Ñ may fall asleep with his or
her head against the side airbag. It may be
difficult for a driver to ensure that children
in the rear seat will remain properly posi-
tioned at all times and do not place their
heads on or near the side airbags. There-
fore, we recommend that the rear side air-
bags, if provided, be deactivated if you plan
to transport children in the rear seat.<
Child-restraint system in the rear
Child-restraint systems appropriate for
every age group and weight are available
at your BMW center.
Children under 13 years of age and
children less than 5 ft/150 cm tall
should always ride in the rear and the
restraint systems should be secured with
the vehicleÔs safety belts.<
Younger children should be secured in an
appropriate forward-facing child-restraint
system that has first been properly secured
with a safety belt.
All rear sitting positions in your vehicle
meet the recommendations of SAE J1819,
an industry-recommended practice for
securing child-restraint systems in motor
vehicles.
Exception for the front passenger
seat
Should it become necessary to use
a child-restraint system on the front
passenger seat, the airbags on the passen-
ger's side must be deactivated. Your BMW
center will be glad to advise you.<
Never install a rearward-facing child-
restraint system in the front passen-
ger seat of this vehicle if the passenger air-
bag is not deactivated. If you do so, the
child could be severely injured when the
airbag is triggered.
Your vehicle is equipped with an airbag
supplemental restraint system for the front
passenger. Because the backrest on any
rearward-facing child-restraint system Ð of
the kind designed for infants under 1 year
and 20 Ibs./9 kg Ð would be within the air-
bag's deployment range, you should never
mount such a system in the front passenger
seat, since the impact of the airbag against
the child restraint's backrest could lead to
serious or fatal injuries.<
Installing child-restraint
systems
Before installing any child-restraint system
or child seat, read the following:
Observe the child-restraint system
manufacturer's instructions for instal-
lation and use. Otherwise the degree of
protection can be reduced.
After an accident, have all parts of the
child-restraint system and of the relevant
vehicle safety belt system checked by a
BMW center and replaced if necessary.<
Commercially-available child-restraint sys-
tems are designed to be secured with a lap
belt or with the lap belt portion of a combi-
nation lap/shoulder belt. Improperly or
inadequately installed restraint systems
can increase the risk of injury to children.
Page 59 of 232
Controls
57Reference
At a glance
Driving tips
Communications
Navigation
Entertainment
Mobility
Always read and follow the instructions that
come with the system.
Child seat security
All of the rear belt retractors and the front
passenger's safety belt can be locked for
mounting and securing child-restraint sys-
tems.
Information regarding this is located near
the buckle latch of each safety belt.
To lock the safety belt
Pull the entire length of the belt from the
belt retractor. Allow the reel to retract the
belt somewhat and engage the buckle,
then tighten the belt against the child-
restraint system. The retraction mechanism
is now locked.
To unlock the safety belt
Release the buckle, remove the child-
restraint system and allow the belt retractor
to reel the belt completely in.
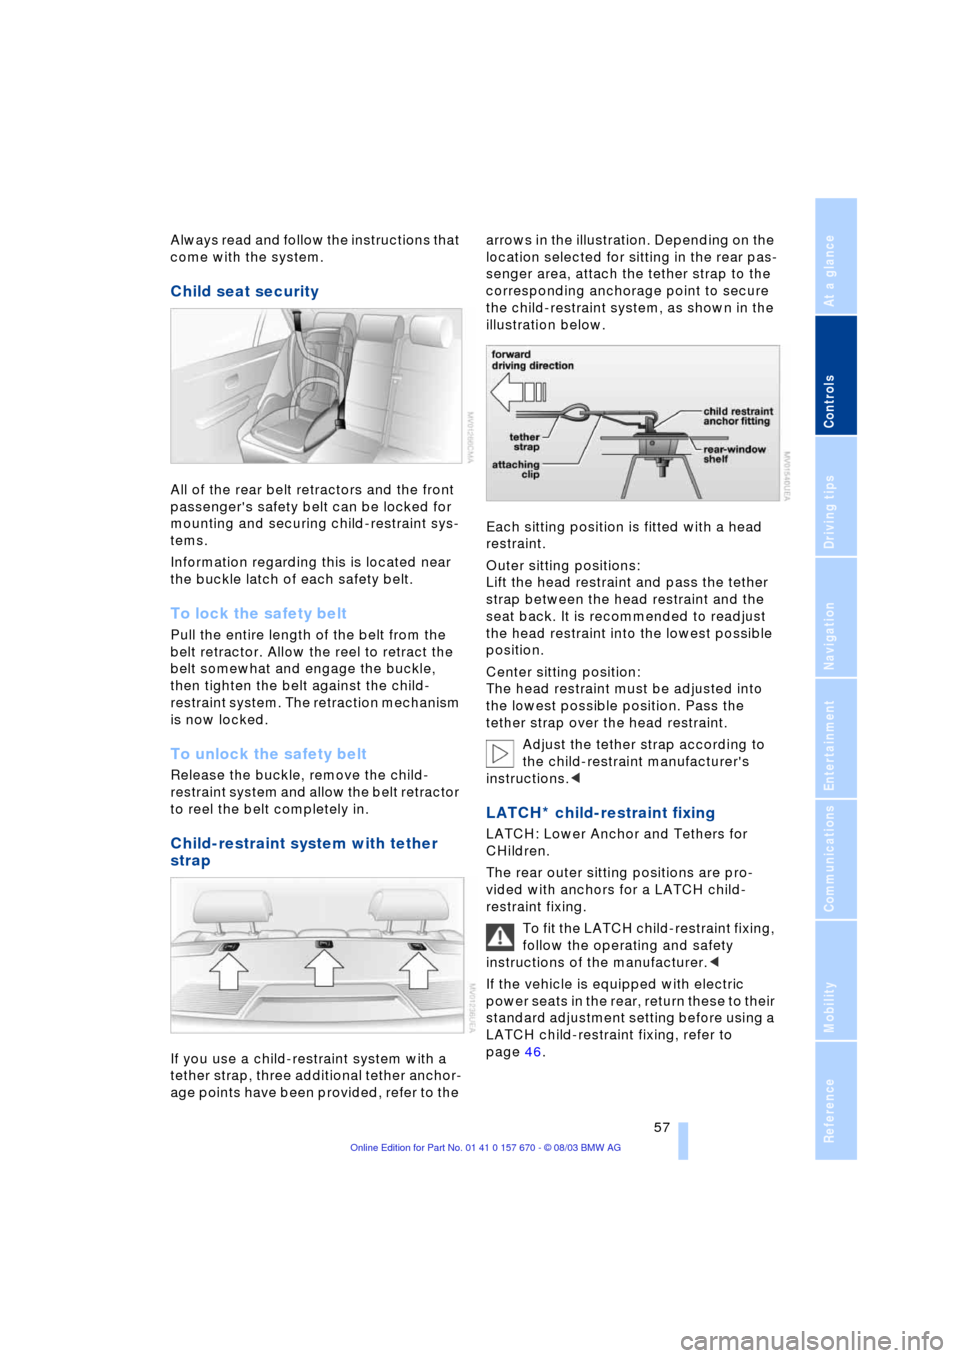
Child-restraint system with tether
strap
If you use a child-restraint system with a
tether strap, three additional tether anchor-
age points have been provided, refer to the arrows in the illustration. Depending on the
location selected for sitting in the rear pas-
senger area, attach the tether strap to the
corresponding anchorage point to secure
the child-restraint system, as shown in the
illustration below.
Each sitting position is fitted with a head
restraint.
Outer sitting positions:
Lift the head restraint and pass the tether
strap between the head restraint and the
seat back. It is recommended to readjust
the head restraint into the lowest possible
position.
Center sitting position:
The head restraint must be adjusted into
the lowest possible position. Pass the
tether strap over the head restraint.
Adjust the tether strap according to
the child-restraint manufacturer's
instructions.<
LATCH* child-restraint fixing
LATCH: Lower Anchor and Tethers for
CHildren.
The rear outer sitting positions are pro-
vided with anchors for a LATCH child-
restraint fixing.
To fit the LATCH child-restraint fixing,
follow the operating and safety
instructions of the manufacturer.<
If the vehicle is equipped with electric
power seats in the rear, return these to their
standard adjustment setting before using a
LATCH child-restraint fixing, refer to
page 46.
Page 66 of 232
Driving
64 Provided that the remote control is
inserted in the ignition lock, you can
also release the parking brake manually
after the engine has been switched off,
refer to page 62. This function is useful in
automatic car washes, etc.
Automatic Hold is deactivated.<
When leaving the vehicle, always
release the remote control from the
detent in the ignition lock; this precaution
prevents children from disengaging the
parking brake, etc.<
For your safety
Automatic Hold is automatically deacti-
vated when
>the engine is switched off
>the system detects that the driver's seat
is not occupied while the engine is run-
ning
>the hood is opened while the engine is
running
>the luggage compartment lid is opened
with the transmission in reverse while
the engine is running, and
>when the parking brake is used to bring
the vehicle to a stop.
The indicator lamp changes from
green to red, and the AUTO P letters in the
Info Display disappear.
Before starting off again, briefly press the
button to disengage the parking brake
manually, refer to page 62, or reactivate
Automatic Hold, refer to page 63.
Before leaving the vehicle with the
engine running, always move the
automatic transmission's selector lever to
position P and ensure that the parking
brake is engaged. The vehicle could start
to roll if you fail to observe these precau-
tions.
Never leave an unattended vehicle with the
engine running, as such a vehicle repre-
sents a potential safety hazard.<
Automatic Hold is automatically
deactivated whenever the system
detects any tendency for the wheels to spin
in response to slippery road surfaces. Note the status reports in the Check Control.
You can find additional information on the
Check Control on page 82.<
Malfunctions
If a malfunction occurs, the indicator
lamp lights up yellow in the Info Dis-
play and a status report will appear in the
Check Control. Please note any supple-
mentary information that appears on the
Control Display.
Releasing the parking brake
manually
You can respond to any interruptions in the
supply of electrical power, for instance, if
the battery is discharged or disconnected,
by releasing the parking brake manually.
Before proceeding to release the
parking brake manually, and each
time you park the vehicle without engaging
the parking brake, always ensure that the
automatic transmission's selector lever is
in position P, refer to page 66. Note the
range indicated in the Info Display.
If the wheel must be changed on a surface
with a more severe slope, take additional
precautions to secure the vehicle from roll-
ing e.g. with a chock, refer to page 203.
Otherwise there is a danger that the vehicle
could start to roll if parked on a steep
slope.<
Should it also be necessary to release the
automatic transmission's lockout manually,
for instance, if the battery is discharged,
always adhere to the following sequence:
1.If necessary, start by manually releasing
the parking brake
2.Then release the automatic transmis-
sion's lockout manually, refer to
page 68.
Jump-starting and towing, refer to
pages 207 and 208.
Page 69 of 232
Controls
67Reference
At a glance
Driving tips
Communications
Navigation
Entertainment
Mobility
the brake pedal until you are ready to start.
You can activate the Automatic Hold fea-
ture to suppress the vehicle's tendency to
creep, refer to page 63.<
Shift commands are transmitted electroni-
cally. To help avoid malfunctions, each
command undergoes a plausibility check
prior to execution.
Remember to observe the Check Control
for status messages.
You can find additional information on the
Check Control on page 82.
To prevent the vehicle from rolling,
always select position P and engage
the parking brake before leaving the vehi-
cle with the engine running. Note the infor-
mation provided in the Info Display.
Never leave an unattended vehicle with the
engine running, as such a vehicle repre-
sents a potential safety hazard.<
P Park
Select P only when the vehicle is station-
ary. The transmission lockout prevents the
rear wheels from turning. The lockout dis-
engages when you press the selector lever
toward D, N or R while the engine is run-
ning.
P is engaged automatically as soon as
you switch off the engine unless N is
engaged and the remote control is inserted
in the ignition lock, refer to page 61.<
R Reverse
Select R only when the vehicle is station-
ary.
N Neutral
Select N only if your journey is interrupted
for a long period.
>From D press the selector lever up
>From R press the selector lever down.
Note the arrows indicating direction in the
range display.
N remains engaged whenever the
remote control unit remains in the
ignition lock after the ignition is switched
off. This function is useful in automatic car washes, etc.
After approx. 30 minutes the system auto-
matically engages P. Remember to
observe the Check Control for status mes-
sages.
Switching off the engine, refer to
page 61.<
D Drive, automatic driving position
This is the range recommended for normal
vehicle operation. All forward gears are
available.
Under normal operating conditions, fuel
consumption is lowest when driving in
position D.
Kickdown
The kickdown mode provides maximum
acceleration.
Press the accelerator pedal beyond the
full-throttle resistance point.
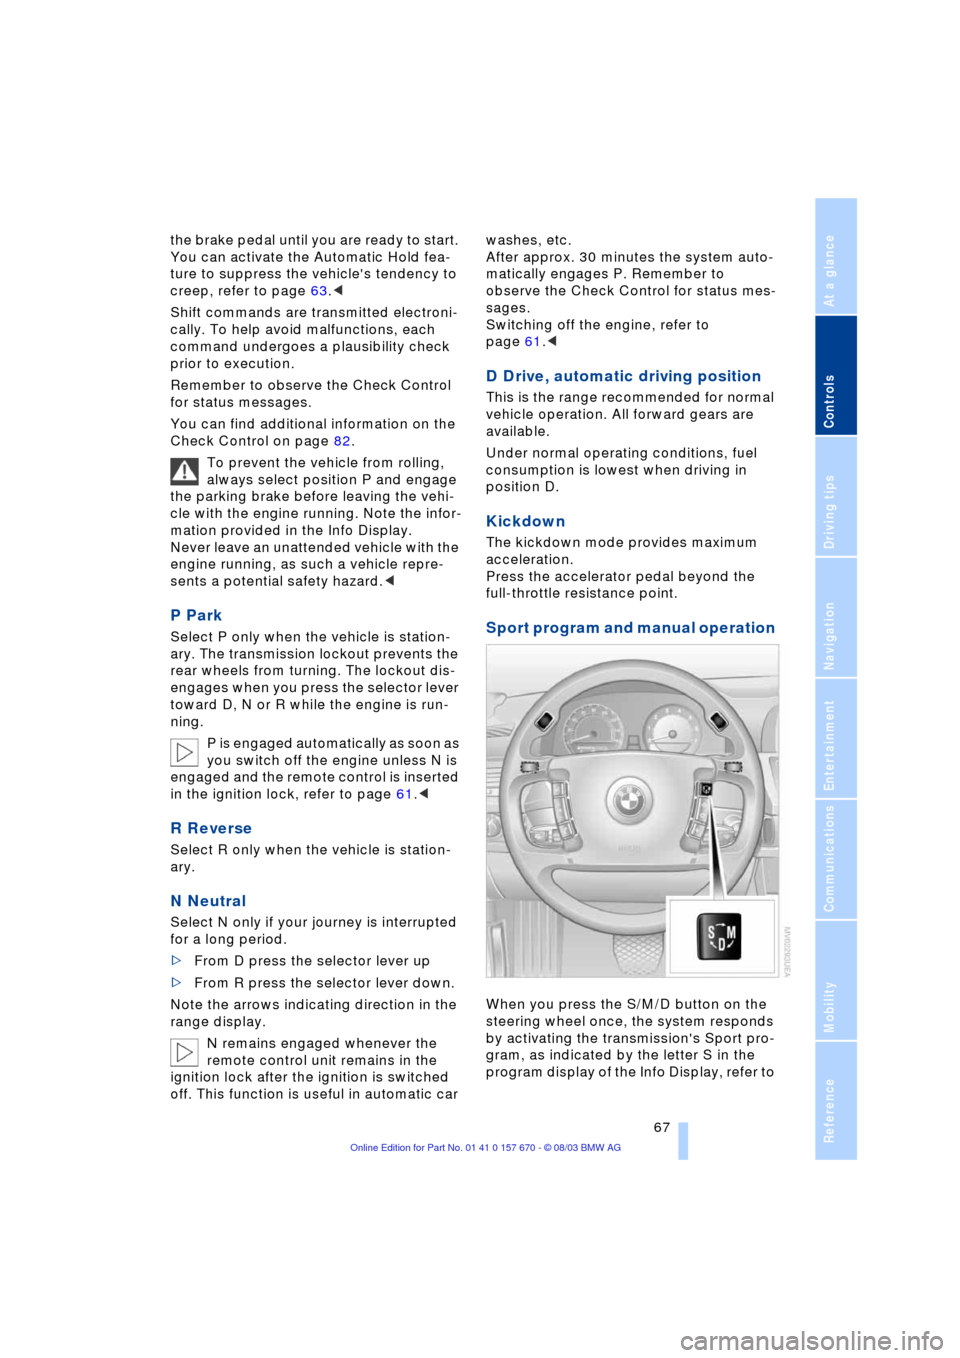
Sport program and manual operation
When you press the S/M/D button on the
steering wheel once, the system responds
by activating the transmission's Sport pro-
gram, as indicated by the letter S in the
program display of the Info Display, refer to