fuel BMW I3 2015 I01 User Guide
[x] Cancel search | Manufacturer: BMW, Model Year: 2015, Model line: I3, Model: BMW I3 2015 I01Pages: 236, PDF Size: 17.6 MB
Page 103 of 236
Information in detail
With Range Extender: total range The total range considers the
capacity of the fuel tank as well
as the electric energy in the
high-voltage battery.
Average fuel consumption
The average fuel consumption is calculated on
the basis of various distances. Standstill with
drive readiness turned off is not considered.
Current fuel consumption Displays the current energy consumption. The
efficiency of the driving can be monitored.
Average speed
Periods when vehicle is parked with drive read‐
iness switched off are not included when cal‐
culating average speed.
Resetting average values Press and hold the onboard computer button
on the turn signal lever.
Speed limit detection
Description of the speed limit detection, refer
to page 84, function.
Trip computer
The vehicle features two types of board com‐
puters.▷"Onboard info": the values can be reset as
often as necessary.▷"Trip computer": the values provide an
overview of the current trip.
Resetting the trip computer
On the Control Display:
1."Vehicle info"2."Trip computer"3."Reset": all values are reset.
"Automatically reset": all values are reset
approx. 4 hours after the vehicle came to a
standstill.
Display on the Control Display
Display the computer or trip computer on the
Control Display.
1."Vehicle info"2."Onboard info" or "Trip computer"
Resetting the fuel consumption or
speed
On the Control Display:
1."Vehicle info"2."Onboard info"3."Consumpt." or "Speed"4."Yes"
Speed warning
The concept Displays a speed, when reached, should cause
a warning to be issued.
The warning is repeated if the vehicle speed
drops below the set speed once by at least
3 mph/5 km/h.
Displaying, setting or changing the
speed warning
On the Control Display:
1."Settings"2."Speed"3."Warning at:"4.Turn the controller until the desired speed
is displayed.5.Press the controller.
Speed warning is stored.
Seite 87DisplaysControls87
Online Edition for Part no. 01 40 2 960 865 - II/15
Page 105 of 236
Settings are stored for the profile currently in
use.
Setting the voice dialog
Voice dialog for the voice activation system,
refer to page 27.
Units of measure
Setting the units of measure
To set the units for fuel consumption, route/
distance and temperature:1."Settings"2."Language/Units"3.Select the desired menu item.4.Select the desired unit.
Settings are stored for the profile currently in
use.
Brightness
Setting the brightness
To set the brightness of the Control Display:
1."Settings"2."Control display"3."Brightness"4.Turn the controller until the desired bright‐
ness is set.5.Press the controller.
Settings are stored for the profile currently in
use.
Depending on the light conditions, the bright‐
ness settings may not be clearly visible.
Activating/deactivating display of the
current vehicle position
If GPS geolocation has been activated, the cur‐
rent vehicle position can be displayed in the
BMW i Remote App or in the ConnectedDrive
customer portal.
1."Settings"2."GPS tracking"3."GPS tracking"Seite 89DisplaysControls89
Online Edition for Part no. 01 40 2 960 865 - II/15
Page 114 of 236
Required tire inflation pressure check
message
A Check Control message is displayed in the
following situations▷The system has detected a wheel change,
but no reset was done.▷Inflation was not carried out according to
specifications.▷The tire inflation pressure has fallen below
the level of the last confirmation.
In this case:
▷Check the tire pressure and correct as
needed.▷Carry out a reset of the system after a tire
change.
System limits
The system does not function properly if a re‐
set has not been carried out, e.g., a flat tire is
reported though tire inflation pressures are
correct.
The tire inflation pressure depends on the
tire's temperature. Driving or exposure to the
sun will increase the tire's temperature, thus
increasing the tire inflation pressure. The tire
inflation pressure is reduced when the tire
temperature falls again. These circumstances
may cause a warning when temperatures fall
very sharply.
Malfunction The yellow warning lamp flashes and
then lights up continuously. A Check
Control message is displayed. No flat
tire or loss of tire inflation pressure can be de‐
tected.
Display in the following situations:
▷A wheel without TPM electronics is fitted:
have the service center check it if needed.▷Malfunction: have the system checked by
your service center.▷TPM was unable to complete the reset.
Reset the system again.▷Interference through systems or devices
with the same radio frequency: after leav‐
ing the area of the interference, the system
automatically becomes active again.
Declaration according to NHTSA/
FMVSS 138 Tire Pressure Monitoring
System
Each tire, including the spare (if provided)
should be checked monthly when cold and in‐
flated to the inflation pressure recommended
by the vehicle manufacturer on the vehicle
placard or tire inflation pressure label. (If your
vehicle has tires of a different size than the size
indicated on the vehicle placard or tire inflation
pressure label, you should determine the
proper tire inflation pressure for those tires.)
As an added safety feature, your vehicle has
been equipped with a tire pressure monitoring
system (TPMS) that illuminates a low tire pres‐
sure telltale when one or more of your tires is
significantly under-inflated. Accordingly, when
the low tire pressure telltale illuminates, you
should stop and check your tires as soon as
possible, and inflate them to the proper pres‐
sure. Driving on a significantly under-inflated
tire causes the tire to overheat and can lead to
tire failure. Under-inflation also reduces fuel ef‐
ficiency and tire tread life, and may affect the
vehicle's handling and stopping ability. Please
note that the TPMS is not a substitute for
proper tire maintenance, and it is the driver's
responsibility to maintain correct tire pressure,
even if under-inflation has not reached the
level to trigger illumination of the TPMS low
tire pressure telltale. Your vehicle has also
been equipped with a TPMS malfunction indi‐
cator to indicate when the system is not oper‐
ating properly. The TPMS malfunction indica‐
tor is combined with the low tire pressure
telltale. When the system detects a malfunc‐
tion, the telltale will flash for approximately one
minute and then remain continuously illumi‐
nated. This sequence will continue upon sub‐
Seite 98ControlsSafety98
Online Edition for Part no. 01 40 2 960 865 - II/15
Page 172 of 236
ECO PRO Tip▷"Limit at:":
Adjust the ECO PRO speed.▷"ECO PRO speed warning":
The output is reduced once the set ECO
PRO speed is reached.
Coasting
With little pressure on the accelerator pedal,
the vehicle can coast without energy recovery.
The accelerator pedal indicator in the instru‐
ment display is centered between CHARGE
and ePOWER during coasting.
ECO PRO climate control "ECO PRO climate control"
Climate control is set to be fuel-efficient.
By making a slight change to the set tempera‐
ture, or slowly adjusting the rate of heating or
cooling of the car's interior, fuel consumption
can be economized.
ECO PRO potential Shows potential savings with the current set‐
tings in percentages.
Display in the instrument cluster
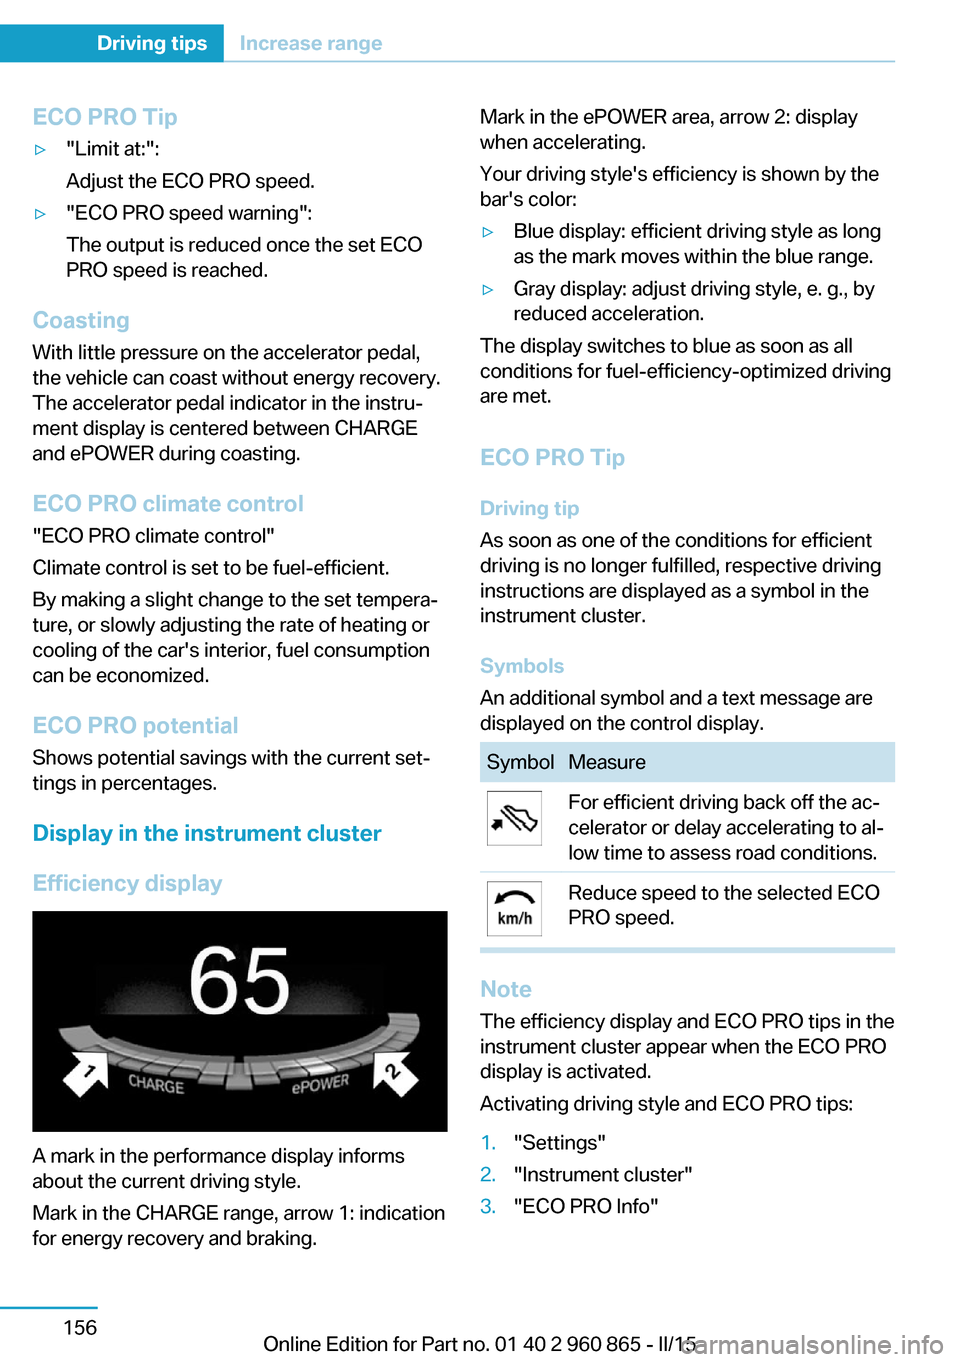
Efficiency display
A mark in the performance display informs
about the current driving style.
Mark in the CHARGE range, arrow 1: indication
for energy recovery and braking.
Mark in the ePOWER area, arrow 2: display
when accelerating.
Your driving style's efficiency is shown by the
bar's color:▷Blue display: efficient driving style as long
as the mark moves within the blue range.▷Gray display: adjust driving style, e. g., by
reduced acceleration.
The display switches to blue as soon as all
conditions for fuel-efficiency-optimized driving
are met.
ECO PRO Tip Driving tip
As soon as one of the conditions for efficient
driving is no longer fulfilled, respective driving
instructions are displayed as a symbol in the
instrument cluster.
Symbols
An additional symbol and a text message are
displayed on the control display.
SymbolMeasureFor efficient driving back off the ac‐
celerator or delay accelerating to al‐
low time to assess road conditions.Reduce speed to the selected ECO
PRO speed.
Note
The efficiency display and ECO PRO tips in the
instrument cluster appear when the ECO PRO
display is activated.
Activating driving style and ECO PRO tips:
1."Settings"2."Instrument cluster"3."ECO PRO Info"Seite 156Driving tipsIncrease range156
Online Edition for Part no. 01 40 2 960 865 - II/15
Page 173 of 236
Indications on the Control DisplayeDRIVE
Information on fuel consumption and technol‐
ogy can be displayed while driving.1."Vehicle info"2."eDRIVE"
Displaying ECO PRO Tips
ECO PRO Tips can be displayed while driving
as a note in the split screen in the energy flow
display.
Displaying ECO PRO Tips:
1."Vehicle info"2."eDRIVE"3. "ECO PRO Tips"
Settings are stored for the profile currently in
use.
ECO PRO driving style analysis
The concept
The system helps develop a particularly effi‐
cient driving style and to save energy.
For this purpose, the driving style is analyzed.
The assessment is done in various categories
and is displayed on the Control Display.
Those assessments will help you adjust your
driving style and save some energy.
The last fifteen minutes of a trip are evaluated.
The range of the vehicle can be extended by
an efficient driving style.
Functional requirement The function is only available in ECO PRO
mode.
Calling up ECO PRO driving styleanalysis
1.Activate ECO PRO.2."eDRIVE"3. Select the symbol.
Display on the Control Display
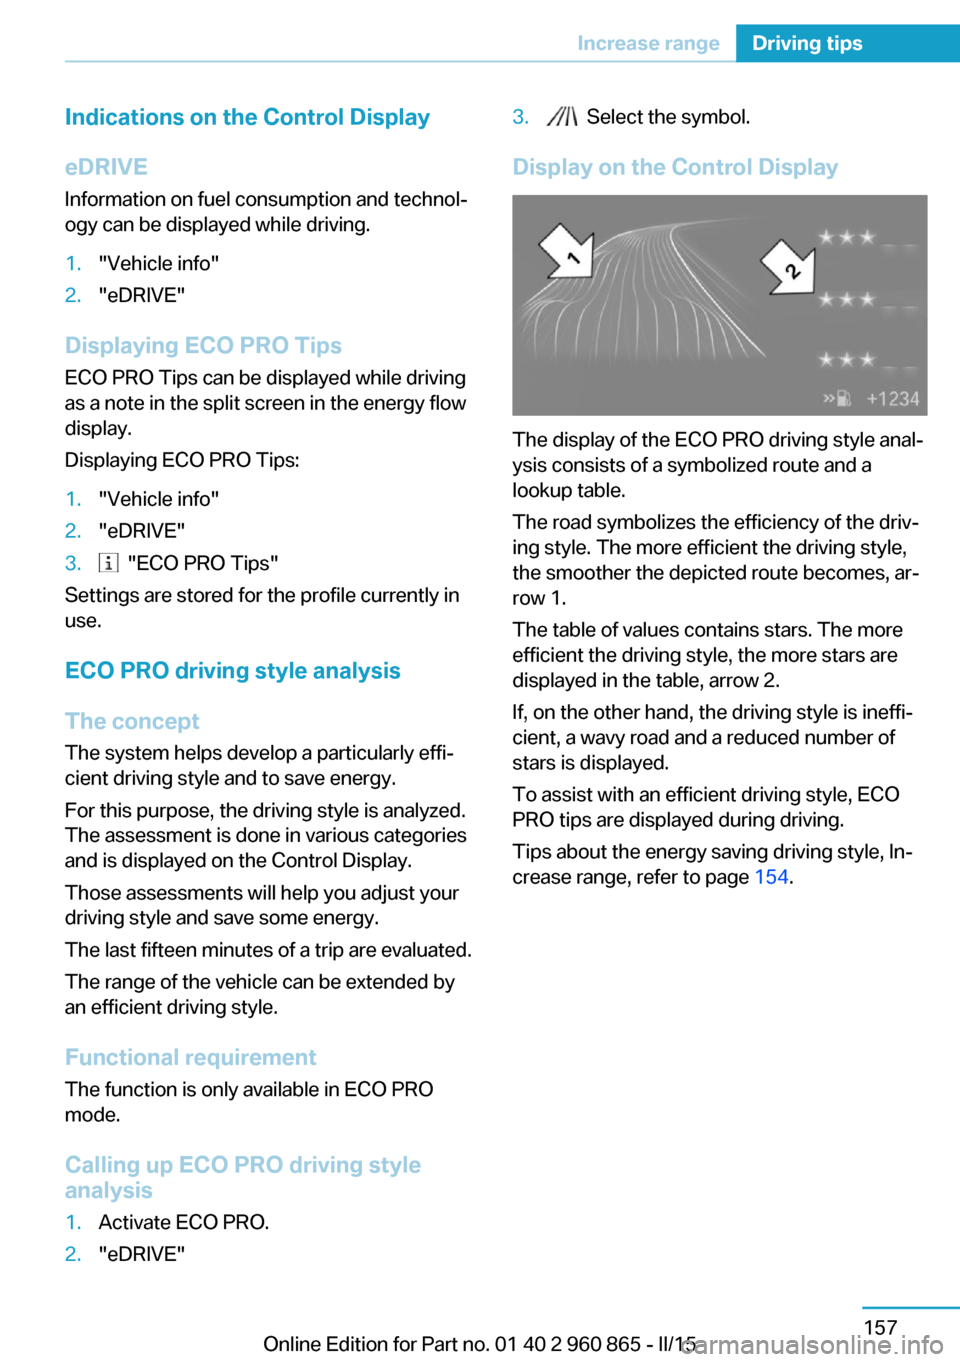
The display of the ECO PRO driving style anal‐
ysis consists of a symbolized route and a
lookup table.
The road symbolizes the efficiency of the driv‐
ing style. The more efficient the driving style,
the smoother the depicted route becomes, ar‐
row 1.
The table of values contains stars. The more
efficient the driving style, the more stars are
displayed in the table, arrow 2.
If, on the other hand, the driving style is ineffi‐
cient, a wavy road and a reduced number of
stars is displayed.
To assist with an efficient driving style, ECO
PRO tips are displayed during driving.
Tips about the energy saving driving style, In‐
crease range, refer to page 154.
Seite 157Increase rangeDriving tips157
Online Edition for Part no. 01 40 2 960 865 - II/15
Page 177 of 236
of the Level 2 charging station. The permitted
charge current strength can vary by country.
The charge current strength for Level 2 charg‐
ing, refer to page 166, can be adjusted in the
vehicle in two steps.
At delivery, the charge current for
Level 2 charging is set to "Reduced". This set‐
ting should be maintained, unless it was veri‐
fied that a higher charge current strength is
permitted in the individual case.
The charge current changes depending on the
setting."Maximum""Reduced"32 A20 A
Depending on the charge current, the charging
duration changes.
Range Extender
With Range Extender, refer to page 69,
switched on, the current charging state can be
maintained. In this way, a higher range is ach‐
ieved.
Hints Working with electrical current
When working with electrical current, ob‐
serve the safety regulations. Otherwise, with
high voltage or excess current there is a risk to
persons and property, e.g., from electrocution or fire.◀
Have the charging device checked be‐
fore commissioning
Before the initial charging process, have your
own charging device checked at the charging location by a qualified electrician, that is,
charging port on the vehicle, charging cable,
charging station or household socket and con‐
nected circuits. Otherwise, there is a danger of
damage to the vehicle and overloading of the
supply mains at the charging location.◀
Follow instructions at the charging sta‐
tion
When working with electrical current, follow
the instructions at the charging station. Other‐
wise, there is a risk of an accident.◀
Make sure that the charging device is in
flawless operating condition
Only use the charging device in a flawless con‐
dition. Otherwise, a risk of fire may result, e.g.,
from the device heating up because of, say,
worn contacts or damage.◀
No simultaneous charging and refueling
Do not refuel while a charging cable is
plugged in, and maintain an adequate safety
distance from highly flammable materials. Oth‐
erwise, there is a danger of personal injury and
property damage from burning fuel vapors,
e.g., if the charging cable is improperly plug‐
ged in or unplugged.◀
Have the charging port cleaned by
trained personnel
If the charging port is dirty, have the car
cleaned only by appropriately trained person‐
nel. Otherwise, there is a danger of injury from high voltage.◀
Charging cable General information
Use a Level 1 charging cable, Level 2 charging
cable or the permanently installed charging ca‐
ble of a charging station to charge the vehicle.
Different charging cables can be required de‐ pending on the country.
Hints Use approved charging cables only
Use only approved charging cables or
charging stations for charging. Otherwise,
there is a danger of property damage or per‐Seite 161Charging vehicleMobility161
Online Edition for Part no. 01 40 2 960 865 - II/15
Page 185 of 236
RefuelingVehicle features and options
This chapter describes all standard, country-
specific and optional features offered with the
series. It also describes features that are not
necessarily available in your car, e. g., due to
the selected options or country versions. This
also applies to safety-related functions and
systems. The respectively applicable country
provisions must be observed when using the
respective features and systems.
Hints Observe the fuel recommendation, refer to
page 172, prior to refueling.
A sufficient amount of fuel must be added to
operate the Range Extender. When the Range
Extender is activated, the current charging
state is maintained. The vehicle has a greater
range.
Do not refuel unless the engine is at a
standstill and the selector lever is in posi‐
tion P/N
Do not refuel unless the engine is at a standstill
and the selector lever is in position P/N, other‐
wise the buildup of pressure may cause the
fuel nozzle to shut off prematurely.◀
Tank vent
The concept The vehicle is equipped with a special fuel
tank. It is designed for special requirements
that arise in operation with the Range Ex‐
tender.General information
In the fuel tank, excess pressure can build up
due to gasoline vapors which are dissipated
before the tank lid is opened.
Overview
The button is located on the driver's footwell.
Tank venting1.Switch off drive readiness.2.
Press button to start the pressure
equalization.
The status of the tank venting is displayed
in the instrument cluster. In rare cases, the
tank venting can last several minutes.
If the tank venting has been completed, a
message is displayed in the instrument
cluster. The tank lid is released for open‐
ing.
3.Open the fuel filler flap.
If the fuel filler flap is not opened within 10
minutes after the fuel filler flap was re‐
leased, the fuel filler flap relocks. Press
button again.
Fuel lid
Opening
Before opening , vent the tank, refer to
page 169.
Seite 169RefuelingMobility169
Online Edition for Part no. 01 40 2 960 865 - II/15
Page 186 of 236
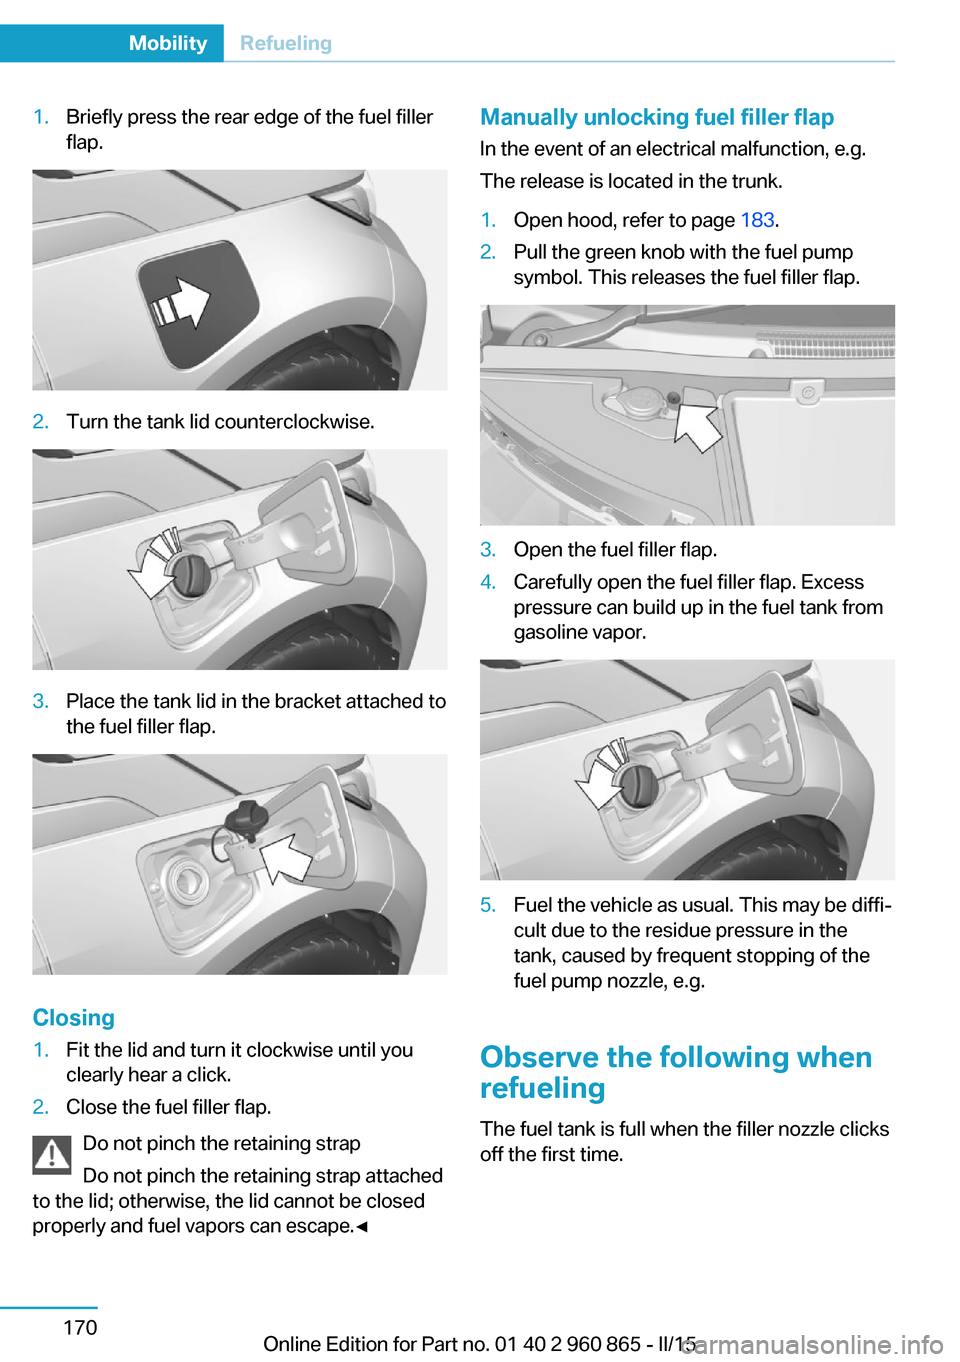
1.Briefly press the rear edge of the fuel filler
flap.2.Turn the tank lid counterclockwise.3.Place the tank lid in the bracket attached to
the fuel filler flap.
Closing
1.Fit the lid and turn it clockwise until you
clearly hear a click.2.Close the fuel filler flap.
Do not pinch the retaining strap
Do not pinch the retaining strap attached
to the lid; otherwise, the lid cannot be closed
properly and fuel vapors can escape.◀
Manually unlocking fuel filler flap
In the event of an electrical malfunction, e.g.
The release is located in the trunk.1.Open hood, refer to page 183.2.Pull the green knob with the fuel pump
symbol. This releases the fuel filler flap.3.Open the fuel filler flap.4.Carefully open the fuel filler flap. Excess
pressure can build up in the fuel tank from
gasoline vapor.5.Fuel the vehicle as usual. This may be diffi‐
cult due to the residue pressure in the
tank, caused by frequent stopping of the
fuel pump nozzle, e.g.
Observe the following when
refueling
The fuel tank is full when the filler nozzle clicks
off the first time.
Seite 170MobilityRefueling170
Online Edition for Part no. 01 40 2 960 865 - II/15
Page 187 of 236

Do not overfill the fuel tank
Do not overfill the fuel tank; otherwise
fuel may eslide, causing harm to the environ‐
ment and damaging the vehicle.◀
Handling fuels
Observe safety regulations posted at the
gas station.◀
No simultaneous charging and refueling
Do not refuel while a charging cable is
plugged in, and maintain an adequate safety
distance from highly flammable materials. Oth‐
erwise, there is a danger of personal injury and
property damage from burning fuel vapors,
e.g., if the charging cable is improperly plug‐
ged in or unplugged.◀Seite 171RefuelingMobility171
Online Edition for Part no. 01 40 2 960 865 - II/15
Page 188 of 236
FuelVehicle features and optionsThis chapter describes all standard, country-
specific and optional features offered with the
series. It also describes features that are not
necessarily available in your car, e. g., due to
the selected options or country versions. This
also applies to safety-related functions and
systems. The respectively applicable country
provisions must be observed when using the
respective features and systems.
Fuel recommendation Note General fuel quality
Even fuels that conform to the specifica‐
tions can be of low quality. This may cause en‐
gine problems, for instance poor engine start-
up behavior, poor handling and/or poor
performance. Switch gas stations or use a
brand name fuel with a higher octane rating.◀
Gasoline For the best fuel efficiency, the gasoline
should be sulfur-free or very low in sulfur con‐
tent.
Fuels that are marked on the gas pump as con‐
taining metal must not be used.
Refuel only with unleaded gasoline with‐
out metallic additives.
Do not refuel with any leaded gasoline or gaso‐
line with metallic additives, e. g. manganese or
iron, as this can cause permanent damage to
the catalytic converter and other compo‐
nents.◀
Fuels with a maximum ethanol content of
10 %, i. e., E10, may be used for refueling.Ethanol should satisfy the following quality
standards:
US: ASTM 4806–xx
CAN: CGSB-3.511–xx
xx: comply with the current standard in each
case.
Do not use a fuel with a higher percent‐
age of ethanol
Do not use a fuel with a higher ethanol per‐
centage than recommended or one with other
types of alcohol, e.g. M5 to M100; otherwise
this could damage the engine and fuel supply
system.◀
Recommended fuel grade BMW recommends AKI 91.
Minimum fuel grade
BMW recommends AKI 89.
Minimum fuel grade
Do not use any gasoline below the mini‐
mum fuel grade as this may impair engine per‐
formance.◀
Fuel supply in winter Depending on the region, many gas stations
sell fuel that has been customized to winter or
summer conditions.
Fuel that is available in winter helps make a
cold start easier, e. g.
The manufacturer of the vehicle recommends
filling the tank with the corresponding fuel at
the start of winter to ensure the operational re‐
liability of the Range Extender at low tempera‐
tures.Seite 172MobilityFuel172
Online Edition for Part no. 01 40 2 960 865 - II/15