BMW M3 1992 E36 Workshop Manual
Manufacturer: BMW, Model Year: 1992, Model line: M3, Model: BMW M3 1992 E36Pages: 759
Page 191 of 759
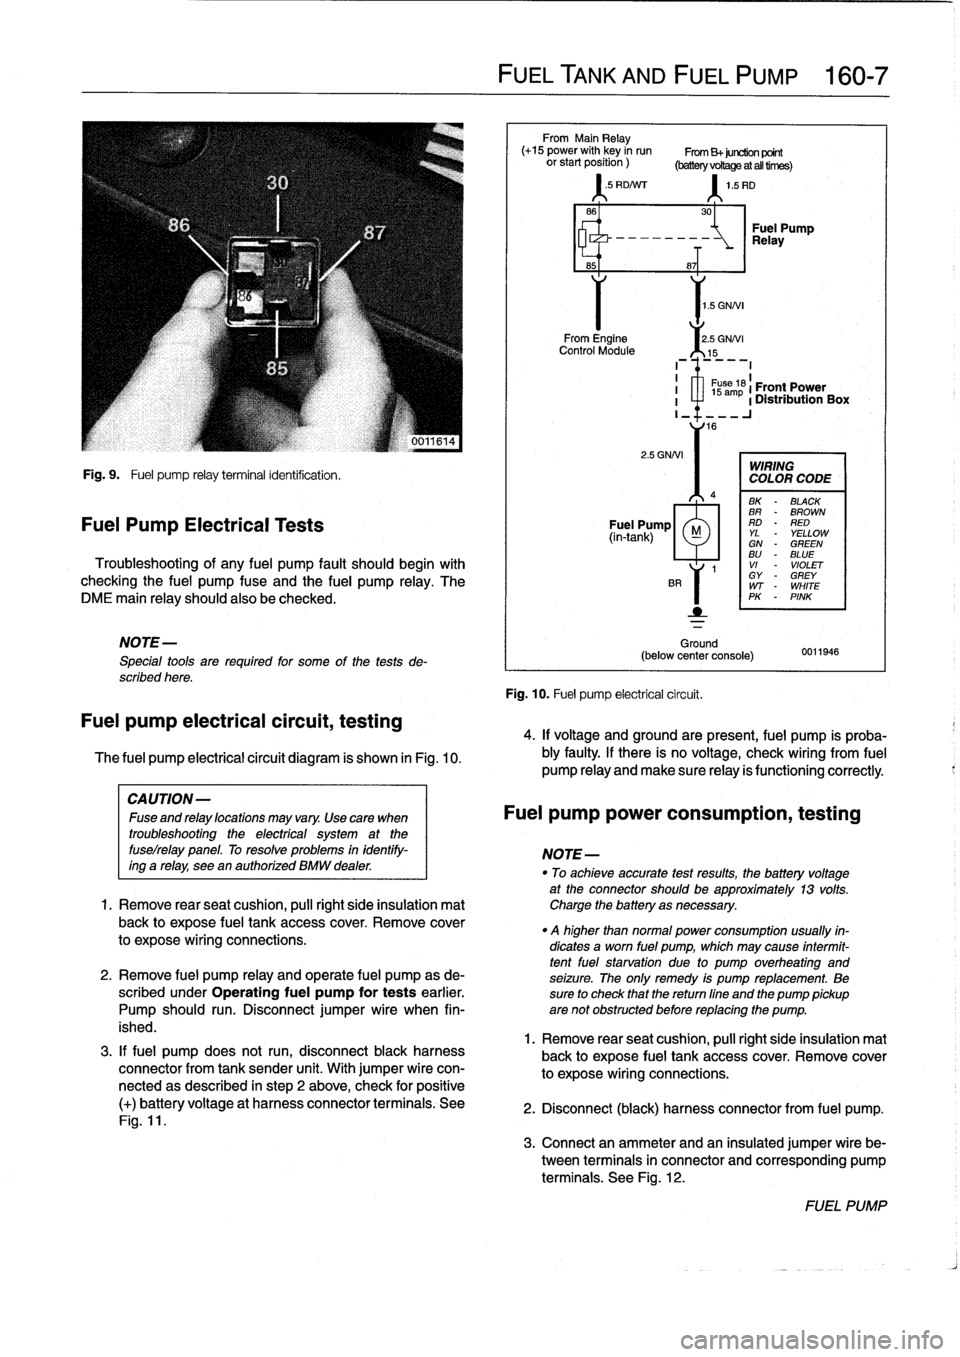
Fig
.
9
.
Fuel
pump
relay
terminal
identification
.
Fuel
Pump
Electrical
Tests
Troubleshooting
of
any
fuel
pump
fault
should
begin
with
checking
the
fuel
pump
fuse
and
the
fuel
pump
relay
.
The
DME
main
relay
should
also
be
checked
.
NOTE-
Special
tools
are
requíred
for
some
of
the
tests
de-
scribed
here
.
Fuel
pump
electrical
circuit,
testing
The
fuel
pump
electrical
circuit
diagram
is
shown
in
Fig
.
10
.
3
.
If
fuel
pump
does
not
run,
disconnect
black
harness
connector
from
tank
sender
unit
.
With
jumper
wire
con-
nectedas
described
in
step
2
above,
check
for
positive
(+)
batteryvoltage
at
harness
connector
terminals
.
See
Fig
.
11
.
FUEL
TANK
AND
FUEL
PUMP
160-
7
From
Main
Relay
(+15
power
with
key
in
run
From
B+juretion
point
orstartposition)
(batteryvoRageatalltirnes)
'
.5
RD/Nrr
1
.5
RD
1
.5
GNNI
From
Engine
2
.5
GNNI
Control
Module
15
2
.5
GNNI
Ground
(below
center
console)
Fig
.
10
.
Fuel
pump
electrical
circuit
.
30
-~
Relay
Fuel
Pump
8~T
I
1
s
ám
61
Front
Power
I
a
1
Distribution
Box
I_
16
WIRING
COLOR
CODE
BK
-
BLACK
BR
-
BROWN
Fuel
Pump
RD
-
RED
(in-tank)
M
YL
YELLOWGN
-
GREENBU
-
BLUE
1
VI
-
VIOLET
GY
-
GREY
WT
-
WHITE
PK
-
PINK
0011946
4
.
If
voltage
and
groundare
present,
fuel
pump
is
proba-
bly
faulty
.
If
there
is
no
voltage,
check
wiring
From
fuel
pump
Reay
and
make
sure
Reay
is
functioning
correctly
.
CAUTION-
Fuseandrelaylocationsmayvary
.
Usecara
when
Fuel
pump
power
consumption,
testing
troubleshooting
the
electrical
system
at
the
fuselrelay
panel
.
To
resolve
problems
in
identify-
NOTE-
ing
a
relay,
see
en
authorízed
BMW
dealer
.
"
To
achieveaccurate
testresults,
fhe
battery
voltage
at
the
connector
should
be
approximately
13
volts
.
1.
Remove
rearseat
cushion,
pull
right
side
insulation
mat
Charge
the
battery
asnecessary
.
back
to
expose
fuel
tank
accesscover
.
Remove
cover
.
q
higher
than
normal
power
consumption
usually
fin-
to
expose
wiring
connections
.
dicates
a
worn
fuel
pump,
which
may
cause
intermit-
tentfuel
starvation
due
lo
pump
overheating
and
2
.
Remove
fuel
pump
relay
and
opérate
fuel
pump
as
de-
seizure
.
The
only
remedy
is
pump
replacement
.
Be
scribed
under
Operating
fuel
pump
for
tests
earlier
.
sure
to
check
that
thereturn
fine
and
the
pump
pickup
Pump
should
run
.
Disconnect
jumper
wire
when
fin-
are
not
obstructed
before
replacing
the
pump
.
ished
.
1
.
Remove
rear
seat
cushion,
pull
right
side
insulation
mal
back
to
expose
fuel
tank
accesscover
.
Remove
cover
to
expose
wiring
connections
.
2
.
Disconnect
(black)
harness
connector
from
fuel
pump
.
3
.
Connect
an
ammeter
and
an
insulated
jumper
wire
be-
tween
terminals
in
connector
and
corresponding
pump
terminals
.
See
Fig
.
12
.
FUEL
PUMP
Page 192 of 759
160-
8
FUEL
TANK
AND
FUEL
PUMP
UU131
tst5
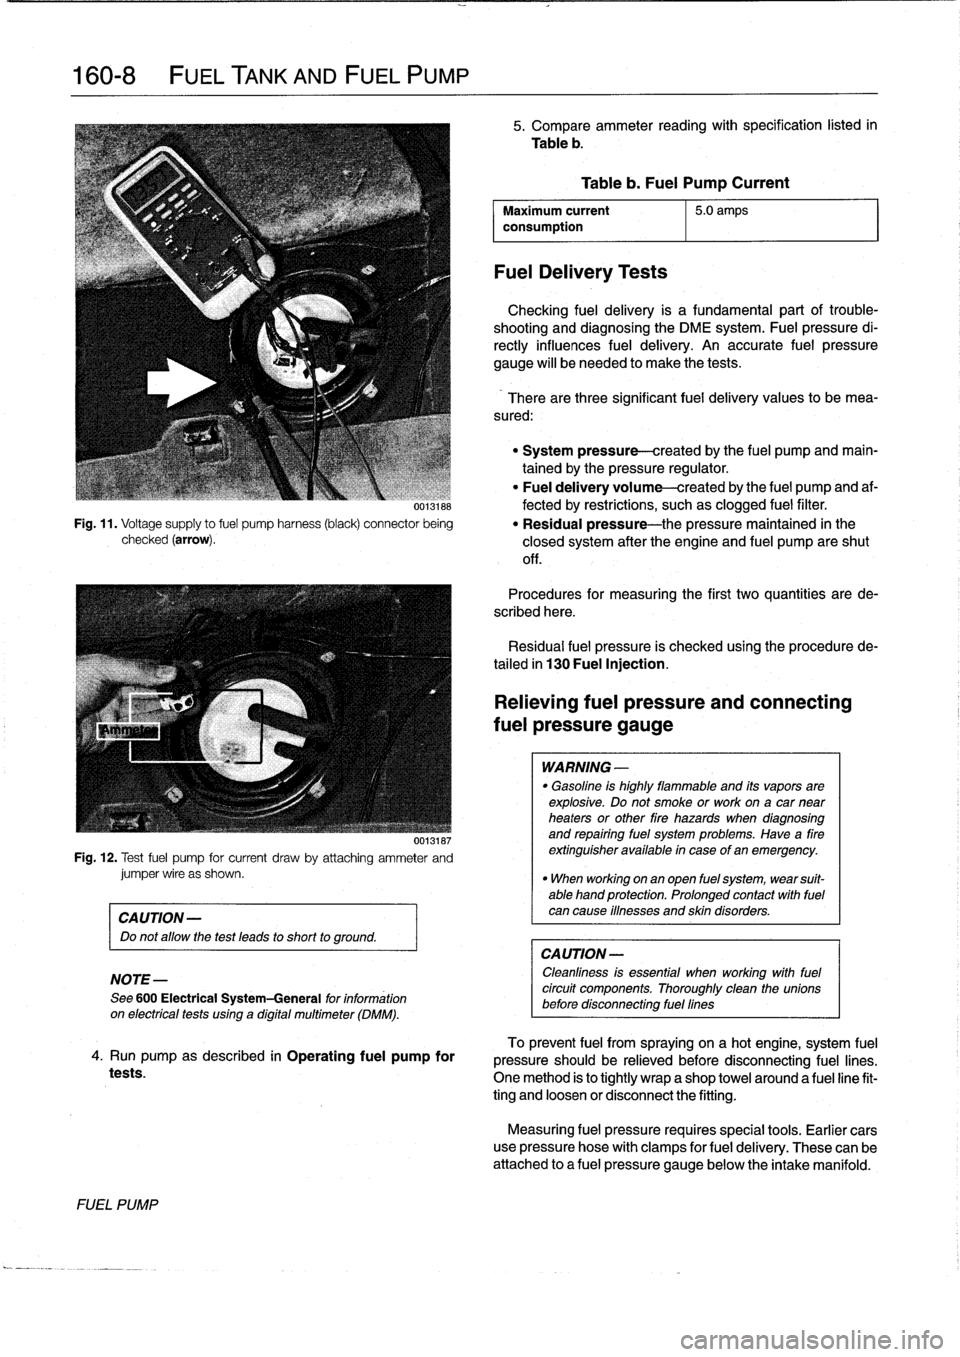
Fig
.
11
.
Voltage
supply
to
fuel
pump
harness
(black)
connector
being
checked
(arrow)
.
00131ts7
Fig
.
12
.
Test
fuel
pump
for
current
draw
by
attadhing
ammeter
andjumper
wire
as
shown
.
CAUTION-
Do
not
allow
the
test
leads
to
short
to
ground
.
NOTE-
See
600
Electrical
System-General
for
information
on
electricaltests
using
a
digital
multimeter
(DMM)
.
4
.
Run
pump
as
described
in
Operating
fuel
pump
for
tests
.
FUEL
PUMP
5
.
Compare
ammeter
reading
with
specification
listed
in
Table
b
.
Maximum
current
5
.0
amps
consumption
FuelDelivery
Tests
Table
b
.
Fuel
Pump
Current
Checking
fuel
delivery
is
a
fundamental
part
of
trouble-
shooting
and
diagnosing
the
DME
system
.
Fuelpressure
di-
rectly
influences
fuel
delivery
.
An
accurate
fuel
pressure
gauge
will
be
needed
to
make
the
tests
.
There
arethree
significant
fuel
delivery
values
to
bemea-
sured
:
"
System
pressure-created
by
the
fuel
pump
and
main-
tained
by
the
pressure
regulator
.
"
Fuel
delivery
volume-created
by
the
fuel
pump
and
af-
fected
by
restrictions,
suchas
clogged
fuel
filter
.
"
Residual
pressure-the
pressure
maintained
in
the
closed
system
after
the
engine
and
fuel
pump
areshut
off
.
Procedures
for
measuring
the
first
two
quantities
arede-
scribed
here
.
Residual
fuel
pressure
is
checked
using
the
procedurede-
tailed
in
130
Fuel
Injection
.
Relieving
fuel
pressure
and
connecting
fuel
pressure
gauge
WARNING
-
"
Gasoline
is
highly
flammable
and
its
vaporsare
explosive
.
Do
not
smoke
or
work
ona
car
near
heaters
or
other
fire
hazards
when
diagnosing
and
repairing
fuel
system
problems
.
Have
a
fire
extinguisher
available
in
case
of
an
emergency
.
"
When
working
onan
open
fuel
system,
wear
suit-
able
hand
protection
.
Prolonged
contact
with
fuel
can
cause
iflnesses
and
skin
disorders
.
CA
UTION-
Cleanliness
is
essential
when
working
withfuel
circuit
components
.
Thoroughly
clean
the
unionsbefore
disconnecting
fuel
fines
To
prevent
fuel
from
spraying
on
a
hotengine,
system
fuel
pressure
should
be
relieved
before
disconnecting
fuel
lines
.
One
method
is
to
tightly
wrap
a
shop
towel
around
a
fuel
line
fit-
ting
and
loosen
or
disconnect
the
fitting
.
Measuring
fuel
pressure
requires
special
tools
.
Earlier
cars
use
pressure
hose
with
clamps
for
fuel
delivery
.
These
can
be
attached
to
a
fuel
pressure
gauge
below
the
intake
manifold
.
Page 193 of 759
NOTE-
NOTE
-
On
1996
and
later
4-cylinder
cars,
use
BMW
special
"
Use
BMW
pressure
gauge
Part
No
.
133
060,or
an
tool
13
6051
(hose
with
quick
release
coupling)
toat-
equivalent
.
The
fuel
pressure
gauge
should
have
a
tach
pressure
gauge
to
Shraeder
valve
fitting
on
top
of
rangeof
0
to
5bar
(0
to
75
psi)
and
mustbe
securely
the
M44
fuel
rail
.
See
Fig
.
13
.
connected
to
prevent
it
from
coming
loose
under
pres-
sure
.
u012503a
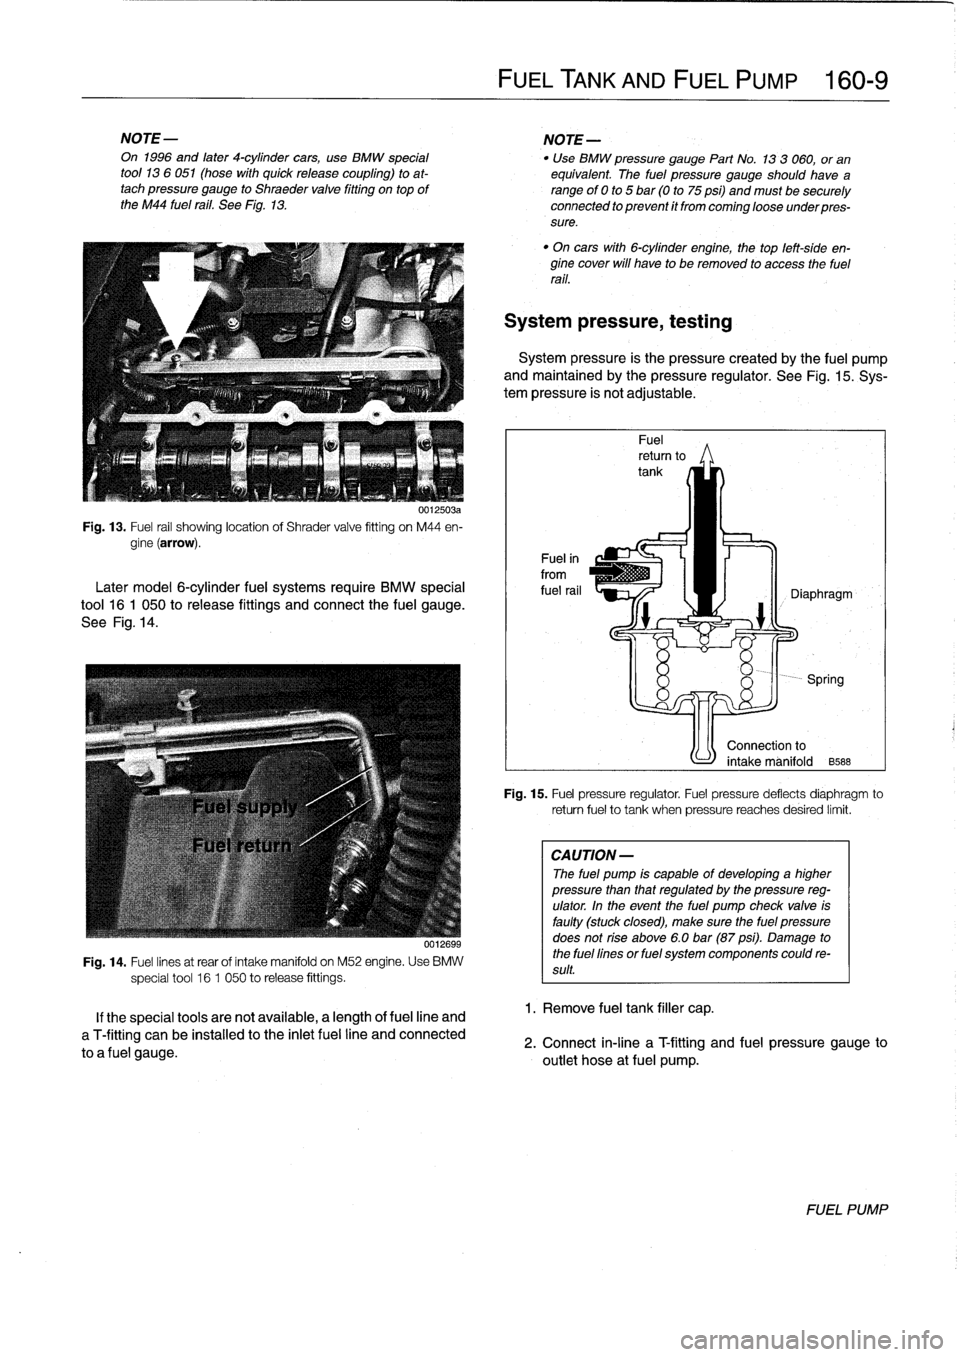
Fig
.
13
.
Fuel
rail
showing
location
of
Shrader
valve
fitting
on
M44
en-
gine
(arrow)
.
Later
model
6-cylinder
fuel
systems
require
BMW
specíal
tool
16
1
050
to
release
fittings
and
connect
the
fuel
gauge
.
See
Fig
.
14
.
0012699
Fig
.
14
.
Fuel
lines
at
rear
of
íntake
manifold
on
M52
engine
.
Use
BMW
special
tool
16
1
050
to
release
fittings
.
If
the
special
tools
arenot
available,
a
length
offuel
line
and
a
T-fitting
can
be
installed
tothe
inlet
fuel
line
and
connected
to
a
fuel
gauge
.
FUEL
TANK
AND
FUEL
PUMP
160-
9
"
On
cars
with
6-cylinder
engine,
thetop
left-side
en-
Bine
cover
will
have
to
be
removed
to
access
the
fuel
rail
.
System
pressure,
testing
System
pressure
is
the
pressure
created
by
the
fuel
pump
and
maintained
by
the
pressure
regulator
.
See
Fig
.
15
.
Sys-
tem
pressure
is
not
adjustable
.
1
.
Remove
fuel
tank
filler
cap
.
Fig
.
15
.
Fuel
pressure
regulator
.
Fuel
pressure
deflects
diaphragm
to
retum
fuel
to
tank
when
pressure
reaches
desired
limit
.
CA
UTION-
The
fuel
pump
is
capable
of
developing
a
higher
pressure
than
that
regulated
by
the
pressure
reg-
ulator
.
In
the
event
the
fuel
pump
check
valve
is
faulty
(stuck
closed),
make
sure
the
fuel
pressure
does
not
rise
aboye
6
.0
bar(87
psi)
.
Damage
to
the
fuel
fines
or
fuel
system
components
could
re-
sult
.
2
.
Connect
in-fine
a
Tfitting
and
fuel
pressure
gauge
to
outlet
hose
atfuel
pump
.
FUEL
PUMP
Page 194 of 759
160-
1
0
FUEL
TANK
AND
FUEL
PUMP
3
.
Operate
fuel
pump
as
described
earlier
under
Operat-
ing
fuel
pump
for
tests
.
Check
that
fuel
pressure
cor-
responds
to
specifications
listed
in
Table
c
.
"
If
system
pressure
is
low,
repeat
test
whilegradually
pinching
off
return
hose
.
Pressure
should
rise
rapidly
.
If
not,fuel
pump
is
most
likely
faulty
.
"
If
system
pressure
is
too
high,
check
return
line
from
pressure
regulator
to
tank
.
Check
for
kinks
in
hose
.
Blow
compressed
air
through
line
to
check
for
block-
ages
.
If
no
faulty
canbe
found,
pressure
regulator
is
most
likely
faulty
.
See
130
Fuel
Injection
for
testing
and
replacementprocedures
.
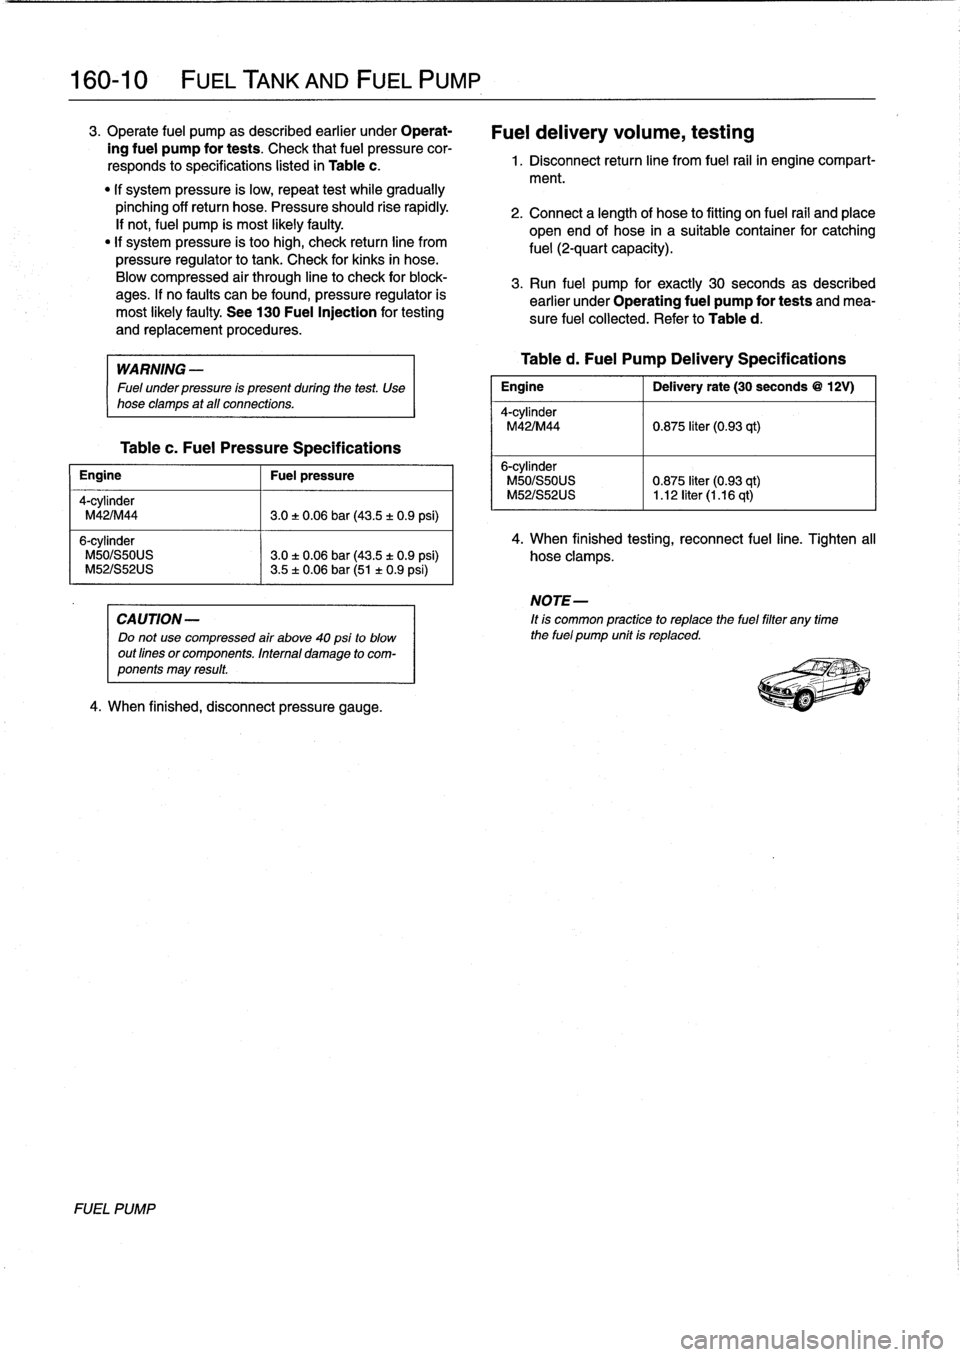
Table
c
.
Fuel
Pressure
Specifications
Engine
1
Fuel
pressure
4-cylinder
M42/M44
3
.0
:e
0
.06
bar(43
.5
±0
.9
psi)
6-cylinder
M50/S50US
3
.0
:j-
0
.06bar(43
.5
t0
.9
psi)
M52/S52US
3
.5
t
0
.06
bar
(51
t0
.9psi)
CA
UTION-
Do
not
use
compressed
air
above
40
psi
to
blow
out
fines
or
components
.
Interna¡
damage
to
com-
ponents
may
result
.
4
.
When
finished,
disconnect
pressure
gauge
.
FUEL
PUMP
Fuel
delivery
volume,
testing
1
.
Disconnect
return
line
from
fuel
rail
in
engine
compart-
ment
.
2
.
Connect
a
length
of
hose
to
fitting
on
fuel
rail
and
place
open
end
of
hose
in
a
suitable
container
for
catching
fuel
(2-quart
capacity)
.
3
.
Run
fuel
pump
for
exactly
30
seconds
as
described
earlier
under
Operating
fuel
pump
for
tests
and
mea-
sure
fuel
collected
.
Refer
to
Table
d
.
WARNING-
Table
d
.
Fuel
Pump
Delivery
Specifications
Fuel
under
pressure
is
present
duringthe
test
.
Use
I
Engine
Delivery
rate
(30
seconds
@
12V)
hose
clamps
at
all
connections
.
4-cylinder
M42/M44
0
.875
fter
(0
.93
qt)
6-cylinder
M50/S50US
0
.875
fter(0
.93
qt)
M52/S52US
~
1
.12
liter
(1
.16
qt)
4
.
When
finished
testing,
reconnect
fuel
line
.
Tighten
all
hose
clamps
.
NOTE-
It
is
common
practice
to
replace
the
fuel
filter
any
time
the
fuel
pump
unit
is
replaced
.
Page 195 of 759
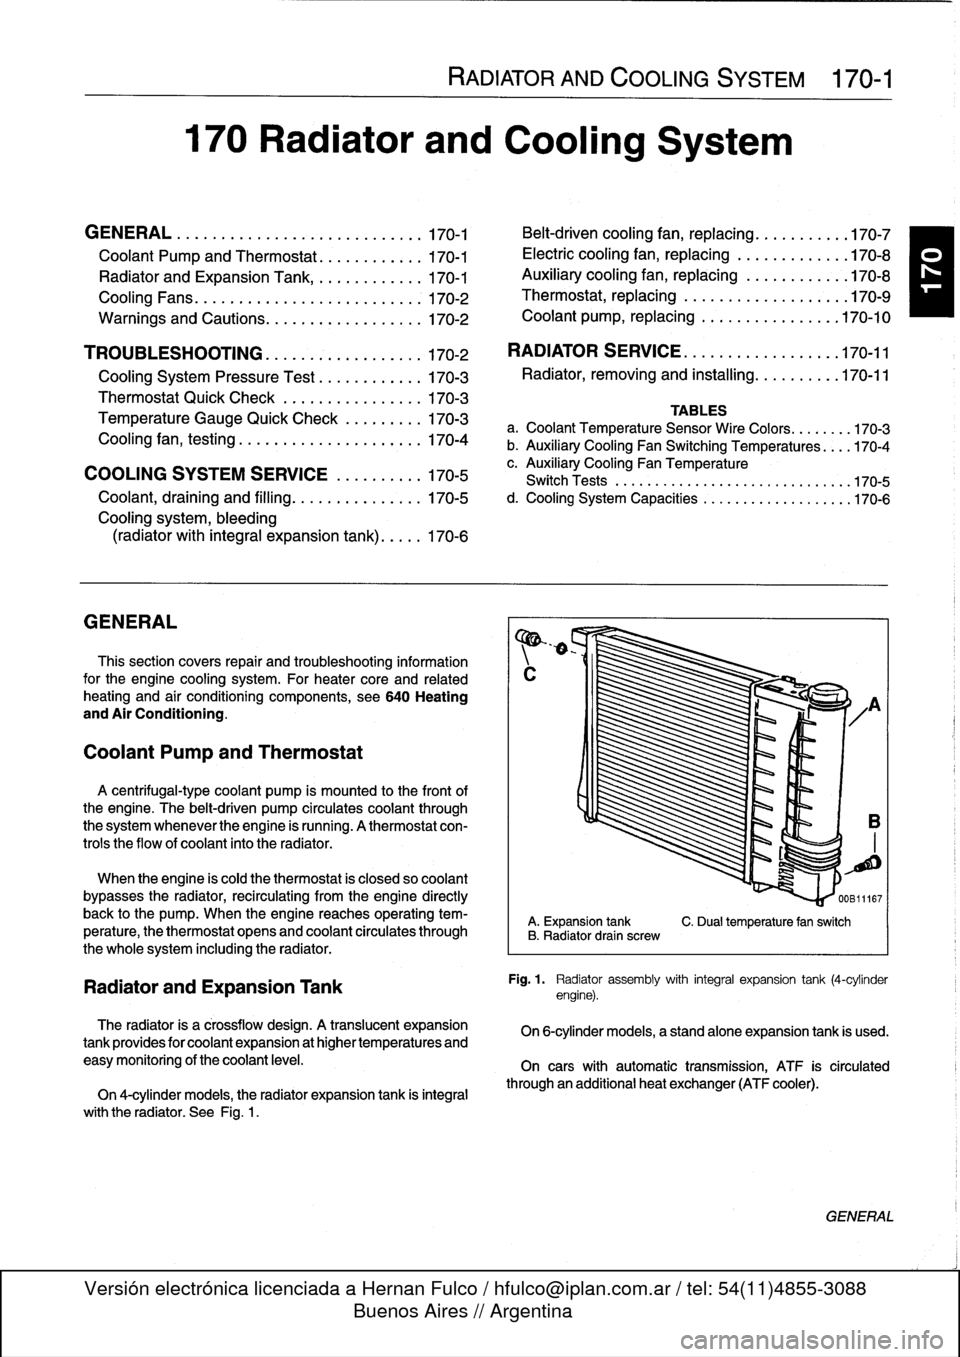
170
Radiator
and
Cooling
System
GENERAL
.
.
.....
.
...
.
.
.
.
.
....
.
.
.
.
.
.
.
.170-1
Coolant
Pump
and
Thermostat
........
.
.
.
.
170-1
Radiator
and
Expansion
Tank
.........
.
...
170-1
Cooling
Fans
.
....
.
.
.
.
.
.
.
.
.
.....
.
......
170-2
Warnings
and
Cautions
.
.
.
.
.
.
.
.
.
.
.
.
...
.
.
.
170-2
TROUBLESHOOTING
...
.
.
.
...
.
.
.
.
.
.
.
.
.170-2
Cooling
System
Pressure
Test
...
.
.
.
.
.
.
.
.
.
170-3
Thermostat
Quick
Check
.
.
.
.
...
.
.
.
.
.
.
.
.
.
170-3
Temperature
Gauge
Quick
Check
.
.
.
.
.
.
.
.
.
170-3
Cooling
fan,
testing
.
.
.
.
........
.
.
.
.
.
.
.
.
.
170-4
COOLING
SYSTEM
SERVICE
.
.
.
.
.
.
.
.
.
.
170-5
Coolant,draining
and
filling
.
.
......
.
.
.
.
.
..
170-5
Cooling
system,
bleeding
(radiator
with
integral
expansion
tank)
.....
170-6
GENERAL
This
section
covers
repair
and
troubleshooting
information
for
the
engine
cooling
system
.
For
heater
core
and
related
heating
and
air
conditioning
components,
see640
Heating
and
Air
Conditioning
.
Coolant
Pump
and
Thermostat
A
centrifuga¡-type
coolant
pump
is
mounted
to
the
front
of
the
engíne
.
The
belt-driven
pump
circulates
coolant
through
the
system
whenever
the
engíne
is
running
.
A
thermostat
con-
trols
the
flow
of
coolant
into
the
radiator
.
When
the
engíne
is
cold
the
thermostat
is
closed
so
coolant
bypasses
the
radiator,
recirculating
from
the
engíne
directly
back
to
the
pump
.
When
the
engíne
reaches
operating
tem-
perature,
the
thermostat
opens
and
coolant
circulates
through
the
whole
system
including
the
radiator
.
Radiator
and
Expansion
Tank
The
radiator
is
a
crossflow
design
.
A
translucent
expansion
tank
provides
for
coolant
expansion
at
higher
temperatures
and
easy
monitoringof
the
coolant
leve¡
.
On
4-cylinder
modeis,
the
radiator
expansion
tank
is
integral
with
the
radiator
.
See
Fig
.
1
.
RADIATOR
AND
COOLING
SYSTEM
170-1
Belt-driven
cooling
fan,
replacing
.
.......
.
.
.
170-7
Electric
cooling
fan,
replacing
.
.
.
.....
.
.
.
.
.
170-8
Auxiliary
cooling
fan,
replacing
.
.
.....
.
.
.
.
.
170-8
Thermostat,
replacing
.
.
.
.
.
.
.
.
.
.....
.
.
.
.
.
170-9
Coolant
pump,
replacing
..........
.
.
.
.
.
.
170-10
RADIATOR
SERVICE
.....
.
......
.
.
.
.
.
.
170-11
Radiator,
removing
and
installing
....
.
.
.
.
.
.
170-11
TABLES
a
.
Coolant
Temperature
Sensor
Wire
Colors
...
.
..
.
.
170-3b
.
Auxiliary
Cooling
Fan
Switching
Temperatures
.:.
.170-4
c
.
Auxiliary
Cooling
Fan
Temperature
Switch
Tests
..
..
.
...
...
.
.............
.
..
.
.
170-5d
.
Cooling
System
Capacities
..............
..
.
.
.
170-6
A
.
Expansion
tank
C
.
Dualtemperature
fan
switch
B
.
Radiator
drain
screw
Fig
.
1
.
Radiator
assembly
with
integral
expansion
tank
(4-cylinder
engine)
.
On
6-cylinder
models,
a
standalone
expansion
tank
is
used
.
On
cars
with
automatic
transmission,
ATF
is
circulated
through
an
additional
heat
exchanger
(ATF
cooler)
.
GENERAL
Page 196 of 759
170-2
RADIATOR
AND
COOLING
SYSTEM
Cooling
Fans
TROUBLESHOOTING
Belt-driven
coolingfan
.
The
primary
cooling
fan
is
belt-
driven
.
It
is
mounted
to
the
frontof
the
coolant
pump
through
a
fan
clutch
.
The
fan
clutch
is
a
viscous
fluid
coupling
that
con-
trols
the
speed
of
thefan
based
on
engine
compartment
tem-
perature
.
Electric
cooling
fan
.
Models
with
M44
engine
and
stan-
dard
transmission
substitute
an
electric
fan
for
the
belt-driven
viscous
fan
.
This
is
attached
to
the
rear
of
the
radiator
and
controlledvia
the
DME
5
.2
engine
management
system
.
NOTE-
The
electric
cooling
fan
in
these
models
is
activated
by
the
engine
control
module
(ECM)
.
Auxiliary
coolingfan
.
In
al¡
models
a
two-speed
electric
auxiliary
cooling
fan
is
mounted
behind
the
front
grill
and
in
front
of
the
radiator
.
This
fan
is
primarily
used
for
the
A/C
sys-
tem,
but
also
operates
when
the
coolant
temperature
ex-
ceeds
a
predetermined
leve¡
.
Warnings
and
Cautions
The
following
warnings
and
Cautions
should
beobserved
when
working
on
the
cooling
system
.
WARNING
-
"
Atnormal
operating
temperature
the
cooling
sys-
tem
is
pressurized
.
Allow
the
system
to
cool
as
long
as
possible
before
opening-a
minimum
of
an
hour-then
release
the
cap
slowly
to
allow
sale
release
of
pressure
.
"
Releasing
the
cooling
system
pressure
lowers
the
coolants
boiling
point
and
the
coolant
may
boíl
suddenly
.
Use
heavy
gloves
and
wear
eye
and
laceprotection
to
guard
against
scalding
.
"
Use
extreme
care
when
draining
and
disposing
of
engine
coolant
.
Coolant
is
poisonous
and
lethal
to
humans
and
pets
.
Pets
are
attracted
to
coolant
because
of
its
sweet
smell
and
taste
.
Consult
a
veterinarian
immediately
if
coolant
is
ingested
byan
animal
.
CAUTION-
"
Avoidadding
cold
water
to
the
coolant
while
the
engine
is
hot
or
overheated
.
If
it
is
necessary
to
add
coolant
to
ahot
system,
do
so
only
with
the
engine
running
and
coolant
pump
tuming
.
"
Prior
to
disconnecting
the
battery,
read
the
bat-
tery
disconnection
cautions
given
at
the
front
of
this
manual
on
page
viii
.
TROUBLESHOOTING
Most
cooling
system
faults
can
be
grouped
into
one
of
three
categories
:
"
Cooling
system
leaks
"
Poor
coolant
circulation
"
Radiator
cooling
fan
faults
When
investigating
the
cause
of
overheating
or
coolant
loss,
begin
with
a
visual
inspection
.
Be
sure
to
check
the
con-
dition
and
tension
of
the
coolant
pump
drive
belt
.
Check
hoses
for
cracks
or
softness
.
Check
clamps
for
looseness
.
Check
the
coolant
leve¡
and
check
for
evidence
of
coolantleaks
from
the
engine
.
Check
that
the
radiator
fins
are
not
blocked
with
dirt
or
de-
bris
.
Clean
the
radiator
using
low-pressure
water
or
com-
pressed
air
.
Blow
outward,
fromthe
engine
side
out
.
Inspect
the
coolant
pump
by
first
removing
the
drive
belt
from
the
pump
.
Firmly
grasp
opposite
sídes
of
the
pulley
and
check
for
play
in
all
directions
.
Spin
the
pulley
and
check
that
the
shaft
runs
smoothly
.
NOTE-
The
coolant
provides
lubrication
for
the
pump
shaft,
soan
occasional
drop
of
coolant
leaking
from
the
pump
is
acceptable
.
If
coolant
drips
steadily
from
the
vent
hole,
the
pump
should
be
replaced
.
The
cooling
system
becomes
pressurized
at
normal
operat-
ing
temperature,
which
raises
the
boiling
point
of
the
coolant
.
Leaks
may
prevent
the
system
from
becoming
pressurized,
allowing
the
coolant
to
boil
at
a
lower
temperature
.
If
visual
ev-
idence
is
inconclusive,
a
cooling
system
pressure
test
can
help
to
pinpointhard-to-find
leaks
.
If
the
cooling
system
is
full
of
coolant
and
holds
pressure,
the
next
most
probable
cause
of
overheating
are
:
"
Faulty
radiator
fan
"
Loose
or
worn
drive
belt
"
Failed
thermostat
or
coolant
pump
"
Clogged/plugged
radiator
or
coolant
passages
.
NOTE
-
"
Some
early
style
coolant
pumps
were
fitted
wíth
fi-
berlplastic
type
impellers
.
Over
time,
this
impeller
can
wear
away
and
result
in
overheating
.
The
plastic
im-
peller
can
also
slip
or
free-wheel
on
the
pump
shaft
.
If
the
engine
overheats
and
no
other
faults
canbe
found,
theold
style
impeller
may
be
the
cause
of
the
problem
.
"
Only
pumps
with
the
updated
metal
impeller
should
be
used
for
replacement
.
Page 197 of 759
Cooling
System
Pressure
Test
If
the
engine
overheats
and
no
other
cooling
system
testsindicate
trouble,
the
radiator
may
have
some
pluggedpassag-
A
cooling
system
pressure
test
is
used
to
check
for
internal
es
that
are
restricting
coolant
flow
.
leaks
.
Some
of
the
common
sources
ofinternal
leaks
are
a
faulty
cylinder
head
gasket,
a
cracked
cylinder
head,
or
a
Temperature
Gauge
Quick
Check
cracked
cylinder
block
.
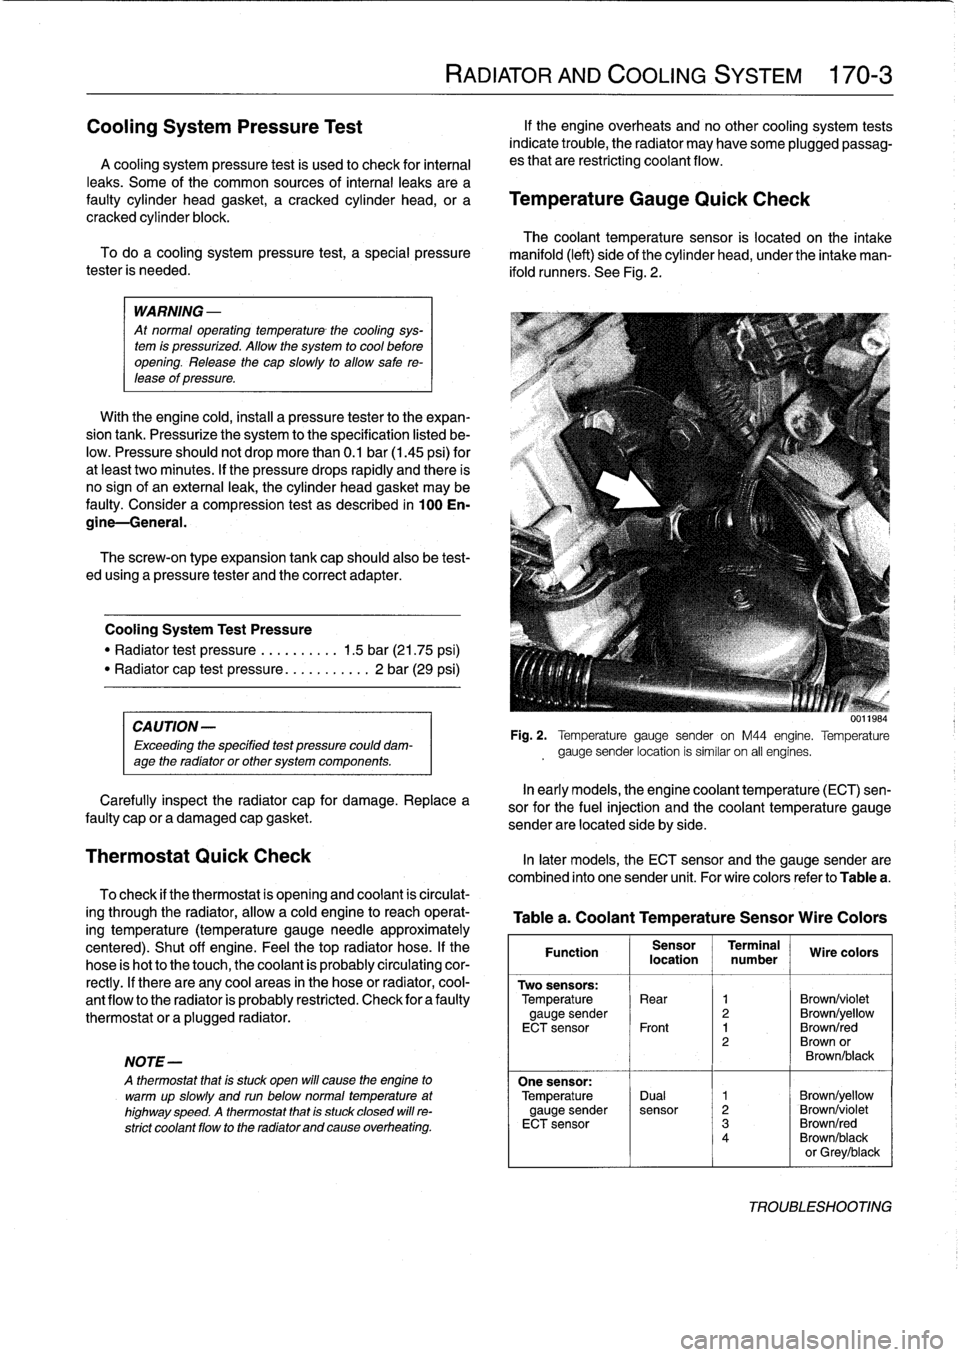
The
coolant
temperature
sensor
is
located
on
the
intake
To
doa
cooling
system
pressure
test,
a
special
pressure
manifold
(left)
side
of
the
cylinder
head,
under
the
intake
man-
tester
is
needed
.
ifold
runners
.
See
Fig
.
2
.
WARNING
-
At
normal
operating
temperature
-
the
cooling
sys-
tem
is
pressurized
.
Allow
the
system
to
cool
before
opening
.
Release
the
cap
slowly
to
allow
sale
re-
tease
of
pressure
.
With
the
engine
cold,instan
a
pressure
tester
to
the
expan-
sion
tank
.
Pressurize
thesystem
to
the
specification
listed
be-
low
.
Pressure
should
not
drop
more
than
0
.1
bar
(1
.45
psi)
for
at
leakt
two
minutes
.
If
the
pressure
drops
rapidly
and
there
is
no
sign
of
an
externa¡
leak,
the
cylinder
head
gasket
may
be
faulty
.
Considera
compression
test
as
described
in
100
En-
gine-General
.
The
screw-on
type
expansion
tank
cap
should
also
be
test-
ed
using
a
pressure
tester
and
the
correct
adapter
.
Cooling
System
Test
Pressure
"
Radiator
test
pressure
.........
.
1
.5
bar
(21
.75
psi)
"
Radiator
cap
test
pressure
..
.
........
2
bar
(29
psi)
CA
UTION-
Exceeding
the
speclfied
test
pressure
could
dam-
age
the
radiatoror
other
system
components
.
Carefully
inspect
the
radiator
cap
for
damage
.
Replace
a
faulty
cap
or
a
damaged
cap
gasket
.
Thermostat
Quick
Check
In
later
models,
the
ECT
sensor
and
the
gauge
sender
are
combined
into
one
sender
unit
.
For
wire
colors
refer
to
Table
a
.
To
check
if
the
thermostat
is
opening
and
coolant
is
circulat-
ing
through
the
radiator,
allow
a
cold
engine
to
reach
operat-
ing
temperature
(temperature
gauge
needieapproximately
centered)
.
Shut
off
engine
.
Feel
the
top
radiator
hose
.
If
the
hose
is
hot
to
the
touch,
the
coolant
is
probably
circulating
cor-
rectly
.
If
there
are
any
cool
areas
in
the
hose
or
radiator,
cool-
ant
flow
to
the
radiator
is
probably
restricted
.
Check
for
a
faulty
thermostat
or
aplugged
radiator
.
NOTE-
A
thermostat
that
is
stuck
open
will
cause
the
engine
to
warmup
slowly
and
run
belownormal
temperature
at
highway
speed
.
A
thermostat
that
is
stuck
closed
will
re-
strict
coolant
flow
to
the
radiator
and
cause
overheating
.
RADIATOR
AND
COOLING
SYSTEM
170-
3
U
.¡ig
.v
Fig
.
2
.
Temperature
gauge
sender
on
M44
engine
.
Temperature
gauge
sender
location
is
similar
on
al]
engines
.
In
early
models,
the
engine
coolant
temperature
(ECT)
sen-
sor
for
the
fuel
injection
and
the
coolant
temperature
gauge
sender
are
located
side
by
side
.
Table
a
.
Coolant
Temperature
Sensor
Wire
Colors
Function
Sensor
Terminal
Wire
colors
location
number
Two
sensors
:
Temperature
Rear
1
Brown/violet
gauge
sender
2
Brown/yellow
ECT
sensor
Front
1
Brown/red
2
Brown
or
Brown/black
One
sensor
:
Temperature
Dual
1
Brown/yellow
gauge
sender
sensor
2
Brown/violet
ECT
sensor
3
Brown/red
4
Brown/black
or
Grey/black
TROUBLESHOOTING
Page 198 of 759
170-
4
RADIATOR
AND
COOLING
SYSTEM
A
quick
testat
the
coolant
temperature
gauge
sender
can
The
auxiliary
cooling
fan
comes
on
when
coolant
tempera
determine
if
the
gauge
is
functioning
correctly
.
ture
exceeds
a
predetermined
leve¡
or
whenever
the
air
condi-
tioning
is
on
.
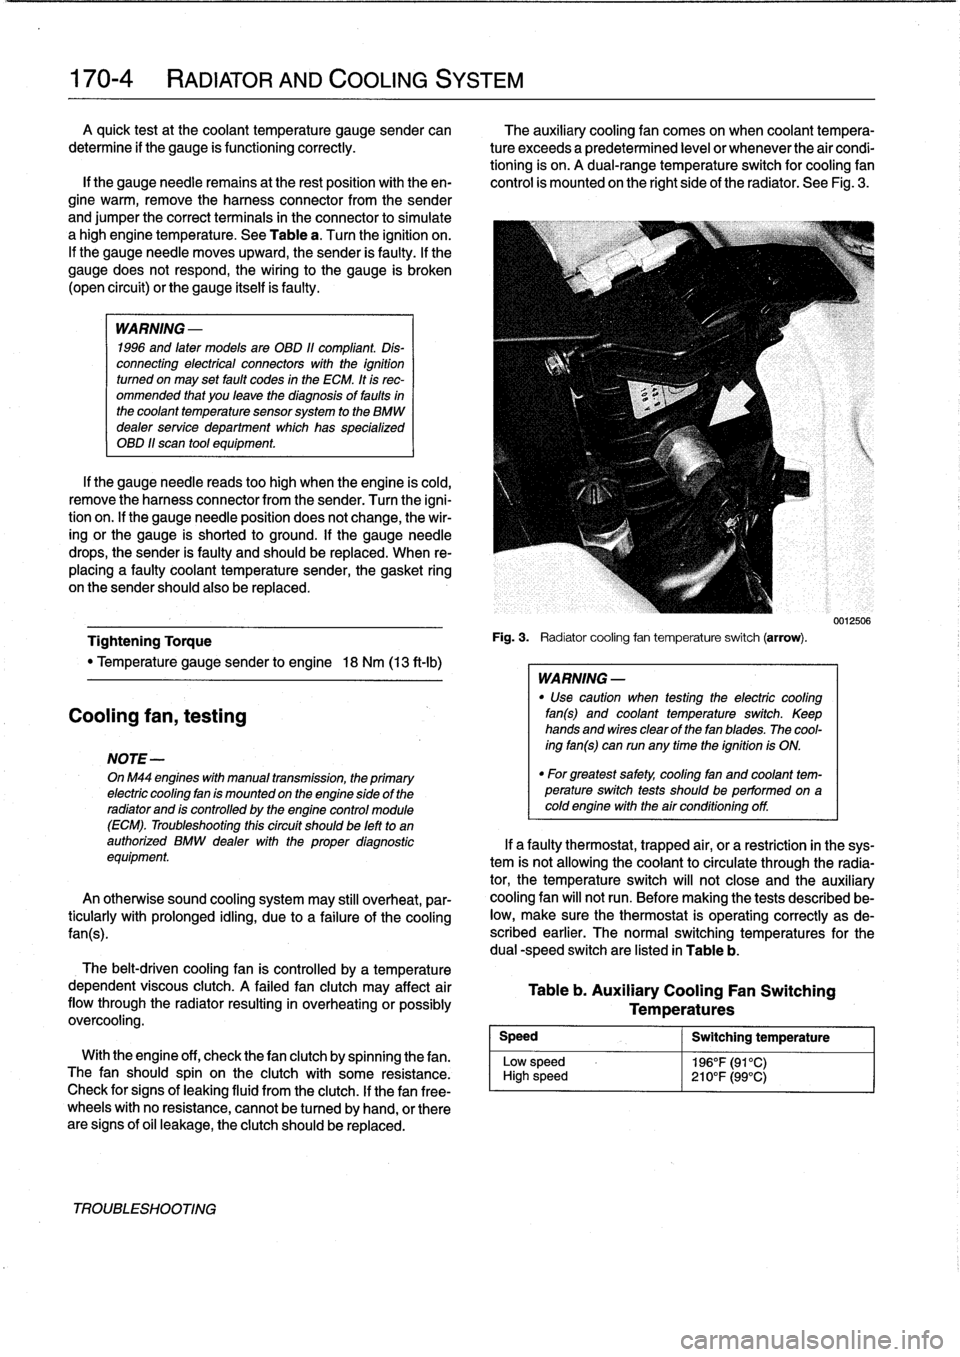
A
dual-range
temperature
switch
for
cooling
fan
lf
the
gauge
needie
remains
at
the
rest
position
with
theen-
control
is
mounted
on
the
right
side
of
the
radiator
.
See
Fig
.
3
.
gine
warm,
remove
the
harness
connector
from
the
sender
and
jumper
the
correct
terminals
in
the
connector
to
simulate
a
high
engine
temperature
.
See
Table
a
.
Turn
the
ignition
on
.
If
the
gauge
needle
moves
upward,
the
sender
is
faulty
.
If
the
gauge
does
not
respond,
the
wiring
to
the
gauge
is
broken
(open
circuit)
or
the
gauge
itselfis
faulty
.
WARNING
-
1996
and
laten
models
are
OBD
11
compliant
.
Dis-
connecting
electrical
connectors
wíth
the
ignition
turned
on
may
set
fault
codes
in
the
ECM
.
It
is
rec-
ommended
that
you
leave
the
diagnosis
of
faults
in
the
coolant
temperature
sensorsystem
to
the
BMW
dealer
service
department
which
has
specialized
OBD
11
scan
tool
equipment
.
If
the
gauge
needle
reads
too
high
when
the
engine
is
cold,
remove
the
harness
connector
from
the
sender
.
Turn
the
igni-
tion
on
.
lf
the
gauge
needle
position
does
not
change,
the
wir-
ing
or
the
gauge
is
shorted
to
ground
.
If
the
gauge
needle
drops,
the
sender
is
faulty
and
should
be
replaced
.
When
re-
placing
a
faulty
coolant
temperature
sender,
the
gasket
ring
on
the
sender
should
also
be
replaced
.
Tightening
Torque
"
Temperature
gauge
sender
to
engine
18
Nm
(13
ft-Ib)
Cooling
fan,
testing
NOTE-
OnM44
engines
with
manual
transmission,
the
primary
electric
cooling
fan
is
mounted
on
the
engine
side
of
the
radiator
and
is
controlled
by
the
engine
control
module
(ECM)
.
Troubleshooting
thiscircuit
should
be
left
to
an
authorized
BMW
dealer
with
the
proper
diagnostic
equipment
An
otherwise
sound
cooling
system
may
still
overheat,
par-
ticularly
with
prolonged
idling,
due
to
a
failure
of
the
coolíng
fan(s)
.
The
belt-driven
cooling
fan
is
controlled
by
a
temperature
dependent
viscous
clutch
.
A
failed
fan
clutch
may
affect
air
flow
through
the
radiator
resulting
in
overheating
orpossibly
overcooling
.
Speed
Low
sp
High
s
With
the
engine
off,
check
thefan
clutch
by
spinning
thefan
.
eed
The
fan
should
spin
on
the
clutch
with
some
resistance
.
peed
Check
for
signs
of
leaking
fluid
from
the
clutch
.
If
thefan
free-
wheels
with
no
resistance,
cannot
be
tu
rned
by
hand,
or
there
are
signs
of
oil
leakage,
the
clutch
should
be
replaced
.
TROUBLESHOOTING
Fig
.
3
.
Radiatorcooling
fan
temperature
switch
(arrow)
.
WARNING
-
"
Use
caution
when
testing
the
electric
cooling
fan(s)
and
coolant
temperature
switch
.
Keep
hands
and
wires
clear
of
thefan
blades
.
The
cool-
ing
fan(s)
can
run
any
time
the
ignition
is
ON
.
"
For
greatest
safety,
coolíng
fan
and
coolant
tem-perature
switch
tests
shouldbe
performed
on
acoldengine
with
the
air
conditioning
off
.
Table
b
.
Auxiliary
Cooling
Fan
Switching
Temperatures
Switching
temperature
196°F(91°C)
210°F(99°C)
0012506
If
a
faulty
thermostat,
trapped
air,
or
a
restriction
in
the
sys-
tem
is
not
allowing
the
coolant
to
circulate
through
the
radia-
tor,
the
temperature
switch
will
not
close
and
the
auxiliary
cooling
fan
will
not
run
.
Before
making
the
tests
described
be-
low,
make
sure
the
thermostat
is
operating
correctly
as
de-
scribed
earlier
.
The
normal
switching
temperatures
for
the
dual
-speed
switch
are
listed
in
Table
b
.
Page 199 of 759
NOTE-
Some
cars
covered
by
this
manual
may
have
an
alter-
nate
cooling
fan
switchwith
switching
temperatures
of
176%190W
(80%88°C)
.
When
replacing
the
switch
check
theswitching
specifications,
whichshouldbe
stamped
on
the
switch
body
.
1
.
If
coolant
is
circulating
at
normal
operating
tempera-
ture,
but
auxiliary
cooling
fan
does
not
run,
disconnect
connector
from
radiator
temperature
switch
and
make
tests
listed
in
Table
c
.
Table
c
.
Auxiliary
Cooling
Fan
Temperature
Switch
Tests
Wires
jumpered
Test
Test
resuits
conditions
Black/green
(terminal2)
and
Ignition
ON
Fan
runs
on
brown
(terminal
1)
low
speed
Black/gray
(terminal
3)
and
Ignition
ON
Fan
runson
brown
(terminal
I
1)
high
speed
2
.
If
fan
runs
only
when
powered
directly
by
jumpered
connector
and
hot
coolant
is
circulating
through
radia-
tor,
radiator
temperature
switch
is
most
likelyfaulty
.
Use
a
new
sealing
ring
when
replacing
switch
Tightening
Torque
"
Temperature
switch
to
radiator
......
15
Nm
(11
ft-Ib)
3
.
If
auxiliary
fan
does
notrun
when
powered
directly,
check
for
battery
voltage
at
temperature
switch
connec-
tor
(black/green
wire)
with
ignition
on
.
If
battery
voltage
is
not
present,
check
fuses
.
See
610
Electrical
Com-
ponent
Locations
.
RADIATOR
AND
COOLING
SYSTEM
170-
5
~r~nmm
a
00
0
Fig
.
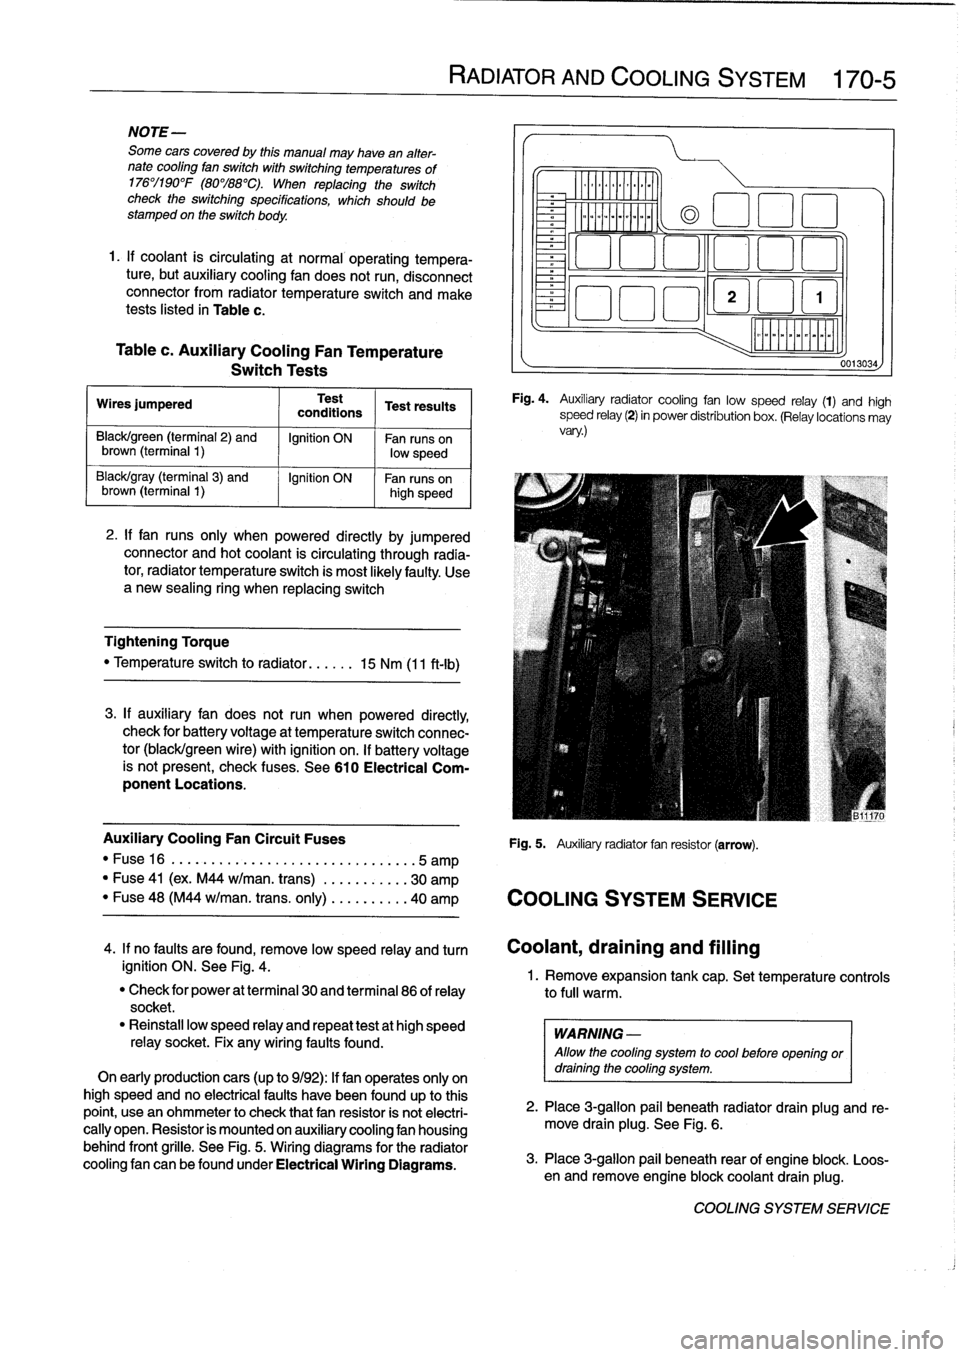
4
.
Auxiliary
radiator
cooling
fan
low
speed
relay
(1)
and
high
speed
relay
(2)
in
power
distribution
box
.
(Relay
locations
may
vary
.)
Auxiliary
Cooling
Fan
Circuit
Fuses
Fig
.
5
.
Auxiliary
radiator
fan
resistor
(arrow)
.
"
Fuse16
.
...................
..
..
...
...
.5
amp
"
Fuse
41
(ex
.
M44
w/man
.
trans)
.
..
.
..
.....
30
amp
"
Fuse
48
(M44
w/man
.
trans
.
only)
..
.
..
.....
40
amp
COOLING
SYSTEM
SERVICE
0013034
4
.
If
no
faults
are
found,
remove
low
speed
relay
and
turn
Coolant,draining
and
filling
ignition
ON
.
See
Fig
.
4
.
1
.
Remove
expansion
tank
cap
.
Set
temperature
controls
"
Check
for
power
at
terminal
30
and
terminal
86
of
relay
to
full
warm
.
socket
.
"
Reinstall
low
speed
relay
and
repeat
testat
high
speed
WARNING
-
relay
socket
.
Fix
any
wiring
faults
found
.
Allow
the
cooling
system
to
cool
before
openlng
or
On
early
productioncars
(up
to
9/92)
:
If
fan
operates
only
on
draining
the
cooling
system
.
high
speed
and
no
electrical
faults
have
been
foundup
to
this
point,
usean
ohmmeter
to
check
that
fan
resistor
is
not
electri-
2
.
Place
3
ra
allo
ug
.
beneath
radiator
drain
plug
and
re-
cally
open
.
Resistor
is
mounted
on
auxiliary
cooling
fan
housing
move
drain
plg
.
See
Fig
.
6
.
behind
front
grille
.
See
Fig
.
5
.
Wiring
diagrams
for
the
radiator
cooling
fan
canbefoundunder
Electrical
Wiring
Diagrams
.
3
.
Place
3-g
pail
beneath
rear
of
engine
blo
.
Loos-
en
and
re
mlon
ove
engine
blockcoolant
drain
plug
k
.
COOLING
SYSTEM
SERVICE
Page 200 of 759
170-6
RADIATOR
AND
COOLING
SYSTEM
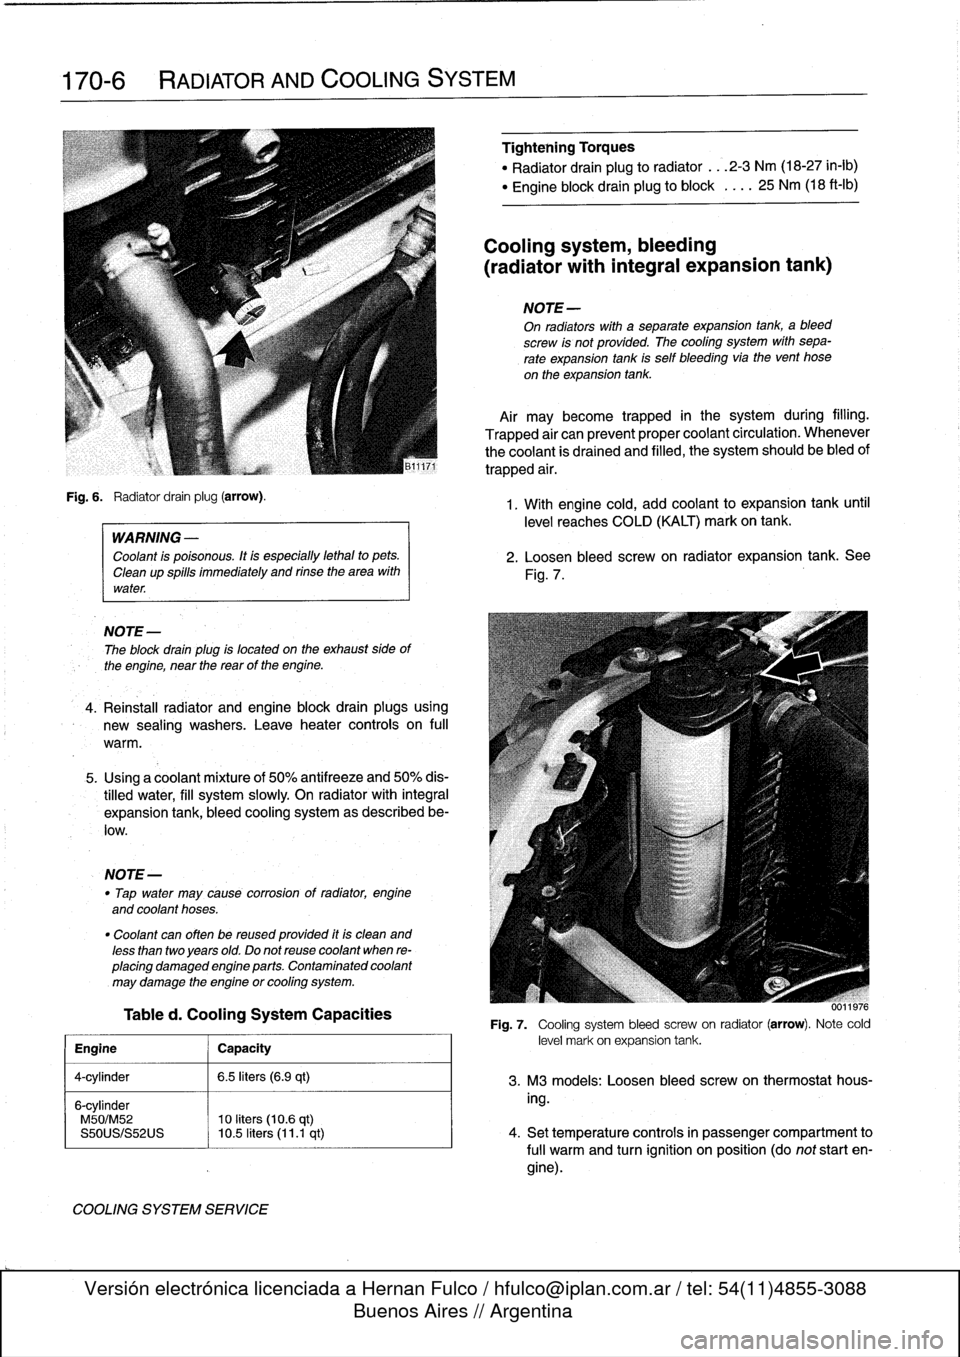
Fig
.
6
.
Radiator
drain
plug
(arrow)
.
WARNING
-
Coolant
is
poisonous
.
Itis
especially
lethal
to
pets
.
Cleanup
spills
immediately
and
rinse
the
area
with
water
.
NOTE
-
The
block
drain
plug
is
located
on
the
exhaust
side
of
the
engine,
near
the
reas
of
the
engine
.
4
.
Reinstall
radiator
and
engine
block
drain
plugsusing
new
sealing
washers
.
Leave
heater
controis
on
full
warm
.
5
.
Using
a
coolantmixture
of
50%
antifreeze
and
50%
dis-
tilled
water,
fill
system
slowly
On
radiator
with
integral
expansion
tank,
bleed
cooling
system
as
described
be-
low
.
NOTE-
"
Tap
water
may
cause
corrosion
of
radiator,
engine
and
coolant
hoses
.
"
Coolant
can
often
be
reused
provided
itis
clean
and
less
than
twoyears
old
.
Do
not
reuse
coolant
when
re-
placing
damaged
engine
parts
.
Contaminated
coolant
may
damage
the
engine
or
cooling
system
.
Tabled
.
Cooling
System
Capacities
Engine
j
Capacity
4-cylinder
1
6
.5
liters
(6.9
qt)
6-cylinder
M50/M52
10
liters
(10
.6
qt)
S50US/S52US
10
.5
liters
(11
.1
qt)
COOLING
SYSTEM
SERVICE
Tightehing
Torques
"
Radiator
drain
plug
to
radiator
...
2-3
Nm
(18-27
in-lb)
"
Engine
block
drain
plug
to
block
.
.
..
25
Nm
(18
ft-Ib)
Cooling
system,
bleeding
(radiator
with
integral
expansion
tank)
NOTE
-
On
radiators
with
a
separate
expansion
tank,
ableed
screw
is
not
provided
.
The
cooling
system
with
sepa-
rate
expansion
tank
is
self
bleeding
via
the
vent
hose
on
the
expansion
tank
.
Air
maybecome
trapped
in
the
system
during
filling
.
Trapped
air
can
prevent
proper
coolant
circulation
.
Whenever
the
coolant
is
drained
and
filled,
the
system
should
be
bled
of
trapped
air
.
1
.
With
engine
cold,
add
coolant
to
expansion
tank
until
level
reaches
COLD
(KALT)
mark
on
tank
.
2
.
Loosen
bleed
screw
on
radiator
expansion
tank
.
See
Fig
.
7
.
0011976
Fig
.
7
.
Cooling
system
bleed
screwon
radiator
(arrow)
.
Note
cold
level
mark
on
expansion
tank
.
3
.
M3
models
:
Loosen
bleed
screw
on
thermostathous-
ing
.
4
.
Set
temperature
controls
in
passenger
compartment
to
fui¡
warm
and
turn
ignition
on
position
(do
not
start
en-
gine)
.