rear main seal BMW M3 1993 E36 User Guide
[x] Cancel search | Manufacturer: BMW, Model Year: 1993, Model line: M3, Model: BMW M3 1993 E36Pages: 759
Page 120 of 759
119-
6
LUBRICATION
SYSTEM
17
.
Raise
engine
as
much
as
possible
.
Check
carefully
for
22
.
Installation
is
reverse
of
removal
.
obstructions,
wiring
harness
clearance
and
pinched
hoses
or
lines
as
engine
is
raised
.
"
When
installing
oil
pan,
apply
a
b
d
of
non-hardening
sealing
compound
(3-Bond
1209
0
or
equivalent)
to
18
.
Remove
oil
pan
mounting
bolts
and
lower
oil
pan
to
front
and
rear
end
cover
seam
areas
on
block
.
subframe
crossmember
.
"
Position
oil
pump
pickup
tube
and
oil
pan
onto
block
and
install
pickup
tube
using
a
new
gasket
.
"
Be
sure
tab
on
gasket
faces
down
towards
intake
of
NOTE-
pickup
tube
.
If
the
oil
pan
does
not
separate
easily
from
the
engine
"
Tightenforward
oil
pan
screws
first,
then
tighten
rear
.
cylinder
block,
afew
taps
with
arubber
mallet
should
"
Fill
engine
with
oil
as
described
in
020
Maintenance
break
it
free
.
Do
not
pry
the
oil
pan
loose
.
Program
.
"
After
adding
engine
oil,
start
and
run
engine
.
Raise
en-
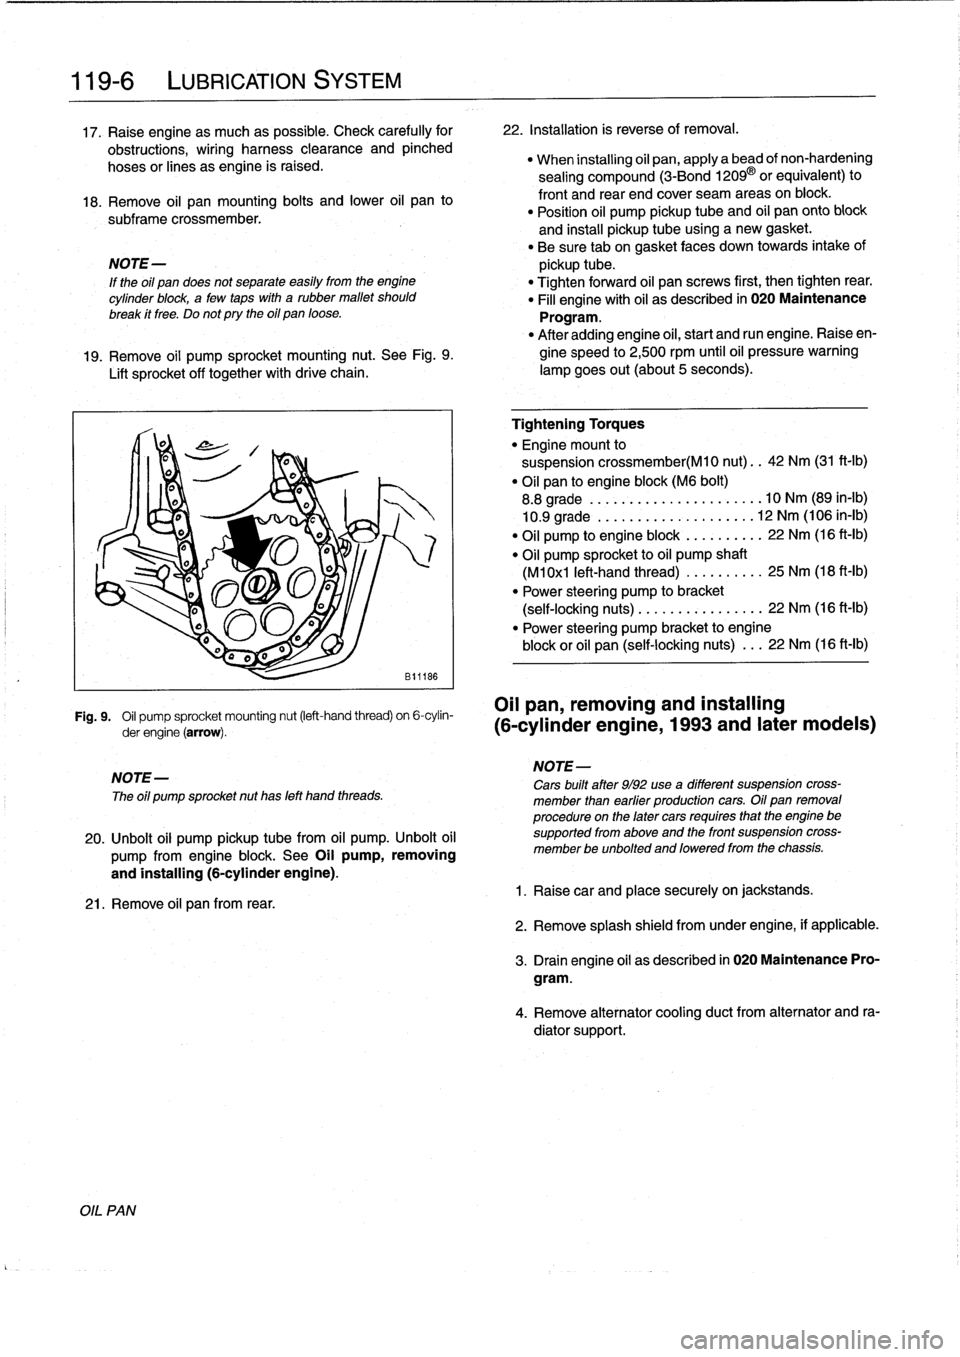
19
.
Remove
oil
pump
sprocket
mounting
nut
.
See
Fig
.
9
.
gine
speed
to
2,500
rpm
until
oil
pressure
warning
Lift
sprocket
off
together
with
drive
chain
.
lampgoes
out(about
5seconds)
.
Fig
.
9
.
Oil
pump
sprocket
mounting
nut
(left-hand
thread)
on
6-cylin-
OII
pan,
removing
and
installing
derengine(arrow)
.
(6-cylinder
engine,
1993
and
later
modeis)
NOTE-
The
oíl
pump
sprocket
nut
has
left
hand
threads
.
20
.
Unbolt
oil
pump
pickup
tubefrom
oil
pump
.
Unbolt
oil
pump
from
engine
block
.
See
Oil
pump,
removing
and
installing
(6-cylinder
engine)
.
21
.
Remove
oil
pan
from
rear
.
Tightening
Torques
"
Engine
mount
to
suspension
crossmember(M10
nut)
..
42
Nm
(31
ft-Ib)
"
Oil
pan
to
engine
block
(M6
bolt)
8
.8
grade
....
..
.
...
...
.
........
10
Nm
(89
in-lb)
10
.9
grade
.
.
..
.
..
...
.
.
.
.
.
.....
12
Nm
(106
in-lb)
"
Oil
pump
to
engine
block
.
...
...
.
..
22
Nm
(16
ft-Ib)
"
Oil
pump
sprocket
to
oil
pump
shaft
(M1
0x1
left-hand
thread)
...
..
.
.
..
.
25
Nm
(18
ft-Ib)
"
Power
steering
pump
to
bracket
(self-locking
nuts)
.....
.
....
..
.
...
22
Nm
(16
ft-lb)
"
Power
steering
pump
bracket
to
engine
block
or
oil
pan
(self-locking
nuts)
.
..
22
Nm
(16
ft-Ib)
NOTE-
Cars
built
after
9/92
use
a
different
suspension
cross-
member
¡han
earfier
productíon
cars
.
Oil
pan
removal
procedure
on
the
later
cars
requíres
that
the
engine
be
supported
from
aboye
and
the
front
suspension
cross-
member
be
unbolted
and
loweredfrom
the
chassis
.
1
.
Raisecar
and
place
securely
on
jackstands
.
2
.
Remove
splash
shield
fromunder
engine,
if
applicable
.
3
.
Drain
engine
oil
as
descríbed
in
020
Maintenance
Pro-
gram
.
4
.
Remove
alternator
cooling
duct
from
alternator
and
ra-
diator
support
.
Page 122 of 759
119-
8
LUBRICATION
SYSTEM
17
.
Installation
is
reverse
of
removal
.
"
Thoroughly
clean
all
old
gasket
material
from
mating
surtaces
anduse
a
new
gasket
.
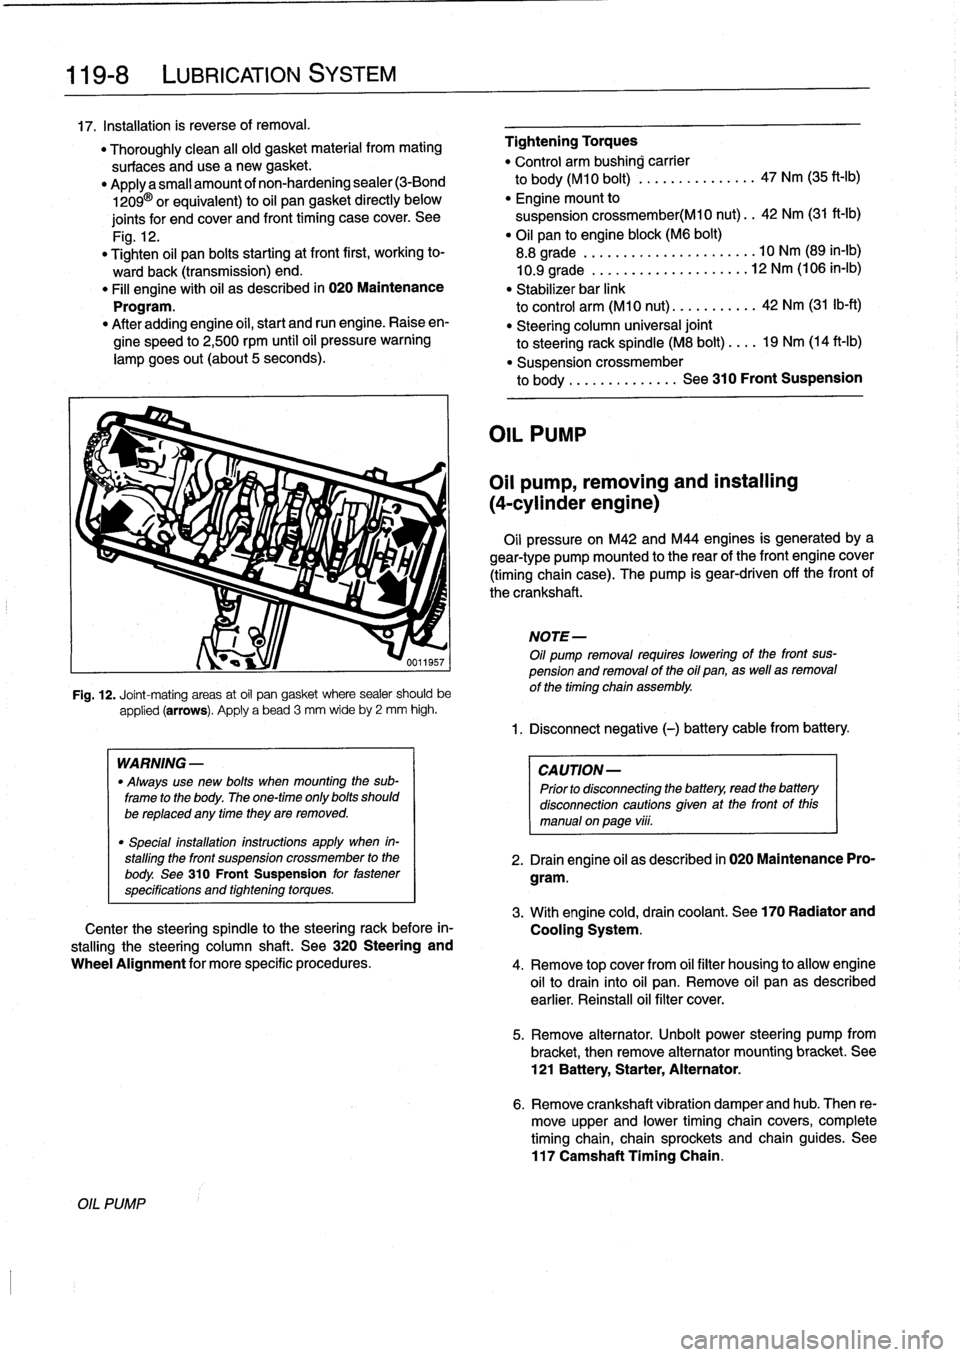
"
Applya
small
amount
of
non-hardening
sealer
(3-Bond
1209
0
or
equivalent)
to
oil
pan
gasket
directly
below
joints
for
and
cover
and
front
timing
case
cover
.
See
Fig
.
12
.
"
Tighten
oil
pan
bolts
starting
at
front
first,
working
to-
wardback
(transmission)
end
.
"
Fill
engine
with
oil
as
described
in
020
Maintenance
Program
.
"
After
addingengine
oil,
start
and
run
engine
.
Raiseen-
gine
speed
to
2,500
rpm
until
oíl
pressure
warning
lampgoes
out
(about
5seconds)
.
OIL
PUMP
applied
(arrows)
.
Apply
a
bead
3
mm
wideby
2
mm
high
.
WARNING
-
"
Always
use
new
bolts
when
mounting
the
sub-
frame
to
the
body
.
The
one-time
only
bolts
should
be
replaced
any
timethey
are
removed
.
"
Special
installation
instructions
apply
when
in-
stalling
the
front
suspension
crossmember
to
the
body
.
See
310
Front
Suspension
for
fastener
specifications
and
tightening
torques
.
Fig
.
12
.
Joint-mating
areas
at
oil
pan
gasket
where
sealer
should
be
Center
the
steering
spindle
to
the
steering
rack
before
in-
stalling
the
steering
column
shaft
.
See
320
Steering
and
Wheel
Alignment
for
more
specific
procedures
.
Tightening
Torques
"
Control
arm
bushing
carrier
to
body
(M10
bolt)
...............
47
Nm
(35
ft-Ib)
"
Engine
mount
to
suspension
crossmember(M10
nut)
..
42
Nm
(31
ft-Ib)
"
Oil
pan
to
engine
block
(M6
bolt)
8
.8
grade
...........
.......
....
10
Nm
(89
in-lb)
10
.9
grade
...........
..
...
...
.
12
Nm
(106
in-lb)
"
Stabilizer
bar
link
to
control
arm
(M10
nut)
.......
....
42
Nm
(31
Ib-ft)
"
Steering
column
universal
joint
to
steering
rack
spindle
(M8
bolt)
....
19
Nm
(14
ft-Ib)
"
Suspensíon
crossmember
to
body
...
...
.
...
..
.
.
See
310
Front
Suspension
OIL
PUMP
Oil
pump,
removing
and
installing
(4-cylinder
engine)
Oil
pressure
on
M42
and
M44
engines
is
generatedbya
gear-type
pump
mounted
to
the
rear
of
the
front
engine
cover
(timing
chaincase)
.
The
pump
is
gear-driven
off
the
front
of
the
crankshaft
.
NOTE-
Oil
pump
removal
requires
lowering
of
the
front
sus-
pension
and
removal
of
the
oil
pan,
as
well
asremoval
of
the
timing
chain
assembly
.
1
.
Disconnect
negative
(-)
battery
cable
from
battery
.
CAUTION-
Prior
to
disconnectiog
the
battery,
read
the
battery
disconnection
cautions
given
at
the
front
of
this
manual
on
paga
vÍii
.
2
.
Drain
engine
oil
as
described
in
020
Maintenance
Pro-
gram
.
3
.
Withengine
cold,
drain
coolant
.
See
170
Radiator
and
Cooling
System
.
4
.
Remove
top
cover
from
oil
filter
housing
to
allow
engine
oil
to
drain
into
oil
pan
.
Remove
oil
pan
as
described
earlier
.
Reinstall
oil
filter
cover
.
5
.
Remove
alternator
.
Unbolt
power
steering
pump
from
bracket,
then
remove
alternator
mountíng
bracket
.
See
121
Battery,
Starter,
Alternator
.
6
.
Remove
crankshaft
vibration
damper
andhub
.
Then
re-
move
upper
and
lower
timing
chain
covers,
complete
timingchain,
chain
sprockets
and
chain
guides
.
See
117
Camshaft
Tíming
Chain
.
Page 172 of 759
130-26
FUEL
INJECTION
Throttle
position
sensor
(TPS),
replacing
The
throttie
position
sensor
is
located
on
the
side
of
the
throttie
housing
.
See
Fig
.
40
.
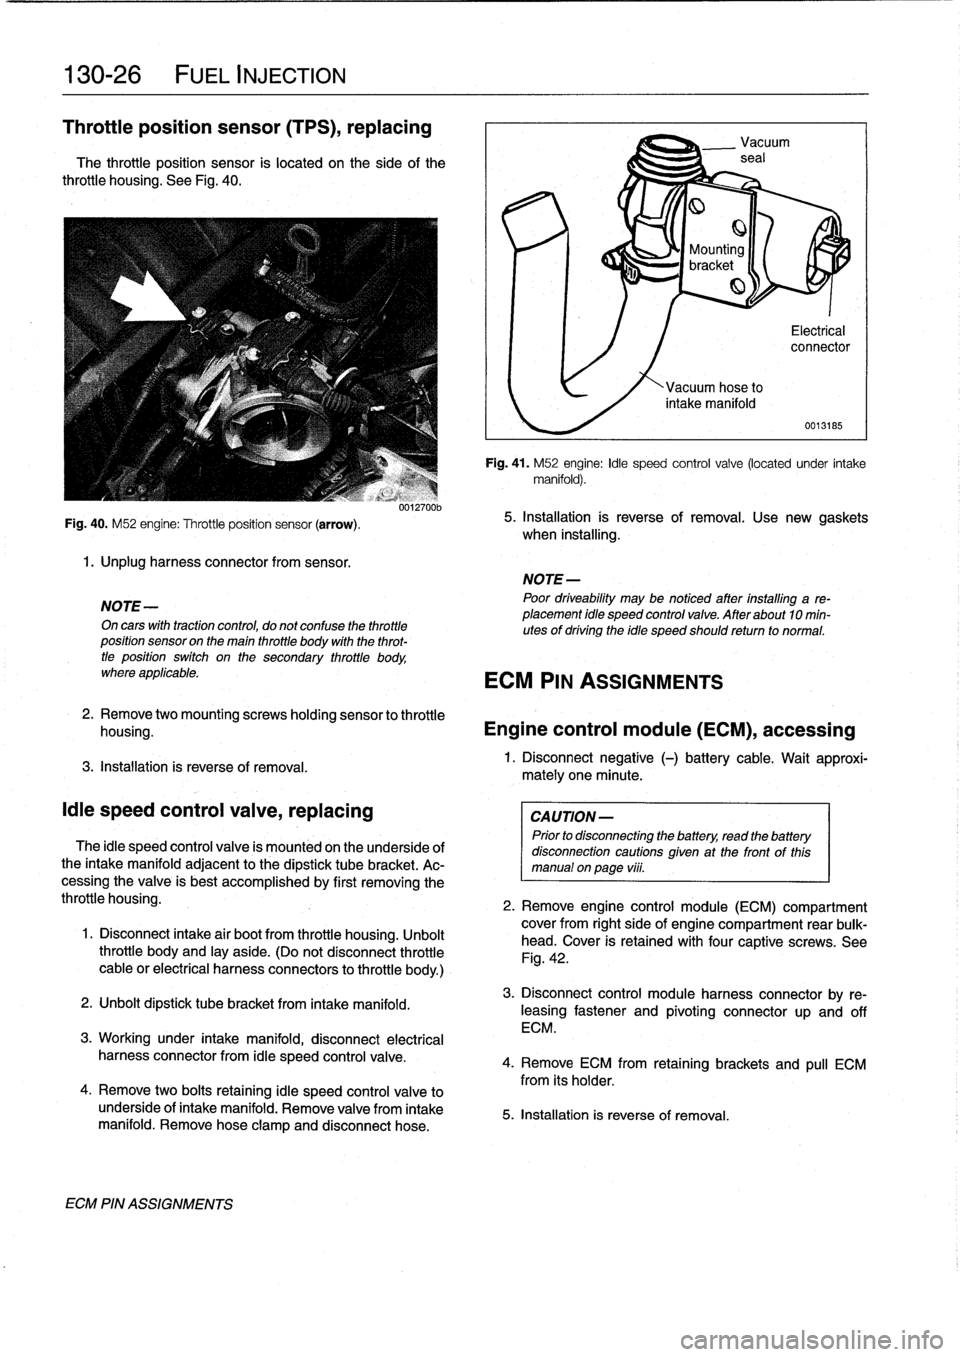
Fig
.
40
.
M52
engine
:
Throttle
position
sensor
(arrow)
.
1
.
Unplug
harness
connector
from
sensor
.
NOTE
-
On
cars
with
tractioncontrol,
do
not
confuse
the
throttieposition
sensor
on
the
main
throttie
body
wíth
the
throt-
tie
position
switch
on
the
secondary
throttie
body,
where
applicable
.
3
.
Installation
is
reverse
of
removal
.
¡die
speed
control
valve,
replacing
0012700b
The
¡die
speed
control
valve
is
mounted
on
the
underside
of
the
intake
manifoldadjacent
to
the
dipstick
tube
bracket
.
Ac-
cessing
the
valve
is
best
accomplished
by
first
removing
the
throttie
housing
.
1
.
Disconnect
intake
air
bootfrom
throttie
housing
.
Unbolt
throttie
body
and
¡ay
aside
.
(Do
not
disconnect
throttie
cable
or
electrical
harness
connectors
to
throttie
body
.)
2
.
Unbolt
dipstick
tube
bracket
from
intakemanifold
.
3
.
Workíng
under
intake
manifold,
disconnect
electrical
harness
connector
from
¡die
speed
control
valve
.
4
.
Remove
two
bolts
retaining
¡die
speed
control
valve
to
underside
of
intake
manifold
.
Remove
valve
from
intake
manifold
.
Remove
hose
clamp
and
disconnect
hose
.
ECM
PIN
ASSIGNMENTS
mately
one
minute
.
Vacuum
seal
Mounting
bracket
Electrical
connector
0013185
Fig
.
41
.
M52
engine
:
¡die
speed
control
valve
(located
under
intake
manifold)
.
5
.
Installation
ís
reverse
of
removal
.
Use
new
gaskets
when
installing
.
NOTE
-
Poor
driveabilíty
may
be
noticed
atter
installing
a
re-
placement
idle
speed
control
valve
.
After
about
10
min-utes
of
dríving
the
idle
speed
should
return
to
normal
.
ECM
PIN
ASSIGNMENTS
2
.
Remove
twomountingscrews
holding
sensor
to
throttie
housing
.
Engine
control
module
(ECM),
accessing
1
.
Disconnect
negative
(-)
battery
cable
.
Wait
approxi-
CAUTION-
Prior
to
disconnecting
the
battery,
read
the
battery
disconnection
cautions
given
at
the
front
of
this
manual
onpage
vüi
.
2
.
Remove
engine
control
module
(ECM)
compartment
cover
from
right
side
of
engine
compartment
rear
bulk-
head
.
Cover
is
retained
withfour
captíve
screws
.
See
Fig
.
42
.
3
.
Disconnect
control
module
harness
connector
by
re-
leasing
fastener
and
pivoting
connectorup
and
off
ECM
.
4
.
Remove
ECM
from
retaining
brackets
and
pull
ECM
from
its
holder
.
5
.
Installation
is
reverse
of
removal
.
Page 189 of 759
Fuel
leve¡
senders,
testing
Fuel
leve¡
sender
(right
side)
The
left
and
right
fuelleve¡
sending
units
are
wired
in
series
.
and
fuel
pump,
removing
and
installing
The
fuel
gauge
receives
a
signal
that
is
the
average
of
the
two
1
.
Disconnect
negative
(-)
cable
from
battery
.
input
values
.
1
.
Remove
rear
seat
cushion,
lift
up
insulation
mats,
andremove
both
fuel
tank
access
covers
.
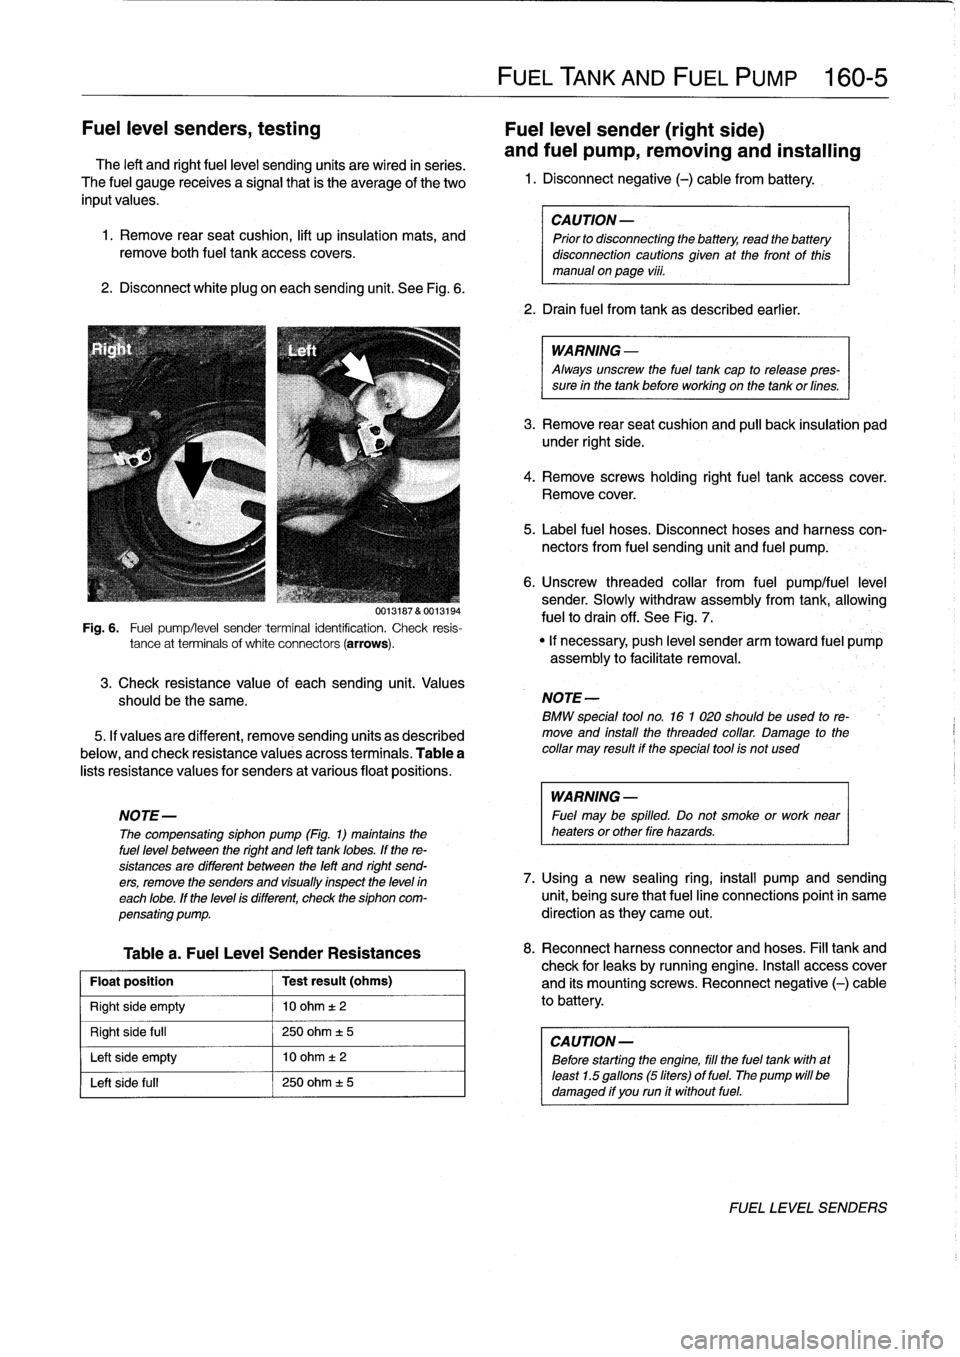
2
.
Disconnect
white
plug
on
each
sending
unit
.
See
Fig
.
6
.
3
.
Check
resistance
value
of
eachsending
unit
.
Values
should
be
the
same
.
5
.
If
valuesare
different,
remove
sending
units
as
described
below,
and
check
resistance
valuésacross
terminals
.
Table
a
lists
resistance
values
for
senders
at
various
float
positions
.
Table
a
.
Fuel
Leve¡
Sender
Resistances
Float
position
Test
result
(ohms)
Right
side
empty
10
ohm
t2
Right
side
full
250
ohm
±
5
Left
side
empty
10
ohm
t
2
Left
side
fui¡
250
ohm
±
5
FUEL
TANK
AND
FUEL
PUMP
160-
5
CAUTION
-
Prior
to
disconnecting
the
battery,
read
the
battery
disconnection
cautionsglven
at
the
front
of
this
manual
onpage
viii
.
2
.
Drain
fuel
from
tank
as
described
earlier
.
WARNING
-
Always
unscrew
the
fuel
tank
cap
to
release
pres-
sure
in
the
tank
before
working
on
the
tank
or
fines
.
3
.
Remove
rear
seat
cushion
and
pull
back
insulation
pad
under
right
side
.
4
.
Remove
screws
holding
rightfuel
tank
accesscover
.
Remove
cover
.
5
.
Label
fuel
hoses
.
Disconnect
hoses
and
harness
con-
nectors
from
fuel
sending
unit
and
fuel
pump
.
6
.
Unscrew
threaded
collar
from
fuel
pumplfuel
leve¡
sender
.
Slowly
withdraw
assembly
from
tank,allowing
fuelto
drain
off
.
See
Fig
.
7
.
0013187
&
0013194
Fig
.
6
.
Fuel
pump/leve¡
sender
terminal
identification
.
Check
resis-
tance
at
terminals
of
white
connectors
(arrows)
.
"
If
necessary,
push
leve¡
sender
arm
toward
fuel
pump
assembly
to
facilitate
removal
.
NOTE
-
BMW
special
tool
no
.
16
1
020
should
beused
to
re-
move
and
install
the
threaded
collar
.
Damage
to
the
collar
may
result
if
the
special
tool
is
not
used
WARNING
-
NOTE-
Fuel
may
be
spilled
.
Do
not
smoke
or
work
near
The
compensating
siphon
pump
(Fig
.
1)
maintains
the
heaters
or
other
fire
hazards
.
fuel
leve¡
between
the
right
and
left
tank
lobes
.
If
the
re-
sistances
are
different
between
the
left
and
right
send-
ers,
remove
the
senders
and
visually
inspect
the
leve)
in
7
.
Using
a
new
sealing
ring,
install
pump
and
sending
each
lobe
.
If
the
leve¡
is
different,
check
the
siphon
com-
unit,
being
sure
that
fuel
line
connections
point
in
same
pensating
pump
.
direction
as
they
carne
out
.
8
.
Reconnect
harnessconnector
and
hoses
.
Fill
tank
and
check
for
leaks
by
running
engine
.
Insta¡¡
access
cover
and
its
mountingscrews
.
Reconnect
negative
(-)
cable
to
battery
.
CAUTION
-
Before
starting
the
engine,
fill
the
fuel
tank
with
at
least
1
.5
gallons
(5liters)
of
fuel
.
The
pump
will
be
damaged
if
you
run
it
without
fuel
.
FUEL
LEVEL
SENDERS
Page 277 of 759
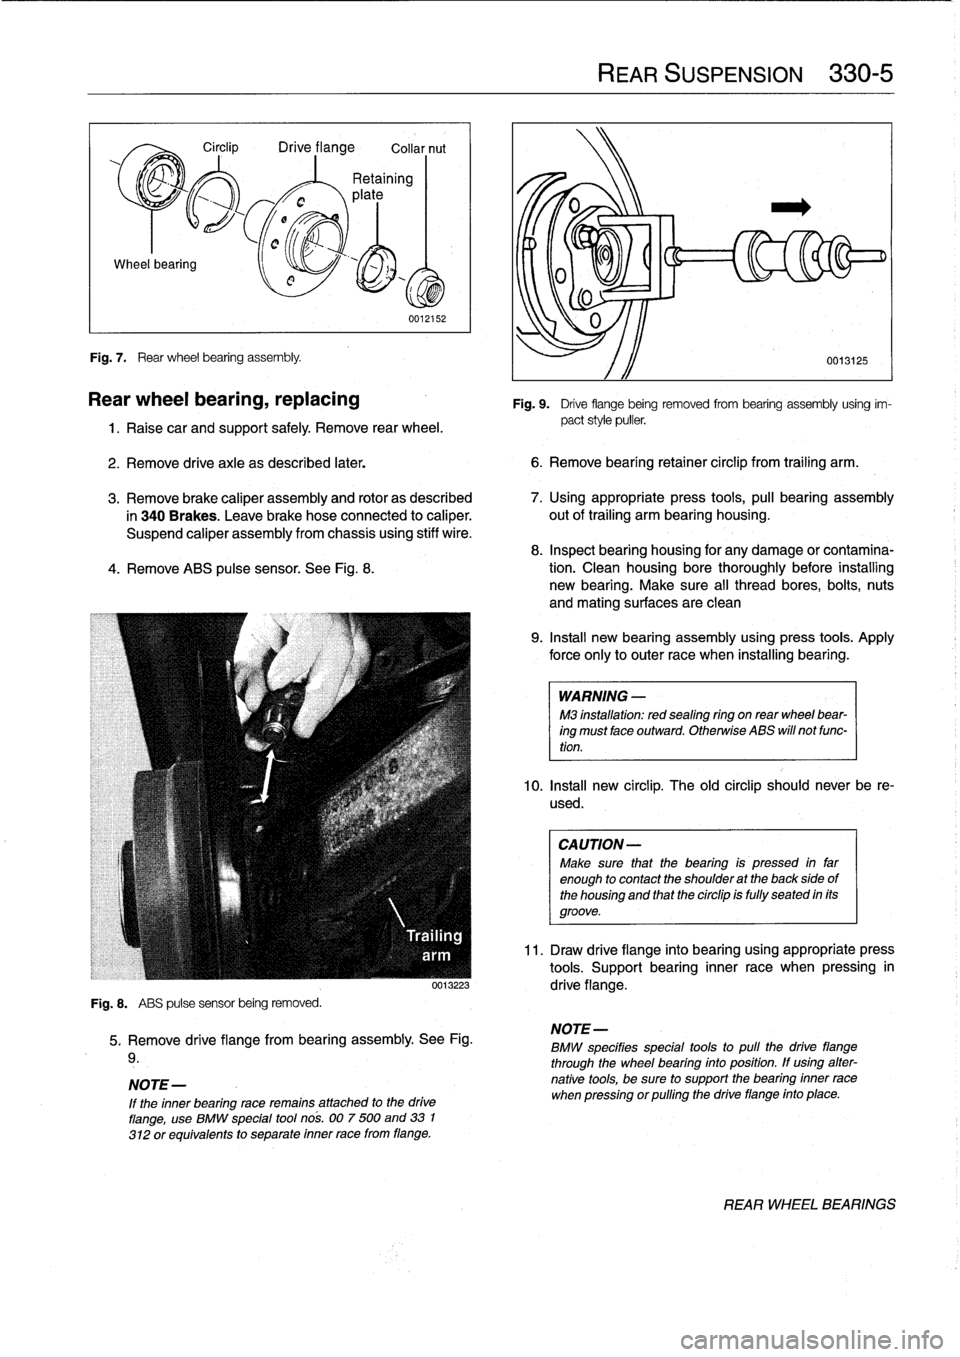
Wheel
bearing
Fig
.
7
.
Rear
wheel
bearing
assembly
.
Circlip
Drive
flange
Collar
nut
0012152
Rear
wheel
bearing,
replacing
1
.
Raise
car
and
support
safely
.
Remove
rear
wheel
.
2
.
Remove
drive
axle
as
described
later
.
6
.
Remove
bearíng
retainer
circlip
from
trailing
arm
.
3
.
Remove
brake
caliper
assembly
and
rotor
as
described
7
.
Using
appropriate
press
tools,
pull
bearing
assembly
in
340
Brakes
.
Leave
brake
hose
connected
to
caliper
.
out
of
trailing
arm
bearing
housing
.
Suspend
caliper
assembly
from
chassís
using
stiff
wire
.
8
.
Inspect
bearing
housing
for
any
damage
or
contamina
4
.
Remove
ABS
pulse
sensor
.
See
Fig
.
8
.
tion
.
Clean
housing
bore
thoroughly
before
installing
new
bearing
.
Make
sure
al¡
thread
bores,
bolts,
nuts
and
mating
surfaces
are
clean
Fig
.
8
.
ABS
pulse
sensor
being
removed
.
5
.
Remove
drive
flange
from
bearing
assembly
.
See
Fig
.
9
.
NOTE-
If
the
inner
bearing
race
remains
attached
to
the
drive
flange,
use
BMW
special
tool
nos
.
007
500
and
33
1
312
or
equivalents
to
separate
inner
race
from
flange
.
REAR
SUSPENSION
330-
5
0013125
Fig
.
9
.
Drive
flange
being
removed
from
bearing
assembly
using
im-
pact
style
puller
.
9
.
Install
new
bearing
assembly
using
press
tools
.
Apply
force
only
to
outer
race
when
installing
bearing
.
WARNING
-
M3
installation
:
redsealing
ríng
on
rear
wheel
bear-
ing
must
face
outward
.
Otherwíse
ABS
will
not
func-
tion
.
10
.
Insta¡¡
new
circlip
.
The
old
circlip
should
never
be
re-
used
.
CAUTION-
Make
sure
that
the
bearing
is
pressed
in
far
enough
to
contact
the
shoulder
at
the
back
sideof
the
housing
and
that
the
circlip
is
fully
seated
in
its
groove
.
11
.
Draw
drive
flange
into
bearing
using
appropriate
press
tools
.
Support
bearing
inner
race
when
pressing
in
0013223
drive
flange
.
NOTE-
BMW
specifies
special
tools
to
pull
the
drive
fiange
through
the
wheel
bearing
into
position
.
If
using
alter-
native
tools,
be
sure
to
support
the
bearing
inner
race
when
pressing
orpulling
the
drive
flange
finto
place
.
REARWHEEL
BEARINGS
Page 377 of 759
Convertible
top
drive
motor,
replacing
5
.
Working
in
convertible
top
storage
compartment
be-
hind
driver's
seat,
remove
convertible
top
linkage
rods
1
.
Open
convertible
top
partially,
stopping
when
convert-
from
top
of
motor
.
Refer
to
Fig
.
11
.
ible
top
lid
is
fully
upen
.
Remove
lid
.
2
.
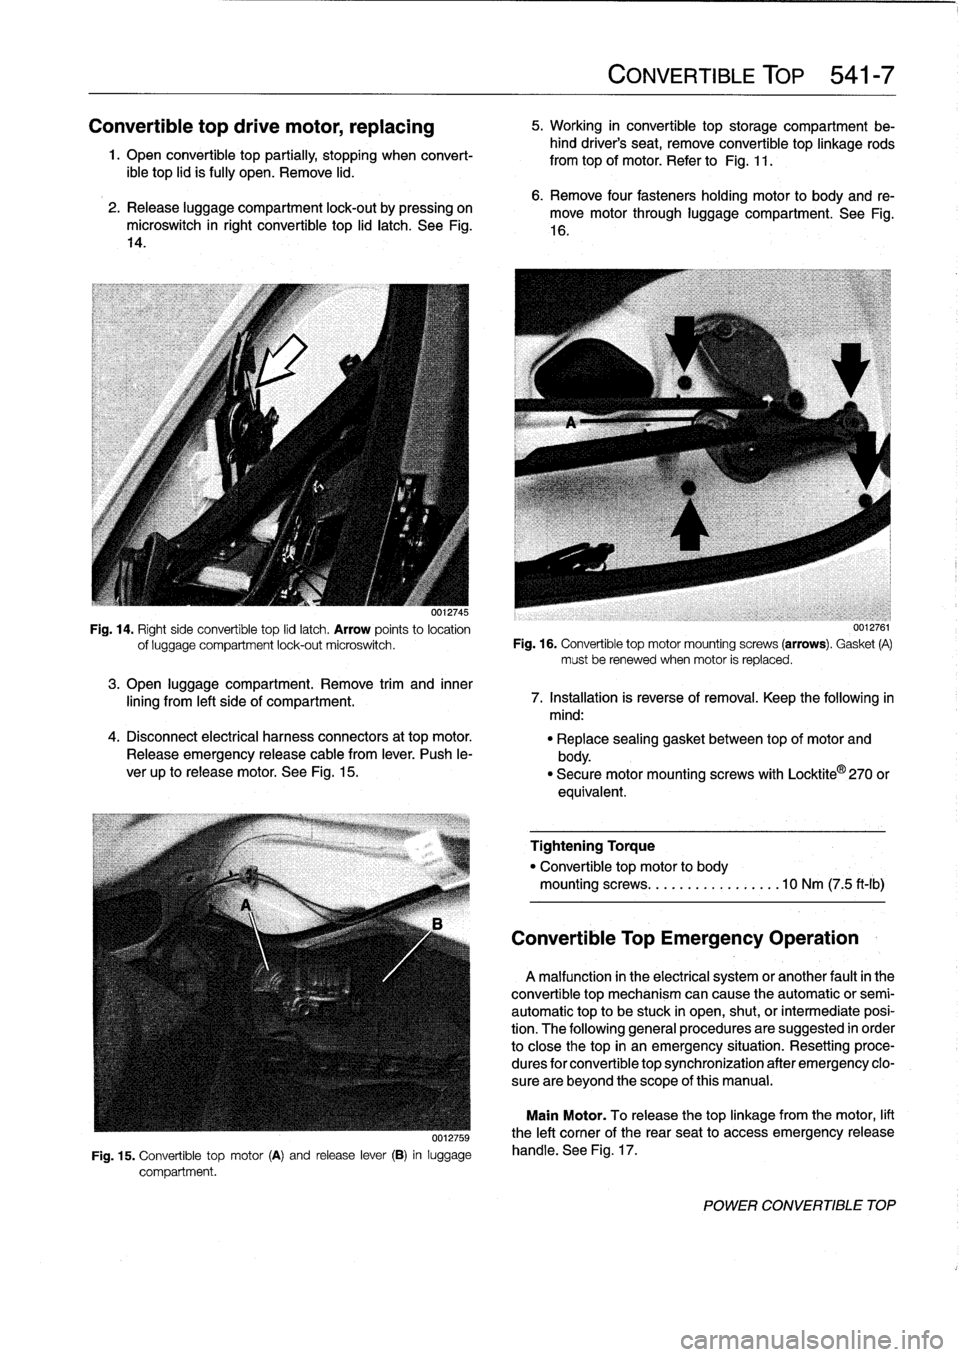
Release
luggage
compartment
lock-out
by
pressing
on
microswitch
in
right
convertible
top
lid
latch
.
See
Fig
.
14
.
0012745
Fig
.
14
.
Rightside
convertible
top
lid
latch
.
Arrow
points
to
location
of
luggage
compartment
lock-out
microswitch
.
3
.
Open
luggage
compartment
.
Remove
trim
and
inner
lining
from
left
side
of
compartment
.
4
.
Disconnect
electrical
harness
connectors
at
top
motor
.
Release
emergency
release
cable
from
lever
.
Push
le-
ver
up
to
release
motor
.
See
Fig
.
15
.
uu12759
Fig
.
15
.
Convertible
top
motor
(A)
and
release
lever
(B)
in
luggage
compartment
.
CONVERTIBLE
TOP
541-
7
6
.
Remove
four
fastenersholding
motor
to
body
and
re-
move
motor
through
luggage
compartment
.
See
Fig
.
16
.
0012761
Fig
.
16
.
Convertible
top
motor
mountingscrews
(arrows)
.
Gasket
(A)
mustbe
renewed
when
motor
is
replaced
.
7
.
Installation
is
reverse
of
removal
.
Keep
the
following
in
mind
:
"
Replace
sealing
gasket
between
top
of
motor
and
body
.
"
Securemotormountingscrews
with
Locktite
®
270
or
equivalent
.
Tightening
Torque
"
Convertible
top
motor
to
body
mountingscrews
...
...
.
.
.........
10
Nm
(7
.5
ft-Ib)
Convertible
Top
Emergency
Operation
A
malfunction
in
the
electrical
system
or
another
fault
in
the
convertible
top
mechanism
can
cause
the
automatic
or
semi-
automatic
top
to
be
stuck
in
open,
shut,
or
intermediate
posi-
tion
.
The
following
general
procedures
are
suggested
in
order
to
close
the
top
in
an
emergency
situation
.
Resetting
proce-
dures
for
convertible
top
synchronization
after
emergency
clo-
sure
are
beyond
the
scope
of
this
manual
.
Main
Motor
.
To
release
thetop
linkage
from
the
motor,
lift
the
left
comer
of
the
rearseat
to
access
emergency
release
handle
.
See
Fig
.
17
.
POWER
CONVERTIBLE
TOP
Page 751 of 759
2
INDEX
Brakes
(cont
.)
pressure
bleeding
brakes
(except
cars
wíth
AST)
340-3
troubleshooting
340-1
Brushes,
alternator
See
Battery,
starter,
alternator
Bulbs
See
Exterior
lighting
See
also
Instruments
Bumpers
See
Exterior
trim,
bumpers
C
CamberSee
Steering
and
wheel
alignment
Camshaft
See
Cylinder
head
and
valvetrain
Camshaft
position
sensor
See
Ignition
system
Camshaft
timing
chain
general
information
117-1
camshaft
timingchain,
4-cylinder
117-
2
camshaft
timing
chains,6-cylinder
117-6
camshaft
timing
chain,
removing
(4-cylinder
engines)
117-2
camshaft
timing
chains,
removing
(6-cylinder
engines)
117-7vanos
(variable
valve
timing)
117-14
control
unit,
removing
117-16system
operation,
testing
117-14
Caster
See
Steering
andwheel
alignment
Catalytic
convertor
See
Exhaustsystem
Cautions
viü
Center
bearing
See
Driveshaft
Center
console
See
interior
trim
Central
body
electronics
(ZKE
IV)
515-8
Central
locking
system
(ZVM)
515-7
Centrallocking
and
anti-theft
general
information
515-1
door
handles
and
Iocks
515-1
door
striker,
replacing
515-6
front
door
handle,
removing/
installing
515-3
front
door
lock,
removing/installing
515-1
rear
door
handle,
removing/installing
515-5
rear
door
lock,
removing/installing
515-4
EWS
II
control
module,
replacing
515-10
EWS
II
ring
antenna,
replacing
515-10
EWS
II
transmitter/receiver
module,
replacing
515-11
locking
system
and
electronic
immobilization
515-7
luggage
compartment
locking
actuator,
removing/installing
515-6
Clutch
general
information210-1
clutch
hydraulic
system,
bleeding
and
flushing
210-2
clutch,
inspecting
and
installing
210-5
clutch
master
cylinder,
replacing
210-2
clutch,
removing
210-4
clutch
slave
cylinder,
replacing
210-3
transmission
pilot
bearing,
replacing
210-6
Clutch
fluid
See
Maintenance
program
Coil
See
Ignition
system
Coilspring
See
Rear
suspension
Component
locations
See
Electrical
component
locations
Compressor
See
Air
conditioning
Compressor
clutch
See
Air
conditioning
Condenser
See
Air
conditioningControl
arms
See
Front
suspension
See
also
Rear
suspension
Convertible
top
general
information
541-1
manual
convertible
top
541-1
lid
release
mechanism
541-2
replacing
541-2
visor
latch
541-1
visor
latch
píate
541-1
power
convertible
top
541-2
drive
motor,
replacing
541-7
emergency
operation
541-7
front
latching
mechanism
541-4
lid
541-9
replacing
541-5
visor
latch
541-4
visor
latch
motor541-5
visor
latch
plate
541-4
rollover
protection
system
541-9
Coolant
(Anti-freeze)
See
Maintenance
program
Coolant
pump
See
Cooling
system
Cooling
system
general
information
170-1
cooling
fan,
replacing
170-8
coolant
pump,
replacing
170-10
coolant
pump
and
thermostat170-1
coolant,
draining/filling
170-5
cooling
fans
170-2
cooling
fan,
testing
170-4
cooling
system
service
170-5
cooling
system,
bleeding
(radiator
with
integral
expansion
tank)
170-6
cooling
system
pressure
test
170-3
electric
cooling
fan,
replacing
170-8
radiator,
removing/installing
170-11
Cooling
system
(cont
.)
radiator
and
expansion
tank
170-1
radiator
service
170-11
temperature
gauge
quick
check170-3
thermostat
quick
check
170-3
thermostat,
replacing
170-9
troubleshooting
170-2
warnings
and
cautions
170-2Crankshaft
position/rpm
sensor
See
Ignition
system
Crash
sensor
See
Airbag
system
(SRS)
CV
joint
See
Maintenance
program
See
also
Rear
suspension
Cylinder
head
and
valvetrain
general
information
116-1
camshaft116-7
camshafts,
removing/installing
(M42
engine)
116-1camshafts,
removing/installing
(M44
engine)
116-3
camshafts,
removing/installing
(6-cylinder
engine)
116-4
cylinder
head,
disassembly/assembly
116-1
cylinder
head
and
valvetrain,
reconditioning
116-7
cylinder
head
116-7
hydraulic
cam
followers,
checking
and
replacing
(M42
and
al]
6-cylinder
engines)
116-9
hydraulic
valve
adjusters,
checking
and
replacing
(M44
Engine)
116-8
valve
guides
116-10
valveseats
116-12
valve
springs
116-12
valve
stem
oil
seals
116-11
valves
116-11
valves,
leak
test
116-11
valves,removing/installing
116-6
Cylinder
head
removal
and
installation
general
information
113-1
cylinder
head,
removing/installing
(4-
cylinder
engine)
113-1
cylinder
head
(6-cylinder
engine),
removing/installing
113-10
Dashboard
See
Interior
trim
Deck
lid
See
Trunk
lid
Defogger
See
Heating
Differential
See
Final
drive
DISA
(dual
resonance
intake
system)
See
Fuel
injection
See
also
Engine-general
DME
(digital
motor
electronics)
See
Ignition
system
See
alsoFuel
injection
Page 753 of 759
4
INDEX
Evaporator
See
Air
conditioning
EWS
(Electronic
immobilization
system)
515-8
Exhaust
system
See
also
Maintenance
program
general
information
180-1
exhaust
manifolds,
removingAnstalling
180-5
exhaustsystem,
removing/installing
180-3
Expansion
valve
See
Air
conditioning
Exterior
lighting
general
information
630-1
center
brake
light
housing,
replacing
(4-door
and
coupe
models)
630-5
foglight
assembly,
removing/installing
630-3
front
turn
signal
assembly,
removing/
installing
630-4
headlight
assembly,removing/
installing
630-2
headlight
bulb,
replacing
630-1
license
plate
light,
removing/installing
630-6
side
marker
lights
630-4
taillight
assembly,
removing/installing
630-5
taillight
bulbs,
replacing
630-4
Exterior
trim,
bumpers
general
information
510-1
BMW
embiem,
removing/installing
510-7
body
side
molding,
replacing
-7
bumper
height,
adjusting
510-6
front
bumper,
removing/installing
510-3
front
bumper
impact
absorber,
replacing
510-4
front
panel,
removing/installing
510-7
outside
rear
view
mirrors
510-1
mirror
housing,
removing/installing
510-1
mírror,
removing/installing
510-2
mirror
glass,
replacing
510-1
radiator
grille,
removing/installing
510-7
rear
bumper,
removingfinstalling
510-
4
rear
bumper
impact
absorber,
replacing
510-4
F
Fenders,
engine
hood
general
information
410-1
front
fenders
410-1
front
fender,
removing/installing
410-1
hood
aligning
410-4
hood,
raising
to
service
position
410-2
hood
release
cable
and
latches,
adjusting
410-4
hood,
removing/installing
410-3
Finaldrive
general
information
331-1
final
drive
se
rvice
331-1
flange
oil
sea¡,
replacing
331-2
inputshaft
oil
sea¡,
replacing
331-3
oil,
draining/filling
331-1
oil
seals331-1
removing/installing
331-3
Final
drive
carrier
See
Rear
suspension
Firing
order
See
Ignition
system
Flexdisc
See
DriveshaftFluids
and
lubricants
See
Maintenance
program
Foglight
See
Exterior
lighting
Front
suspension
general
information
310-1
ball
joint
See
outer
control
arm
ball
joint
control
arm,
removing/installing
310-5
control
arm
bushing,
replacing
310-7
control
arms
310-5
front
wheel
bearing,
replacing
310-8
front
wheel
bearings
310-8
outer
control
arm
ball
joint,
replacing
(except
M3)310-6
ride
height
310-4shock
absorbers
and
springs
310-2
stabilizer
bar
310-9
stabilizer
bar,
removing/installing
310-9
strut
assembly,disassembling/
assembling310-4
strut
assembly,
removing/installing
310-2subframe
crossmember
310-9subframe
crossmember,
removing/
installing
310-9
Fuel
injection
general
information
130-2
basic
engine
settings
130-2
principies
of
operatínn
130-2
Bosch
DME
Ml
.7
component
tests
and
repairs
130-14
air
floiv
sensor,testing/replacing
130-14
engine
coolant
temperature
(ECT)
sensor,
testing/replacing
130-15
¡dle
speed
control
valve,
testing/
replacing
130-16
throttle
position
sensor
(TPS),
testing/replacing
130-16
Bosch
DME
M3
.1
and
M3
.3
.1
component
tests
and
repairs
130-17
engine
coolant
temperature
(ECT)
sensor,
testing/replacing
130-18
¡dle
speed
control
valve,
replacing
130-21
¡dle
speed
control
valve,
testing
130-
20
intake
air
temperature
(IAT)
sensor,
testing/replacing
130-19
mass
air
flow
sensor130-17
Bosch
DME
M3
.1
and
M3
.3.1
(cont)
mass
air
flow
sensor
(hot
film)
testing/replacing
130-18
mass
air
flow
sensor
(hot
wire)
testing/replacing
130-17
throttle
position
sensor
(TPS),
testing/replacing
130-19
Bosch
DME
M5
.2
component
replacement
130-21engine
coolant
temperature
(ECT)
sensor,
replacing
130-22
ldle
speed
control
valve,
replacing
130-23
intake
air
temperature
(IAT)
sensor,
replacing
130-22
mass
air
flow
sensor,
replacing
130-
22
throttle
position
sensor
(TPS),
replacing
130-22
DISA
(dual
resonance
intake
system)
130-3
ECM
pin
assignments130-26
electrical
checks
andcomponent
testing
130-7engine
control
module(ECM),
accessing
130-26
fuel
delivery
tests
130-9
fuel
pressure
regulator
response
to
engine
load,
testing
130-11
fuel
pressure
regulator
130-13
fuel
pressure
regulator,
replacing
(fuel
rail
mount)130-13
fuel
pressure
regulator,
replacing
(under
car
mount)130-14
fuel
pump
relay,
testing
130-7
fuel
rail
and
injectors,
checking
130-11
fuel
rail
and
injectors,
replacing
130-
12
fuel
delivery
tests
(cont
.)
operatíng
fuel
pump
for
tests
130-9
relieving
fuel
pressure
and
connecting
fuel
pressure
gauge
130-10
residual
fuel
pressure,
testing
130-10
main
relay,
testing
130-7on-board
diagnostics
(OBD)
and
fault
diagnosis
130-4
oxygen
sensor,
testing
(Bosch
systems
only)
130-8
secondary
air
injection
130-5
Siemens
MS
41
.1
component
replacement
130-23
engine
coolant
temperature
(ECT)
sensor,
replacing
130-25
¡dle
speed
control
valve,
replacing
130-26
lntake
air
temperature
(IAT)
sensor,
replacing
130-25
mass
air
flow
sensor,
replacing
130-
25
throttle
position
sensor
(TPS),
replacing
130-26warnings
and
cautions
130-6
Fuel
filter
See
Maintenance
program
Page 754 of 759
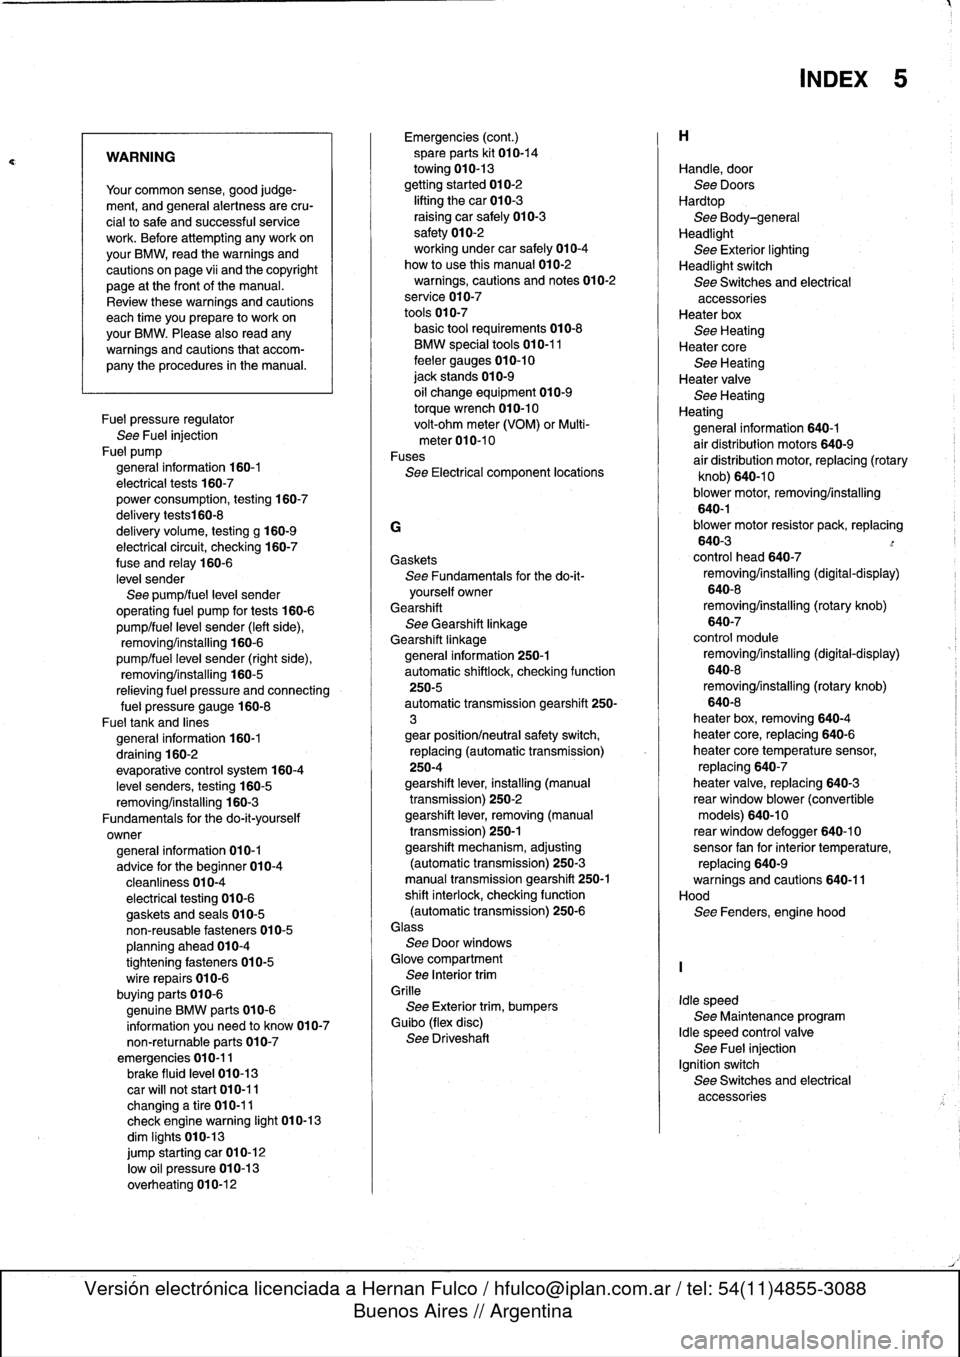
WARNING
Your
common
sense,
good
judge-
ment,
and
general
alertness
are
cru-
cial
tosafe
and
successful
service
work
.
Before
attempting
any
work
on
your
BMW,
read
the
warnings
and
cautions
on
page
vi¡
and
the
copyright
page
at
the
frontof
the
manual
.
Review
these
warnings
and
cautions
each
time
you
prepare
to
work
on
your
BMW
.
Please
also
read
any
warnings
and
cautions
that
accom-
pany
the
procedures
in
the
manual
.
Fuel
pressure
regulator
See
Fuel
injection
Fue]
pump
general
information
160-1
electrical
tests
160-7
power
consumption,
testing
160-7
delivery
tests160-8
delivery
volume,
testing
g
160-9
electrical
circuit,
checking
160-7
fuse
and
relay
160-6
level
sender
See
pump/fuel
leve¡
sender
operating
fuel
pump
for
tests
160-6
pump/fuel
level
sender
(left
side),
removing/installing
160-6
pump/fuel
leve¡
sender
(right
side),
removing/installing
160-5
relieving
fuel
pressure
and
connecting
fue¡
pressure
gauge
160-8
Fueltank
and
lines
general
information
160-1
draining
160-2
evaporative
control
system
160-4
leve¡
senders,
testing
160-5
removing/installing
160-3
Fundamentals
for
the
do-it-yourself
owner
general
information
010-1
advice
for
the
beginner
010-4
cleanliness
010-4
electrical
testing
010-6
gaskets
and
seals
010-5
non-reusable
fasteners
010-5
planning
ahead
010-4
tightening
fasteners
010-5
wire
repairs
010-6
buying
parts
010-6
genuine
BMW
parts
010-6
information
you
need
to
know
010-7
non-returnable
parts
010-7
emergencies
010-11brake
fluid
leve¡
010-13
car
will
not
start
010-11
changinga
tire
010-11
check
enginewarning
light
010-13
dim
Iights
010-13
jump
starting
car
010-12
low
o]I
pressure
010-13
overheating
010-12
Emergencies
(cont
.)
spare
parts
kit
010-14
towing
010-13
gettingstarted
010-2
lifting
thecar
010-3
raising
car
safely
010-3
safety
010-2
working
under
car
safely
010-4
how
to
use
this
manual
010-2
warnings,
cautions
and
notes
010-2
service
010-7
tools
010-7
basic
tool
requirements010-8
BMW
specialtools
010-11
feeler
gauges
010-10
jack
stands
010-9
oil
change
equipment
010-9
torque
wrench
010-10
volt-ohm
meter
(VOM)
or
Multi-
meter010-10
Fuses
See
Electrical
component
locations
G
Gaskets
See
Fundamentals
for
the
do-it-
yourself
owner
Gearshift
See
Gearshift
linkage
Gearshift
linkagegeneral
information
250-1
automatic
shiftlock,
checking
function
250-5
automatic
transmission
gearshift
250-
3
gear
position/neutral
safety
switch,
replacing
(automatic
transmission)
250-4
gearshift
lever,
installing
(manual
transmission)
250-2
gearshift
lever,
removing
(manual
transmission)
250-1
gearshift
mechanism,
adjusting
(automatictransmission)
250-3
manual
transmission
gearshift
250-1
shift
interlock,
checking
function
(automatic
transmission)
250-6Glass
See
Door
windows
Glove
compartment
See
Interior
trim
Grille
See
Exterior
trim,
bumpers
Guibo
(flex
disc)
See
Driveshaft
Handle,
door
See
Doors
Hardtop
See
Body-general
Headlight
See
Exterior
lighting
Headlight
switch
See
Switches
and
electrical
accessoriesHeater
box
See
Heating
Heater
core
See
Heating
Heater
valve
See
Heating
Heating
general
information
640-1
air
distribution
motors
640-9
air
distribution
motor,
replacing
(rotary
knob)
640-10
blower
motor,
removing/installing
640-1blower
motor
resistor
pack,
replacing
640-3
control
head
640-7
removing/installing
(digital-display)
640-8
removing/installing
(rotary
knob)
640-7
control
module
removing/installing
(digital-display)
640-8
removing/installing
(rotary
knob)
640-8
heater
box,
removing640-4
heater
core,
replacing
640-6
heater
core
temperature
sensor,
replacing
640-7
heater
valve,
replacing
640-3
rear
window
blower
(convertible
models)
640-10
reas
window
defogger
640-10sensor
fan
forinterior
temperature,
replacing
640-9warnings
and
cautions
640-11
Hood
See
Fenders,
engine
hood
Idle
speed
See
Maintenance
program
Idle
speed
control
valve
See
Fuel
injection
Ignition
switch
See
Switches
and
electrical
accessories
INDEX
5
Page 757 of 759
8
INDEX
Speakers
See
Radio
SRS
(Supplemental
restraint
system)
See
Airbag
system
(SRS)
Starter
See
Battery,
starter,
alternator
Steering
and
wheel
alignment
general
information
320-1
caster
and
camber
320-5
front
toe-in
and
toe
difference
angle
320-6
outer
tie
rod
end,
replacing
320-4
power
steering
pump,
removing/
installing
320-2
power
steering
system
320-2
power
steering
system,
bleeding/filling
320-3
rear
toe-in
320-6
steering
gear320-3
steering
gear
rack,
removing/installing
320-3
steering
wheel
320-1
steering
wheel,
removing/installing
320-1
tie
rod,
replacing
320-5
wheel
alignment
320-5
wheel
alignment
specifications
320-6
Steering
gear
See
steering
and
wheel
alignment
Strut
See
Front
suspension
Subframe
See
Front
suspension
Sunroof
general
information
540-1
motor,
removing/installing
540-3
panel,
adjusting
540-2
panel,
emergency
closing
540-2
Suspension,
front
See
Front
suspension
Suspension,
rear
See
Rear
suspension
Suspension,
steering
and
brakes
general
information
300-1
al¡
season
traction
(AST)
300-4
antilock
brake
system
(ABS)
300-2
brakes
300-2
front
suspension
300-1
integrated
systems
300-2
M3
suspension
and
brakes
300-7
steering
300-2
rear
suspension
300-2suspension
and
steering
troubleshooting
300-7
tires
and
wheels300-2
T
Switches
and
electrical
accessories
general
information
612-1
dome
light,
rear
map
lights,
trunk
light,
replacing
bulbs
612-7
hazard
warning
switch,
replacing
612-5
headlight
switch,
replacing
612-5
foglight
switch,
replacing
612-5
ignition
electrical
switch,
replacing
612-3
ignition
lock
cylinder,
replacing
612-4
ignition
switch
assembly
612-3
outside
mirror
switch,
replacing
612-6
power
window
switch,
replacing
612-5
turn
signal
switch
and
wiper
switch,
removing/installing
612-1
wiper
switch
See
turn
signal
and
wiper
switch
Taillight
See
Exterior
lighting
Thermostat
See
Cooling
system
Throttleposition
sensor
(TPS)
See
Fuel
injection
Throw-out
bearing
See
ClutchTierod
See
Steering
and
wheel
alignment
Tires
See
Suspension,
steering
and
brakes-general
See
also
Maintenance
program
Timing
chain
See
Camshaft
timing
chain
Toe-in
See
Steering
and
wheel
alignment
Tools
See
Fundamentals
for
the
do-it-
yourself
owner
Torque
convector
See
Automatic
transmission
Towing
See
Fundamentals
for
the
do-it-
yourself
owner
Traction
control
See
also
Suspension,
steering
and
brakes-general
Trailing
arm
See
Rear
suspension
Transmission-general
See
also
Automatic
transmission
See
also
Manual
transmission
general
information
200-1
automatic
transmission
200-1
manual
transmission
200-1
transmission
ID
codes
200-2
Transmission
fluid
See
Maintenance
program
See
also
Automatic
transmission
Transmission
input
shaft
See
Manual
transmission
Transmission
output
shaft
See
Manual
transmission
Trim,
interior
See
Interior
trim
Trunk
lid
general
information
412-1
trunk
lid,
412-1
trunk
lid,
aligning
412-1
trunk
lid,
removing/installing
412-1
trunk
lid
support
strut,
removing/
installing
412-2
U
Upholstery
See
Maintenance
program
U-joints
See
Driveshaft
V
V-belt
See
Maintenance
program
Vacuum
booster
See
Brakes
Vacuum
leaks
See
Engine-general
Valveguides
See
Cylinder
head
and
valvetrain
Valve
seals
See
Cylinder
head
and
valvetrain
Valveseats
See
Cylinder
head
and
valvetrain
Valves
See
Cylinder
head
and
valvetrain
Valvetrain
See
Cylinder
head
and
valvetrain
VANOS
(variable
valve
timing)
See
Camshaft
timing
chaín
See
also
Engine-general
Vehicle
identification
number
(VIN)
See
Fundamentals
for
the
do-it-
yourself
owner
Vehicle
speed
sensor
See
Instruments
Ventilation
See
Air
conditioning
See
also
Heating
Voltage
regulator
See
Battery,
starter,
alternator
Voltage
tests
See
Electrical
system-general
W
Warnings
vi¡
Washer
fluid
pump
See
Wipers
and
washers
Washers
See
Wipers
and
washers
Water
pump
See
Cooling
system
Waxing
See
Maintenance
program