torque BMW M3 1995 E36 Owner's Manual
[x] Cancel search | Manufacturer: BMW, Model Year: 1995, Model line: M3, Model: BMW M3 1995 E36Pages: 759
Page 75 of 759
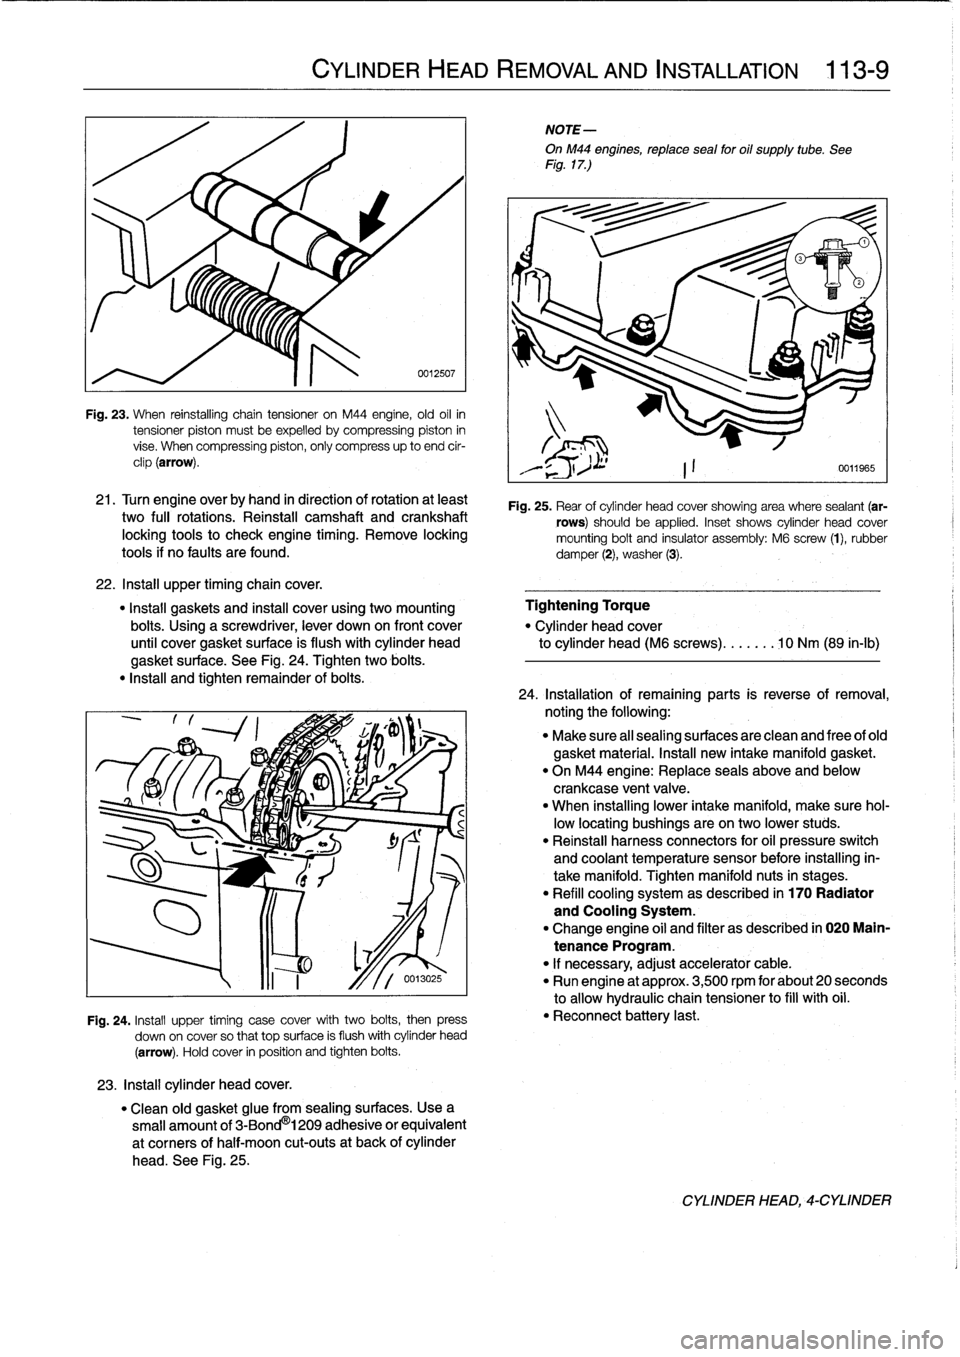
Fig
.
23
.
When
reinstalling
chain
tensioner
on
M44
engine,
old
oil
in
tensioner
piston
mustbe
expelled
bycompressing
piston
in
vise
.
When
compressing
piston,
only
compress
up
to
end
cir-
clip
(arrow)
.
21
.
Turn
engine
overby
hand
in
direction
of
rotation
at
least
two
fui¡
rotations
.
Reinstall
camshaft
and
crankshaft
locking
tools
to
check
engíne
timing
.
Remove
locking
tools
if
no
faults
are
found
.
22
.
Insta¡¡
upper
timingchain
cover
.
"
Install
gaskets
and
instan
cover
using
two
mounting
Tightening
Torque
bolts
.
Using
a
screwdriver,
lever
down
on
front
cover
"
Cylinder
head
cover
until
cover
gasket
surface
is
flush
with
cylinder
head
to
cylinder
head
(M6
screws)
.......
10
Nm
(89
in-lb)
gasket
surface
.
See
Fig
.
24
.
Tighten
two
bolis
.
"
Insta¡¡
and
tighten
remainder
of
bolis
.
23
.
Install
cylinder
head
cover
.
CYLINDER
HEAD
REMOVAL
AND
INSTALLATION
113-
9
0012507
Fig
.
24
.
Install
upper
timing
case
cover
with
two
bolis,
then
press
down
on
cover
so
that
top
surface
is
flush
withcylinder
head
(arrow)
.
Hold
cover
in
position
and
tighten
bolis
.
"
Clean
old
gasket
glue
from
sealing
surfaces
.
Usea
small
amount
of
3-Bond
®
1209
adhesive
or
equivalent
at
corners
of
half-moon
cut-outs
at
back
of
cylinder
head
.
See
Fig
.
25
.
NOTE-
OnM44
engines,
reptace
sea¡
for
oil
supply
tube
.
See
Fig
.
17
.)
Fig
.
25
.
Rear
of
cylinder
head
cover
showing
area
where
sealant
(ar-
rows)
should
be
applied
.
Inset
shows
cylinder
head
cover
mounting
bolt
and
insulator
assembly
:
M6
screw
(1),
rubber
damper
(2),
washer
(3)
.
24
.
Installation
of
remaining
parts
is
reverseofremoval,
noting
the
following
:
"
Make
sure
al¡
sealing
surfaces
are
clean
and
free
of
old
gasket
material
.
Install
new
intake
manifold
gasket
.
"
On
M44
engine
:
Replace
seals
above
and
below
crankcase
ventvalve
.
"
When
installing
lower
intake
manifold,
make
sure
hol-
low
locating
bushings
are
on
two
lower
studs
.
"
Reinstall
harness
connectors
for
oil
pressure
switch
and
coolant
temperature
sensor
before
installing
in-
take
manifold
.
Tighten
manifold
nuts
in
stages
.
"
Refill
cooling
system
as
described
in
170
Radiator
and
Cooling
System
.
"
Change
engine
oil
and
filter
as
described
in
020
Main-
tenance
Program
.
"
If
necessary,
adjust
accelerator
cable
.
"
Run
engine
at
approx
.
3,500
rpm
for
about
20
seconds
to
allow
hydraulic
chain
tensioner
to
fill
with
oil
.
"
Reconnect
battery
last
.
CYLINDER
HEAD,-CYLINDER
Page 76 of 759
113-10
CYLINDER
HEAD
REMOVAL
AND
INSTALLATION
Tightening
Torques
"
Coolant
drain
plug
to
cylinder
block
.
.
25
Nm
(18
ft-1b)
"
Intake
manifold
support
to
manifold
.
.
15
Nm
(11
ft-Ib)
"
Lower
intake
manifold
to
cylinder
head
.
..........
.
..
...
15
Nm
(11
ft-Ib)
"
Lower
intake
manifold
to
upper
manifold
..........
.
..
...
15
Nm
(11
ft-Ib)
"
Radiator
cooling
fan
to
coolant
pump
.
40
Nm
(30
ft-Ib)
"
Radiator
drain
screw
to
radiator
...
.
2
.5
Nm
(22
in-lb)
CYLINDER
HEAD,
6-CYLINDER
For
ease
of
use
this
procedure
is
broken
into
subsections,
as
follows
:
General
Coolingsystem,
draining
Cyiinder
head
cover,
removing
Intake
manifold,
removing
Timing
chains,
uncoupling
Cylinder
head
assembly,
removing
WARNING
-
Allow
the
engine
to
cool
before
beginning
this
pro-
cedure
.
General
1
.
Working
inside
luggage
compartment,
disconnect
neg-
ative
(-)
battery
cable
.
CAUTION-
"
Prior
to
disconnectiog
the
battery,
read
the
bat-
tery
disconnection
cautions
given
at
the
front
of
this
manual
on
page
vi¡¡
.
"
Disconnecting
the
battery
may
erase
fault
code(s)
stored
in
control
module
memory
.
Check
for
fault
codes
using
special
BMW
diagnostic
equipment
2
.
Remove
front
exhaust
pipes
from
manifolds
.
Discard
nuts
.
3
.
Remove
air
filter
housing
complete
with
mass
air
flow
sensor
and
intake
air
ducting
.
Disconnect
vacuum
hos-
es
from
throttle
housing
.
4
.
On
M52
and
S52US
engines
:
Remove
secondary
air
injection
check-valve
from
front
of
engine
and
set
aside
.
CYLINDER
HEAD,
6-CYLINDER
Coolingsystem,
draining
5
.
Drain
engine
coolant
and
Rmove
coolant
hoses
from
thermostat
housing
.
Drain
engine
block
by
removing
block
drain
.
See
170
Radiator
and
Cooling
System
.
NOTE-
The
block
drain
is
on
the
exhaust
side
of
the
engine,
near
cylinder
no
.
5
.
6
.
Remove
radiator
cooling
fan
and
fan
shroud
.
See
170
Radiator
and
Cooling
System
.
NOTE-
The
radiator
cooling
fannut(32
mm
wrench)
has
left-
hand
threads
.
Cylinder
head,
removing
(6-cylinder
engine)
7
.
Disconnect
heater
hoses
at
rear
of
cylinder
head
.
See
Fig
.
26
.
'i
8
.
Remove
alternator
cooling
duct
.
Cylinder
head
cover,
removing
0012687
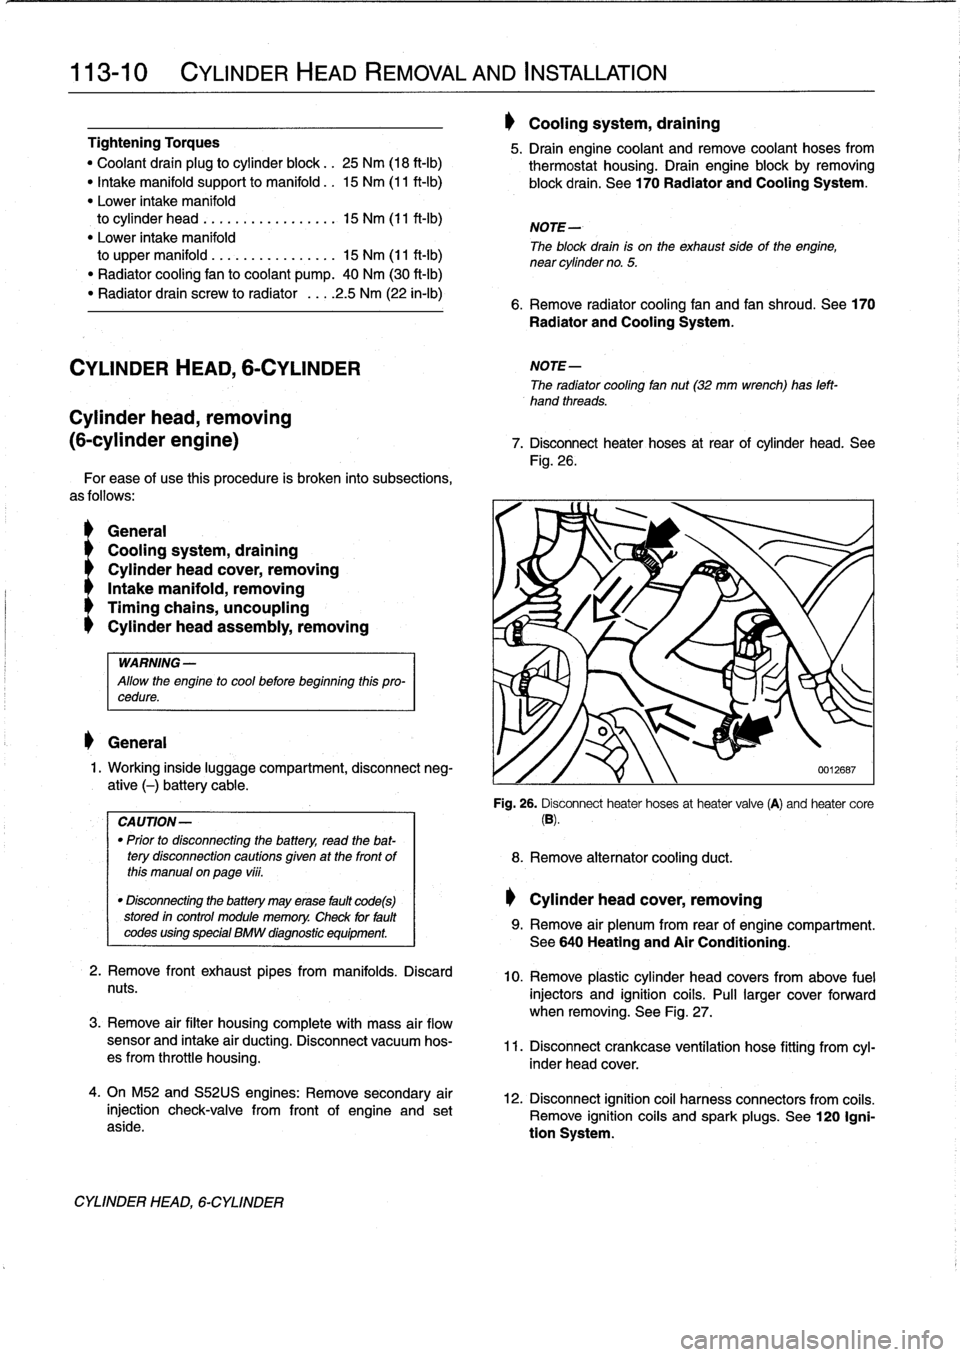
Fig
.
26
.
Disconnect
heater
hoses
at
heater
valve
(A)
and
heater
core
(B)
.
9
.
Remove
air
plenum
from
rear
of
engine
compartment
.
See640
Heating
and
Air
Conditioning
.
10
.
Remove
plastic
cylinder
head
covers
from
above
fuel
injectors
and
ignition
coils
.
Pull
larger
cover
forward
when
removing
.
See
Fig
.
27
.
11
.
Disconnect
crankcase
ventílation
hose
fitting
from
cyl-
inder
head
cover
.
12
.
Disconnect
ignition
coil
harness
connectors
from
coiis
.
Remove
ignition
coiis
and
spark
plugs
.
See
120
Igni-
tion
System
.
Page 82 of 759
113-16
CYLINDER
HEAD
REMOVAL
AND
INSTALLATION
NOTE-
Check
that
all
washers
for
the
cylinder
head
bolts
are
in
place
before
installlng
the
bolts
.
Some
of
the
washers
may
be
staked
to
the
cylinder
head
.
6
.
Tighten
cylinder
head
bolts
in
correct
sequence
.
See
Fig
.
41
.
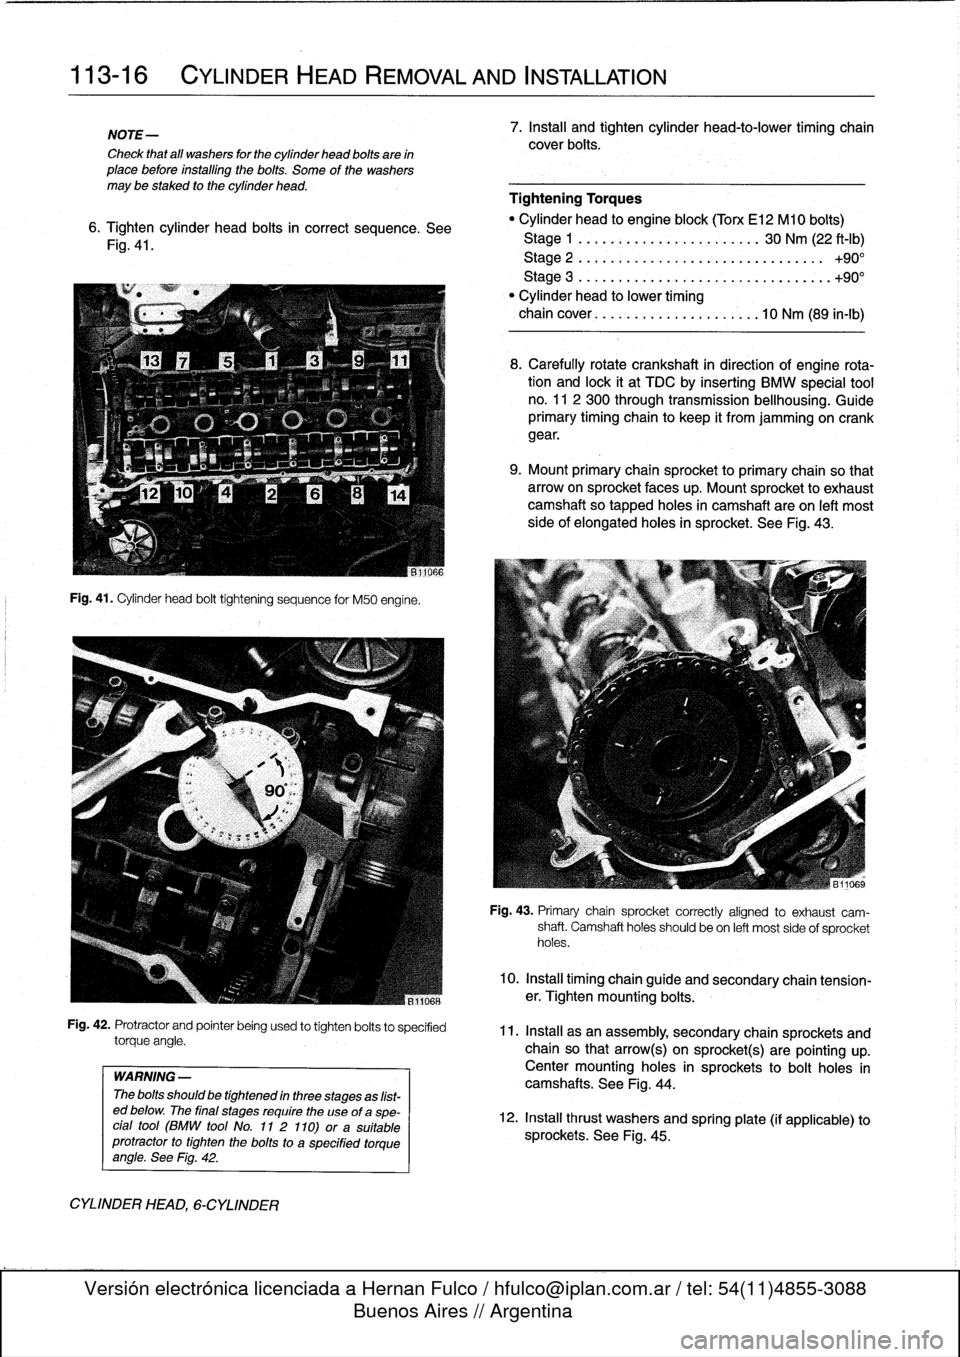
Fig
.
41
.
Cylinder
head
bolt
tightening
sequence
for
M50
engine
.
Fig
.
42
.
Protractor
and
pointer
being
used
to
tighten
bolts
to
specified
torque
angle
.
WARNING
-
The
bolts
should
be
tightened
in
three
stages
as
list-
ed
below
.
The
final
stages
require
the
use
of
aspe-
cial
tool
(BMW
tool
No
.
11
2
110)
ora
suitable
protractor
to
tighten
the
bolts
to
a
specified
torque
angle
.
See
Fig
.
42
.
CYLINDER
HEAD,
6-CYLINDER
7
.
Install
and
tighten
cylinder
head-to-lower
timing
chain
cover
bolts
.
Tightening
Torques
"
Cylinder
head
to
engine
block(Torx
El
2
Ml
0
bolts)
Stage
1
.........
..
.
.
.
...
.
...
..
30
Nm
(22
ft-Ib)
Stage
2
.........
..
..
....
.
...
..........
+90°
Stage
3
...
.
.....
..
.
.
.
...
.
...
..........
.+90°
"
Cylinder
head
lo
lower
timing
chaincover
.......
..
..
..
...
.
....
10
Nm
(89
in-lb)
8
.
Carefully
rotate
crankshaft
in
direction
of
engine
rota-tion
and
lock
it
at
TDC
by
inserting
BMW
special
tool
no
.
11
2
300
through
transmission
bellhousing
.
Guide
primary
timing
chain
to
keep
it
from
jamming
on
crank
gear
.
9
.
Mount
primary
chain
sprocketto
primary
chain
so
that
arrowon
sprocket
faces
up
.
Mount
sprocket
to
exhaust
camshaftso
tapped
holes
in
camshaft
are
on
left
most
side
of
elongated
holes
in
sprocket
.
See
Fig
.
43
.
Fig
.
43
.
Primary
chain
sprocket
correctly
afgned
to
exhaust
cam-
shaft
.
Camshaft
holes
should
be
on
left
most
sideof
sprocket
holes
.
10
.
Install
timing
chain
guide
and
secondary
chain
tension-er
.
Tighten
mounting
bolts
.
11
.
Install
asan
assembly,
secondary
chain
sprockets
and
chain
so
that
arrow(s)
on
sprockt(s)
are
pointing
up
.
Centermounting
holes
in
sprockets
tobolt
holes
in
camshafts
.
See
Fig
.
44
.
12
.
Install
thrust
washers
and
spring
plate
(if
applicable)
to
sprockets
.
See
Fig
.
45
.
Page 83 of 759
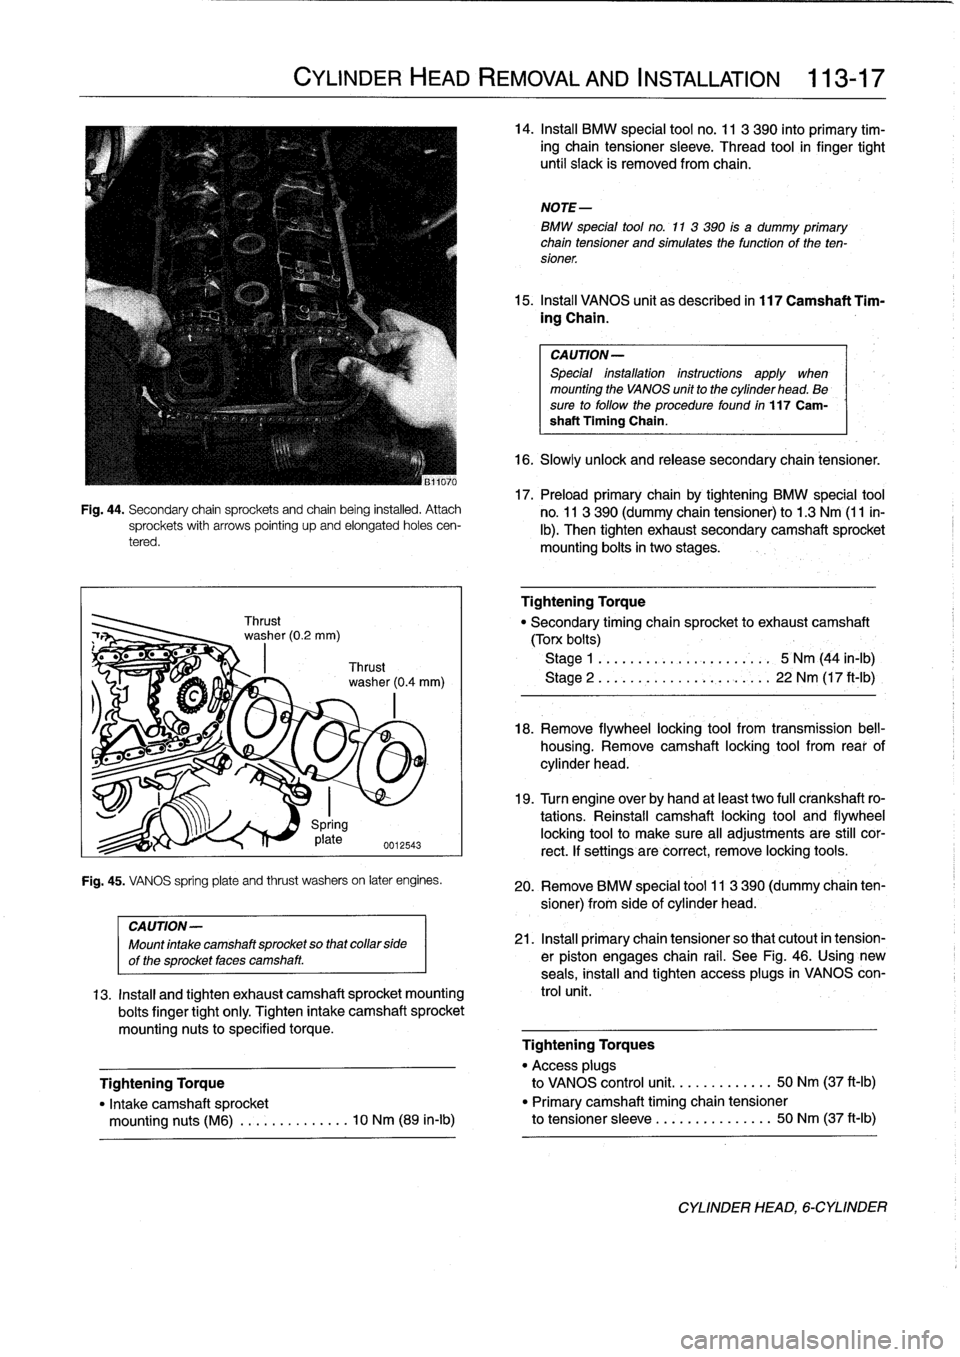
Fig
.
44
.
Secondary
chain
sprockets
and
chain
being
installed
.
Attachsprockets
with
arrows
pointing
upand
elongated
holes
cen-
tered
.
CYLINDER
HEAD
REMOVAL
AND
INSTALLATION
113-17
Spring
17
plate
0012543
Fig
.
45
.
VANOS
spring
plate
and
thrust
washerson
later
engines
.
14
.
Insta¡¡
BMW
special
tool
no
.
11
3
390
into
primary
tim-
ing
chain
tensioner
sleeve
.
Thread
tool
in
finger
tight
until
siack
is
removed
from
chain
.
NOTE-
BMW
special
tool
no
.
11
3
390
is
a
dummy
primary
chain
tensioner
and
simulatesthe
function
of
the
ten-
sioner
.
15
.
Insta¡¡
VANOS
unit
as
described
in
117
Camshaft
Tim-
ing
Chain
.
CAUTION-
Special
ínstallation
instructions
apply
when
mounting
the
VANOS
unit
to
the
cylinder
head
.
Be
sure
to
follow
the
procedurefound
in
117
Cam-
shaft
Timing
Chain
.
16
.
Slowlyuniock
and
release
secondary
chain
tensioner
.
17
.
Preloadprimary
chain
by
tightening
BMW
special
tool
no
.
11
3390
(dummy
chain
tensioner)
to
1.3
Nm
(11
in-
lb)
.
Then
tighten
exhaust
secondary
camshaft
sprocket
mounting
bolts
in
two
stages
.
Tightening
Torque
"
Secondary
timing
chain
sprocket
to
exhaust
camshaft
(Torx
bolts)
Stage
1
.
.............
..
..
.
...
5
Nm
(44
in-lb)
Stage
2
..............
..
..
.
,
.
..
22
Nm
(17
ft-1b)
18
.
Remove
flywheel
locking
tool
from
transmission
bell-
housing
.
Remove
camshaft
locking
tool
from
rear
of
cylinder
head
.
19
.
Turn
engine
over
by
hand
at
least
two
fui¡
crankshaft
ro-
tations
.
Reinstall
camshaft
locking
tool
and
flywheel
locking
toolto
make
sure
al¡
adjustments
are
still
cor-
rect
.
lf
settings
are
correct,
remove
locking
tools
.
20
.
Remove
BMW
special
tool
11
3390
(dummy
chain
ten-
sioner)
from
side
of
cylinder
head
.
CAUTION-
Mountintake
camshaft
sprocket
so
thatcollar
side
21
.
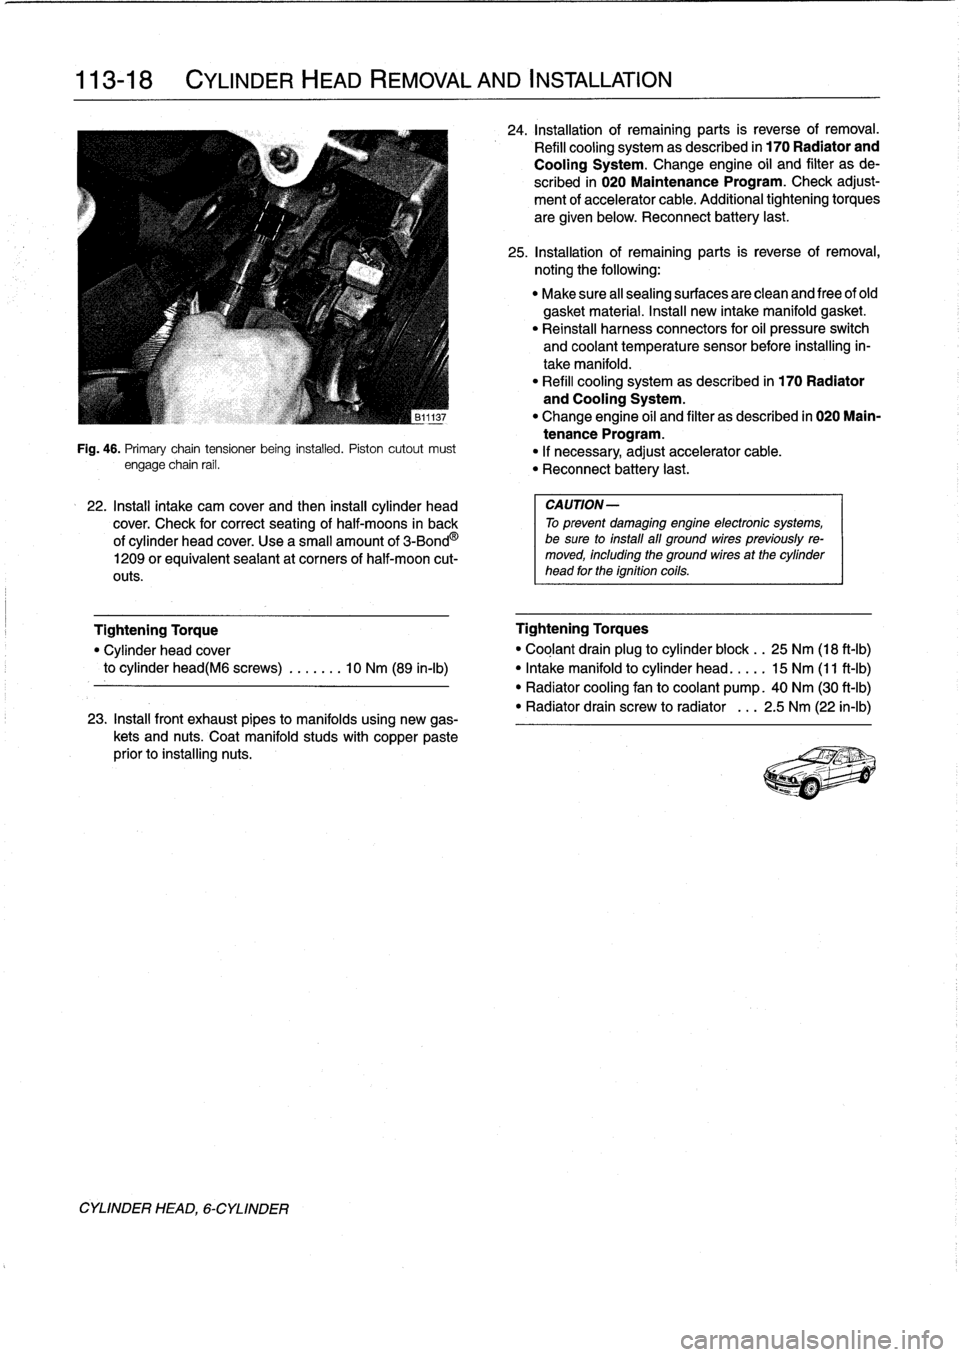
Insta¡¡
primary
chain
tensioner
so
that
cutout
in
tension-
of
the
sprocket
faces
camshaft
.
er
piston
engages
chain
rail
.
See
Fig
.
46
.
Using'new
seals,
install
and
tighten
access
plugs
in
VANOS
con
13
.
Install
and
tighten
exhaust
camshaft
sprocket
mounting
trol
unit
.
boits
finger
tight
only
.
Tighten
intake
camshaft
sprocket
mounting
nuts
to
specified
torque
.
Tightening
Torques
"
Access
plugs
Tightening
Torque
to
VANOS
control
unit
.
..
.
.
........
50
Nm
(37
ft-Ib)
"
Intake
camshaft
sprocket
"
Primary
camshaft
timing
chain
tensioner
mounting
nuts
(M6)
..............
10
Nm
(89
in-lb)
to
tensioner
sleeve
..
...
.
.
........
50
Nm
(37
ft-Ib)
CYLINDER
HEAD,
6-CYLINDER
Page 84 of 759
113-
1
8
CYLINDER
HEAD
REMOVAL
AND
INSTALLATION
CYLINDER
HEAD,
6-CYLINDER
Fig
.
46
.
Primary
chaintensioner
being
installed
.
Piston
cutout
must
engage
chain
rail
.
22
.
Install
intake
cam
cover
and
then
install
cylinder
head
cover
.
Check
for
correct
seating
of
half-moons
in
back
of
cylinder
head
cover
.
Use
a
small
amount
of
3-Bond
O
1209
orequivalent
seaiant
at
corners
of
half-moon
cut-
outs
.
23
.
Install
front
exhaust
pipes
to
manifolds
using
new
gas-
kets
and
nuts
.
Coat
manifold
studs
with
copper
paste
prior
to
installing
nuts
.
24
.
Installationof
remaining
parts
is
reverse
of
removal
.
Refill
cooling
system
as
described
in
170
Radiator
and
Cooling
System
.
Change
engine
oil
and
filter
as
de
scribed
in
020
Maintenance
Program
.
Check
adjust-
ment
of
accelerator
cable
.
Additional
tightening
torques
are
given
below
.
Reconnect
battery
last
.
25
.
Installationof
remaining
parts
is
reverse
of
removal,
noting
the
following
:
"
Make
sure
all
sealing
surfaces
are
clean
and
free
of
old
gasket
material
.
Insta¡¡
new
intake
manifold
gasket
.
"
Reinstall
harness
connectors
for
oil
pressure
switch
and
coolant
temperature
sensor
before
installing
in-
take
manifold
.
"
Refill
cooling
systemas
described
in
170
Radiator
and
Cooling
System
.
"
Change
engine
oil
and
filter
as
described
in
020
Main-
tenance
Program
.
"
If
necessary,
adjust
accelerator
cable
.
"
Reconnect
battery
last
.
CAUTION-
To
prevent
damaging
engine
electronic
systems,
be
sure
to
install
all
ground
wirespreviously
re-
moved,
including
the
ground
wires
at
the
cylinder
head
for
the
ignition
coils
.
Tightening
Torque
Tightening
Torques
"
Cylinder
head
cover
"
Coglant
drain
plug
to
cylinder
block
.
.
25
Nm
(18
ft-Ib)
to
cylinder
head(M6
screws)
.
.
.....
10
Nm
(89
in-lb)
"
Intake
manifold
to
cylinder
head
.
...
.
15
Nm
(11
ft-Ib)
"
Radiator
cooling
fan
to
coolant
pump
.
40
Nm
(30
ft-Ib)
"
Radiator
drain
screw
to
radiator
.
..
2
.5
Nm
(22
in-lb)
Page 86 of 759
116-2
CYLINDER
HEADAND
VALVETRAIN
3
.
Remove
timing
chain
sprockets
and
timing
chains
from
7
.
Slowly
release
pressure
oncamshaft
bearing
capsby
camshafts
.
Remove
upper
timing
chain
guidefrom
cyl-
turningeccentric
shaft
.
Remove
bearing
caps
and
inder
head
.
See117
Camshaft
Timing
Chain
.
camshaft
.
Repeat
procedureon
remaining
camshaft
.
NOTE-
It
is
not
necessary
lo
remove
the
lower
timing
chain
cover
.
4
.
Remove
spark
plugs
and
instaf
BMW
special
tool
11
3
260
to
cylinder
head
.
Tighten
tool
retaining
bolts
in
spark
plug
holes
.
Do
not
over-tighten
bolts
.
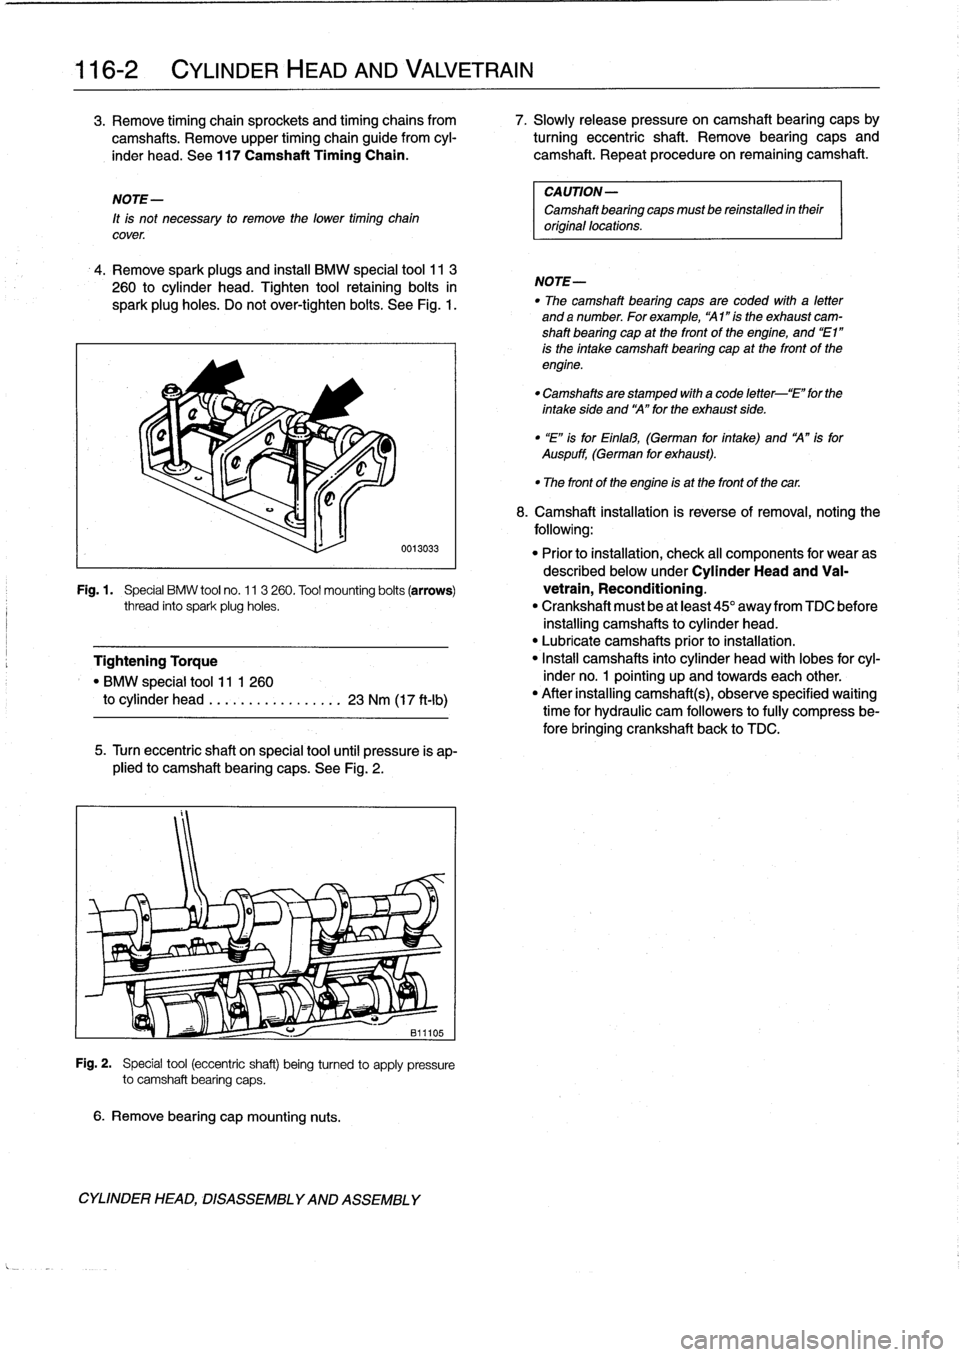
See
Fig
.
1
.
6
.
Remove
bearing
cap
mounting
nuts
.
0013033
5
.
Turn
eccentric
shaft
on
special
tool
until
pressure
is
ap-
plied
to
camshaft
bearing
caps
.
See
Fig
.
2
.
Fig
.
2
.
Special
tool
(eccentric
shaft)
being
turned
to
apply
pressure
to
camshaft
bearing
caps
.
CYLINDER
HEAD,
DISASSEMBLYAND
ASSEMBLY
CAUTION-
Camshaft
bearing
caps
mustbe
reinstalled
intheir
original
locations
.
NOTE-
"
The
camshaft
bearing
caps
are
coded
wíth
a
letter
anda
number
.
Forexample,
"Al
"ís
the
exhaust
cam-
shaft
bearing
cap
at
the
front
of
the
engíne,
and
"El"
is
the
intake
camshaft
bearing
cap
at
the
front
of
the
engine
.
"
Camshafts
are
stamped
with
a
code
letter-`E"
for
the
intakeside
and
`A"forthe
exhaust
side
.
"
"E"
isforEinlal3,
(German
for
íntake)
and
A"
isfor
Auspuff,
(German
for
exhaust)
.
"
The
front
of
the
engine
is
at
the
front
of
thecar
.
8
.
Camshaft
installation
is
reverse
of
removal,noting
the
following
:
"
Prior
to
installation,
check
al¡
components
for
wear
as
described
below
underCylinder
Head
and
Va¡-
Fig
.1
.
Special
BMW
tool
no
.
11
3
260
.
Tool
mounting
bolts
(arrows)
vetrain,
Reconditioning
.
thread
into
spark
plug
holes
.
"
Crankshaft
must
be
at
least
45°
away
from
TDC
before
installing
camshafts
to
cylinder
head
.
"
Lubricate
camshafts
prior
to
installation
.
Tightening
Torque
"
Install
camshafts
into
cylinder
head
with
lobes
for
cyl-
"
BMW
special
tool
11
1
260
inder
no
.
1
pointing
up
and
towards
each
other
.
to
cylinder
head
.
...
.
.
...........
23
Nm
(17
ft-Ib)
"
After
installing
camshafts),observe
specified
waiting
time
for
hydraulic
cam
followers
to
fully
compress
be-
fore
bringing
crankshaft
back
to
TDC
.
Page 87 of 759
Camshaft
installation
waíting
times
"
Ator
above
68°F
(20°C)
............
.
..
10
minutes
"
50-68°F
(10-20°C)
................
..
.
30
minutes
"
32-50°F
(0-10°C)
.
.......
.
.........
..
.
75minutes
"
Reinstall
timing
chain
sprockets
and
tensioner
as
spe-
cifically
described
in
117
Camshaft
Timing
Chain
.
i
"
Wait
at
least
10minutes
before
cranking
engine
over
with
starter
motor
for
the
fi+
1
1/
/~~
.0
time
.
Tightening
Torques
"
Camshaft
bearing
caps
to
cylinder
head
(M7)
.............
15
Nm
(11
ft-Ib)
"
Cylinder
head
cover
to
cylinder
head
(M6)
.............
10
Nm
(89
in-lb)
"
Primary
timing
chain
tensioner
plug
to
cylinder
head
..
..
..
...........
40
Nm
(30
ft-Ib)
(see
117
Camshaft
Timing
Chain)
"
Spark
plugs
(M12)
..
.
.............
23
Nm
(17
ft-Ib
"
Timing
chain
cover
(upper)
to
cylinder
head
..
.
.
...
..........
10
Nm
(89
in-lb)
"
Timing
chainsprockets
to
camshaft
M6
........
.
...
.
..
.
..........
10
Nm
(7.5
ft-Ib)
M7
............
.
..
..
...........
15
Nm
(11
ft
.lb)
(see
117
Camshaft
Timing
Chain)
Camshafts,
removing
and
installing
(M44
engine)
Special
BMW
service
tools
should
always
be
used
to
remove
and
install
the
camshafts
.
Removal
and
installation
of
the
cam-
shafts
without
the
special
tools
can
result
in
camshaft
and
val-
vetrain
damage
.
1.
Disconnect
negative
(-)
battery
cable
.
CAUTION-
Prior
to
disconnecting
the
battery,
read
the
battery
disconnection
cautions
given
at
the
front
of
this
manual
on
page
vi¡¡
.
CYLINDER
HEAD
AND
VALVETRAIN
116-
3
2
.
Remove
spark
plugs
.
See
1201gnition
System
.
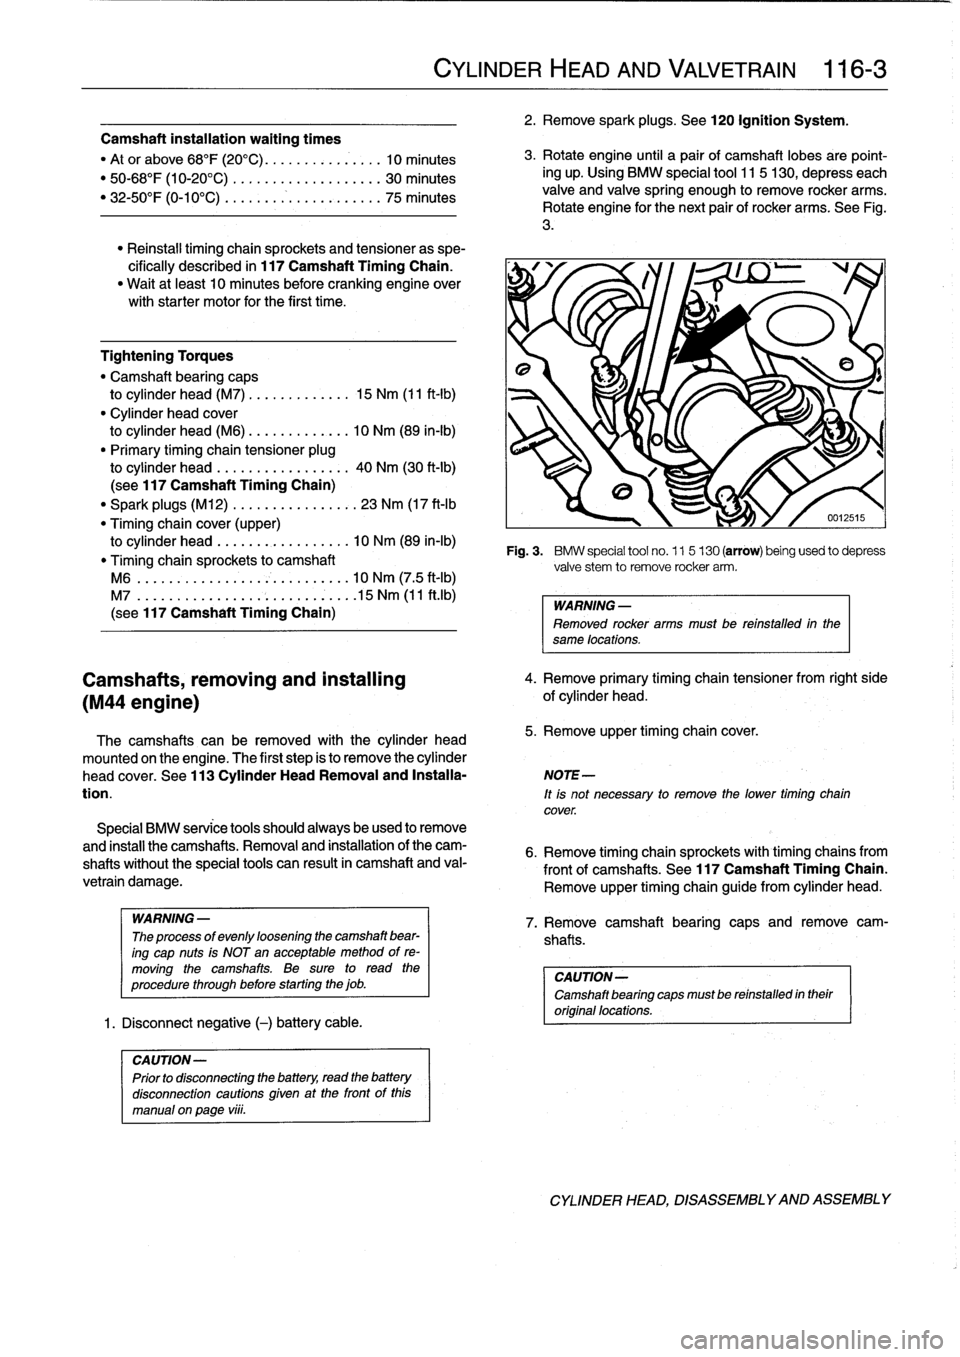
3
.
Rotateengine
until
a
pair
of
camshaft
lobes
are
point-
ing
up
.
Using
BMW
special
tool
115
130,
depresseach
valve
and
valve
spring
enough
to
remove
rocker
arms
.
Rotate
engine
for
the
next
pair
of
rocker
arms
.
See
Fig
.
3
.
cover
.
Fig
.
3
.
BMW
special
tool
no
.
11
5130
(arrow)
being
used
to
depress
valve
stem
to
remove
rocker
arm
.
WARNING
-
Removed
rocker
arms
must
be
reinstalled
in
the
same
locations
.
4
.
Remove
primary
timing
chain
tensioner
from
right
side
of
cylinder
head
.
The
camshafts
can
be
removed
with
the
cylinder
head
5
.
Remove
upper
timing
chaincover
.
mounted
onthe
engine
.
The
first
step
is
to
remove
the
cylinder
head
cover
.
See
113
Cylinder
HeadRemoval
and
Installa-
NOTE-
tion
.
lt
is
not
necessary
to
remove
the
lower
timing
chain
6
.
Remove
timing
chain
sprockets
with
timing
chains
from
front
of
camshafts
.
See
117
Camshaft
Timing
Chain
.
Remove
upper
timing
chain
guide
from
cylinder
head
.
WARNING-
7
.
Remove
camshaft
bearing
caes
and
remove
cam
The
process
of
evenly
loosening
the
camshaft
bear-
shafts
.
ing
cap
nuts
is
NOT
an
acceptable
method
of
re-
moving
the
camshafts
.
Be
sure
to
read
the
CAUTION-
procedure
through
before
starting
the
job
.
Camshaft
bearing
capsmust
be
reinstalled
intheir
original
locations
.
CYLINDER
HEAD,
DISASSEMBLYAND
ASSEMBLY
Page 88 of 759
116-
4
CYLINDER
HEAD
AND
VALVETRAIN
NOTE-
"
The
camshaft
bearing
caps
are
coded
with
a
letter
anda
number
.
Forexample,
'541"is
the
exhaustcam-
shaft
bearing
cap
at
the
front
of
the
engine,
and
`El"
is
the
intake
camshaft
bearing
cap
at
the
front
of
the
engine
.
"
Camshafts
are
stamped
with
a
code
letter-'E"
for
the
intakeside
and
A"
for
the
exhaust
side
.
"
"E"
isfor
Einla3,
(German
for
intake)
and
A"
is
for
Auspuff,
(Germen
for
exhaust)
.
"
The
front
of
the
engine
is
at
the
front
of
the
car
.
8
.
Camshaft
installation
is
reverse
of
removal,
noting
the
following
:
"
Prior
to
installation,
check
all
components
for
wear
as
described
below
underCylinder
Head
and
Val-
vetrain
Reconditioning
.
"
Lubricate
camshafts
prior
to
installation
.
"
Reinstall
timing
chain
sprockets
and
tensioner
and
set
valve
timing
before
reinstalling
rocker
arms,as
spe-
cifically
described
in
117
Camshaft
Timing
Chain
.
"
Be
sure
corresponding
camshaft
lobe
is
pointing
up
before
installing
rocker
arms
.
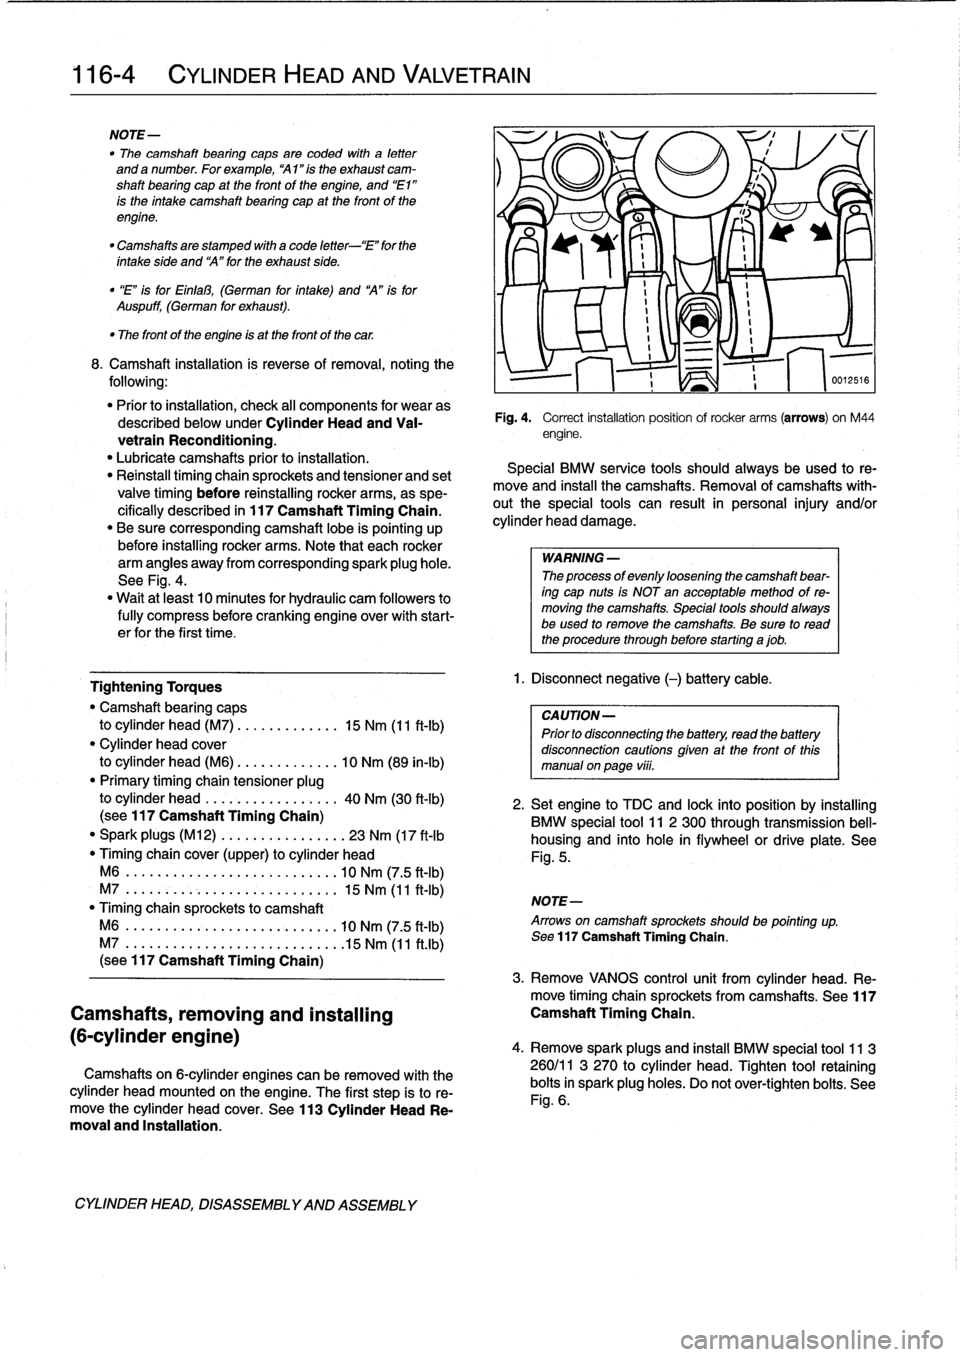
Note
that
each
rocker
arm
angles
away
from
corresponding
spark
plug
hole
.
See
Fig
.
4
.
"
Wait
at
least
10
minutes
for
hydraulic
cam
followers
to
fully
compress
before
cranking
engine
over
with
start-
er
for
the
first
time
.
Tightening
Torques
"
Camshaft
bearing
caps
to
cylinder
head
(M7)
.............
15
Nm
(11
ft-Ib)
"
Cylinder
head
cover
to
cylinder
head
(M6)
.............
10
Nm
(89
in-lb)
"
Primary
timing
chain
tensioner
plug
to
cylinder
head
.
................
40
Nm
(30
ft-lb)
(sea
117
Camshaft
Timing
Chain)
"
Spark
plugs
(M12)
.............
...
23
Nm
(17
ft-lb
Timing
chaincover
(upper)
to
cylinder
head
M6
.....
.
.
...
................
.
10
Nm
(7
.5
ft-Ib)
M7
....
..
.
.
........
.
.....
.
...
.
15
Nm
(11
ft-Ib)
"
Timing
chain
sprockets
to
camshaft
M6
....
.
.
..
..............
.
..
..
10
Nm
(7
.5
ft-Ib)
M7
....
....
..............
.
..
..
.15
Nm
(11
ft
.lb)
(sea
117
Camshaft
Timing
Chain)
Camshafts,
removing
and
installing
(6-cylinder
engine)
Camshafts
on
6-cylinder
engines
can
be
removed
with
the
cylinder
head
mounted
on
the
engine
.
The
first
step
is
to
re-
move
the
cylinder
head
cover
.
See
113
Cylinder
Head
Re-
moval
and
Installation
.
CYLINDER
HEAD,
DISASSEMBLYAND
ASSEMBLY
Fig
.
4
.
Correct
installation
position
ofrocker
arms
(arrows)
on
M44
engine
.
Special
BMW
service
tools
should
always
be
used
to
re-
move
and
instan
the
camshafts
.
Removal
of
camshafts
with-
outthe
special
tools
can
result
in
personal
injury
and/or
cylinder
head
damage
.
WARNING
-
The
processof
evenly
loosening
the
camshaft
bear-
ing
cap
nuts
is
NOT
en
acceptable
method
of
re-
moving
the
camshafts
.
Special
tools
shouldalways
be
used
lo
remove
the
camshafts
.
Be
sure
to
read
the
procedure
through
before
starting
ajob
.
1
.
Disconnect
negative
(-)
battery
cable
.
CAUTION-
Prior
to
disconnectiog
the
battery,
read
the
battery
disconnection
cautions
given
at
the
front
of
this
manual
onpaga
viii
.
516
2
.
Setengine
to
TDC
and
lock
into
position
by
installing
BMW
special
tool
11
2
300
through
transmission
bell-
housing
and
into
hole
in
flywheel
or
drive
platea
See
Fig
.
5
.
NOTE-
Arrows
on
camshaft
sprockets
shouldbe
pointing
up
.
Sea
117
Camshaft
Timing
Chain
.
3
.
Remove
VANOS
control
unit
from
cylinder
head
.
Re-
move
timing
chainsprockets
from
camshafts
.
See117
Camshaft
Timing
Chain
.
4
.
Remove
sparkplugs
and
insta¡¡
BMW
special
tool
11
3
260/11
3
270
to
cylinder
head
.
Tighten
tool
retaining
bolts
in
spark
plug
holes
.
Do
not
ovar-tighten
bolts
.
See
Fig
.
6
.
Page 89 of 759
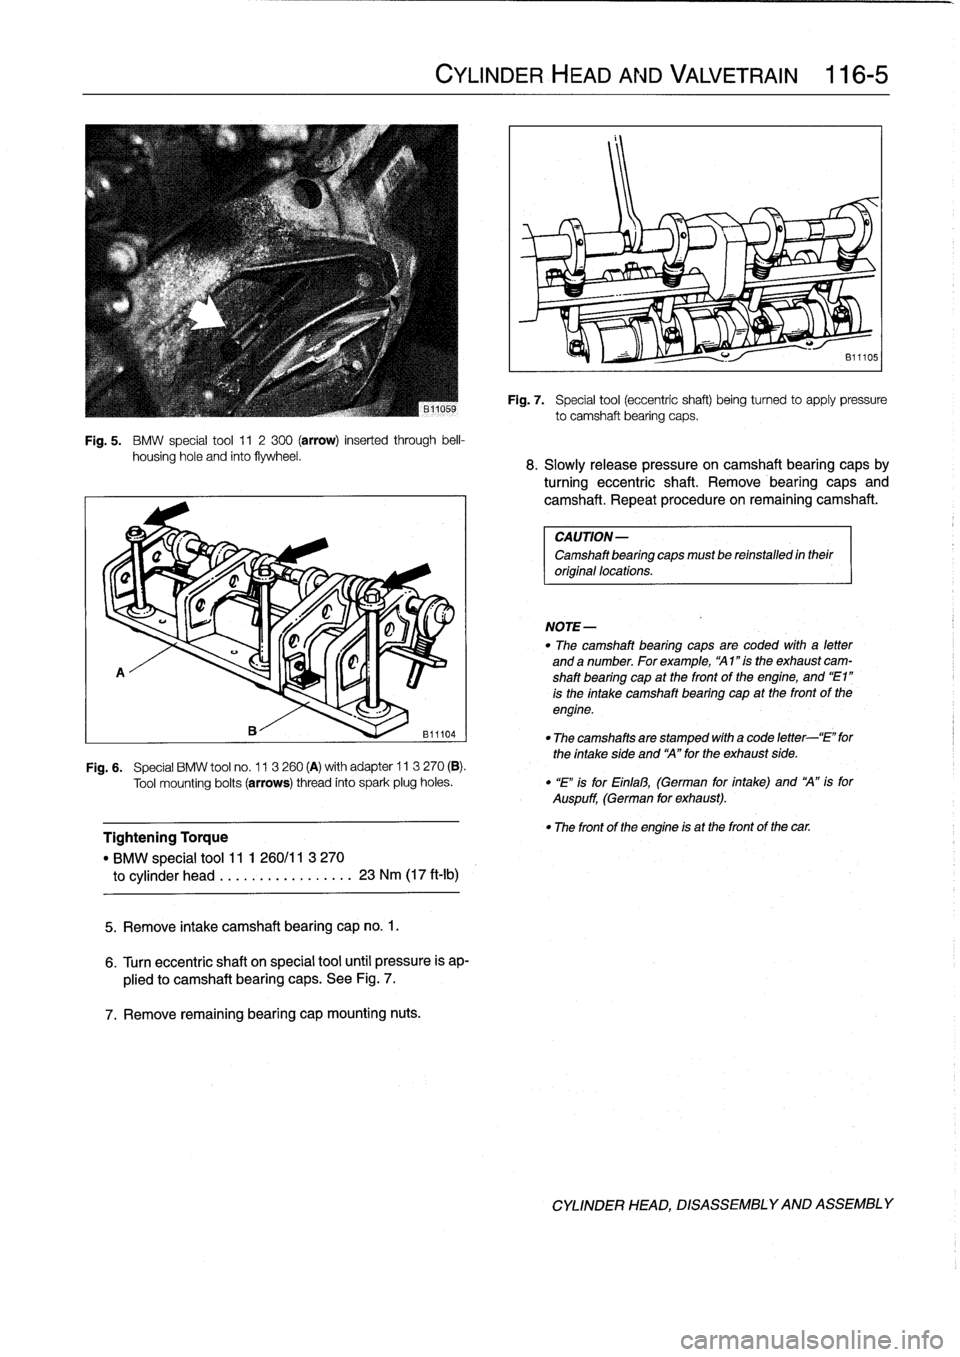
Fig
.
5
.
BMW
special
tool
11
2300
(arrow)
inserted
through
bell-
housing
hole
and
finto
flywheel
.
A
Tightening
Torque
"
BMW
special
tool11
1
260/11
3
270
to
cylinder
head
.................
23
Nm
(17
ft-Ib)
5
.
Remove
intake
camshaft
bearing
cap
no
.
1
.
6
.
Turn
eccentric
shaft
on
special
tool
until
pressure
is
ap-
plied
to
camshaft
bearing
caps
.
See
Fig
.
7
.
7
.
Remove
remaining
bearing
capmounting
nuts
.
CYLINDER
HEAD
AND
VALVETRAIN
116-
5
NOTE-
Fig
.
7
.
Special
tool
(eccentric
shaft)
beingturned
to
apply
pressure
to
camshaft
bearing
caps
.
8
.
Slowly
release
pressure
oncamshaft
bearing
capsby
turning
eccentric
shaft
.
Remove
bearing
caps
and
camshaft
.
Repeat
procedure
on
remaining
camshaft
.
CAUTION-
Camshaft
bearing
capsmust
be
reinstalled
in
their
original
locations
.
"
The
camshaft
bearing
caps
are
coded
with
a
letter
and
a
number
.
For
example,
`A1
"is
the
exhaust
cam-
shaft
bearing
cap
at
the
front
of
the
engine,
and
"E1"
is
the
intake
camshaft
bearing
cap
at
the
front
of
the
engine
.
"
The
camshaftsare
stamped
with
a
code
letter-`E"
for
the
intake
síde
and
`A"
for
the
exhaust
side
.
F19
.6
.
Special
BMW
tool
no
.
11
3260
(A)
with
adapter
ll
3
270
(B)
.
Tool
mounting
bolts
(arrows)
thread
into
spark
plug
holes
.
"
"E"
is
for
Einfal3,
(German
for
intake)
and
`A"
is
for
Auspuff,
(German
for
exhaust)
.
"
The
front
of
the
engine
is
at
the
front
of
the
car
.
CYLINDER
HEAD,
DISASSEMBLYAND
ASSEMBLY
Page 90 of 759
116-
6
CYLINDER
HEAD
AND
VALVETRAIN
9
.
Camshaft
installation
is
reverse
of
removal,noting
the
following
:
"
Prior
to
installation,
check
al¡
components
for
wear
as
described
below
under
Cylinder
Head
and
Val-
vetrain
Reconditioning
.
"
Crankshaft
must
be
at
least
45°
away
from
MC
before
installing
camshafts
to
cylinder
head
.
"
Lubricate
camshafts
prior
to
installation
.
"
Insta¡¡
camshafts
into
cylinder
head
with
lobes
for
cyl-
inder
no
.
1
pointing
up
and
towards
each
other
.
See
Fig
.
8
.
"
After
installing
camshaft(s),
observe
specified
waiting
time
for
hydraulic
cam
followers
to
fully
compress
be-
fore
bringing
crankshaft
back
to
TDC
.
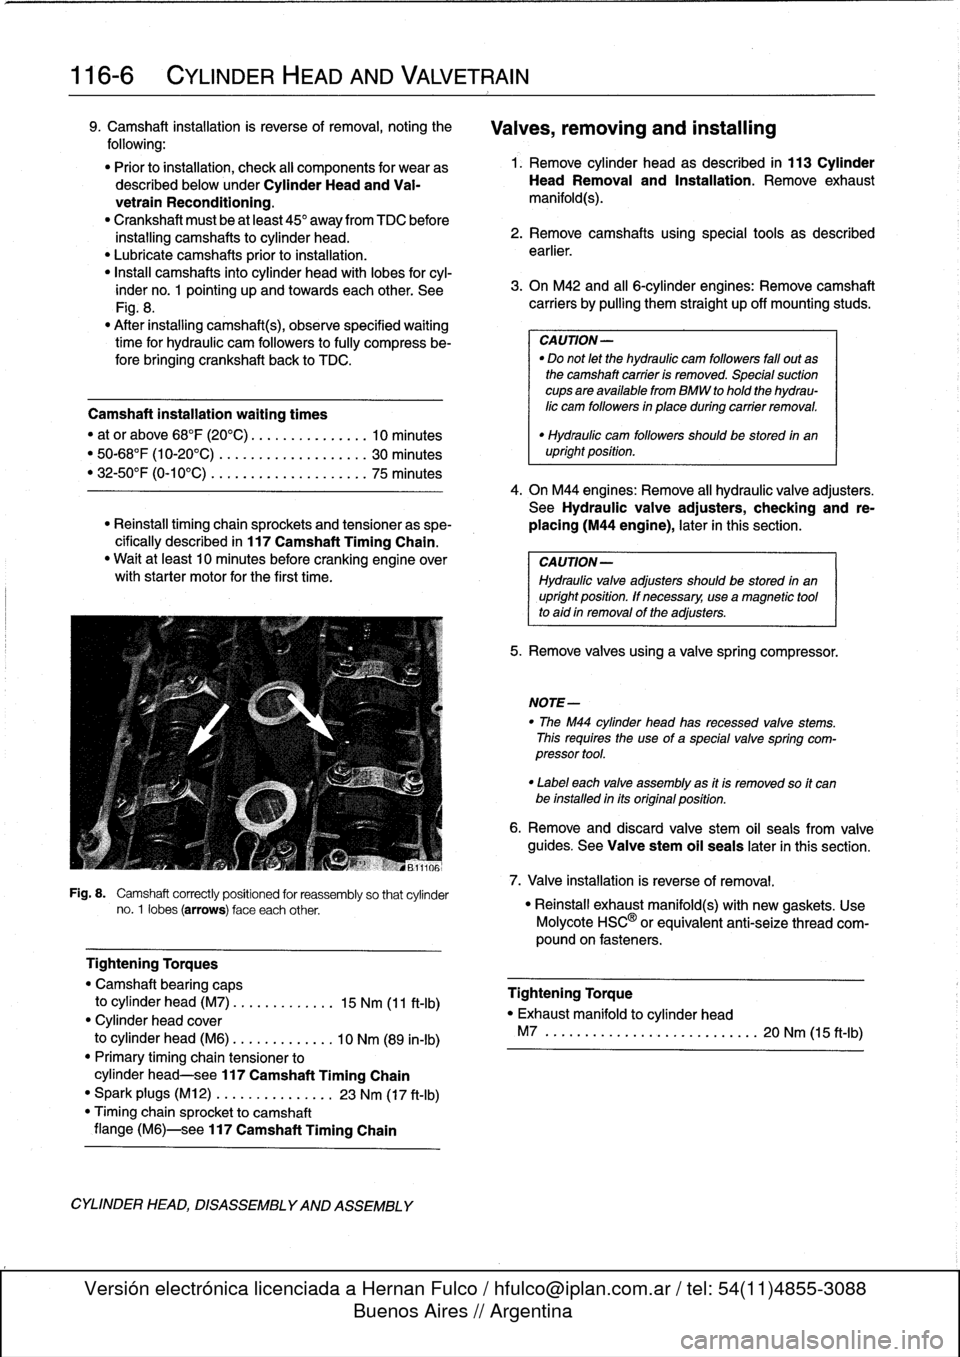
Fig
.
8
.
Camshaft
correctly
positioned
for
reassembly
so
thatcylinder
no
.
1
lobes
(arrows)
face
each
other
.
Tightening
Torques
"
Camshaft
bearing
caps
to
cylinder
head
(M7)
.
..
...
..
.
....
15
Nm
(11
ft-Ib)
"
Cylinder
head
cover
to
cylinder
head
(M6)
..
.
..........
10
Nm
(89
in-lb)
"
Primary
timing
chaintensioner
to
cylinder
head-see
117
Camshaft
Timing
Chain
"
Spark
plugs
(M12)
.............
.
.
23
Nm
(17
ft-Ib)
"
Timing
chain
sprocket
to
camshaft
flange
(M6)-see
117
Camshaft
Timing
Chain
CYLINDER
HEAD,
DISASSEMBLYAND
ASSEMBLY
Valves,
removing
and
installing
1
.
Remove
cylinder
head
as
described
in
113
Cylinder
HeadRemoval
and
Installation
.
Remove
exhaust
manifold(s)
.
2
.
Remove
camshafts
using
special
tools
as
descríbed
earlier
.
3
.
On
M42
and
al¡
6-cylinder
engines
:
Remove
camshaft
carriers
by
pulling
them
straight
up
off
mounting
studs
.
CAUTION-
"
Do
not
let
the
hydraulic
cam
followers
fa¡¡
out
as
the
camshaft
carrier
is
removed
.
Special
suction
cupsare
available
from
BMW
to
hold
the
hydrau-
lic
cam
followers
in
place
during
carrier
removal
.
Camshaft
installation
waiting
times
"
at
or
above
68°F
(20
0
C)
....
..
.
..
......
10
minutes
"
50-68°F
(10-20°C)
...
.
..
....
.
..
......
30
minutes
"
32-50°F
(0-10°C)
....
.
..
....
.
..
......
75
minutes
4
.
On
M44
engines
:
Remove
all
hydraulic
valve
adjusters
.
See
Hydraulicvalve
adjusters,
checking
and
re-
"
Reinstall
timing
chainsprockets
and
tensioner
as
spe-
placing
(M44
engine),
later
in
this
section
.
cifically
described
in
117
Camshaft
Timing
Chain
.
"
Waít
at
least
10
minutes
before
cranking
engine
over
CAUTION-
withstarter
motor
for
the
first
time
.
Hydraulic
valve
adjusters
should
be
stored
in
an
upright
position
.
lf
necessary,
use
amagnetic
tool
to
aid
in
removal
of
the
adjusters
.
"
Hydraulic
cam
followers
shouldbe
stored
in
an
upright
position
.
5
.
Remove
valves
using
a
valve
spring
compressor
.
NOTE-
"
The
M44
cylinder
head
has
recessed
valve
stems
.
This
requires
the
use
of
a
special
valve
spring
com-
pressor
tool
.
"
Label
each
valve
assembly
as
it
is
removed
so
it
can
be
installed
in
its
original
position
.
6
.
Remove
and
discard
valve
stem
oil
seals
from
valve
guides
.
See
Valve
stem
oil
seals
later
in
this
section
.
7
.
Valve
installation
is
reverse
of
removal
.
"
Reinstall
exhaust
manifold(s)
with
new
gaskets
.
Use
Molycote
HSC'
5
or
equivalent
anti-seize
thread
com-
pound
on
fasteners
.
Tightening
Torque
"
Exhaust
manifold
to
cylinder
head
M7
............
..
...
....
.
...
..
20
Nm
(15
ft-Ib)