relay BMW M3 1995 E36 Workshop Manual
[x] Cancel search | Manufacturer: BMW, Model Year: 1995, Model line: M3, Model: BMW M3 1995 E36Pages: 759
Page 22 of 759
010-14
FUNDAMENTALS
FOR
THE
DO-ITYOURSELF
OWNER
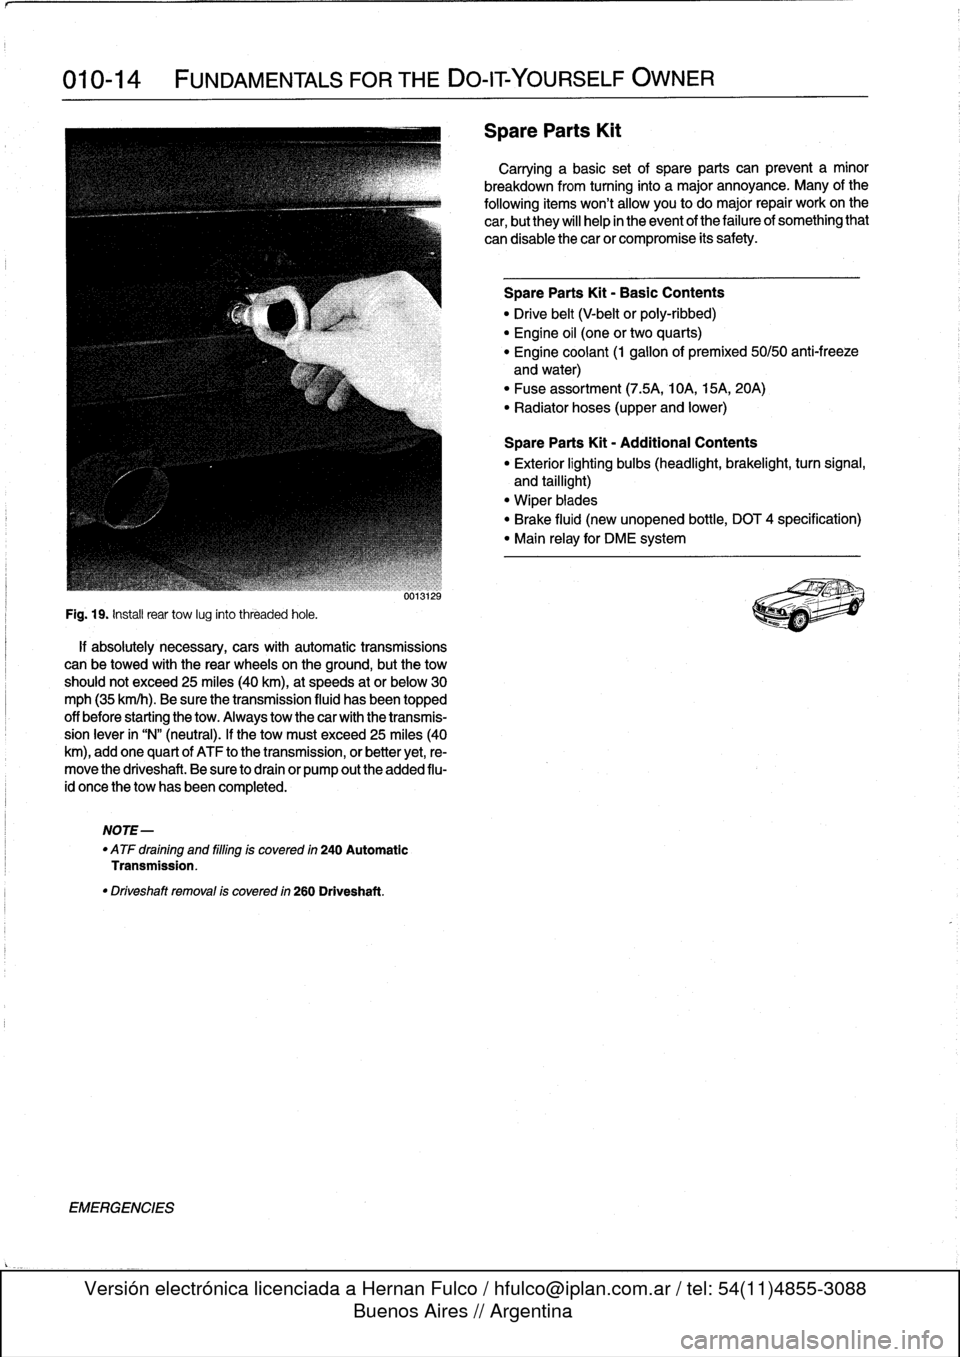
Fig
.
19
.
Instaf
rear
tow
lug
into
threaded
hole
.
if
absolutely
necessary,
cars
with
automatic
transmissions
can
be
towed
with
the
rear
wheels
on
the
ground,
butthe
tow
should
not
exceed
25
miles
(40
km),at
speeds
at
or
below30
mph
(35
km/h)
.
Be
sure
the
transmission
fluid
hasbeen
topped
off
before
starting
the
tow
.
Always
tow
thecar
with
the
transmis-
sion
lever
in
"N"
(neutral)
.
If
the
tow
must
exceed25
miles
(40
km),
add
one
quart
of
ATF
to
the
transmission,
or
better
yet,
re-
move
the
driveshaft
.
Be
sure
to
drain
or
pump
outthe
added
flu-
id
once
the
tow
has
been
completed
.
NOTE-
"
ATF
draining
and
filling
is
covered
in
240
Automatic
Transmission
.
"
Driveshaft
removal
is
covered
in
260
Driveshaft
.
EMERGENCIES
úo1W¿b
Spare
Parts
Kit
Carrying
a
basic
set
of
spare
parts
can
prevent
a
minor
breakdown
from
turning
into
a
major
annoyance
.
Many
of
the
following
itemswon't
allow
you
todo
major
repair
workon
the
car,
but
they
will
help
in
the
event
of
the
failure
of
something
that
can
disable
thecar
or
compromise
its
safety
.
Spare
Parts
Kit
-
Basic
Contents
"
Drive
belt
(V-belt
or
poly-ribbed)
"
Engine
oil
(one
or
two
quarts)
"
Engine
coolant
(1
gallonof
premixed
50/50
anti-freeze
and
water)
"
Fuse
assortment
(7
.5A,
10A,
15A,
20A)
"
Radiator
hoses
(upper
and
lower)
Spare
Parts
Kit
-
Additional
Contents
"
Exterior
lighting
bulbs
(headlight,
brakelight,
turn
signal,
and
taillight)
"
Wiper
biades
"
Brake
fluid
(new
unopened
bottle,
DOT
4
specification)
"
Main
relay
for
DME
system
Page 46 of 759
100-4
ENGINE-GENERAL
'
TEMP
PRECAT
POST
CAT
OXYGENSENSOR
HEATING
#
.
THROTTLE
POSITION
FUEL
INJECTOR
CONTROL
(SEQUENTIAL)
OPERATING
POWER
00
CAMSHAFT
POSITION
SENSOR
ECM
I
MAIN
GROUND
RELAY
J_
-
AC
COMPRESSOR
RELAY
CONTROL
TERMINAL
15
MEMORY
POWER
FUEL
PUMP
RELAY
CONTROL
AUX
GROUND
P
CRANKSHAFT
POSITION
dESENSOR
INTAKE
AIR
ENGINE
COOLANT
TEMP
FUEL
TANK
PRESSURE
SENSOR
S-EML
S-MSR
ASC
S-ASC
VEHICLE
SPEED
LOW
FUEL
LEVEL
A/C
SWITCH
ON
(AC)
E36
IHKA
COMPRESSOR"ON"
SIGNAL
(KO)
INDIVIDUAL
SERIAL
NUMBER
MS41
.1
SECONDARY
AIR
1NJECTION
AIR
PUMP®
RELAY
CONTROL
IDLE
CONTROL
VALVE
'M
FUEL
INJECTION
(TI)
ENGINE
SPEED
(TD)
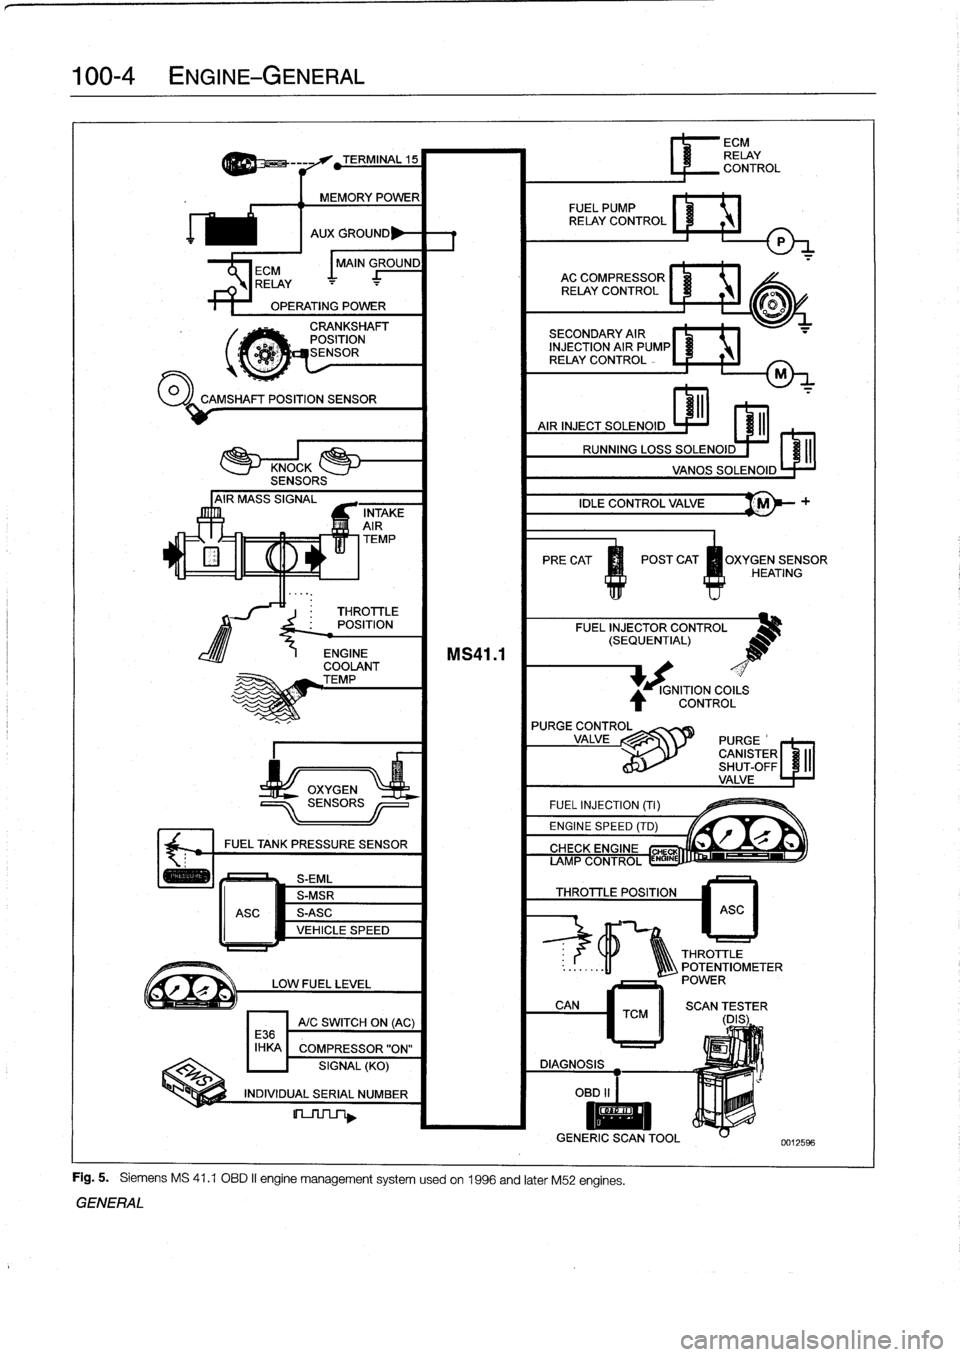
Fig
.
5
.
Siemens
MS
41
.1
OBD
II
engine
management
systemusedon
1996
and
later
M52
engines
.
GENERAL
IGNITION
COILS
CONTROL
L
r"Q
if~
CIYVFIYC
CHE
AMP
CONTROL
ENGINE
THROTTLE
POSITION
6
ECM
RELAY
CONTROL
ASC
THROTTLE
..
:
.
.
..
-11
1Q\\\
POTENTIOMETER
POWER
CAN
TCM
II
SCAN
(DES
;
ER
DIAGNOSIS
OBD
II
I
II
GENERIC
SCANTOOL
0012596
Page 48 of 759
100-6
ENGINE-GENERAL
Cylinder
compression,
checking
A
compression
tester
is
needed
to
make
a
compression
test
.
To
obtain
accurate
test
results,
the
battery
and
starter
must
be
capable
of
cranking
the
engine
at
250-300
rpm,
and
theen-
gine
should
be
at
normal
operating
temperature
.
Use
com-
pressed
air
to
clean
aroundthe
spark
plugs
before
removal
.
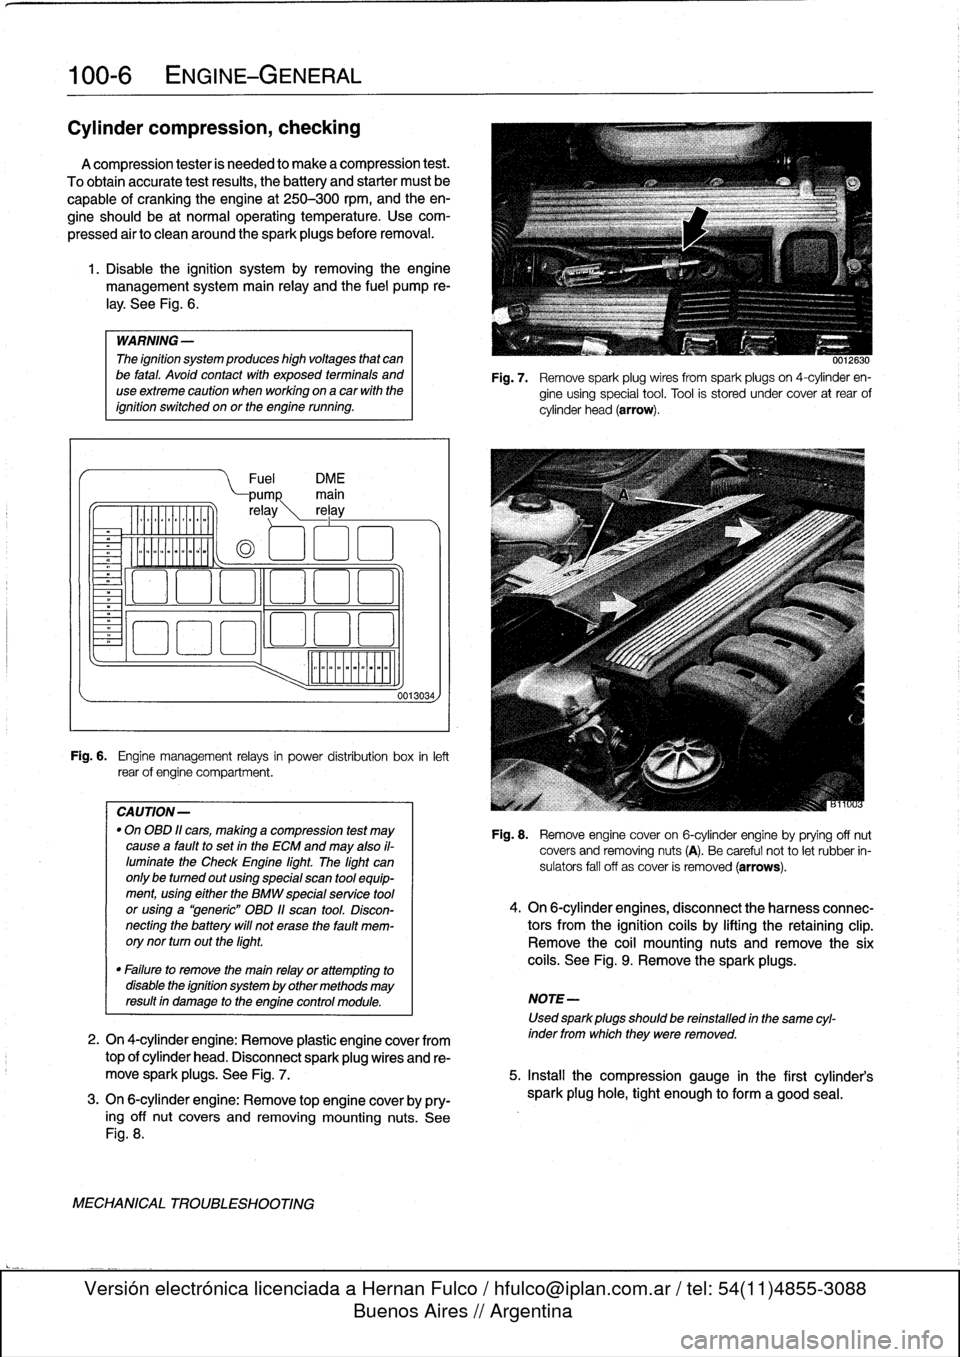
1
.
Disable
the
ignítion
system
by
removing
the
engine
management
system
main
relay
and
the
fuel
pump
re-
¡ay
.
See
Fig
.
6
.
WARNING
-
The
ignítion
system
produces
high
voltages
that
canbe
fatal
.
Avoid
contact
with
exposed
termínals
and
useextreme
caution
when
working
on
acar
wíth
the
ignítion
switched
on
or
the
engine
running
.
Fuel
DM
E
pump
main
re
ay
rel
ay
o
oa
ooa
.,
o00
oao
Fig
.
6
.
Engine
management
relays
in
power
distribution
box
inleft
rear
of
engine
compartment
.
CAUTION-
"
On
OBD
11
cars,
making
a
compression
test
may
causea
faultto
set
in
the
ECM
and
may
also
il-
luminate
the
Check
Engine
light
.
The
light
can
only
be
tumed
out
using
special
scan
tool
equip-
ment,using
eíther
the
BMW
specialservíce
tool
or
using
a
"generic"
OBD
11
scan
tool
.
Discon-
necting
the
battery
will
not
erase
the
fault
mem-
orynor
turn
outthe
light
.
0013034,
0012630
Fig
.
7
.
Remove
spark
plug
wires
from
spark
plugs
on
4-cylinder
en-
gine
using
special
tool
.
Tool
is
stored
under
cover
at
rear
of
cylinder
head
(arrow)
.
Fig
.
8
.
Remove
engine
cover
on
6-cylinder
engine
byprying
off
nut
covers
and
removing
nuts
(A)
.
Be
careful
not
to
let
rubber
in-
sulators
fall
off
as
cover
is
removed
(arrows)
.
4
.
On
6-cylinder
engines,
disconnect
the
harness
connec-
tors
from
the
ignítion
coils
by
lifting
the
retaining
clip
.
Remove
the
coil
mounting
nuts
andremove
the
six
coils
.
See
Fig
.
9
.
Remove
the
sparkplugs
.
"
Failure
to
remove
the
main
relay
or
attempting
to
disable
the
ignítion
system
by
other
methods
may
resultin
damage
to
the
engine
control
module
.
NOTE-
Used
sparkplugs
should
be
reinstalled
in
the
same
cyl-
2
.
On
4-cylinder
engine
:
Remove
plastic
engine
cover
from
inder
fromwhich
they
were
removed
.
top
of
cylinder
head
.
Disconnect
spark
plug
wires
and
re-
move
spark
plugs
.
See
Fig
.
7
.
5
.
Insta¡¡
the
compression
gauge
in
the
first
cylinder's
3
.
On
6-cylinder
engine
:
Remove
top
engine
coverby
pry-
spark
plug
hole,
tight
enough
to
form
a
good
seal
.
ing
off
nut
covers
and
removing
mounting
nuts
.
See
Fig
.
8
.
MECHANICAL
TROUBLESHOOTING
Page 52 of 759
100-
1
0
ENGINE-GENERAL
Table
d
.
OBD
I
Fault
(Blink)
Codes
(continued)
(1992-1995
modeis
only)
Graphic
representation
of
flashing
Check
Engine
light
fault
code
:
1221
-
;
5
Seconds
.
;--~
2
.5
r
----------------
Check
Engine
light
on
Fault
code
and
meaning
Corrective
action
Check
Engine
light
off
Code
1243
:
Crankshaft
position
sensor
(DME
3
.3
.1
only)
Test
crankshaft
position/rpm
sensor
and
wiring
from
sensor
lo
DME
control
module
.
Repair
Group
120
Code
1244
:
Camshaft
position
sensor
(DME
3
.3
.1
only)
Test
camshaft
position
sensor
and
wiring
fromsensor
to
DME
con-
trol
module
.
Repair
Group
130
Code
1245
:
Electronic
transmission
control
intervention
(DME
3
.3
.1
Check
wiring
between
DME
control
module
and
auto
.
transmission
only)
control
module
Code
1247
:
Ignition
secondary
monitor
(DME
3
.3
.1
only)
Check
secondary
voltage
lo
ignition
coils
.
Check
wiringat
ignition
coils
.
Repair
Group
120
Code
1251
:
Fuel
injector
#1
(DME
3
.113
.3
.1
only)
1
Test
injector
operation/signal
lo
injector
.
Repair
group130
Code
1252
:
Fuel
injector
#2
(DME
3
.113
.3
.1
only)
Test
injector
operation/signal
lo
injector
.
Repair
group130
Code
1253
:
Fuel
injector
#3
(DME
3
.1/3
.3
.1
only)
Test
injector
operation/signal
to
injector
.
Repair
group130
Code
1254
:
Fuel
injector
#4
(DME
3
.1/3
.3
.1
only)
Test
injector
operation/signal
to
injector
.
Repair
group
130
Code
1255
:
Fuel
injector
#5
(DME
3
.1/3
.3
.1
only)
Test
injector
operation/signal
to
injector
.
Repair
group130
Code
1256
:
Fuel
injector
#6
(DME
3
.1/3
.3
.1
only)
Test
injector
operation/signal
lo
injector
.
Repair
group130
Code
1261
:
Fuel
pump
control
Test
fuel
pump
relay
and
fuel
pump
circuit
.
Repairgroup
160
Code
1262
:
Idle
speed
control
Test
idleair
controlvalve
and
signalto
valve
.
Repair
Group
130
Code
1263
:
Fuel
tank
evaporative
(EVAP)
system
Test
EVAP
purge
valve
.
Repair
Group
160
Code
1264
:
Oxygen
sensor
heater
1
Test
oxygen
sensorheater
and
heater
relay
.
Repair
group
130
Code
1265
:
Check
engine
lamp
(DME
3
.3.1
only)
1
Test
for
faulty
bulb
or
wiring
.
Electrical
Wiring
Diagrams
Code
1266
:
VANOS
(DME
3
.3
.1
only)
1
Test
VANOS
solenoid
.
Check
for
signal
to
VANOS
solenoid
.
Code
1267
:
Air
pump
relay
control
(DME
3
.3
.1
only)
Test
air
pump
relay
and
wiring
(where
applicable)
Electrical
Wiring
Diagrams
Code
1271
:
Ignition
coil
#1
(DME
3
.3.1
only)
Test
ignitioncoil
and
wiring
toignitioncoil
.
Repair
Group
120
Code
1272
:
Ignition
coil
#2
(DME
3
.3.1
only)
Test
ignitioncoil
and
wiring
loignitioncoil
.
Repair
Group
120
Code
1273
:
Ignition
coil
#3
(DME
3
.3.1
only)
Test
ignitioncoil
and
wiring
loignitioncoil
.
Repair
Group
120
Code
1274
:
Ignítion
coil
#4
(DME
3
.3.1
only)
Test
ignitioncoil
and
wiring
toignitioncoil
.
Repair
Group
120
Code
1275
:
Ignitioncoil
#5
(DME
3
.3.1
only)
Test
ignition
coil
and
wiring
loignitioncoil
.
Repair
Group
120
Code
1276
:
Ignition
coil
#6
(DME
3
.3.1
only)
Test
ignitioncoil
and
wiring
loignitioncoil
.
Repair
Group
120
Code
1281
:
DME
control
module
memory
supply
(DME
3
.3
.1
only)
Check
voltage
supply
from
battery
lo
DME
control
module
.
Electri-
Code
1282
:
Fault
code
memory
(DME
3
.3.1
only)
Check
DME
control
module
inputs/outputs
.
Control
module
may
be
faulty
.
Repair
Group
130
Code
1283
:
Fuel
injector
output
stage
(DME
3
.3
.1
only)
Check
DME
control
module
inputs/outputs
.
Control
module
may
be
faulty
.
Repair
Group
130
DRIVEABILITY
TROUBLESHOOTING
cal
Wiring
Diagrams
Page 57 of 759
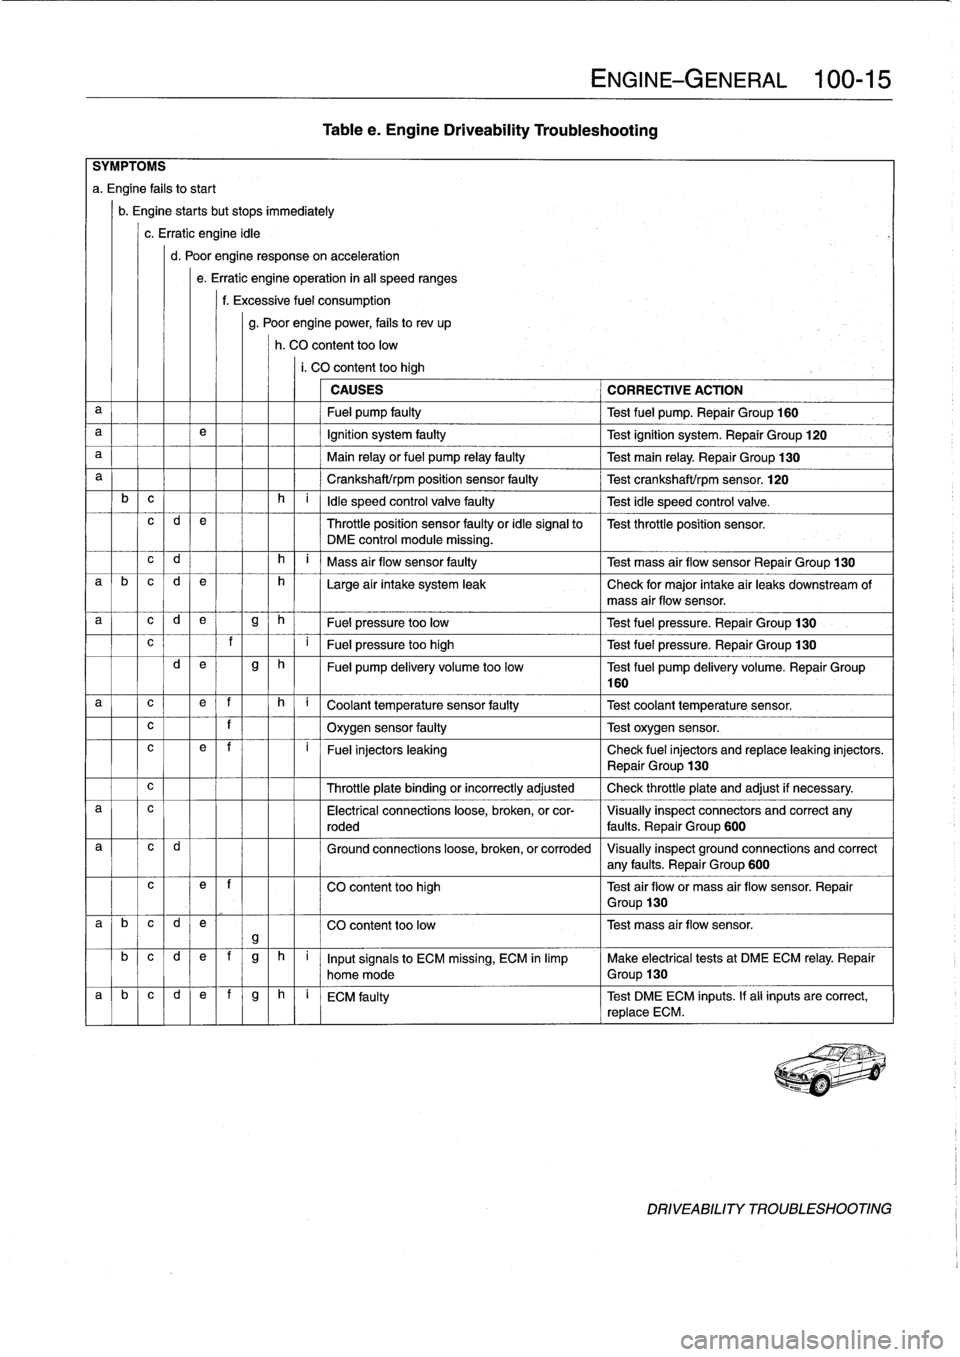
al
Icld
Table
e
.
Engine
Driveability
Troubleshooting
c
l
1
I
f
I
I
Oxygen
sensor
faulty
Test
oxygen
sensor
.
ENGINE-GENERAL
100-
1
5
SYMPTOMS
a
.
Engine
fafs
tostart
b
.
Engine
startsbut
stops
immediately
c
.
Erratic
engine
idle
d
.
Poor
engine
responseon
acceleration
e
.
Erratic
engine
operation
in
al¡
speed
ranges
f
.
Excessive
fuel
consumption
g
.
Poor
enginepower,
fails
to
rev
up
h
.
CO
content
toolow
i.
CO
content
too
high
CAUSES
CORRECTIVE
ACTION
a
Fuel
pump
faulty
Test
fuel
pump
.
Repair
Group
160
a
e
Ignition
system
faulty
Test
ignition
system
.
Repair
Group
120
a
Main
relay
or
fuel
pump
relay
faulty
Test
main
relay
.
Repair
Group
130
a
Crankshaft/rpm
position
sensor
faulty
Test
crankshaft/rpm
sensor
.
120
b
c
h
i
ldle
speed
control
valve
faulty
Test
idle
speed
control
valve
.
c
d
e
Throttle
position
sensor
faulty
or
idle
signal
to
Test
throttle
position
sensor
.
DME
control
module
missing
.
c
d
h
i
Mass
air
flow
sensor
faulty
Test
mass
air
flow
sensor
Repair
Group
130
a
b
c
d
e
h
Large
air
intake
system
leak
Check
for
major
intake
air
leaks
downstream
of
mass
air
flow
sensor
.
a
c
d
e
g
h
Fuel
pressure
too
low
Test
fuel
pressure
.
Repair
Group
130
?
I
F
ue
l
pr
essu
r
e
t
oo
high
T
est
f
u
el
pressure
.
Repair
Group
130
d
e
g
h
Fuel
pump
delivery
volume
too
low
Test
fuel
pump
delivery
volume
.
Repair
Group
160
a
c
e
f
h
q
C
oo
l
a
nt
t
e
mp
e
r
a
t
u
r
e
se
n
so
r
f
au
lty
--]
T
est
coo
l
a
n
t
temp
erature
sensor
.
c
e
~
f
i
~
Fuel
injectors
leaking
Check
fuel
injectors
and
replace
leaking
injectors
.
~
Repair
Group
130
Throttle
plate
binding
or
incorrectly
adjusted
Check
throttle
plate
and
adjust
if
necessary
.
a
c
Electrical
connections
loose,
broken,
or
cor-
Visually
inspect
connectors
and
correct
any
roded
faults
.
Repair
Group
600
Ground
connections
loose,
broken,
or
corroded
Visually
inspect
ground
connections
and
correct
any
faults
.
Repair
Group
600
c
e
~
f
CO
content
too
high
Test
air
flowor
mass
air
flow
sensor
.
Repair
~
Group
130
a
b
c
d
e
CO
content
too
low
Test
mass
air
flow
sensor
.
gb
c
d
e
f
g
h
i
Inputsignals
to
ECM
missing,
ECM
in
limp
Make
electrical
tests
at
DMEECM
relay
.
Repair
home
mode
Group
130
a
~
b
~
c
~
d
e]
f
g
h
i
ECM
faulty
Test
DMEECM
inputs
.
If
all
inputs
are
correct,
replace
ECM
.
DRIVEABILITY
TROUBLESHOOTING
Page 126 of 759
120-2
IGNITION
SYSTEM
Fig
.1
.
Ignition
characteristic
map
.
Disabling
Ignition
System
WARNING
-
The
ignition
system
is
a
high-energy
system
operat-
ing
in
a
dangerous
voltage
range
that
couldprove
to
be
fatal
if
exposed
terminals
or
live
parts
are
con-
tacted
.
Use
extreme
caution
when
working
on
a
car
with
the
ignition
on
or
the
engine
running
.
The
ignition
system
operates
in
a
lethal
voltage
range
and
should
therefore
be
disabied
any
time
senrice
or
repair
work
is
being
doneon
the
engine
that
requires
the
ignition
to
be
switched
on
.
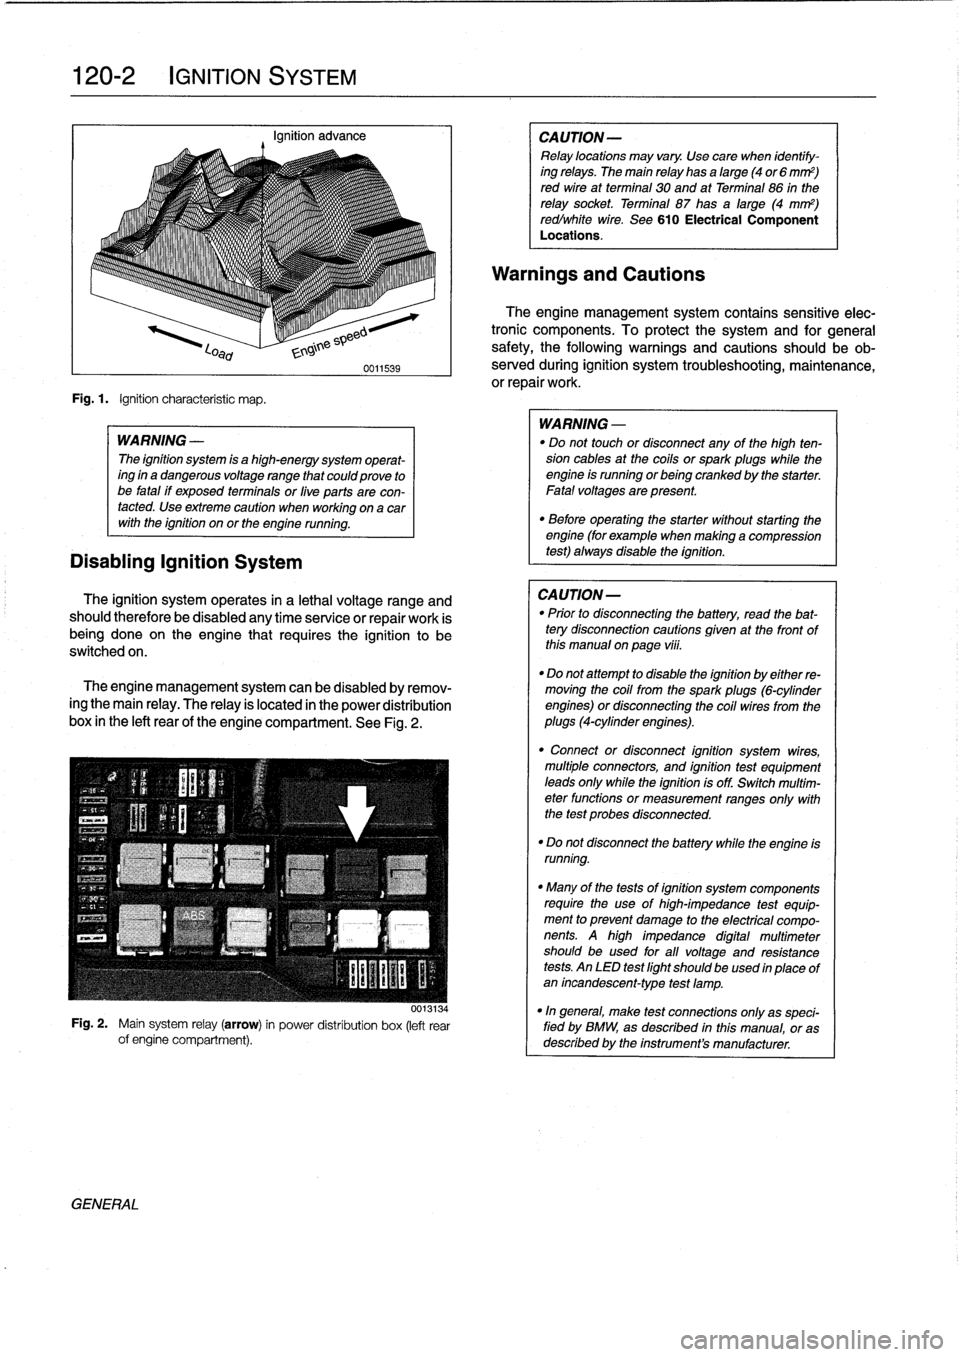
The
engine
management
system
can
be
disabled
byremov-
ingthe
main
relay
.
The
relay
is
located
in
the
power
distribution
box
in
the
left
rear
of
the
engine
compartment
.
See
Fig
.
2
.
0013134
Fig
.
2
.
Maínsystem
relay
(arrow)
in
power
distribution
box
(left
rear
of
engine
compartment)
.
GENERAL
WARNING
-
"
Do
not
touch
or
disconnect
any
of
the
high
ten-
sion
cables
at
the
cotls
orspark
plugs
while
the
engine
ts
running
orbeingcranked
by
the
starter
.
Fatalvoltages
are
present
.
"
Before
operating
the
starter
without
starting
the
engine
(for
example
when
making
a
compression
test)
always
disable
the
ignition
.
CAUTION-
"
Prior
to
disconnecting
the
battery,
read
the
bat-tery
disconnection
cautions
gtven
at
the
front
of
thts
manual
on
page
viti
.
"
Do
not
attempt
to
disable
the
ignition
by
either
re-
moving
the
cotl
from
the
spark
plugs
(6-cylinder
engines)
or
disconnecting
the
coll
wires
from
the
plugs
(4-cylinder
engines)
.
"
Connect
or
disconnect
ignition
system
wires,
multiple
connectors,
and
ignition
test
equipment
leads
only
while
the
ignitionis
off
.
Switch
multtm-
eter
functions
or
measurement
ranges
onty
with
the
test
probes
disconnected
.
"
Do
not
disconnect
the
battery
while
the
engine
ts
running
.
"
Many
of
the
tests
of
ignition
system
components
require
the
use
of
high-impedance
test
equip-
ment
to
prevent
damage
to
the
electrical
compo-
nents
.
A
high
impedance
digital
multimeter
should
be
used
for
all
voltage
and
resistance
tests
.
AnLED
test
light
shouldbe
used
in
place
of
an
incandescent-type
test
lamp
.
"In
general,
make
test
connections
only
as
speci-fied
by
BMW,
as
described
inthis
manual,
or
as
described
by
the
instrumenta
manufacturer
.
Page 132 of 759
120-8
IGNITION
SYSTEM
1
1
.0
GN
1
.0
Gl
.0
GN
I
Ign
coil
1
.0
GN
.
Tti
%ti
r,
_%ti
_
_
ice_
I
25
52
5524
51
54
56
I
Power
input
power
input
t
U
Engine
Control
Module
(Bosch
DME
Ml
.7)
II
Powerinput
Mainrelaycontrol
I
15
42
43
16442868
67
34
6
26
27
1
-----
__
V
_
--
_
~
8K
.35
BK
.35
13,1
1
.35
YE
1
.35
BK35
VE
.35
3
cyl
.1
1
11
E
S
2
1
.0
BR
2
.5
BR
Ign
.
coil
cyl
.
3
II
Ign
.
coil
Ign
.
coil
3
cyI
.
2
1
Y
_
Y
2
k
3
cyl
.
4
IGNITION
SYSTEM
SCHEMATICS
Battery
voltage
in
run
or
start
(
vía
ignition
switchterminal
15)
WIRING
COLOR
CODE
4
.0
GN
1
.0
BR'V
.
Camshaft
Knock
Sensor
Knock
Sensor
Position
(cyl
.1-2)
(cyl
.3-4)
Sensor
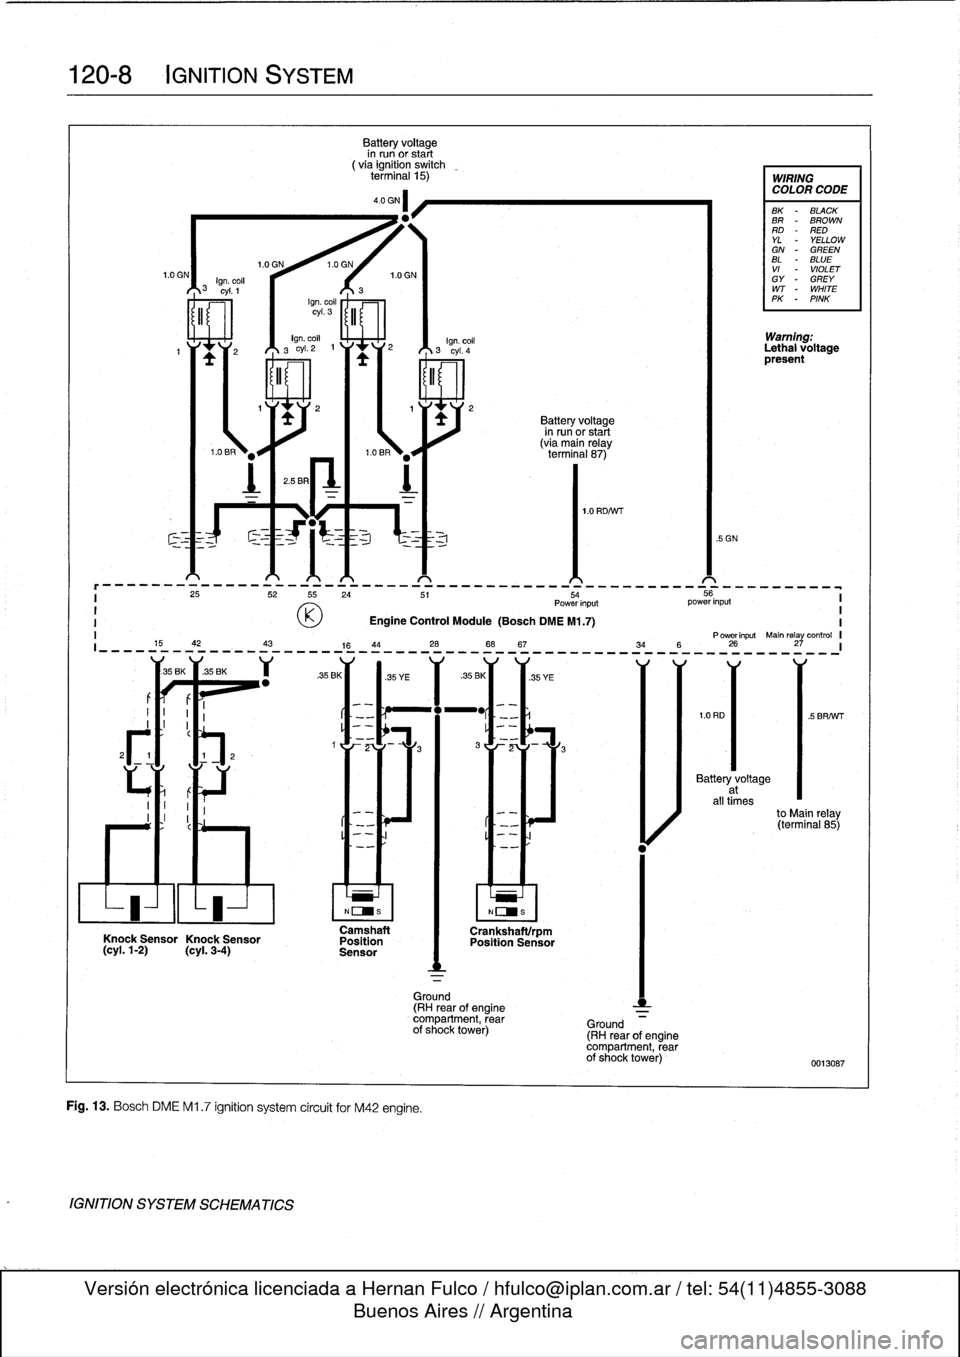
Fig
.
13
.
Bosch
DME
M1
.7
ignition
system
circuit
for
M42
engine
.
Ground
(RH
rearof
engine
compartment,
rear
of
shock
tower)
N[INS
Crankshaftlrpm
Position
Sensor
Battery
voltage
in
run
or
start
(vía
main
relay
terminal
87)
Ground
(RH
rearof
engine
compartment,
rearof
shock
tower)
5GN
BK
-
BLACK
BR
"
BROWN
RD
-
RED
YL-
YELLOW
GN
-
GREEN
BL
-
BLUE
VI
-
VIOLET
GY
-
GREY
WT
-
WHITE
PK
-
PINK
Warning
:
Lethal
voltagepresent
Battery
voltage
at
all
times
to
Main
relay
(terminal
85)
'Y
Y
---------------------
0013087
Page 133 of 759
^1
.5WT
^1
.5RD
^1
.5YL
^1
.5BL
r
--__
____-
__-_
___-_
-___-_____--__--
-____-___
____-
i
26
g
5022
23
54
5
I
Power
input
power
input
I
Engine
Control
Module
(Bosch
DME
M5
.2)
I
I
grounds
I
P
owerinput
Main
relay
control
I
70
40
71
21
2078
34
55
626
27
----------------------
-
---------
-
--
-
------------
-
-----------
.,
v
1
1
.1
v
`
1
35BK
35BK
2
(
1Y
¡3
194
Knock
Sensor
Knock
Sensor
(cyl
.1-2)
(cyl
.3-4)
Frommain
relay
terminal
87
(battery
voltage
in
run
or
start
Battery
voltage
in
run
or
start
(
via
ignition
switch
Warnin
terminal
15)
Lethal
óltage
WIRING
present
COLOR
CODE
2
.5
GN
'
1
.0
YL
/
1
.0
BL
/
1
.0
RDNJT
.35
BK
/
/
.35
BK
Camshaft
Position
Sensor
-_
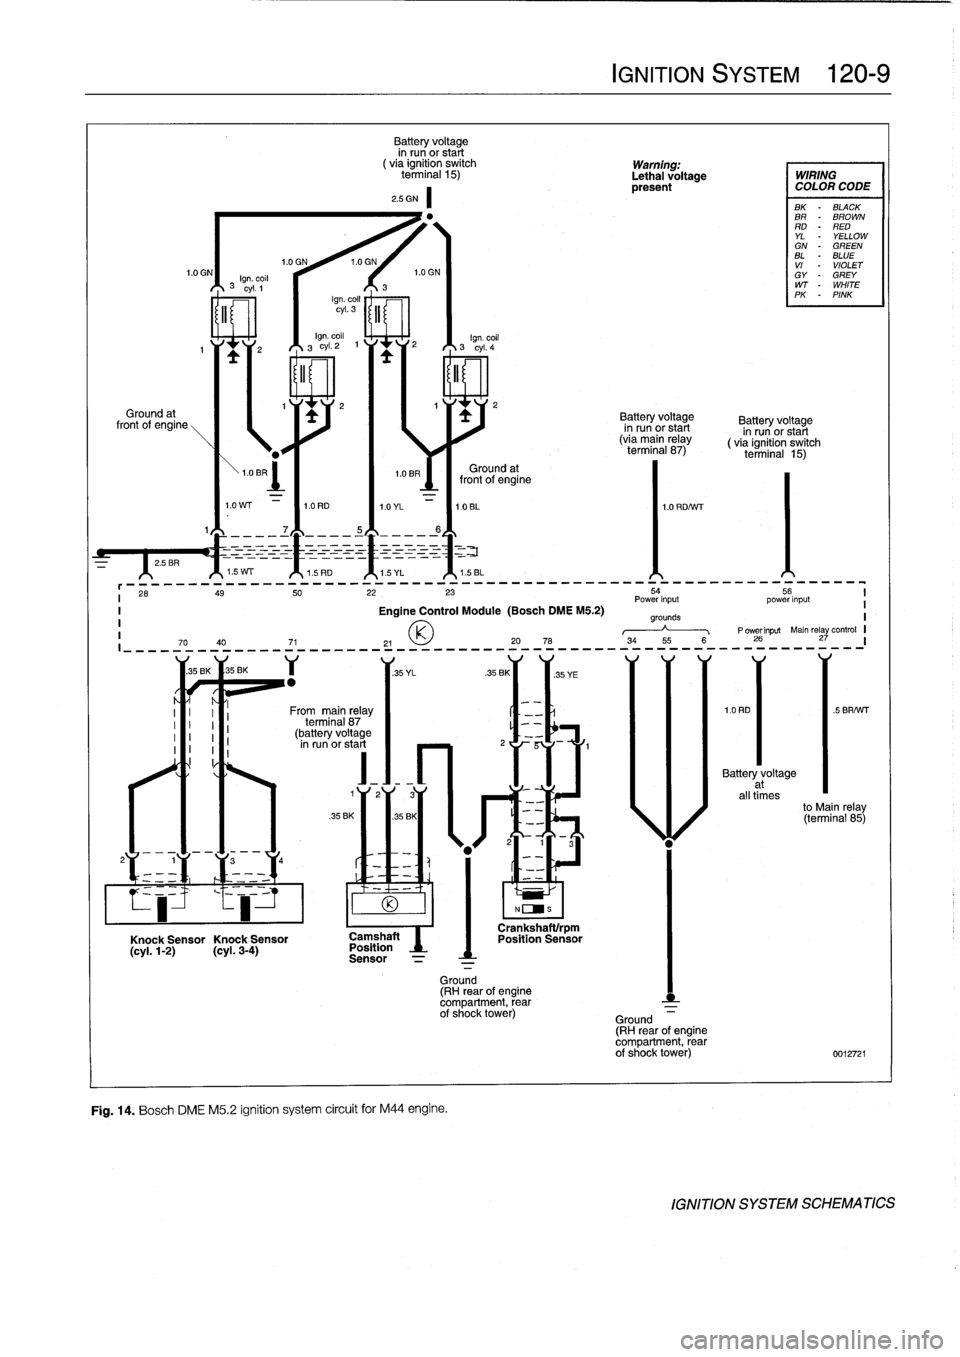
Fig
.
14
.
Bosch
DME
M5
.2
ignition
system
circuit
for
M44
engine
.
Ground
(RH
rear
of
engine
compartment,
rearof
shock
tower)
Crankshaftirpm
Position
Sensor
IGNITION
SYSTEM
120-9
Batteryvoltage
Battery
voltage
in
run
or
start
in
run
or
start
(via
main
relay
(
via
ignition
switch
terminal
87)
terminal
15)
BK
-
BLACX
BR
-
BROWN
RD
-
RED
YL
-
YELLOW
GN
-
GREEN
BL
-
BLUE
VI
-
VIOLET
GY
-
GREY
WT
-
WHITE
PK
-
PINK
Battery
voltage
at
all
times
to
Main
relay
(terminal
85)
Ground
(RH
rear
of
engine
compartment,
rearof
shock
tower)
0012721
lGNITION
SYSTEM
SCHEMATlCS
Page 134 of 759
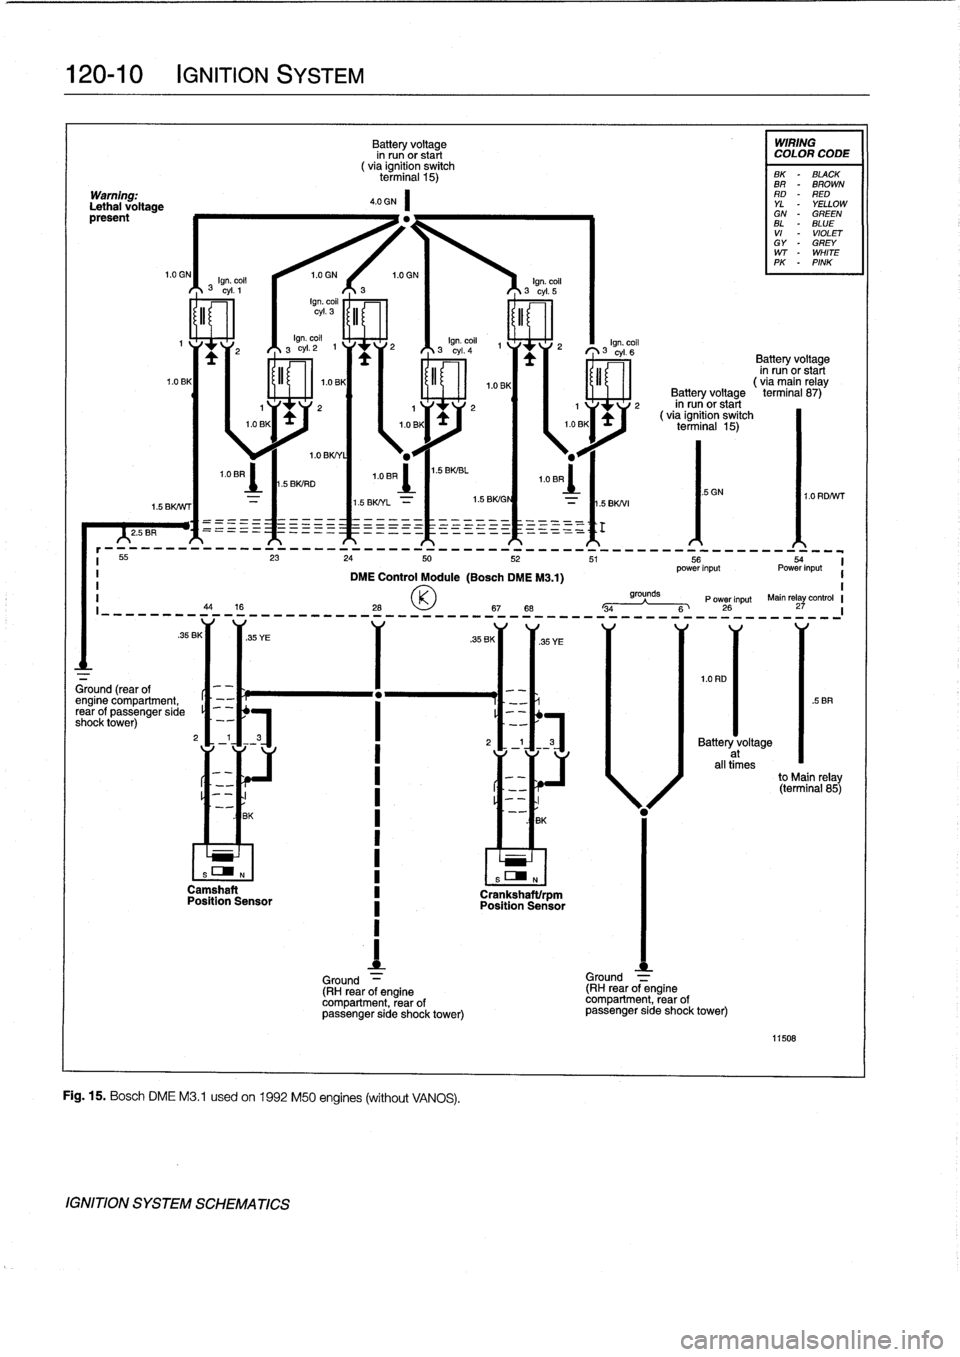
120-10
IGNITION
SYSTEM
Ground
(rear
of
engine
compartment,
rear
of
passenger
side
shock
tower)
.!
BK
Camshaft
Position
Sensor
IGNITION
SYSTEM
SCHEMATICS
Batteryvoltage
in
run
or
start
(
via
ignition
switch
terminal
15)
---------------------------------------------------------
55
S5154
i
power
input
Power
input
1
DME
Control
Module(Bosch
DME
M3
.1)
Ground
-
(RHrear
of
enginecompartment,
rearof
passenger
side
shock
tower)
Fig
.
15
.
Bosch
DME
M3
.1
usedon1992
M50
engines(without
VANOS)
.
.EBK
Crankshaftlrpm
Position
Sensor
5GN
1.0
RD
Ground
(RH
rearof
enginecompartment,
rear
of
passenger
side
shock
tower)
WIRING
COLOR
CODE
BK
-
BLACK
BR
-
BROWN
RD
-
RED
YL
-
YELLOWGN
-
GREEN
BL
-
BLUE
VI-
VIOLET
GY
"
GREY
WT
"
WHITE
PK
-
PINK
Batteryvoltage
in
run
or
start
(
via
main
relay
Battery
voltage
terminal
87)
in
run
or
start
(via
ignition
switch
terminal
15)
11508
1
grounds
Main
rela
control
P
ower
Input
Y
I
-
34
---"--
6
26
27
1
Battery
voltage
at
all
times
to
Main
relay
(terminal
85)
Page 135 of 759
RER
Knock
Sensor
Knock
Sensor
(cyl
.1-3)
(cyl
.4-6)
Batteryvoltage
IMIRING
in
run
or
start
COLORCODE
(
via
ignition
switch
termina¡
15)
BK
BLAOK
BR
BROWN
RD
-
RED
YL
-
YELLOW
GN
"
GREEN
EL
-
BLUF
VI
-
VIOLET
GY
-
GREY
WT
-
WHITE
PK
-
PINK
4
.0
GN
l1/1j\
I'1
/~/1r1
l\r1
1
55
so
si
52
23
25
24
56
54
1
Power
input
Power
input
III
O
Engine
Control
Module
(Bosch
DMEM13
.1)
II
grounds
P
ower
input
Main
relaY
control
I
70
__
_
71
69
17
28
43
16
-34---"-6
26
27
____________________________________________
From
main
relaterminal
87
(battery
voltage
in
run
or
start
.5
YL
Camshaft
Position
Sensor
Ground
(RH
rearof
enginecompartment,
rear
of
shock
tower)
.5
BK
Crankshaft/rpm
Position
Sensor
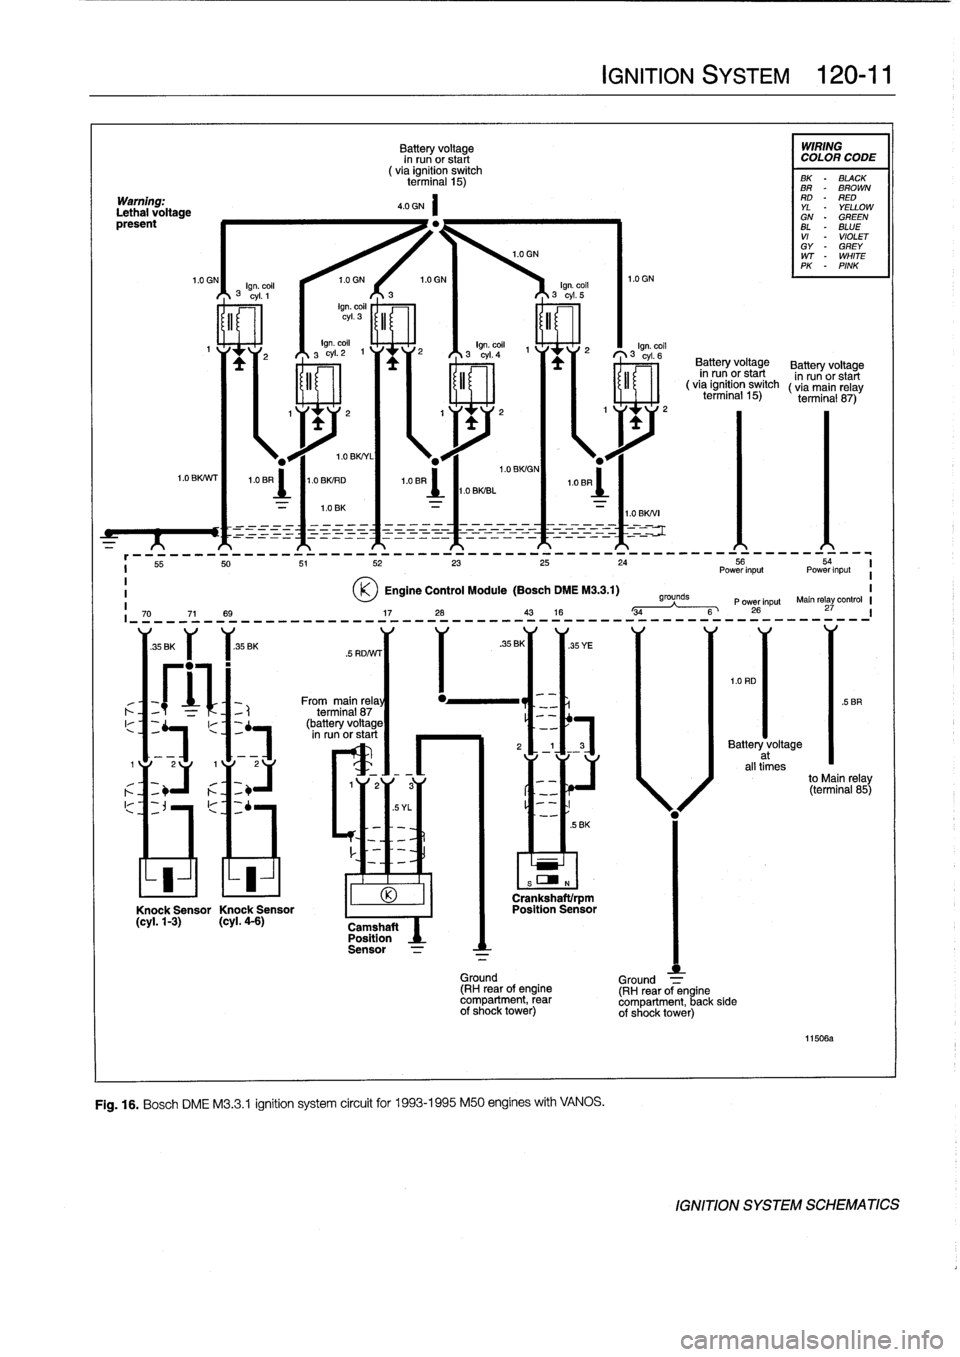
Fig
.
16
.
Bosch
DME
M33
.1
ignition
system
círcuit
for
1993-1995
M50
engines
with
VANOS
.
IGNITION
SYSTEM
120-11
Ground
=
(RH
rear
of
engine
compartment,
back
sideof
shock
tower)
Batteryvoltage
Battery
voltage
in
run
or
start
in
run
or
start
(
via
ignition
switch
(
via
main
relay
terminal
15)
terminal
87)
1
.0
RD
11506a
.5
BR
Batteryvoltage
at
all
times
to
Main
relay
(terminal
85)
IGNITION
SYSTEM
SCHEMATICS