sensor BMW M3 1998 E36 Workshop Manual
[x] Cancel search | Manufacturer: BMW, Model Year: 1998, Model line: M3, Model: BMW M3 1998 E36Pages: 759
Page 302 of 759
340-
1
2
BRAKES
ABS
is
self-tested
by
the
ABS
diagnostic
unit
each
time
the
car
is
started
.
Once
the
test
is
complete,
the
ABS
dashboard
light
tucos
off
.
If
the
light
remains
lit
or
comes
on
at
any
time
during
driving,
a
system
fault
has
occurred
and
ABS
is
elec-
tronically
disabled
.
The
conventional
braking
systemremains
fully
functioning
.
ABS
Inspection
A
visual
inspection
of
the
ABS
may
help
to
locate
system
faults
.
If
no
visual
faults
can
befound
and
the
ABS
light
re-
mains
on,
have
the
system
diagnosedbyan
authorized
BMW
dealer
.
Carefully
inspect
the
entire
ABS
wiring
harness,
particularly
the
pulse
sensorharnesses
and
connectors
near
each
wheel
.
Look
for
chafing
or
damage
due
to
incorrectly
routed
wires
.
Carefully
remove
the
wheelspeed
sensors
.
Clean
the
sen-
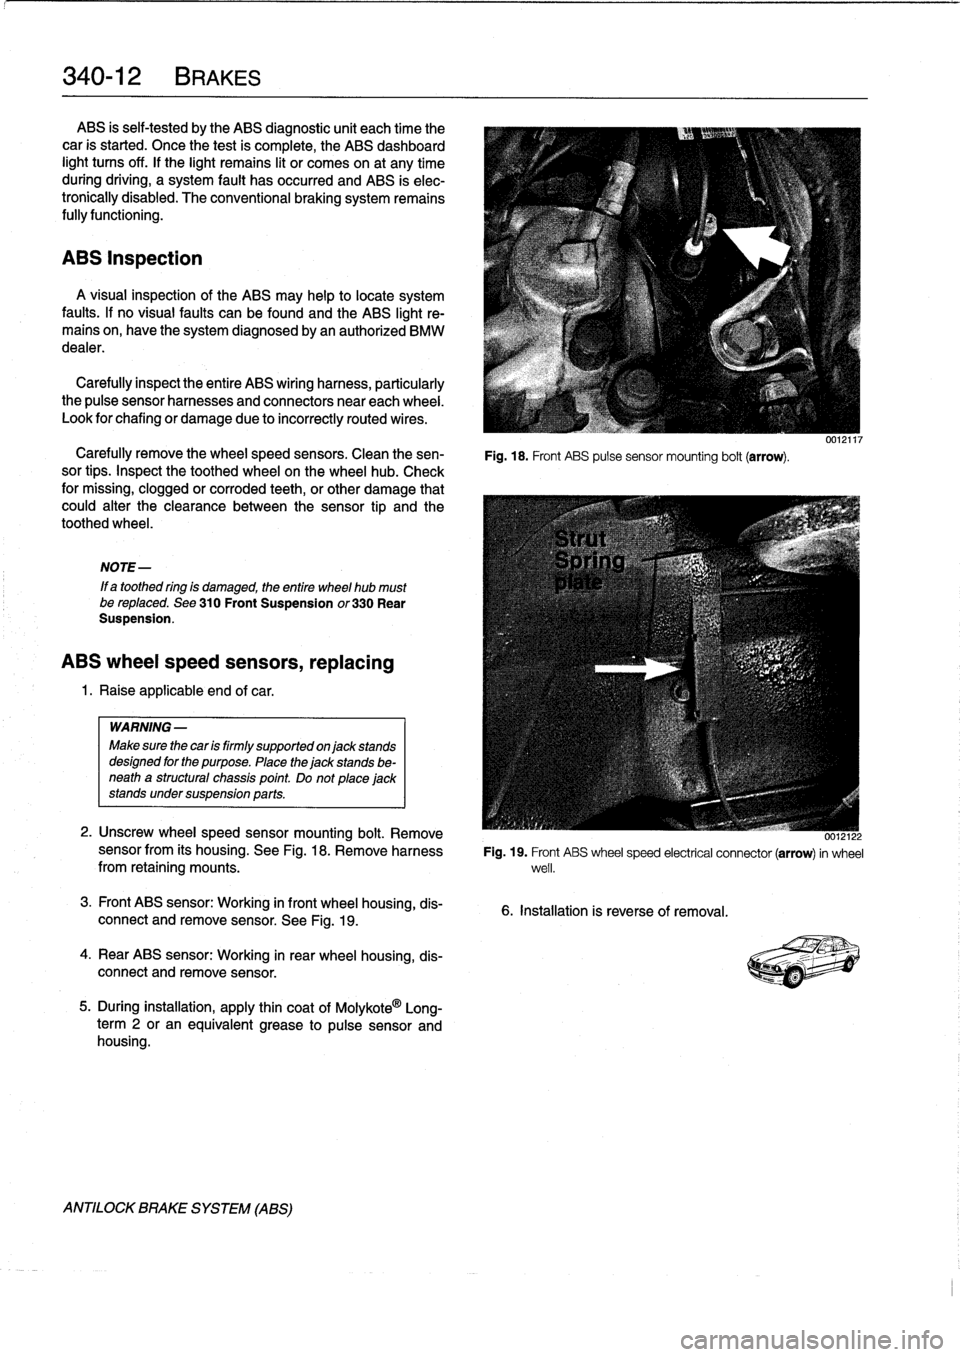
Fig
.
18
.
Front
ABS
pulse
sensor
mounting
bolt
(arrow)
.
sor
tips
.
Inspect
the
toothed
wheel
on
thewheel
hub
.
Check
for
missing,
clogged
or
corroded
teeth,
or
other
damage
that
could
alter
the
clearance
between
the
sensor
tip
and
the
toothed
wheel
.
NOTE-
If
a
toothed
ring
is
damaged,
the
entire
wheel
hub
mustbe
reptaced
.
See
310
Front
Suspension
or330
Rear
Suspension
.
ABS
wheel
speed
sensors,
replacing
1
.
Raise
applicable
end
of
car
.
WARNING
-
Make
sure
thecar
is
firmly
supportedon
jack
stands
designed
for
the
purpose
.
Place
the
jack
stands
be-
neath
a
structural
chassis
point
Do
not
place
jack
stands
under
suspension
parts
.
2
.
Unscrew
wheelspeed
sensor
mounting
bolt
.
Remove
sensor
from
its
housing
.
See
Fig
.
18
.
Remove
harnessfrom
retaining
mounts
.
3
.
Front
ABS
sensor
:
Working
in
front
wheel
housing,
dis-
connect
and
remove
sensor
.
See
Fig
.
19
.
4
.
Rear
ABS
sensor
:
Working
in
rear
wheel
housing,
dis-
connect
andremove
sensor
.
5
.
During
installation,
apply
thin
coat
of
Molykote
0
Long-
term
2
or
an
equivalent
grease
to
pulse
sensor
and
housing
.
ANTILOCK
BRAKE
SYSTEM
(ABS)
0012122
Fig
.
19
.
Front
ABS
wheel
speed
electrical
connector
(arrow)
in
wheel
well
.
6
.
Installation
is
reverse
of
removal
.
Page 326 of 759
510-4
EXTERIOR
TRIM,
BUMPERS
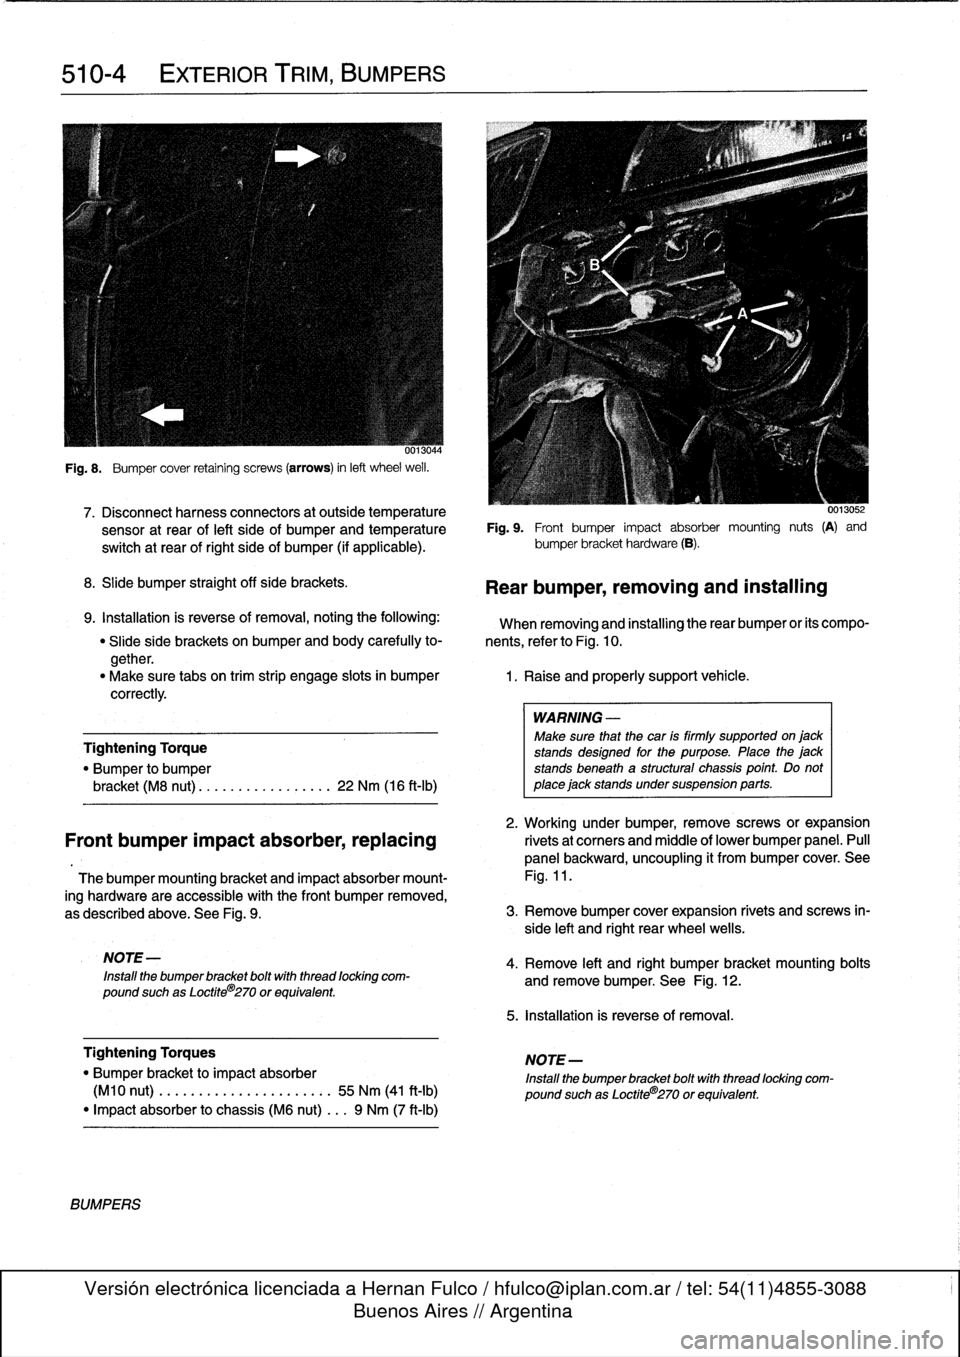
Fig
.
8
.
Bumper
cover
retaining
screws
(arrows)
in
left
wheel
weil
.
7
.
Disconnect
harnessconnectors
at
outside
temperature
0013052
sensor
at
rear
of
left
side
of
bumperand
temperatura
Fig
.
9
.
Front
bumper
impact
absorber
mounting
nuts
(A)
and
switch
at
rear
of
right
side
of
bumper
(if
applicable)
.
bumper
bracket
hardware
(B)
.
8
.
Slide
bumper
straight
off
sida
brackets
.
9
.
Installation
is
reverse
of
removal,
notingthe
following
:
When
removing
and
installing
therear
bumper
or
its
compo-
"
Slide
side
brackets
on
bumper
and
body
carefully
to-
nents,
referto
Fig
.
10
.
gether
.
"
Make
sure
tabs
on
trim
strip
engage
slots
in
bumper
1
.
Raise
and
properly
support
vehicle
.
correctly
.
Tightening
Torque
"
Bumper
to
bumper
bracket
(M8
nut)
............
...
.
.
22
Nm
(16
ft-Ib)
2
.
Working
under
bumper,
remove
screws
or
expansion
Front
bumper
impact
absorber,replacing
rivetsat
corners
and
middle
of
lower
bumper
panel
.
Pull
panel
backward,
uncoupling
it
from
bumper
cover
.
See
Thebumper
mounting
bracket
and
impact
absorber
mount-
Fig
.
11
.
ing
hardware
are
accessible
with
the
Font
bumper
removed,
as
described
above
.
See
Fig
.
9
.
3
.
Remove
bumper
cover
expansion
rivets
and
screws
in-
side
left
and
right
rear
wheel
wells
.
NOTE
-
Install
the
bumper
bracket
boltwith
thread
locking
com-
pound
suchas
Loctite
8
270
or
equivalent
.
Tightening
Torques
"
Bumper
bracket
to
impact
absorber
(M10
nut)
.
..
.
...
.............:.
55
Nm
(41
ft-Ib)
"
Impact
absorber
to
chassis
(M6
nut)
...
9
Nm
(7
ft-Ib)
BUMPERS
Rear
bumper,
removing
and
installing
WARNING
-
Make
sure
that
the
car
is
firmly
supported
on
jack
stands
designad
for
the
purpose
.
Place
the
jack
stands
beneath
a
structural
chassis
point
.
Do
not
place
jack
stands
under
suspension
parts
.
4
.
Remove
left
and
right
bumper
bracket
mounting
bolts
and
remove
bumper
.
See
Fig
.
12
.
5
.
Installation
is
reverse
of
removal
.
NOTE-
Install
the
bumper
bracket
bolt
with
thread
locking
com-
pound
suchas
Loctite®270
or
equivalent
.
Page 379 of 759
Convertible
Top
Lid
The
components
of
the
convertible
top
lid
are
shown
in
Fig
.
20
.
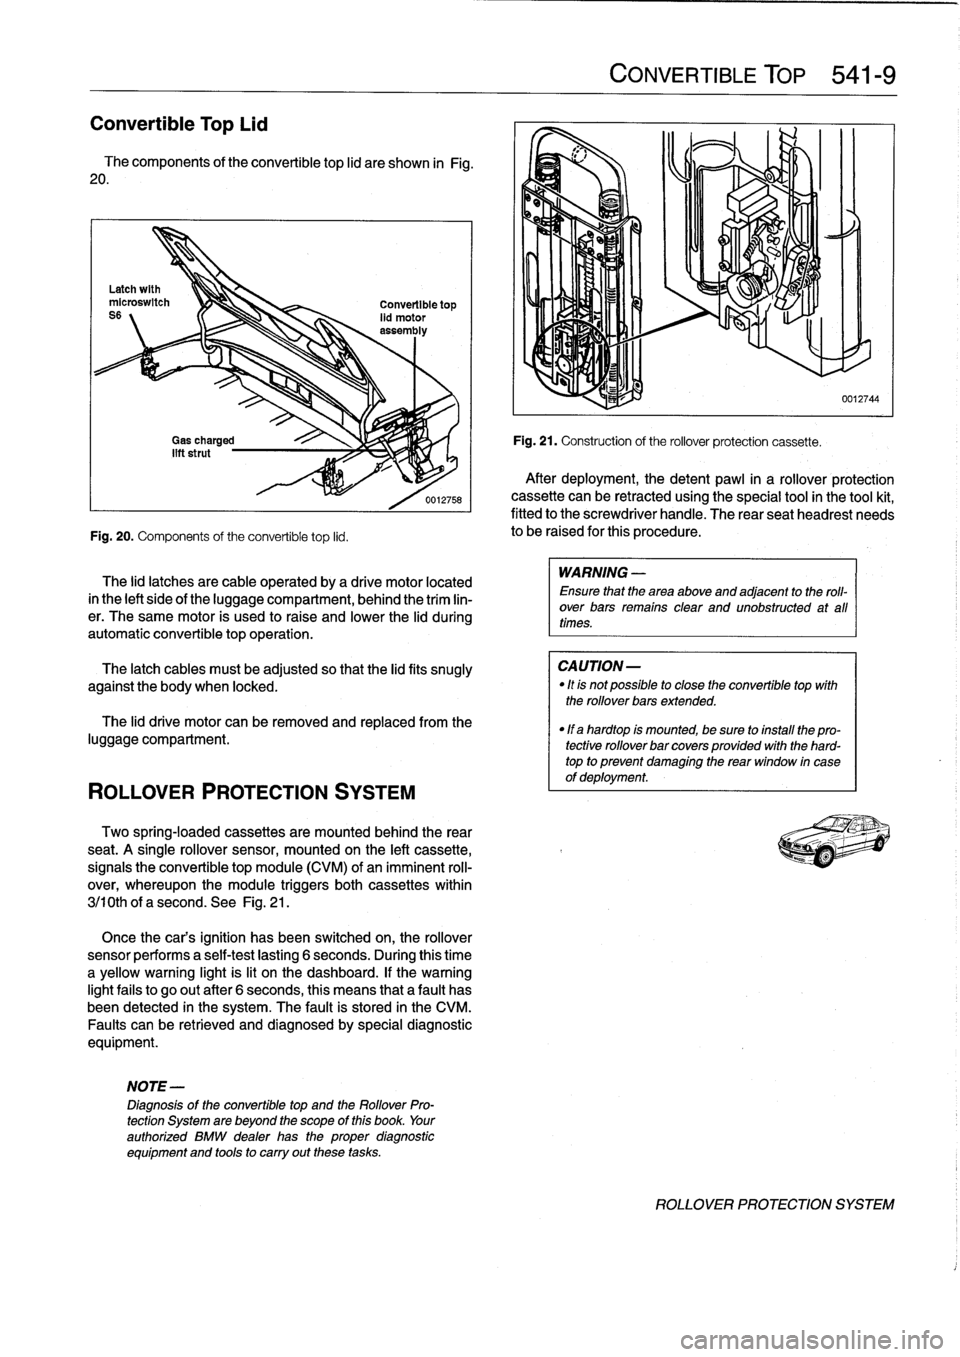
Fig
.
20
.
Components
of
the
convertible
top
lid
.
ROLLOVER
PROTECTION
SYSTEM
The
lid
latches
are
cable
operated
by
a
drive
motor
located
in
the
left
sideof
the
luggagecompartment,
behind
the
trim
lin-
er
.
The
same
motor
is
used
to
raise
and
lower
the
lid
during
automatic
convertible
topoperation
.
The
latch
cables
must
be
adjusted
so
that
the
lidfits
snugly
against
the
body
when
locked
.
The
lid
drive
motor
can
be
removed
and
replaced
from
the
luggage
compartment
.
Two
spring-locaed
cassettes
are
mounted
behind
the
rear
seat
.
A
single
rollover
sensor,
mounted
on
the
left
cassette,
signals
the
convertible
top
module
(CVM)
of
animminent
roll-
over,
whereupon
the
module
triggers
both
cassettes
within
3j10th
of
a
second
.
See
Fig
.
21
.
Once
the
cars
ignition
has
been
switched
on,
the
rollover
sensor
performs
a
self-test
lasting
6
seconds
.
During
this
time
a
yellow
warning
light
is
lit
on
the
dashboard
.
If
thewarning
lightfails
to
go
out
after
6
seconds,
this
means
that
a
fault
has
been
detected
in
the
system
.
The
fault
is
stored
in
the
CM
Faults
canbe
retrieved
and
diagnosedby
special
diagnostic
equipment
.
NOTE-
Diagnosis
of
the
convertible
top
and
the
Rollover
Pro-
tection
System
are
beyond
the
scope
of
this
book
.
Your
authorized
BMW
dealer
has
the
proper
diagnostic
equipment
and
tools
to
carry
out
these
tasks
.
CONVERTIBLE
TOP
541-
9
Fig
.
21
.
Construction
of
the
rollover
protection
cassette
.
After
deployment,
thedetent
pawl
in
a
rollover
protection
cassette
can
be
retracted
using
the
special
tool
in
the
tool
kit,
fitted
to
the
screwdriver
handle
.
The
rear
seatheadrest
needs
to
be
raised
for
this
procedure
.
WARNING
-
Ensure
that
the
area
above
and
adjacent
to
the
roll-
over
bars
remains
clear
and
unobstructed
at
all
times
.
CAUTION-
"
Itis
not
possible
to
close
the
convertible
top
with
the
rollover
bars
extended
.
"
If
a
hardtop
is
mounted,
be
sure
to
install
the
pro-
tective
rollover
bar
covers
provided
with
the
hard-
top
to
prevent
damaglng
the
rear
window
in
case
of
deployment
.
0012744
ROLLOVER
PROTECTION
SYSTEM
Page 385 of 759
Continuity,
checking
Short
Circuits
from
Battery
CAUTION-
Use
only
a
high
quality
digital
ohmmeter
having
high
input
impedance
when
checking
electronic
componente
.
The
internal
power
source
used
in
most
analog
(swing-need1e)
meterscan
damage
solidstate
components
.
0013239
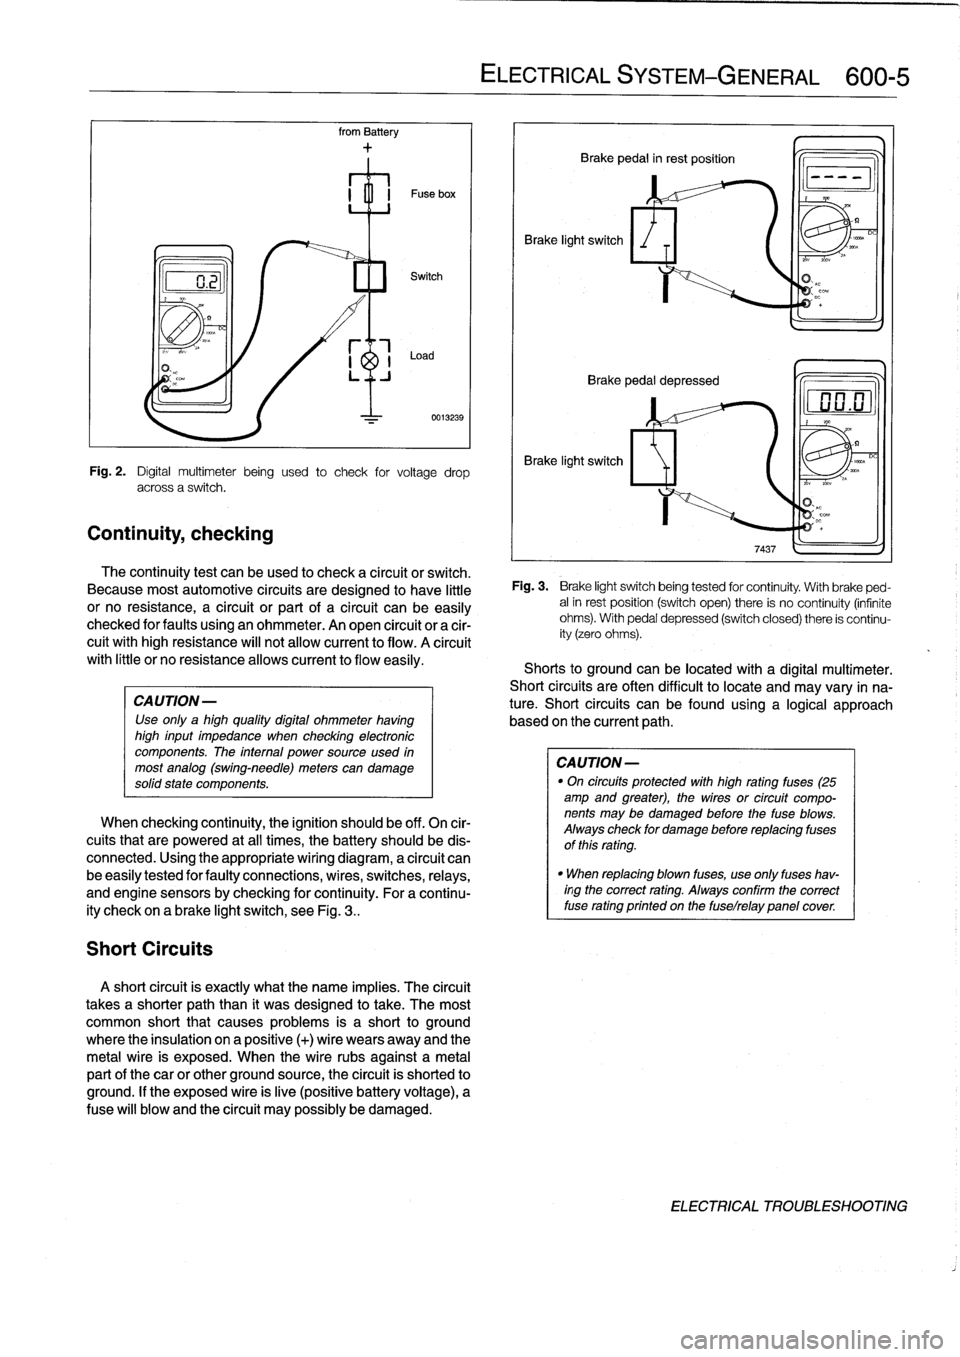
Fig
.
2
.
Digital
multimeter
being
used
to
check
for
voltage
drop
across
a
switch
.
The
continuity
test
can
beused
to
check
a
circuit
or
switch
.
Because
most
automotive
circuits
are
designed
to
have
little
or
no
resistance,
a
circuit
or
part
of
a
circuit
canbe
easily
checked
for
faults
using
an
ohmmeter
.
An
open
circuit
or
a
cir-
cuit
withhigh
resistance
will
not
allow
current
to
flow
.
A
círcuit
with
little
or
no
resistanceallows
current
to
flow
easily
.
When
checking
continuity,
the
ignition
should
be
off
.
On
cir-
cuits
that
are
powered
at
all
times,
the
battery
should
be
dis-
connected
.
Using
the
appropriate
wiring
diagram,
a
circuit
can
be
easily
tested
for
faulty
connections,
wires,
switches,
relays,
and
engine
sensorsby
checking
forcontinuity
.
For
a
continu-
ity
check
on
a
brake
light
switch,
see
Fig
.
3
..
A
short
circuit
is
exactly
what
the
narre
implies
.
The
circuit
takes
a
shorter
paththan
it
was
designed
to
take
.
The
most
common
short
that
causes
problems
is
a
short
to
ground
where
the
insulation
on
a
positive
(+)
wire
wears
away
and
the
metal
wire
is
exposed
.
When
the
wire
rubs
against
a
metal
partof
thecar
or
other
ground
source,
the
circuit
is
shorted
to
ground
.
If
the
exposed
wire
is
live
(positive
battery
voltage),
a
Puse
will
blow
and
the
circuit
may
possibly
be
damaged
.
ELECTRICAL
SYSTEM
-
GENERAL
600-
5
Brake
light
switch
Brake
pedal
in
rest
position
Q
Brake
pedal
depressed
Brake
light
switch
Fig
.
3
.
Brake
light
switchbeing
tested
for
continuity
.
With
brake
ped-
alin
rest
position
(switch
open)
there
is
no
continuity
(infinite
ohms)
.
With
pedal
depressed
(switch
closed)
there
is
continu-
ity
(zero
ohms)
.
Shorts
to
groundcanbe
located
with
a
digital
multimeter
.
Short
circuits
are
often
difficult
to
locate
and
may
vary
in
na-
ture
.
Short
circuits
can
befound
using
a
logical
approach
based
onthe
current
path
.
CAUTION
-
"
On
circuits
protected
with
high
rating
fuses
(25
amp
and
greater),
the
wires
or
circuit
compo-
nents
may
be
damaged
before
the
fuse
blows
.
Always
check
for
damage
before
replacing
fuses
of
this
rating
.
"
When
replacing
blown
fuses,
use
only
fuses
hav-
ingthe
correct
rating
.
Always
confirm
the
correct
fuse
rating
printed
on
the
fuselrelay
panelcover
DC
ELECTRICAL
TROUBLESHOOTING
Page 388 of 759
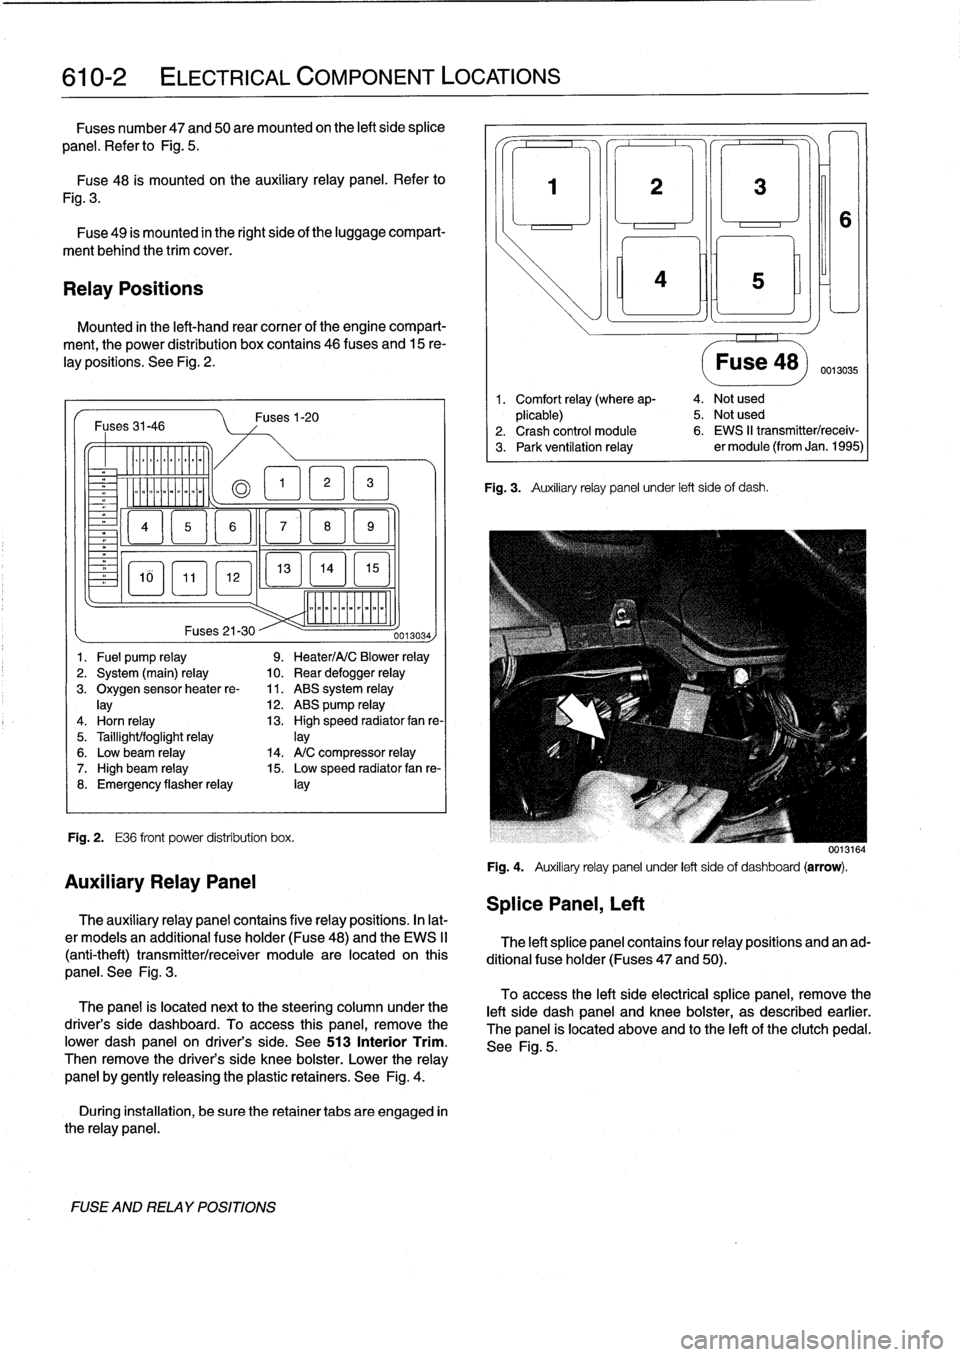
610-2
ELECTRICAL
COMPONENT
LOCATIONS
Fuses
number47
and
50are
mounted
on
the
left
side
splice
panel
.
Refer
lo
Fig
.
5
.
Fuse48
is
mounted
on
the
auxiliary
relay
panel
.
Refer
to
Fig
.
3
.
Fuse
49
is
mounted
in
the
right
side
of
the
luggage
compart-
ment
behind
the
trim
cover
.
Relay
Positions
Mounted
in
the
left-hand
rear
comer
of
the
engine
compart-
ment,
the
power
distribution
box
contains
46
(uses
and
15
re-
lay
positions
.
See
Fig
.
2
.
Fuses31-46
-
Er
a
&QT
MM
~
Fig
.
2
.
E36
front
power
distribution
box
.
FUSE
AND
RELAY
POSITIONS
Fuses1-20
13
EL1
5
]
mmmmmmmmmm
Fuses
21-30
--
0013034)
1
.
Fuel
pump
relay
9
.
Heater/A/C
Blower
relay
2
.
System
(main)
relay
10
.
Rear
defogger
relay
3
.
Oxygen
sensorheater
re-
11
.
ABS
system
relay
lay
12
.
ABS
pump
relay
4
.
Horn
relay
13
.
High
speed
radiator
fan
re-
5
.
Taillight/foglight
relay
]ay
6
.
Low
beam
relay
14
.
A/C
compressor
relay
7
.
High
beam
relay
15
.
Low
speed
radiator
fan
re-
8
.
Emergency
flasherrelay
¡ay
Auxiliary
Relay
Panel
The
auxiliary
relay
panel
contains
five
relay
positions
.
In
lat-
er
modeis
an
additional
fuse
holder
(Fuse48)
and
the
EWS
II
(anti-theft)
transmitter/receiver
module
are
located
on
this
panel
.
See
Fig
.
3
.
The
panel
is
located
nextto
the
steering
column
under
the
driver's
side
dashboard
.
To
access
this
panel,
remove
the
pwer
dash
panel
on
driver's
side
.
See513
Interior
Trim
.
Then
remove
the
driver's
side
knee
bolster
.
Lower
the
relay
panel
by
gently
releasing
the
plastic
retainers
.
See
Fig
.
4
.
During
installation,
be
sure
the
retainer
tabs
are
engaged
in
the
relay
panel
.
Splice
Panel,
Left
3
¡ni
Fig
.
3
.
Auxiliary
relay
panel
under
left
side
of
dash
.
Fuse
48)
0013035
1
.
Comfort
relay
(where
ap-
4
.
Not
used
plicable)
5
.
Not
used
2
.
Crash
control
module
6
.
EWS
II
transmitter/receiv-
3
.
Park
ventilation
relay
er
module
(from
Jan
.
1995)
0013164
Fig
.
4
.
Auxiliary
relay
panel
under
left
sideof
dashboard
(arrow)
.
The
left
splice
panel
contains
four
relay
positions
and
an
ad-
ditional
fuse
holder
(Fuses
47
and
50)
.
To
access
the
left
side
electrical
splice
panel,
remove
the
left
side
dash
panel
and
knee
bolster,
as
described
earlier
.
The
panel
is
located
above
and
lo
the
left
of
the
clutch
pedal
.
See
Fig
.
5
.
Page 391 of 759
1
.
Heater
valves
2
.
ABS
pedal
travel
sensor3
.
ABS
pump
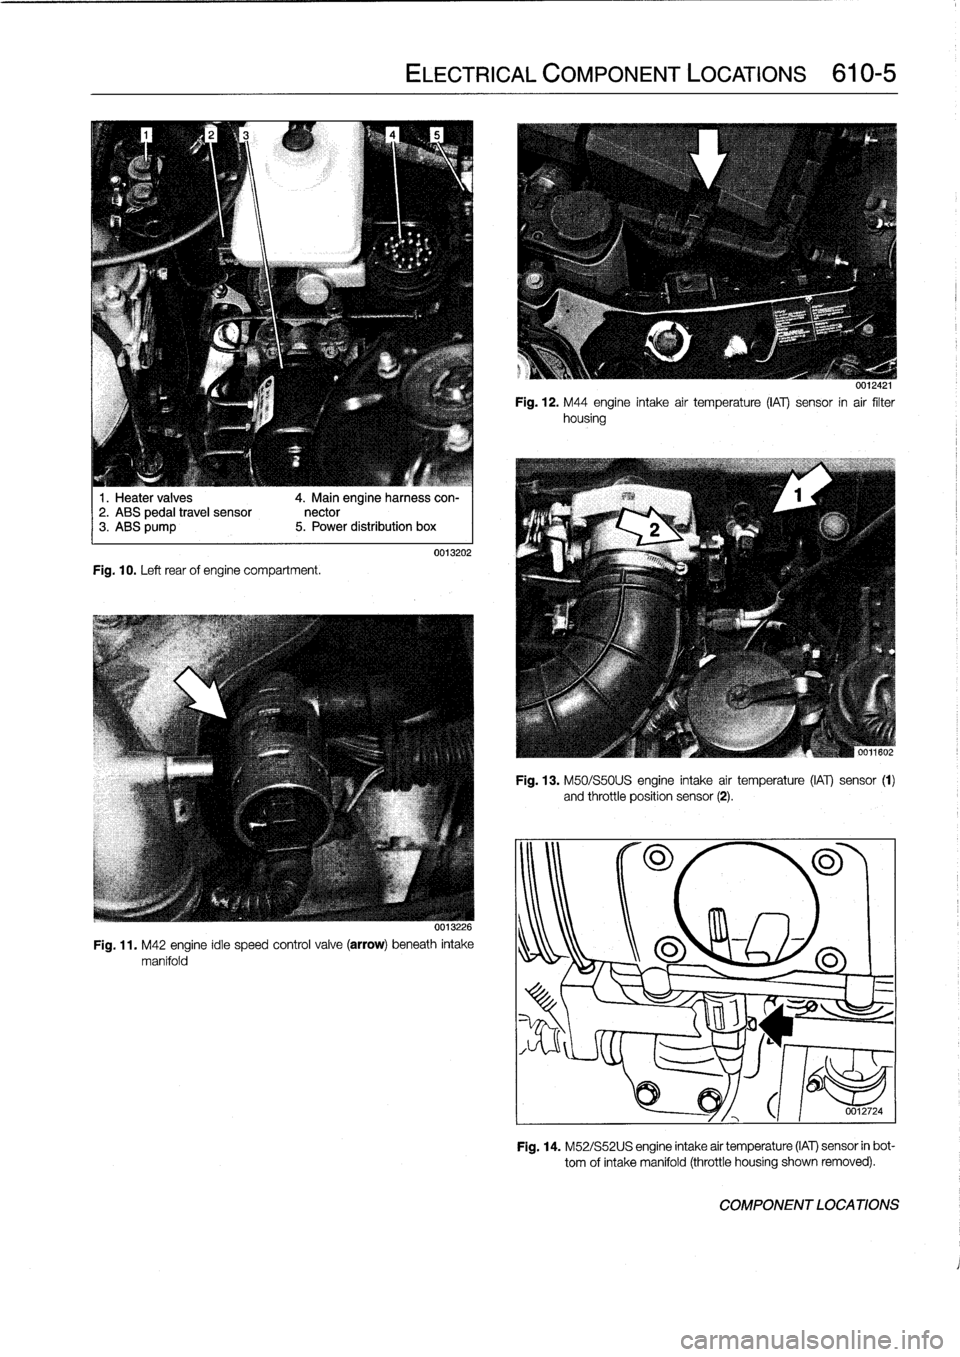
Fig
.
10
.
Left
rear
of
engine
compartment
.
4
.
Main
engineharness
con-
nector
5
.
Power
distribution
box
ELECTRICAL
COMPONENT
LOCATIONS
610-5
0013202
0013226
Fig
.
11
.
M42
engine
idie
speed
control
valve
(arrow)
beneath
intake
manifold
0012421
Fig
.
12
.
M44
engine
intake
air
temperature
(¡Al)
sensor
in
air
filter
housing
Fig
.
13
.
M50/S50U
S
engine
intake
air
temperature
(IAT)
sensor
(1)
and
throttle
position
sensor
(2)
.
301180
0012724
Fig
.
14
.
M52/S52U
S
engine
intake
air
temperature
(IAT)
sensor
in
bot-
tom
of
intake
manifold
(throttle
housing
shown
removed)
.
COMPONENT
LOCATIONS
Page 393 of 759
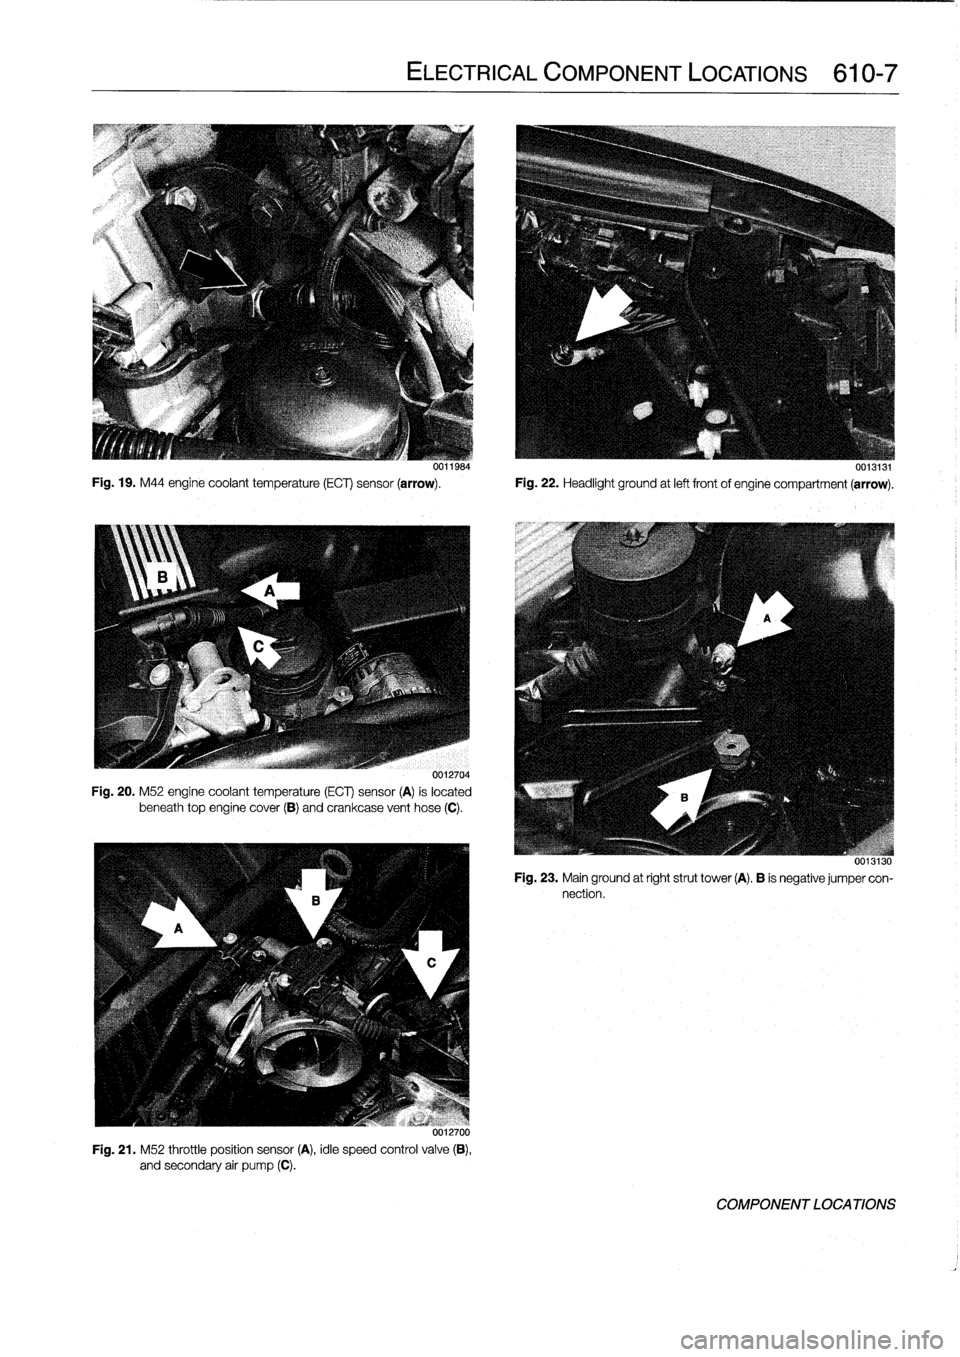
Fig
.
19
.
M44
engine
coolant
temperature
(ECT)
sensor
(arrow)
.
Fig
.
22
.
Headlight
ground
at
left
frontof
engine
compartment
(arrow)
.
0012704
Fig
.
20
.
M52
engine
coolant
temperature
(ECT)
sensor
(A)
is
located
beneath
top
enginecover
(B)
and
crankcase
vent
hose
(C)
.
uu12700
Fig
.
21
.
M52
throttle
position
sensor
(A),
idle
speed
control
valve
(B),
and
secondary
air
pump
(C)
.
ELECTRICAL
COMPONENT
LOCATIONS
610-7
00119s4
0013131
uvijijo
Fig
.
23
.
Mainground
at
right
strut
tower
(A)
.
B
is
negative
jumper
con-
nection
.
COMPONENT
LOCA
TIONS
Page 395 of 759
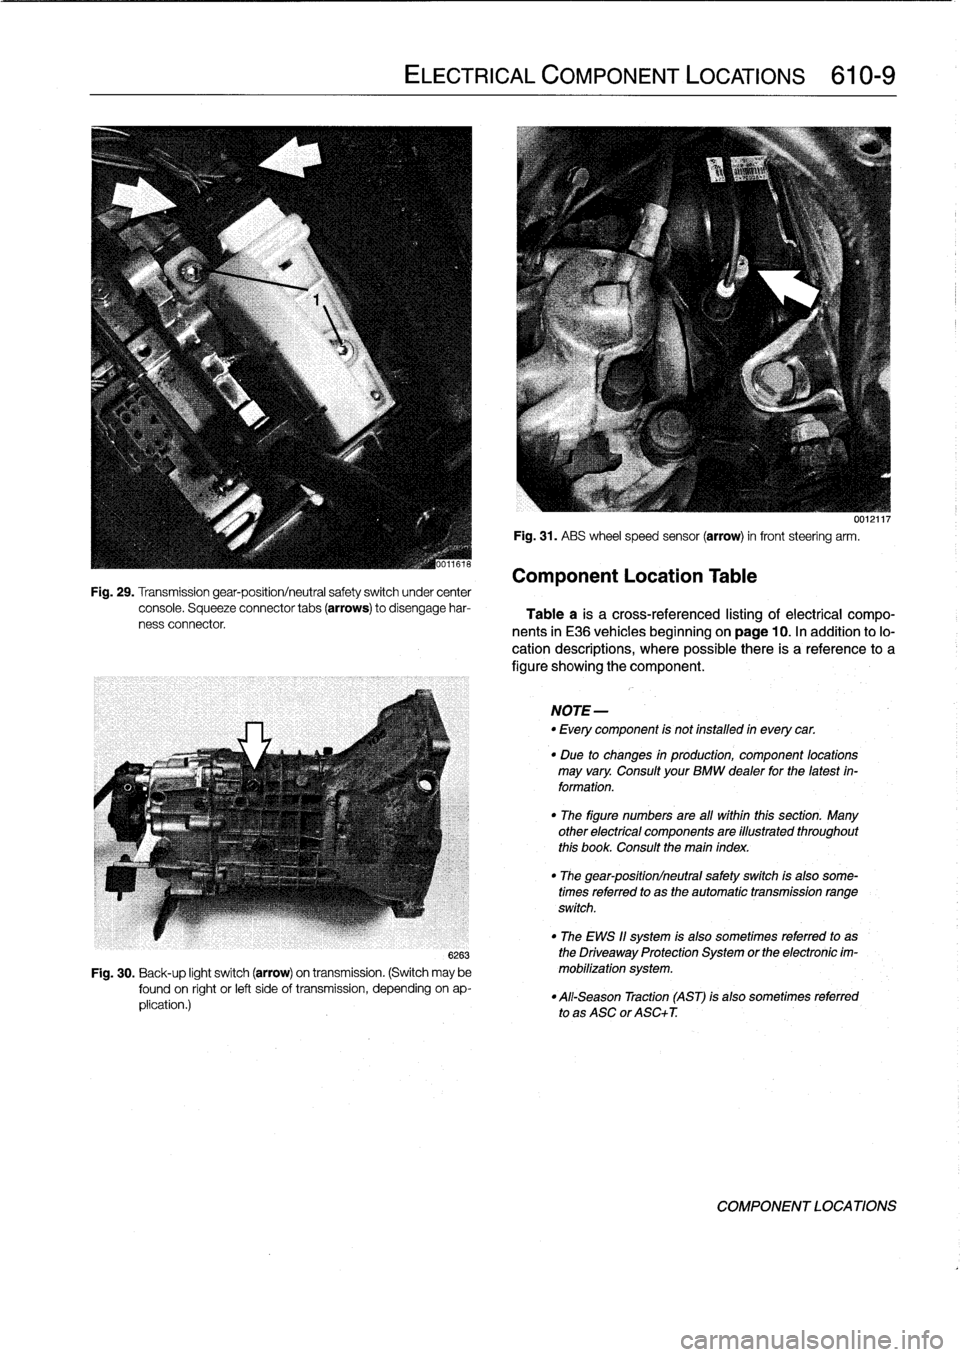
Fig
.
29
.
Transmission
gear-position/neutral
safety
switch
under
center
console
.
Squeeze
connector
tabs
(arrows)
to
disengage
har-
ness
connector
ELECTRICAL
COMPONENT
LOCATIONS
610-
9
6263
Fig
.
30
.
Back-up
light
switch
(arrow)
on
transmission
.
(Switch
may
be
found
on
right
or
left
sideof
transmission,
depending
on
ap-
plication
.)
Fig
.
31
.
ASS
wheel
speed
sensor
(arrow)
in
front
steering
arm
.
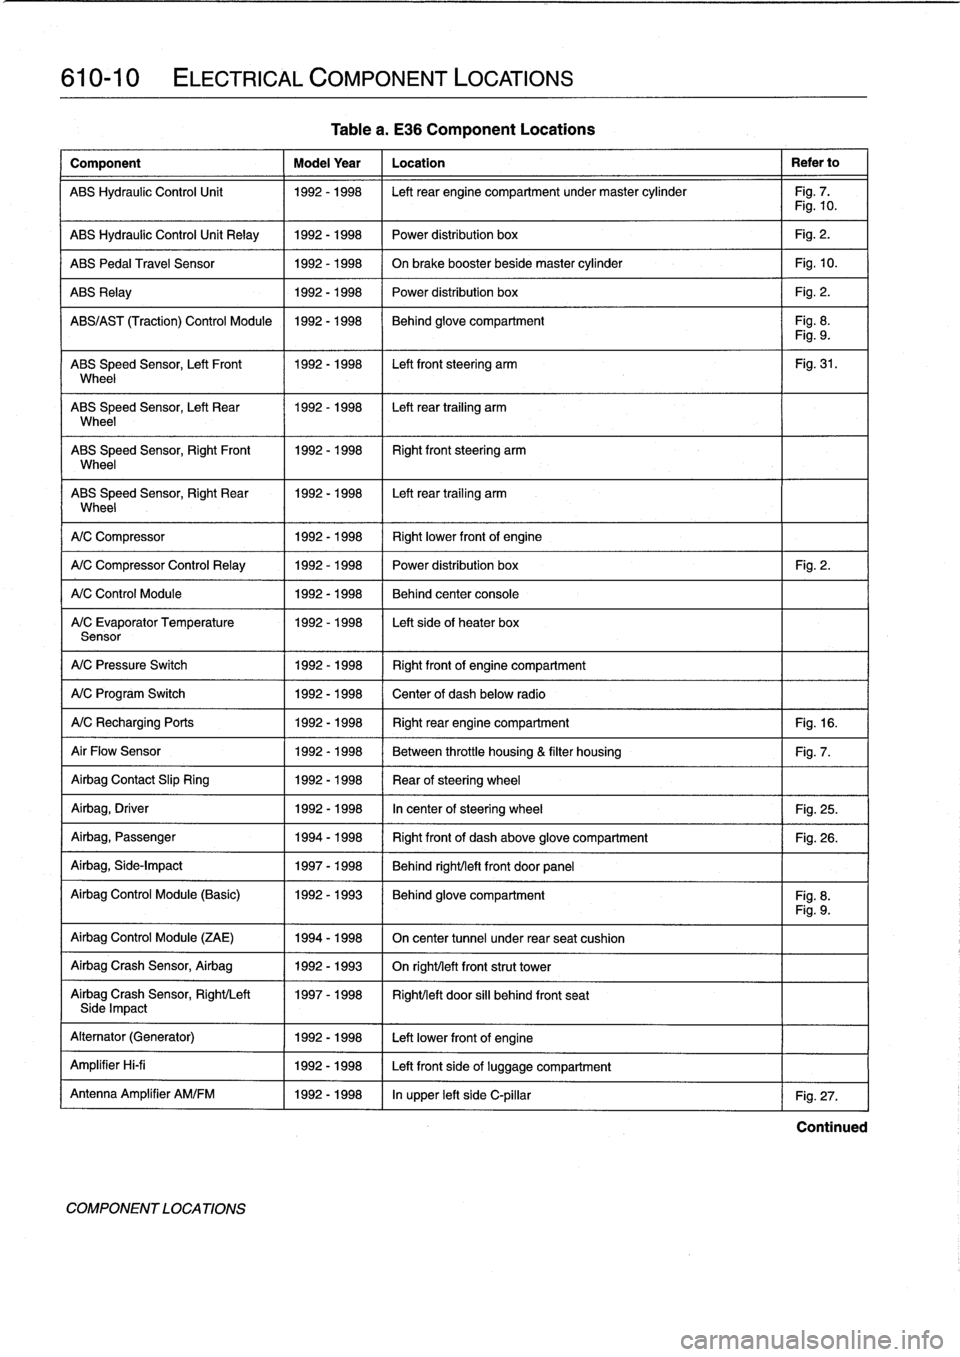
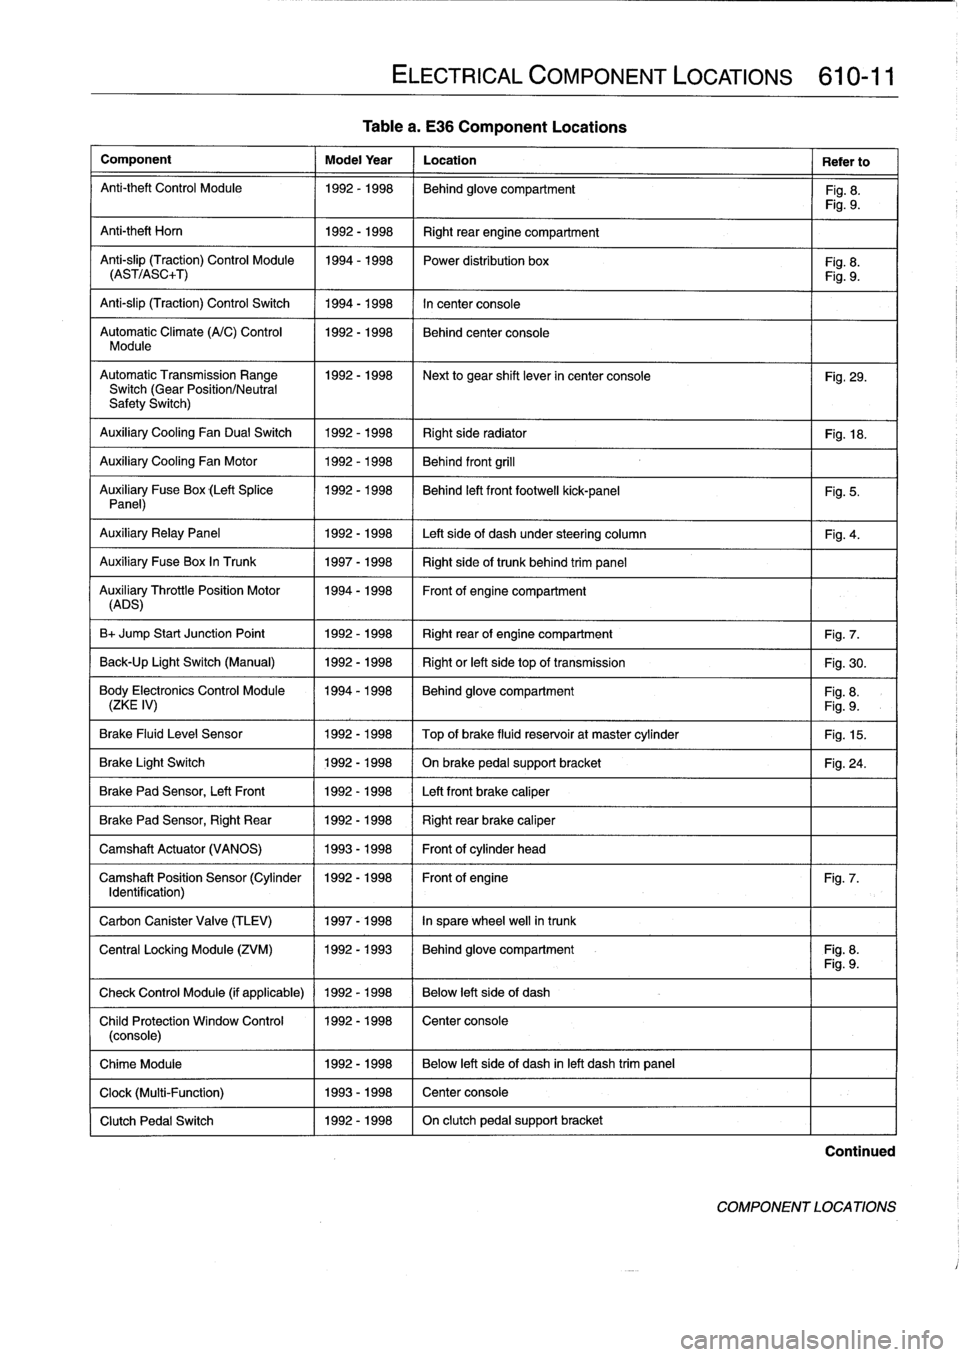
Component
Location
Table
Table
a
is
a
cross-referenced
listing
of
electrical
compo-
nents
in
E36
vehicles
beginning
onpage
10
.
In
addition
to
lo-
cation
descriptions,
where
possiblethere
is
areference
to
a
figure
showing
the
component
.
NOTE-
-
Every
component
is
not
installed
in
everycar
.
"
Due
to
changes
in
production,
component
locations
may
vary
.
Consult
your
BMW
dealer
forthe
latest
in-
formation
.
"
The
figure
numbers
are
all
within
this
section
.
Many
other
electrical
components
are
illustrated
throughout
this
book
.
Consult
the
main
index
"
The
gear-position/neutral
safetyswitch
is
aleo
some-
times
referred
to
as
the
automatic
transmission
range
switch
.
"
The
EWS
11
system
is
also
sometimes
referredto
as
the
Driveaway
Protection
System
or
the
electronic
im-
mobilization
system
.
"
All-Season
Traction
(AST)
is
also
sometímes
referred
to
as
ASC
or
ASC+T
.
0012117
COMPONENT
LOCATIONS
Page 396 of 759
610-10
ELECTRICAL
COMPONENT
LOCATIONS
Component
Model
Year
Location
Refer
to
ABS
Hydraulic
Control
Unit
1992-1998
Left
rear
engine
compartment
undermaster
cylinder
Fig
.
7
.
Fig
.
10
.
ABS
Hydraulic
Control
Unit
Relay
1992-1998
Power
distribution
box
Fig
.
2
.
ABS
Pedal
Travel
Sensor
1992-1998
On
brake
booster
beside
master
cylinder
Fig
.
10
.
ABS
Relay
1992-1998
Power
distribution
box
Fig
.
2
.
ABS/AS
T
(Traction)
Control
Module
1992-1998
Behind
glove
compartment
Fig
.
8
.
Fig
.
9
.
ABS
Speed
Sensor,
Left
Front
1992-1998
Left
front
steering
arm
Fig
.
31
.
Wheel
ABS
Speed
Sensor,
Left
Rear
1992-1998
Left
rear
trailing
arm
Wheel
ABS
Speed
Sensor,
RightFront
11992-1998
Right
front
steering
arm
Wheel
ABS
Speed
Sensor,
Right
Rear
1992-1998
I
Left
rear
trailing
arm
Wheel
1
A/C
Compressor
1
1992-1998
(
Rightlower
frontof
engine
A/C
Compressor
Control
Relay
1
1992-1998
1992-1998
1992-1998
A/C
Control
Module
A/C
Evaporator
Temperature
Sensor
A/C
Pressure
Switch
1992-1998
Right
frontof
engine
compartment
A/C
Program
Switch
1992-1998
Center
of
dash
below
radio
A/CRecharging
Ports
1992-1998
Right
rear
engine
compartment
Fig
.
16
.
Air
Flow
Sensor
1992-1998
Between
throttle
housing
&
filter
housing
Fig
.
7
.
Airbag
Contact
Slip
Ring
1992-1998
Rear
ofsteering
wheel
Airbag,
Driver
1992-1998
In
center
of
steering
wheel
Fig
.
25
.
Airbag,
Passenger
1994-1998
Right
front
of
dash
above
glove
compartment
Fig
.
26
.
Airbag,
Side-Impact
1997-1998
Behind
right/left
front
door
panel
Airbag
Control
Module
(Basic)
1992-1993
Behind
glove
compartment
Fig
.
8
.
Fig
.
9
.
Airbag
Control
Module
(ZAE)
1994-1998
On
center
tunnel
under
rear
seat
cushion
Airbag
Crash
Sensor,
Airbag
1992-1993
On
righUleft
front
strut
tower
Airbag
Crash
Sensor,
Right/Left
1997-1998
Right/left
door
si¡¡
behind
front
seatSide
Impact
Alternator
(Generator)
1992-1998
Left
lowerfront
of
engine
Amplifier
Hi-fi
1992-1998
Left
front
side
of
luggage
compartment
Antenna
Amplifier
AM/FM
1992-1998
In
upper
left
side
C-pillar
Fig
.
27
.
COMPONENT
LOCA
TIONS
Table
a
.
E36
Component
Locations
Power
distribution
box
Fig
.
2
.
Behind
center
console
Left
sideof
heater
box
Continued
Page 397 of 759
Table
a
.
E36
Component
Locations
Component
Model
Year
Location
Refer
to
Anti-theft
Control
Module
1992-1998
Behind
glove
compartment
Fig
.
8
.
Fig
.
9
.
Anti-theft
Horn
1
1992-1998
1
Right
rear
engine
compartment
Anti-slip
(Traction)
Control
Module
1994-1998
Power
distribution
box
Fig
.
8
.
(AST/ASC+T)
Fig
.
9
.
Anti-slip
(Traction)
Control
Switch
1994-1998
In
center
console
Automatic
Climate
(A/C)
Control
1992-1998
Behind
center
console
Module
AutomaticTransmission
Range
1992-1998
~
Next
to
gear
shift
lever
in
center
console
Fig
.
29
.
Switch
(Gear
Position/Neutral
Safety
Switch)
Auxiliary
Cooling
Fan
Dual
Switch
1992-1998
Right
side
radiator
1
Fig
.
18
.
Auxiliary
Cooling
Fan
Motor
1992-1998
Behind
front
grill
Auxiliary
Fuse
Box
(Left
Splice
1992-1998
I
Behind
left
front
footwell
kick-panel
Panel)
Auxiliary
RelayPanel
1
1992-1998
1
Left
side
of
dash
under
steering
column
Auxiliary
Fuse
Box
In
Trunk
1
1997-1998
1
Right
sideof
trunk
behind
trim
panel
AuADSry
ThrottlePosition
Motor
11994-1998
Front
of
engine
compartment
B+
Jump
Start
Junction
Point
1992-1998
Right
rear
of
engine
compartment
Fig
.
7
.
Back-Up
Light
Switch
(Manual)
1992-1998
Right
or
left
side
top
of
transmission
Fig
.
30
.
Body
Electronics
Control
Module
1994-1998
Behindglove
compartment
Fig
.
8
.
(ZKE
IV)
Fig
.
9
.
Brake
Fluid
Level
Sensor
1992-1998
Top
of
brake
fluid
reservoir
at
master
cylinder
Fig
.
15
.
Brake
Light
Switch
1
1992-1998
1
On
brake
pedal
supportbracket
Brake
Pad
Sensor,
Left
Front
1
1992-1998
1
Left
front
brake
caliper
Brake
Pad
Sensor,
Right
Rear
1992-1998
Right
rear
brake
caliper
Camshaft
Actuator
(VANOS)
1993-1998
Front
of
cylinder
head
Camshaft
Position
Sensor
(Cylinder
1992-1998
Front
of
engine
Identification)
Carbon
Canister
Valve
(TLEV)
1
1997-1998
1
In
sparewheel
well
in
trunk
ELECTRICAL
COMPONENT
LOCATIONS
610-11
Fig
.
5
.
Fig
.
4
.
Fig
.
24
.
Fig
.
7
.
Central
Locking
Module
(ZVM)
11992-1993
1
Behindglove
compartment
I
Fig
.
8
.
Fig
.
9
.
Check
Control
Module
(if
applicable)
1
1992
-
1998
1
Below
left
side
of
dash
Child
Protection
Window
Control
1992-1998
Center
console
(console)
Chime
Module
1992-1998
Below
left
side
of
dash
inleft
dash
trim
panel
Clock
(Multi-Function)
1993-1998
Center
console
Clutch
Pedal
Switch
1992-1998
On
clutch
pedal
support
bracket
Continued
COMPONENT
LOCATIONS