display BMW M3 1998 E36 Owner's Manual
[x] Cancel search | Manufacturer: BMW, Model Year: 1998, Model line: M3, Model: BMW M3 1998 E36Pages: 759
Page 452 of 759
640-6
HEATING
AND
AIRCONDITIONING
Heater
core,replacing
1.
Drain
engíne
coolant
.
See170
Radiator
and
Cooling
System
.
WARNING
-
Allow
the
cooling
system
to
cool
before
opening
or
drainíng
the
cooling
system
.
2
.
Remove
center
console
.
See
513
Interior
Trim
.
3
.
Remove
Multi-Information
Display
(MID)
module
.
See
620
Instruments
.
4
.
Remove
lower
dash
panel
and
knee
bolster
on
driver
side
.
See
513
Interior
Trim
.
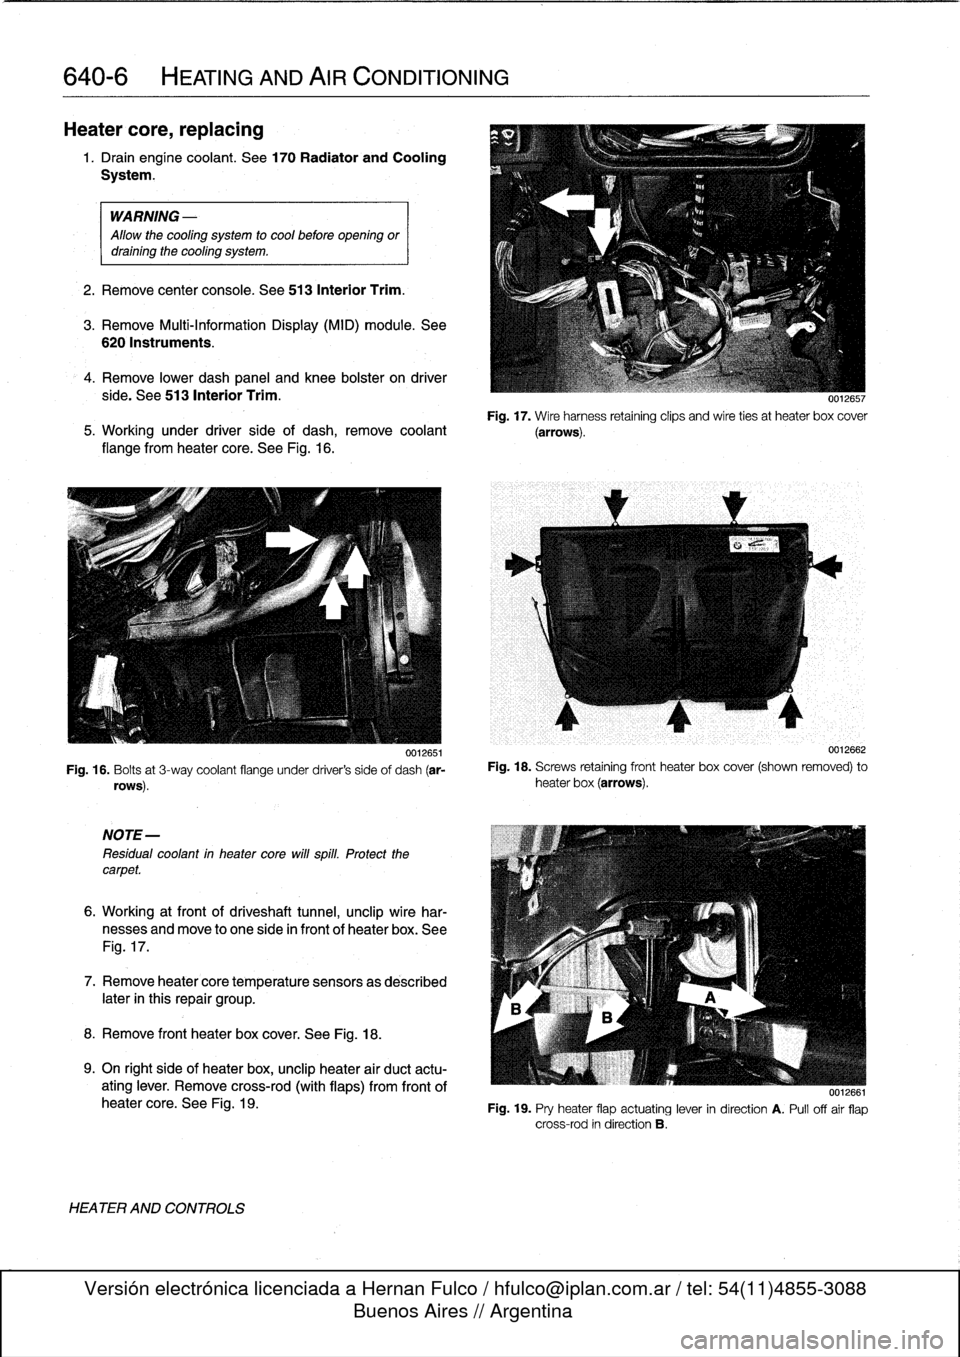
Fig
.
17
.
Wire
harness
retaining
clips
and
wire
ties
at
heater
box
cover
5
.
Working
under
driver
side
of
dash,
remove
coolant
(arrows)
.
flange
from
heater
core
.
See
Fig
.
16
.
0012651
Fig
.
16
.
Bolts
at
3-way
coolant
flange
under
driver's
side
of
dash
(ar-
rows)
.
NOTE-
Residual
coolant
in
heater
core
will
spill
.
Protect
thecarpet
.
6
.
Working
at
front
of
driveshaft
tunnel,
unclip
wire
har-
nesses
and
move
to
one
side
in
front
of
heater
box
.
See
Fig
.
17
.
7
.
Remove
heatercore
temperature
sensorsas
described
later
in
this
repair
group
.
8
.
Remove
front
heater
box
cover
.
See
Fig
.
18
.
9
.
On
right
side
of
heater
box,
unclip
heater
air
duct
actu-
ating
lever
.
Remove
cross-rod
(with
flaps)
from
frontof
heater
core
.
See
Fig
.
19
.
HEATER
AND
CONTROLS
0012662
Fig
.
18
.
Screws
retaining
front
heater
box
cover
(shown
removed)
to
heater
box
(arrows)
.
0012661
Fig
.
19
.
Pry
heater
flap
actuating
lever
in
direction
A
.
Pull
offair
flap
cross-rod
in
direction
B
.
Page 453 of 759
10
.
Pul¡
heater
core
up
and
backward,
away
from
heater
box
.
If
necessary,
remove
left
and
right
reinforcing
bracket
bolts
.
See
Fig
.
20
.
CAUTION-
Replace
coolant
flange
O-rings
and
tighten
fas-
teners
to
specified
torques
.
Tightening
Torques
1
.
Remove
center
console
.
See
513
Interior
trim
.
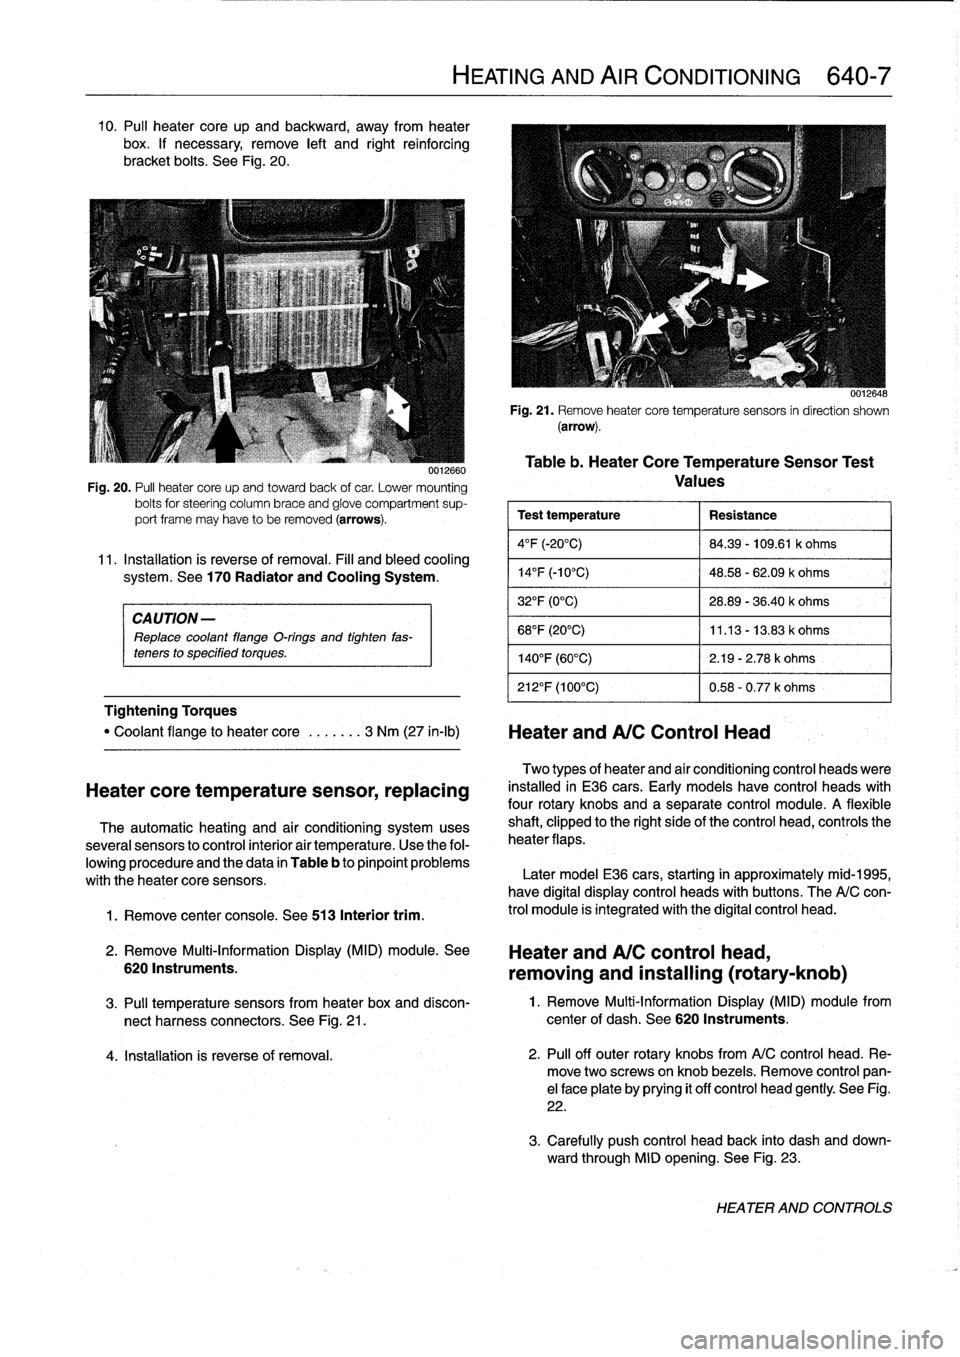
0012660
Fig
.
20
.
PA
heater
core
upand
towardback
of
car
.
Lower
mounting
bolts
for
steering
column
brace
and
glove
compartment
sup-
port
frame
may
have
to
be
removed
(arrows)
.
11
.
Installation
is
reverse
of
removal
.
Fill
and
bleed
cooling
system
.
See
170
Radiator
and
Cooling
System
.
"
Coolant
flange
to
heater
core
.
..
....
3
Nm
(27
in-lb)
Heater
andA/C
Control
Head
Heatercore
temperature
sensor,
replacing
The
automatic
heating
and
air
conditioning
systemuses
severa¡
sensors
to
control
interior
air
temperature
.
Use
the
fol-
lowing
procedure
and
the
data
in
Table
b
to
pinpoint
problems
with
theheater
core
sensors
.
2
.
Remove
Multi-Information
Display
(MID)
module
.
See
6201nstruments
.
HEATING
AND
AIR
CONDITIONING
640-7
0012648
Fig
.
21
.
Remove
heatercore
temperaturesensors
in
direction
shown
(arrow)
.
Table
b
.
Heater
CoreTemperatureSensor
Test
Values
Test
temperature
Resistance
4°F
(-20°C)
84
.39
-
109
.61
k
ohms
14
°
F
(-10°C)
48
.58
-
62
.09
k
ohms
32°F
(0°C)
28
.89
-
36
.40
k
ohms
68°F
(20°C)
11
.13
-
13
.83
k
ohms
140°F
(60°C)
2
.19
-
2
.78
k
ohms
212°F
(100°C)
0
.58
-
0
.77
k
ohms
Two
types
of
heater
and
aír
conditioning
control
heads
viere
installed
in
E36
cars
.
Early
models
have
control
heads
with
four
rotary
knobs
and
a
separate
control
module
.
A
flexible
shaft,
clipped
to
the
right
sideof
the
control
head,
controls
the
heater
flaps
.
Later
model
E36
cars,
starting
in
approximately
mid-1995,
have
digital
display
control
heads
with
buttons
.
The
A/C
con-
trol
module
is
integrated
with
the
digital
control
head
.
Heater
and
A/C
control
head,
removing
and
installing
(rotary-knob)
3
.
Pul¡
temperature
sensors
from
heater
box
and
discon-
1
.
Remove
Multi-Information
Display
(MID)
module
from
nect
harness
connectors
.
See
Fig
.
21
.
center
of
dash
.
See
620
Instruments
.
4
.
Installation
is
reverse
of
removal
.
2
.
Pul¡
off
outer
rotary
knobs
from
A/C
control
head
.
Re-
move
two
screwsonknob
bezels
.
Remove
control
pan-
el
face
plate
by
prying
it
off
control
head
gently
.
See
Fig
.
22
.
3
.
Carefully
push
control
head
back
into
dash
and
down-
ward
through
MID
opening
.
See
Fig
.
23
.
HEATER
AND
CONTROLS
Page 454 of 759
640-8
HEATING
AND
AIR
CONDITIONING
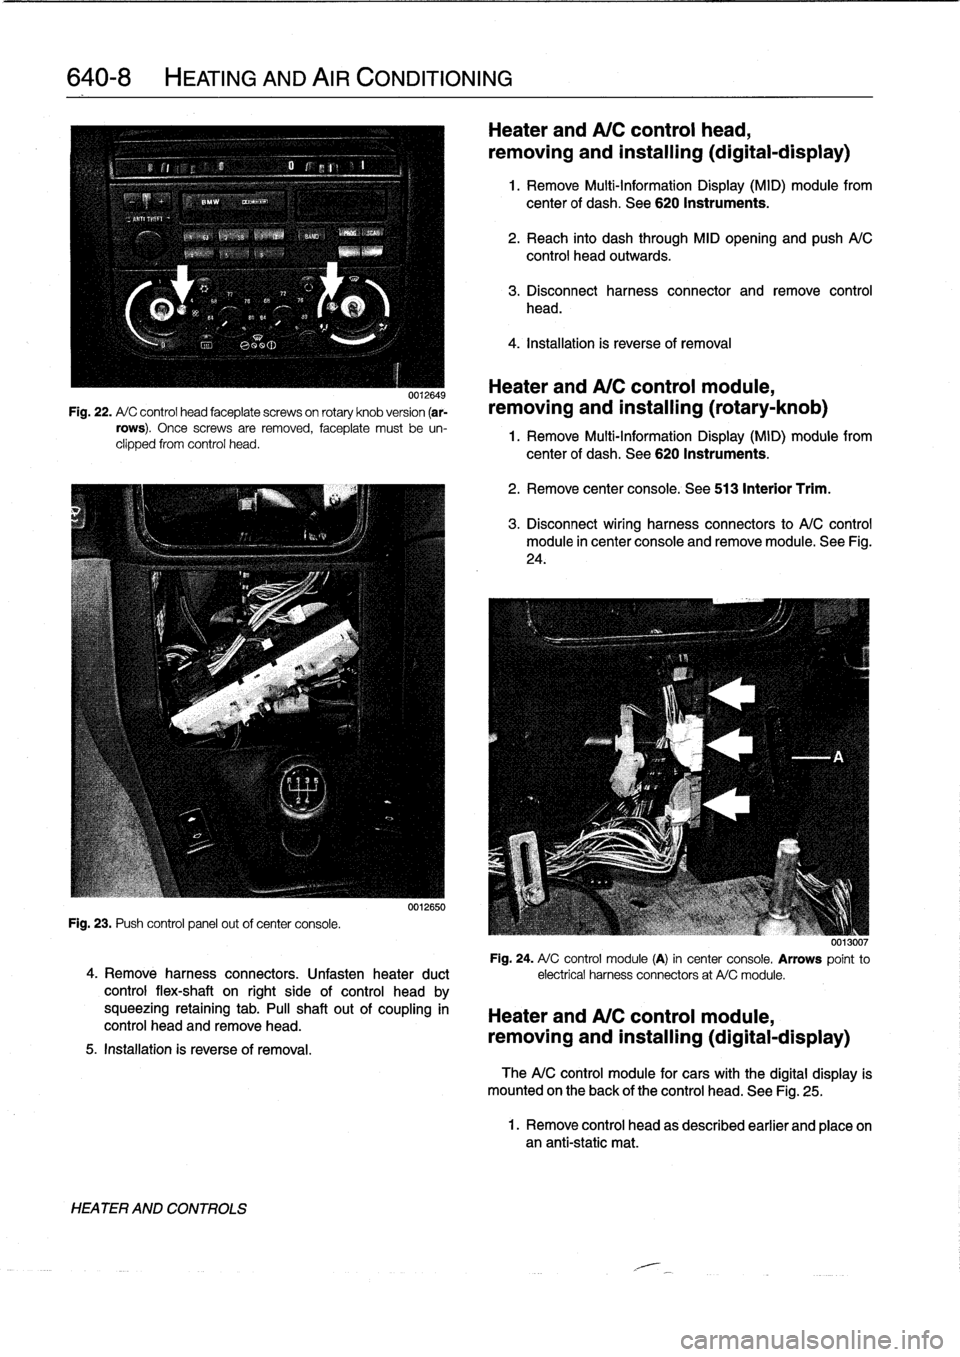
0012649
Fig
.
22
.
A/
C
control
head
faceplate
screwson
rotary
knob
version
(ar-
rows)
.
Once
screws
are
removed,
faceplate
must
be
un-
clipped
from
control
head
.
Fig
.
23
.
Push
control
panel
out
ofcenter
console
.
4
.
Remove
harness
connectors
.
Unfasten
heater
duct
control
flex-shaft
on
right
side
of
control
head
by
squeezing
retaining
tab
.
PA
shaftout
of
coupling
in
control
head
and
remove
head
.
5
.
Installation
is
reverseof
removal
.
HEATER
AND
CONTROLS
0012650
Heater
and
A/C
control
head,
removing
and
installing(digital-display)
1
.
Remove
Multi-Information
Display
(MID)
module
from
center
of
dash
.
See
620
Instruments
.
2
.
Reach
into
dash
through
MID
opening
and
push
A/C
control
head
outwards
.
3
.
Disconnect
harness
connector
and
remove
control
head
.
4
.
Installation
is
reverse
of
removal
Heater
andA/C
control
module,
removing
and
installing
(rotary-knob)
1
.
Remove
Multi-Information
Display
(MID)
module
from
center
of
dash
.
See
620
Instruments
.
2
.
Remove
center
console
.
See
513
Interior
Trim
.
3
.
Disconnect
wiring
harness
connectors
to
A/C
control
module
in
center
console
and
removemodule
.
See
Fig
.
24
.
0013007
Fig
.
24
.
A/
C
control
module
(A)
in
center
console
.
Arrows
point
to
electrical
harness
connectors
at
A/Cmodule
.
Heater
and
A/C
control
module,
removing
and
installing(digital-display)
TheA/C
control
module
for
cars
with
the
digital
display
is
mounted
on
the
back
of
the
control
head
.
See
Fig
.
25
.
1
.
Remove
control
head
as
described
earlier
and
place
onan
anti-static
mat
.
Page 455 of 759
Sensor
fan
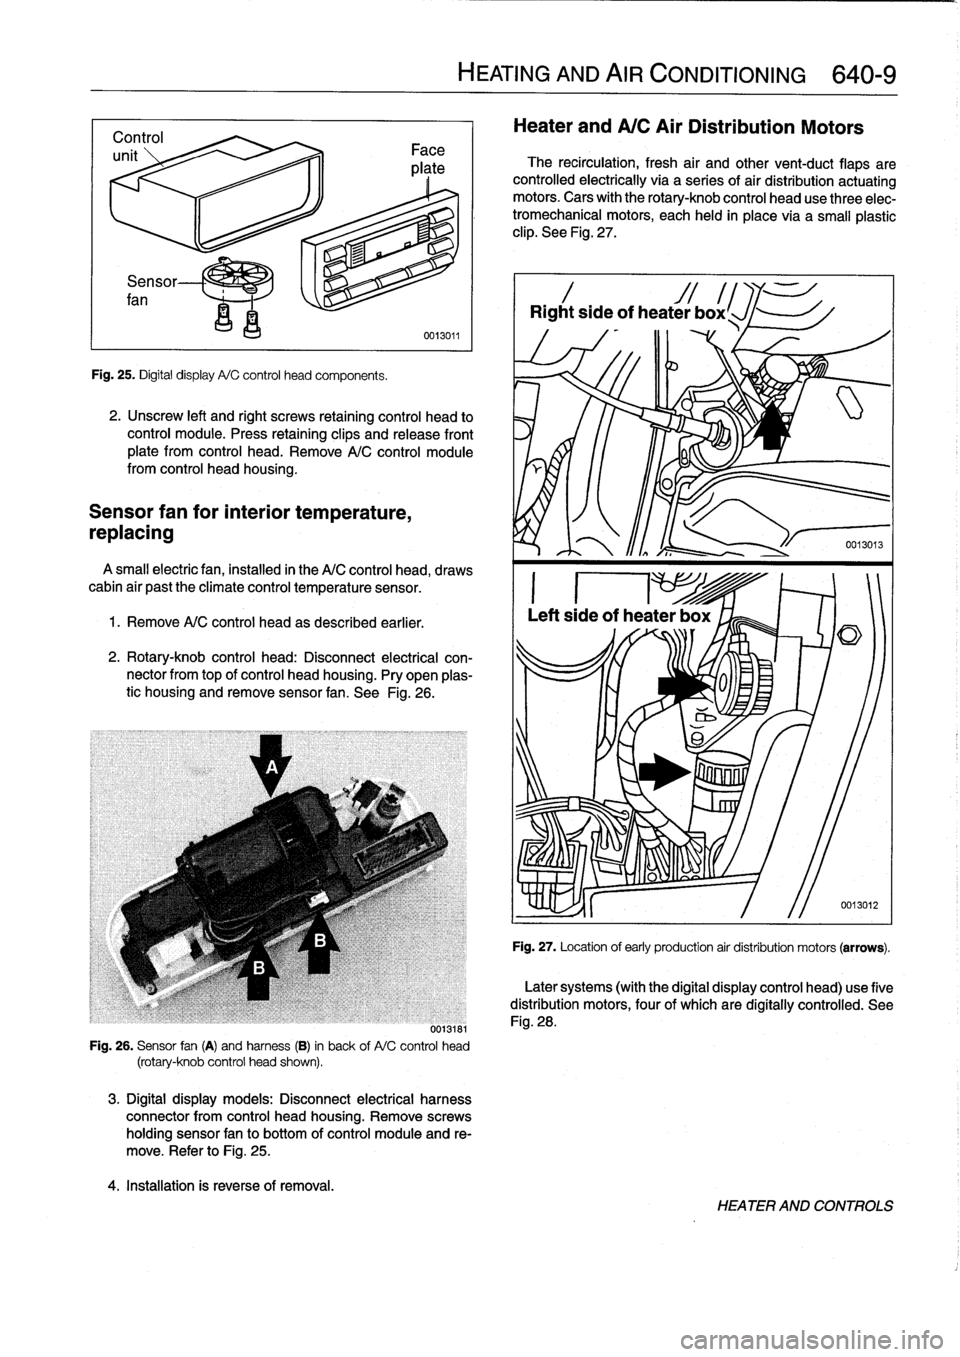
Fig
.
25
.
Digital
display
A/C
control
head
components
.
2
.
Unscrew
left
and
right
screws
retaining
control
head
to
control
module
.
Press
retaining
clips
and
release
front
plate
from
control
head
.
Remove
A/C
control
module
from
control
head
housing
.
Sensor
fan
for
interior
temperature,
repiacing
A
small
electricfan,installed
in
the
A/C
control
head,
draws
cabin
air
past
the
climate
control
temperature
sensor
.
1.
Remove
A/C
control
head
as
described
earlier
.
2
.
Rotary-knob
control
head
:
Disconnect
electrical
con-
nector
from
top
of
control
head
housing
.
Pry
open
plas-
tic
housing
and
remove
sensor
fan
.
See
Fig
.
26
.
0013181
Fig
.
26
.
Sensor
fan
(A)
and
harness
(B)
in
back
of
A/C
control
head
(rotary-knob
control
head
shown)
.
3
.
Digital
display
models
:
Disconnect
electrical
harness
connector
from
control
head
housing
.
Remove
screws
holding
sensor
fan
to
bottom
of
control
moduleand
re-
move
.
Refer
to
Fig
.
25
.
4
.
Installation
is
reverse
of
removal
.
HEATING
AND
AIR
CONDITIONING
640-
9
Heater
and
A/C
Air
Distribution
Motors
The
recirculation,
fresh
air
and
othervent-duct
flaps
are
controlled
electrically
via
a
series
of
air
distribution
actuating
motors
.
Cars
with
the
rotary-knob
control
head
use
three
elec-
tromechanical
motors,
each
held
in
place
via
a
small
plastic
clip
.
See
Fig
.
27
.
Rightside
of
heater
box
l
Fig
.
27
.
Location
of
early
production
air
distribution
motors
(arrows)
.
Later
systems
(with
the
digital
display
control
head)
use
five
distribution
motors,
four
of
which
are
digítally
controlled
.
See
Fig
.
28
.
HEATER
AND
CONTROLS
Page 472 of 759
720-2
SEAT
BELTS
WARNING
-
"
For
maximum
protection
from
injury,
seat
belts
should
be
replaced
as
a
set
(including
all
hard-
ware),
if
they
are
subject
to
occupant
loading
in
a
collision
.
"
Seat
belts
should
not
be
modified
or
repaired
.
The
seat
belt
anchorage
points
should
not
be
changed
or
modified
.
"
Do
notbleach
or
dye
seat
belt
webbing
.
Webbing
that
is
severely
fadedor
re-dyed
will
not
meet
the
strength
requirements
of
a
collision
and
must
be
replaced
.
"
Seat
belts
shouldbe
periodically
inspected
for
webbing
defects
suchas
cuts
or
pulled
threads
.
FRONT
SEATBELT
ASSEMBLY
Automatic
Front
Seat
Belt
Lock
Tensioners
The
procedure
for
disabling
the
mechanical
spring
tension-
er
used
on
early
cars
is
covered
below
.
On
cars
with
thepyro-
technic(explosive
device)
tensioners,
the
orange
harness
connectorshould
be
removed
from
the
tensioner
any
time
the
seat
is
removed
.
WARNING
-
Both
the
mechanical
and
the
pyrotechnictensioners
are
powerful
devíces
and
shouldbehandled
with
extreme
care
.
Mechanical
spring
tensioner,
disarming
1
.
Remove
front
seat
.
See
520
Seats
.
2
.
Disarm
tensioner-electrically
adjustableseats
:
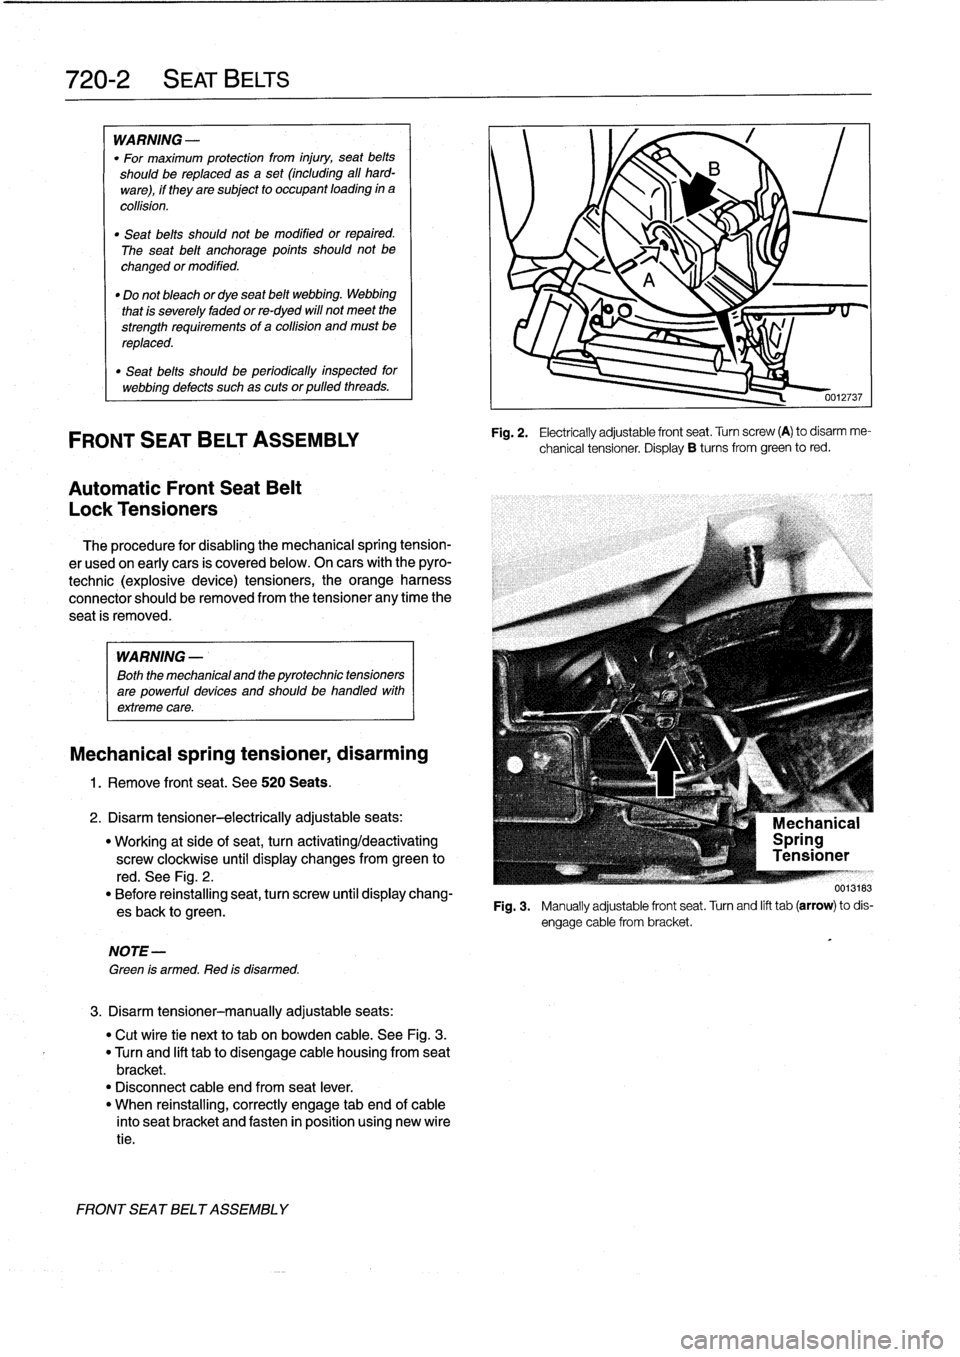
"
Working
at
side
of
seat,
turn
activating/deactivating
screw
clockwise
until
display
changes
from
green
to
red
.
See
Fig
.
2
.
"
Before
reinstalling
seat,
turn
screw
until
display
chang-
esback
to
green
.
NOTE-
Green
is
armed
.
Red
is
disarmed
.
3
.
Disarm
tensioner-manually
adjustable
seats
:
"
Cut
wíre
tie
next
to
tab
on
bowden
cable
.
See
Fig
.
3
.
"
Turn
and
lift
tabto
disengage
cable
housing
from
seat
bracket
.
"
Disconnect
cable
end
from
seat
lever
.
"
When
reinstalling,
correctly
engage
tab
end
of
cable
into
seat
bracket
and
fasten
in
position
using
new
wíre
tie
.
FRONT
SEATBELT
ASSEMBLY
0012737
Fig
.
2
.
Electrically
adjustable
front
seat
.
Turn
screw
(A)
to
disarm
me-
chanical
tensioner
.
Display
B
tucos
from
green
to
red
.
F19
.3
.
Manuallyadjustablefrontseat
.Turnandlifttab(arrow)todis-
Page 477 of 759
721
Airbag
System
(SRS)
Airbag
Systems
.......
.
...
.
.
.
.
.
....
.
.
.
.
721-1
AIRBAG
SENSORS
AND
ELECTRONICS
721-2
SRS
Warning
Light
and
Fault
Display
.
.
.
.
.
..
721-2
Airbagcontact
ring,
replacing
........
.
.
.
.
.
721-3
Airbag
crash
sensor,replacing
..
.
....
.
...
.
721-4
ZAE
control
module,
replacing
.
.
.
.........
721-5
GENERAL
This
repair
group
covers
only
removal
and
installation
of
air-
bag
components
.
Airbag
system
repair
and
fault
diagnosis
is
not
covered
here
.
Diagnostics,
component
testing,
and
airbag
system
repair
should
be
carried
out
by
trained
BMW
service
technicians
.
NOTE-
Special
test
equipment
is
required
to
retrieve
SRS
fault
codes,
diagnose
system
faults,
and
resetltum
off
the
SRS
indicator
light
.
The
SRS
indicator
light
will
remain
on
until
any
problem
has
been
corrected
and
the
fault
memory
has
been
cleared
.
When
servicing
cars
equipped
with
SRS,
the
precautions
on
this
page
mustbeobserved
to
prevent
personal
injury
.
Airbag
Systems
The
airbag
system
installed
on
E36
cars
through
the
1993
model
year
consisted
of
a
single
airbag
in
the
steering
wheel
.
This
systemcan
be
identified
by
the
orange
crash
sensors
lo-
cated
on
the
front
wheel
wells
and
the
absence
of
a
passenger
side
airbag
.
The
ZAE
airbag
system,
starting
in
model
year
1994
(pro-
duction
date9/93
and
later),
provides
both
a
driver
side
and
a
passenger
sideairbag
.
On
ZAE
vehicles,
the
crash
sensorsare
integrated
into
the
airbag
control
module,
located
under
thecenter
of
the
rear
seat
.
The
ZAE
control
module
triggers
deployment
of
the
airbags
When
it
sensos
the
vehicle
deceler-
ating
at
a
rate
equivalent
to
a
head-on
collisionof
at
least
13
mph
(18
km/h)
.
In
some
1997
4-door
models
and
all
1998
models,
side-impact
airbags
were
installed
in
the
front
doors
.
The
airbag
units
are
mounted
behindthe
door
trim
panels
.
Caution
mustbeused
when
working
on
vehicle
systems
in
the
proximity
of
air
bags,
such
as
the
steering
column,
the
dashboard,
or
the
doors
.
AIRBAG
SYSTEM
(SRS)
721-1
GENERAL
.
.
.
.
.
.
.
.
.
.
.......
.
......
.
.
.
.
721-1
Front
side-impact
airbag
crash
sensor,
removing
and
installing
....
.
.....
.
.....
.
721-5
AIRBAGS
..............
.
.
.
.
.
.
.
.
.
.
.
.
.
.
.
721-5
Driver
side
airbag,
removing
and
installing
.
.
.
721-5
Passenger
side
airbag,
removing
and
installing
..............
.
.
.721-6
Front
side-impact
airbag,
removing
and
installing
.
.
.
.
.
.
.
.
.
.
......
.721-7
WARNING
-
"
Airbag(s)
are
inflated
byan
explosive
device
.
Handled
improperly
or
without
adequate
safe-
guards,
the
System
can
be
very
dangerous
.
Spe-
cial
precautions
must
be
observed
prior
to
any
work
ator
near
the
driverside
airbag,
the
passen-
ger
side
airbag
(where
applicable)
or
the
side-im-
pact
airbags
(where
applicable)
.
"
The
airbag
is
a
vehicle
safety
system
.
Serious
in-
jury
may
result
if
System
service
is
attempted
by
persons
unfamiliar
with
the
BMW
SRS
and
its
ap-
proved
service
procedures
.
BMW
advises
that
all
inspection
and
service
be
performed
by
an
autho-
rized
BMW
dealer
.
"
Always
disconnect
the
battery
and
cover
the
neg-
ative
()
battery
terminal
with
an
insulator
before
startingdiagnostic,
troubleshooting
or
service
worknot
associated
with
SRS,
and
before
doing
any
welding
on
the
car
.
"
If
an
airbag
has
been
activated
due
to
an
acci-dent,
BMW
specifies
that
SRS
components
be
replaced
.
For
more
information
on
post-collision
SRS
service,
see
an
authorized
BMW
dealer
.
"
Do
not
allow
the
airbag
unit
to
come
in
contact
with
cleaning
solutions
orgrease
.
Never
subject
an
airbag
unit
to
temperatures
aboye
212°F
(100°C)
.
When
reconnecting
the
battery,
no
per-
son
should
be
inside
the
vehicle
.
"
Always
place
an
airbag
unitthat
has
been
re-
moved
from
its
packaging
with
the
padded
sidefacing
upward
.
Do
not
leave
an
airbag
unlt
unat-
tended
.
"
!f
the
airbag
unit
or
airbag
control
modulehas
been
dropped
froma
height
of
!
1
2
meter
(1
Y2
ft.)
ormore,
theairbag
unit
should
not
be
installed
.
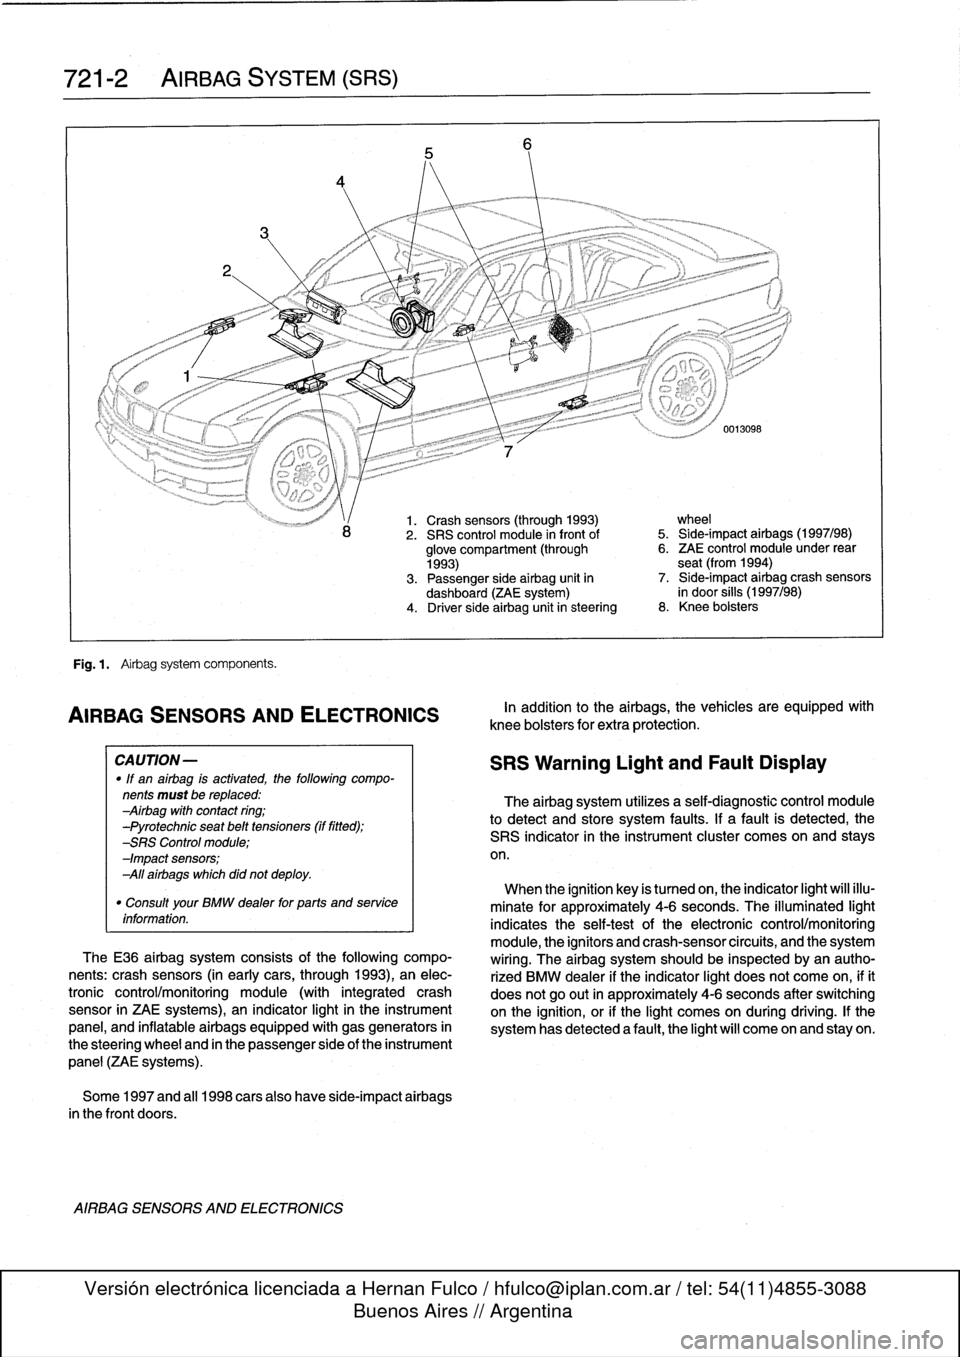
Aírbag
system
components
are
shown
in
Fig
.
1.
GENERAL
Page 478 of 759
721-2
AIRBAG
SYSTEM
(SRS)
Fig
.
1
.
Airbag
system
components
.
AIRBAG
SENSORSAND
ELECTRONICS
CA
UTION-
"
If
an
airbag
is
activated,
the
following
compo-
nents
must
be
replaced
:
Airbag
with
contact
ring
;
-Pyrotechnic
seat
belt
tensioners
(if
fitted)
;
-SRS
Control
module
;
-Impact
sensors
;
All
airbags
which
did
not
deploy
.
"
Consult
your
BMW
dealer
for
parts
and
service
information
.
TheE36
airbag
system
consists
of
the
following
compo-
nents
:
crash
sensors
(in
earlycars,
through
1993),
an
elec-
tronic
control/monitoring
module
(with
integrated
crash
sensor
in
ZAE
systems),
an
indicator
light
in
the
instrument
panel,
and
inflatable
airbags
equipped
with
gas
generators
in
the
steering
wheel
and
in
the
passenger
side
of
the
instrument
panel
(ZAE
systems)
.
Some
1997
and
al¡
1998
carsalso
have
side-impact
airbags
in
the
front
doors
.
AIRBAG
SENSORS
AND
ELECTRONICS
1.
Crash
sensors
(through
1993)
wheel
2
.
SRS
control
module
in
front
of
5
.
Side-impact
airbags
(1997/98)
glove
compartment
(through
6
.
ZAE
control
module
under
rear
1993)
seat
(from
1994)
3
.
Passenger
side
airbag
unit
in
7
.
Side-impact
airbag
crash
sensors
dashboard
(ZAE
system)
in
door
silis
(1997/98)
4
.
Driver
side
airbag
unitin
steering
8
.
Knee
bolsters
In
addition
to
the
airbags,
the
vehicles
are
equipped
wíth
knee
bolsters
for
extra
protection
.
SRS
Warning
Light
and
Fault
Display
The
airbag
system
utilizes
a
self-diagnostic
control
module
to
detect
and
store
system
faults
.
If
a
fault
is
detected,
the
SRS
indicator
in
the
instrument
cluster
comes
on
and
stays
on
.
When
the
ignition
key
is
tumed
on,
the
indicator
light
will
illu-
minate
for
approximately
4-6
seconds
.
The
illuminated
light
indicates
the
self-testof
the
electronic
control/monitoring
module,
the
ignítors
and
crash-sensorcircuits,
and
the
system
wiring
.
The
airbag
system
should
be
inspected
byan
autho-
rized
BMW
dealer
if
the
indicator
light
does
not
come
on,
ifit
does
not
go
out
in
approximately
4-6
seconds
after
switching
onthe
ignition,
or
if
the
light
comes
on
during
driving
.
If
the
system
has
detected
a
fault,
the
light
will
come
on
and
stay
on
.
Page 649 of 759
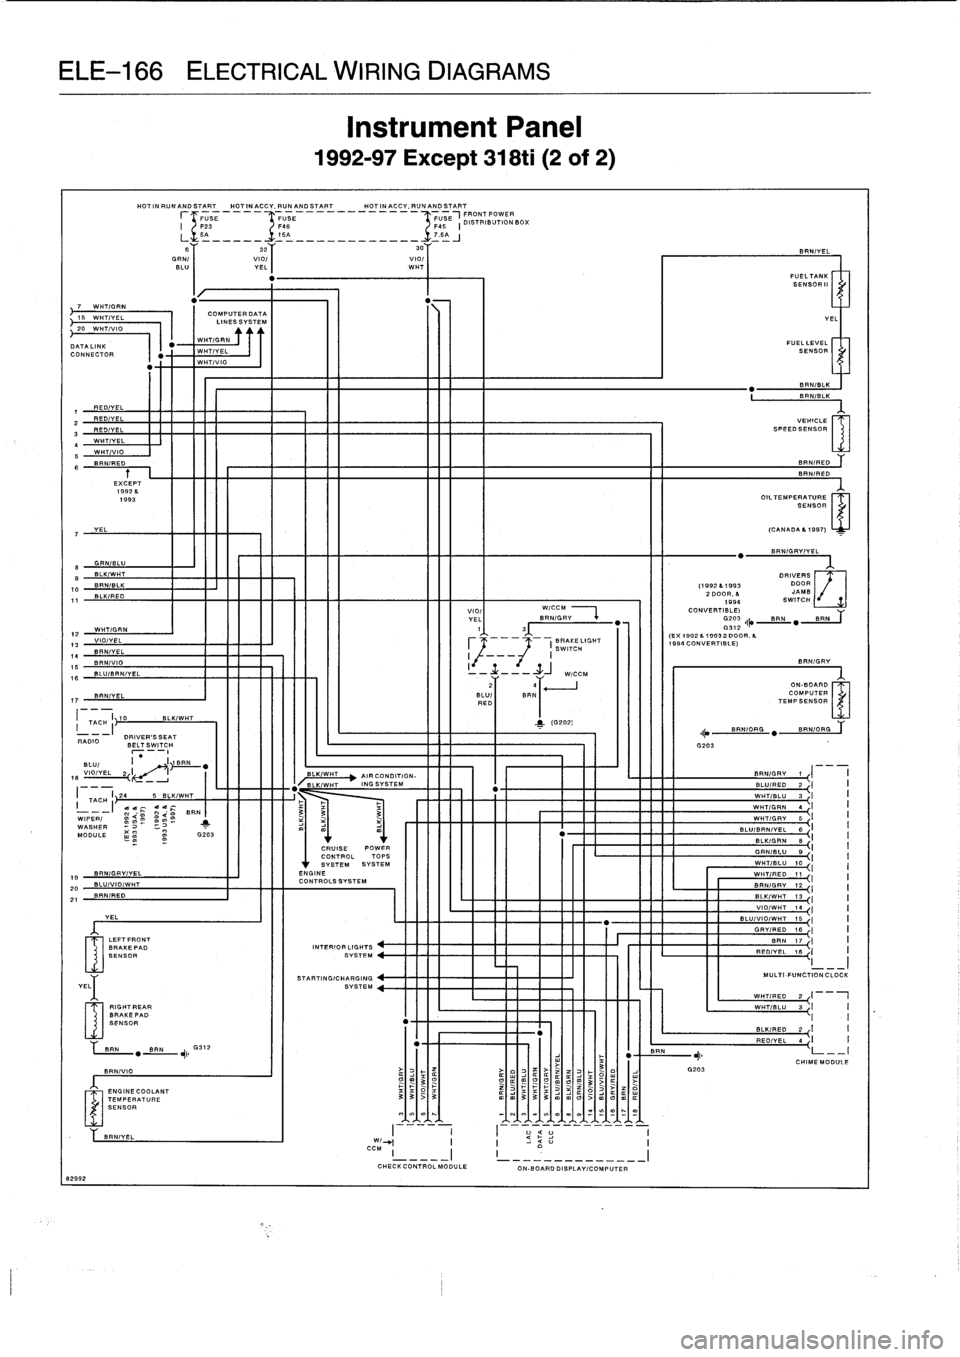
ELE-166
ELECTRICAL
WIRING
DIAGRAMS
"
-
N15
WH7/VA
I
COLIESSSVSTEM
20
WHT/VIO
DATALINK
WHT/GRN
CONNECTOR
WHT/YEL
1
WHT/VIO
REDIVEL
FF"
2
REDIVELREDIVEL
17
BRNIYEL
170
I
TAC-I~
RADIO
DRIVER'SSEAT
BELT
SWITCH
BLUI
I
_
I1
BRN
VIO/YEL
2
I
-
18
19
BRN/GFY/YEL
20
BLU/VIOIWHT
21
BRN/RED
YEL
8299
2
YEL
LEFTFRONT
BRAKEPAD
SENSOR
RIGHT
EAR
BRAKEPAD
SENSOR
HOTINRUNANDSTART
HOTINACCY,PUNANDSTART
HOTINACCY,RUNANDSTART
r
F23
E___
USE
__________-IFFUSE
USE
IDSOTRIBUTIONBOX
BLK/WHT
BRN
"BAN
,I
G312
BRNIVIO
ENGINECOOLANT
TEMPERATURESENSOR
InstrumentPanel
1992-97
Except
318ti
(2
of
2)
5A_____-TISA
____________
.T7
.5AJ
B
32
30Y
GRN/
viol
I
viol
BLU
I
YEL
WHT
WHT/VEL
WHT/VIO
BRNIRED
EXCEPT
1992
&
1993
OIL7EMPESENSOR
7
YEL
(CANADA61997)
.
BRNIGRVIYEL
e
GRNIBLU
9
BLKIWHT
DRIVERS
DOOR
0
JAMB
1994
SWITCH
1
BIN/ILK
(19926
1
993
BLK/RED
2
DOOR,
6
VIOI
WICCM
CONVERT
BR
WHTIGRN
YE'
I
3
N/GRY
~
(EX
1992
6
7993
200
V"'
0R
6
VIO/YEL
I
BRAKELIGHT
.
1990
CONVERTIBLE)
BRNIYEL
SWITCH
BRN/VIO
I
I
8RN/GRV
BLUIBRN/VEL
-
----+-j
W/CCM
.LU/
COMPUTER
REDI
BRN1
~
TEMPSENSOR
MMONE
-
.
INNER
BRNIYEL
I----
I
I--
-
-----
--
W/_I
I
I
CC
M
CHECK
CONTROLMODULE
ON-BOARD
DISPLAYICOMPUTER
BRN
G203
BRNIYEL
FUELTANKI
SENSOR"
FUELLEVEL
SENSORI
8RN/BLK
BRN/BLK
VEHICLE
SPEEDSENSOR
BF
RED
an
RED
YEL
GRN/BLU
9
I
WIT/
WHT/RED
11-I
I
BRNI
.P
Y12
I
I
BLK/WHT
13
I
VIO/WHT
10
I
BLU/VIO/WHT
75
I
GRV/RED
18`
I
I
BRN
17
~I
PEDIYEL
18
I
I
MULTI
FUNCTION
CLOCK
WHTwHTRG1
-
I
WHT/BLU
3
I
II
I
BLKIRED
2
{
I
I
REOIVE
L4
I
I
CHIMEMODULE
Page 651 of 759
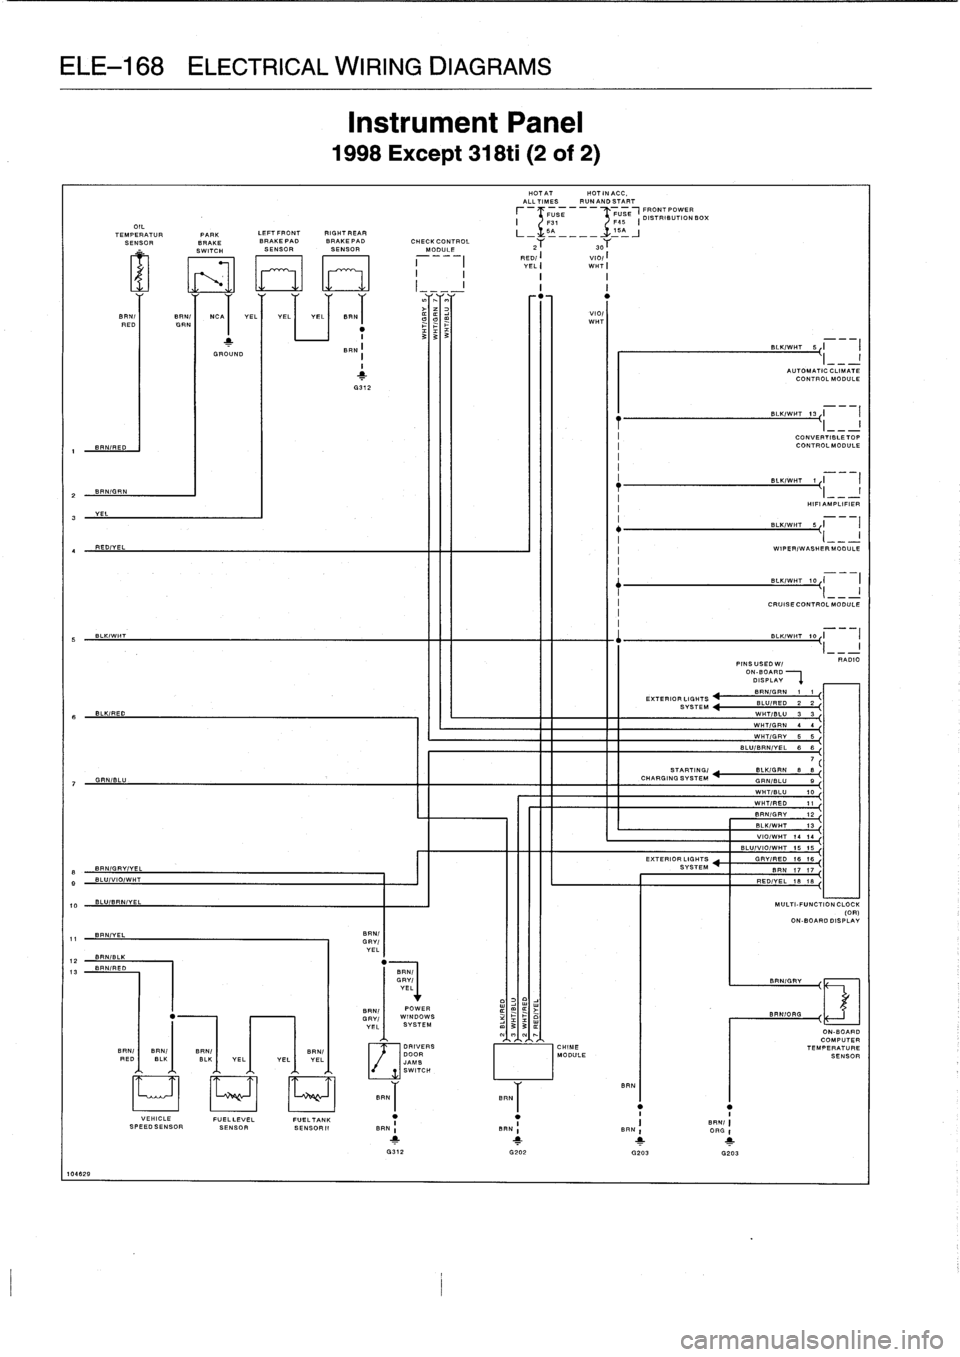
ELE-168
ELECTRICAL
WIRING
DIAGRAMS
5
6
7
0
10
10462
9
GRN/BLU
BRN/YEL
BRN/BLK
BRN/RED
DRIVERS
DOOR
JAMB
SWITCHBAN
t
YEL
SAW
ELI
YEL
Instrument
Panel
1998
Except
318ti
(2
of
2)
OIL
TEMPERATUR
PARK
LEFTFRONTRIGHTREAR
SENSOR
BRAKE
BRAKEPAD
BRAKEPAD
CHECK
CONTROL
SWITCH
SENSOR
SENSOR
MODULE
I
SREDI
BFI
GRNI
NCAI
YELIYELI
YELI
BR
.:
1
I
3I3I
3GROUND
I
BANI
III
III
I
BLK/WHT
CONVERTIBLETOP
BRN/RED
CONTROLMODULE
I
T
BLK/WHT
1
I
I
BRN/GRN
II
I
HIPI
AMPLIFIER
L
I
;
BLK/WHT
5
i_--I
REDIYEL
q
WIPERIWASHERMODULE
II
-_
BLK/WHT
10I
I
I--I
CRUISE
CONTROLMODULE
I
BLKIWHT
SLK/WHT
10
I
I
PINS
USED
W/
BRN/GRN
11
BLU/RED
22
BLK/RED
WHT/SLU
33
WHT/GRN
44
WHT/GRY
55
BLU/BRN/YEL
667
STARTING/
BLK/GRN
BB
CHARGINGSYSTEM
GRN/BLU
9
WHT/BLU
10
WHTIRED
11
BRN/GRY
12
BLK/WHT
13
V
11
/WHT
1414
BLU/VIOIWHT
1515
EXTERIOR
LIGHTS
GRY/RED
1616
H
BRN/GRY/YEL
SYSTEM
RAN
1717
BLU/VIO/WHT
RED/YEL
1515
BLUIBRN/YEL
MULTI-FUNCTION
CLOCK
ON-BOARD
DISPLAY
EXTERIOR
LIGHTS
SYSTEM
BRN/
DAY
/
YEL
GVEL
BRN/GRY
BRN/
POWER
GRY/I
WINDOWS
YEL
SYSTEM
mI
3I
3
:1
R.
t
HOT
AT
HOT
IN
ACC,
ALLTIMES
RUNAND
START
FUSE
y
FUSE
FRONTPOWER
F45
I
DISTRIBUTION
11,
5=____~-5_J
30Y
REDII
V101
I
YELI
WHTI
vIOf
WHT
ON-BOARD
COMPUTERMODULE
TEMPERATURE
BRN
"
1
I
VEHICLE
FUELLEVEL
FUELTANK
I
"
I
1
BAN/
SPEEDSENSOR
SENSOR
SENSORII
BAN
I
SANI
BAN
I
GAS
I
1
1
1
1
G312
G202
G203
G203
I
AUTOMATIC
CLIMATE
CONTROL
MODULE
BLKLKIW
J
T
13
1
I
RADIO
BRN/ORG
Page 750 of 759
WARNING
Your
common
sense,
good
judge-
ment,
and
general
alertness
are
cru-
cial
to
safe
and
successful
service
work
.
Before
attempting
any
work
on
your
BMW,
read
the
warnings
and
cautions
on
page
vi¡
and
the
copyright
page
at
the
front
of
the
manual
.
Review
these
warnings
and
cautions
each
time
youprepare
to
work
on
your
BMW
.
Please
also
read
any
warnings
and
cautions
that
accom-
pany
the
procedures
in
the
manual
.
A
ABS
(anti-lock
brakes)
See
Brakes
Accelerator
and
throttle
linkage
See
Maintenance
program
Air
conditioning
general
information
640-1
air
distribution
motor,
replacing
(rotary
knob)
640-10
air
distribution
motors
640-9
blower
motor,
removing/installing
640-1blower
motor
resistor
pack,
replacing
640-3
compressor,
replacing
640-12
compressor
clutch
640-13
condenser,
replacing
640-14
control
head
640-7
removing/installing
(digital
-display)
640-8
removing/installing
(rotary
knob)
640-7
control
module
removing/installing
(digital-display)
640-8
removing/installing
(rotary
knob)
640-8
evaporator,
removinglinstalling
640-17
evaporator
temperature
sensor,
replacing
640-17
expansion
valve,
removing/installing
640-16
microfilter,
replacing
640-18
receiverldrier,
replacing
640-15
sensor
fan
forinterior
temperature,
replacing
640-9
warnings
and
cautions
640-11
Air
distribution
(flap)
motor
See
Air
conditioning
See
also
Heating
Air
filter
See
Maintenanceprogram
Airbag
system
(SRS)
general
information
721-1
contact
ring,
replacing
721-3
driver
side
airbag,removing/installing
721-5
front
crash
sensor,
replacing
721-4
front
side-impact
airbag,
removing/
installing
721-7
front
side-impact
airbag
crash
sensor,
removing/installing
721-5
passenger
side
airbag,
removing/
installing
721-6
sensors
and
electronics
721-1
SRS
warning
light
and
fault
display
721-2
systems
721-1
ZAE
control
module,
replacing
721-5
Alarm
system
See
Central
locking
and
anti-theft
Alternator
See
Battery,
starter,
alternator
Anti-freeze
(Engine
coolant)
See
Maintenance
program
Anti-theft
See
Central
lockíng
and
anti-theft
AST
(Al¡
season
traction)
300-4
ATF
(Automatic
transmission
fluid)
See
Automatic
transmission
Automatic
transmission
See
alsoTransmission-general
general
information
240-1
ATF,draining
and
filling
240-2
ATF
leve¡,
checking
240-1
transmission
removaland
ínstallation
240-4
transmission,
removinglinstalling
240-4
transmission
service
240-1
Auxiliary
fan
See
Cooling
system
Axle
joint
See
Maintenance
program
B
Back-up
light
switch
See
Manual
transmission
Balljoint
See
Front
suspension
Battery
See
Battery,
starter,
alternator
Battery,
starter,
alternator
See
also
Maintenance
program
general
information
121-1
alternator,
removing/installing
(4-
cylinder
engine)
121-5
alternator,
removinglinstalling
(6-
cylinder
engine)
121-6
alternator
brushes,
inspecting/
replacing
121-7
alternator
service
121-4
batterycharging
121-4
battery
load
voltage
test
121-4
batteryopen-circuit
voltage
test
121-4
battery
service
121-3
INDEX
1
Battery,
starter,
alternator
(cont
.)
battery
testing
121-3
charging
system
quick
check121-2
charging
system
troubleshooting
121-
2
hydrometer
testing
121-3
solenoid
switch,
removinglinstalling
121-10
starter
service
121-7
starter
troubleshooting
121-7
starter,
removing/installing(4-cylinder
engine)
121-8
starter,
removing/installing(6-cylinder
engine
with
automatic
transmission)
121-9
starter,
removing/installing
(6-cylinder
engine
with
manual
transmission)
121-8
static
current
draw,
checking
121-2
voltage
regulator,
removing/installing
121-6
Bearing,
wheel
See
Front
suspension
or
Rear
suspension
Blowermotor
See
Air
conditioning
See
also
Heatíng
BMW
emblem
See
Exterior
trim,
bumpers
Body-general
general
information
400-1
body
assembly
400-1
central
body
electronics
400-4
convertible
models
400-2
coupe
models
400-2
electronic
immobilizatíon
system
400-
4
exterior
and
aerodynamics
400-2
heating
afhdair
conditioning
400-5
instruments
and
controls
400-4
interior
equipment
400-3
seats
and
seatbelts
400-3
Body
side
molding
See
Exterior
trim,
bumpers
Brake
fluid
See
Maintenance
program
Brakes
general
information
340-1
antilock
brake
system
(ABS)
340-11
inspection
340-12
wheelspeed
sensors,
replacing
340-12
bleeding
brakes
340-3
brake
booster,
removinglinstalling
340-8
brake
caliper,
removing/installing
340-6
brake
pads,
calipers,
and
rotors
340-3
brake
pads,
replacing
340-4
brake
rotor,
removing/installing
340-7
master
cylinder,
removing/installing
340-7
parking
brake
340-10
adjusting
340-10
.
cable,
replacing
340-11
shoes,
removinglinstalling
340-11