fluid BMW M3 1998 E36 Owner's Manual
[x] Cancel search | Manufacturer: BMW, Model Year: 1998, Model line: M3, Model: BMW M3 1998 E36Pages: 759
Page 65 of 759
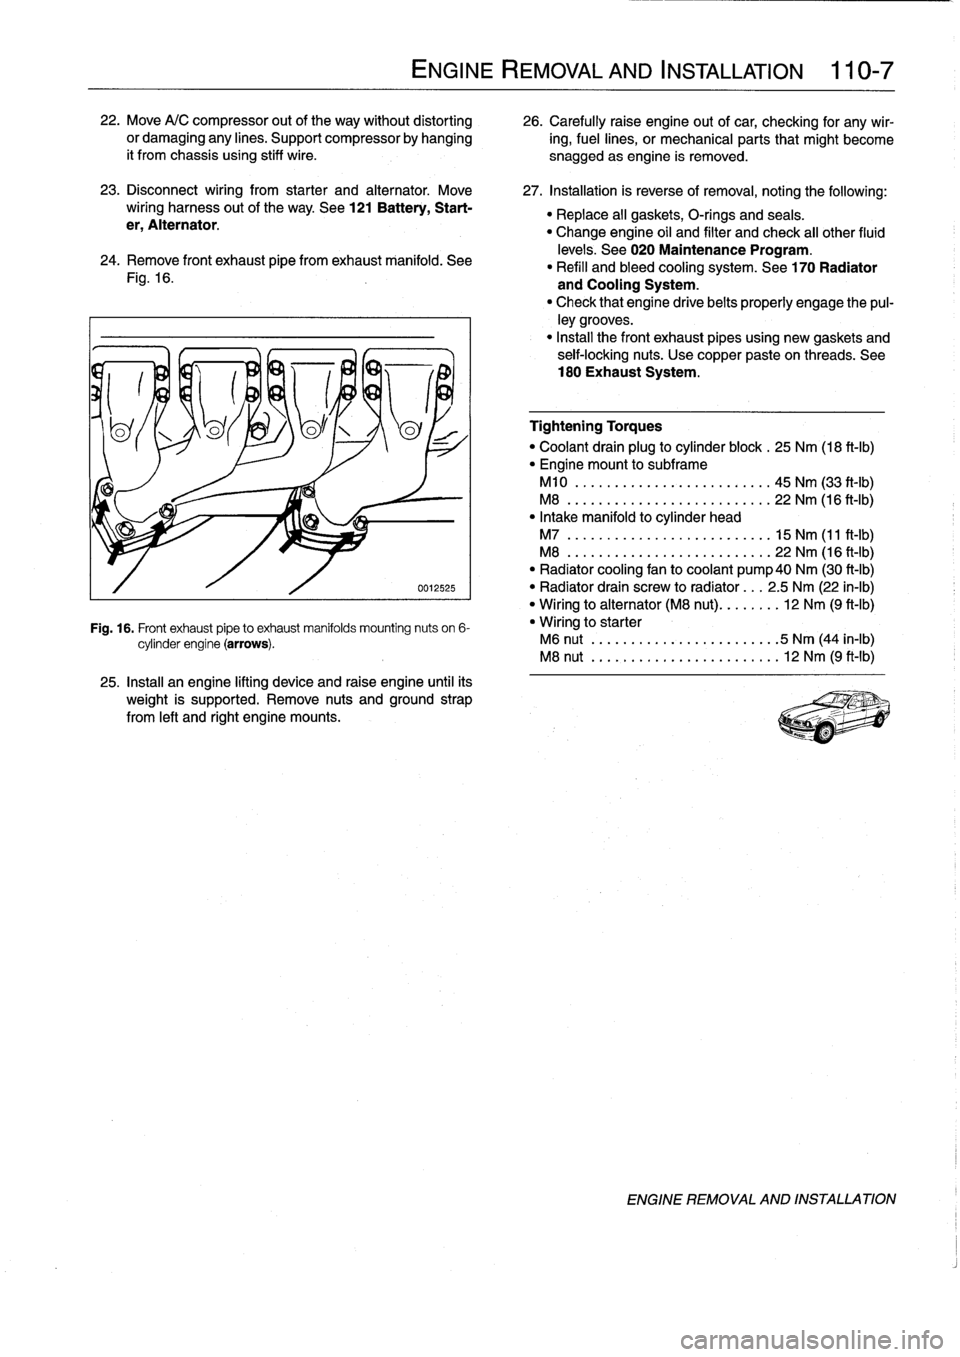
22
.
Move
A/C
compressor
out
of
the
way
without
distorting
26
.
Carefully
raise
engine
out
ofcar,
checking
for
any
wir-
or
damaging
any
lines
.
Support
compressor
by
hanging
ing,fuel
lines,
or
mechanical
parts
that
might
become
it
from
chassis
using
stiff
wire
.
snagged
as
engine
is
removed
.
23
.
Disconnect
wiring
from
starter
and
alternator
.
Move
27
.
Installation
is
reverse
of
removal,
noting
the
following
:
wiring
harness
out
of
the
way
.
See
121
Battery,
Start-
Replace
al¡
gaskets,
O-rings
and
seals
.
er,
Alternator
.
"
Change
engine
oil
and
filter
and
check
all
other
fluid
24
.
Remove
Fontexhaust
pipe
fromexhaust
manifold
.
See
levels
.
See
020
Maintenance
Program
.
"
Refill
and
bleed
cooling
system
.
See
170
Radiator
Fig
.
16
.
and
Cooling
System
.
"
Check
that
engine
drivebelts
properly
engage
the
pul-
ley
grooves
.
"
Install
the
Font
exhaust
pipesusing
new
gaskets
and
seif-locking
nuts
.
Use
copper
paste
on
threads
.
See
180
Exhaust
System
.
0012525
Fig
.
16
.
Front
exhaust
pipeto
exhaust
manifolds
mounting
nuts
on
6-
cylinder
engine
(arrows)
.
25
.
Install
an
engine
lifting
device
and
raise
engine
until
its
weight
is
supported
.
Remove
nuts
and
ground
strap
from
left
and
right
engine
mounts
.
ENGINE
REMOVAL
AND
INSTALLATION
110-
7
Tightening
Torques
"
Coolant
drain
plug
to
cylinder
block
.
25
Nm
(18
ft-Ib)
"
Engine
mount
to
subframe
M10
..
.
.
.
...
..............
..
.
45
Nm
(33
ft-Ib)
M8
..
..
.
..
................
...
22
Nm
(16
ft-Ib)
"
Intake
manifold
to
cylinder
head
M7
..
..
..
...
................
.
15
Nm
(11
ft-Ib)
M8
...
.
..
...
................
.
22
Nm
(16
ft-Ib)
"
Radiator
cooling
fan
to
coolant
pump40
Nm
(30
ft-Ib)
"
Radiator
drain
screw
to
radíator
...
2
.5
Nm
(22
in-lb)
"
Wiring
to
alternator
(M8
nut)
........
12
Nm
(9
ft-Ib)
"
Wiring
to
starter
M6
nut
.
..
...
..................
5
Nm
(44
in-lb)
M8
nut
.....
..
.
.
.
.
.............
12
Nm
(9
ft-Ib)
ENGINE
REMOVAL
AND
INSTALLATION
Page 95 of 759
Valves
Valve
specifications
are
listed
in
Table
d
.
Remove
carbon
deposits
from
thevalves
using
a
wire
brush
or
wire
wheel
.
Specification
M42
engine
M42IM44
engines
M50
engine
M50,
M52
engines
S50
USIS52
US
(1992)
(1993-1998)
(1992)
(1993-1998)
I
engine
(1995-1998)
Valve
head
dia
.
Intake
133
.0
mm
(1
.299
in)
133
.0
mm
(1
.299
in)
33
.0
mm
(1
.299
in)
33
.0
mm
(1
.299
in)
130
.0
mm
(1
.181
in)
Exhaust
30
.5
mm
(1
.201
in)
30
.5
mm
(1
.201
in)
30
.5
mm
(1
.201
in)
~
30
.5
mm
(1
.201
in)
27
.0
mm
(1
.063
in)
Valve
stem
dia
.
Standard
Intake
6
.975-0
.015
mm
5
.975-0
.015
mm
6
.975-0
.015
mm
5
.975-0
.015
mm
5
.975-0015
mm
(0
.2746-00006
in)
(0
.2352-00006
in)
(0
.2746-00006
in)
(0
.2352-00006
in)
(0
.2352
-
00006
in)
Exhaust
6
.960-0015
mm
5
.960-0
.015
mm
6
.960
--0
.015
mm
5
.960
-0
.015
mm
5
.960-0
.015
mm
(0
.2740-00006
in)
(0
.2345-0
.0006
in)
(0
.2740--0
.0006
in)
(0
.2345-0
.0006
in)
(0
.2345-0
.0006
in)
Intake
7
.075-0
.015
mm
6
.075-0
.015
mm
7
.075-0
.015
mm
6
.075-0
.015
mm
6
.075-0
.015
mm
(0
.2785-00006
in)
(0
.2392-0
.0006
in)
(0
.2785-00006
in)
(0
.2392
-
00006
in)
(0
.2392-00006
in)
Exhaust
7
.060-0015
mm
6
.060-0015
mm
7
.060-0
.015
mm
6
.060-0015
mm
6
.060-0015
mm
(0
.
2779-0
.0006
in)
(0
.2386-00006
in)
(0
.2779-00006
in)
(0
.2386-00006
in)
(0
.2386-00006
in)
Oversize
2
Intake
7
.175-0
.015
mm
6
.175-0
.015
mm
7
.175-0
.015
mm
6
.175-0
.015
mm
6
.175-0
.015
mm
(0
.2825-00006
in)
(0
.2431-00006
in)
(0
.2825-00006
in)
(0
.2431--0
.0006
in)
(0
.2431-00006
in)
Exhaust
7
.160-0015
mm
6
.160-0015
mm
7
.160-0
.015
mm
6
.160-0015
mm
6
.160-0-015
mm
(0
.2819
-
00006
i
n
)
(0
.2425-00006
in)
(0
.2819-00006
in)
(0
.2425-00006
in)
(0
.2425-00006
in)
Valves,
leak
test
NOTE-
BMW
speclal
tools
are
available
to
remove
the
valve
To
test
thevalves
for
leakage,
the
camshafts
and
camshaft
stem
oil
seals
.
As
an
alternative,
standard
valvesea¡
carriers
(where
applicable)
should
first
be
removed
.
Instali
the
removal
tools
are
available
from
most
automotive
parts
valve
assemblies
and
the
spark
plugs
in
each
cylinder
.
Place
stores
.
See
Flg
.
17
.
the
cylinder
head
on
a
workbench
with
the
combustion
cham-
ber
facing
upward
.
Fill
each
combustion
chamber
with
a
thin
non-flammable
liquid,
suchas
a
parts
cleaning
fluid
.
After
fif-
teenminutes,
check
the
leve¡
of
the
fluid
.
If
the
fluid
level
in
any
cylinder
drops,
thatcylinder
is
not
sealing
properly
.
Valve
Stem
Oil
Seals
The
purpose
of
the
valve
stem
oil
sea¡
is
to
prevent
excess
oil
from
entering
the
combustion
chamber
.
The
sign
offautty
valve
stem
oil
seals
is
excessive
oil
consumption
and
smoke
from
the
exhaust
immediately
after
starting
and
during
decel-
erat¡on
NOTE-
Valve
stem
oil
seals
should
not
be
reused
.
ff
valves
are
removed,
new
valve
stem
oil
seals
should
be
installed
.
Valve
stem
oil
sea¡
replacement
requires
that
the
cylinder
head
be
disassembled
and
thevalves
removed
as
described
above
under
Valves,
removing
and
installing
.
CYLINDER
HEAD
AND
VALVETRAIN
116-
11
Table
d
.
Valve
Specifications
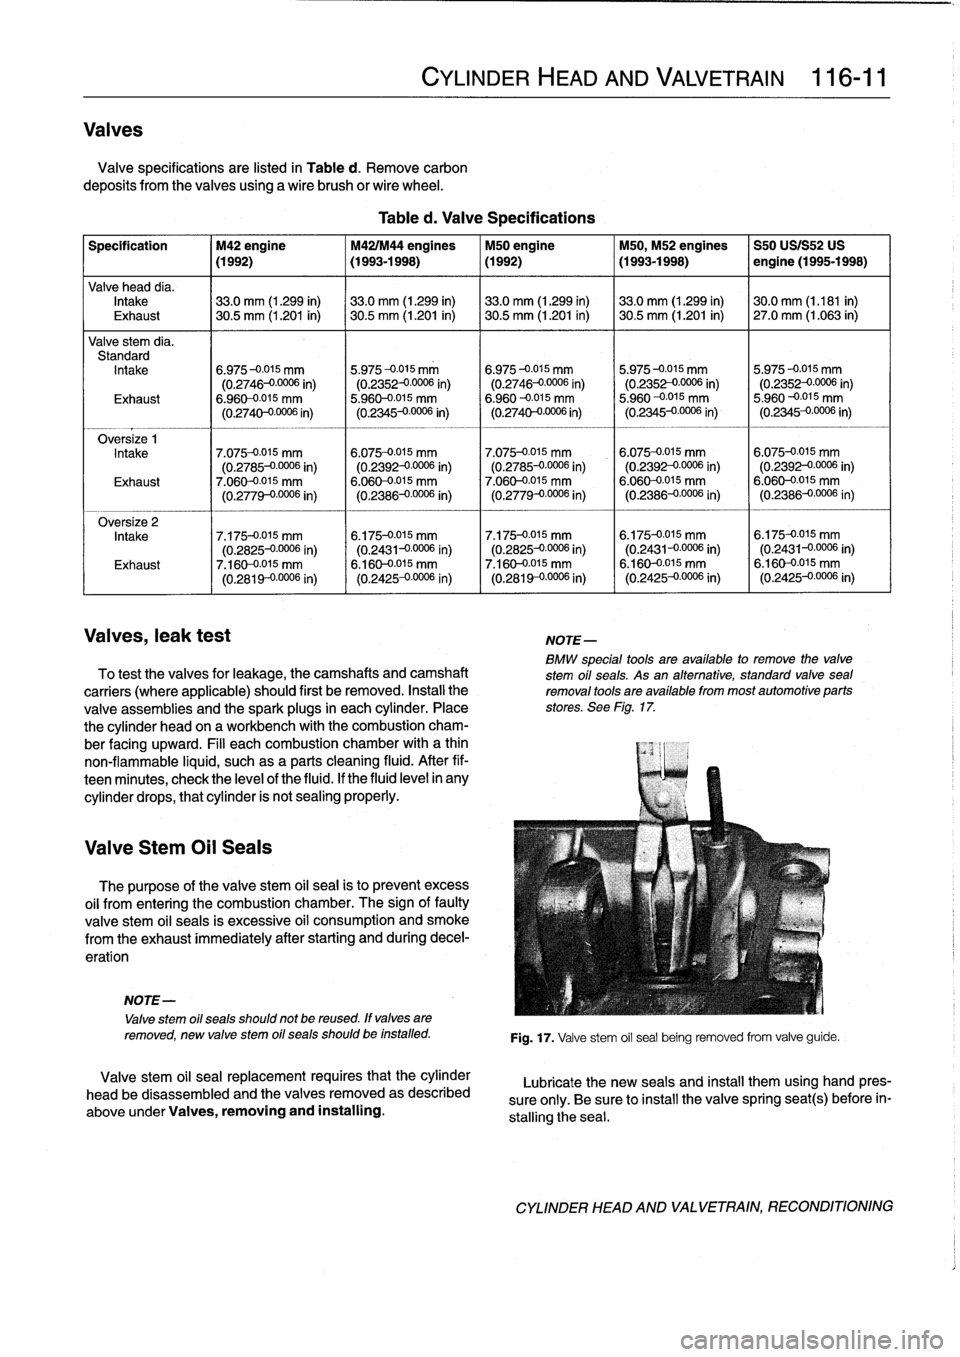
Fig
.
17
.
Valve
stem
oil
sea¡
being
removed
from
valve
guide
.
Lubricate
the
new
seals
and
insta¡]
them
using
hand
pres-
sure
only
.
Be
sure
to
install
the
valve
spring
seat(s)
before
in-
stalling
the
sea¡
.
CYLINDER
HEAD
AND
VALVETRAIN,
RECONDITIONING
Page 119 of 759
8
.
Remove
air
plenum
from
rear
of
engine
compartment
.
See
640
Heating
and
Air
Conditioning
.
9
.
Release
drive
belt
tension
and
remove
alternator
drive
belt
.
Remove
A/C
compressor
drive
belt
.
See
Fig
.
6
.
B11143
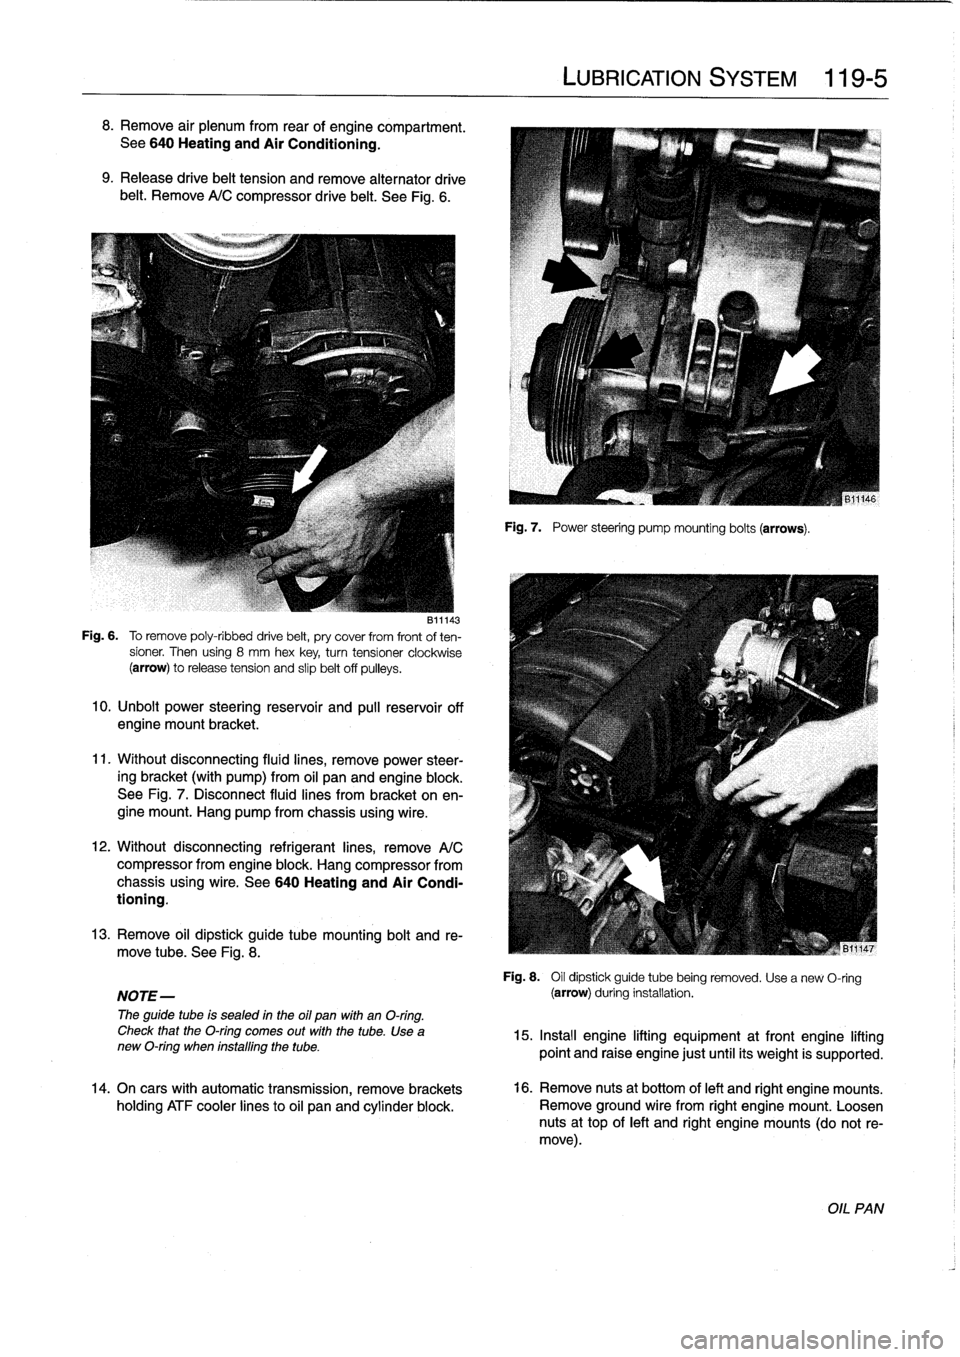
Fig
.
6
.
To
remove
poly-ribbed
drive
belt,
pry
cover
from
front
of
ten-
sioner
.
Then
using
8
mm
hex
key,
turntensioner
clockwise
(arrow)
torelease
tension
and
slip
belt
off
pulleys
.
10
.
Unbolt
power
steering
reservoir
and
pull
reservoir
off
engine
mount
bracket
.
11
.
Without
disconnecting
fluid
lines,
remove
power
steer-
ing
bracket
(with
pump)
from
oil
panand
engine
block
.
See
Fig
.
7
.
Disconnect
fluid
lines
from
bracket
on
en-
gine
mount
.
Hang
pump
from
chassis
using
wire
.
12
.
Without
disconnecting
refrigerant
lines,
remove
A/C
compressor
from
engine
block
.
Hang
compressor
from
chassis
using
wire
.
See
640
Heating
and
Air
Condi-
tioning
.
13
.
Remove
oil
dipstick
guide
tube
mounting
bolt
and
re-
move
tube
.
See
Fig
.
8
.
NOTE-
The
guide
tube
is
sealed
in
the
oil
pan
with
an
O-ring
.
Check
that
the
O-ring
comes
out
with
the
tube
.
Use
anew
O-ring
when
installing
the
tube
.
14
.
On
cars
with
automatic
transmission,
remove
brackets
holding
ATF
cooler
linesto
oil
pan
and
cylinder
block
.
LUBRICATION
SYSTEM
119-
5
Fig
.
7
.
Power
steering
pump
mounting
bolts
(arrows)
.
Fig
.
8
.
Oil
dipstick
guide
tube
being
removed
.
Usea
new
O-ring
(arrow)
during
installation
.
15
.
Insta¡¡
engine
lifting
equipment
at
front
engine
lifting
point
and
raise
engine
just
until
its
weight
is
supported
.
16
.
Remove
nuts
at
bottom
of
left
and
right
engine
mounts
.
Remove
ground
wire
from
right
engine
mount
.
1-oosen
nuts
at
top
of
left
and
right
engine
mounts
(do
not
re-
move)
.
OIL
PAN
Page 121 of 759
5
.
Remove
air
filter
housingcomplete
with
mass
air
flow
sensor
.
See113
Cylinder
HeadRemoval
and
Instal-
lation
.
6
.
Remove
oil
dipstick
guide
tube
mounting
bolt
.
Discon-
nect
oil
separator
hose
frombase
of
guide
tube
and
re-
move
tubefrom
oil
pan
(where
applicable)
.
See
Fig
.
10
.
NOTE-
The
guide
tube
is
sealed
in
the
blockusing
an
O-ring
.
Check
that
the
O-ring
comes
out
with
the
tube
.
Use
a
new
O-ring
when
installing
the
tube
.
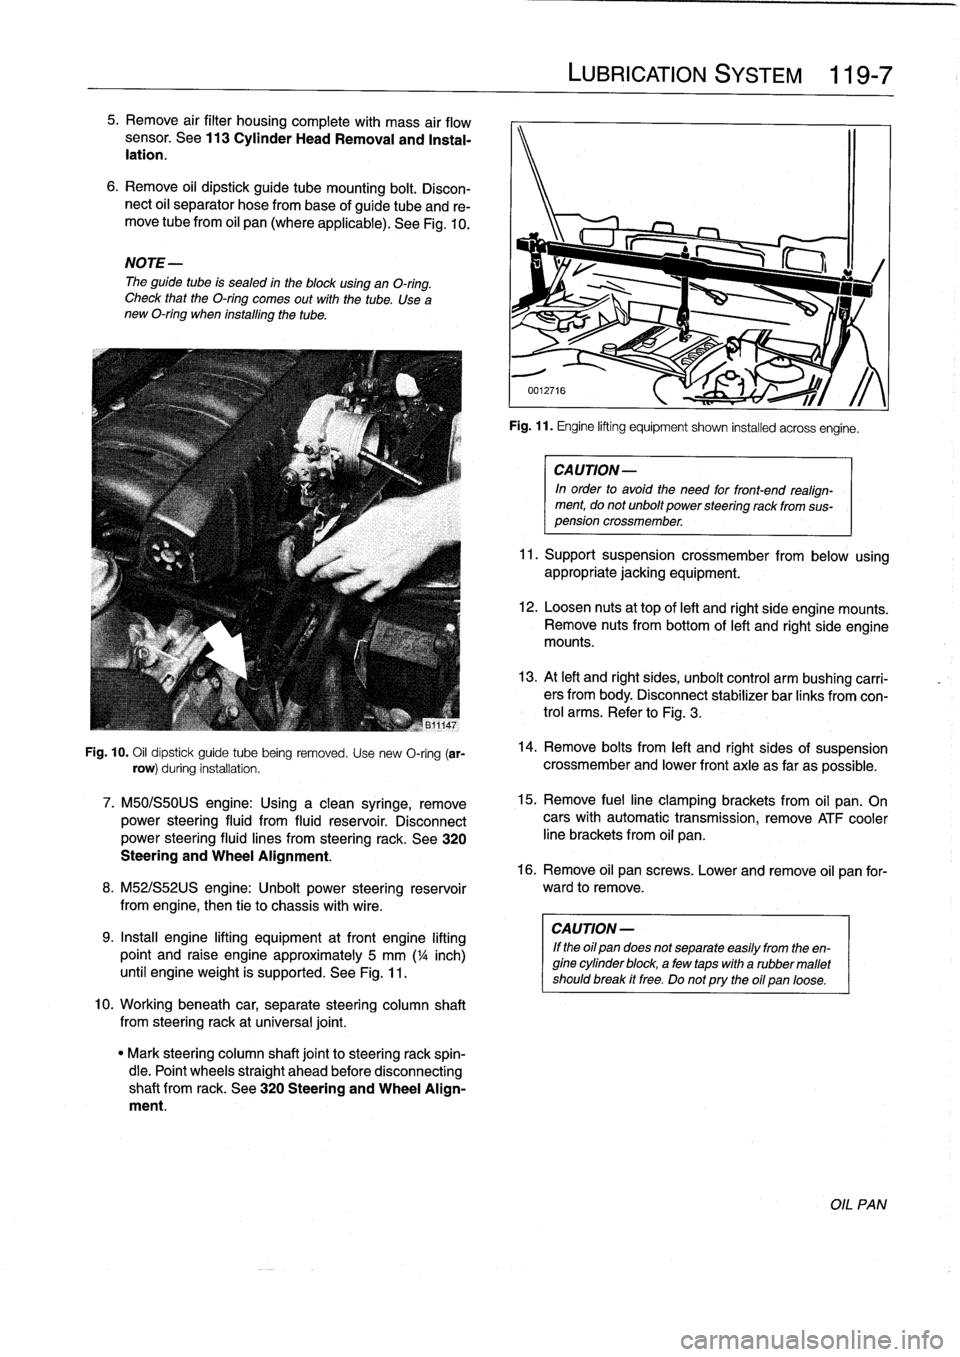
Fig
.
10
.
Oil
dipstick
guide
tube
being
removed
.
Use
new
O-ring
(ar-
row)
during
installation
.
7
.
M50/S50US
engine
:
Using
a
clean
syringe,
remove
power
steering
fluid
from
fluid
reservoir
.
Disconnect
power
steering
fluid
lines
from
steering
rack
.
See
320
Steering
and
Wheel
Alignment
.
8
.
M52/S52US
engine
:
Unbolt
power
steering
reservoir
from
engíne,
then
tie
to
chassis
with
wire
.
9
.
Insta¡¡
engine
lifting
equipment
atfront
engine
lifting
point
and
raise
engine
approximately
5
mm
('/a
inch)
until
engineweight
is
supported
.
See
Fig
.
11
.
10
.
Workingbeneath
car,
separate
steering
column
shaft
from
steeringrack
at
universal
joint
.
"
Mark
steering
column
shaft
jointto
steering
rack
spin-
dle
.
Point
wheels
straight
ahead
before
disconnecting
shaft
from
rack
.
See
320
Steering
and
Wheel
Align-
ment
.
LUBRICATION
SYSTEM
119
Fig
.
11
.
Engine
lifting
equipment
shown
installed
acrossengíne
.
CA
UTION-
In
order
to
avoid
the
need
for
front-end
realign-
ment,
donot
unbolt
power
steering
rack
from
sus-
pension
crossmember
.
11
.
Support
suspension
crossmember
from
below
using
appropriate
jacking
equipment
.
12
.
Loosen
nuts
at
top
of
left
and
right
side
engine
mounts
.
Remove
nuts
from
bottom
of
left
and
right
side
engine
mounts
.
13
.
At
left
and
right
sides,
unbolt
control
arm
bushíng
carri-
ers
from
body
.
Disconnect
stabilizer
bar
links
fromcon-
trol
arms
.
Refer
to
Fig
.
3
.
14
.
Remove
bolts
from
left
and
right
sides
of
suspension
crossmember
and
lower
front
axle
as
far
as
possible
.
15
.
Remove
fuelline
clamping
brackets
from
oil
pan
.
On
cars
with
automatic
transmission,
remove
ATF
cooler
line
brackets
from
oil
pan
.
16
.
Remove
oil
pan
screws
.
Lower
and
remove
oil
pan
for-
ward
to
remove
.
CA
UTION-
If
the
oil
pan
does
not
separate
easily
from
the
en-
gine
cylinder
block,
a
few
taps
with
a
rubber
mallet
shouldbreak
it
free
.
Do
notpry
the
oil
pan
loose
.
OIL
PAN
Page 196 of 759
170-2
RADIATOR
AND
COOLING
SYSTEM
Cooling
Fans
TROUBLESHOOTING
Belt-driven
coolingfan
.
The
primary
cooling
fan
is
belt-
driven
.
It
is
mounted
to
the
frontof
the
coolant
pump
through
a
fan
clutch
.
The
fan
clutch
is
a
viscous
fluid
coupling
that
con-
trols
the
speed
of
thefan
based
on
engine
compartment
tem-
perature
.
Electric
cooling
fan
.
Models
with
M44
engine
and
stan-
dard
transmission
substitute
an
electric
fan
for
the
belt-driven
viscous
fan
.
This
is
attached
to
the
rear
of
the
radiator
and
controlledvia
the
DME
5
.2
engine
management
system
.
NOTE-
The
electric
cooling
fan
in
these
models
is
activated
by
the
engine
control
module
(ECM)
.
Auxiliary
coolingfan
.
In
al¡
models
a
two-speed
electric
auxiliary
cooling
fan
is
mounted
behind
the
front
grill
and
in
front
of
the
radiator
.
This
fan
is
primarily
used
for
the
A/C
sys-
tem,
but
also
operates
when
the
coolant
temperature
ex-
ceeds
a
predetermined
leve¡
.
Warnings
and
Cautions
The
following
warnings
and
Cautions
should
beobserved
when
working
on
the
cooling
system
.
WARNING
-
"
Atnormal
operating
temperature
the
cooling
sys-
tem
is
pressurized
.
Allow
the
system
to
cool
as
long
as
possible
before
opening-a
minimum
of
an
hour-then
release
the
cap
slowly
to
allow
sale
release
of
pressure
.
"
Releasing
the
cooling
system
pressure
lowers
the
coolants
boiling
point
and
the
coolant
may
boíl
suddenly
.
Use
heavy
gloves
and
wear
eye
and
laceprotection
to
guard
against
scalding
.
"
Use
extreme
care
when
draining
and
disposing
of
engine
coolant
.
Coolant
is
poisonous
and
lethal
to
humans
and
pets
.
Pets
are
attracted
to
coolant
because
of
its
sweet
smell
and
taste
.
Consult
a
veterinarian
immediately
if
coolant
is
ingested
byan
animal
.
CAUTION-
"
Avoidadding
cold
water
to
the
coolant
while
the
engine
is
hot
or
overheated
.
If
it
is
necessary
to
add
coolant
to
ahot
system,
do
so
only
with
the
engine
running
and
coolant
pump
tuming
.
"
Prior
to
disconnecting
the
battery,
read
the
bat-
tery
disconnection
cautions
given
at
the
front
of
this
manual
on
page
viii
.
TROUBLESHOOTING
Most
cooling
system
faults
can
be
grouped
into
one
of
three
categories
:
"
Cooling
system
leaks
"
Poor
coolant
circulation
"
Radiator
cooling
fan
faults
When
investigating
the
cause
of
overheating
or
coolant
loss,
begin
with
a
visual
inspection
.
Be
sure
to
check
the
con-
dition
and
tension
of
the
coolant
pump
drive
belt
.
Check
hoses
for
cracks
or
softness
.
Check
clamps
for
looseness
.
Check
the
coolant
leve¡
and
check
for
evidence
of
coolantleaks
from
the
engine
.
Check
that
the
radiator
fins
are
not
blocked
with
dirt
or
de-
bris
.
Clean
the
radiator
using
low-pressure
water
or
com-
pressed
air
.
Blow
outward,
fromthe
engine
side
out
.
Inspect
the
coolant
pump
by
first
removing
the
drive
belt
from
the
pump
.
Firmly
grasp
opposite
sídes
of
the
pulley
and
check
for
play
in
all
directions
.
Spin
the
pulley
and
check
that
the
shaft
runs
smoothly
.
NOTE-
The
coolant
provides
lubrication
for
the
pump
shaft,
soan
occasional
drop
of
coolant
leaking
from
the
pump
is
acceptable
.
If
coolant
drips
steadily
from
the
vent
hole,
the
pump
should
be
replaced
.
The
cooling
system
becomes
pressurized
at
normal
operat-
ing
temperature,
which
raises
the
boiling
point
of
the
coolant
.
Leaks
may
prevent
the
system
from
becoming
pressurized,
allowing
the
coolant
to
boil
at
a
lower
temperature
.
If
visual
ev-
idence
is
inconclusive,
a
cooling
system
pressure
test
can
help
to
pinpointhard-to-find
leaks
.
If
the
cooling
system
is
full
of
coolant
and
holds
pressure,
the
next
most
probable
cause
of
overheating
are
:
"
Faulty
radiator
fan
"
Loose
or
worn
drive
belt
"
Failed
thermostat
or
coolant
pump
"
Clogged/plugged
radiator
or
coolant
passages
.
NOTE
-
"
Some
early
style
coolant
pumps
were
fitted
wíth
fi-
berlplastic
type
impellers
.
Over
time,
this
impeller
can
wear
away
and
result
in
overheating
.
The
plastic
im-
peller
can
also
slip
or
free-wheel
on
the
pump
shaft
.
If
the
engine
overheats
and
no
other
faults
canbe
found,
theold
style
impeller
may
be
the
cause
of
the
problem
.
"
Only
pumps
with
the
updated
metal
impeller
should
be
used
for
replacement
.
Page 198 of 759
170-
4
RADIATOR
AND
COOLING
SYSTEM
A
quick
testat
the
coolant
temperature
gauge
sender
can
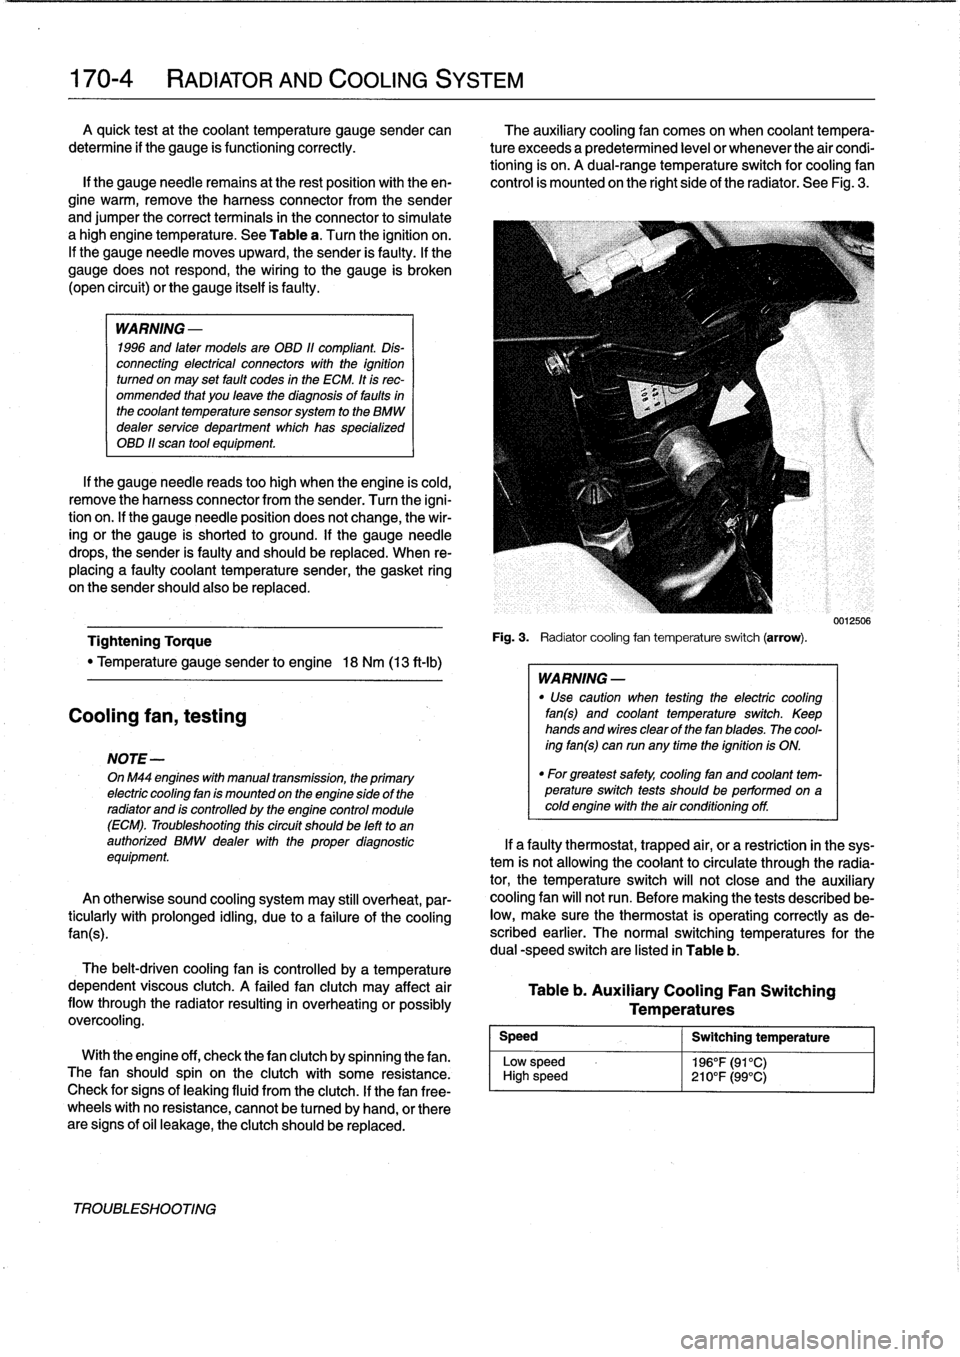
The
auxiliary
cooling
fan
comes
on
when
coolant
tempera
determine
if
the
gauge
is
functioning
correctly
.
ture
exceeds
a
predetermined
leve¡
or
whenever
the
air
condi-
tioning
is
on
.
A
dual-range
temperature
switch
for
cooling
fan
lf
the
gauge
needie
remains
at
the
rest
position
with
theen-
control
is
mounted
on
the
right
side
of
the
radiator
.
See
Fig
.
3
.
gine
warm,
remove
the
harness
connector
from
the
sender
and
jumper
the
correct
terminals
in
the
connector
to
simulate
a
high
engine
temperature
.
See
Table
a
.
Turn
the
ignition
on
.
If
the
gauge
needle
moves
upward,
the
sender
is
faulty
.
If
the
gauge
does
not
respond,
the
wiring
to
the
gauge
is
broken
(open
circuit)
or
the
gauge
itselfis
faulty
.
WARNING
-
1996
and
laten
models
are
OBD
11
compliant
.
Dis-
connecting
electrical
connectors
wíth
the
ignition
turned
on
may
set
fault
codes
in
the
ECM
.
It
is
rec-
ommended
that
you
leave
the
diagnosis
of
faults
in
the
coolant
temperature
sensorsystem
to
the
BMW
dealer
service
department
which
has
specialized
OBD
11
scan
tool
equipment
.
If
the
gauge
needle
reads
too
high
when
the
engine
is
cold,
remove
the
harness
connector
from
the
sender
.
Turn
the
igni-
tion
on
.
lf
the
gauge
needle
position
does
not
change,
the
wir-
ing
or
the
gauge
is
shorted
to
ground
.
If
the
gauge
needle
drops,
the
sender
is
faulty
and
should
be
replaced
.
When
re-
placing
a
faulty
coolant
temperature
sender,
the
gasket
ring
on
the
sender
should
also
be
replaced
.
Tightening
Torque
"
Temperature
gauge
sender
to
engine
18
Nm
(13
ft-Ib)
Cooling
fan,
testing
NOTE-
OnM44
engines
with
manual
transmission,
the
primary
electric
cooling
fan
is
mounted
on
the
engine
side
of
the
radiator
and
is
controlled
by
the
engine
control
module
(ECM)
.
Troubleshooting
thiscircuit
should
be
left
to
an
authorized
BMW
dealer
with
the
proper
diagnostic
equipment
An
otherwise
sound
cooling
system
may
still
overheat,
par-
ticularly
with
prolonged
idling,
due
to
a
failure
of
the
coolíng
fan(s)
.
The
belt-driven
cooling
fan
is
controlled
by
a
temperature
dependent
viscous
clutch
.
A
failed
fan
clutch
may
affect
air
flow
through
the
radiator
resulting
in
overheating
orpossibly
overcooling
.
Speed
Low
sp
High
s
With
the
engine
off,
check
thefan
clutch
by
spinning
thefan
.
eed
The
fan
should
spin
on
the
clutch
with
some
resistance
.
peed
Check
for
signs
of
leaking
fluid
from
the
clutch
.
If
thefan
free-
wheels
with
no
resistance,
cannot
be
tu
rned
by
hand,
or
there
are
signs
of
oil
leakage,
the
clutch
should
be
replaced
.
TROUBLESHOOTING
Fig
.
3
.
Radiatorcooling
fan
temperature
switch
(arrow)
.
WARNING
-
"
Use
caution
when
testing
the
electric
cooling
fan(s)
and
coolant
temperature
switch
.
Keep
hands
and
wires
clear
of
thefan
blades
.
The
cool-
ing
fan(s)
can
run
any
time
the
ignition
is
ON
.
"
For
greatest
safety,
coolíng
fan
and
coolant
tem-perature
switch
tests
shouldbe
performed
on
acoldengine
with
the
air
conditioning
off
.
Table
b
.
Auxiliary
Cooling
Fan
Switching
Temperatures
Switching
temperature
196°F(91°C)
210°F(99°C)
0012506
If
a
faulty
thermostat,
trapped
air,
or
a
restriction
in
the
sys-
tem
is
not
allowing
the
coolant
to
circulate
through
the
radia-
tor,
the
temperature
switch
will
not
close
and
the
auxiliary
cooling
fan
will
not
run
.
Before
making
the
tests
described
be-
low,
make
sure
the
thermostat
is
operating
correctly
as
de-
scribed
earlier
.
The
normal
switching
temperatures
for
the
dual
-speed
switch
are
listed
in
Table
b
.
Page 201 of 759
5
.
Slowly
add
coolant
until
it
spills
from
bleed
screws
.
When
coolant
spillíng
from
bleed
screws
is
free
of
air
bubbies,
tighten
screws
.
6
.
Run
engine
until
it
reaches
operatíng
temperature
.
Af-
ter
engine
has
cooled,
recheck
coolant
level
and
top
up
as
necessary
.
CAUTION-
Always
use
genuine
BMW
coolant
or
its
equiva-
lent
to
avoid
the
formation
of
harmful,
clogging
de-
posits
in
the
cooling
system
.
Use
of
other
antifreeze
solutions
may
be
harmful
to
the
cooling
system
.
Tightening
Torque
"
Radiator
bleed
screw
to
thermostat
housing
...
.
.
........
8
Nm
(71
in-lb)
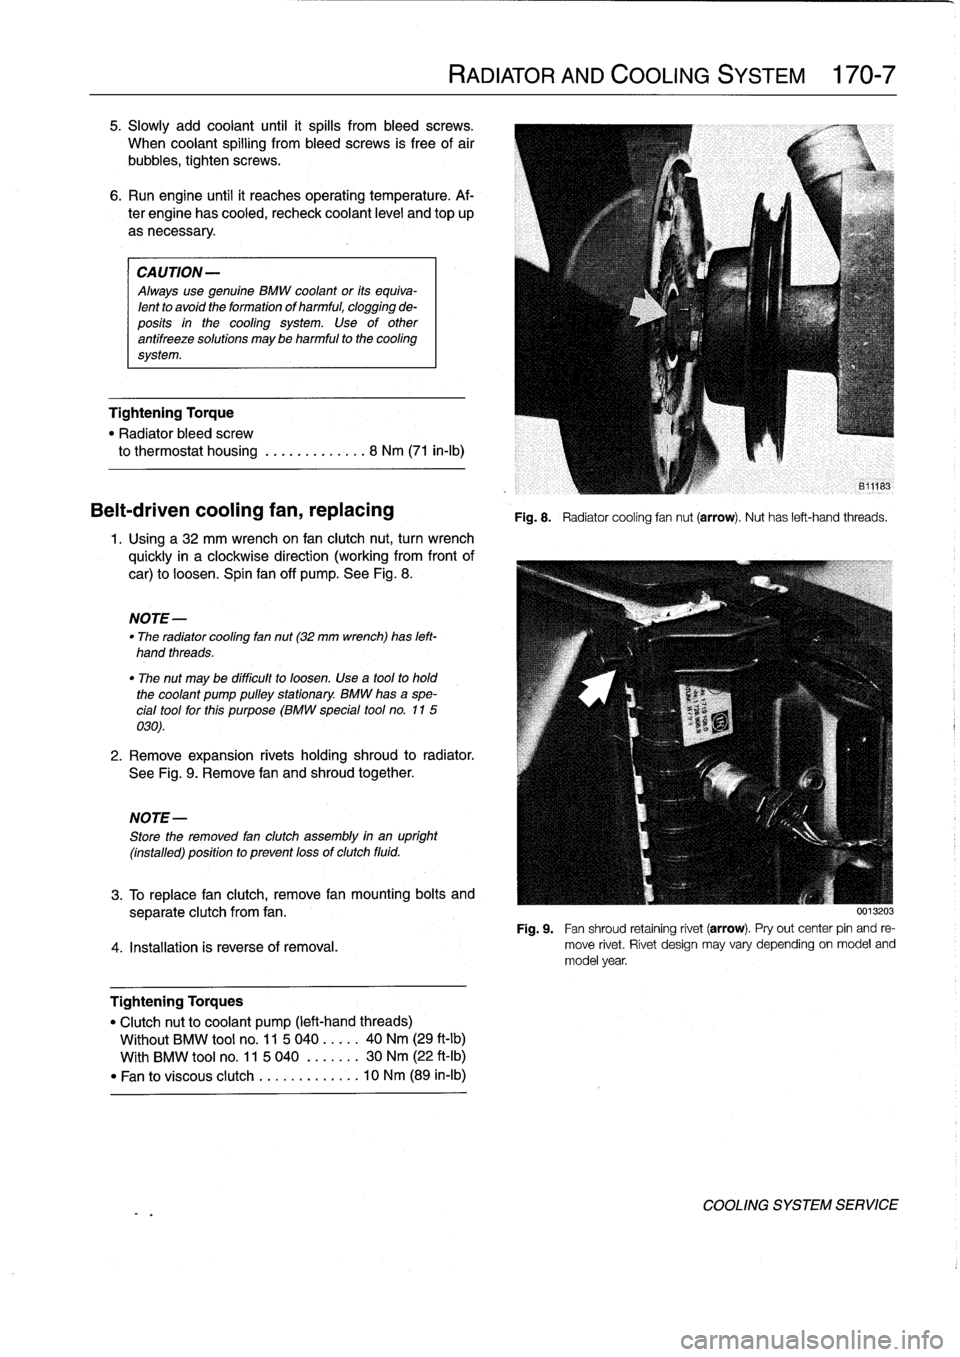
Belt-driven
cooling
fan,
replacing
1
.
Usinga32
mm
wrench
on
fan
clutch
nut,
turn
wrench
quickly
in
a
clockwise
direction
(working
from
front
of
car)
to
loosen
.
Spin
fan
off
pump
.
See
Fig
.
8
.
NOTE-
"
The
radiator
cooling
fan
nut(32
mm
wrench)
has
left-
hand
threads
.
"
The
nut
may
be
difficult
to
loosen
.
Use
a
tool
to
hold
the
coolant
pump
pulleystationary
.
BMW
hasa
spe-
cial
tool
forthis
purpose
(BMW
special
tool
no
.
115
030)
.
2
.
Remove
expansion
rivets
holding
shroud
to
radiator
.
See
Fig
.
9
.
Remove
fan
and
shroud
together
.
NOTE-
Store
the
removed
fan
clutch
assembly
in
an
upright
(installed)
positionto
prevent
lossof
clutch
fluid
.
RADIATOR
AND
COOLING
SYSTEM
170-
7
Fig
.
8
.
Radiatorcooling
fannut
(arrow)
.
Nuthas
left-hand
threads
.
3
.
To
replace
fan
clutch,
remove
fan
mounting
bolts
and
separate
clutch
from
fan
.
Fig
.
9
.
Fan
shroud
retaining
rivet
(arrow)
.
Pryout
center
pin
and
re
4
.
Installation
is
reverse
of
rernoval
.
move
rivet
.
Rivet
design
may
vary
depending
on
model
and
model
year
.
Tightening
Torques
"
Clutchnut
to
coolant
pump
(left-hand
threads)
Wíthout
BMW
tool
no
.
11
5
040
.....
40
Nm
(29
ft-lb)
With
BMW
tool
no
.
11
5
040
.
......
30
Nm
(22
ft-Ib)
"
Fan
to
viscous
clutch
...
.
..
.
......
10
Nm
(89
in-lb)
0013203
COOLING
SYSTEM
SERVICE
Page 205 of 759
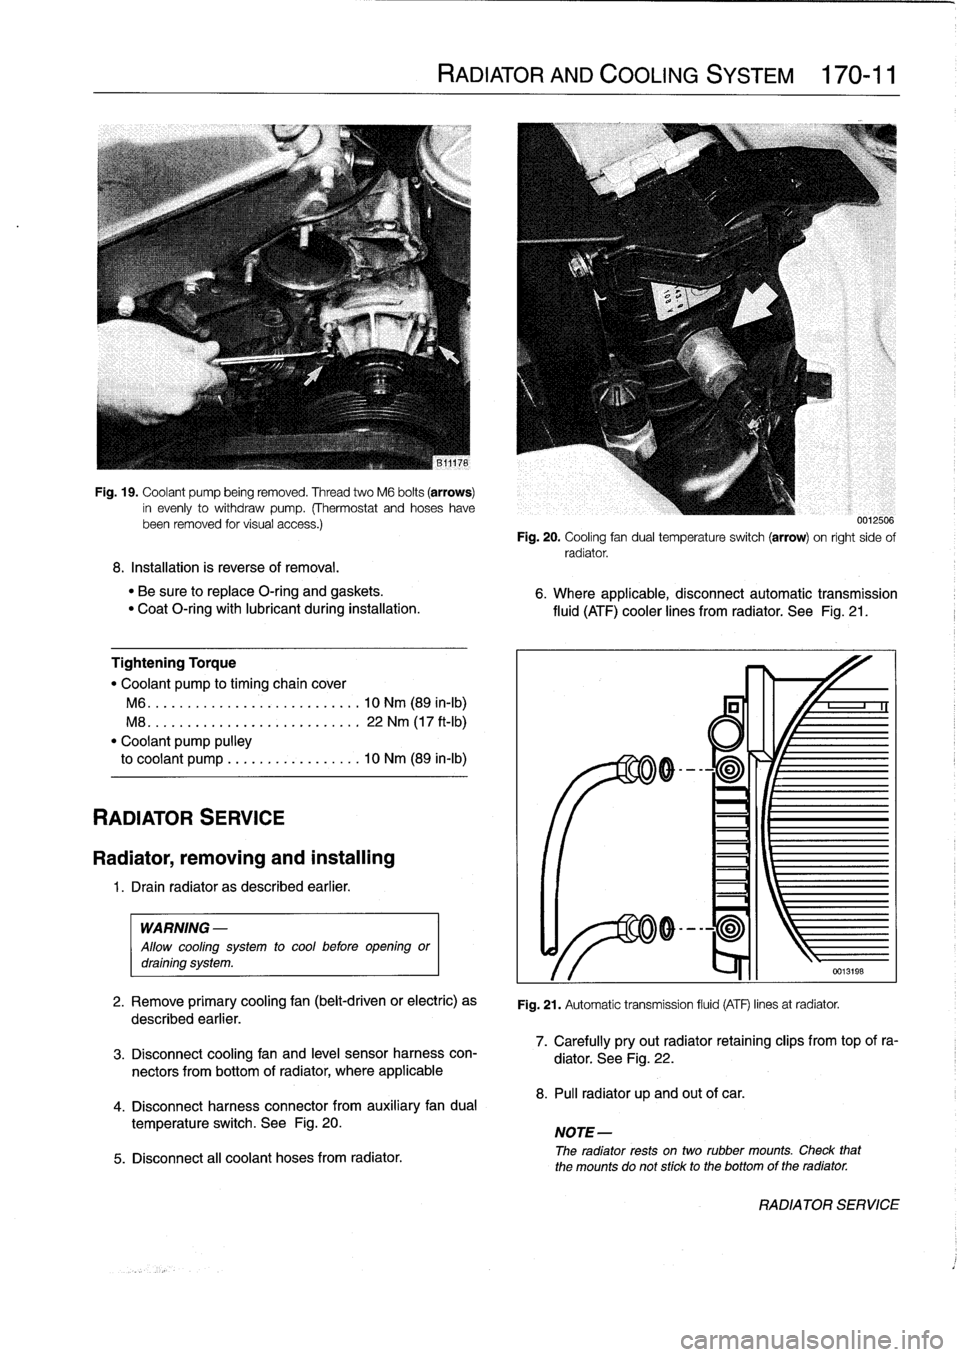
Fig
.
19
.
Coolant
pump
being
removed
.
Thread
two
M6
bolts
(arrows)
in
evenly
to
withdraw
pump
.
(Thermostat
and
hoseshavebeen
removed
tor
visual
access
.)
8
.
Installation
is
reverse
of
removal
.
"
Be
sure
to
replace
O-ring
and
gaskets
.
"
Coat
O-ring
with
lubricant
during
installation
.
Tightening
Torque
"
Coolant
pump
to
timing
chaincover
M6
...
.
...................
..
.
.
10
Nm
(89
in-lb)
M8
.
..
.
....................
.
.
.
22
Nm
(17
ft-Ib)
"
Coolant
pump
pulley
to
coolant
pump
.................
10
Nm
(89
in-lb)
RADIATOR
SERVICE
Radiator,
removing
and
installing
1
.
Drain
radiator
as
described
earlier
.
WARNING
-
Allow
cooling
system
to
cool
before
opening
ordraining
system
.
2
.
Remove
primary
cooling
fan
(belt-driven
or
electric)
as
described
earlier
.
3
.
Disconnect
coolingfan
and
leve¡
sensor
harness
con-
nectors
from
bottom
of
radiator,
where
applicable
4
.
Disconnect
harness
connector
from
auxiliary
fandual
temperature
switch
.
See
Fig
.
20
.
5
.
Disconnect
all
coolant
hoses
from
radiator
.
RADIATOR
AND
COOLING
SYSTEM
170-11
0012500
Fig
.
20
.
Cooling
fan
dual
temperatura
switch
(arrow)
on
right
sido
of
radiator
.
6
.
Where
applicable,
disconnectautomatic
transmission
fluid
(ATF)
cooler
lines
from
radiator
.
See
Fig
.
21
.
Fig
.
21
.
Automatic
transmission
fluid
(ATF)
linos
at
radiator
.
7
.
Carefully
pryout
radiator
retaining
clips
from
top
of
ra-
diator
.
See
Fig
.
22
.
8
.
Pul¡
radiator
up
and
out
of
car
.
NOTE-
The
radiator
rests
ontwo
rubber
mounts
.
Check
that
the
mounts
do
not
stick
to
the
bottomof
the
radiator
.
RADIATOR
SERVICE
Page 214 of 759
200-2
TRANSMISSION-GENERAL
Transmission
ID
Codes
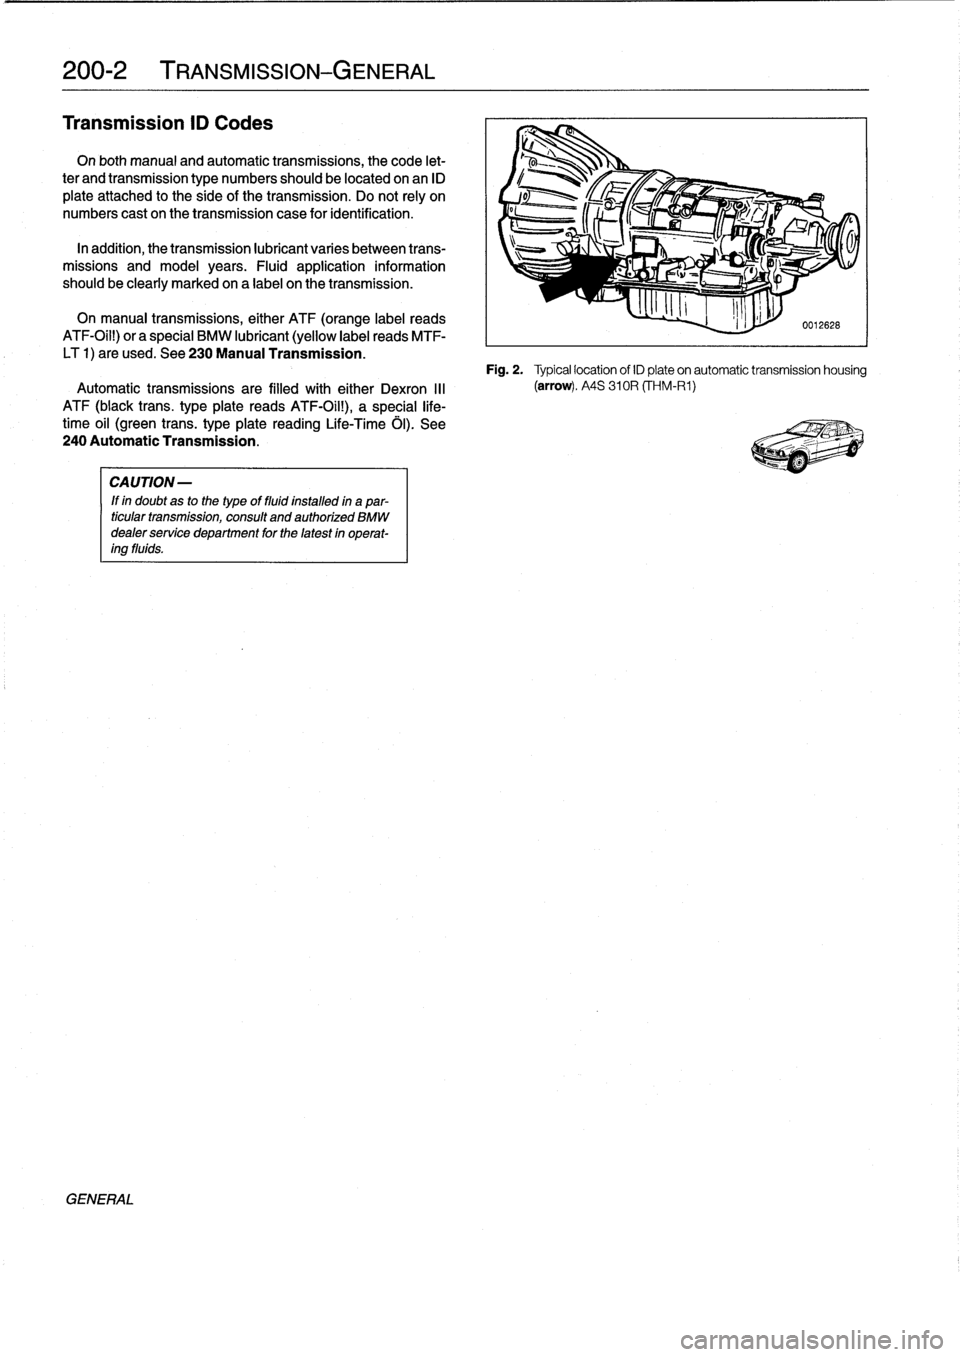
On
both
manual
and
automatic
transmissions,
the
code
let-
ter
and
transmission
type
numbers
should
be
located
onan
ID
plate
attached
to
the
síde
of
thetransmission
.
Do
not
rely
on
numbers
cast
on
the
transmission
case
for
identification
.
In
addition,
thetransmission
lubricant
varies
between
trans-
missions
and
model
years
.
Fluid
application
information
should
be
clearly
marked
on
a
label
on
thetransmission
.
On
manual
transmissions,
either
ATF
(orange
label
reads
ATF-Oil!)
or
a
special
BMW
lubricant
(yellow
label
reads
MTF-
LT
1)
are
used
.
See
230Manual
Transmission
.
Automatic
transmissions
are
filled
with
either
Dexron
III
ATF
(black
trans
.
type
plate
reads
ATF-Oil!),
a
special
ffe-
time
oil
(green
trans
.
type
plate
reading
Life-Time
ó1)
.
See
240AutomaticTransmission
.
GENERAL
CAUTION-
lf
in
doubtas
to
the
typeof
fluid
installed
in
a
par-
ticular
transmission,
consult
and
authorized
BMW
dealer
service
department
for
the
latest
in
operat-
ing
fluids
.
Fig
.
2
.
Typical
location
of
IDpíate
on
automatic
transmission
housing
(arrow)
.
A4S
310R
(THM-R1)
Page 215 of 759
GENERAL
..
.
.
.
.
.
.
.
.
.
.
.
.
.
......
.
......
210-1
CLUTCH
MECHANICAL
.
.
.
.
.
...
.
.....
.
.
210-3
CLUTCH
HYDRAULICS
.
.
.
.............
210-1
Clutch,
removing
.
.
.
.
.
.
.
.
.
.
.
.
.
.
.
.
...
.
.
.
.
210-4
Clutch,inspecting
and
installing
.
.
.
.
.
.
.
.
.
.
.
.210-5Clutch
hydraulic
system,
Transmission
pilot
bearing,replacing
.
.
.
.
...
210-6
bleeding
and
flushing
.
.
.
.
.
.......
.
.....
210-2
Clutch
master
cylinder,
replacing
..
.
.
.
.
.
...
210-2
Table
Clutch
slave
cylinder,
replacing
...
.
.
.
.
.
.
.
.
210-3
a
.
Clutch
Disc
Diameter
.............
..
..
.
......
210-3
GENERAL
CLUTCH
HYDRAULICS
This
repair
group
covers
replacement
of
the
clutch
mechan-
The
Clutch
is
hydraulically
actuated
by
the
master
and
slave
¡cal
and
hydraulic
components
.
Special
tools
may
be
required
cylinders
.
Clutch
disc
wear
is
automatically
taken
upby
the
for
some
of
the
procedures
.
Read
the
procedure
through
be-
pushrod
travelof
the
slave
cylinder,
making
periodic
adjust-fore
beginning
a
job
.
ments
unnecessary
.
NOTE-
See200
Transmission-General
for
transmission
applicatíon
information
.
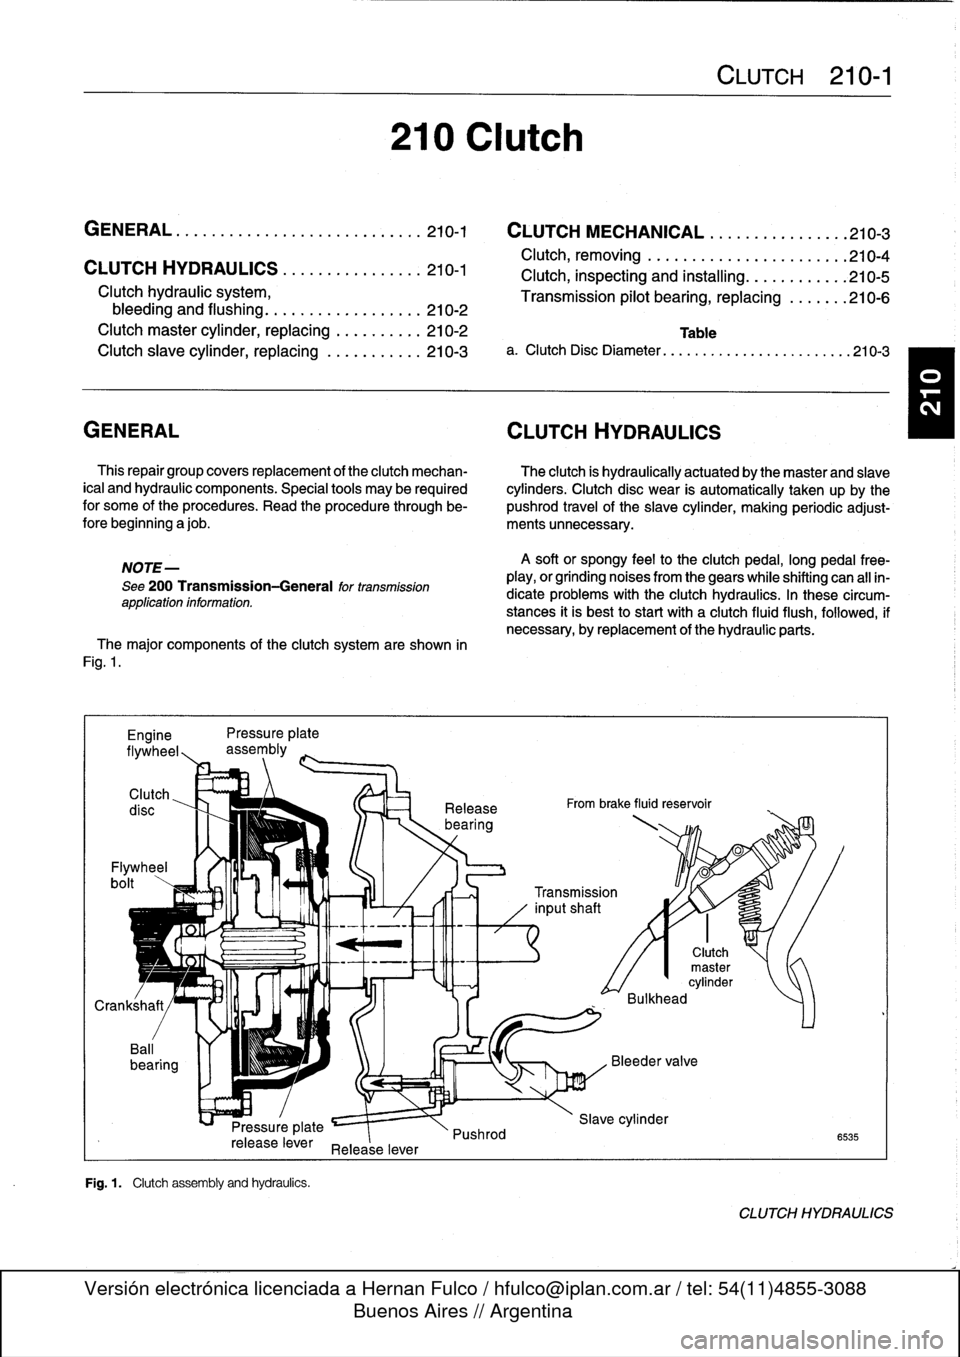
The
major
components
of
the
clutch
system
are
shown
in
Fig
.
1
.
Engine
Pressure
plate
flywheel,,
assembly
Clutch
Flywheel
bolt
Pressure
plate
release
lever
Release
lever
Fig
.
1
.
Clutch
assembly
and
hydraufcs
.
210
Clutch
Release
bearing
Pushrod
A
soft
or
spongy
feel
to
the
clutchpedal,
long
pedal
free-
play,
or
grinding
noises
from
thegears
while
shifting
can
all
in-
dicate
problems
with
the
Clutch
hydraulics
.
In
these
circum-
stances
it
is
best
to
start
with
a
clutch
fluid
flush,
followed,
if
necessary,
byreplacement
of
the
hydraulic
parts
.
From
brake
fluid
reservoir
CLUTCH
210-1
0
0
Transmission
inputshaft
Clutch
master
cylinder
Bulkhead
Slave
cylinder
6535
CLUTCH
HYDRAULICS