check engine BMW M3 1998 E36 Owner's Guide
[x] Cancel search | Manufacturer: BMW, Model Year: 1998, Model line: M3, Model: BMW M3 1998 E36Pages: 759
Page 57 of 759
al
Icld
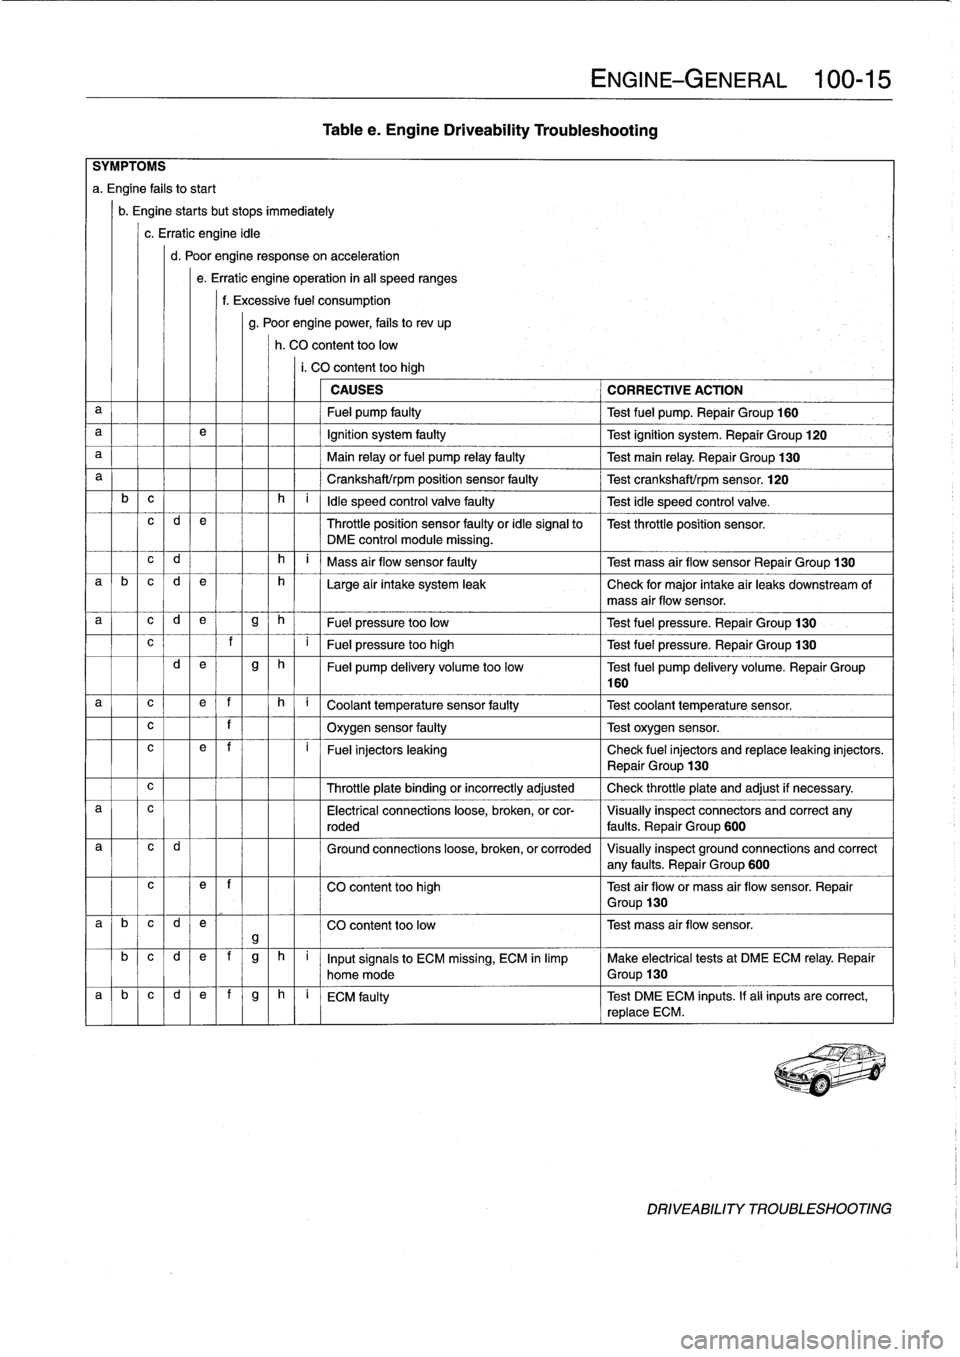
Table
e
.
Engine
Driveability
Troubleshooting
c
l
1
I
f
I
I
Oxygen
sensor
faulty
Test
oxygen
sensor
.
ENGINE-GENERAL
100-
1
5
SYMPTOMS
a
.
Engine
fafs
tostart
b
.
Engine
startsbut
stops
immediately
c
.
Erratic
engine
idle
d
.
Poor
engine
responseon
acceleration
e
.
Erratic
engine
operation
in
al¡
speed
ranges
f
.
Excessive
fuel
consumption
g
.
Poor
enginepower,
fails
to
rev
up
h
.
CO
content
toolow
i.
CO
content
too
high
CAUSES
CORRECTIVE
ACTION
a
Fuel
pump
faulty
Test
fuel
pump
.
Repair
Group
160
a
e
Ignition
system
faulty
Test
ignition
system
.
Repair
Group
120
a
Main
relay
or
fuel
pump
relay
faulty
Test
main
relay
.
Repair
Group
130
a
Crankshaft/rpm
position
sensor
faulty
Test
crankshaft/rpm
sensor
.
120
b
c
h
i
ldle
speed
control
valve
faulty
Test
idle
speed
control
valve
.
c
d
e
Throttle
position
sensor
faulty
or
idle
signal
to
Test
throttle
position
sensor
.
DME
control
module
missing
.
c
d
h
i
Mass
air
flow
sensor
faulty
Test
mass
air
flow
sensor
Repair
Group
130
a
b
c
d
e
h
Large
air
intake
system
leak
Check
for
major
intake
air
leaks
downstream
of
mass
air
flow
sensor
.
a
c
d
e
g
h
Fuel
pressure
too
low
Test
fuel
pressure
.
Repair
Group
130
?
I
F
ue
l
pr
essu
r
e
t
oo
high
T
est
f
u
el
pressure
.
Repair
Group
130
d
e
g
h
Fuel
pump
delivery
volume
too
low
Test
fuel
pump
delivery
volume
.
Repair
Group
160
a
c
e
f
h
q
C
oo
l
a
nt
t
e
mp
e
r
a
t
u
r
e
se
n
so
r
f
au
lty
--]
T
est
coo
l
a
n
t
temp
erature
sensor
.
c
e
~
f
i
~
Fuel
injectors
leaking
Check
fuel
injectors
and
replace
leaking
injectors
.
~
Repair
Group
130
Throttle
plate
binding
or
incorrectly
adjusted
Check
throttle
plate
and
adjust
if
necessary
.
a
c
Electrical
connections
loose,
broken,
or
cor-
Visually
inspect
connectors
and
correct
any
roded
faults
.
Repair
Group
600
Ground
connections
loose,
broken,
or
corroded
Visually
inspect
ground
connections
and
correct
any
faults
.
Repair
Group
600
c
e
~
f
CO
content
too
high
Test
air
flowor
mass
air
flow
sensor
.
Repair
~
Group
130
a
b
c
d
e
CO
content
too
low
Test
mass
air
flow
sensor
.
gb
c
d
e
f
g
h
i
Inputsignals
to
ECM
missing,
ECM
in
limp
Make
electrical
tests
at
DMEECM
relay
.
Repair
home
mode
Group
130
a
~
b
~
c
~
d
e]
f
g
h
i
ECM
faulty
Test
DMEECM
inputs
.
If
all
inputs
are
correct,
replace
ECM
.
DRIVEABILITY
TROUBLESHOOTING
Page 59 of 759
110
Engine
Removal
and
Installation
GENERAL
.
.
.
.
.......
.
.
.
..........
.
...
110-1
Engine,
removing
and
installing
(4-cylinder
engines)
.
..
.....
..
...........
110-1
ENGINE
REMOVAL
AND
INSTALLATION
110-1
Engine,
removing
and
installing
(6-cylinder
engines)
..
...
...
..
.....
..
....
110-4
GENERAL
Some
special
tools
are
required
for
removal
and
installation
of
the
engine
.
Be
sure
to
have
the
necessary
equipment
on
hand
before
starting
thejob
.
CAUTION-
"
Engine
removal
requires
disconnecting
the
bat-
tery
.
This
may
erase
any
system
fault
code(s)
that
havebeen
stored
in
control
unit
memories
.
Check
forfault
codes
prior
to
disconnecting
the
battery
cables
.
"
If
the
Check
Engine
lightis
illuminated
with
the
engine
running,
see
100
Engine-General
for
On-Board
Diagnostics
(08D)
fault
code
infor-
mation
.
"
If
any
other
system
faults
have
been
detected,
as
indicated
by
an
illuminated
ANTI
LOCK,
SRS
or
AST
warning
light,
see
the
appropriate
repair
group
inthis
manual
or
an
authorized
BMW
dealer
for
more
information
on
fault
codes
.
ENGINE
REMOVALAND
INSTALLATION
Engine,
removing
and
installing
(4-cylinder
engines)
Cover
al¡
painted
surfaces
before
beginning
theremoval
procedure
.
Asan
aid
to
installation,
label
al¡
components,
wires,
and
hoses
before
removing
them
.
Do
not
reuse
gas-
kets,
O-rings
or
seals
during
reassembly
.
WARNING
-
Due
to
risk
of
personal
injury,
be
sure
the
engine
is
cold
before
beginning
the
removalprocedure
.
1.
Disconnect
negative
(-)
cable
from
battery
in
luggage
compartment
.
0011969
CAUTION-
Prior
to
disconnecting
the
battery,
read
the
battery
disconnection
cautions
given
at
the
front
of
this
manual
on
page
viii
.
ENGINE
REMOVAL
AND
INSTALLATION
110-1
2
.
Remove
transmission
from
car
.
See230
Manual
Transmission
or
240
Automatic
Transmission
.
3
.
Remove
enginehood
or
place
hood
in
service
positíon
.
See
410
Fenders,
Engine
Hood
.
NOTE-
tt
is
notnecessary
to
remove
the
engine
hood,
but
it
is
helpful
and
will
make
engine
removal
and
installation
easier
.
4
.
Remove
splash
guard
under
engine,
if
applicable
.
5
.
Unbolt
ignition
coil
assembly
from
bracket
on
strut
tow-er
.
Disconnect
wiring
to
ignition
cofs,
then
place
coil
assembly
on
engine
.
6
.
Disconnect
al¡
cables
and
harness
connectors
at
throt-
tle
housing
.
7
.
Unbolt
andremove
complete
air
cleaner
housing
with
mass
air
flow
sensor,
disconnecting
and
labeling
con-
nectors,
ducting
and
hoses
asnecessary
.
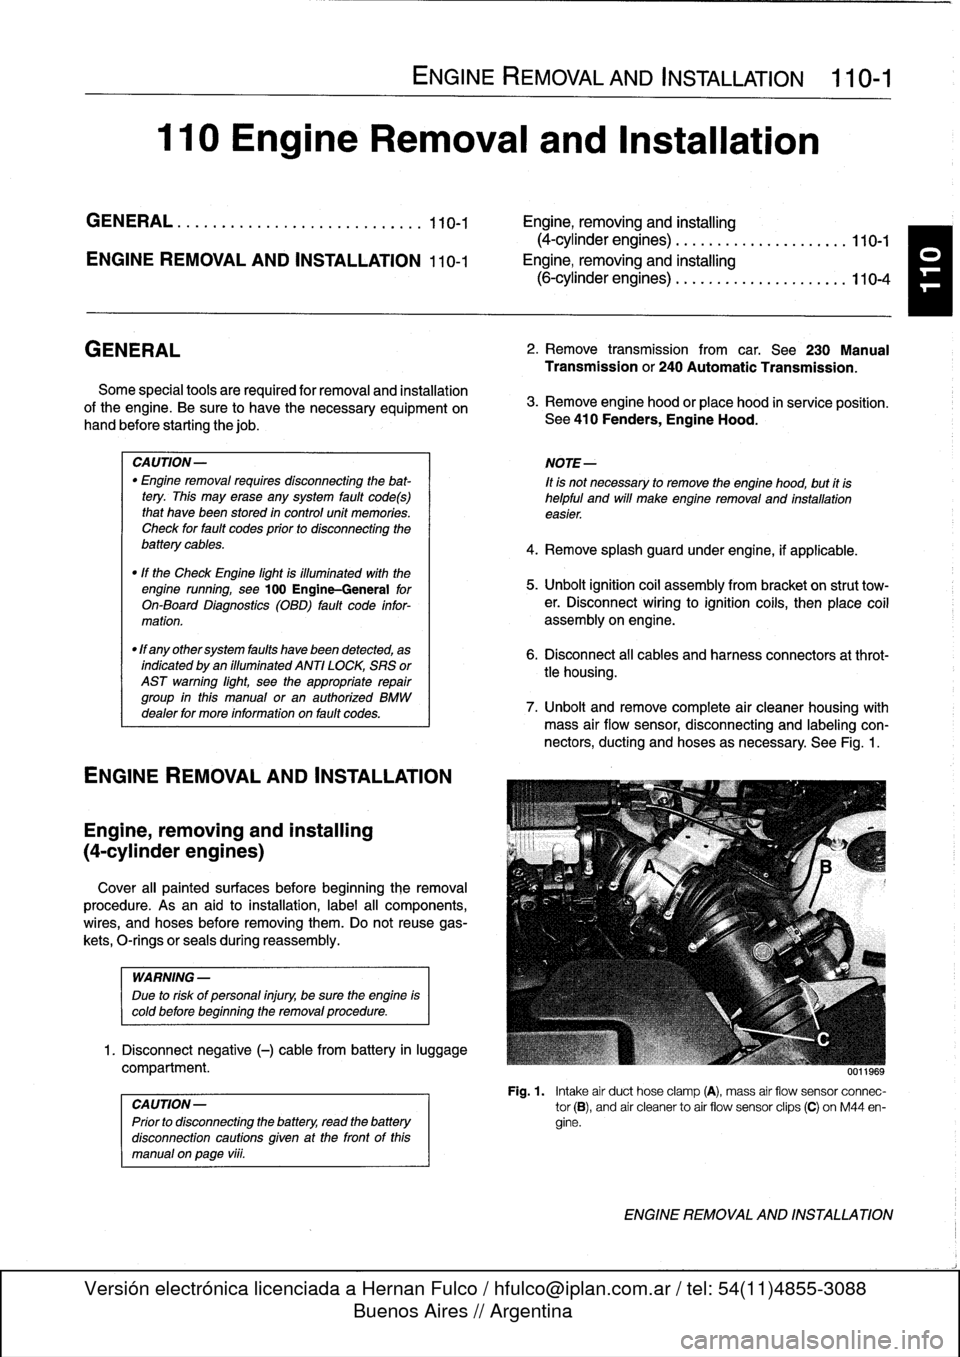
See
Fig
.
1
.
Fig
.
1
.
Intake
air
duct
hose
clamp
(A),
mass
air
flow
sensor
connec-
tor
(B),
and
air
cleanerto
air
flow
sensor
clips
(C)
on
M44
en-
gine
.
ENGINE
REMOVAL
AND
INSTALLATION
Page 61 of 759
14
.
Unbolt
power
steering
fluid
reservoir
from
íts
mounting
bracket
.
Use
stiff
wire
to
hang
reservoir
to
one
side
.
Do
not
disconnect
fluid
lines
.
15
.
Remove
power
steering
pump
drive
belt
and
remove
pump
from
its
mounting
bracket
.
Use
stiff
wire
to
hang
pump
from
body
.
16
.
On
cars
with
automatic
transmission
remove
front
and
rear
brackets
holding
automatic
transmission
cooler
linesto
engine
.
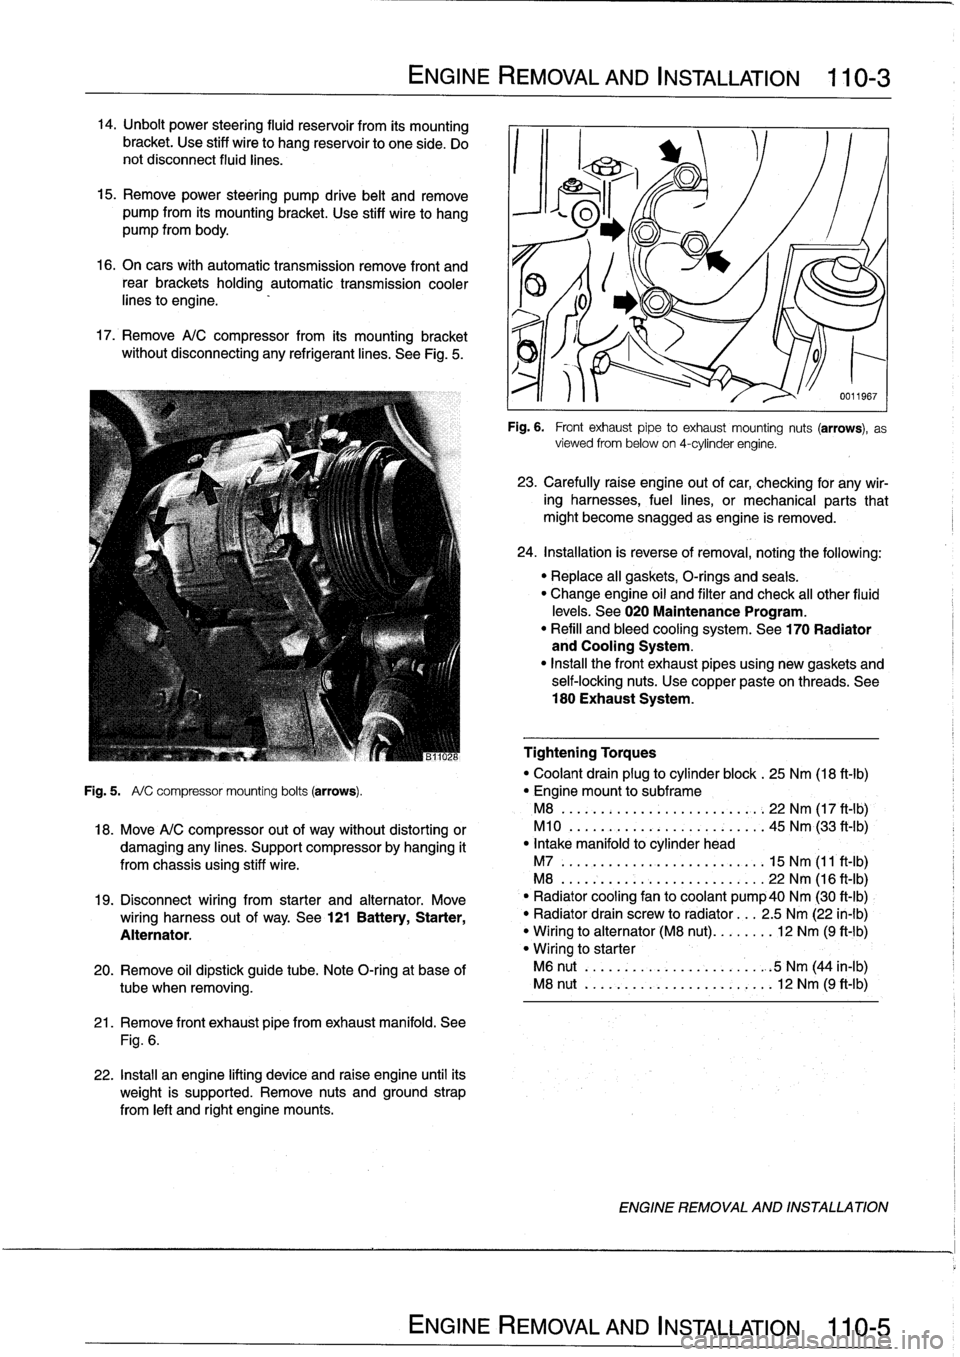
17
.
Remove
A/C
compressor
from
its
mounting
bracket
without
disconnecting
any
refrigerantlines
.
See
Fig
.
5
.
ENGINE
REMOVAL
AND
INSTALLATION
110-
3
21
.
Remove
front
exhaust
pipefrom
exhaust
manifold
.
See
Fig
.
6
.
22
.
Install
an
engine
lifting
device
and
raise
engine
until
its
weight
is
supported
.
Remove
nuts
and
ground
strap
from
left
and
right
engine
mounts
.
0011967
Fig
.
6
.
Front
exhaustpipe
to
exhaust
mounting
nuts
(arrows),
as
viewed
from
below
on
4-cylinder
engine
.
23
.
Carefully
raíse
engine
out
of
car,
checking
for
any
wir-
ing
harnesses,
fuel
lines,
or
mechanical
parts
that
might
become
snagged
as
engine
is
removed
.
24
.
Installation
is
reverse
of
removal,
noting
the
following
:
"
Replace
all
gaskets,
O-rings
and
seals
.
"
Change
engine
oil
and
filter
and
check
al¡
other
fluid
levels
.
See020
Maintenance
Program
.
"
Refill
and
bleed
cooling
system
.
See
170
Radiator
and
Cooling
System
.
"
Insta¡¡
the
front
exhaust
pipes
using
new
gaskets
and
self-locking
nuts
.
Use
copper
pasteon
threads
.
See
180
Exhaust
System
.
Tightening
Torques
"
Coolant
drain
plug
to
cylinder
block
.
25
Nm
(18
ft-Ib)
Fig
.
5
.
A/
C
compressor
mounting
bolts
(arrows)
.
"
Engine
mount
to
subframe
M8
......:...
..
..
..
......,:..
22
Nm
(17
ft
-
1b)
,
18
.
Move
A/C
compressor
out
of
way
without
distorting
or
M10
.
...
.
..
...
.
.
...........
45
Nm
(33
ft'-Ib)
damaging
any
lines
.
Support
compressor
by
hanging
it
"
Intake
manifold
to
cylinder
head
from
chassis
using
stiff
wire
.
M7
.....
.
..
...
..
..
...........
15
Nm
(11
ft-Ib)
M8
...
.
.
.
..
..
...
..
...........
22
Nm
(16
ft-Ib)
19
.
Disconnect
wiring
from
starter
and
alternator
.
Move
`
"
Radiator
cooling
fan
to
coolant
pump40
Nm
(30
ft-Ib)
wiring
harness
out
of
way
.
See
121
Battery,
Starter,
"
Radiator
drain
screw
to
radiator
...
2
.5
Nm
(22
in-lb)
Alternator
.
"
Wiring
to
alternator
(M8
nut)
........
12
Nm
(9
ft-1b)
"
Wiring
to
starter
20
.
Remove
oil
dipstick
guide
tube
.
Note
O-ring
at
base
of
M6
nut
..
.
..
..
...
..
...........
.
:5
Nm
(44
in-lb)
tube
when
removing
.
M8
nut
..
.
..
..
...
..
............
12
Nm
(9
ft-Ib)
ENGINE
REMOVAL
AND
INSTALLATION
Page 65 of 759
22
.
Move
A/C
compressor
out
of
the
way
without
distorting
26
.
Carefully
raise
engine
out
ofcar,
checking
for
any
wir-
or
damaging
any
lines
.
Support
compressor
by
hanging
ing,fuel
lines,
or
mechanical
parts
that
might
become
it
from
chassis
using
stiff
wire
.
snagged
as
engine
is
removed
.
23
.
Disconnect
wiring
from
starter
and
alternator
.
Move
27
.
Installation
is
reverse
of
removal,
noting
the
following
:
wiring
harness
out
of
the
way
.
See
121
Battery,
Start-
Replace
al¡
gaskets,
O-rings
and
seals
.
er,
Alternator
.
"
Change
engine
oil
and
filter
and
check
all
other
fluid
24
.
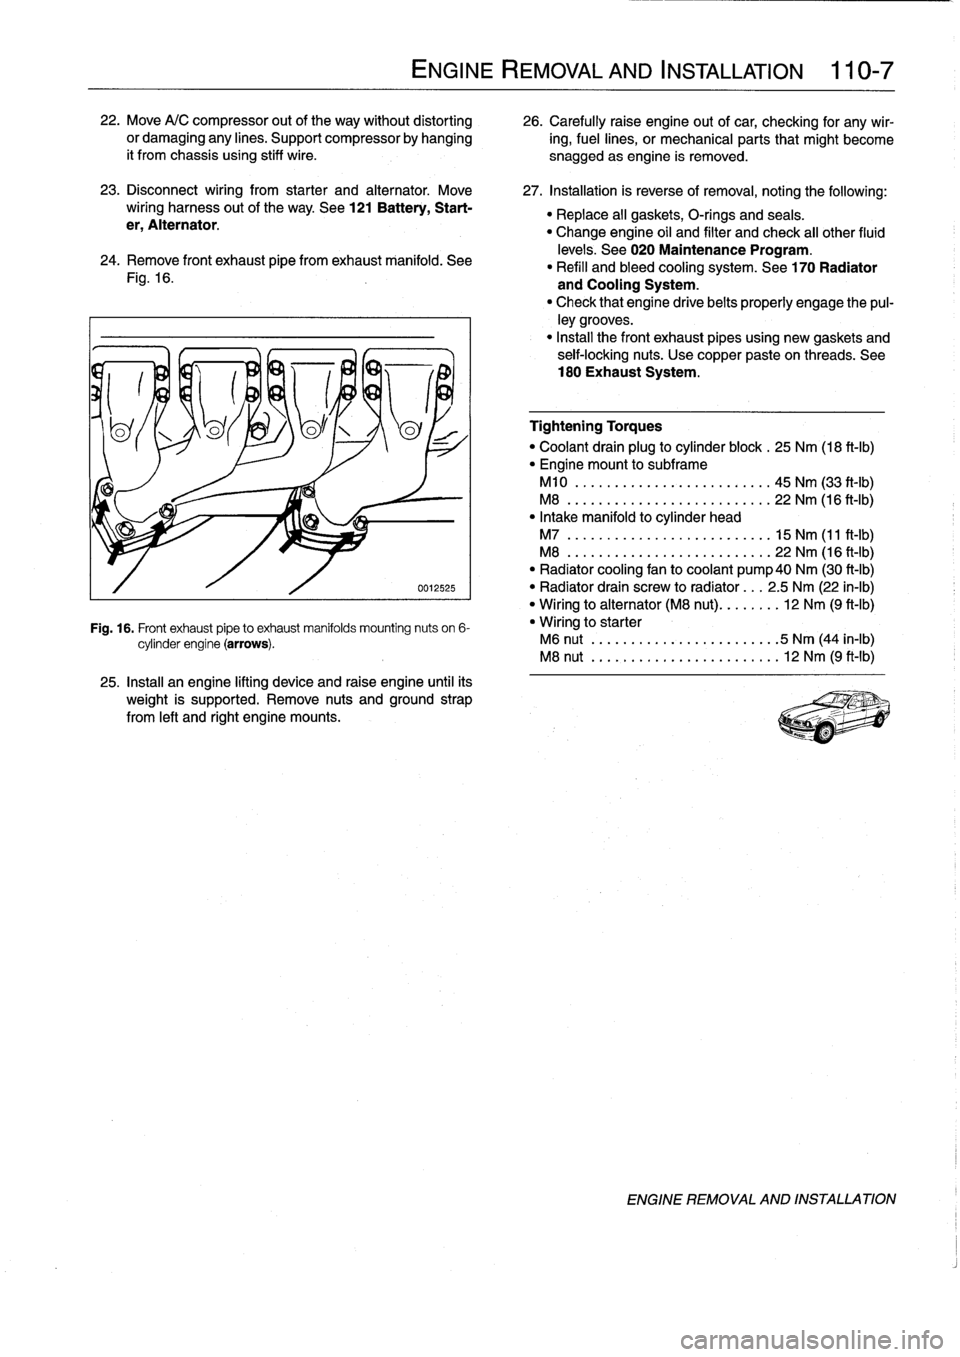
Remove
Fontexhaust
pipe
fromexhaust
manifold
.
See
levels
.
See
020
Maintenance
Program
.
"
Refill
and
bleed
cooling
system
.
See
170
Radiator
Fig
.
16
.
and
Cooling
System
.
"
Check
that
engine
drivebelts
properly
engage
the
pul-
ley
grooves
.
"
Install
the
Font
exhaust
pipesusing
new
gaskets
and
seif-locking
nuts
.
Use
copper
paste
on
threads
.
See
180
Exhaust
System
.
0012525
Fig
.
16
.
Front
exhaust
pipeto
exhaust
manifolds
mounting
nuts
on
6-
cylinder
engine
(arrows)
.
25
.
Install
an
engine
lifting
device
and
raise
engine
until
its
weight
is
supported
.
Remove
nuts
and
ground
strap
from
left
and
right
engine
mounts
.
ENGINE
REMOVAL
AND
INSTALLATION
110-
7
Tightening
Torques
"
Coolant
drain
plug
to
cylinder
block
.
25
Nm
(18
ft-Ib)
"
Engine
mount
to
subframe
M10
..
.
.
.
...
..............
..
.
45
Nm
(33
ft-Ib)
M8
..
..
.
..
................
...
22
Nm
(16
ft-Ib)
"
Intake
manifold
to
cylinder
head
M7
..
..
..
...
................
.
15
Nm
(11
ft-Ib)
M8
...
.
..
...
................
.
22
Nm
(16
ft-Ib)
"
Radiator
cooling
fan
to
coolant
pump40
Nm
(30
ft-Ib)
"
Radiator
drain
screw
to
radíator
...
2
.5
Nm
(22
in-lb)
"
Wiring
to
alternator
(M8
nut)
........
12
Nm
(9
ft-Ib)
"
Wiring
to
starter
M6
nut
.
..
...
..................
5
Nm
(44
in-lb)
M8
nut
.....
..
.
.
.
.
.............
12
Nm
(9
ft-Ib)
ENGINE
REMOVAL
AND
INSTALLATION
Page 67 of 759
113
Cylinder
Head
Removal
and
Installation
GENERAL
.
...............
.
.
.
.
.
.......
113-1
CYLINDER
HEAD,
6-CYLINDER
.
.
.
.
.
.
.
113-10
Cylinder
head,
removing
(6-cylinder
engine)
..
113-10
CYLINDER
HEAD,
4-CYLINDER
..
.
...
.
.
113-1
Cylinder
head,
installing
(6-cylinder
engine)
...
113-15
Cylinder
head,
removing
(4-cylinder
engine)
...
113-1
E
Cylinder
head,
installing
(4-cylinder
engine)
...
113-6
GENERAL
CYLINDER
HEAD,
4-CYLINDER
The
information
given
inthis
repair
group
assumes
that
the
engine
is
installed
in
the
engine
bay
.
For
cylinder
head,
cam-
Cylinder
head,
removing
shaft,
and
valvetrain
disassembly
and
reconditioning
informa-
(4-cylinder
engine)
tion,
see116
Cylinder
Head
and
Valvetrain
.
For
ease
of
use
this
removal
procedure
is
broken
into
sub-
In
the
procedures
given
below,
engines
are
referred
to
by
sections,
as
follows
:
engine
code
.
If
necessary,
see100
Engine-General
for
en-
gine
code
and
application
information
.
NOTE-
If
a
head
gasket
problem
is
suspected,
acompression
test
will
usually
detectthe
fault
.
See
100
Engine-Gen-
eral
for
compression
testing
information
.
Special
BMW
service
tools
are
required
to
properly
remove
and
install
the
cylinder
head
on
both
the
4-cylinder
and
6-cyl-
inder
engines
.
The
special
tools
are
used
to
time
the
val-
vetrain
to
the
crankshaft
and
to
remove
the
Torx
(El
2)
head
bolts
.
Read
the
procedure
through
before
beginning
thejob
.
Cover
al¡
painted
surfaces
before
beginning
the
removal
procedure
.
As
an
aid
to
installation,
label
all
components,
wires,
and
hoses
before
removing
them
.
Do
not
reuse
gas-
kets,
O-rings
or
seals
during
reassembly
.
WARNING
-
Due
to
risk
of
personal
injury,
be
sure
the
engine
is
cold
before
beginning
the
removalprocedure
.
CYLINDER
HEAD
REMOVAL
AND
INSTALLATION
113-1
General
Coolingsystem,
draining
Cylinder
head
cover,
removing
Intake
manifold,
removing
Timing
chains,
uncoupling
Cylinder
head
assembly,
removing
WARNING
-
Allow
engine
to
cool
before
beginning
this
proce-
dure
.
General
1
.
Disconnect
negative
(-)
cable
from
battery
.
CAUTION
-
"
Prior
to
disconnectiog
the
battery,
read
the
bat-
tery
disconnection
cautions
given
at
the
front
of
this
manual
on
page
viii
.
"
Disconnecting
the
battery
may
erase
fault
codees)
stored
in
control
module
memory
.
Check
for
fault
codes
using
special
BMW
diagnostic
equipment
.
NOTE-
The
battery
is
mounted
in
the
luggage
compartment
behind
the
right
side
trim
panel
.
2
.
Working
underneath
vehicle,
remove
front
exhaust
pipe
from
exhaust
manifold
.
See
Fig
.
1
.
3
.
Disconnect
vacuum
hose
fitting
from
brake
booster
on
rear
bulkhead
.
Plug
opening
in
booster
and
hose
end
.
CYLINDER
HEAD,
4-CYLINDER
Page 70 of 759
113-4
CYLINDER
HEAD
REMOVAL
AND
INSTALLATION
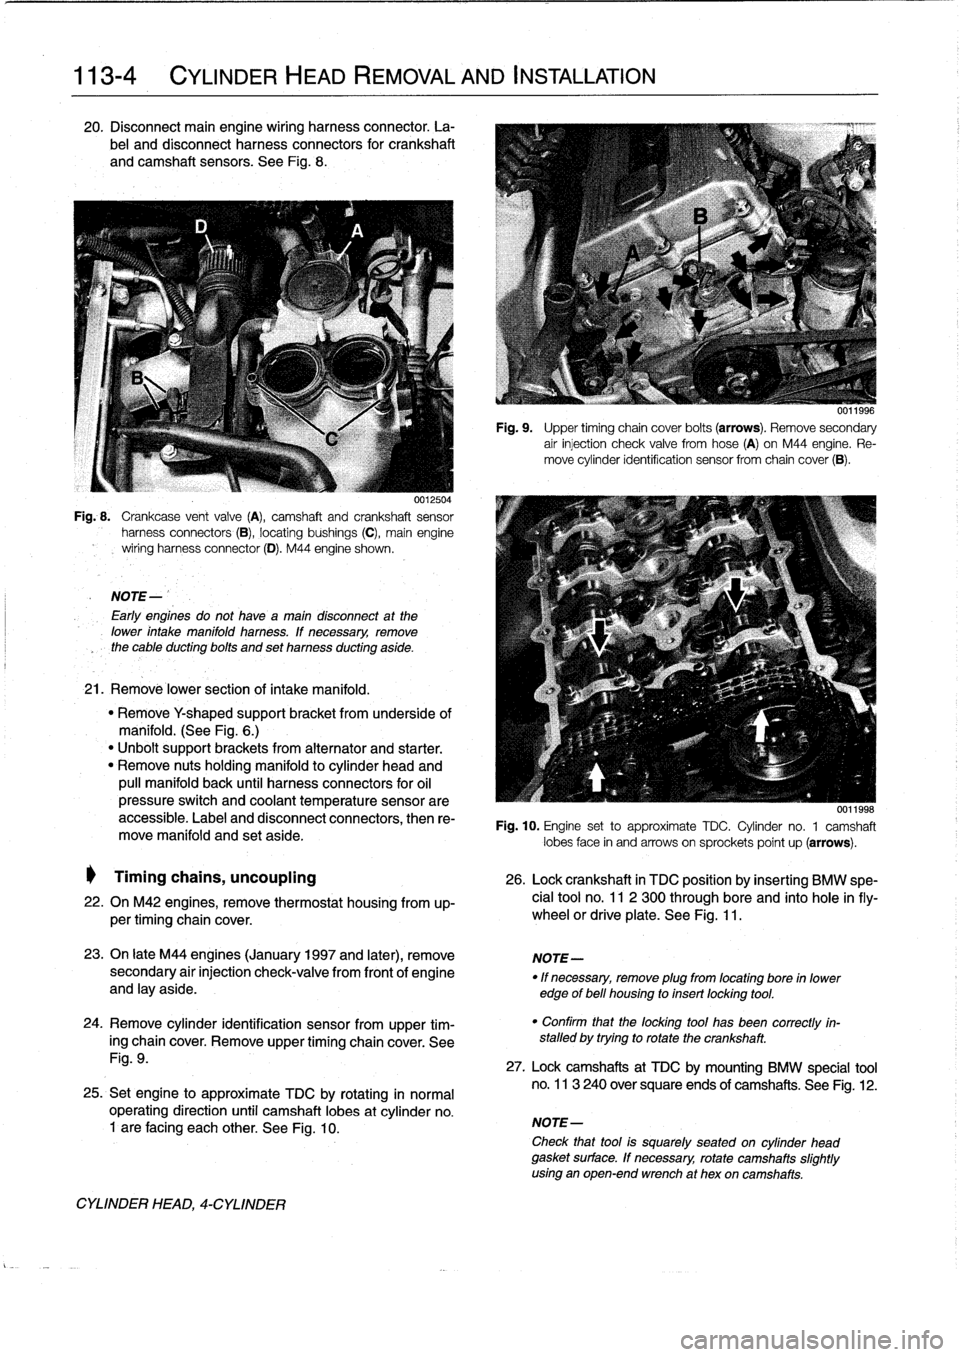
20
.
Disconnect
main
engine
wiring
harness
connector
.
La-
bel
and
disconnect
harness
connectors
for
crankshaft
and
camshaft
sensors
.
See
Fig
.
8
.
0012504
Fig
..
Crankcase
vent
valve
(A),
camshaft
and
crankshaft
sensor
harness
connectors
(B),
locating
bushings
(C),
main
engine
wiring
harnessconnector
(D)
.
M44
engine
shown
.
NOTE-
Early
engines
do
not
havea
maín
disconnect
at
the
lower
intake
manifold
harness
.
lf
necessary,
remove
the
cable
ducting
bolts
and
set
harness
ducting
aside
.
21
.
Remové
lower
section
of
intake
manifold
.
"
Remove
Y
shaped
supportbracket
from
underside
of
manifold
.
(See
Fig
.
6
.)
"
Unbolt
support
brackets
from
alternator
and
starter
.
"
Remove
nuts
holding
manifold
to
cylinder
head
and
pull
manifold
back
until
harness
connectors
for
oil
pressure
switch
and
coolant
temperature
sensorare
accessible
.
Label
and
disconnect
connectors,
then
re-
move
manifold
and
set
aside
.
Timing
chains,
uncoupling
26
.
Lock
crankshaft
in
TDC
position
by
insertíng
BMW
spe-
22
.
On
M42
engines,
remove
thermostat
housing
from
up-
cial
tool
no
.
11
2
300
through
bore
and
into
hole
infly-
per
timing
chaincover
.
wheel
or
driveplate
.
See
Fig
.
11
.
23
.
On
late
M44
engines
(January
1997
and
later),
remove
NOTE-
secondary
air
injection
check-valve
from
front
of
engine
"
If
necessary,
remove
plug
from
locating
bore
in
lower
and
lay
aside
.
edge
of
bell
housing
to
insert
locking
tool
.
24
.
Remove
cylinder
identification
sensor
from
upper
tim-
ing
chaincover
.
Remove
upper
timing
chaincover
.
See
Fig
.
9
.
25
.
Set
engine
to
approximate
TDC
by
rotating
in
normal
operating
direction
until
camshaft
lobes
at
cylinder
no
.
1
are
facing
each
other
.
See
Fig
.
10
.
CYLINDER
HEAD,
4-CYLINDER
Fig
.
9
.
Upper
timing
chain
cover
bolts
(arrows)
.
Remove
secondary
air
injection
check
valve
fromhose
(A)
on
M44
engine
.
Re-
move
cylinder
identification
sensor
from
chaincover
(B)
.
0011998
Fig
.
10
.
Engine
set
to
approximate
TDC
.
Cylinder
no
.
1
camshaft
lobes
face
in
and
arrows
on
sprockets
poínt
up
(arrows)
.
"
Confirm
that
the
locking
tool
has
been
correctly
in-
stalled
by
trying
to
rotate
the
crankshaft
.
27
.
Lock
camshafts
at
TDC
by
mounting
BMW
specíal
tool
no
.
113
240
over
square
ends
of
camshafts
.
See
Fig
.
12
.
NOTE-
Check
that
tool
is
squarely
seated
on
cylinder
head
gasket
surface
.
If
necessary,
rotate
camshafts
slightly
using
an
open-end
wrench
at
hex
oncamshafts
.
Page 72 of 759
113-
6
CYLINDER
HEAD
REMOVAL
AND
INSTALLATION
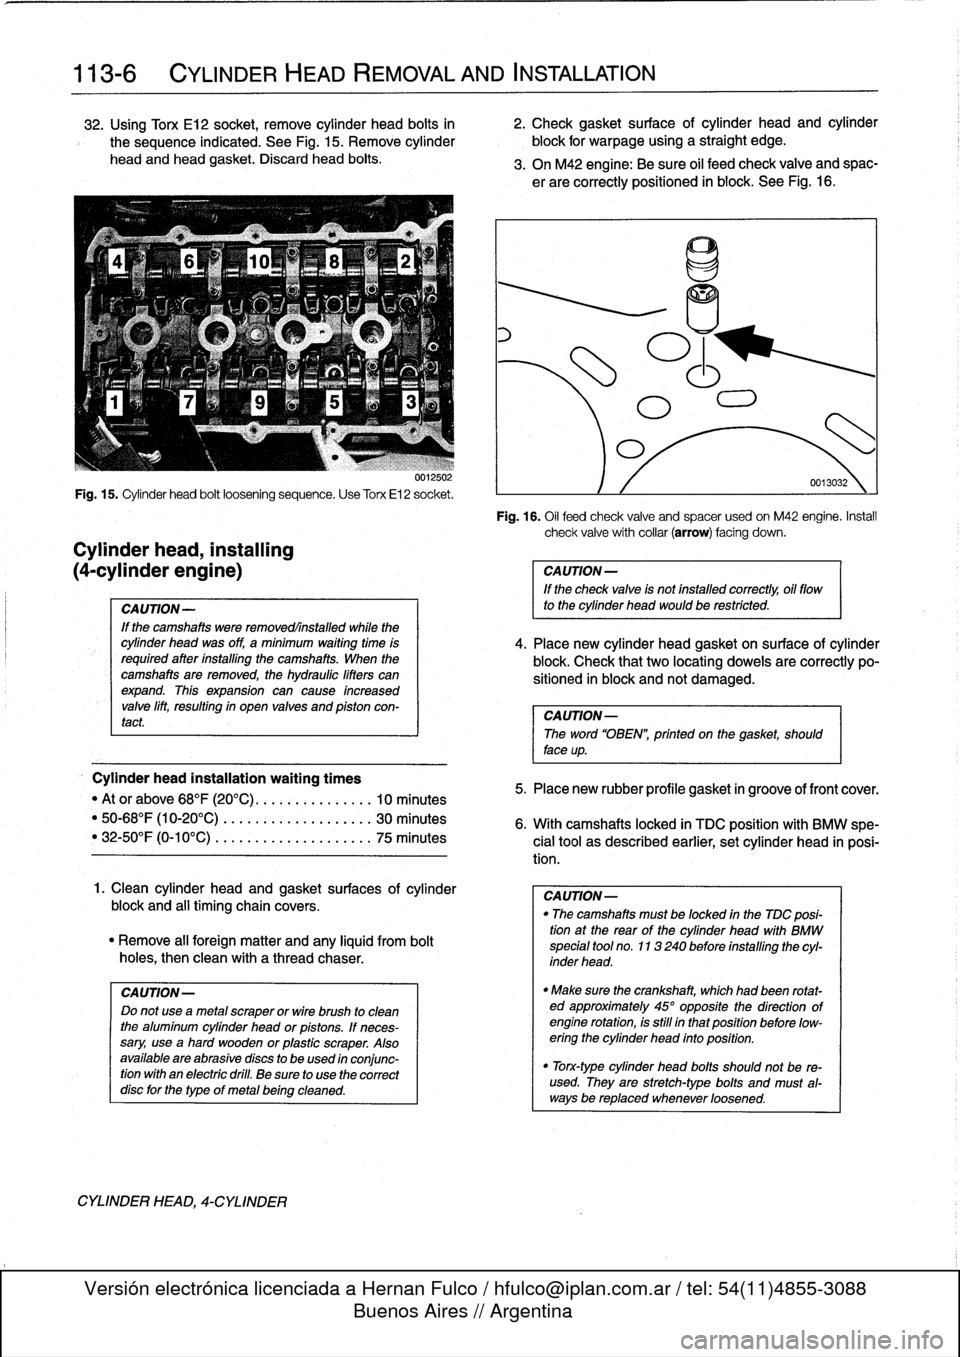
32
.
Using
Torx
E12
socket,
remove
cylinder
head
bolts
in
2
.
Check
gasket
surface
of
cylinder
head
and
cylinder
the
sequence
indicated
.
See
Fig
.
15
.
Remove
cylinder
block
for
warpage
using
a
straight
edge
.
head
and
head
gasket
.
Discard
head
boits
.
3
.
On
M42
engine
:
Be
sure
oil
feed
check
valve
and
spac-
er
are
correctly
positioned
in
block
.
See
Fig
.
16
.
0012502
Fig
.
15
.
Cylinder
head
bolt
loosening
sequence
.
Use
Torx
El
2
socket
.
Cylinder
head,
installing
(4-cylinder
engine)
CAUTION-
If
the
camshafts
were
removedrínstalled
while
the
cylinder
head
was
off,
a
minimum
wafting
time
ís
requíred
after
installing
the
camshafts
.
When
the
camshafts
are
removed,
the
hydraulic
lifters
canexpand
.
This
expansion
can
cause
fncreased
valve
lift,
resultíng
in
open
valves
and
pfston
con-
tact
Cylinder
head
installation
waiting
times
"
Ator
above
68°F
(20°C)
...............
10
minutes
"50-68°F
(10-20°C)
.
.
..
...............
30
minutes
"
32-50°F
(0-10°C)
..
.
..
...............
75
minutes
1
.
Clean
cylinder
head
and
gasket
surfaces
of
cylinder
block
and
al¡
timing
chain
covers
.
"
Remove
al¡
foreign
matter
and
any
¡¡quid
from
bolt
holes,
then
clean
with
a
thread
chaser
.
CAUTION-
Do
not
useametal
scraper
or
wire
brush
to
clean
the
alumfnum
cylinder
head
or
pistons
.
If
neces-
sary,
useahard
wooden
or
plastic
scraper
.
Also
available
are
abrasivediscs
to
be
used
ín
conjunc-
tionwíth
an
electric
dril¡
.
Be
sure
to
use
the
correct
disc
for
the
type
of
metalbeingcleaned
.
CYLINDER
HEAD,
4-CYLINDER
Fig
.
16
.
Oil
feed
check
valve
and
spacer
used
on
M42
engine
.
Install
check
valvewíth
collar
(arrow)
facing
down
.
CAUTION-
If
the
check
valve
is
not
installed
correctly,
oil
flow
to
the
cylinder
head
would
be
restrícted
.
4
.
Place
new
cylinder
head
gasket
on
surface
of
cylinder
block
.
Check
that
two
locating
dowels
are
correctly
po-
sitioned
in
block
and
not
damaged
.
CAUTION-
The
word
"OBEN",
prfnted
on
the
gasket,
should
face
up
.
5
.
Place
new
rubber
profile
gasket
in
groove
of
front
cover
.
6
.
With
camshafts
locked
in
TDC
positionwith
BMW
spe-
cial
tool
as
described
earlier,
set
cylinder
head
in
posi-
tion
.
CAUTION-
"
The
camshafts
mustbe
focked
in
the
TDC
posi-
tion
at
the
rear
of
the
cylinder
head
with
BMW
specfal
tool
no
.
113240
before
installing
the
cyl-
inder
head
.
"
Make
sure
the
crankshaft,
which
had
been
rotat-
ed
approximately
45°
opposite
the
dfrection
of
engine
rotation,
is
still
in
thatposition
before
low-
ering
the
cyffnder
head
ínto
position
.
"
Torx-type
cylinder
head
bolts
should
not
be
re-
used
.
They
are
stretch-type
bolts
and
must
al-
waysbe
replaced
whenever
loosened
.
Page 73 of 759
7
.
Lightly
lubricate
new
cylinder
head
bolts
.
Loosely
instan
bolts
and
their
washers,
then
thread
them
in
until
they
are
finger
tight
.
NOTE-
Check
that
all
washers
for
the
cylinder
head
bolts
are
in
place
before
installing
the
bolts
.
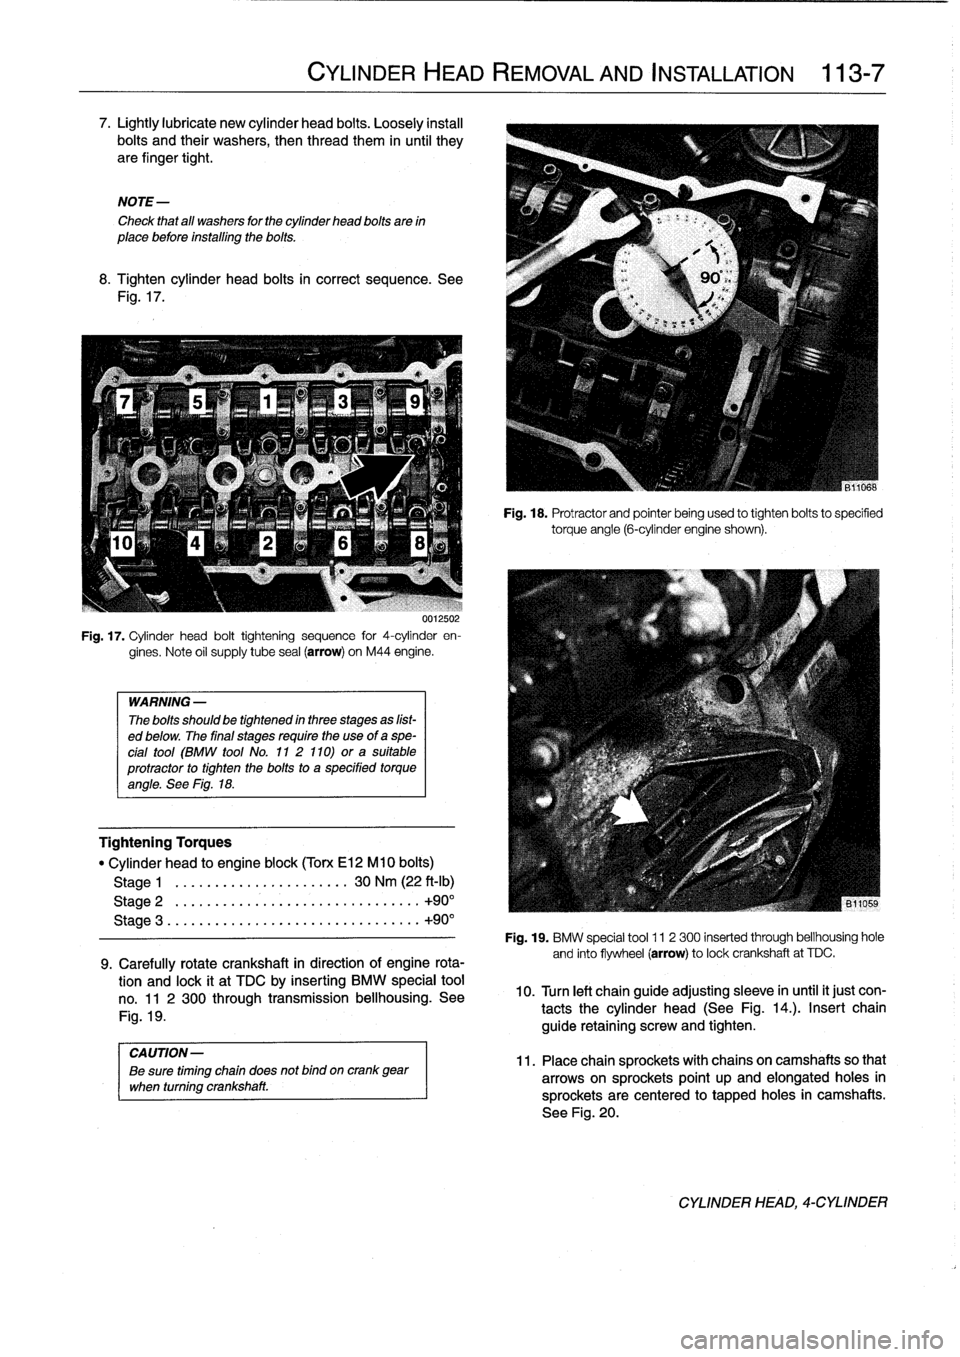
8
.
Tighten
cylinder
head
bolts
in
correct
sequence
.
See
Fig
.
17
.
UU125U2
Fig
.
17
.
Cylinder
head
bolt
tightening
sequence
for
4-cylinder
en-
gines
.
Note
oil
supply
tube
seal
(arrow)
on
M44
engine
.
WARNING
-
The
bolts
should
be
tightennd
in
three
stages
as
líst-
ed
below
.
The
final
stages
require
the
use
of
a
spe-
cial
tool
(BMW
tool
No
.
11
2
110)
ora
suitable
protractor
to
tighten
the
bolts
to
a
specified
torqueangle
.
See
Fig
.
18
.
Tightening
Torques
"
Cylinder
head
to
engine
block
(Torx
El2
M10
bolts)
Stage
1
.
.
.....
.
.
.............
30
Nm
(22
ft-Ib)
Stage
2
.
...
...
.
.
...................
..
.
+90°
Stage
3
.....
...
.
..
...................
..
+90°
9
.
Carefully
rotate
crankshaft
in
direction
of
engine
rota-
tion
and
lock
it
at
TDC
by
inserting
BMW
special
tool
no
.
11
2
300
through
transmission
bellhousing
.
See
Fig
.
19
.
CYLINDER
HEAD
REMOVAL
AND
INSTALLATION
113-
7
Fig
.
18
.
Protractor
and
pointer
being
used
to
tighten
bolts
to
specified
torqueangle
(6-cylinder
engine
shown)
.
Fig
.
19
.
BMW
special
tool
11
2
300
inserted
through
bellhousing
hole
and
finto
flywheel
(arrow)
to
lockcrankshaft
at
TDC
.
10
.
Turn
left
chainguide
adjusting
sleeve
in
until
it
just
con-
tacts
the
cylinder
head
(See
Fig
.
14
.)
.
Insert
chain
guide
retaining
screw
and
tighten
.
CAUTION-
11
.
Placechain
sprockets
with
chains
oncamshaftsso
that
Be
sure
timing
chain
does
not
bind
oncrank
gear
when
turning
crankshaft
.
arrowson
sprockets
point
up
and
elongated
holes
in
sprocketsare
centered
to
tapped
holes
in
camshafts
.
See
Fig
.
20
.
CYLINDER
HEAD,
4-CYLINDER
Page 74 of 759
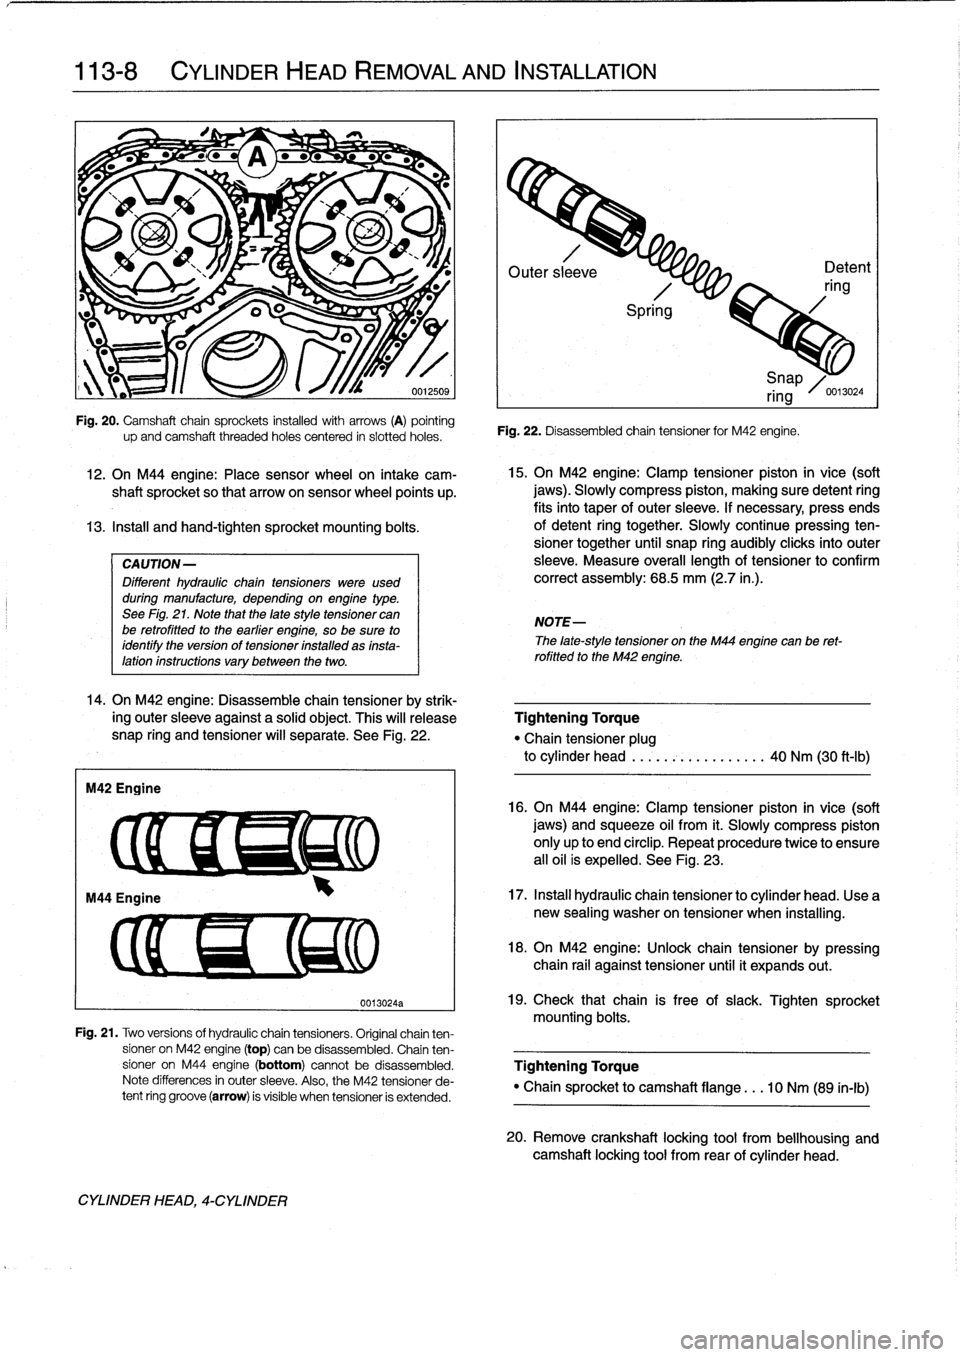
113-8
CYLINDER
HEAD
REMOVAL
AND
INSTALLATION
IW?
-
L
'/~f
W
~
4r
"
-
"
;,s
1
12
.
On
M44
engine
:
Place
sensor
wheel
on
intake
cam-
shaft
sprocket
so
that
arrowon
sensor
wheel
points
up
.
13
.
Instan
and
hand-tighten
sprocket
mounting
bolts
.
CAUTION-
Different
hydraulic
chaintensioners
were
used
during
manufacture,
depending
onengine
type
.
See
Fig
.
21
.
Note
that
the
late
style
tensioner
can
be
retrofitted
to
the
earlier
engine,
so
be
sure
to
identify
the
version
of
tensioner
installed
as
insta-lation
instructions
vary
between
the
two
.
14
.
On
M42
engine
:
Disassemble
chain
tensioner
by
strik-
ing
outer
sleeve
against
a
solid
object
.
This
will
release
snap
ring
and
tensioner
will
separate
.
See
Fig
.
22
.
M42
Engine
up
and
camshaft
threaded
holes
centered
in
siotted
holes
.
CYLINDER
HEAD,
4-CYLINDER
0013024a
Outer
sl
eve
Detent
ring
Spri
g
Fig
.
22
.
Disassembled
chain
tensioner
for
M42
engine
.
15
.
On
M42
engine
:
Clamp
tensioner
piston
in
vice
(soft
jaws)
.
Slowly
compress
piston,
making
sure
detent
ring
fits
into
taper
of
outer
sleeve
.
If
necessary,
press
ends
of
detent
ring
together
.
Slowly
continuepressing
ten-
sioner
together
until
snap
ring
audibly
clicksinto
outer
sleeve
.
Measure
overall
lengthof
tensioner
to
confirm
correct
assembly
:
68
.5
mm
(2.7
in
.)
.
NOTE-
i
Snap
ring
/0
.13024
The
late-style
tensioner
on
the
M44
engíne
canbe
ret-
rofitted
to
the
M42
engine
.
Tightening
Torque
"Chain
tensioner
plug
to
cylinder
head
.....
.-~
..........
40
Nm
(30
ft-Ib)
16
.
On
M44
engíne
:
Clamp
tensioner
píston
in
vice
(soft
jaws)
and
squeeze
oil
from
it
.
Slowly
compress
piston
only
up
to
end
circlip
.
Repeat
procedure
twice
to
ensure
all
oil
is
expelled
.
See
Fig
.
23
.
17
.
Instan
hydraulic
chain
tensioner
to
cylinder
head
.
Use
a
new
sealing
washer
on
tensioner
when
installing
.
18
.
On
M42
engine
:
Unlock
chain
tensioner
by
pressing
chain
rail
against
tensioner
until
it
expands
out
.
19
.
Check
that
chain
is
free
of
slack
.
Tighten
sprocket
mounting
bolts
.
Fig
.
21
.
Two
versions
of
hydraulic
chain
tensioners
.
Original
chainten-
sioner
on
M42
engine
(top)
can
be
disassembled
.
Chain
ten
sioner
on
M44
engine
(bottom)
cannotbe
disassembled
.
Tightening
Torque
Note
differences
in
outer
sleeve
.
Also,
the
M42
tensioner
de-
"
Chain
sprocket
to
camshaft
flange
.
..
10
Nm
(89
in-lb)
tent
ring
groove
(arrow)
is
visible
when
tensioner
is
extended
.
20
.
Remove
crankshaft
locking
tool
from
bellhousing
and
camshaft
locking
tool
from
rear
of
cylinder
head
.
Page 75 of 759
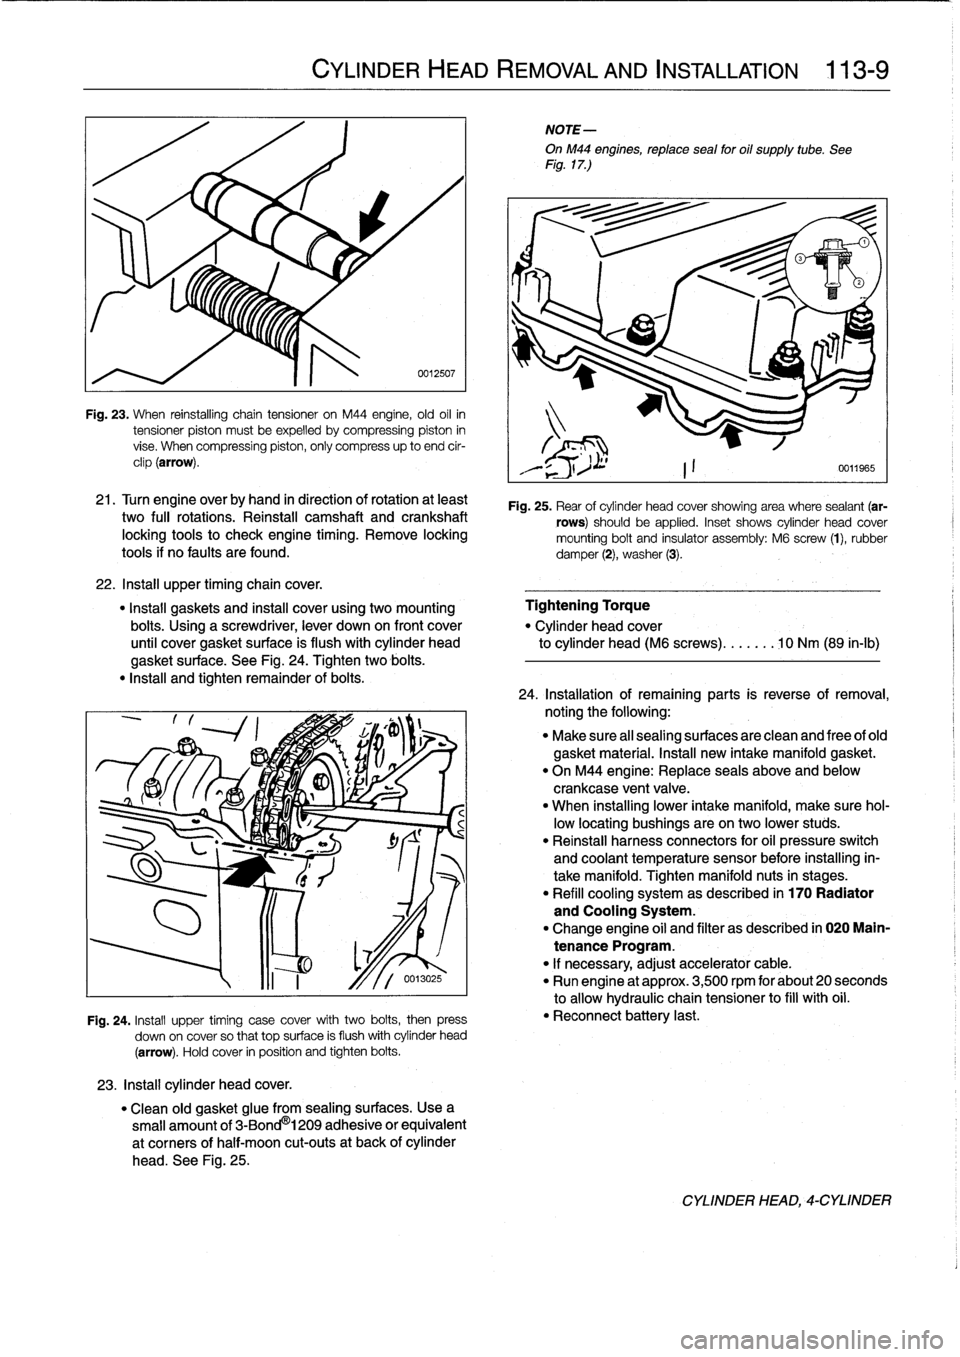
Fig
.
23
.
When
reinstalling
chain
tensioner
on
M44
engine,
old
oil
in
tensioner
piston
mustbe
expelled
bycompressing
piston
in
vise
.
When
compressing
piston,
only
compress
up
to
end
cir-
clip
(arrow)
.
21
.
Turn
engine
overby
hand
in
direction
of
rotation
at
least
two
fui¡
rotations
.
Reinstall
camshaft
and
crankshaft
locking
tools
to
check
engíne
timing
.
Remove
locking
tools
if
no
faults
are
found
.
22
.
Insta¡¡
upper
timingchain
cover
.
"
Install
gaskets
and
instan
cover
using
two
mounting
Tightening
Torque
bolts
.
Using
a
screwdriver,
lever
down
on
front
cover
"
Cylinder
head
cover
until
cover
gasket
surface
is
flush
with
cylinder
head
to
cylinder
head
(M6
screws)
.......
10
Nm
(89
in-lb)
gasket
surface
.
See
Fig
.
24
.
Tighten
two
bolis
.
"
Insta¡¡
and
tighten
remainder
of
bolis
.
23
.
Install
cylinder
head
cover
.
CYLINDER
HEAD
REMOVAL
AND
INSTALLATION
113-
9
0012507
Fig
.
24
.
Install
upper
timing
case
cover
with
two
bolis,
then
press
down
on
cover
so
that
top
surface
is
flush
withcylinder
head
(arrow)
.
Hold
cover
in
position
and
tighten
bolis
.
"
Clean
old
gasket
glue
from
sealing
surfaces
.
Usea
small
amount
of
3-Bond
®
1209
adhesive
or
equivalent
at
corners
of
half-moon
cut-outs
at
back
of
cylinder
head
.
See
Fig
.
25
.
NOTE-
OnM44
engines,
reptace
sea¡
for
oil
supply
tube
.
See
Fig
.
17
.)
Fig
.
25
.
Rear
of
cylinder
head
cover
showing
area
where
sealant
(ar-
rows)
should
be
applied
.
Inset
shows
cylinder
head
cover
mounting
bolt
and
insulator
assembly
:
M6
screw
(1),
rubber
damper
(2),
washer
(3)
.
24
.
Installation
of
remaining
parts
is
reverseofremoval,
noting
the
following
:
"
Make
sure
al¡
sealing
surfaces
are
clean
and
free
of
old
gasket
material
.
Install
new
intake
manifold
gasket
.
"
On
M44
engine
:
Replace
seals
above
and
below
crankcase
ventvalve
.
"
When
installing
lower
intake
manifold,
make
sure
hol-
low
locating
bushings
are
on
two
lower
studs
.
"
Reinstall
harness
connectors
for
oil
pressure
switch
and
coolant
temperature
sensor
before
installing
in-
take
manifold
.
Tighten
manifold
nuts
in
stages
.
"
Refill
cooling
system
as
described
in
170
Radiator
and
Cooling
System
.
"
Change
engine
oil
and
filter
as
described
in
020
Main-
tenance
Program
.
"
If
necessary,
adjust
accelerator
cable
.
"
Run
engine
at
approx
.
3,500
rpm
for
about
20
seconds
to
allow
hydraulic
chain
tensioner
to
fill
with
oil
.
"
Reconnect
battery
last
.
CYLINDER
HEAD,-CYLINDER