diff BMW M3 1998 E36 Owner's Guide
[x] Cancel search | Manufacturer: BMW, Model Year: 1998, Model line: M3, Model: BMW M3 1998 E36Pages: 759
Page 250 of 759
300-2
SUSPENSION,
STEERING
AND
BRAKES-GENERAL
Steering
INTEGRATED
SYSTEMS
The
steering
linkage
connects
the
rack-and-pinion
unit
through
tie
rodsto
the
steering
arms
.
The
tie
rod
ends
allow
the
wheels
to
pivot
and
react
to
suspension
travel
.
Rear
Suspension
The
rear
axle
carrier
is
the
main
mounting
point
for
the
final
drive
housing
and
the
rear
suspension
components
.
Trailing
arms
locatethe
rear
wheels
and
anchorthe
springs,
shocks
and
stabilizer
bar
.
Driveaxies
with
constant-velocity
(CV)
joints
at
both
ends
transfer
power
from
the
differential
to
the
road
wheels
.
The
differential
is
mounted
to
the
rearaxle
carrier
through
rubber
mountsand
bushings
to
hele
isolate
drivetrain
noise
and
vibration
.
Brakes
E36
cars
areequipped
with
power
disc
brakes
with
an
inte-
gral
antilock
brakes
(ABS)
.
The
parking
brake
is
a
dual-drum
system
integrated
with
the
rear
brake
rotors
.
See
Fig
.
3
.
Power
assist
is
provided
by
a
vacuum
booster
when
the
en-
gine
is
running
.
The
brakepedal
pushrod
is
connected
directly
to
the
master
cylinder,
so
failure
of
the
vacuum
booster
does
not
normally
result
in
total
brake
failure
.
0012124
Each
disc
brakeuses
a
caliper
with
a
single
hydraulic
cylin-
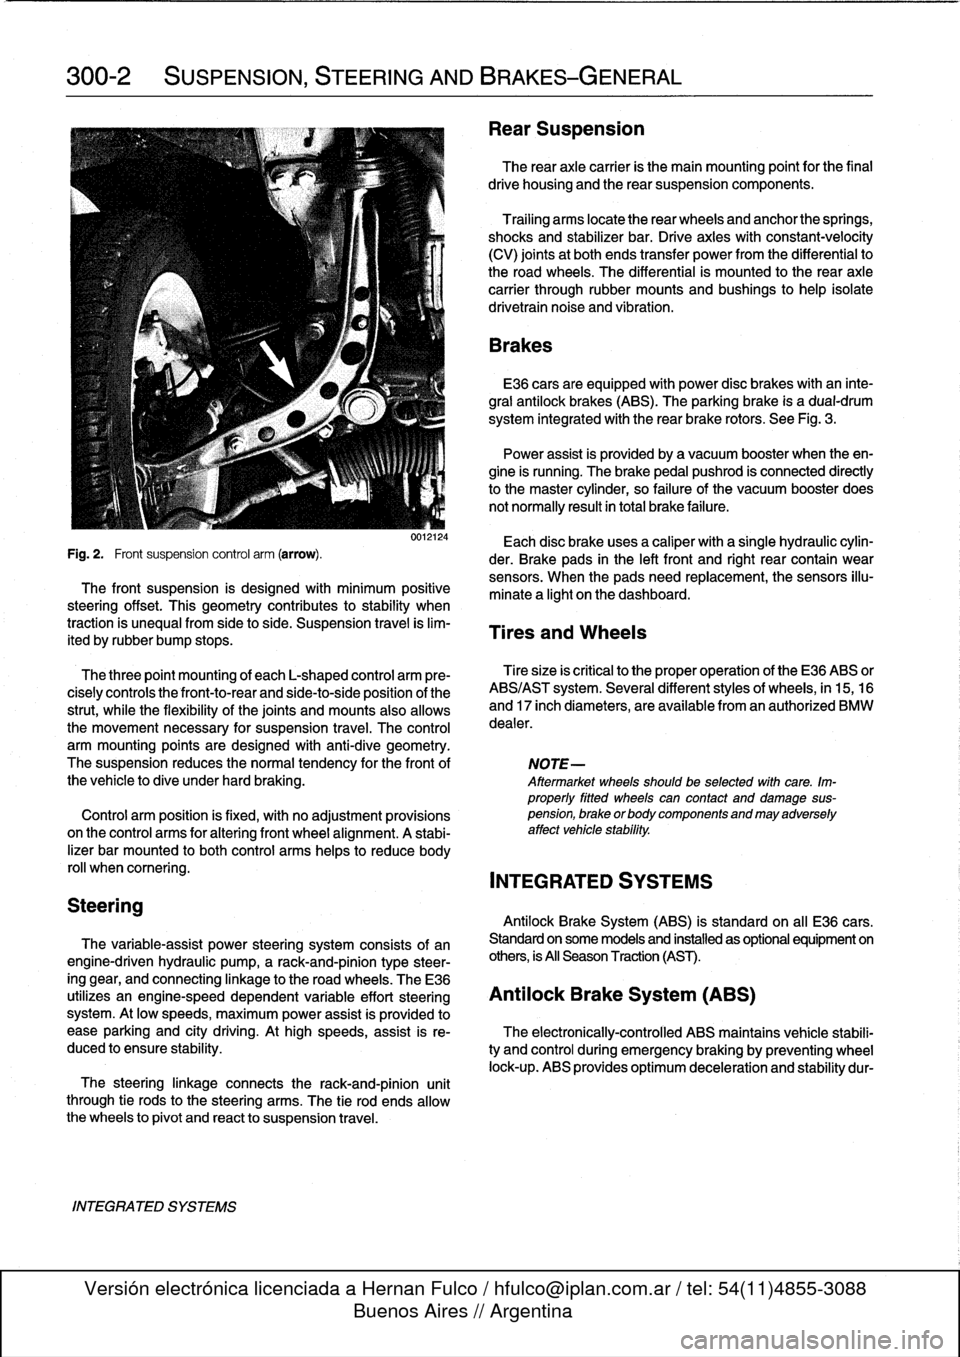
Fig
.
2
.
Front
suspension
control
arm
(arrow)
.
der
.
Brake
pads
in
the
left
front
and
right
rear
contain
wear
sensors
.
When
the
padsneed
replacement,the
sensors
illu-
The
front
suspension
is
designed
with
minimum
positive
minate
a
light
on
the
dashboard
.
steering
offset
.
This
geometry
contributes
to
stability
when
traction
is
unequalfrom
side
to
side
.
Suspension
travel
is
lim-
Tires
and
Wheels
ited
by
rubber
bump
stops
.
The
three
point
mounting
of
each
L-shaped
control
arm
ere-
Tiresize
is
critica¡
to
the
proper
operatíon
of
the
E36
ABS
or
cisely
controls
the
front-to-rear
and
side-to-side
position
of
the
ABS/AST
system
.
Severa¡
different
styles
of
wheels,
in
15,16
strut,
while
the
flexibility
of
the
joints
and
mounts
alsoallows
and
17
inch
diameters,
are
available
from
an
authorized
BMW
the
movement
necessary
for
suspension
travel
.
The
control
dealer
.
arm
mounting
points
are
designed
with
anti-dive
geometry
.
The
suspension
reduces
the
normaltendency
for
the
front
of
NOTE-
the
vehicle
to
dive
under
hard
braking
.
Aftermarket
wheelsshould
be
selected
wlth
care
.
Im-
properly
fitted
wheels
can
contact
anddamage
sus
Control
arm
position
is
fixed,
with
no
adjustment
provisions
pension,
brakeorbodycomponentsandmayadversely
on
the
control
arms
for
alter¡ng
front
wheel
al
ignment
.
A
stabi-
affect
vehicle
stability
.
lizer
bar
mounted
to
both
control
arms
heles
to
reduce
body
rol¡
whencomering
.
INTEGRATED
SYSTEMS
Antilock
Brake
System
(ABS)
is
standard
on
all
E36
cars
.
The
variable-assist
power
steering
system
consists
of
an
Standard
on
some
models
and
installed
as
optional
equipment
on
engine-driven
hydraulic
pump,
a
rack-and-pinion
type
steer-
others,
is
All
Season
Traction
(AST)
.
ing
gear,
and
connecting
linkage
to
the
road
wheels
.
TheE36
utilizes
an
engine-speed
dependent
variable
effort
steering
Antilock
Brake
System
(ABS)
system
.
At
low
speeds,
maximum
power
assist
is
provided
to
ease
parking
and
city
driving
.
Athigh
speeds,
assist
is
re-
The
electronically-controlled
ABS
maintains
vehícle
stabili
duced
to
ensure
stability
.
ty
and
control
during
emergency
braking
by
preventing
wheel
lock-up
.
ABS
provides
optimum
deceleration
and
stability
dur-
Page 253 of 759
NOTE-
The
traction
control
system
referred
to
as
AST
(all
sea-
son
traction)
may
also
be
referred
to
as
ASC
(Automat-
ic
Stability
Control)
and
ASC+T
(Automatic
Stability
Control+Traction)
.
The
AST
system
improves
traction
by
electronically
apply-
ing
the
rear
brakes
when
therear
drive
wheels
are
spinning
at
a
faster
rate
than
the
front
wheels
.
The
combined
ABS/AST
control
module,
operating
through
the
ABS
hydraulic
control
unit,
modulates
braking
force
at
therear
wheels
.
In
addition,
AST
uses
retarded
ignition
timing
and
an
auxil-iary
engine
throttle
plate
to
reduceengine
torque
and
maintain
vehicle
stability
.
The
auxiliary
throttle
plate
is
held
open
by
spring
pressure
.
The
AST
system
actívates
the
auxiliary
throttie
position
motor
(ADS)
to
cose
the
AST
throttle
as
needed
.
This
reduces
the
volume
of
engine
intake
air
.
Due
to
the
throttle
closing
very
rapidly
during
AST
operationthe
driver
cannot
increase
theengine
power
output
regardless
of
how
far
theaccelerator
pedal
is
pushed
to
the
floor
.
The
auxiliary
throttle
plate
is
placed
ahead
of
the
conven-
tional
throttle
plate
in
the
throttle
body
.
Traction
control
also
comes
into
operationduringdecelera-
tion
.
Decelerating
on
snowy
or
icy
road
surfaces
can
lead
to
rear
wheel
slip
.
If
a
rear
wheel
startsto
drag
or
lock
up
when
the
throttle
is
closed
rapidly
orduringdownshifting,the
AST
system
can
limit
the
problem
by
advancing
the
ignition
timing
.
A
switch
on
the
center
console
is
used
to
togglethe
AST
on
or
off
.
The
AST
system
is
designed
to
be
maintenance
free
.
There
are
no
adjustments
that
can
be
made
.
Repair
and
trouble-
shooting
of
the
AST
system
requires
special
test
equipment
andknowledgeand
should
be
performed
only
by
an
autho-
rized
BMW
dealer
.
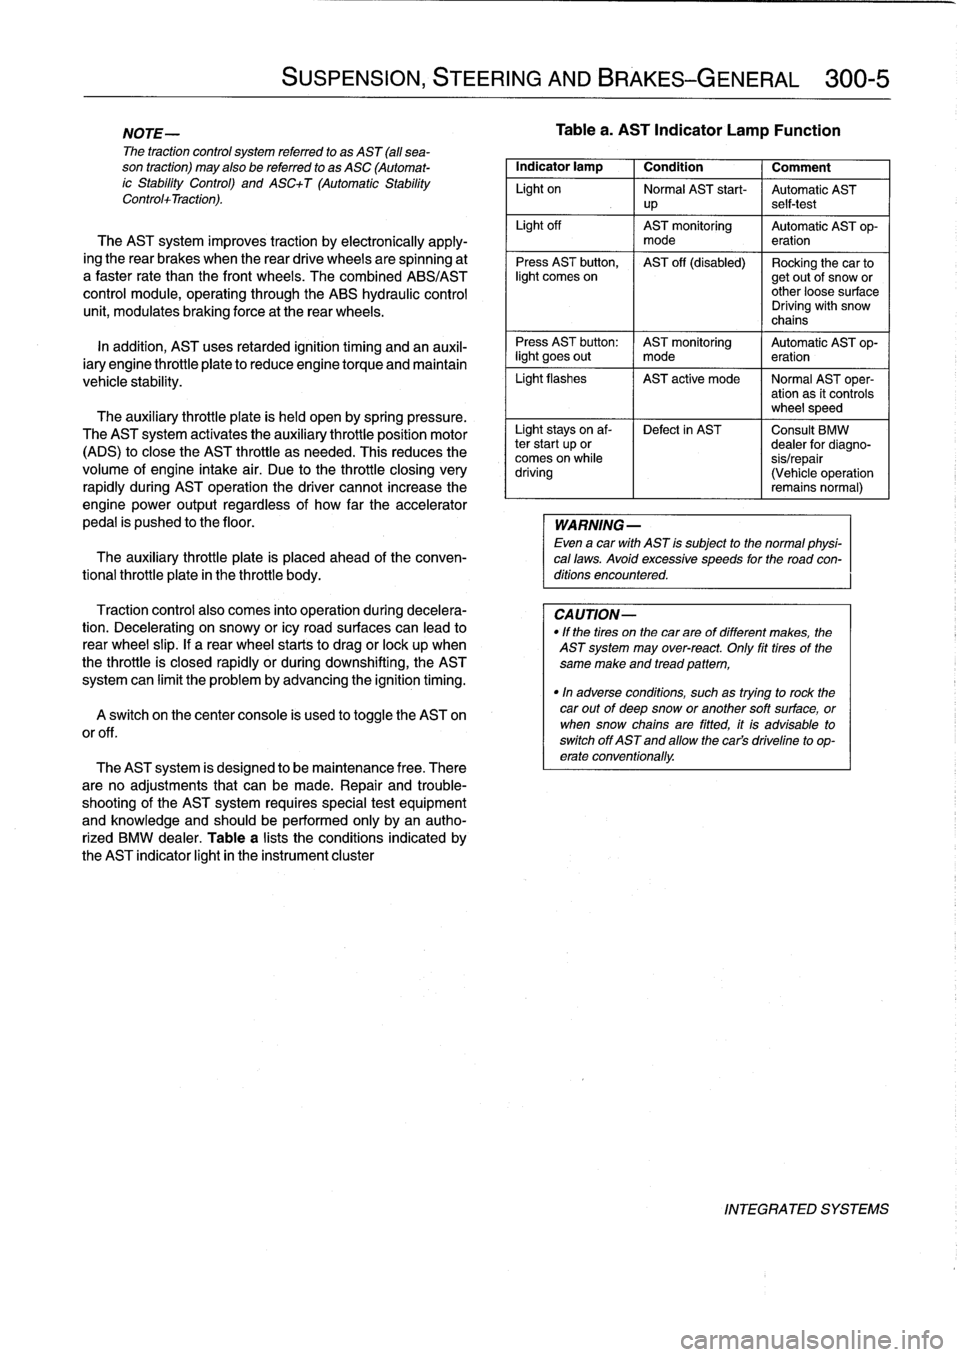
Table
a
lists
theconditions
indicated
by
the
AST
indicator
light
in
the
instrument
cluster
SUSPENSION,
STEERING
AND
BRAKES-GENERAL
300-5
Tablea
.
AST
Indicator
Lamp
Function
Indicator
lamp
1
Condition
1
Comment
Light
on
Normal
AST
start-
Automatic
AST
up
self-test
Light
off
AST
monitoring
Automatic
AST
op-
mode
eration
Press
AST
button,
AST
off
(disabled)
Rocking
the
car
tolight
comes
on
getout
of
snow
or
other
loose
surface
Driving
with
snow
chains
Press
AST
button
:
AST
monitoring
Automatic
AST
op-
light
goes
out
I
mode
eration
Light
flashes
AST
active
mode
I
Normal
AST
oper-
ation
as
it
controls
wheel
speed
Light
stays
on
af-
Defect
in
AST
Consult
BMW
ter
start
up
or
dealer
for
diagno-
comes
on
while
sis/repair
driving
(Vehicle
operation
remains
normal)
WARNING
-
Even
a
car
with
AST
is
subject
to
the
normal
physi-
cal
laws
.
Avoid
excessive
speeds
for
the
road
con-
ditions
encountered
.
CAUTION-
"
If
the
tires
on
the
carare
of
different
makes,
the
AST
system
may
over-react
.
Only
fit
tires
of
the
same
make
and
tread
pattem,
"In
adverse
conditions,
such
as
trying
to
rock
the
car
outof
deep
snow
or
another
soft
surface,
or
when
snow
chainsare
fitted,
it
is
advisable
to
switch
off
AST
and
allow
the
cars
driveline
to
op-
erate
conventionally
.
INTEGRATED
SYSTEMS
Page 255 of 759
increased
power
output
and
road-handling
demands
.
The
steering
geometry
is
modified
by
changing
the
cast-
er/camber
angles
slightly
.
This
is
accomplishedby
reposition-
ing
the
upper
strut
mounting
holes
in
the
frontstrut
towers
and
through
different
front
and
rear
control
arms
.
M3
Brake
System
Improvements
"
Vented
directionalfront
rotors
:
315
mm
dia
.
x
28
mm
thick
.
"
Vented
directional
rear
rotors
:
312
mm
dia
.
x20
mm
thick
.
"
Larger
brake
pads
and
calipers
.
"
Modified
Teves
ABS
system
.
SUSPENSION,
STEERING
AND
BRAKES-GENERAL
300-
7
M3
SUSPENSION
AND
BRAKES
NOTE-
M3
brake
rotors
are
directional,
having
a
different
part
TheE36
M3
was
introduced
in
late
1994
as
a
1995
model
.
number
for
each
side
.
Rotors
with
an
odd
part
number
The
design
of
the
M3
suspension,
steering
and
brakes
is
a
go
on
the
left
while
rotors
with
en
even
part
numbergo
modification
of
existing
E36
systems
which
accommodates
on
the
right
.
M3
Front
SuspensionImprovements
"
Reinforced
spring
plates,control
arms,
control
arm
bush-
ings,
steering
arms
.
"
Recalibrated
struts,
firmer
springs
.
"
Stiffer
stabilizerbar,
larger
stabilizer
bar
bushings
.
"
Front
stabilizer
linked
to
struts
.
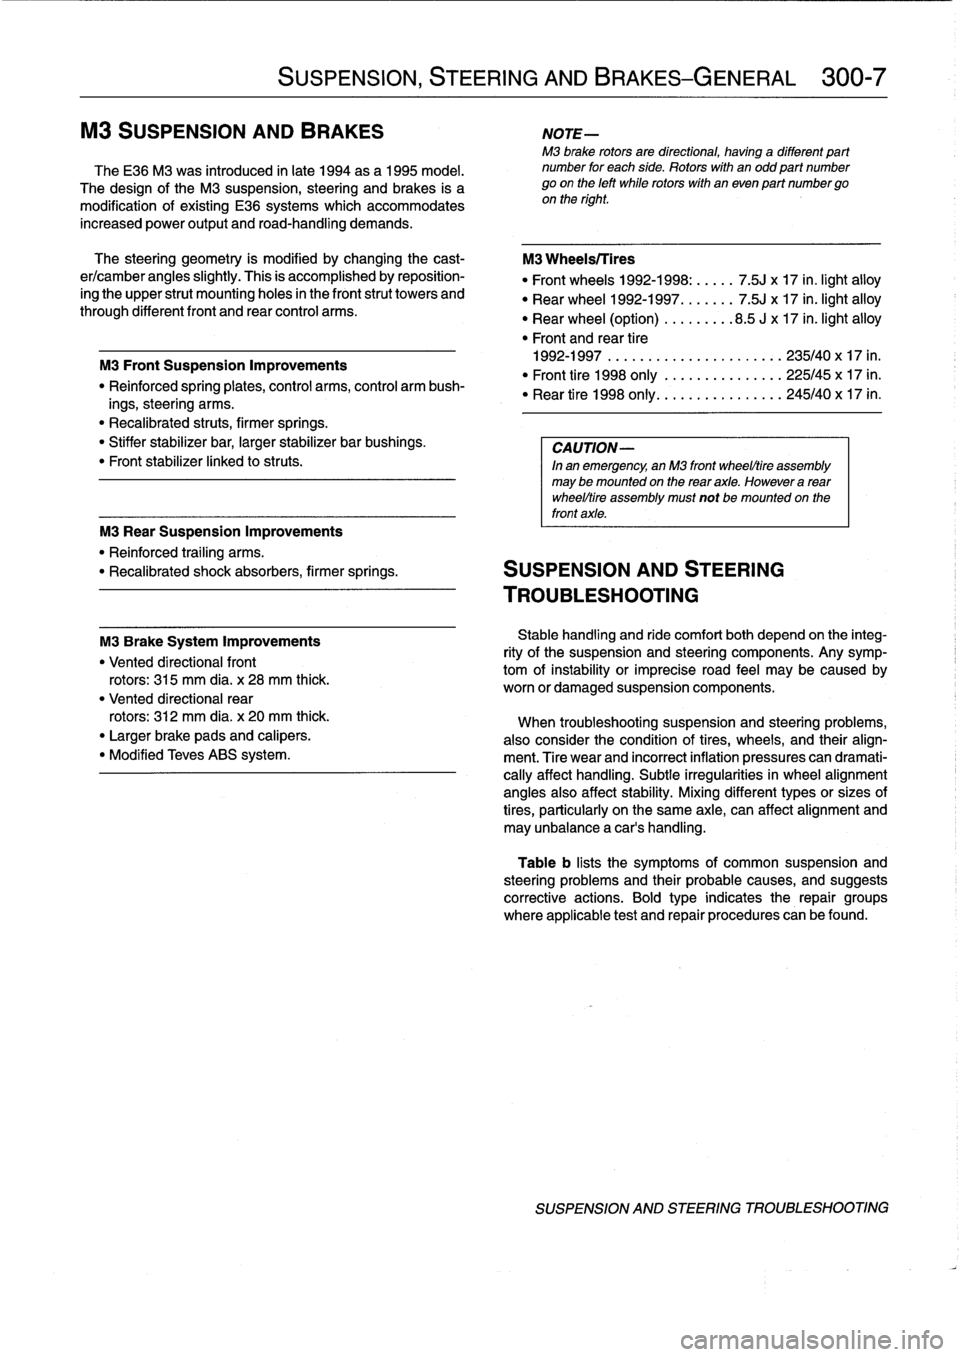
M3
Wheels/Tires
"
Front
wheels
1992-1998
:.....
7
.5J
x
17
in
.
light
alloy
"
Rear
wheel
1992-1997
.......
7
.5J
x17
in
.
light
alloy
"
Rear
wheel
(option)
........
.8
.5
Jx17
in
.
light
alloy
"
Front
and
rear
tire
1992-1997
.............
.
.
.
...
...
235/40
x
17
in
.
"
Front
tire
1998
only
......
...
.
.
.
...
225/45
x
17
in
.
"
Rear
tire
1998
only
.......
.
.
.
...
...
245/40
x
17
in
.
CAUTION-
In
en
emergency,
an
M3
front
wheel/tire
assembly
may
be
mounted
on
the
rearaxle
.
However
a
rear
wheel/tire
assemblymust
not
be
mounted
on
the
front
axle
.
M3
RearSuspensionImprovements
"
Reinforced
trailing
arms
.
"
Recalibrated
shock
absorbers,
firmer
springs
.
SUSPENSION
AND
STEERING
TROUBLESHOOTING
Stable
handling
and
ride
comfort
both
depend
on
the
integ-
rity
of
the
suspension
and
steering
components
.
Any
symp-
tom
of
instability
or
imprecise
road
feel
may
be
caused
by
worn
or
damaged
suspension
components
.
When
troubleshooting
suspension
and
steering
problems,
also
consider
the
condition
of
tires,
wheels,
and
their
align-
ment
.
Tire
wear
and
incorrect
inflation
pressures
can
dramati-
cally
affect
handling
.
Subtie
irregularities
in
wheel
alignment
angles
also
affect
stabílity
.
Mixing
different
types
or
sizes
of
tires,
particularly
on
the
same
axle,
can
affect
alignment
and
may
unbalancea
car's
handling
.
Table
b
lists
the
symptoms
of
common
suspension
and
steering
problems
and
their
probable
causes,
and
suggests
corrective
actions
.
Bold
type
indicates
the
repair
groups
where
applicable
test
and
repair
procedures
can
befound
.
SUSPENSION
AND
STEERING
TROUBLESHOOTING
Page 265 of 759
STABILIZER
BAR
Stabilizer
bar,
removing
and
installing
Stabilizer
bar
link
arrangements
differ
slightly
among
mod-
els
.
In
most
models
the
links
attach
lo
the
control
arms
near
the
outboard
end
.
OnM3
models
the
links
attach
lo
the
strut
assemblies
.
1
.
Raise
car
and
remove
both
front
wheels
.
WARNING
-
Make
sure
that
the
car
is
firmly
supported
on
jack
stands
desígned
for
the
purpose
.
Place
the
jack
stands
beneath
a
structural
chassís
point
.
Do
not
place
jack
stands
under
suspension
parts
.
uul
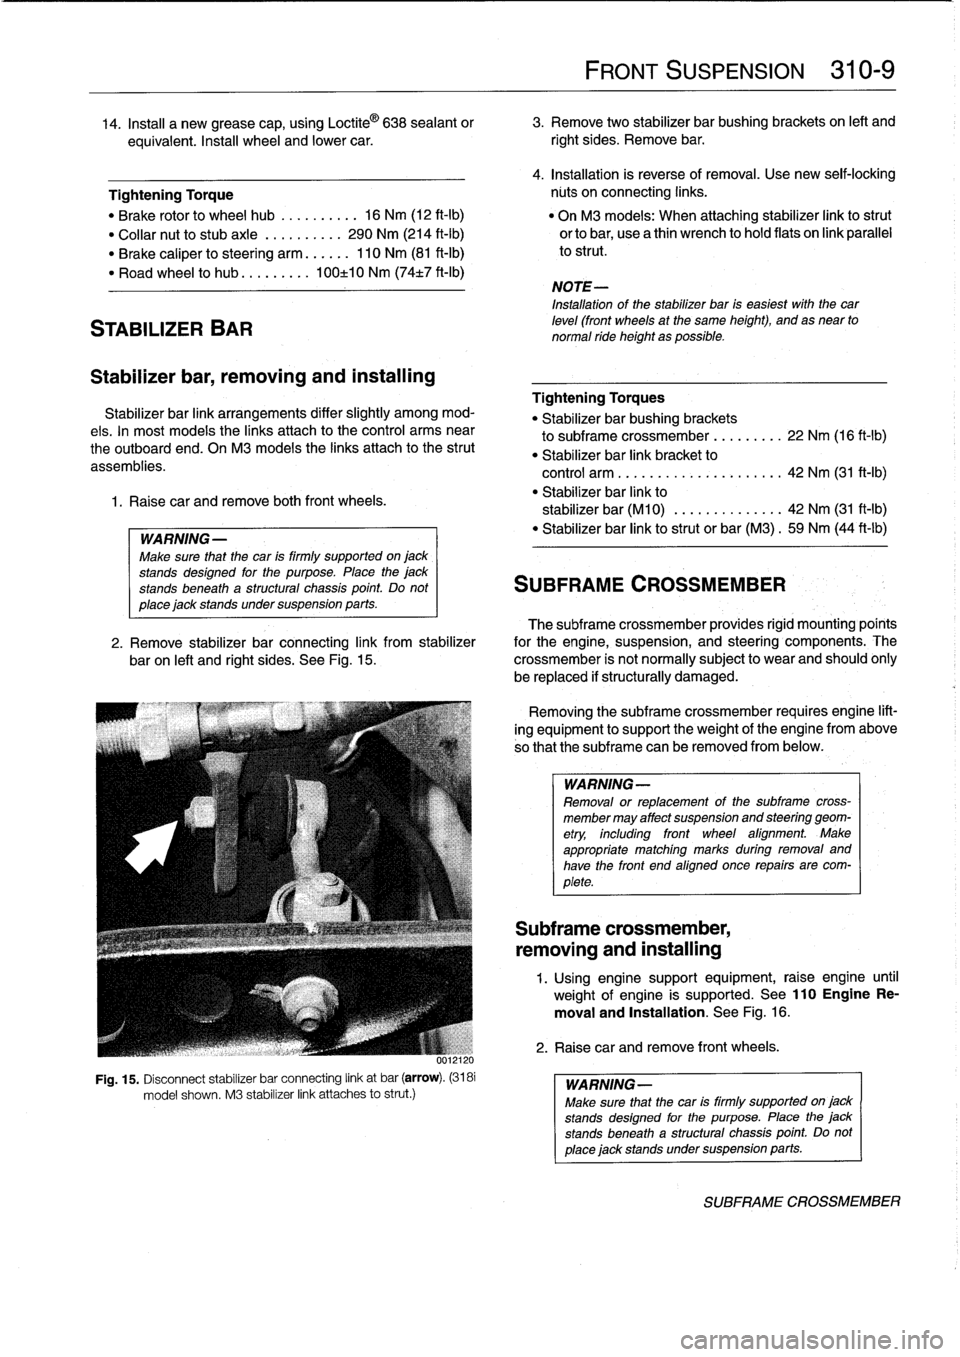
Fig
.
15
.
Disconnect
stabilizer
bar
connecting
link
at
bar
(arrow)
.
(3181
model
shown
.
M3
stabilizer
link
attaches
lo
strut
.)
FRONT
SUSPENSION
310-
9
14
.
Insta¡¡
a
new
grease
cap,
using
Loctite
©
638
sealant
or
3
.
Remove
two
stabilizer
bar
bushing
brackets
on
left
and
equivalent
.
Insta¡¡
wheel
and
lower
car
.
right
sides
.
Remove
bar
.
4
.
Installation
is
reverse
of
removal
.
Use
new
seif-lockíng
Tightening
Torque
núts
on
connecting
links
.
"
Brake
rotor
lo
wheel
hub
..........
16
Nm
(12
ft-Ib)
"
On
M3
models
:
When
attaching
stabilizer
link
lostrut
"
Collar
nut
lo
stubaxle
.
.........
290
Nm
(214
ft-Ib)
orlobar,
usea
thin
wrench
lo
hold
flats
on
link
parallel
"
Brake
caliper
losteering
arm
......
110
Nm
(81
ft-Ib)
lo
strut
.
"
Road
wheel
lo
hub
...
...
.
.
.
100±10
Nm
(74t7
ft-Ib)
NOTE-
Installation
of
the
stabilizer
bar
is
easiest
with
thecar
leve¡
(front
wheels
at
the
same
height),
and
as
near
to
normal
ride
height
as
possible
.
Tightening
Torques
"
Stabilizer
bar
bushing
brackets
lo
subframe
crossmember
...
..
.
..
.
22
Nm
(16
ft-Ib)
"
Stabilizer
bar
link
bracket
lo
control
arm
................
.
.
.
.
.
42
Nm
(31
ft-1b)
"
Stabilizer
bar
link
lo
stabilizer
bar
(M10)
.............
.
42
Nm
(31
ft-Ib)
"
Stabilizer
bar
link
lostrut
or
bar
(M3)
.
59
Nm
(44
ft-Ib)
SUBFRAME
CROSSMEMBER
The
subframe
crossmember
provides
rigid
mounting'poínts
2
.
Remove
stabilizer
bar
connecting
link
from
stabilizer
for
the
engine,
suspension,
and
steering
components
.
The
baron
left
and
right
sides
.
See
Fig
.
15
.
crossmember
is
not
normally
subject
lo
wear
and
should
ohly
be
replaced
if
structurally
damaged
.
Removing
the
subframe
crossmember
requires
engine
lift-
ing
equipment
lo
support
theweight
of
tfhe
engine
from
above
so
that
the
subframe
can
be
removed
from
below
.
WARNING-
Removal
or
replacement
of
the
subframe
cross-
member
may
affect
suspension
and
steering
geom-
etry,
including
front
wheel
afignment
.
Make
appropriate
matching
marks
during
removal
and
have
the
front
end
aligned
once
repairs
are
com-
plete
.
Subframe
crossmember,
removing
and
installing
1
.
Using
enginesupport
equipment,
raise
engine
until
weight
of
engine
is
supported
.
See
110EngineRe-
moval
and
Installation
.
See
Fig
.
16
.
2
.
Raise
car
andremove
front
wheels
.
WARNING-
Make
sure
that
the
car
is
firmly
supportedon
jack
stands
desígned
for
the
purpose
.
Place
the
jack
stands
beneatha
structural
chassís
point
Do
not
place
jack
standsundersuspension
parts
.
SUBFRAME
CROSSMEMBER
Page 267 of 759
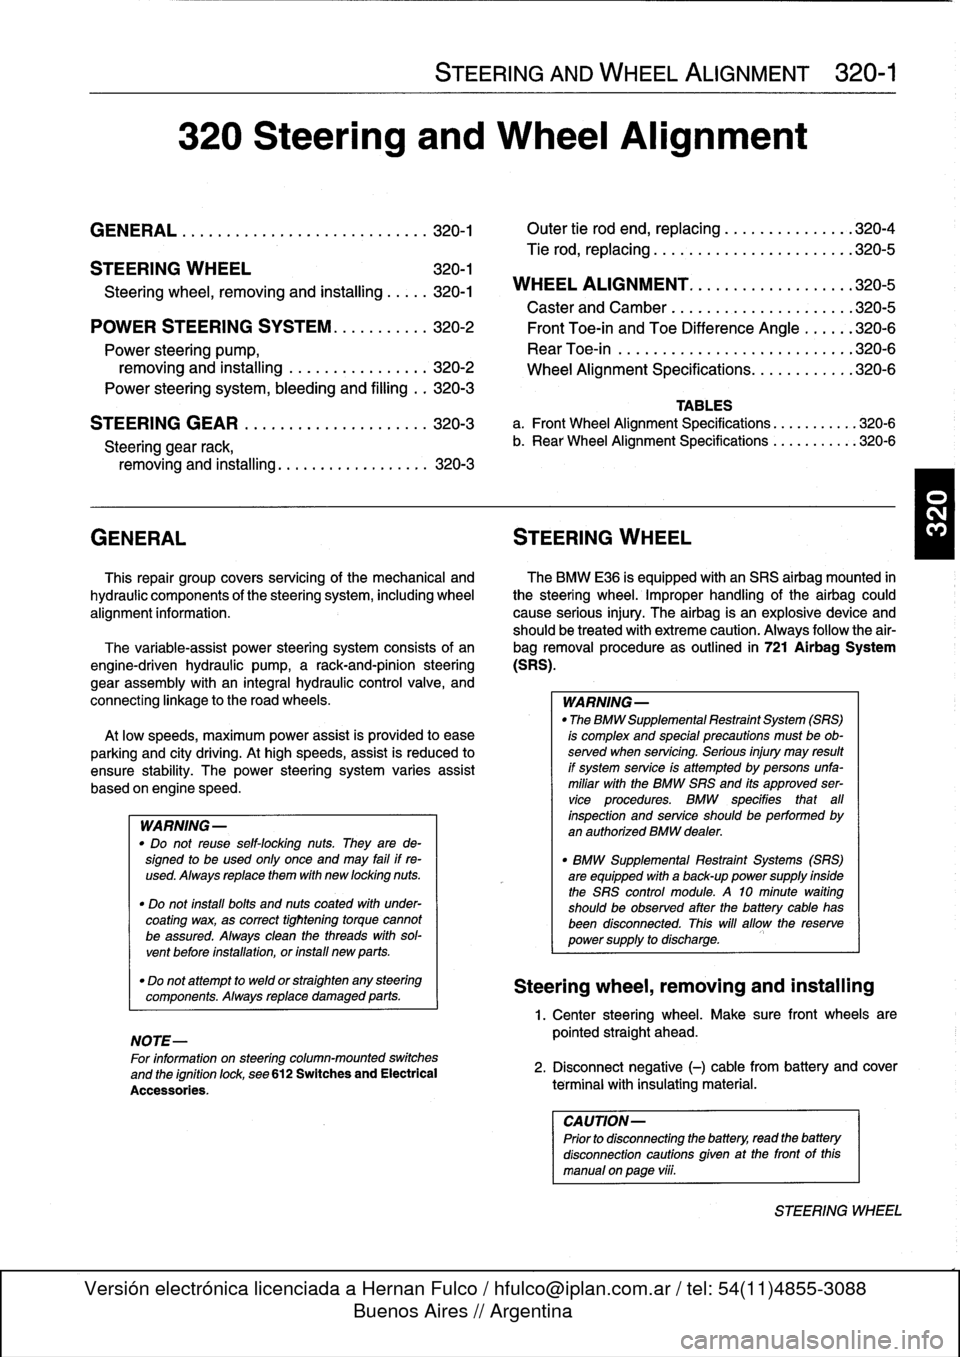
320
Steering
and
Wheel
Alignment
GENERAL
...
.
.
.
...
.
....
.
.
.
.
.
.
.
.
.
...
.
.
320-1
Outer
tie
rod
end,
replacing
.
...
.
.
.
.
.
.
.
...
.
320-4
Tie
rod,
replacing
.
.
.
.
.
.
.
.......
.
.
.
.
.
...
.
320-5
STEERING
WHEEL
320-1
Steering
wheel,
removing
and
installing
.....
320-1
WHEEL
ALIGNMENT
.
.
.
.........
.
.....
.320-5
POWER
STEERING
SYSTEM
.
.
.
.
.
.
.....
320-2
Front
Toe-in
and
Toe
Difference
Angle
.
.
...
.
320-6
Power
steering
pump,
Rear
Toe-in
.
.
.
.
.
.
.
...
.
................
320-6
removing
and
installing
..
.
.
.
.
.
.
.
.
.
.....
320-2
Wheel
Alignment
Specifications
.....
.
......
320-6
Power
steering
system,
bleeding
and
filling
.
.
320-3
STEERING
GEAR
.
.
.
.
...
.
.
.
.
.
.
.
.
.
.....
320-3
Steering
gear
rack,
removing
and
installing
.
...
.
..
.
..
..
..
.
..
.
320-3
GENERAL
STEERING
WHEEL
This
repair
group
covers
servicing
of
the
mechanical
and
The
BMW
E36
is
equipped
with
an
SRS
airbag
mounted
in
hydraulic
components
of
the
steering
system,
including
wheel
the
steering
wheel
.
Improper
handling
of
the
airbag
could
alignment
information
.
cause
serious
injury
.
The
airbag
is
an
explosivedevice
and
should
be
treated
with
extreme
caution
.
Always
follow
the
air-
The
variable-assist
power
steering
system
consistsof
an
bag
removal
procedure
as
outlined
in
721
Airbag
System
engine-driven
hydraulic
pump,
a
rack-and-pinion
steering
(SRS)
.
gear
assembly
with
an
integral
hydraulic
control
valve,
and
connecting
linkage
to
the
road
wheels
.
WARNING-
"
The
BMW
Supplemental
Restraint
System
(SRS)
At
lowspeeds,
maximum
power
assist
is
provided
to
ease
is
complex
and
special
precautions
must
be
ob-
parking
and
city
driving
.
At
high
speeds,
assist
is
reduced
to
served
when
servicing
.
Serious
injury
may
result
ensure
stability
.
The
power
steering
system
varies
assist
if
system
service
is
attempted
by
persons
unfa-
based
on
engine
speed
.
miliar
with
the
BMW
SRS
and
its
approved
ser-
vice
procedures
.
BMW
specifies
that
all
ING-
inspection
and
service
shouldbe
performed
by
WARN
an
authorized
BMW
dealer
.
"
Do
not
reuse
self-locking
nuts
.
They
are
de-signed
to
beused
only
once
and
may
failif
re-
"
BMW
Supplemental
Restraint
Systems
(SRS)
used
.
Always
replace
them
with
new
locking
nuts
.
are
equipped
with
a
back-up
power
supply
inside
the
SRS
control
module
.
A
10minute
waiting
"
Do
not
ínstall
bolts
and
nuts
coated
with
under-
shouldbe
observed
after
the
battery
cable
has
coating
wax,
as
correct
tightening
torque
cannot
been
disconnected
.
This
will
allow
the
reserve
be
assured
.
Always
clean
the
threads
with
sol-
power
supply
to
discharge
.
vent
before
installation,
or
install
new
parts
.
"
Do
not
attempt
to
weldor
straighten
any
steering
components
.
Always
replace
damaged
parts
.
NOTE-
For
information
on
steering
column-mounted
switches
and
the
ignition
lock,
see
612
Switches
and
Electrical
Accessories
.
STEERING
AND
WHEEL
ALIGNMENT
320-1
Caster
and
Camber
.
.
.
.
.
...........
.
....
320-5
TABLES
a
.
Front
Wheel
Alignment
Specifications
.
...
.......
320-6
b
.
Rear
Wheel
Alignment
Specifications
.
...
.......
320-6
Steering
wheel,
removing
and
installing
1
.
Center
steering
wheel
.
Make
sure
front
wheelsare
pointed
straight
ahead
.
2
.
Disconnect
negative
(-)
cable
from
battery
and
cover
terminal
with
insulating
material
.
CAUTION-
Prior
to
disconnectiog
the
battery,
read
the
battery
disconnection
cautions
given
at
the
front
of
this
manual
on
page
viii
.
STEERING
WHEEL
Page 272 of 759
320-
6
STEERING
AND
WHEEL
ALIGNMENT
Front
Toe-in
andToe
Difference
Angle
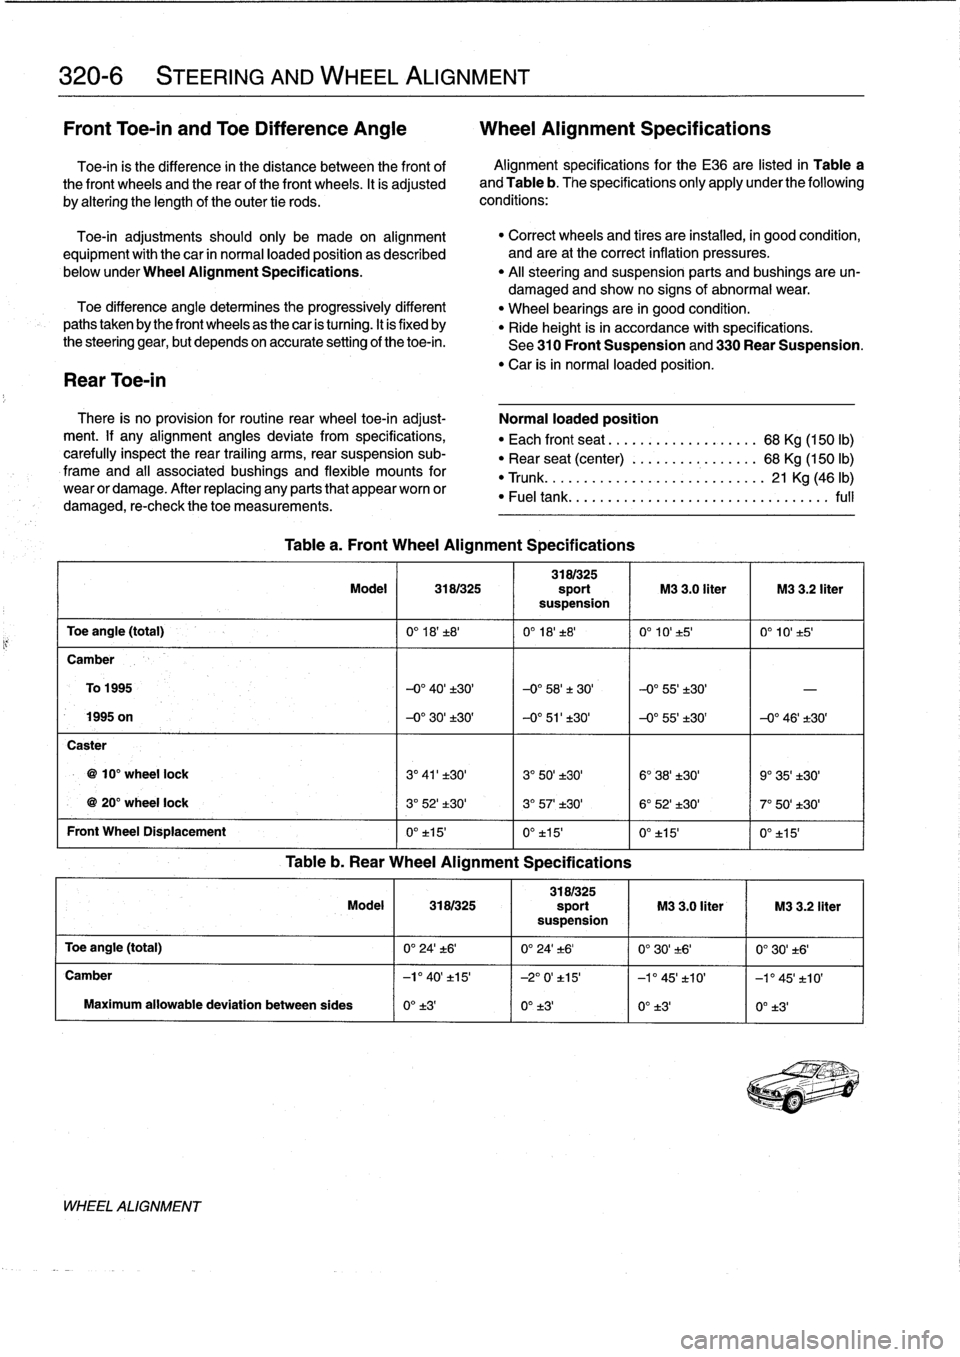
Wheel
Alignment
Specifications
Toe-in
is
the
difference
in
the
distance
between
the
front
of
Alignment
specificationsfor
the
E36
are
listed
in
Table
a
the
front
wheels
and
the
rear
of
the
front
wheels
.
It
is
adjusted
and
Table
b
.
The
specifications
only
apply
under
the
following
by
altering
the
length
of
the
outer
tie
rods
.
conditions
:
Toe-in
adjustments
should
only
be
made
on
alignment
equipment
with
the
car
in
normalloaded
position
as
described
below
under
Wheel
Alignment
Specifications
.
Toe
difference
angledetermines
the
progressively
different
pathstaken
by
the
front
wheelsas
the
car
is
turning
.
It
is
fixed
by
the
steering
gear,
but
depends
on
accurate
setting
of
the
toe-in
.
Rear
Toe-in
There
is
no
provision
for
routinerear
wheel
toe-in
adjust-
ment
.
If
any
alignment
angles
deviate
from
specifications,
carefully
inspect
the
rear
trailing
arms,
rear
suspension
sub-
frame
and
al¡
associated
bushings
and
flexible
mounts
for
wear
or
damage
.
After
replacing
any
parts
that
appear
worn
or
damaged,
re-check
thetoe
measurements
.
WHEEL
ALIGNMENT
Table
a
.
Front
Wheel
Alignment
Specifications
"
Correct
wheels
and
tires
are
installed,
in
good
condition,
and
are
at
the
correct
inflation
pressures
.
"
Al¡
steering
and
suspension
parts
and
bushings
areun-
damaged
and
show
no
signs
of
abnormal
wear
.
"
Wheel
bearings
are
in
good
condition
.
"
Ride
height
is
in
accordance
with
specifications
.
See
310
Front
Suspension
and330
Rear
suspension
.
"
Car
isin
normal
loaded
position
.
Normal
loaded
position
"
Each
front
seat
.....:.............
68
Kg
(150
lb)
"
Rear
seat
(center)
................
68
Kg
(150
lb)
"
Trunk
.
.
.
..
.......................
21
Kg
(46
lb)
"
Fueltank
.
........................
...
.
..
..
full
3181325
Model
3181325
sport
M3
3
.0
liter
M3
3
.2
liter
suspension
Toe
angle
(total)
0°
18'±8'
0°
18'±8'
0°
10'
±5'
0°
10't5'
Camber
To
1995
-0°
40'±30'
-0°
58'±
30'
-0°55'±30'
-
1995
on
-0°
30'
±30'
-0°
51'±30'
-0°55'±30'
-0°
46'±30'
Caster
10°
wheel
lock
3°
41'±30'
3°
50'±30'
6°
38'±30'
9°
35'±30'
20°
wheel
lock
3°
52'±30'
3°
57'
t30'
6°
52'±30'
7°
50'±30'
Front
Wheel
Displacement
0°
t15'
0°t15'
0°
±15
0°
±15'
Table
b
.
Rear
Wheel
Alignment
Specifications
3181325
Model
3181325
sport
M3
3
.0
liter
M3
3
.2
liter
suspension
Toe
angle
(total)
0°
24't6'
0°
24'±6'
0'30'
.-t6'
0°
30't6'
Camber
-l'
40'
t15'
-2°
0'
t15'
-1
°
45'
t10'
-1'45'±10'
Maximum
allowabledeviation
between
sides
0°
±3'
0°
±3'
0°
t3'
0°
t3'
Page 297 of 759
Brake
rotor,
removing
and
installing
Brake
rotors
shouldalways
be
replaced
in
pairs
.
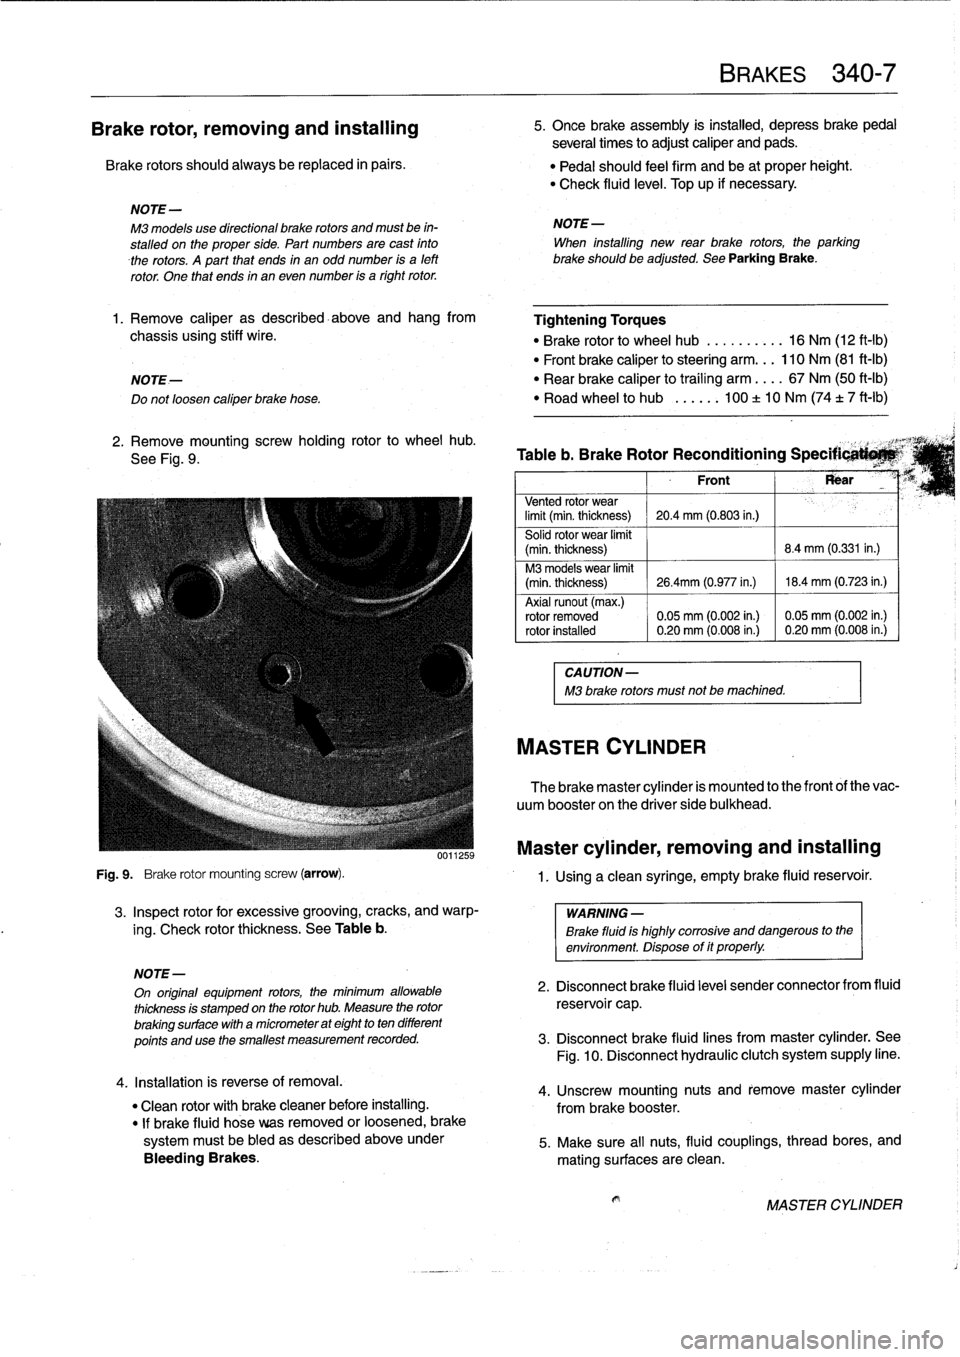
Fig
.
9
.
Brake
rotor
mounting
screw
(arrow)
.
3
.
Inspect
rotor
for
excessive
grooving,
cracks,
and
warp-
ing
.
Check
rotor
thickness
.
See
Table
b
.
4
.
Installation
is
reverse
of
removal
.
"
Clean
rotor
with
brakecleaner
before
installing
.
"
If
brake
fluid
hose
veas
removed
or
loosened,
brake
systemmustbe
bled
as
described
aboveunder
Bleeding
Brakes
.
BRAKES
340-
7
5
.
Once
brake
assembly
is
instalind,
depress
brakepedal
several
times
to
adjust
caliper
and
pads
.
"
Pedal
should
feel
firm
and
be
at
proper
height
.
"
Check
fluid
leve¡
.
Top
up
if
necessary
.
NOTE-
M3
models
use
directional
brake
rotors
and
mustbe
in-
NOTE-
stalled
on
the
proper
side
.
Part
numbes
are
cast
finto
When
installing
new
rear
brake
rotors,
the
parking
therotors
.
A
part
that
ends
in
an
odd
number
is
a
left
brakeshouldbe
adjusted
.
See
Parking
Brake
.
rotor
.
One
that
ends
in
an
even
number
is
a
right
rotor
.
1.
Remove
caliper
as
described-above
and
hang
from
Tightening
Torques
chassis
using
stiff
wire
.
"
Brake
rotor
to
wheel
hub
..........
16
Nm
(12
ft-Ib)
"
Front
brake
caliper
to
steering
arm
...
110
Nm
(81
ft-Ib)
NOTE-
"
Rear
brake
caliper
to
traíling
arm
....
67
Nm
(50
ft-Ib)
Do
notloosen
caliper
brake
hose
.
"
Road
wheel
to
hub
...
..
.
100
±
10
Nm
(74
t
7
ft-Ib)
2
.
Remove
mountingscrew
holding
rotor
to
wheel
hub
.
,
See
Fig
.
9
.
Table
b
.
Brake
Rotor
Reconditioning
Specificati*M`
Front
Rear
Vented
rotor
wear
limit
(min
.
thickness)
20
.4
mm
(0
.803
in.)
Solid
rotor
wear
limit
(min
.
thickness)
8
.4
mm
(0.331
in
.)
M3
models
wear
limit
(min
.
thickness)
26
.4mm
(0
.977
in
.)
18
.4
mm
(0
.723
in
.)
Axial
runout
(max
.)
rotor
removed
0
.05
mm
(0
.002
in
.)
0
.05
mm
(0
.002
in
.)
rotor
installed
0
.20
mm
(0
.008
in
.)
0
.20
mm
(0
.008
in
.)
CAUTION-
M3
brake
rotors
must
not
be
machined
.
MASTER
CYLINDER
The
brake
master
cylinder
is
mounted
to
the
front
of
the
vac-
uum
booster
on
the
driver
side
bulkhead
.
Master
cylinder,
removing
and
installing
1
.
Using
a
clean
syringe,
empty
brake
fluid
reservoir
.
WARNING
-
Brake
fluid
is
highly
corrosive
and
dangerous
to
the
environment
.
Dispose
of
it
properly
.
NOTE-
On
original
equipment
rotors,
the
mínimum
allowable
2
.
Disconnect
brake
fluid
leve¡
sender
connector
from
fluid
thickness
is
stamped
on
the
rotor
hub
.
Measure
the
rotor
reservoi
r
cap
.
brakingsurface
with
a
micrometer
at
eight
to
ten
different
points
and
use
the
smallest
measurement
recorded
.
3
.
Disconnect
brake
fluid
lines
frommaster
cylinder
.
See
Fig
.
10
.
Disconnect
hydraulic
clutch
system
supply
line
.
4
.
Unscrew
mounting
nuts
and
remove
master
cylinder
from
brake
booster
.
5
.
Make
sure
all
nuts,
fluid
couplings,
thread
bores,
and
mating
surfaces
are
clean
.
MASTER
CYLINDER
Page 301 of 759
7
.
Turn
on
ignition
.
Check
that
light
comes
on
as
soonas
4
.
Remove
parkíng
brake
shoes
as
described
above
.
lever
is
pulled
up
.
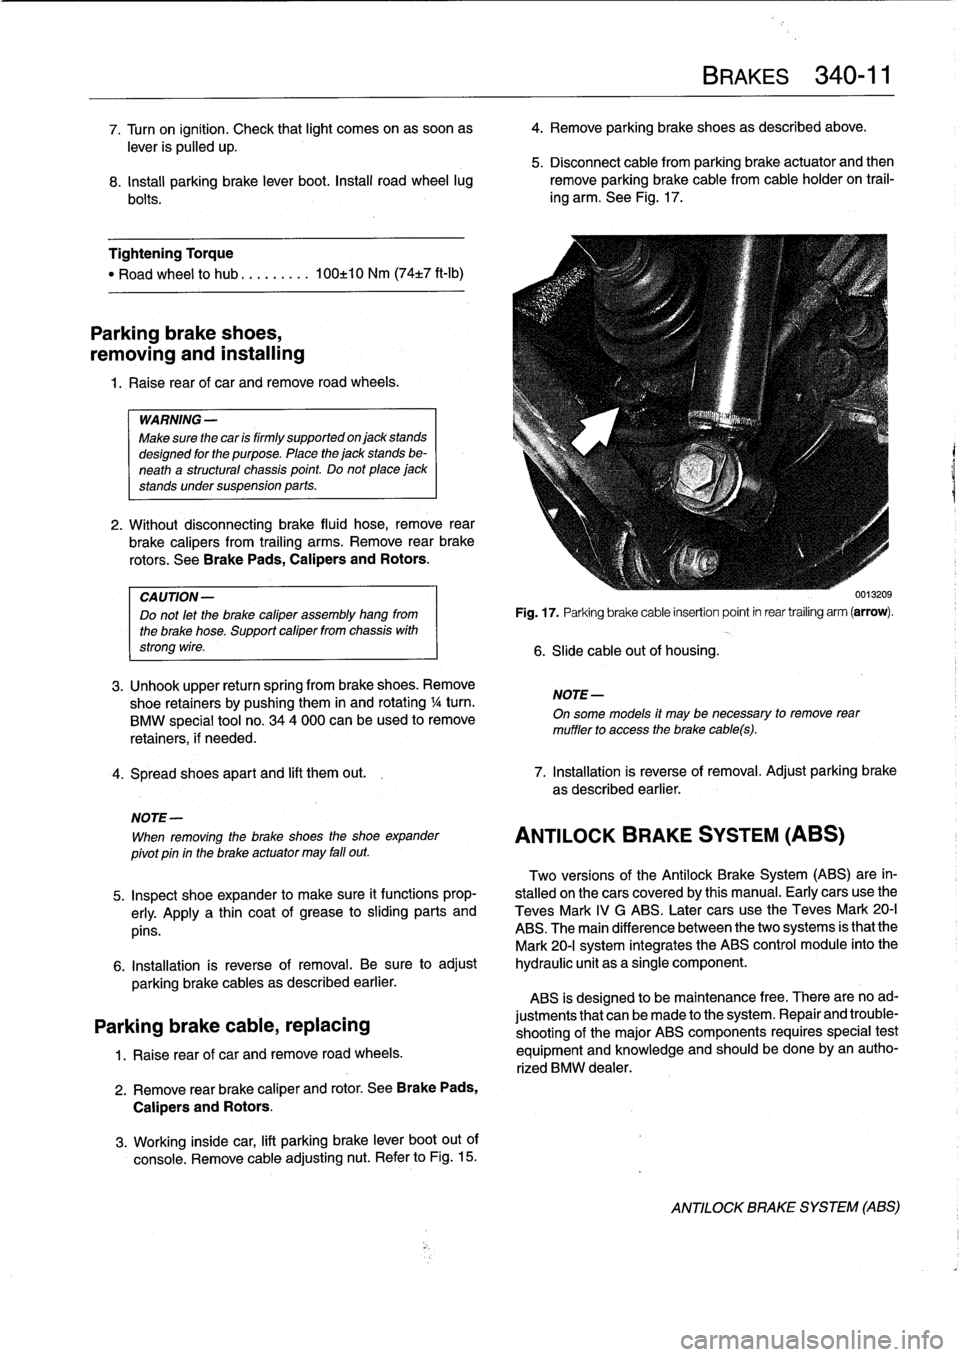
5
.
Disconnect
cable
from
parking
brake
actuator
and
then
8
.
Install
parking
brake
lever
boot
.
Install
road
wheel
lug
remove
parking
brakecable
from
cable
holder
on
trail-
bolts
.
ing
arm
.
See
Fig
.
17
.
Tightening
Torque
"
Road
wheel
to
hub
.
..
......
100±10
Nm
(74±7
ft-Ib)
Parking
brake
shoes,
removing
and
installing
1.
Raise
rear
of
car
andremove
road
wheels
.
WARNING
-
Make
sure
the
car
is
firmly
supportedon
jack
stands
designed
for
the
purpose
.
Place
the
jack
stands
be-
neath
a
structural
chassis
point
.
Do
not
place
jack
stands
undersuspension
parts
.
2
.
Without
disconnecting
brake
fluid
hose,
remove
rear
brake
calipers
from
trailing
arms
.
Remove
rear
brake
rotors
.
See
Brake
Pads,
Calipers
and
Rotors
.
CA
UTION-
Do
not
let
the
brake
caliper
assembly
hang
from
the
brake
hose
.
Support
caliper
from
chassis
with
strong
wire
.
3
.
Unhook
upper
return
spring
from
brake
shoes
.
Remove
shoe
retainers
bypushing
them
in
and
rotating
1
/4turn
.
BMW
special
tool
no
.
344
000
can
beused
to
remove
retainers,
if
needed
.
4
.
Spread
shoes
apart
and
lift
them
out
.
7
.
Installation
is
reverse
of
removal
.
Adjust
parking
brake
as
described
earlier
.
NOTE-
When
removing
the
brake
shoes
the
shoe
expander
pivot
pin
in
the
brake
actuator
may
fall
out
.
Two
versions
of
the
Antilock
Brake
System
(ABS)
are
in-
5
.
Inspect
shoe
expander
to
make
sure
it
functions
prop-
stalled
onthe
cars
coveredby
this
manual
.
Early
cars
use
the
erly
.
Apply
a
thin
coat
of
grease
tosliding
parts
and
Teves
Mark
IV
G
ABS
.
Later
cars
use
the
Teves
Mark
20-I
pins
.
ABS
.
The
main
difference
between
the
two
systems
is
that
the
Mark
20-I
system
integrates
the
ABS
control
module
into
the
6
.
Installation
is
reverse
of
removal
.
Be
sure
to
adjust
hydraulic
unit
as
a
single
component
.
parking
brake
cables
as
described
earlier
.
ABS
is
designed
to
be
maintenance
free
.
There
are
noad
Parking
brake
cable,
replacing
justments
that
canbe
made
to
the
system
.
Repair
and
trouble-
shooting
of
the
major
ABS
components
requires
special
test
1
.
Raise
rear
of
car
and
remove
road
wheels
.
equipment
and
knowiedge
and
should
be
done
by
an
autho-
rized
BMW
dealer
.
2
.
Remove
rear
brake
caliper
and
rotor
.
See
Brake
Pads,
Calipers
and
Rotors
.
3
.
Working
inside
car,
lift
parking
brake
lever
boot
out
of
console
.
Remove
cable
adjusting
nut
.
Refer
to
Fig
.
15
.
Fig
.
17
.
Parking
brake
cable
insertion
point
in
rear
trailing
arm
(arrow)
.
6
.
Slide
cable
out
of
housing
.
NOTE
-
BRAKES
340-
1
1
On
some
models
it
may
be
necessary
to
remove
rear
muffler
to
access
the
brake
cabes)
.
ANTILOCK
BRAKE
SYSTEM
(ABS)
0013209
ANTILOCK
BRAKE
SYSTEM
(ABS)
Page 305 of 759
TheE36
convertible
is
an
all-season
vehicle
with
a
high
lev-
e¡offunctionality,
excellent
interior
comfort,
and
acoustic
re-
finement
.
Interior
materials
and
colors,
the
soft
top
and
the
light-alloy
wheelshave
been
carefully
matched
.
Various
versions
of
manual
and
automatic
soft
tops
have
been
used,
with
the
fully
automatic
convertible
roof
being
in-
stalled
beginning
in
the
1997
model
year
.
A
hard-top
in
body
color
with
heated
rear
window
is
avail-
ableas
an
option
for
the
cold
season
.
BODY-GENERAL
400-
3
Coupe
Models
The
convertible
body
structure
includes
many
passive
safe-
ty
refinements
over
its
fixed-top
counterparts
.
Some
of
the
en-
TheE36
coupe
is
similar
to
the4-door
sedan,
but
has
a
hancements
include
:
more
stretched
and
sleeker
appearance
.
Thus,
with
the
same
wheelbase
and
identicallength,
it
looks
different
but
still
famil-
"
More
rígíd
underbody
.
iar
.
"
Transverse
seat
members
.
"
Reinforced
windshield
frame
with
bonded
windshield,
The
2-door
variant
differs
from
the
4-door
sedan
by
a
3
.12
and
tubular
door
reinforcements
.
inch
(8
cm)
longer
front
end,
a
flatter
hood
line
with
air
slits,
"
Rollover
protection
system,
which
is
tripped
into
position
and
a
roof
almost
1
.2
inches
(3
cm)
shorter
.
Additional
differ-
in
a
fraction
of
second
.
This
is
available
as
optional
ences
include
wider
doors
with
frameless
Windows,
glass-
equipment
(standard
on
the
1998
328iC)
and
may
be
fit-
covered
door-posts
(B-pillars)
and
a
shorter
and
lower
lug-
ted
to
earlier
convertible
models
.
With
this
feature,
two
gage
compartment
lid
.
bars
fully
independent
of
each
other
come
up
behind
each
rear-seat
backrest
when
the
vehicle
is
in
danger
of
Convertible
Models
turning
over
.
A
convertible
body
normally
flexes
and
vibrates,
transfer-
ring
oscillations
to
the
luggage
compartment
.
In
the
E36
con-
vertible,
BMW
utilizes
a
special
battery
in
the
luggage
compartment,
in
conjunction
with
a
unique
battery
tray,
asa
vibration
dampening
system
to
counteract
thisoscillation
.
CAUTION
-
The
E36
convertible
requires
a
specialbattery
which
is
designed
for
constant
vibration
.
Information
for
the
convertible
top
and
its
related
mecha-
nisms
can
be
found
541
Convertible
Top
.
BODYASSEMBLY
Page 306 of 759
400-
4
BODY-GENERAL
INTERIOR
EQUIPMENT
E36
interiors
have
a
unique
character,
with
a
combínation
of
sporty
features
and
innovative
design
.
Al¡
body
versions
were
made
in
a
wide
choice
of
interior
and
exterior
colors
.
New
colors
with
matching
leather
and/or
fabric
upholstery
were
in-
troduced
for
each
model
year,
including
light-alloy
wheels
in
new
designs
.
Driving
comfort
is
enhanced
by
power
steering,
tilt
steering
wheel
(optional),
height-adjustable
front
seats,
and
electrical-
ly
adjustable
and
heated
rear-view
mirrors
.
Inside
thecar
there
are
reading
lights
at
four
seating
positions
.
Seats
and
Seat
Belts
NOTE-
Theseat
base
usedon
cars
with
pyrotechnic
seatbelt
Anatom¡cal
ly-correct
seats
are
constructed
from
polyure-
tensioners
is
not
interchangeable
with
the
earlier
seat
thane
foam
containing
areas
or
"zones"
of
different
firmness
.
base
.
The
seat
bases
have
steel
springs
for
added
support
and
strength
.
The
power
seats
are
provided
with
conveniently
lo-
Instruments
and
Controls
cated
switches
along
the
outside
edge
of
the
seat
.
Heated
seats
are
an
option
in
all
models
.
See
520
Seats
for
more
de-
Everything
in
the
interior
passenger
compartment
essential
tails
.
to
the
driver
is
logically
grouped
and
easy
to
reach
.
Al¡
instru-
ments
and
controls
havebeen
arranged
ergonomically
and
The
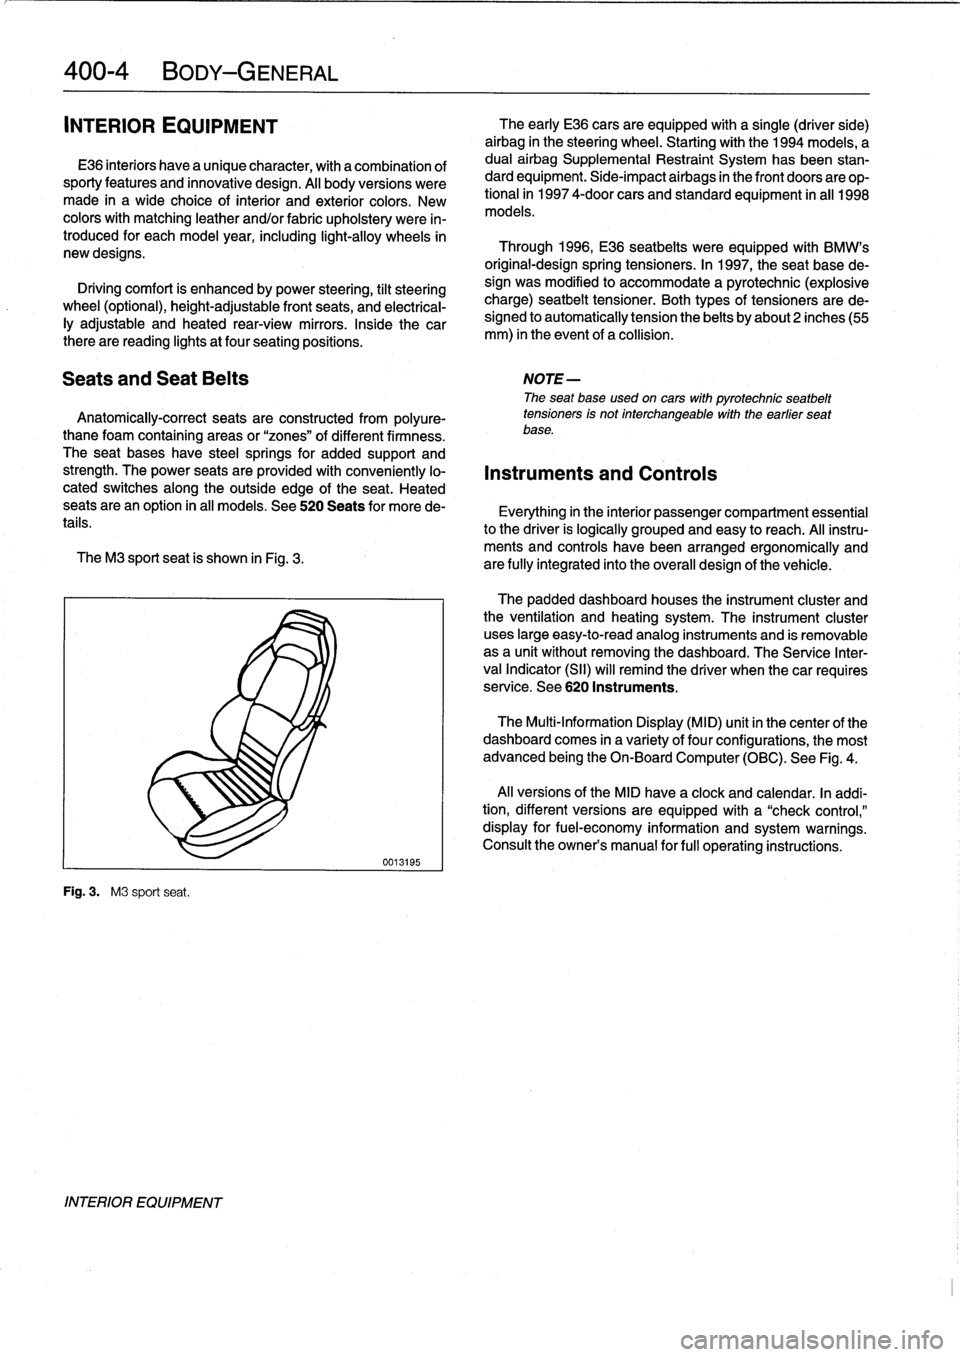
M3
sport
seat
is
shown
in
Fig
.
3
.
are
fully
integrated
into
the
overall
design
of
the
vehicle
.
Fig
.
3
.
M3
sport
seat
.
INTERIOR
EQUIPMENT
0013195
The
early
E36
cars
areequipped
with
a
single
(driver
side)
airbag
in
the
steering
wheel
.
Startingwith
the
1994
models,
a
dual
airbag
Supplemental
Restraint
System
has
been
stan-
dard
equipment
.
Side-impact
airbags
in
the
front
doors
are
op-
tional
in
1997
4-door
cars
and
standard
equipment
in
all
1998
models
.
Through
1996,
E36
seatbelts
were
equipped
with
BMW's
original-designspring
tensioners
.
In
1997,
the
seat
base
de-
sign
was
modified
to
accommodate
a
pyrotechnic
(explosive
charge)
seatbelt
tensioner
.
Both
types
of
tensioners
arede-
signed
to
automatically
tension
the
belts
by
about2
inches(55
mm)
in
the
event
of
a
collision
.
The
padded
dashboard
houses
the
instrument
cluster
and
the
ventilation
and
heating
system
.
The
instrument
cluster
uses
large
easy-to-read
analog
instruments
and
is
removable
as
a
unit
without
removing
the
dashboard
.
The
Service
Inter-
val
Indicator
(SII)
will
remind
the
driver
when
thecar
requires
service
.
See
620
Instruments
.
The
Multi-Information
Display
(MID)
unit
in
thecenter
of
the
dashboard
comes
in
a
variety
of
four
configurations,
the
most
advanced
being
the
On-Board
Computer
(OBC)
.
See
Fig
.
4
.
Al¡
versions
of
the
MID
have
a
clock
and
calendar
.
In
addi-
tion,
different
versions
areequipped
with
a
"check
control,"
display
for
fuel-economy
information
and
system
warnings
.
Consult
the
owner's
manual
for
fui¡
operating
instructions
.