tow BMW M3 1998 E36 Service Manual
[x] Cancel search | Manufacturer: BMW, Model Year: 1998, Model line: M3, Model: BMW M3 1998 E36Pages: 759
Page 383 of 759
NOTE
-
Sometimes
the
color
of
en
installed
wire
may
be
differ-
ent
than
the
one
on
the
wiring
diagram
.
Don't
be
con-
cerned
.
Just
be
sure
lo
confirm
that
the
wire
connects
lo
the
proper
terminals
.
Wire
color
codes
"
BLU
.........
.
..
..
...
.
.................
Blue
"
BRN
....:....
.
..
..
...
..
...............
Brown
"
YEL
.........
.
..
..
...................
.Yellow
"
GRN
.........
.
..
..
...
.
................
creen
"
G
RY
.......
.
.
.
..
..
.....................
G
ray
"
ORG
.........
.
..
..
...
.
..............
.Orange
"
RED
......
...
.
.
..
.....................
.Red
"
BLK
.........
.
..
..
...
.
................
Black
"
VIO
..........
.
..
...
..
..
.......
.
.......
Violet
"
WHT
.........
.
.
....
.
...
:..............
White
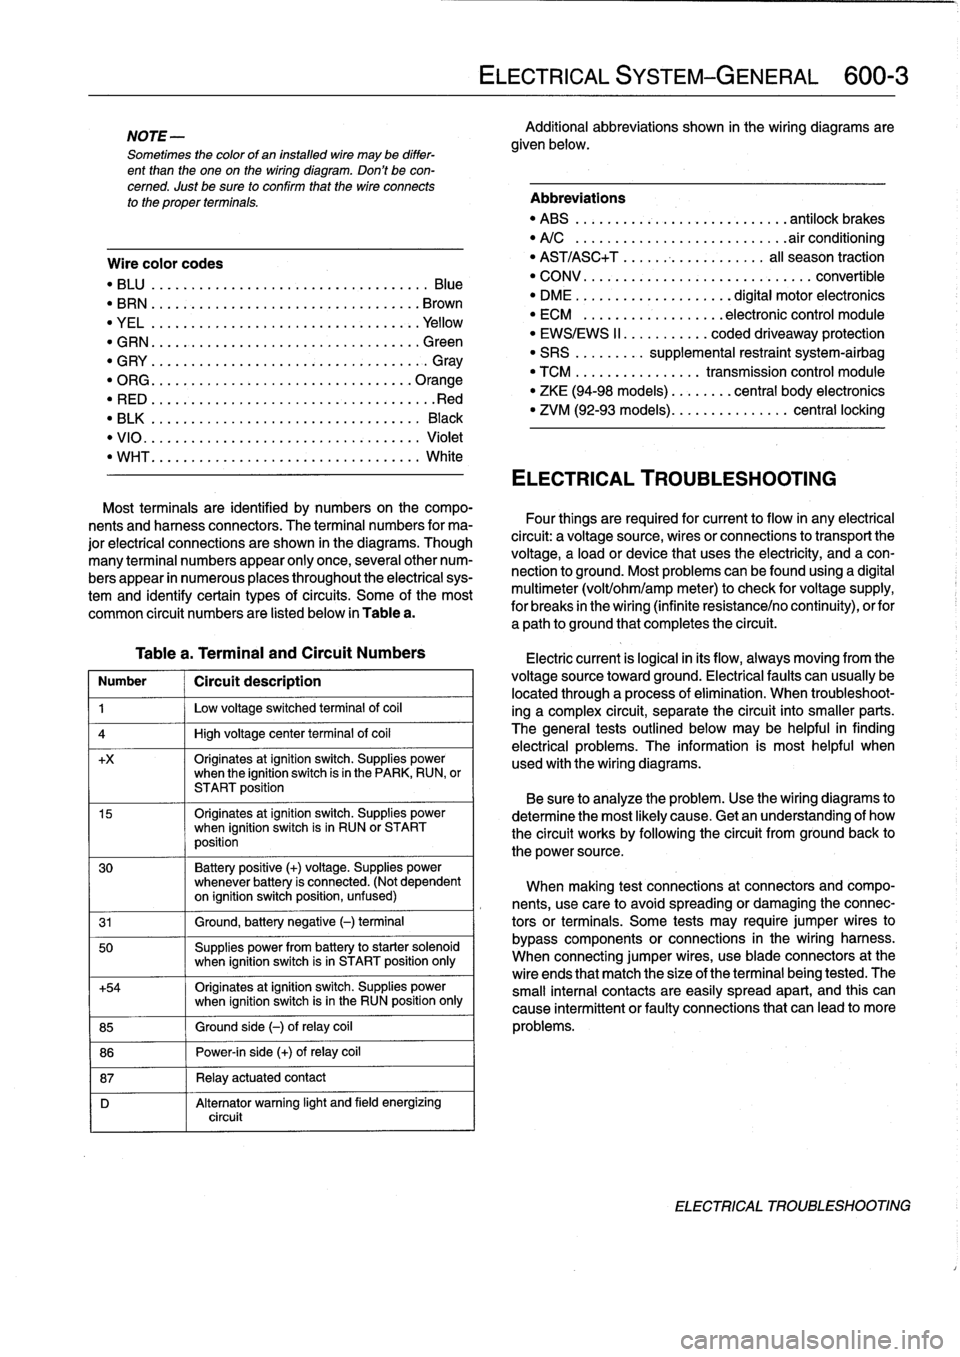
Table
a
.
Terminal
and
Circuit
Numbers
Number
1
Circuít
description
1
j
Low
voltage
switched
terminal
of
coi¡
4
1
High
voltage
center
termina¡
of
coi¡
+x
Originates
atignition
switch
.
Supplies
powerwhen
the
ignition
switch
is
in
the
PARK,
RUN,
or
START
position
15
Originates
atignition
switch
.
Supplies
powerwhen
ignition
switch
is
in
RUN
or
START
position
30
Battery
positive
(+)
voltage
.
Supplies
power
whenever
battery
is
connected
.
(Not
dependent
on
ignition
switch
position,
unfused)
31
1
Ground,
battery
negative
(-)
terminal
50
Supplies
power
from
battery
to
starter
solenoid
when
ignition
switch
isin
START
position
only
+54
Originates
atignition
switch
.
Supplies
power
when
ignition
switch
isin
the
RUN
position
only
85
1
Ground
side
(-)
ofrelay
coil
86
1
Power-in
side
(+)
ofrelay
coil
87
1
Relay
actuatedcontact
D
Alternator
warning
light
and
field
energizing
circuit
ELECTRICAL
SYSTEM-GENERAL
600-
3
Additional
abbreviations
shown
in
the
wiring
diagrams
are
given
below
.
Abbreviations
"
ABS
........
.
...
.
...
.
..........
antilock
brakes
"
A/C
........
.
...
..
..
.
.........
.airconditioning
"
AST/ASC+T
.......
...
.
.
.......
al¡
season
traction
"
CONV
.......
.
.
...
.................
convertible
"
DME
........
.
.
...
.......
digital
motor
electronics
"
ECM
.......
.
...
..
..
.
..
electronic
control
module
"
EWS/EWS
II
......
...
.
.
coded
driveaway
protection
"
SRS
........
.
supplemental
restraint
system-airbag
"
TCM
........
.
..
....
.
transmission
control
module
"
ZKE
(94-98
models)
..
..
.
...
central
body
electronics
"
ZVM
(92-93
models)
...
.
.
..
.
.......
central
locking
ELECTRICAL
TROUBLESHOOTING
Most
terminals
are
identified
by
numbers
on
the
compo-
nents
and
harness
connectors
.
The
terminal
numbers
for
ma-
Four
things
are
required
for
current
toflow
in
any
electrical
jor
electrical
connections
are
shown
in
the
diagrams
.
Though
circuit
:
a
voltagesource,
wires
or
connections
to
transport
the
many
terminal
numbers
appear
only
once,
severa¡other
num-
voltage,
a
load
or
device
that
uses
the
electricity,
and
a
con-
bers
appear
in
numerous
places
throughout
the
electrical
sys-
nection
to
ground
.
Most
problemscanbefound
using
a
digital
tem
and
identify
certain
types
ofcircuits
.
Some
of
the
most
multimeter
(volt/ohm/amp
meter)to
check
for
voltage
supply,
common
circuit
numbers
are
listed
below
in
Table
a
.
for
breaks
in
the
wiring
(infinite
resistance/no
continuity),
orfor
a
path
to
ground
that
completesthe
circuit
.
Electric
current
is
logical
in
its
flow,
always
moving
from
the
voltage
sourcetoward
ground
.
Electricalfaults
can
usually
be
located
through
a
process
of
elimination
.
When
troubleshoot-
ing
a
complex
circuit,
separate
the
circuit
into
smaller
parts
.
The
general
testsoutlined
below
may
be
helpful
in
finding
electrical
problems
.
The
information
is
most
helpful
when
used
with
the
wiring
diagrams
.
Be
sure
to
analyze
the
problem
.
Use
the
wiring
diagrams
to
determine
the
most
likely
cause
.
Getan
understanding
of
how
the
circuit
works
by
following
the
circuit
from
groundback
to
the
power
source
.
When
making
test
connections
at
connectors
andcompo-
nents,
use
care
to
avoidspreading
or
damaging
the
connec-
tors
or
terminals
.
Some
tests
may
require
jumper
wires
to
bypass
components
or
connections
in
the
wiring
harness
.
When
connecting
jumper
wires,
use
bladeconnectors
at
the
wire
ends
that
match
the
size
of
the
terminal
being
tested
.
The
small
interna¡
contacts
are
easily
spread
apart,
and
this
can
cause
intermittent
or
faultyconnections
that
can
leadto
more
problems
.
ELECTRICAL
TROUBLESHOOTING
Page 393 of 759
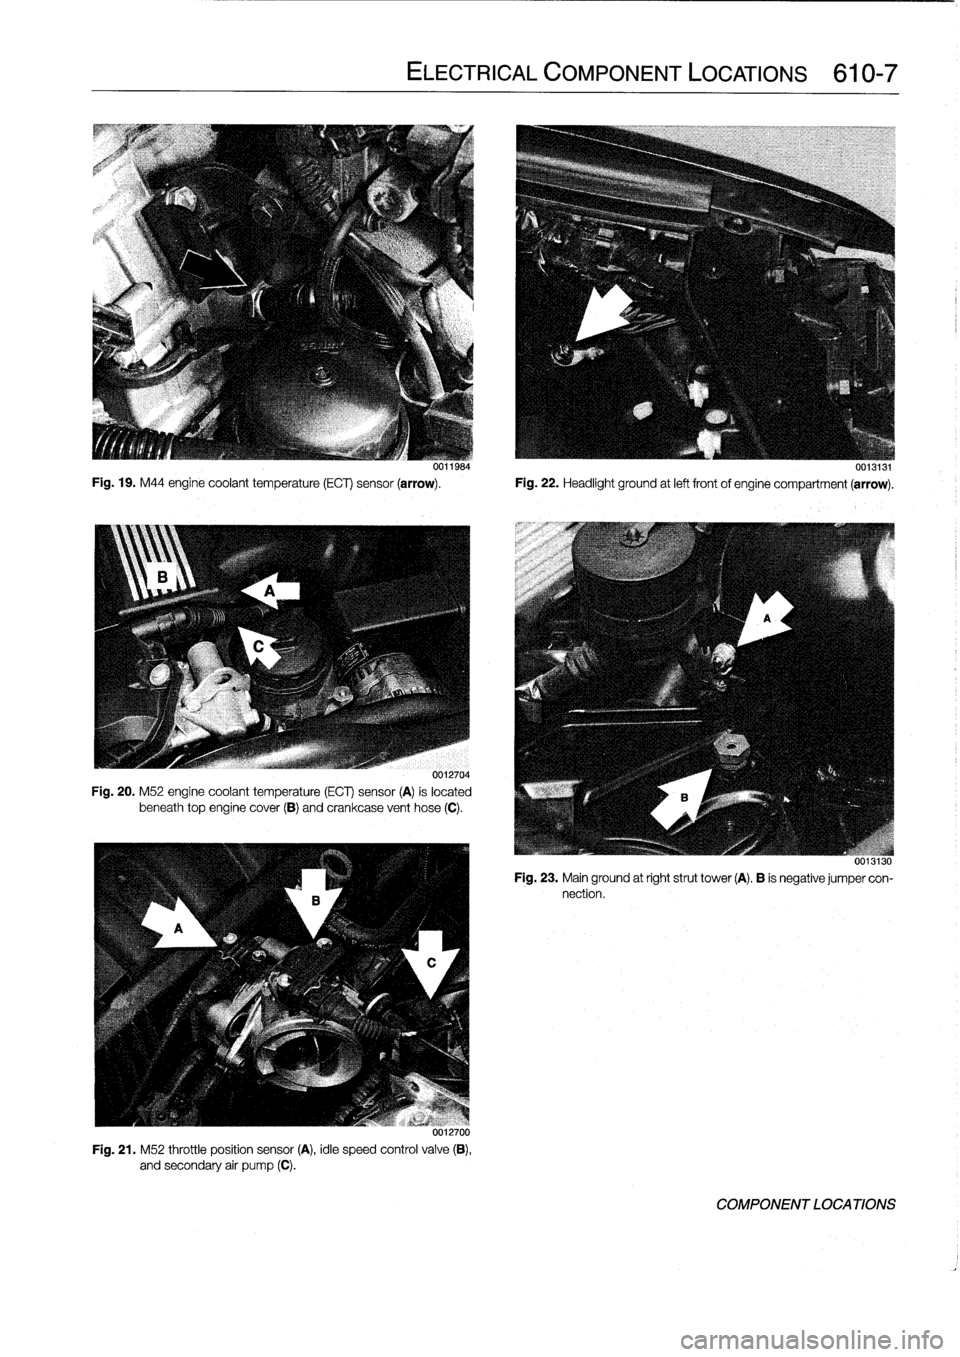
Fig
.
19
.
M44
engine
coolant
temperature
(ECT)
sensor
(arrow)
.
Fig
.
22
.
Headlight
ground
at
left
frontof
engine
compartment
(arrow)
.
0012704
Fig
.
20
.
M52
engine
coolant
temperature
(ECT)
sensor
(A)
is
located
beneath
top
enginecover
(B)
and
crankcase
vent
hose
(C)
.
uu12700
Fig
.
21
.
M52
throttle
position
sensor
(A),
idle
speed
control
valve
(B),
and
secondary
air
pump
(C)
.
ELECTRICAL
COMPONENT
LOCATIONS
610-7
00119s4
0013131
uvijijo
Fig
.
23
.
Mainground
at
right
strut
tower
(A)
.
B
is
negative
jumper
con-
nection
.
COMPONENT
LOCA
TIONS
Page 396 of 759
610-10
ELECTRICAL
COMPONENT
LOCATIONS
Component
Model
Year
Location
Refer
to
ABS
Hydraulic
Control
Unit
1992-1998
Left
rear
engine
compartment
undermaster
cylinder
Fig
.
7
.
Fig
.
10
.
ABS
Hydraulic
Control
Unit
Relay
1992-1998
Power
distribution
box
Fig
.
2
.
ABS
Pedal
Travel
Sensor
1992-1998
On
brake
booster
beside
master
cylinder
Fig
.
10
.
ABS
Relay
1992-1998
Power
distribution
box
Fig
.
2
.
ABS/AS
T
(Traction)
Control
Module
1992-1998
Behind
glove
compartment
Fig
.
8
.
Fig
.
9
.
ABS
Speed
Sensor,
Left
Front
1992-1998
Left
front
steering
arm
Fig
.
31
.
Wheel
ABS
Speed
Sensor,
Left
Rear
1992-1998
Left
rear
trailing
arm
Wheel
ABS
Speed
Sensor,
RightFront
11992-1998
Right
front
steering
arm
Wheel
ABS
Speed
Sensor,
Right
Rear
1992-1998
I
Left
rear
trailing
arm
Wheel
1
A/C
Compressor
1
1992-1998
(
Rightlower
frontof
engine
A/C
Compressor
Control
Relay
1
1992-1998
1992-1998
1992-1998
A/C
Control
Module
A/C
Evaporator
Temperature
Sensor
A/C
Pressure
Switch
1992-1998
Right
frontof
engine
compartment
A/C
Program
Switch
1992-1998
Center
of
dash
below
radio
A/CRecharging
Ports
1992-1998
Right
rear
engine
compartment
Fig
.
16
.
Air
Flow
Sensor
1992-1998
Between
throttle
housing
&
filter
housing
Fig
.
7
.
Airbag
Contact
Slip
Ring
1992-1998
Rear
ofsteering
wheel
Airbag,
Driver
1992-1998
In
center
of
steering
wheel
Fig
.
25
.
Airbag,
Passenger
1994-1998
Right
front
of
dash
above
glove
compartment
Fig
.
26
.
Airbag,
Side-Impact
1997-1998
Behind
right/left
front
door
panel
Airbag
Control
Module
(Basic)
1992-1993
Behind
glove
compartment
Fig
.
8
.
Fig
.
9
.
Airbag
Control
Module
(ZAE)
1994-1998
On
center
tunnel
under
rear
seat
cushion
Airbag
Crash
Sensor,
Airbag
1992-1993
On
righUleft
front
strut
tower
Airbag
Crash
Sensor,
Right/Left
1997-1998
Right/left
door
si¡¡
behind
front
seatSide
Impact
Alternator
(Generator)
1992-1998
Left
lowerfront
of
engine
Amplifier
Hi-fi
1992-1998
Left
front
side
of
luggage
compartment
Antenna
Amplifier
AM/FM
1992-1998
In
upper
left
side
C-pillar
Fig
.
27
.
COMPONENT
LOCA
TIONS
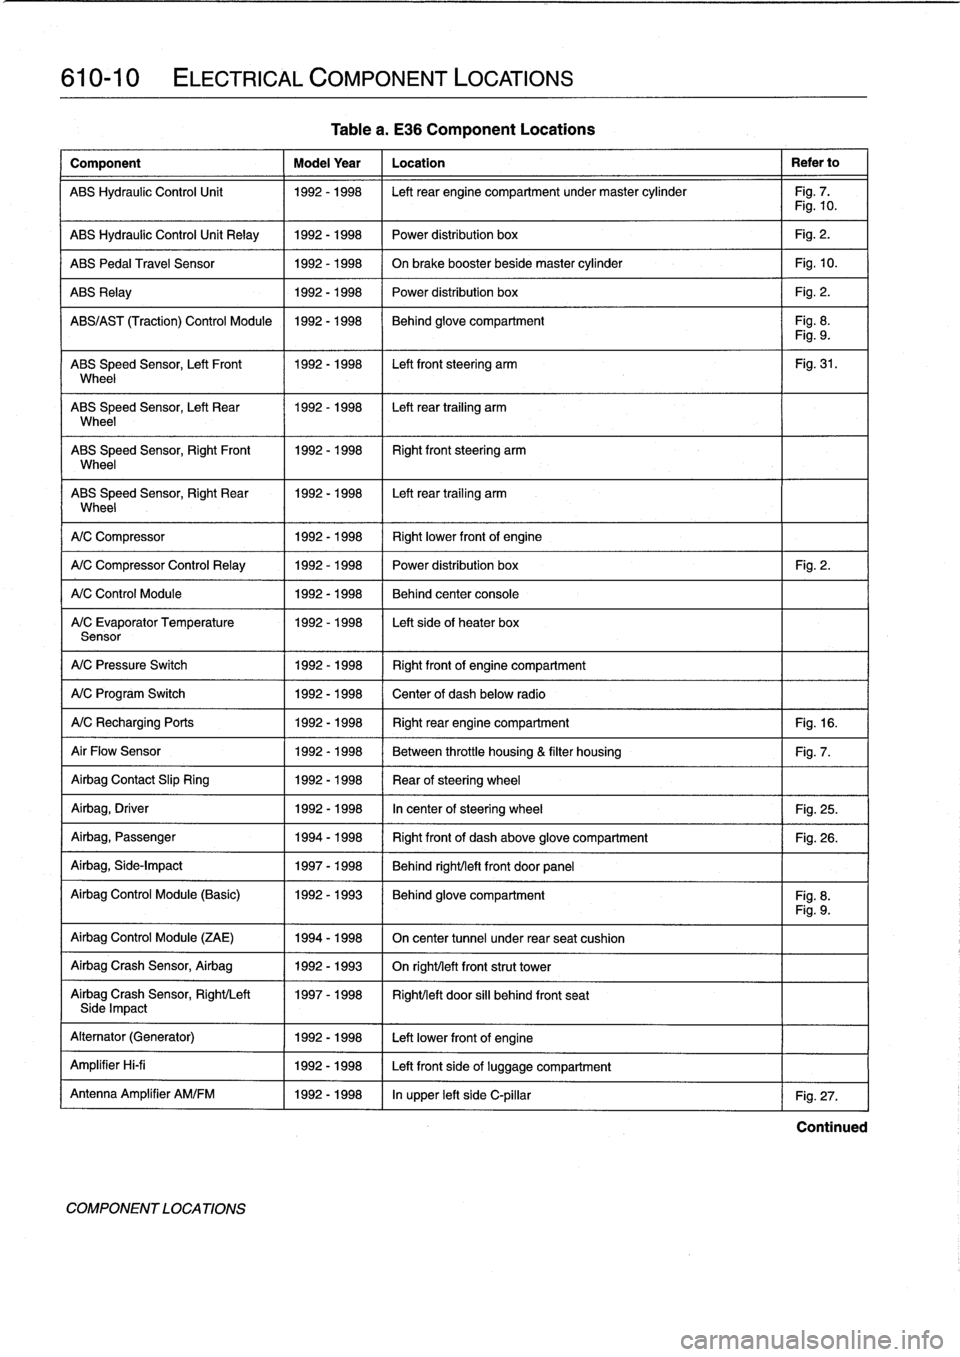
Table
a
.
E36
Component
Locations
Power
distribution
box
Fig
.
2
.
Behind
center
console
Left
sideof
heater
box
Continued
Page 398 of 759
610-12
ELECTRICAL
COMPONENT
LOCATIONS
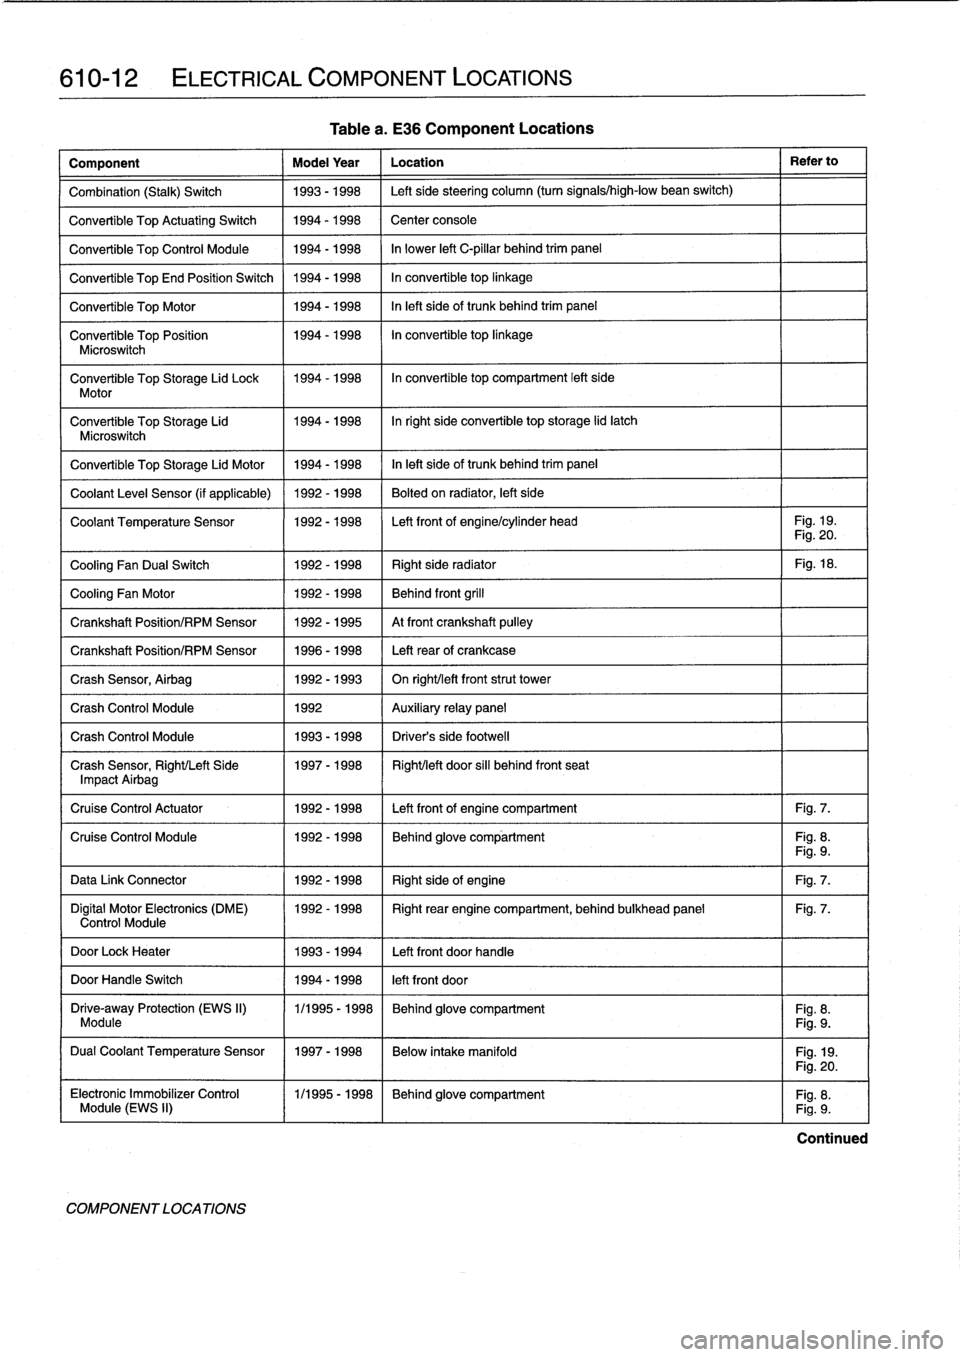
Table
a
.
E36
Component
Locations
Component
Model
Year
Location
Refer
to
Combination
(Stalk)
Switch
1993-1998
Left
sidesteering
column
(turn
signals/high-low
bean
switch)
Convertible
Top
ActuatingSwitch
1994-1998
Center
console
Convertible
Top
Control
Module
1994-1998
In
lower
left
C-pillar
behind
trim
panel
Convertible
TopEnd
Position
Switch
1994-1998
In
convertible
top
linkage
Convertible
Top
Motor
1994-1998
In
left
sideof
trunk
behind
trim
panel
Convertible
Top
Position
1994-1998
In
convertible
top
linkage
Microswitch
Convertible
Top
Storage
Lid
Lock
1994-1998
In
convertible
top
compartment
left
side
Motor
Convertible
Top
Storage
Lid
1994-1998
Inright
side
convertible
top
storage
lid
latch
Microswitch
Convertible
Top
Storage
Lid
Motor
1994-1998
In
left
side
of
trunk
behind
trim
panel
Coolant
Leve¡
Sensor
(if
applicable)
1992-1998
Bolted
on
radiator,
left
side
Coolant
Temperature
Sensor
1992-1998
Left
front
of
engine/cylinder
head
Fig
.
19
.
Fig
.
20
.
Cooling
Fan
Dual
Switch
1992-1998
Right
side
radiator
Fig
.
18
.
Cooling
Fan
Motor
1992-1998
Behind
front
grill
Crankshaft
Position/RPM
Sensor
1992-1995
At
front
crankshaft
pulley
Crankshaft
Position/RPM
Sensor
1996-1998
Left
rearof
crankcase
Crash
Sensor,
Airbag
1992-1993
On
right/left
frontstrut
tower
Crash
Control
Module
1992
Auxiliary
relay
panel
Crash
Control
Module
1993-1998
Driver's
side
footwell
Crash
Sensor,
Right/Left
Side
1997-1998
Right/left
door
sill
behind
front
seat
Impact
Airbag
Cruise
Control
Actuator
1992-1998
Left
front
of
engine
compartment
Fig
.
7
.
Cruise
Control
Module
1992-1998
Behind
glove
compartment
Fig
.
8
.
Fig
.
9
.
Data
Link
Connector
1992-1998
Right
sideof
engine
Fig
.
7
.
Digital
Motor
Electronics
(DME)
1992-1998
Right
rear
engine
compartment,
behind
bulkhead
panel
Fig
.
7
.
Control
Module
DoorLock
Heater
1993-1994
Left
front
doorhandle
DoorHandle
Switch
1994-1998
left
front
door
Drive-away
Protection
(EWS
II)
1/1995
-
1998
Behind
glove
compartment
Fig
.
8
.
Module
Fig
.
9
.
Dual
Coolant
Temperature
Sensor
1997-1998
Below
intake
manifold
Fig
.
19
.
COMPONENT
LOCATIONS
Fig
.
20
.
Electronic
Immobilizer
Control
(
1/1995-1998
~
Behind
glove
compartment
Fig
.
8
.
Module
(EWS
II)
Fig
.
9
.
Continued
Page 400 of 759
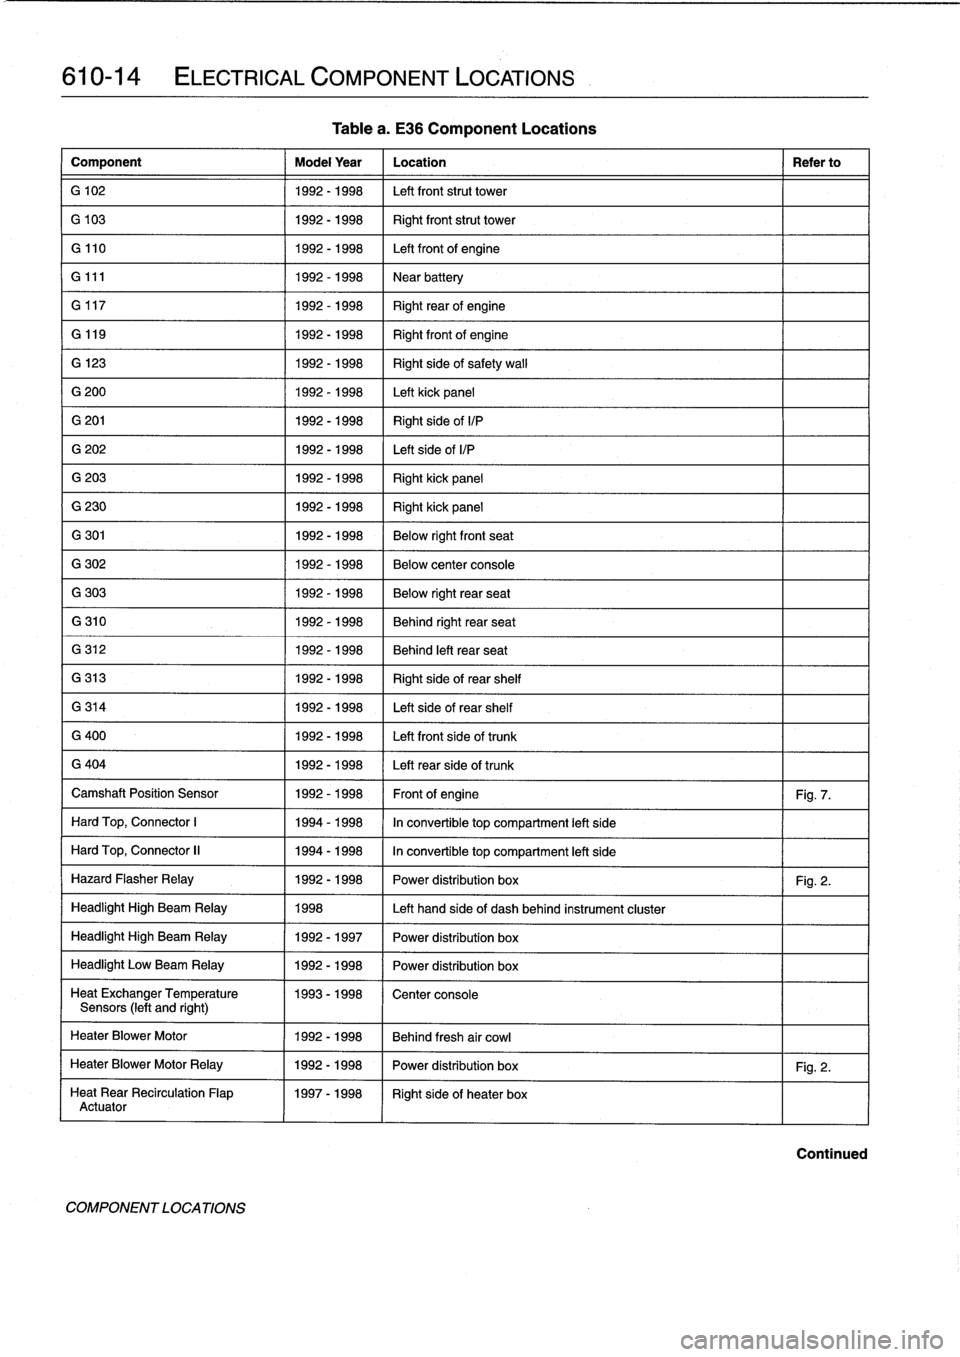
610-14
ELECTRICAL
COMPONENT
LOCATIONS
Component
Model
Year
Location
Refer
to
G
102
1992-1998
Left
front
strut
tower
G
103
1992-1998
Right
front
strut
tower
G
110
1992-1998
Left
front
of
engine
G
111
1992-1998
Near
battery
G
117
1992-1998
Right
rearof
engine
G
119
1992-
1998
Right
front
of
engine
G
123
1992-1998
Right
side
of
safety
wall
G
200
1992-1998
Left
kick
panel
G
201
1992-1998
Right
side
ofI/P
G
202
1992-1998
Left
side
ofI/P
G
203
1992-1998
Right
kick
panel
G
230
1992-1998
Right
kick
panel
G
301
1992-1998
Below
rightfront
seat
G
302
1992-1998
Below
center
console
G
303
1992-1998
Below
right
rear
seat
G
310
1992-1998
Behind
right
rear
seat
G
312
1992-1998
Behind
left
rear
seat
G
313
1992-1998
Right
side
of
rear
shelf
G
314
1992-1998
Left
side
of
rear
shelf
G
400
1992-1998
Left
front
side
of
trunk
G
404
1992-1998
Left
rearside
of
trunk
Camshaft
Position
Sensor
1992-1998
Front
of
engine
Fig
.
7
.
Hard
Top,
Connector
1
1994-1998
In
convertible
top
compartment
left
side
Hard
Top,
Connector
II
1994-1998
In
convertible
top
compartment
left
side
Hazard
Flasher
Relay
1992-1998
Power
distribution
box
Fig
.
2
.
Headlight
High
Beam
Relay
1998
Left
hand
side
of
dash
behind
instrument
cluster
Headlight
High
Beam
Relay
1992-1997
Power
distribution
box
Headlight
Low
Beam
Relay
1992-1998
Power
distribution
box
Heat
ExchangerTemperature
1993-1998
Center
console
Sensors
(left
and
right)
HeaterBlower
Motor
1992-1998
Behind
fresh
air
cowl
HeaterBlower
Motor
Relay
1992-1998
Power
distribution
box
Fig
.
2
.
Heat
Rear
Recirculation
Flap
1997-1998
Right
sideof
heater
box
Actuator
COMPONENTLOCATIONS
Tablea
.
E36
Component
Locations
Continued
Page 437 of 759
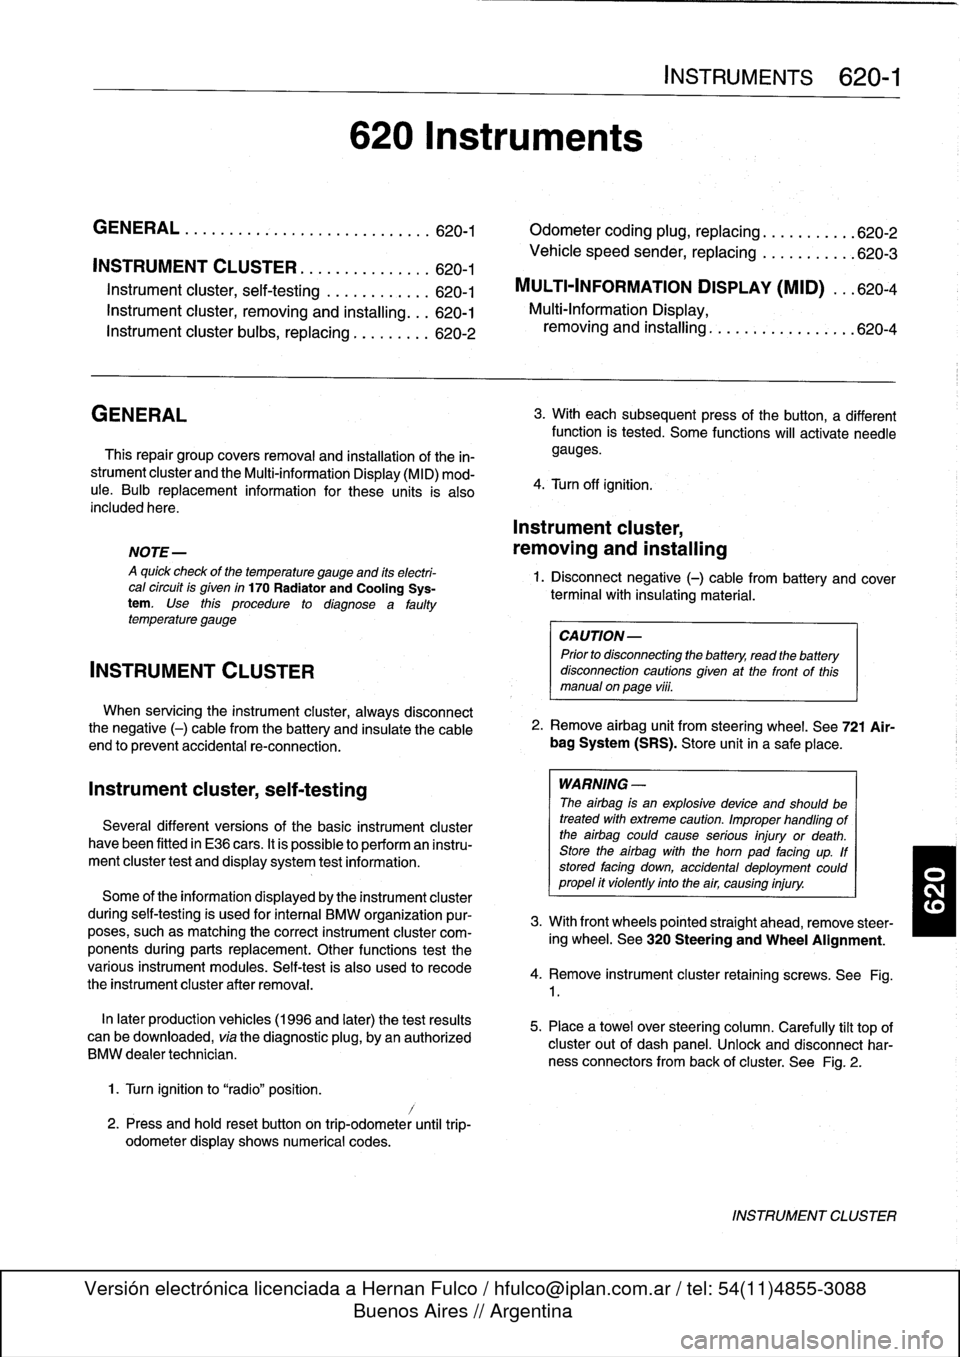
INSTRUMENT
CLUSTER
....
.
.
.
.
.
...
.
..
620-1
Instrument
cluster,
seif-testing
.
.
.......
.
..
620-1
Instrument
cluster,
removing
and
installing
...
620-1
Instrument
cluster
bulbs,
replacing
.
.
.
.
.
.
...
620-2
GENERAL
This
repair
group
covers
removal
and
installation
of
the
in-
strument
cluster
and
the
Multi-information
Display
(MID)
mod-
ule
.
Bulb
replacement
information
for
these
units
is
also
included
here
.
NOTE
-
A
quick
check
of
the
temperature
gauge
and
its
electri-
cal
circuitis
given
in
170
Radiator
and
Cooling
Sys-
tem
.
Use
this
procedure
to
diagnosea
faulty
temperature
gauge
INSTRUMENT
CLUSTER
When
servicing
the
instrument
cluster,
always
disconnect
the
negative
(-)
cable
from
the
battery
and
insulate
the
cable
end
to
prevent
accidental
re-connection
.
Instrument
cluster,
seif-testing
Severa¡
different
versions
of
the
basic
instrument
cluster
havebeen
fitted
in
E36
cars
.
It
is
possibleto
perform
an
instru-
ment
cluster
test
and
display
system
test
information
.
Some
of
the
information
displayed
by
the
instrument
cluster
during
seif-testing
is
used
for
interna¡
BMW
organizationpur-
poses,
suchasmatching
the
correct
instrument
cluster
com-
ponents
during
parts
replacement
.
Other
functions
test
the
various
instrument
modules
.
Self-test
is
also
used
to
recode
the
instrument
cluster
after
removal
.
In
later
production
vehicles
(1996
and
later)
the
test
results
canbe
downioaded,
via
the
diagnostic
plug,
byan
authorized
BMW
dealertechnician
.
1
.
Turn
ignition
to
"radio"position
.
2
.
Press
and
hold
reset
button
on
trip-odometer
untiltrip-
odometer
display
shows
numerical
codes
.
620
Instruments
4
.
Turn
off
ignition
.
Instrument
cluster,
removing
and
installing
INSTRUMENTS
620-1
GENERAL
.....
.
.
.
.
.
.
.
.
.
.........
.
....
620-1
Odometer
coding
plug,
replacing
.....
.
.
.
.
.
.
620-2
Vehicle
speed
sender,
replacing
...
.
.
.
.
.
.
.
.
620-3
MULTI-INFORMATION
DISPLAY
(MID)
.
.
.
620-4
Multi-Information
Display,
removing
and
installing
..
.
....
.
.........
620-4
3
.
With
each
subsequent
press
of
the
button,
a
different
function
is
tested
.
Some
functions
will
activate
need1e
gauges
.
1
.
Disconnect
negative
(-)
cable
from
battery
and
cover
terminal
with
insulating
material
.
CAUTION-
Prior
to
disconnectiog
the
battery,
read
the
battery
disconnection
cautionsgiven
at
the
front
of
this
manual
on
page
vi¡¡
.
2
.
Remove
airbag
unit
from
steering
wheel
.
See
721
Air-
bag
System
(SRS)
.
Store
unit
in
a
safe
place
.
WARNING
-
The
airbag
is
an
explosive
devfce
and
should
be
treated
with
extreme
caution
.
Improper
handling
of
the
airbag
could
cause
serious
injury
or
death
.
Store
the
airbag
with
the
horn
pad
facing
up
.
If
stored
facing
down,
accidental
deployment
couldpropel
it
vfolently
into
the
air,
causing
injury
.
3
.
With
front
wheels
pointed
straight
ahead,
remove
steer-
ing
wheel
.
See
320
Steering
and
Wheel
Alignment
.
4
.
Remove
instrument
cluster
retaining
screws
.
See
Fig
.
1
.
5
.
Place
a
towel
over
steering
column
.
Carefully
tilt
top
of
cluster
out
of
dash
panel
.
Unlock
and
disconnect
har-
ness
connectors
from
back
of
cluster
.
See
Fig
.
2
.
INSTRUMENT
CLUSTER
Page 453 of 759
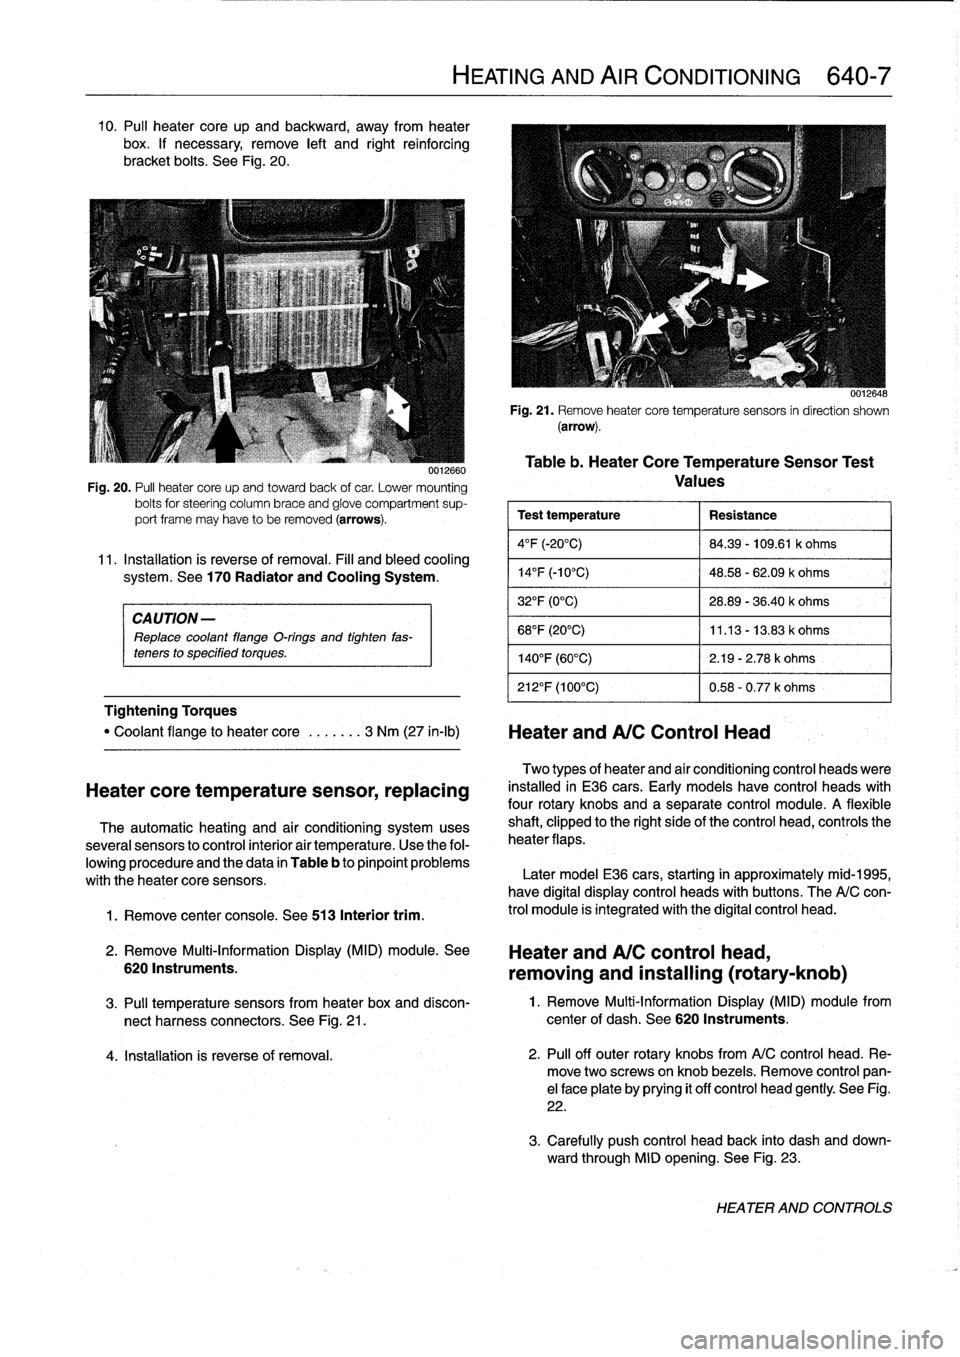
10
.
Pul¡
heater
core
up
and
backward,
away
from
heater
box
.
If
necessary,
remove
left
and
right
reinforcing
bracket
bolts
.
See
Fig
.
20
.
CAUTION-
Replace
coolant
flange
O-rings
and
tighten
fas-
teners
to
specified
torques
.
Tightening
Torques
1
.
Remove
center
console
.
See
513
Interior
trim
.
0012660
Fig
.
20
.
PA
heater
core
upand
towardback
of
car
.
Lower
mounting
bolts
for
steering
column
brace
and
glove
compartment
sup-
port
frame
may
have
to
be
removed
(arrows)
.
11
.
Installation
is
reverse
of
removal
.
Fill
and
bleed
cooling
system
.
See
170
Radiator
and
Cooling
System
.
"
Coolant
flange
to
heater
core
.
..
....
3
Nm
(27
in-lb)
Heater
andA/C
Control
Head
Heatercore
temperature
sensor,
replacing
The
automatic
heating
and
air
conditioning
systemuses
severa¡
sensors
to
control
interior
air
temperature
.
Use
the
fol-
lowing
procedure
and
the
data
in
Table
b
to
pinpoint
problems
with
theheater
core
sensors
.
2
.
Remove
Multi-Information
Display
(MID)
module
.
See
6201nstruments
.
HEATING
AND
AIR
CONDITIONING
640-7
0012648
Fig
.
21
.
Remove
heatercore
temperaturesensors
in
direction
shown
(arrow)
.
Table
b
.
Heater
CoreTemperatureSensor
Test
Values
Test
temperature
Resistance
4°F
(-20°C)
84
.39
-
109
.61
k
ohms
14
°
F
(-10°C)
48
.58
-
62
.09
k
ohms
32°F
(0°C)
28
.89
-
36
.40
k
ohms
68°F
(20°C)
11
.13
-
13
.83
k
ohms
140°F
(60°C)
2
.19
-
2
.78
k
ohms
212°F
(100°C)
0
.58
-
0
.77
k
ohms
Two
types
of
heater
and
aír
conditioning
control
heads
viere
installed
in
E36
cars
.
Early
models
have
control
heads
with
four
rotary
knobs
and
a
separate
control
module
.
A
flexible
shaft,
clipped
to
the
right
sideof
the
control
head,
controls
the
heater
flaps
.
Later
model
E36
cars,
starting
in
approximately
mid-1995,
have
digital
display
control
heads
with
buttons
.
The
A/C
con-
trol
module
is
integrated
with
the
digital
control
head
.
Heater
and
A/C
control
head,
removing
and
installing
(rotary-knob)
3
.
Pul¡
temperature
sensors
from
heater
box
and
discon-
1
.
Remove
Multi-Information
Display
(MID)
module
from
nect
harness
connectors
.
See
Fig
.
21
.
center
of
dash
.
See
620
Instruments
.
4
.
Installation
is
reverse
of
removal
.
2
.
Pul¡
off
outer
rotary
knobs
from
A/C
control
head
.
Re-
move
two
screwsonknob
bezels
.
Remove
control
pan-
el
face
plate
by
prying
it
off
control
head
gently
.
See
Fig
.
22
.
3
.
Carefully
push
control
head
back
into
dash
and
down-
ward
through
MID
opening
.
See
Fig
.
23
.
HEATER
AND
CONTROLS
Page 467 of 759
2
.
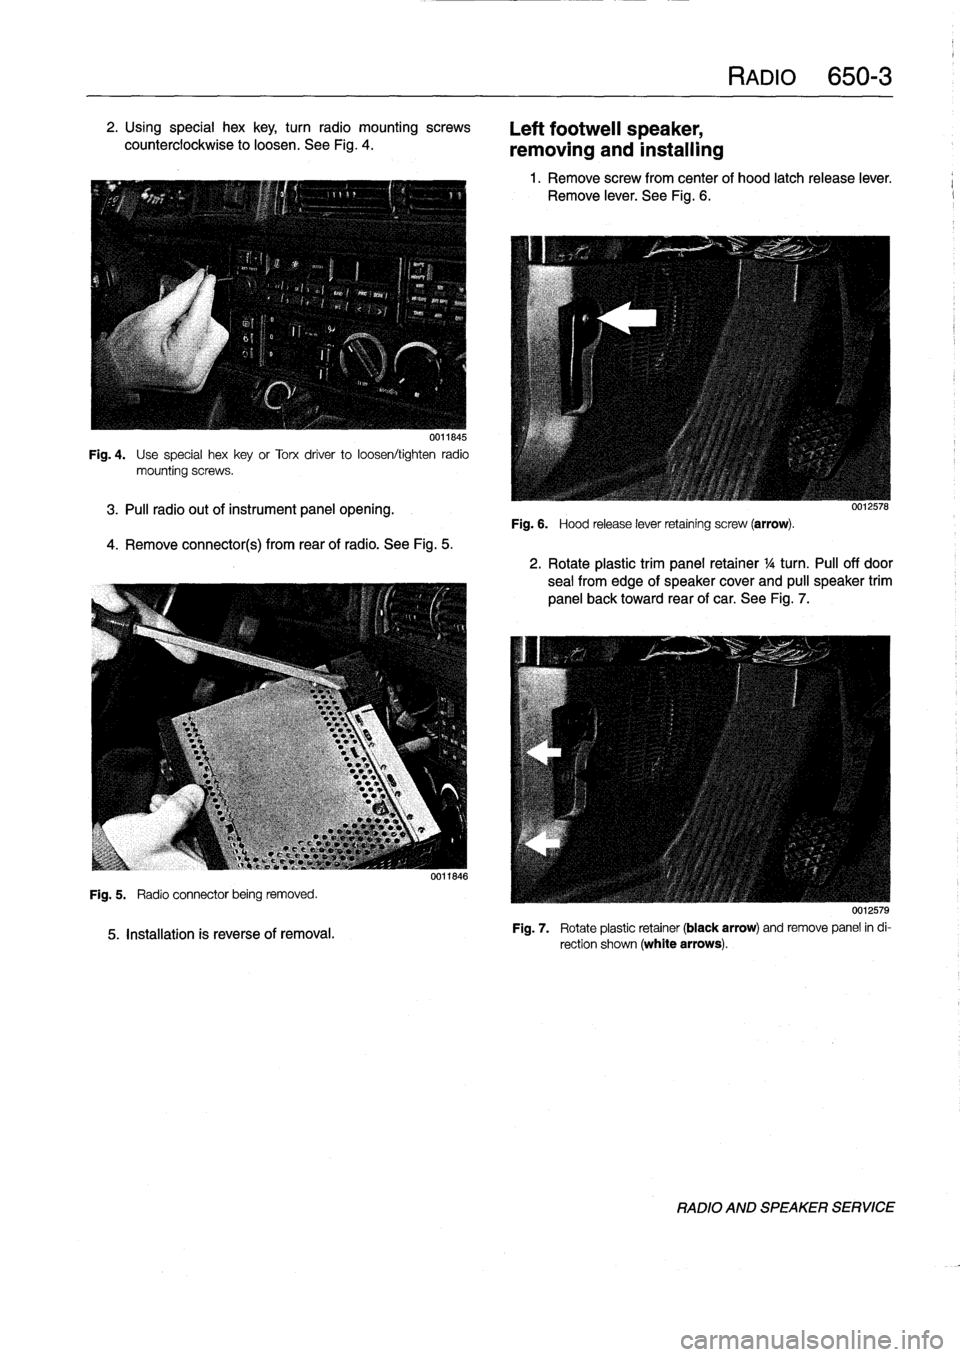
Using
special
hex
key,
turn
radio
mountingscrews
counterclockwise
to
loosen
.
See
Fig
.
4
.
0011845
Fig
.
4
.
Use
special
hexkey
or
Torx
driver
to
loosen/tighten
radio
mountingscrews
.
3
.
Pul¡
radio
out
of
instrument
panel
opening
.
4
.
Remove
connector(s)
from
rearof
radio
.
See
Fig
.
5
.
Fig
.
5
.
Radio
connector
being
removed
.
5
.
Installation
is
reverse
of
removal
.
0011846
Left
footweil
speaker,
removing
and
installing
Fig
.
6
.
Hood
release
lever
retaining
screw
(arrow)
.
RADIO
650-
3
1
.
Remove
screw
from
center
of
hood
latch
release
lever
.
Remove
lever
.
See
Fig
.
6
.
0012578
2
.
Rotate
plastic
trim
panel
retainer
1
/4
turn
.
Pul¡
off
door
sea¡
from
edge
of
speaker
cover
and
pull
speaker
trim
panel
back
toward
rear
of
car
.
See
Fig
.
7
.
0012579
Fig
.
7
.
Rotate
plastic
retainer
(black
arrow)
andremove
panel
in
di-
rection
shown
(white
arrows)
.
RADIO
AND
SPEAKER
SERVICE
Page 468 of 759
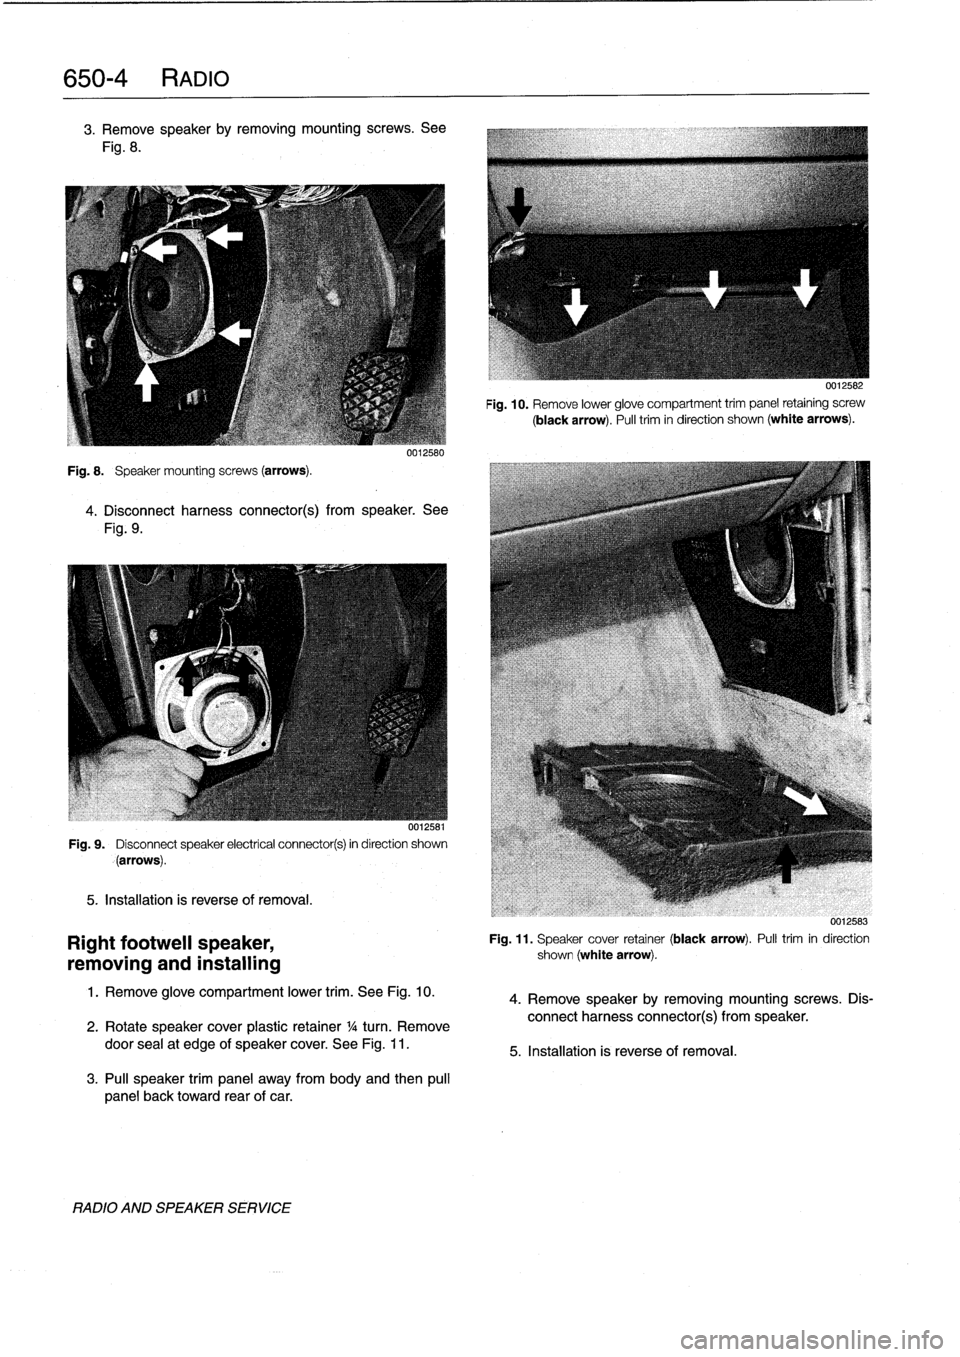
650-
4
RADIO
3
.
Remove
speakerby
removing
mountingscrews
.
See
Fig
.
8
.
Fig
.
8
.
Speaker
mounting
screws
(arrows)
.
0012580
4
.
Disconnect
harness
connector(s)
from
speaker
.
See
Fig
.
9
.
001,58
Fig
.
9
.
Disconnect
speaker
electrical
connector(s)
in
direction
shown
(arrows)
.
5
.
Installation
is
reverse
of
removal
.
Right
footwell
speaker,
removing
and
installing
1
.
Remove
glove
compartment
lower
trim
.
See
Fig
.
10
.
2
.
Rotate
speakercover
plastic
retainer
1
/a
turn
.
Remove
door
sea¡at
edge
of
speaker
cover
.
See
Fig
.
11
.
3
.
Pul¡
speaker
trim
panel
away
from
body
and
then
pul¡
panel
back
toward
rear
of
car
.
RADIO
AND
SPEAKER
SERVICE
0012582
Fig
.
10
.
Remove
lower
glove
compartment
trim
panel
retaining
screw
(black
arrow)
.
Pull
trim
in
direction
shown
(white
arrows)
.
0012583
Fig
.
11
.
Speaker
cover
retainer
(black
arrow)
.
Pulltrim
in
direction
shown
(white
arrow)
.
4
.
Remove
speaker
by
removing
mountingscrews
.
Dis-
connect
harness
connector(s)
from
speaker
.
5
.
Installation
is
reverse
of
removal
.
Page 518 of 759
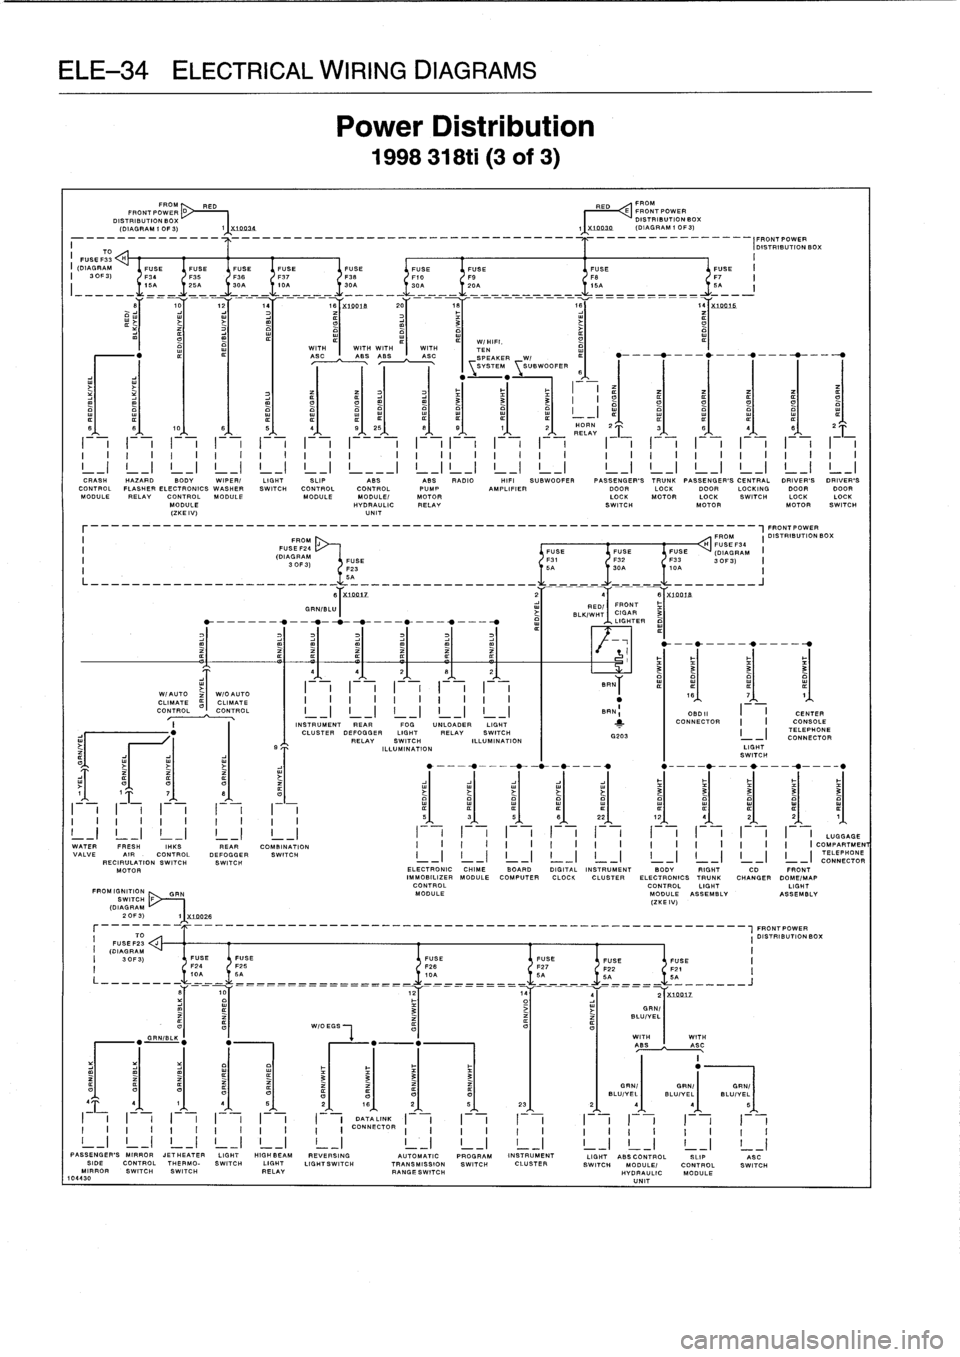
ELE-34
ELECTRICAL
WIRING
DIAGRAMS
FROM
RED
RED
D
E
FROM
FRONT
POWER
FRO-POWER
DISTRIBUTION
BOX
DISTRIBUTION
BOX
(DIAGRAM
IOF3)
X
.LD024
1
X1003D
(DIAGRAM
IoF3)
------------------------------------------------
-----------
I
TO
FUSEF33
I
(DIAGRAM
V
FUSE
FUSE
I
30F3)
131135
7
WIAUTOW/OAUTO
CLIMATE
al
CLIMATE
CONTROL
CONTROL
I
I
F
-
l
F
-
1
I
--
[
I
-,-
II
I
I
I
I
I
I
I
I
I
_I
LI
LI
L
_I
LI
Power
Distribution
1998
318ti
(3
of
3)
I
I
1
I
I
I
I
1
I
I
I
I
I
I
I
II
I
I
I
I
I
I
I
I
I
I
I
I
I
I
I
I
I
I
_I
1--i
!
_I
!
_I
!
_I
!
_I
!
___I
I__I
L
-j
!
_I
!
_I
1
-
_!
1
-
_!
1
-
_l
1
-
_l
1
-
_l
!
_I
CRASH
HAZARD
BODY
WIPER/
LIGHT
SLIP
ABS
ABS
RADIO
HIFI
SUBWOOFER
PASSENGER'STRUNK
PASSENGER'S
CENTRAL
DRIVER'S
DRIVER'S
CONTROL
FLASHER
ELECTRONICS
WASHER
SWITCH
CONTROL
CONTROL
PUMP
AMPLIFIER
DOOR
LOCK
DOOR
LOCKING
DOOR
DOOR
MODULE
RELAY
CONTROLMODULE
MODULE
MODULE/
MOTOR
LOCK
MOTOR
LOCK
SWITCH
LOCKLOCK
MODULE
HYDRAULIC
RELAY
SWITCH
MOTOR
MOTOR
SWITCH
(ZKEIV)
UNIT
F
-,
F
-,
I
I
I
I
F-
II
I
I
I
I
I
I
I
I
I
_I
L-1
L-1
L
-I
L-1
INSTRUMENT
REAR
FOG
UNLOADER
LIGHT
CLUSTER
DEFOGGER
LIGHT
RELAY
SWITCH
RELAY
SWITCH
ILLUMINATION
ILLUMINATION
1
11
1
1
1
1
11
1
1
11
11
11
1
LoccaceWATER
FRESH
IHKS
REAR
COMBINATION
I
I
I
I
I
I
I
I
I
I
I
I
I
I
I
I
I
/
COMPARTMENT
VALVE
AIR
-
CONTROL
DEFOGGER
SWITCH
I
-
II
-
II
-
I
I
II
_
I
I
_I
I
_I
I
_I
I
_I
TELEPHONE
RE
Cl
RULATION
SWITCH
SWITCH
CONNECTORMOTOR
ELECTRONIC
CHIME
BOARD
DIGITAL
INSTRUMENT
BODY
RIGHT
CD
FRONT
IM
MOB
ILIZER
MODULE
COMPUTER
CLOCK
CLUSTER
ELECTRONICS
TRUNK
CHANGER
COME/MAP
CONTROL
CONTROL
LIGHT
LIGHT
FROM
IGNITION
GRN
MODULE
MODULE
ASSEMBLY
ASSEMBLY
SWITCH
(EF
(DIAGRAM
20F3)
1
XIR02fi
_
_______________________-____________-I
FROHIPOWER
I
DISTRIBUTIONSOX
ASE-_____________
T
10AE________
5A7
F
26
F2B
JIUSE
.
5ASA
E....
SASE
GRN/
BLU/YEL
WITH
I
WITH
ABS
ASC
G
RN/
GRN/I
GRN/
BLU/YEL
4
BLU/YEL/
BLU/YEL
4
54
1
1~
4I
BJ~
.(
2,
~
113),
2j5
I
23
~
2IS
~
I
~h
.
.+
.
.~
.I
I
I
II
I
I
I
I
I
I
I
DATA
TA
LINK
I
1
I
1
I
1
1
1I
I
I
I
I
I
I
1
I
I
I
I
1
1
1
1
1
1
CONNECTOR
I
I
I
I
I
I
I
I
I
I
I
I
1
1
1_I
!
_I
!
_I
!
_I
!
_I
!
_I
I
_I
!
_I
L-1
!
_I
!
_I
!
_I
L-1
PASSENGER'S
MIRROR
JE7HEATER
LIGHT
HIGHBEAM
REVERSING
AUTOMATIC
PROGRAM
INSTRUMENT
LIGHT
ABS
CONTROL
SLIP
ABC
SIDE
CONTROL
THERMO-
SWITCH
LIGHT
LIGHT
SWITCH
TRANSMISSION
SWITCH
CLUSTER
SWITCH
MODULE/
CONTROL
SWITCH
MIRROR
SWITCH
SWITCH
RELAY
RANGE
SWITCH
HYDRAULIC
MODULE
104430
UNIT
I
15A
25A
z