parking brake BMW M3 2010 Owners Manual
[x] Cancel search | Manufacturer: BMW, Model Year: 2010, Model line: M3, Model: BMW M3 2010Pages: 196, PDF Size: 5.78 MB
Page 49 of 196
Reference
At a glance
Controls
Driving tips
Mobility
47
Radio readiness and ignition off
All indicator and warning lamps as well as dis-
plays in the instrument cluster go out.
Starting the engine
Do not run the engine in enclosed areas;
otherwise, the inhalation of toxic exhaust
gases can cause loss of consciousness and
death. The exhaust gases contain carbon mon-
oxide, an odorless and colorless, but highly
toxic gas. Never leave an unattended vehicle
with the engine running; otherwise, such a vehi-
cle represents a potential safety hazard.
Before leaving the car with the engine running,
place the transmission in neutral or move the
selector lever to position P and forcefully apply
the parking brake to prevent the car from mov-
ing.<
Avoid frequent starting in quick succes-
sion as well as repeated start attempts in
which the engine does not start. Otherwise, the
fuel is not burned or incompletely burned and
there is a danger of overheating and damaging
the catalytic converter.<
Do not wait for the engine to warm up while the
vehicle remains stationary. Start driving right
away, but at moderate engine speeds.
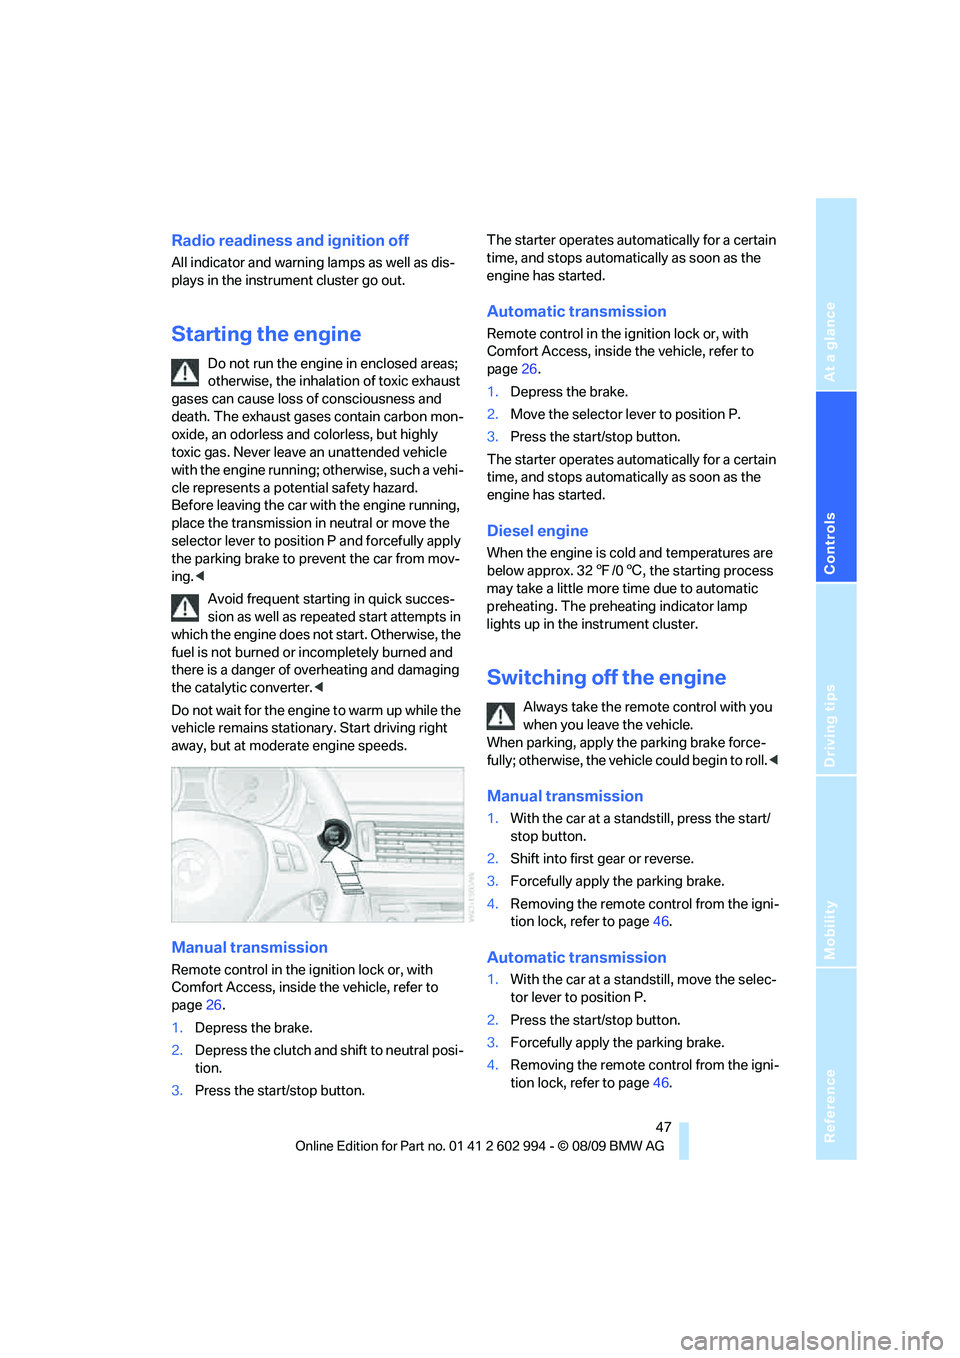
Manual transmission
Remote control in the ignition lock or, with
Comfort Access, inside the vehicle, refer to
page26.
1.Depress the brake.
2.Depress the clutch and shift to neutral posi-
tion.
3.Press the start/stop button.The starter operates automatically for a certain
time, and stops automatically as soon as the
engine has started.
Automatic transmission
Remote control in the ignition lock or, with
Comfort Access, inside the vehicle, refer to
page26.
1.Depress the brake.
2.Move the selector lever to position P.
3.Press the start/stop button.
The starter operates automatically for a certain
time, and stops automatically as soon as the
engine has started.
Diesel engine
When the engine is cold and temperatures are
below approx. 327/06, the starting process
may take a little more time due to automatic
preheating. The preheating indicator lamp
lights up in the instrument cluster.
Switching off the engine
Always take the remote control with you
when you leave the vehicle.
When parking, apply the parking brake force-
fully; otherwise, the vehicle could begin to roll.<
Manual transmission
1.With the car at a standstill, press the start/
stop button.
2.Shift into first gear or reverse.
3.Forcefully apply the parking brake.
4.Removing the remote control from the igni-
tion lock, refer to page46.
Automatic transmission
1.With the car at a standstill, move the selec-
tor lever to position P.
2.Press the start/stop button.
3.Forcefully apply the parking brake.
4.Removing the remote control from the igni-
tion lock, refer to page46.
Page 50 of 196
Driving
48
Parking brake
The parking brake is primarily intended to pre-
vent the vehicle from rolling while parked; it
brakes the rear wheels.
Indicator lamp
The indicator lamp is lit, and when you
drive off an acoustic signal sounds in
addition. The parking brake is still
applied.
Indicator lamp for Canadian models.
Applying
The lever locks in position automatically.
Releasing
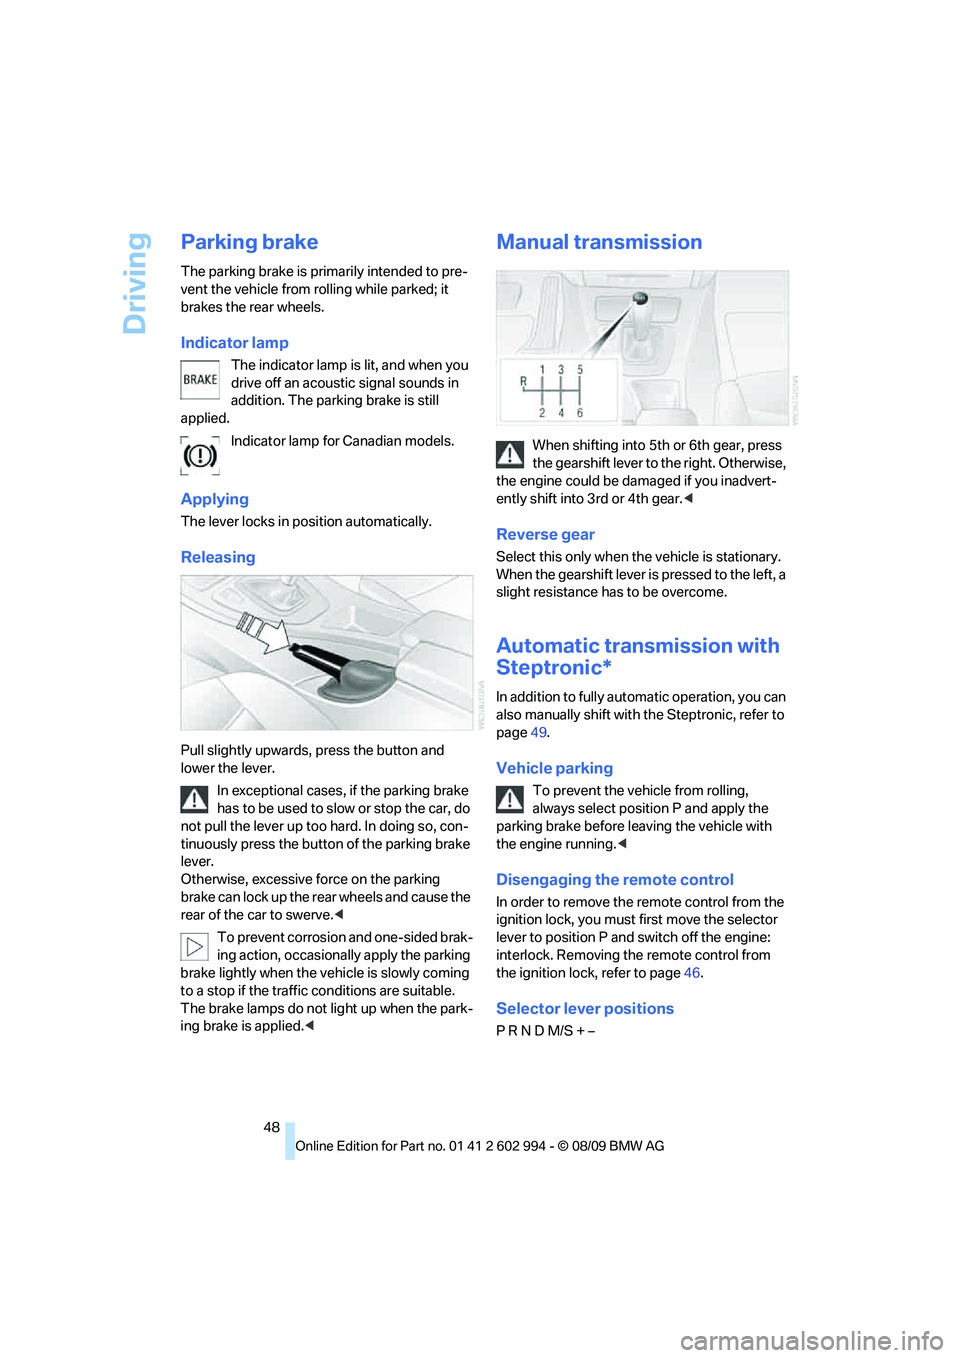
Pull slightly upwards, press the button and
lower the lever.
In exceptional cases, if the parking brake
has to be used to slow or stop the car, do
not pull the lever up too hard. In doing so, con-
tinuously press the button of the parking brake
lever.
Otherwise, excessive force on the parking
brake can lock up the rear wheels and cause the
rear of the car to swerve.<
To prevent corrosion and one-sided brak-
ing action, occasionally apply the parking
brake lightly when the vehicle is slowly coming
to a stop if the traffic conditions are suitable.
The brake lamps do not light up when the park-
ing brake is applied.<
Manual transmission
When shifting into 5th or 6th gear, press
the gearshift lever to the right. Otherwise,
the engine could be damaged if you inadvert-
ently shift into 3rd or 4th gear.<
Reverse gear
Select this only when the vehicle is stationary.
When the gearshift lever is pressed to the left, a
slight resistance has to be overcome.
Automatic transmission with
Steptronic*
In addition to fully automatic operation, you can
also manually shift with the Steptronic, refer to
page49.
Vehicle parking
To prevent the vehicle from rolling,
always select position P and apply the
parking brake before leaving the vehicle with
the engine running.<
Disengaging the remote control
In order to remove the remote control from the
ignition lock, you must first move the selector
lever to position P and switch off the engine:
interlock. Removing the remote control from
the ignition lock, refer to page46.
Selector lever positions
P R N D M/S + –
Page 57 of 196
Reference
At a glance
Controls
Driving tips
Mobility
55
Active cruise control*
The concept
With active cruise control, you can select a
desired speed which is not only automatically
maintained when driving on open roadways, but
also varied to maintain a selected distance set-
ting as slower traffic is encountered.
Active cruise control is a technological advance
over the familiar cruise control and is a welcome
relief from the constant adjustment of speed
that can accompany driving in traffic on high-
ways or other high-speed thoroughfares. Espe-
cially on longer trips, the system can reduce
fatigue and tension, while increasing your
enjoyment of driving. Please use it safely and
responsibly.
Within the limits of its capability, the system
automatically adapts the car's speed to that of a
slower vehicle in front of you. You can specify
the distance to be maintained from the vehicle
in front in four stages. For safety reasons, the
distance is speed-dependent. Based on your
selected distance setting, the system automat-
ically decreases the throttle setting and lightly
applies the brakes if necessary. The vehicle
brake lamps will automatically illuminate to sig-
nal a following driver to take action. In addition,
it may be necessary for the vehicle or the driver
to downshift, depending on the kind of trans-
mission your vehicle is equipped with, to main-
tain the distance setting selected. If the vehicle
ahead speeds up or when the lane ahead
becomes clear, your vehicle will accelerate to
the speed you have selected by increasing the
throttle setting and shifting gears automatically
or by the driver as needed. Your selected speed
will be held when driving downhill, too.
Since this active cruise control system is a new
technology and operates differently from con-
ventional cruise control systems which you may
be accustomed to, you are strongly urged to
read all of the pages relating to this system
before use. Pay special attention to the System
limitations section beginning on page59.
Braking sensation
>If you step on the brake pedal while the sys-
tem is braking, pedal sensation will be
slightly different from the usual.
>Possible noises during automatic braking
are normal.
Manual transmission
You can shift gears while cruise control is acti-
vated. The system is deactivated when you
drive at very low engine speeds for an extended
period.
Range of applications
The minimum desired speed is 20 mph or
30 km/h, the maximum desired speed is
110 mph or 180 km/h.
As with conventional cruise control sys-
tems, active cruise control in no way
diminishes or substitutes for the driver’s own
personal responsibility, alertness and aware-
ness in adjusting speed, braking or otherwise
controlling the vehicle. The driver should
decide when to use the system on the basis of
road, traffic, visibility, and weather conditions.
Active cruise control is intended for use on
highway-type roadways where traffic is moving
relatively smoothly. Do not use this system in
city driving; heavy traffic such as during rush
hour; on curvy, winding roads, slippery roads or
roads with sharp curves such as highway off-
ramps; during inclement weather such as snow,
strong rain or fog; or when entering inter-
changes, service/parking areas or toll booths.
It is also important to regulate your vehicle's
speed and distance setting within applicable
legal limits. Always be ready to take action or
apply the brakes if necessary, especially when
the system is actively following a vehicle in front
of you. Otherwise, driving situations could
result that pose the risk of accidents.<
Page 59 of 196
Reference
At a glance
Controls
Driving tips
Mobility
57
Use good judgment to select the appro-
priate following distance given road con-
ditions, traffic, applicable laws and driving rec-
ommendations for safe following distance.
Otherwise, an accident risk could result.<
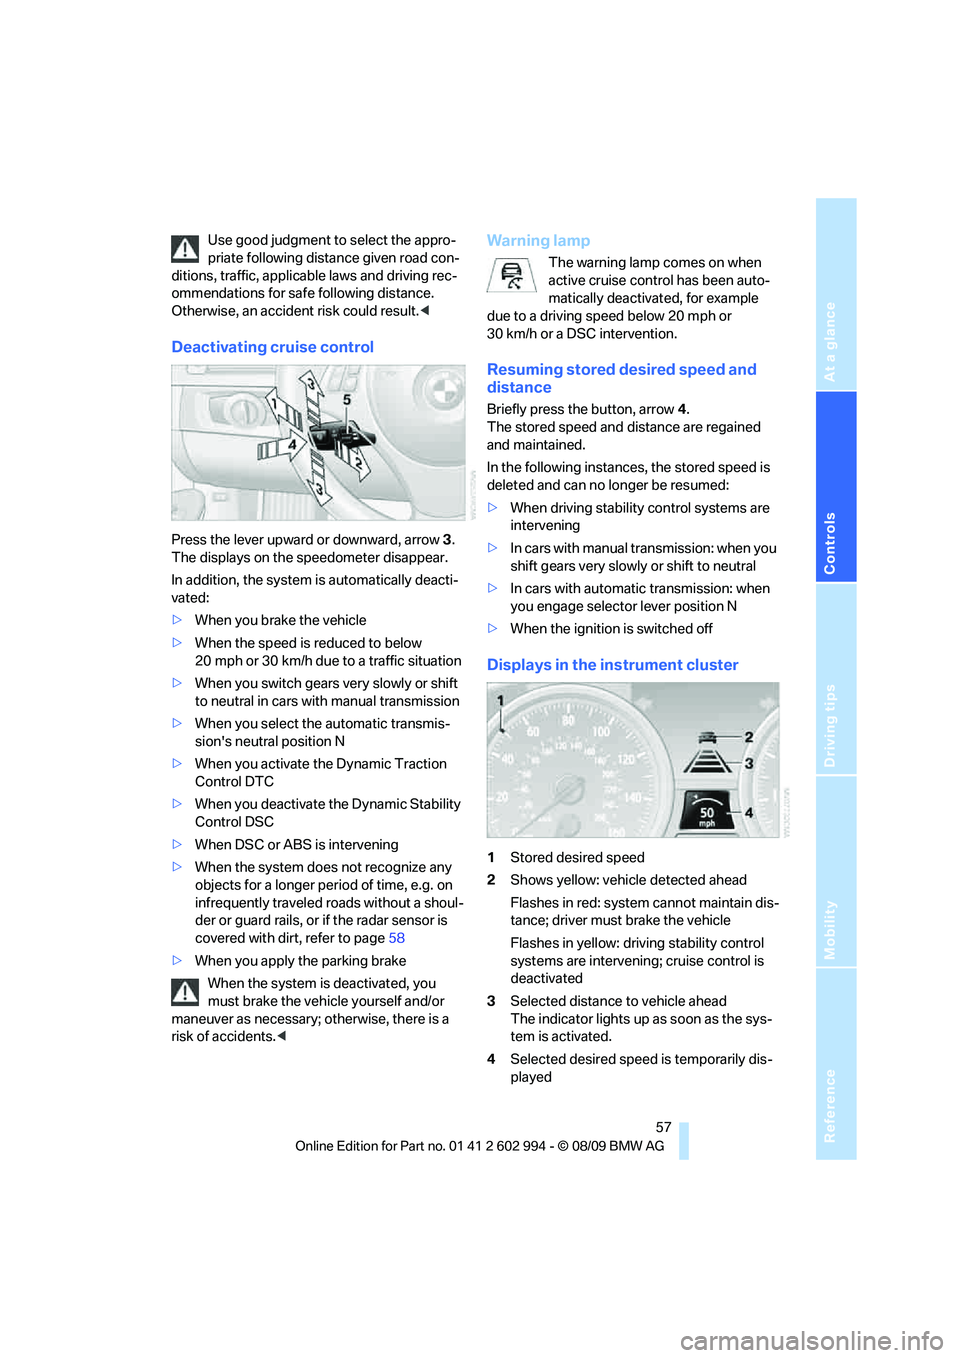
Deactivating cruise control
Press the lever upward or downward, arrow3.
The displays on the speedometer disappear.
In addition, the system is automatically deacti-
vated:
>When you brake the vehicle
>When the speed is reduced to below
20 mph or 30 km/h due to a traffic situation
>When you switch gears very slowly or shift
to neutral in cars with manual transmission
>When you select the automatic transmis-
sion's neutral position N
>When you activate the Dynamic Traction
Control DTC
>When you deactivate the Dynamic Stability
Control DSC
>When DSC or ABS is intervening
>When the system does not recognize any
objects for a longer period of time, e.g. on
infrequently traveled roads without a shoul-
der or guard rails, or if the radar sensor is
covered with dirt, refer to page58
>When you apply the parking brake
When the system is deactivated, you
must brake the vehicle yourself and/or
maneuver as necessary; otherwise, there is a
risk of accidents.<
Warning lamp
The warning lamp comes on when
active cruise control has been auto-
matically deactivated, for example
due to a driving speed below 20 mph or
30 km/h or a DSC intervention.
Resuming stored desired speed and
distance
Briefly press the button, arrow 4.
The stored speed and distance are regained
and maintained.
In the following instances, the stored speed is
deleted and can no longer be resumed:
>When driving stability control systems are
intervening
>In cars with manual transmission: when you
shift gears very slowly or shift to neutral
>In cars with automatic transmission: when
you engage selector lever position N
>When the ignition is switched off
Displays in the instrument cluster
1Stored desired speed
2Shows yellow: vehicle detected ahead
Flashes in red: system cannot maintain dis-
tance; driver must brake the vehicle
Flashes in yellow: driving stability control
systems are intervening; cruise control is
deactivated
3Selected distance to vehicle ahead
The indicator lights up as soon as the sys-
tem is activated.
4Selected desired speed is temporarily dis-
played
Page 74 of 196
Technology for driving comfort and safety
72 HDC is automatically deactivated at speeds
greater than approx. 35 mph/60 km/h.
Using HDC
In cars with manual transmission:
Use HDC in lower gears and in reverse gear.
With automatic transmission:
You can use HDC in any drive position.
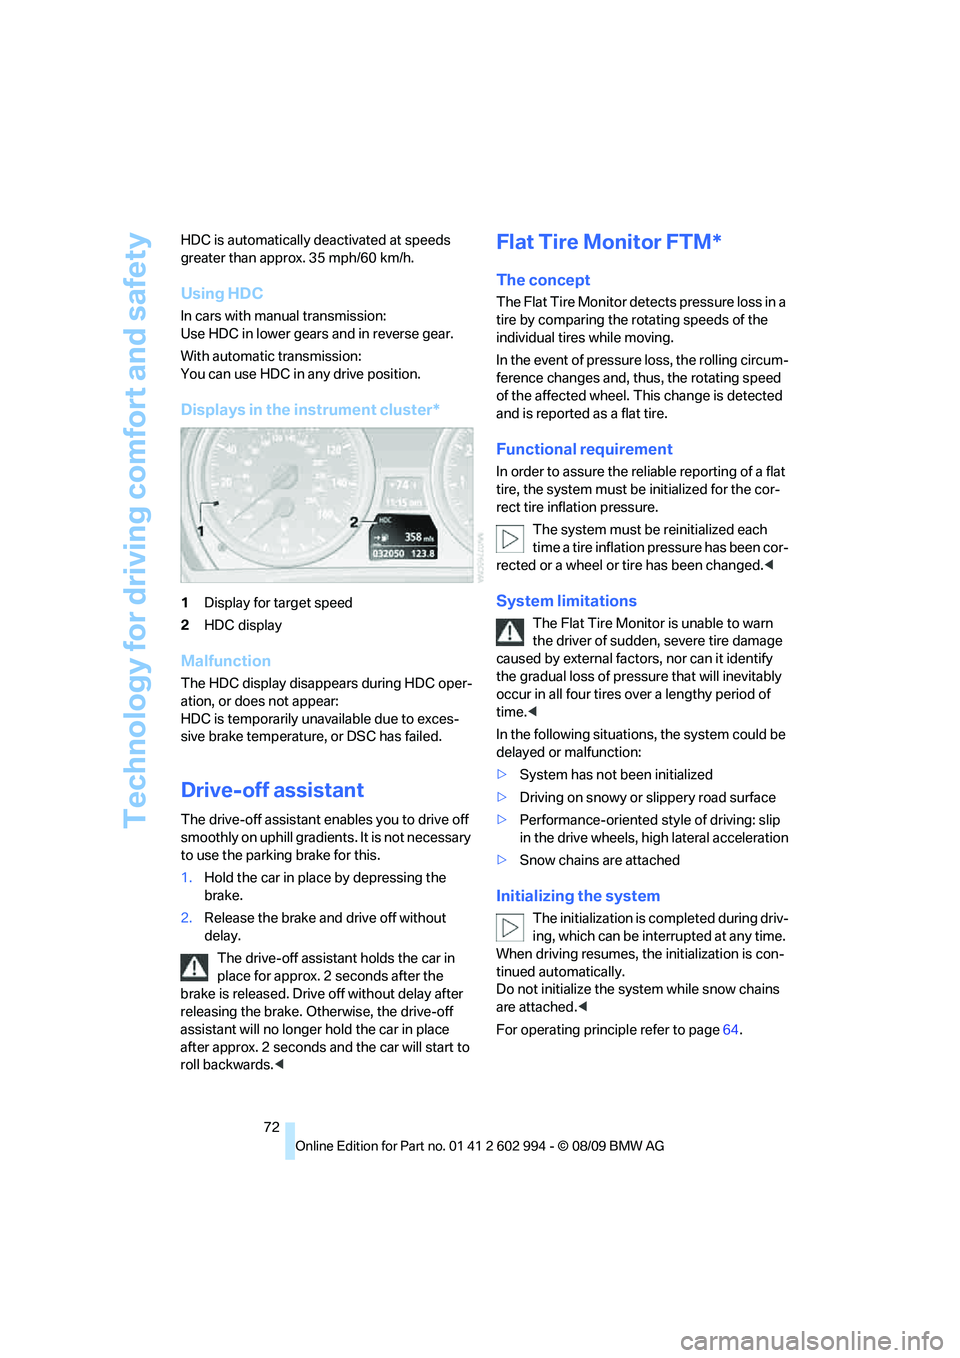
Displays in the instrument cluster*
1Display for target speed
2HDC display
Malfunction
The HDC display disappears during HDC oper-
ation, or does not appear:
HDC is temporarily unavailable due to exces-
sive brake temperature, or DSC has failed.
Drive-off assistant
The drive-off assistant enables you to drive off
smoothly on uphill gradients. It is not necessary
to use the parking brake for this.
1.Hold the car in place by depressing the
brake.
2.Release the brake and drive off without
delay.
The drive-off assistant holds the car in
place for approx. 2 seconds after the
brake is released. Drive off without delay after
releasing the brake. Otherwise, the drive-off
assistant will no longer hold the car in place
after approx. 2 seconds and the car will start to
roll backwards.<
Flat Tire Monitor FTM*
The concept
The Flat Tire Monitor detects pressure loss in a
tire by comparing the rotating speeds of the
individual tires while moving.
In the event of pressure loss, the rolling circum-
ference changes and, thus, the rotating speed
of the affected wheel. This change is detected
and is reported as a flat tire.
Functional requirement
In order to assure the reliable reporting of a flat
tire, the system must be initialized for the cor-
rect tire inflation pressure.
The system must be reinitialized each
time a tire inflation pressure has been cor-
rected or a wheel or tire has been changed.<
System limitations
The Flat Tire Monitor is unable to warn
the driver of sudden, severe tire damage
caused by external factors, nor can it identify
the gradual loss of pressure that will inevitably
occur in all four tires over a lengthy period of
time.<
In the following situations, the system could be
delayed or malfunction:
>System has not been initialized
>Driving on snowy or slippery road surface
>Performance-oriented style of driving: slip
in the drive wheels, high lateral acceleration
>Snow chains are attached
Initializing the system
The initialization is completed during driv-
ing, which can be interrupted at any time.
When driving resumes, the initialization is con-
tinued automatically.
Do not initialize the system while snow chains
are attached.<
For operating principle refer to page64.
Page 78 of 196
Technology for driving comfort and safety
76
Active steering*
The concept
Active steering varies the turning angle of the
front wheels in relation to steering wheel move-
ments. It also varies the steering force required
to turn the wheels depending on the speed at
which you are driving.
When you are driving in the low road speed
range, e.g. in a town or when parking, the steer-
ing angle is increased, i.e. steering becomes
very direct and less effort is required to turn the
wheels. In the higher speed range, on the other
hand, the steering angle is reduced as the
speed increases. This improves the handling of
your BMW over the entire speed range.
In critical situations, the system can make tar-
geted corrections to the steering angle pro-
vided by the driver and thus stabilize the vehicle
before the driver intervenes. This stabilizing
intervention is simultaneously deactivated
when DSC is switched off, refer to page70.
Malfunction
The warning lamps come on. Active
steering is malfunctioning or is tem-
porarily deactivated. At low speeds,
greater steering wheel movements
are required, whereas at higher speeds the
vehicle reacts more sensitively to steering
wheel movements. The stability-enhancing
feature may also be deactivated. Drive cau-
tiously and think well ahead.
Deactivation
Active steering is deactivated to perform an ini-
tialization. A message indicates that the feature
is deactivated. Initialization may take several
minutes.
If the message does not disappear during the
current trip, have the system checked.
Defect
If there is a defect, a corresponding message
appears. Have the system checked.
Servotronic*
The concept
The Servotronic varies the steering force
required to turn the wheels relative to the vehi-
cle speed.
At low speeds, the steering force is strongly
assisted, i.e. less force is needed for steering.
As the vehicle speed increases, the steering
assisting power is reduced.
Malfunction
Malfunctions are displayed via Check Control,
refer to page67.
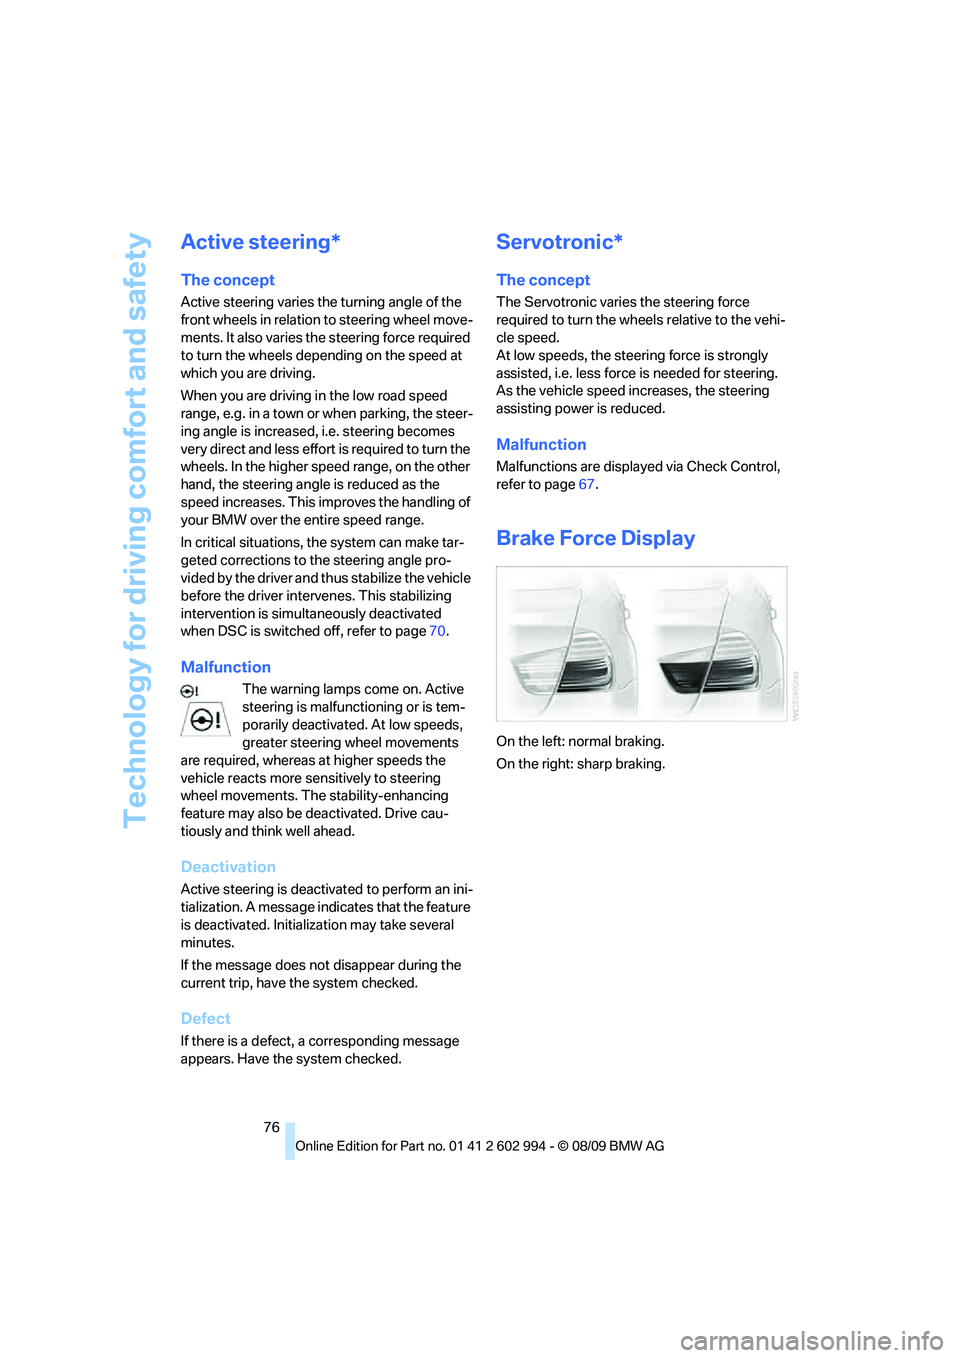
Brake Force Display
On the left: normal braking.
On the right: sharp braking.
Page 110 of 196
Things to remember when driving
108 for a short period after the engine is switched
off.
Hydroplaning
When driving on wet or slushy roads,
reduce road speed. If you do not, a wedge
of water can form between tires and road sur-
face. This situation, known as hydroplaning,
means that the tire can completely lose contact
with the road surface, so that neither the car can
be steered nor the brake be properly applied.<
The risk of hydroplaning increases with declin-
ing tread depth on the tires, refer also to Mini-
mum tread depth on page133.
Driving through water
Drive through water on the road only if it is
not deeper than 1 ft/30 cm, and then only
at walking speed at the most. Otherwise, the
vehicle's engine, the electrical systems and the
transmission may be damaged.<
Use the parking brake on inclines
On inclines, do not hold the vehicle for a
lengthy period using the clutch; use the
parking brake instead. Otherwise, greater
clutch wear will result.<
For more information about the drive-off assis-
tant, refer to page72.
Braking safely
Your BMW is equipped with ABS as a standard
feature. Applying the brakes fully is the most
effective way of braking in situations in which
this is necessary. Since the vehicle maintains
steering responsiveness, you can still avoid
possible obstacles with a minimum of steering
effort.
Pulsation of the brake pedal, combined with
sounds from the hydraulic circuits, indicate that
ABS is in its active mode.
Driving in wet conditions
When roads are wet or there is heavy rain,
briefly exert gentle pressure on the brake pedal
every few miles. Monitor traffic conditions to
ensure that this maneuver does not endanger other road users. The heat generated in this
process helps dry the pads and rotors to ensure
that full braking efficiency will then be available
when you need it.
Hills
To prevent overheating and the resulting
reduced efficiency of the brake system,
drive long or steep downhill gradients in the
gear in which the least braking is required. Even
light but consistent brake pressure can lead to
high temperatures, brake wear and possibly
even brake failure.<
You can increase the engine's braking effect by
shifting down, all the way to first gear if neces-
sary. This strategy helps you avoid placing
excessive loads on the brake system. Down-
shifting in manual mode of the automatic trans-
mission, refer to page49.
Never drive with the clutch held down,
with the transmission in neutral or with
the engine switched off; otherwise, engine
braking action will not be present or there will be
no power assistance to the brakes or steering.
Never allow floor mats, carpets or any other
objects to protrude into the area around the
pedals; otherwise, pedal function could be
impaired.<
Corrosion on brake rotors
When the vehicle is driven only occasionally,
during extended periods when the vehicle is not
used at all, and in operating conditions where
brake applications are less frequent, there is an
increased tendency for corrosion to form on
rotors, while contaminants accumulate on the
brake pads. This occurs because the minimum
pressure which must be exerted by the pads
during brake applications to clean the rotors is
not reached.
Should corrosion form on the brake rotors, the
brakes will tend to respond with a pulsating
effect that even extended application will fail to
cure.
Page 145 of 196
Reference
At a glance
Controls
Driving tips
Mobility
143
Care
Care products
Regular cleaning and care contributes signifi-
cantly to the value retention of your BMW.
BMW recommends cleaning and caring for your
vehicle with products that are approved by
BMW for this purpose.
Your BMW center will be happy to advise you on
the products and services available for cleaning
and caring for your BMW.
Original BMW Care Products have been
material tested, laboratory checked and
proven in the field, and offer optimal care and
protection for your vehicle.<
Do not use cleaners that contain alcohol
or solvents as these may result in dam-
age.<
Cleaning agents can contain substances
that are dangerous or hazardous to your
health. Therefore, follow the warning and safety
instructions on the packaging. When cleaning
inside the vehicle, always open the doors or
windows of the vehicle. In enclosed areas, pro-
vide for sufficient ventilation. Only use products
designed for cleaning vehicles.<
Exterior care
Washing the vehicle
Especially during the winter months,
ensure that the vehicle is washed more
frequently. Heavy soiling and road salt can lead
to vehicle damage.<
After washing the vehicle, apply the
brakes briefly to dry them; otherwise,
water can reduce braking efficiency over the
short term and the brake discs can corrode.<
Automatic car washes
Preference should be given to cloth car washes.
Before driving into a car wash, ensure that it is
suitable for your BMW. Check the following:>Dimensions of your vehicle, refer to
page175.
>If necessary: fold in the exterior mirrors,
refer to page39.
>Maximum permissible tire width.
Avoid car washes with guide rail heights
over 4 in/10 cm; otherwise, there is the
danger of damaging chassis parts.<
Preparations before driving into an automatic
car wash:
>Unscrew the rod antenna
*.
>Deactivate the rain sensor
* to prevent unin-
tentional wiping.
>Sports Wagon: deactivate the rear window
wiper and protect it against damage. If nec-
essary, ask the operator of the car wash
about protective measures you should take.
>Remove additional add-on parts, e.g. spoil-
ers or phone antennas, if they could be
damaged.
Automatic transmission
Before driving into an automatic car wash, per-
form the following steps to ensure that the vehi-
cle can roll:
1.Insert the remote control into the ignition
lock, even with Comfort Access.
2.Move the selector lever to position N.
3.Release the parking brake.
4.Switch off the engine.
5.Leave the remote control in the ignition lock
so that the vehicle can roll.
Steam jets/high-pressure washers
When using steam jets or high-pressure
washers, ensure that you maintain suffi-
cient clearance to the vehicle and do not exceed
a temperature of 1407/606.
Insufficient clearance or excessive pressure or
temperature can lead to component damage or
Page 152 of 196
Replacing components
150
Changing low-beam and high-beam
bulbs
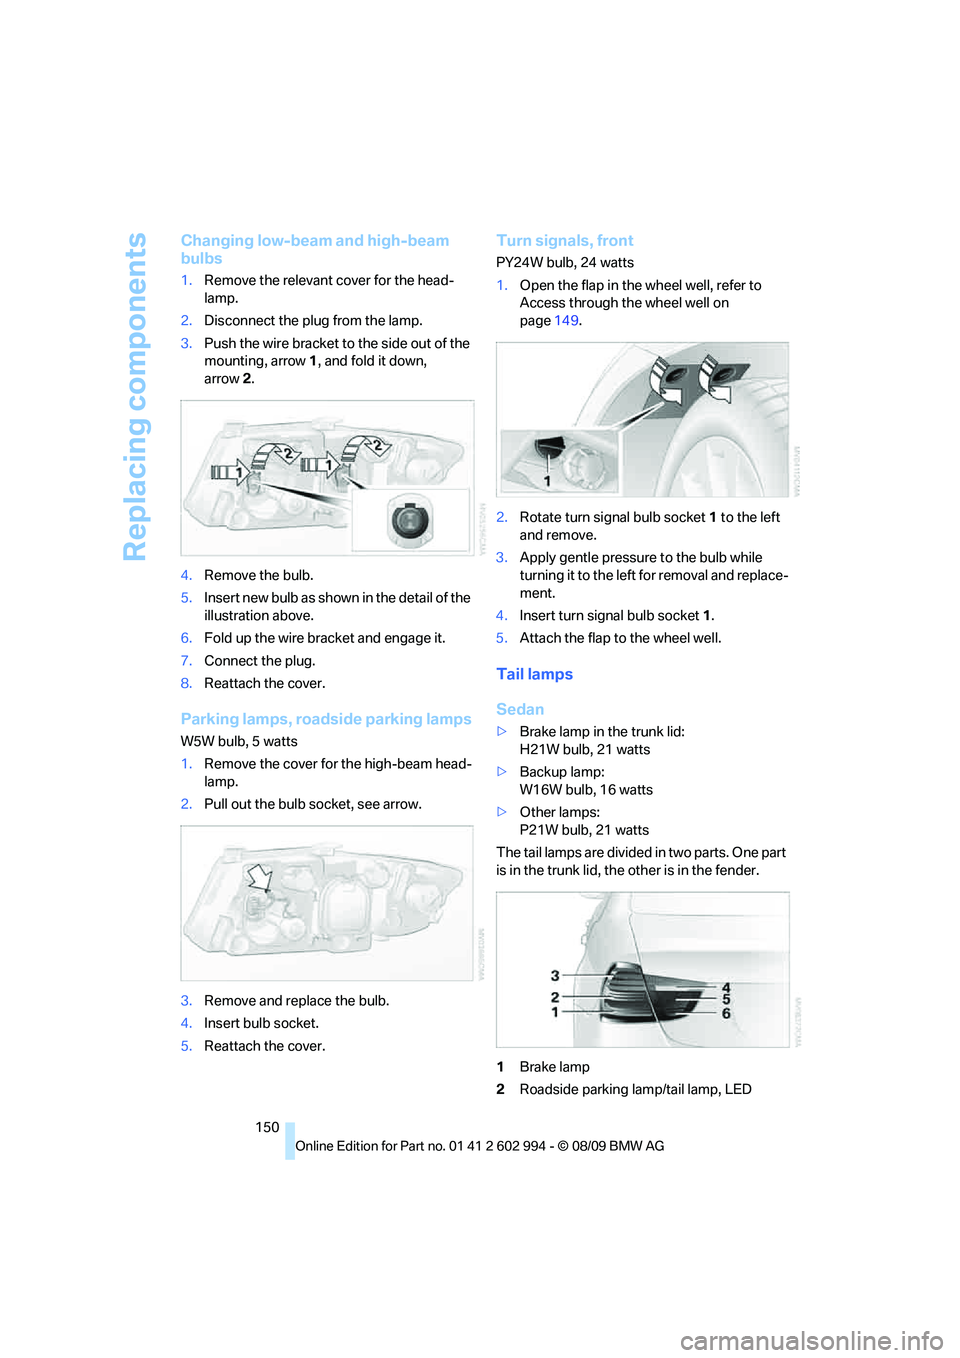
1.Remove the relevant cover for the head-
lamp.
2.Disconnect the plug from the lamp.
3.Push the wire bracket to the side out of the
mounting, arrow1, and fold it down,
arrow2.
4.Remove the bulb.
5.Insert new bulb as shown in the detail of the
illustration above.
6.Fold up the wire bracket and engage it.
7.Connect the plug.
8.Reattach the cover.
Parking lamps, roadside parking lamps
W5W bulb, 5 watts
1.Remove the cover for the high-beam head-
lamp.
2.Pull out the bulb socket, see arrow.
3.Remove and replace the bulb.
4.Insert bulb socket.
5.Reattach the cover.
Turn signals, front
PY24W bulb, 24 watts
1.Open the flap in the wheel well, refer to
Access through the wheel well on
page149.
2.Rotate turn signal bulb socket 1 to the left
and remove.
3.Apply gentle pressure to the bulb while
turning it to the left for removal and replace-
ment.
4.Insert turn signal bulb socket 1.
5.Attach the flap to the wheel well.
Tail lamps
Sedan
>Brake lamp in the trunk lid:
H21W bulb, 21 watts
>Backup lamp:
W16W bulb, 16 watts
>Other lamps:
P21W bulb, 21 watts
The tail lamps are divided in two parts. One part
is in the trunk lid, the other is in the fender.
1Brake lamp
2Roadside parking lamp/tail lamp, LED
Page 153 of 196
Reference
At a glance
Controls
Driving tips
Mobility
151
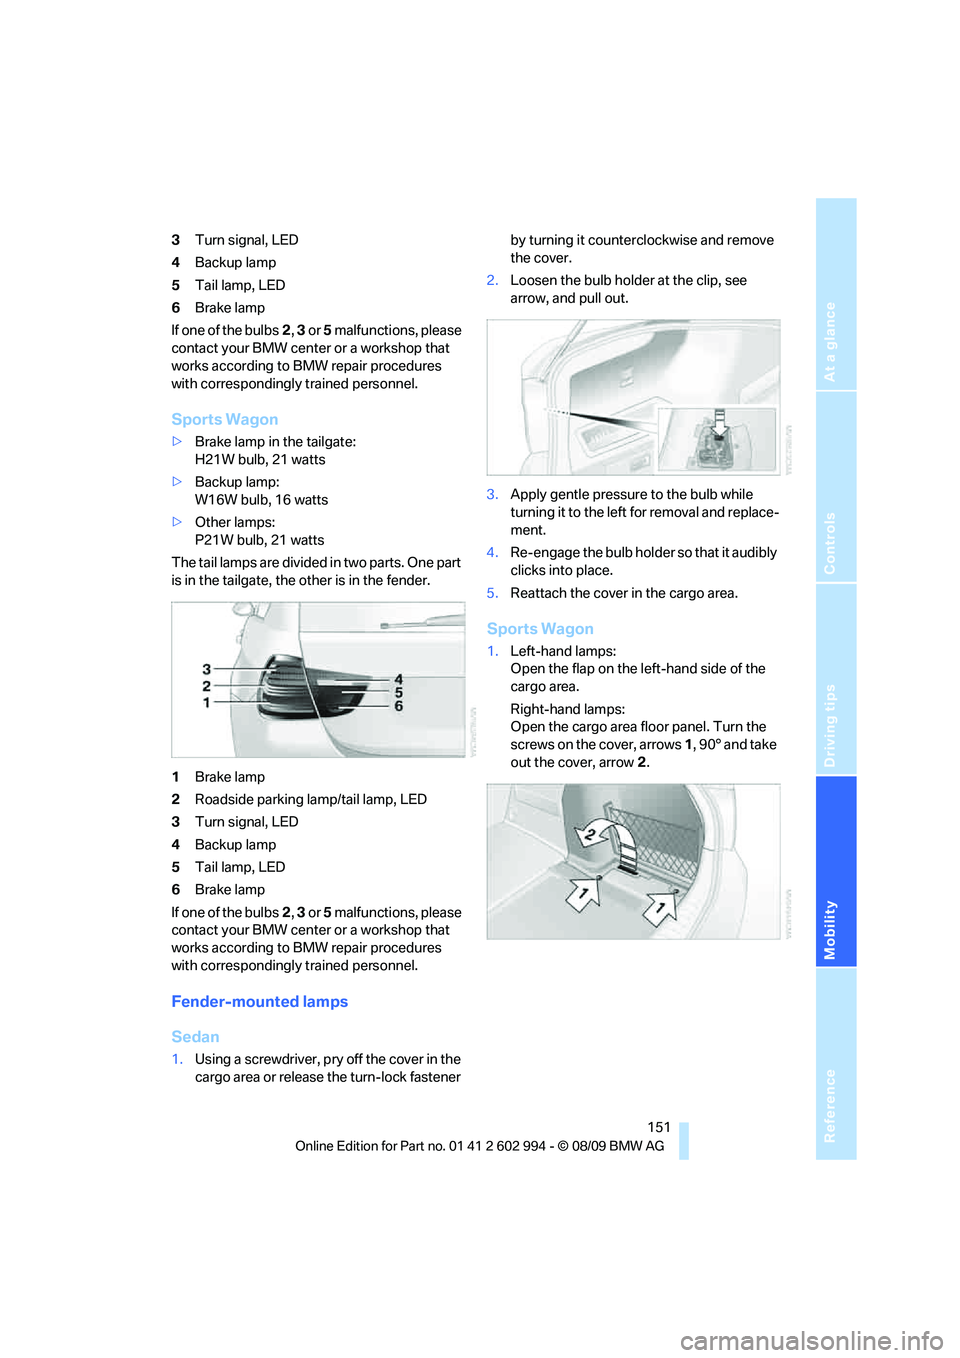
3Turn signal, LED
4Backup lamp
5Tail lamp, LED
6Brake lamp
If one of the bulbs2, 3 or 5 malfunctions, please
contact your BMW center or a workshop that
works according to BMW repair procedures
with correspondingly trained personnel.
Sports Wagon
>Brake lamp in the tailgate:
H21W bulb, 21 watts
>Backup lamp:
W16W bulb, 16 watts
>Other lamps:
P21W bulb, 21 watts
The tail lamps are divided in two parts. One part
is in the tailgate, the other is in the fender.
1Brake lamp
2Roadside parking lamp/tail lamp, LED
3Turn signal, LED
4Backup lamp
5Tail lamp, LED
6Brake lamp
If one of the bulbs2, 3 or 5 malfunctions, please
contact your BMW center or a workshop that
works according to BMW repair procedures
with correspondingly trained personnel.
Fender-mounted lamps
Sedan
1.Using a screwdriver, pry off the cover in the
cargo area or release the turn-lock fastener by turning it counterclockwise and remove
the cover.
2.Loosen the bulb holder at the clip, see
arrow, and pull out.
3.Apply gentle pressure to the bulb while
turning it to the left for removal and replace-
ment.
4.Re-engage the bulb holder so that it audibly
clicks into place.
5.Reattach the cover in the cargo area.
Sports Wagon
1.Left-hand lamps:
Open the flap on the left-hand side of the
cargo area.
Right-hand lamps:
Open the cargo area floor panel. Turn the
screws on the cover, arrows 1, 90° and take
out the cover, arrow 2.