instrument cluster BMW M3 CONVERTIBLE 2001 E46 Owner's Manual
[x] Cancel search | Manufacturer: BMW, Model Year: 2001, Model line: M3 CONVERTIBLE, Model: BMW M3 CONVERTIBLE 2001 E46Pages: 195, PDF Size: 1.96 MB
Page 10 of 195

Contents
Overview
Controls and features
Cockpit16
Instrument cluster18
Indicator and warning lamps20
Multifunction steering wheel
(MFL)24
Hazard warning flashers25
Warning triangle25
Refueling26
Fuel specifications27
Tire inflation pressures27
Opening and closing:
Keys32
Electronic vehicle
immobilizer33
Central locking system33
Opening and closing – via the
door lock34
Opening and closing – via the
remote control35
Opening and closing – from
inside38
Luggage compartment lid39
Luggage compartment40
Alarm system42
Electric power windows44
Convertible top45
Adjustments:
Seats48
Mirrors52
Seat and mirror memory54
Steering wheel55
Car Memory, Key Memory55
Passenger safety systems:
Safety belts57
Transporting children safely58
Airbags61
Rollover protection system64
Driving:
Steering/Ignition lock66
Starting the engine66
Switching off the engine67
Parking brake67
Manual transmission68
Turn signal indicator/Headlamp
flasher69
Washer/Wiper system69
Rear window defroster71
Cruise control71
Everything under control:
Odometer73
Tachometer73
Engine oil temperature gauge73
Fuel gauge74
Coolant temperature gauge74
Service Interval Display75
Check Control76
Clock76
Computer77
Technology for safety and
convenience:
Park Distance Control (PDC)79
Dynamic Stability Control
(DSC)80
Tire Pressure Warning (RDW)81
M Engine dynamics control83
Contents
Page 15 of 195
Overview
Controls and features
Operation, care
and maintenance
Owner service procedures
Technical data
Index Advanced technology
15n
IndexDataTechnologyRepairsCar careControlsOverview
Cockpit16
Instrument cluster18
Indicator and warning lamps20
Multifunction steering wheel
(MFL)24
Hazard warning flashers25
Warning triangle25
Refueling26
Fuel specifications27
Tire inflation pressures27
Overview
Page 18 of 195
18n
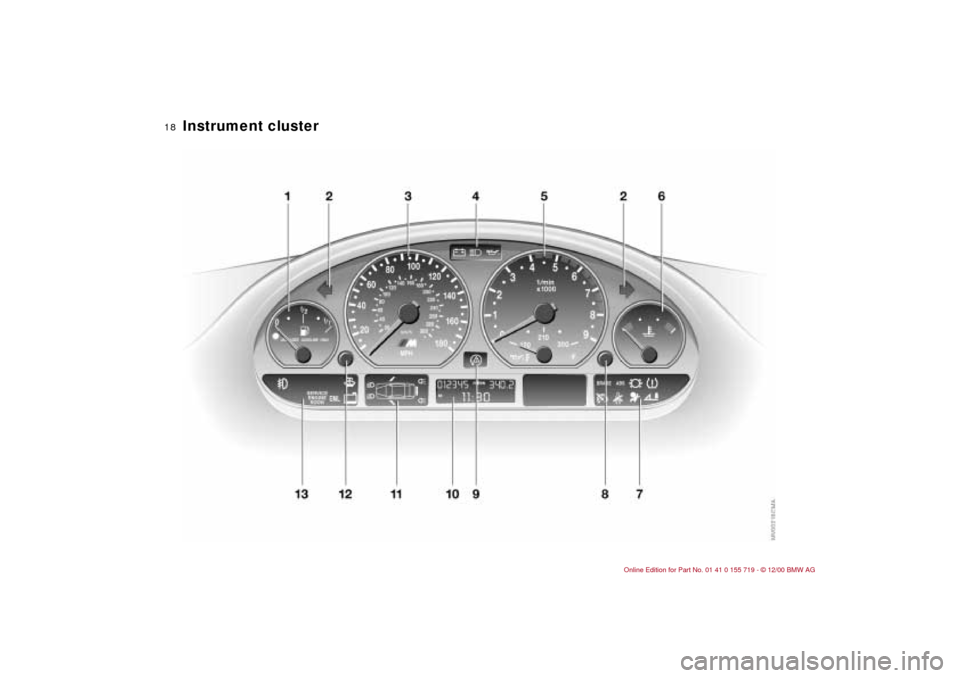
Instrument cluster
Page 19 of 195

19n
IndexDataTechnologyRepairsCar careControlsOverview
Instrument cluster
1 Fuel gauge with indicator lamp for
fuel reserve74
2 Turn signal indicator23
3 Speedometer
4 Indicator lamp for
>
Battery charge current20
>
High beams23
>
Engine oil pressure/Engine oil
level20, 21
5 Tachometer and engine oil temper-
ature gauge73
6 Engine coolant temperature gauge
with "Coolant temperature too high"
indicator74
7 Indicator and warning lamps (clock-
wise) for
>
Parking brake/Brake system
hydraulic circuits/Cornering
Brake Control (CBC)20, 21
>
Antilock Brake System (ABS)21
>
Brake pads22
>
Tire Pressure Warning
(RDW)20, 22
>
Rollover protection system22
>
Airbags21
>
Please fasten safety belts, lock
backrest21
>
Cruise control238 Reset button for
>
Clock76
>
Unit of measure for outside
temperature display77
9 Indicator lamp for Dynamic Stability
Control (DSC)22
10 Display panel for
>
Odometer73
>
Trip odometer73
>
Clock76
>
Service Interval75
Computer display, using the turn
signal lever to operate, refer to
page 77:
>
Clock
>
Outside temperature
>
Average fuel consumption
>
Cruising range
>
Average speed
11 Check Control display76
12 Trip odometer, reset to zero7313 Indicator and warning lamps (clock-
wise) for
>
Fog lamps23
>
Add washer fluid22
>
Coolant level22
>
Electronic Engine Power Control
(EML)22
>
Service Engine Soon22
You can have the outside temper-
ature and distance traveled shown
in other units of measurement.
<
Page 51 of 195
51n
IndexDataTechnologyRepairsCar careControlsOverview
Head restraints Entering the rear
Do not remove the rear head
restraints as this would damage
them.<
For further information, please consult
your BMW center.
Do not use the rear head
restraints as storage shelves.
Always keep the travel path clear for
the rollover protection system. Never
attach any type of protective coverings
to the head restraints (refer also to the
labeling on the head restraints).<
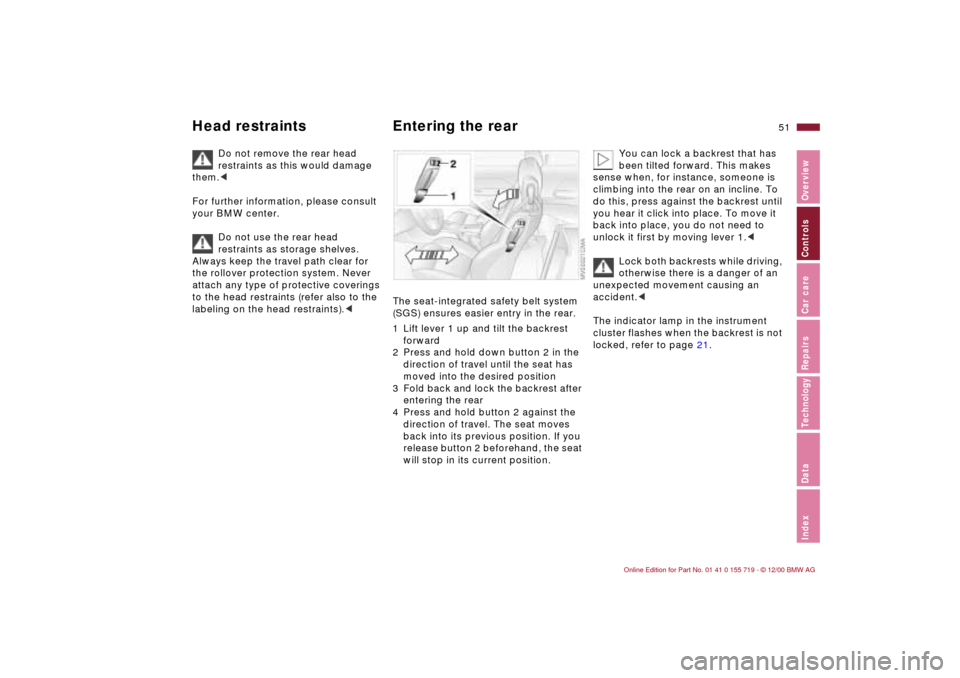
The seat-integrated safety belt system
(SGS) ensures easier entry in the rear.
1 Lift lever 1 up and tilt the backrest
forward
2 Press and hold down button 2 in the
direction of travel until the seat has
moved into the desired position
3 Fold back and lock the backrest after
entering the rear
4 Press and hold button 2 against the
direction of travel. The seat moves
back into its previous position. If you
release button 2 beforehand, the seat
will stop in its current position.
You can lock a backrest that has
been tilted forward. This makes
sense when, for instance, someone is
climbing into the rear on an incline. To
do this, press against the backrest until
you hear it click into place. To move it
back into place, you do not need to
unlock it first by moving lever 1.<
Lock both backrests while driving,
otherwise there is a danger of an
unexpected movement causing an
accident.<
The indicator lamp in the instrument
cluster flashes when the backrest is not
locked, refer to page 21.
Page 55 of 195
55n
IndexDataTechnologyRepairsCar careControlsOverview
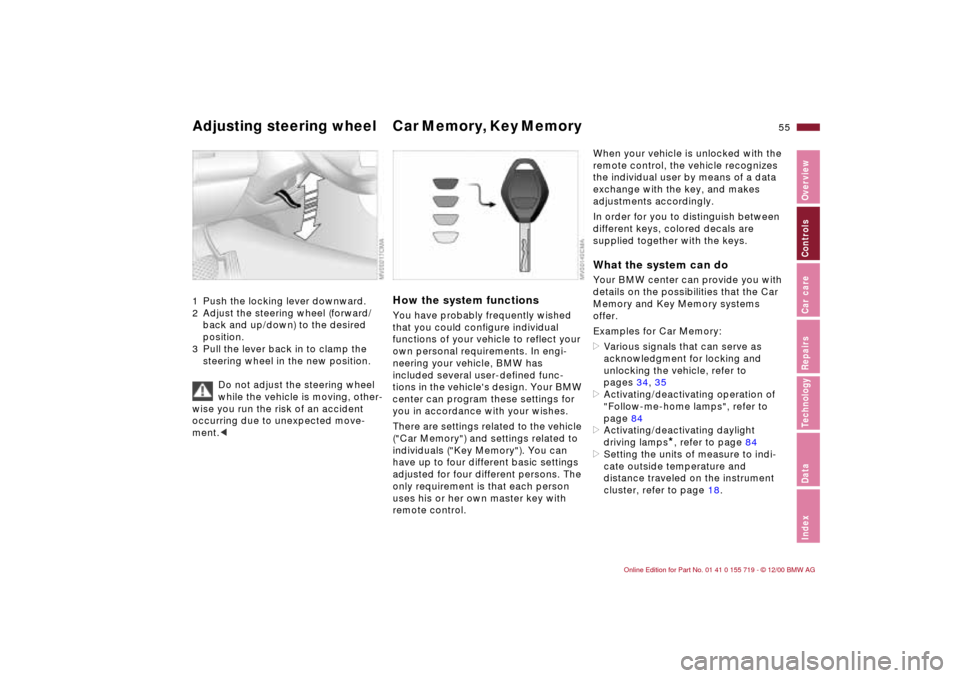
Adjusting steering wheel Car Memory, Key Memory 1 Push the locking lever downward.
2 Adjust the steering wheel (forward/
back and up/down) to the desired
position.
3 Pull the lever back in to clamp the
steering wheel in the new position.
Do not adjust the steering wheel
while the vehicle is moving, other-
wise you run the risk of an accident
occurring due to unexpected move-
ment.<
How the system functionsYou have probably frequently wished
that you could configure individual
functions of your vehicle to reflect your
own personal requirements. In engi-
neering your vehicle, BMW has
included several user-defined func-
tions in the vehicle's design. Your BMW
center can program these settings for
you in accordance with your wishes.
There are settings related to the vehicle
("Car Memory") and settings related to
individuals ("Key Memory"). You can
have up to four different basic settings
adjusted for four different persons. The
only requirement is that each person
uses his or her own master key with
remote control.
When your vehicle is unlocked with the
remote control, the vehicle recognizes
the individual user by means of a data
exchange with the key, and makes
adjustments accordingly.
In order for you to distinguish between
different keys, colored decals are
supplied together with the keys.What the system can doYour BMW center can provide you with
details on the possibilities that the Car
Memory and Key Memory systems
offer.
Examples for Car Memory:
>Various signals that can serve as
acknowledgment for locking and
unlocking the vehicle, refer to
pages 34, 35
>Activating/deactivating operation of
"Follow-me-home lamps", refer to
page 84
>Activating/deactivating daylight
driving lamps
*, refer to page 84
>Setting the units of measure to indi-
cate outside temperature and
distance traveled on the instrument
cluster, refer to page 18.
Page 67 of 195
67n
IndexDataTechnologyRepairsCar careControlsOverview
Starting the engine Switching off the engine Parking brake If the engine does not start on the first
attempt (if it is very hot or cold, for
instance):
>Press the accelerator pedal halfway
down while engaging the starter.
Cold starts at very low temperatures,
starting at approx. 5 7 (–15 6) and at
high altitudes (over 1,000 meters):
>On the first start attempt, engage the
starter for a longer period (approx.
10 seconds)
>Press the accelerator pedal halfway
down while engaging the starter.
Engine idle speed is controlled by the
engine computer system. Increased
speeds at startup are normal and
should decrease as the engine warms
up. If engine speed does not decrease,
service is required.
To prevent the battery from
discharging, always deactivate elec-
trical devices that are not in use. Switch
the ignition off when the vehicle is not
being driven.Turn the ignition key to position 1 or 0.
Do not remove the ignition key
while the vehicle is still moving.
If you did so, the steering lock would
engage when the steering wheel is
turned.
When you leave the vehicle, always
remove the ignition key and engage the
steering lock.
Set the parking brake when parking on
steep hills, because under certain
conditions, putting the vehicle into first
or reverse gear may not be enough to
prevent it from rolling away.
The power assist is not available when
the engine is not on. This means that
more effort is required for braking.<
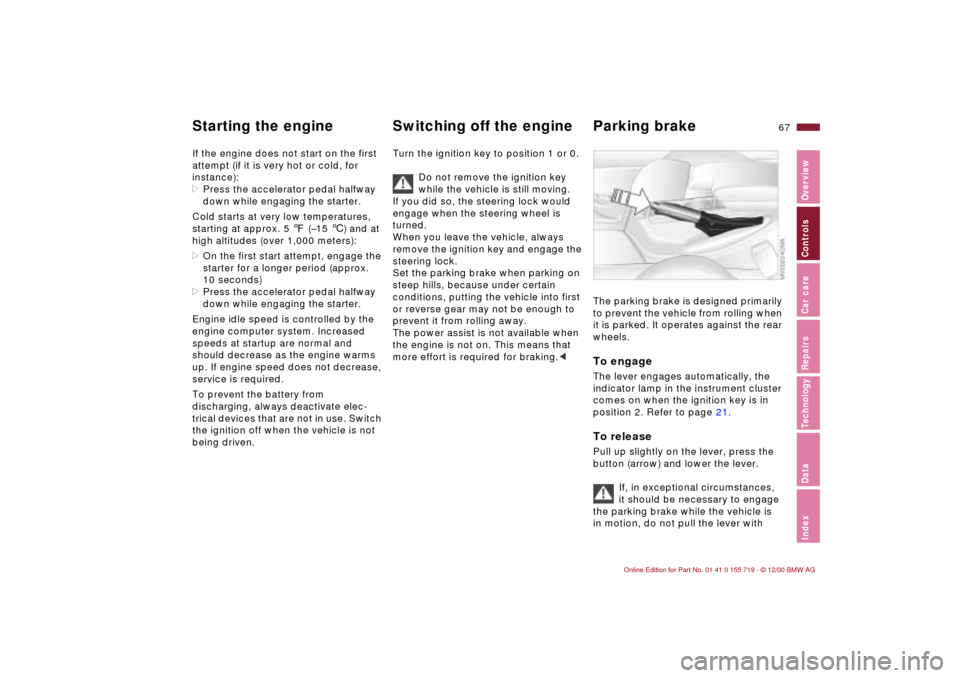
The parking brake is designed primarily
to prevent the vehicle from rolling when
it is parked. It operates against the rear
wheels. To engageThe lever engages automatically, the
indicator lamp in the instrument cluster
comes on when the ignition key is in
position 2. Refer to page 21.To releasePull up slightly on the lever, press the
button (arrow) and lower the lever.
If, in exceptional circumstances,
it should be necessary to engage
the parking brake while the vehicle is
in motion, do not pull the lever with
Page 69 of 195
69n
IndexDataTechnologyRepairsCar careControlsOverview
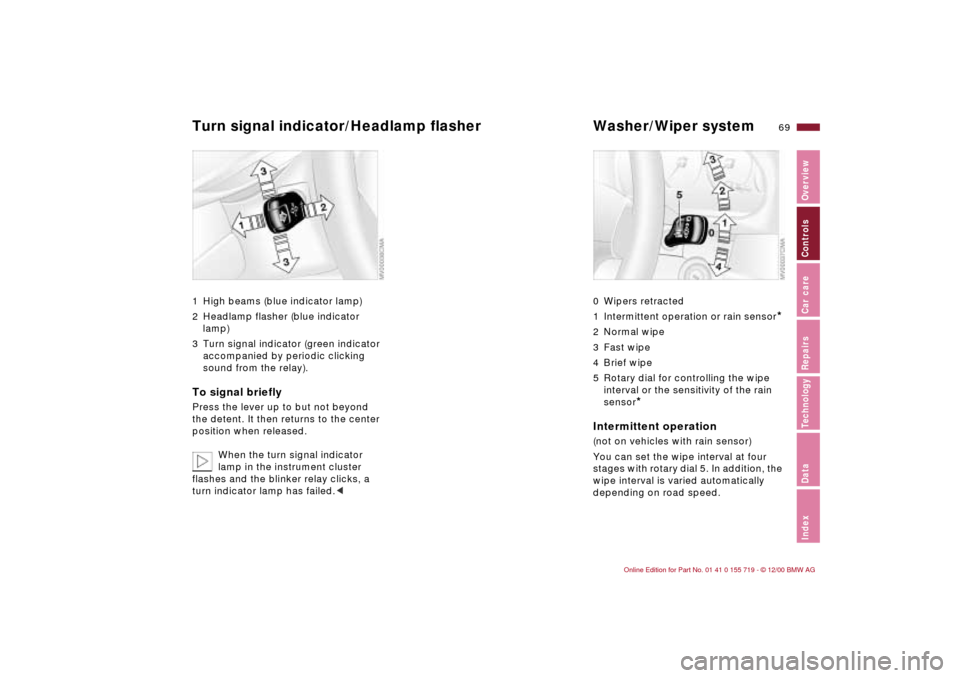
Turn signal indicator/Headlamp flasher Washer/Wiper system 1 High beams (blue indicator lamp)
2 Headlamp flasher (blue indicator
lamp)
3 Turn signal indicator (green indicator
accompanied by periodic clicking
sound from the relay).To signal brieflyPress the lever up to but not beyond
the detent. It then returns to the center
position when released.
When the turn signal indicator
lamp in the instrument cluster
flashes and the blinker relay clicks, a
turn indicator lamp has failed.<
0 Wipers retracted
1 Intermittent operation or rain sensor
*
2 Normal wipe
3 Fast wipe
4 Brief wipe
5 Rotary dial for controlling the wipe
interval or the sensitivity of the rain
sensor
*
Intermittent operation(not on vehicles with rain sensor)
You can set the wipe interval at four
stages with rotary dial 5. In addition, the
wipe interval is varied automatically
depending on road speed.
Page 72 of 195

72n
Cruise control To activate the system From ignition key position 2.
Press button 3 and the indicator lamp
on the instrument cluster (refer to
page 23) will come on. You can now
use the cruise control.
Do not use cruise control on
twisting roads, when high traffic
density prevents driving at a constant
speed, when the road surface is slick
(snow, rain, ice), or when the road
surface is loose (rocks, sand).< To deactivate the system Press button 3 as often as you need to
until the indicator lamp on the instru-
ment cluster goes out.
Cruise control is also deactivated when
the ignition key is in position 0.
The speed stored in memory is deleted.
To store and maintain speed or to
acceleratePress button 1 briefly: the system regis-
ters and maintains the current vehicle
speed. Every time you tap the button,
the speed increases by approx.
0.6 mph (1 km/h).
Press and hold button 1: the vehicle
accelerates without pressure on the
accelerator pedal. When you release
the button, the system registers and
maintains the current speed.
If, on a downhill gradient, the
engine braking effect is not suffi-
cient, the controlled speed may be
exceeded. Speed can drop on uphill
grades if the engine output is insuffi-
cient.< To deceleratePress button 2 briefly: if you are already
driving with active cruise control, the
speed is decreased by approx. 0.6 mph
(1 km/h) every time you tap the button.
Press and hold button 2: with the cruise
control active, the system automatically
reduces the throttle opening to slow the
vehicle. When you release the button,
the system registers and maintains the
current speed.
To interrupt the cruise control When the cruise control is on, press
button 3. The indicator lamp will stay
on.
You can use the cruise control again
whenever you want by calling up the
speed that was stored last.
In addition, cruise control is interrupted
automatically
>if the brakes are applied
>when you depress the clutch pedal,
>if you exceed or fall below the
programmed speed for an extended
period (by depressing the acceler-
ator, for example).Recall the stored speed.Press button 4: the vehicle accelerates
to and maintains the last speed stored.
Page 73 of 195
73n
IndexDataTechnologyRepairsCar careControlsOverview
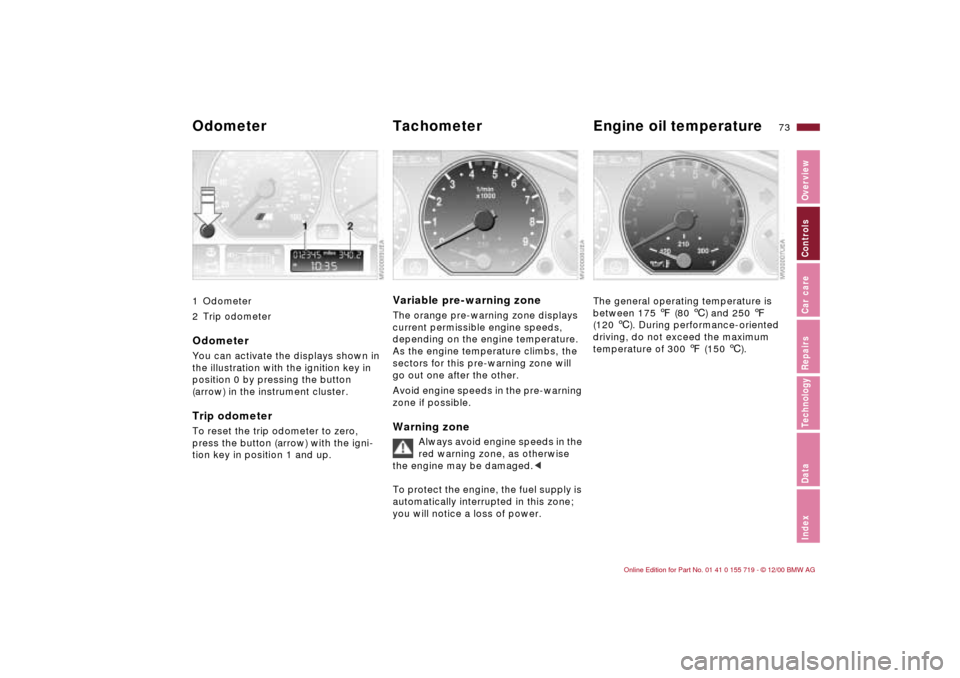
1 Odometer
2 Trip odometerOdometerYou can activate the displays shown in
the illustration with the ignition key in
position 0 by pressing the button
(arrow) in the instrument cluster.Trip odometerTo reset the trip odometer to zero,
press the button (arrow) with the igni-
tion key in position 1 and up.
Variable pre-warning zoneThe orange pre-warning zone displays
current permissible engine speeds,
depending on the engine temperature.
As the engine temperature climbs, the
sectors for this pre-warning zone will
go out one after the other.
Avoid engine speeds in the pre-warning
zone if possible.Warning zone
Always avoid engine speeds in the
red warning zone, as otherwise
the engine may be damaged.<
To protect the engine, the fuel supply is
automatically interrupted in this zone;
you will notice a loss of power.
The general operating temperature is
between 175 7 (80 6) and 250 7
(120 6). During performance-oriented
driving, do not exceed the maximum
temperature of 300 7 (150 6).
Odometer Tachometer Engine oil temperature