check engine BMW M5 2007 User Guide
[x] Cancel search | Manufacturer: BMW, Model Year: 2007, Model line: M5, Model: BMW M5 2007Pages: 253, PDF Size: 8.57 MB
Page 202 of 253
Under the hood
200
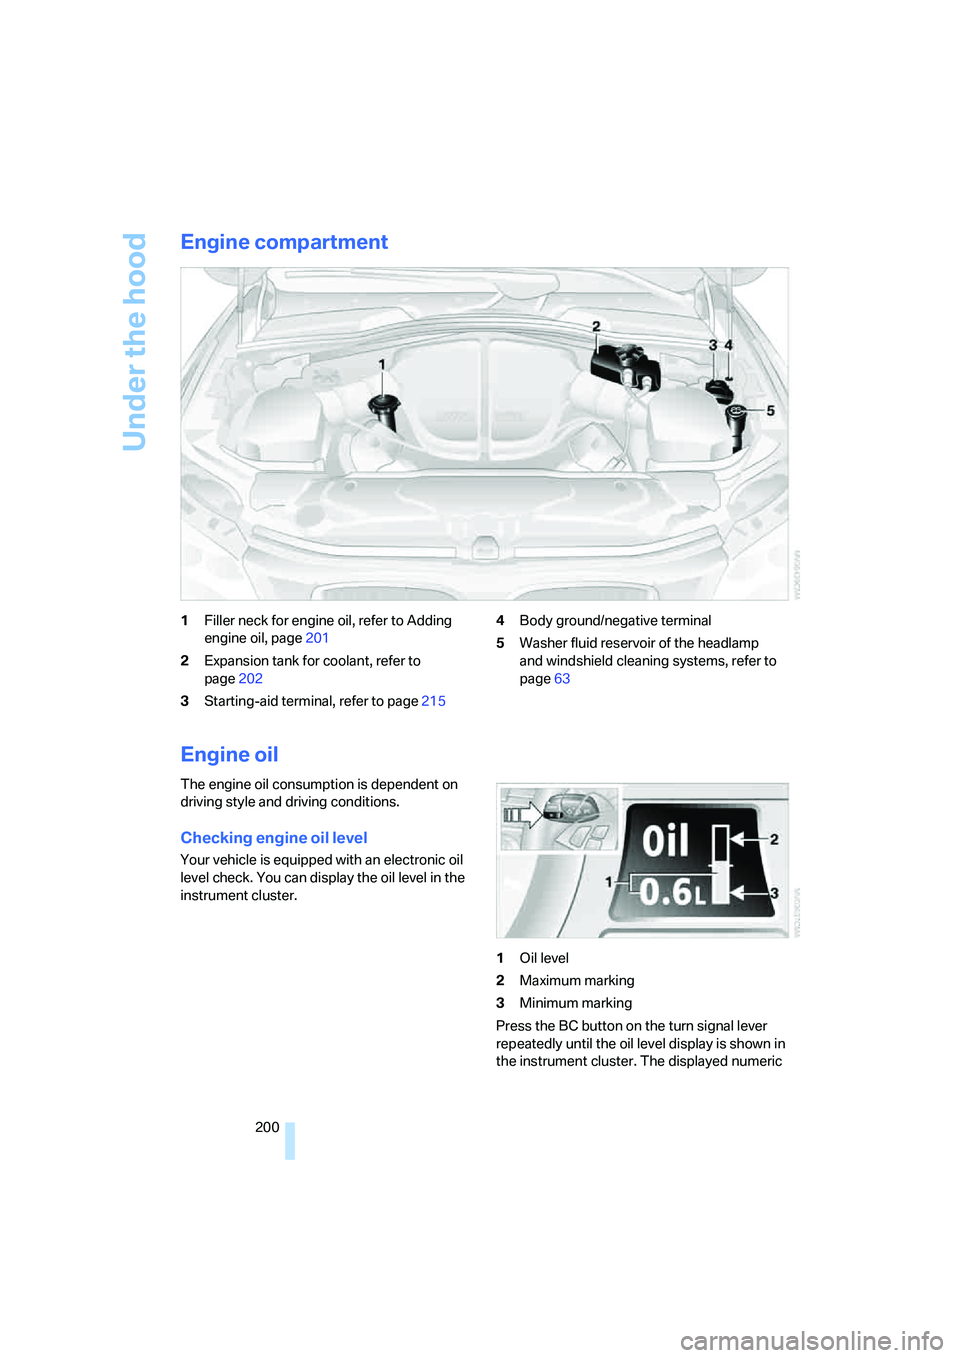
Engine compartment
1Filler neck for engine oil, refer to Adding
engine oil, page201
2Expansion tank for coolant, refer to
page202
3Starting-aid terminal, refer to page2154Body ground/negative terminal
5Washer fluid reservoir of the headlamp
and windshield cleaning systems, refer to
page63
Engine oil
The engine oil consumption is dependent on
driving style and driving conditions.
Checking engine oil level
Your vehicle is equipped with an electronic oil
level check. You can display the oil level in the
instrument cluster.
1Oil level
2Maximum marking
3Minimum marking
Press the BC button on the turn signal lever
repeatedly until the oil level display is shown in
the instrument cluster. The displayed numeric
Page 203 of 253
Mobility
201Reference
At a glance
Controls
Driving tips
Communications
Navigation
Entertainment
value indicates the current oil level in liters
above Minimum.
After starting the engine, the last determined
value is displayed.
The oil level must be between the two marks.
Manual transmission: the engine oil level
will be shown in the lower display.<
Exact measurement
The oil level is measured continuously while
driving or when stopped with the engine run-
ning.
The determination of a new value can take
30 minutes or longer.
If only dashes are shown in the display, it
was not possible to determine a new
value. This can, for example, be the case when
driving short distances or with a sporty driving
style.<
Fast measurement
In addition to the continuous measurement, you
can also quickly determine the current oil level,
e.g. after adding engine oil, however with a low
measuring accuracy.
1.With the engine at operating temperature,
i.e. after at least 6 miles/10 km of uninter-
rupted driving, park the vehicle in a horizon-
tal position.
2.Allow the engine to run at idle.
3.Press the BC button on the turn signal lever
repeatedly until the oil level display is
shown in the instrument cluster.
4.Press the BC button on the turn signal lever
for at least 2 seconds.
The oil level is determined. A clock symbol
is displayed during the measurement.
5.After approx. 1 minute the current oil level is
displayed.
If not all measuring conditions are met,
e.g. with the engine cold, "-.-" is dis-
played. The requested measurement is carried
out as soon as possible.<
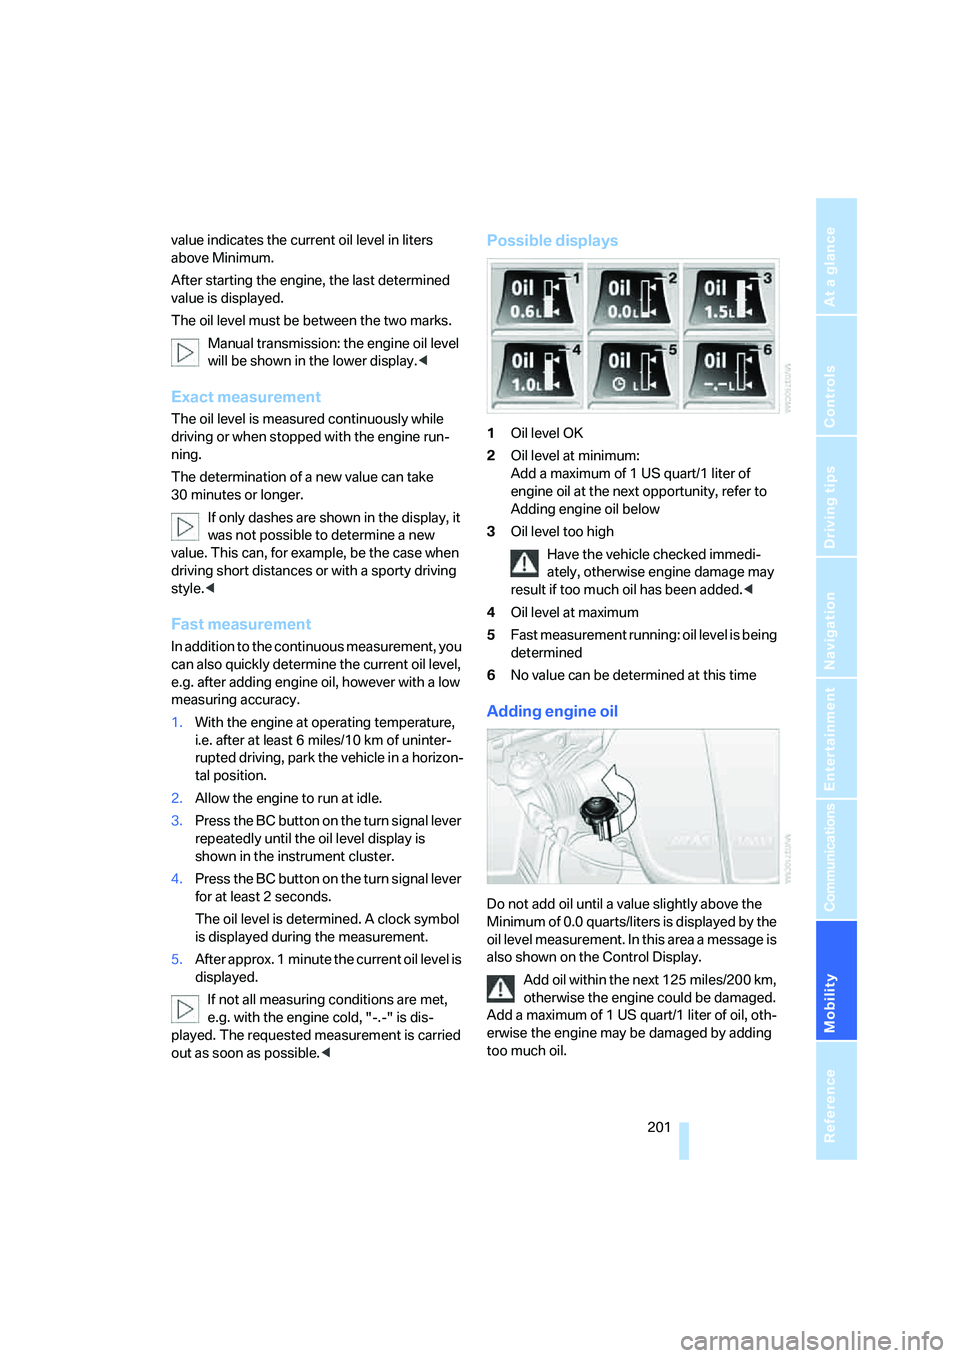
Possible displays
1Oil level OK
2Oil level at minimum:
Add a maximum of 1 US quart/1 liter of
engine oil at the next opportunity, refer to
Adding engine oil below
3Oil level too high
Have the vehicle checked immedi-
ately, otherwise engine damage may
result if too much oil has been added.<
4Oil level at maximum
5Fast measurement running: oil level is being
determined
6No value can be determined at this time
Adding engine oil
Do not add oil until a value slightly above the
Minimum of 0.0 quarts/liters is displayed by the
oil level measurement. In this area a message is
also shown on the Control Display.
Add oil within the next 125 miles/200 km,
otherwise the engine could be damaged.
Add a maximum of 1 US quart/1 liter of oil, oth-
erwise the engine may be damaged by adding
too much oil.
Page 204 of 253
Under the hood
202 Add at least 0.5 US quart/0.5 liter of oil, other-
wise the oil level check cannot reliably display
the current oil level.<
Please conduct a fast measurement after
adding engine oil to check the oil quantity
added and to update the display.<
Continuous exposure to used oil has
caused cancer in laboratory testing.
For this reason, any skin areas that come into
contact with oil should be thoroughly washed
with soap and water.
Keep oil, grease etc. out of reach of children and
observe the warnings on the containers to pre-
vent health risks.<
Oil change
Have oil changed only at your BMW center or
at a workshop that works according to BMW
repair procedures with correspondingly trained
personnel.
Approved engine oils
The quality of the engine oil selected has critical
significance for the operation and service life of
an engine. BMW continuously approves spe-
cific oils after confirming their suitability for use
in its vehicles with extensive testing.
Do not use oil additives, as these may
result in engine damage.<
Your BMW center will be happy to answer
detailed questions on BMW High Perfor-
mance Synthetic Oil or approved synthetic
oils.<
You can also call BMW of North America at
1-800-831-1117 or visit the website at
www.bmwusa.com to obtain this information.
Viscosity grades
Viscosity is a measure of an oil's flow rating and
is specified in SAE grades.
Approved oils belong to the SAE grade
10W-60.<
Alternative oil grades
If BMW High Performance Synthetic Oil is
unavailable, you can add small quantities of
other synthetic oils between oil changes.
Only use oils with the following specifications:
>Viscosity
preferred: SAE 10W-60;
alternative: SAE 10W-40, SAE 5W-50 or
SAE 10W-50
>Specification
API SJ/CF, API SK/CF or higher
Low ambient temperatures
The oils used by BMW from the factory for your
vehicle model can be used at virtually all ambi-
ent temperatures. However, if the vehicle is
operated for a longer period at temperatures
below –47/–206, your BMW center will be
happy to recommend a suitable oil.
Coolant
Do not add coolant to the cooling system
when the engine is hot. Escaping coolant
can cause burns.<
Coolant is comprised of water and coolant addi-
tive. Not all commercially available additives are
suitable for your BMW. Ask your BMW center
for suitable additives.
Only use suitable additives, otherwise
engine damage may result. The additives
present a health hazard; observe the instruc-
tions on the containers.<
Comply with the appropriate environ-
mental protection regulations when dis-
posing of coolant additives.<
Checking coolant level
1.The engine must be at ambient tempera-
ture.
2.Turn the cap of the expansion tank counter-
clockwise to allow any accumulated pres-
sure to escape, then continue turning to
open.
Page 206 of 253
Maintenance
204
Maintenance
BMW maintenance system
The BMW maintenance system supports the
preservation of the traffic and operating safety
of your BMW. The service schedule also
includes operations related to the vehicle's
comfort and convenience features, such as
replacement of the filters for the inside air.
The ultimate objective is to ensure economical
maintenance by providing the ideal service for
your vehicle.
Should the day come when you decide to sell
your BMW, a complete dealer service history
will prove to be an asset of inestimable value.
CBS Condition Based Service
Sensors and special algorithms take the differ-
ent driving conditions of your BMW into
account. Condition Based Service uses this to
determine the current and future service
requirements. By letting you define a service
and maintenance regimen that reflects your
own individual requirements, the system builds
the basis for trouble-free driving.
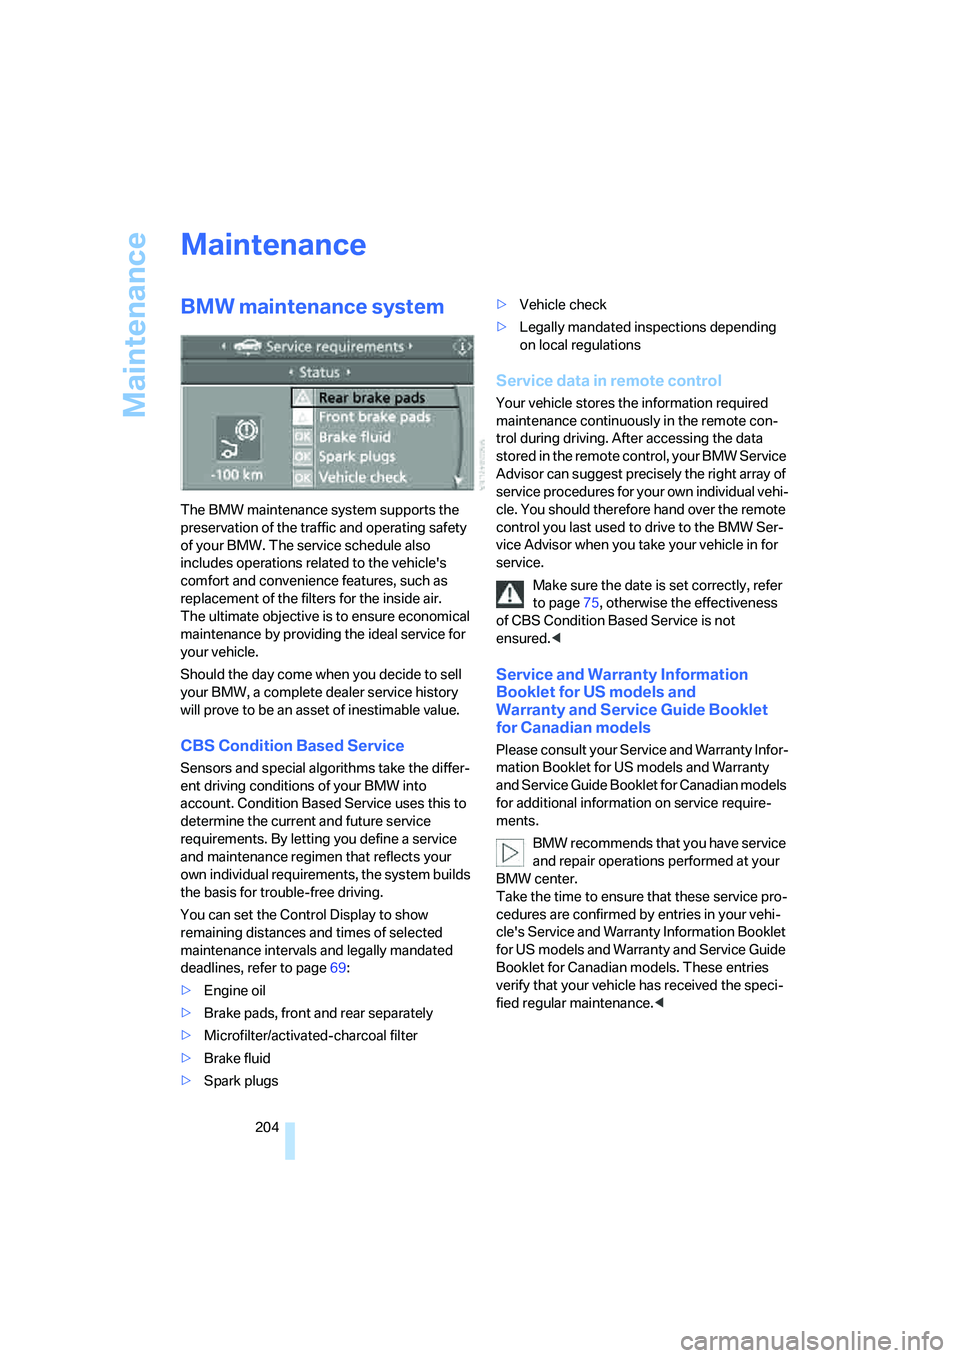
You can set the Control Display to show
remaining distances and times of selected
maintenance intervals and legally mandated
deadlines, refer to page69:
>Engine oil
>Brake pads, front and rear separately
>Microfilter/activated-charcoal filter
>Brake fluid
>Spark plugs>Vehicle check
>Legally mandated inspections depending
on local regulations
Service data in remote control
Your vehicle stores the information required
maintenance continuously in the remote con-
trol during driving. After accessing the data
stored in the remote control, your BMW Service
Advisor can suggest precisely the right array of
service procedures for your own individual vehi-
cle. You should therefore hand over the remote
control you last used to drive to the BMW Ser-
vice Advisor when you take your vehicle in for
service.
Make sure the date is set correctly, refer
to page75, otherwise the effectiveness
of CBS Condition Based Service is not
ensured.<
Service and Warranty Information
Booklet for US models and
Warranty and Service Guide Booklet
for Canadian models
Please consult your Service and Warranty Infor-
mation Booklet for US models and Warranty
and Service Guide Booklet for Canadian models
for additional information on service require-
ments.
BMW recommends that you have service
and repair operations performed at your
BMW center.
Take the time to ensure that these service pro-
cedures are confirmed by entries in your vehi-
cle's Service and Warranty Information Booklet
for US models and Warranty and Service Guide
Booklet for Canadian models. These entries
verify that your vehicle has received the speci-
fied regular maintenance.<
Page 207 of 253
Mobility
205Reference
At a glance
Controls
Driving tips
Communications
Navigation
Entertainment
Socket for OBD Onboard
Diagnostics interface
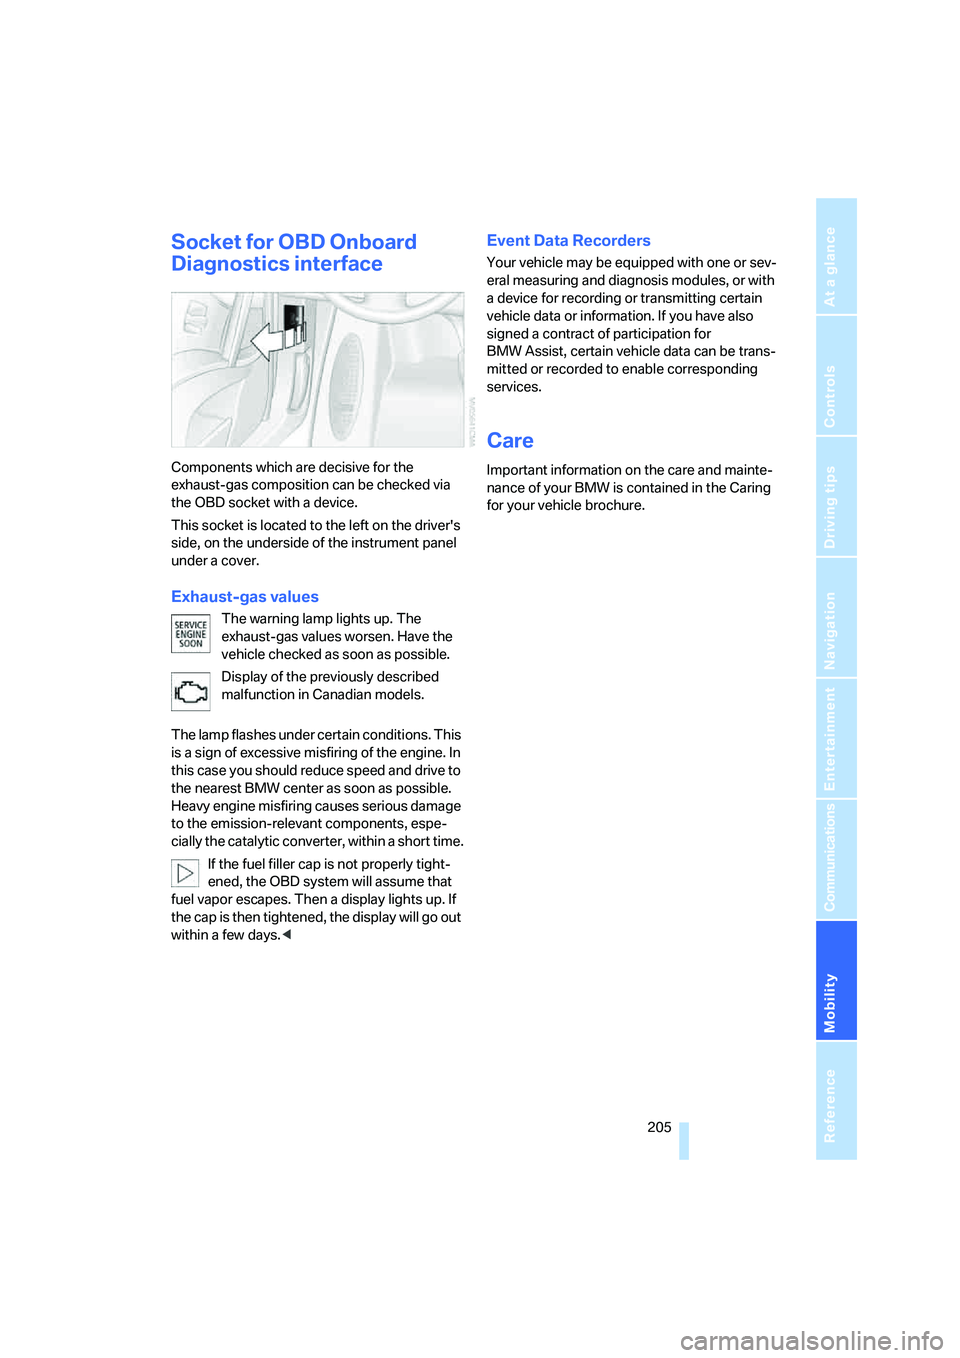
Components which are decisive for the
exhaust-gas composition can be checked via
the OBD socket with a device.
This socket is located to the left on the driver's
side, on the underside of the instrument panel
under a cover.
Exhaust-gas values
The warning lamp lights up. The
exhaust-gas values worsen. Have the
vehicle checked as soon as possible.
Display of the previously described
malfunction in Canadian models.
The lamp flashes under certain conditions. This
is a sign of excessive misfiring of the engine. In
this case you should reduce speed and drive to
the nearest BMW center as soon as possible.
Heavy engine misfiring causes serious damage
to the emission-relevant components, espe-
cially the catalytic converter, within a short time.
If the fuel filler cap is not properly tight-
ened, the OBD system will assume that
fuel vapor escapes. Then a display lights up. If
the cap is then tightened, the display will go out
within a few days.<
Event Data Recorders
Your vehicle may be equipped with one or sev-
eral measuring and diagnosis modules, or with
a device for recording or transmitting certain
vehicle data or information. If you have also
signed a contract of participation for
BMW Assist, certain vehicle data can be trans-
mitted or recorded to enable corresponding
services.
Care
Important information on the care and mainte-
nance of your BMW is contained in the Caring
for your vehicle brochure.
Page 217 of 253
Mobility
215Reference
At a glance
Controls
Driving tips
Communications
Navigation
Entertainment
First-aid kit*
Some of the articles contained in the first-aid kit
have a limited service life. Therefore, check the
expiration dates of the contents regularly and
replace the contents concerned in good time if
necessary.
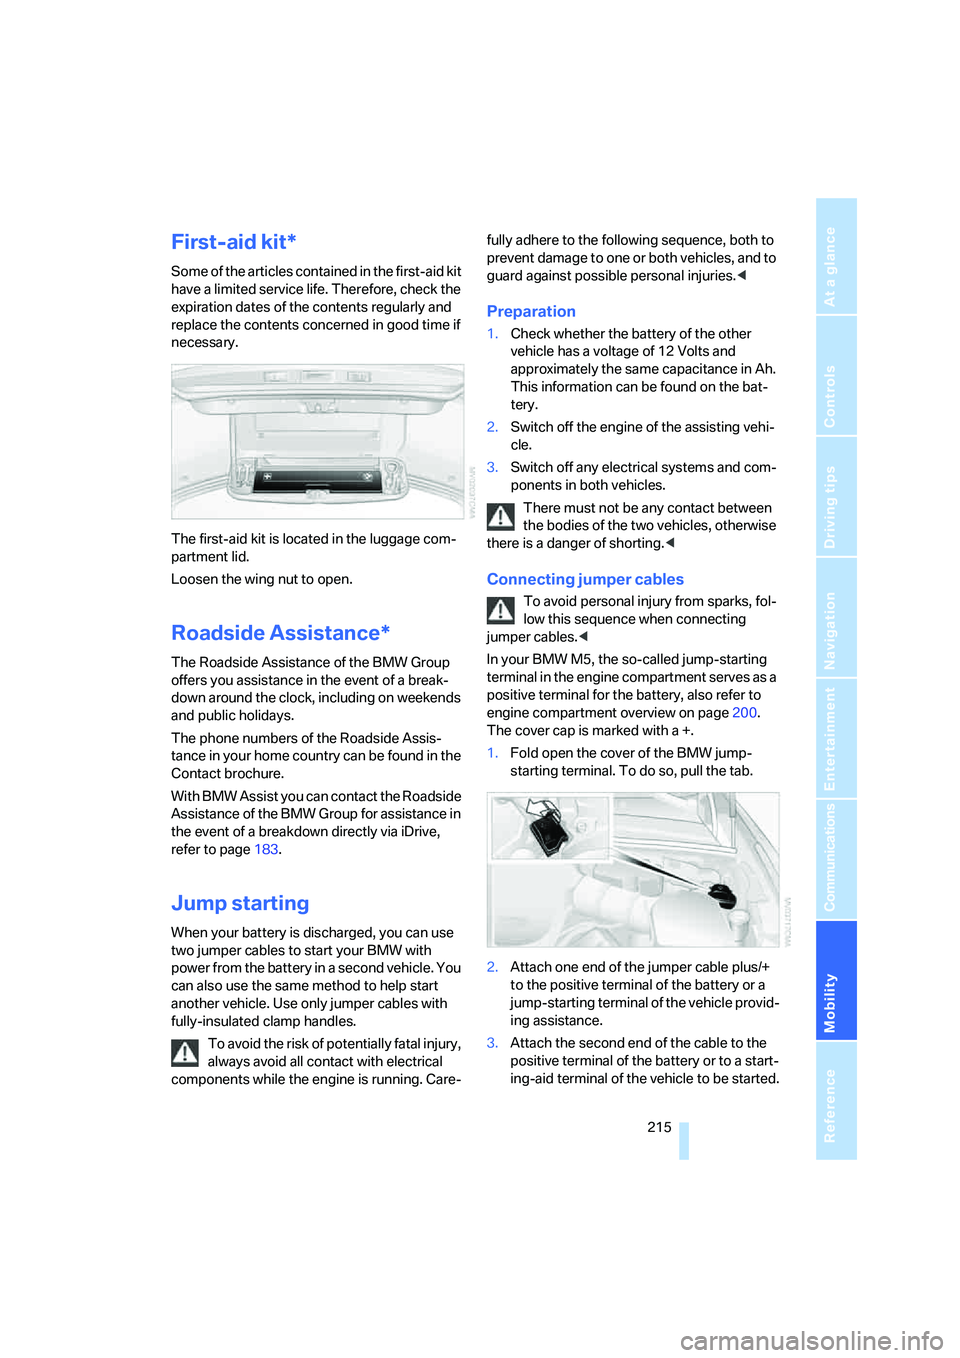
The first-aid kit is located in the luggage com-
partment lid.
Loosen the wing nut to open.
Roadside Assistance*
The Roadside Assistance of the BMW Group
offers you assistance in the event of a break-
down around the clock, including on weekends
and public holidays.
The phone numbers of the Roadside Assis-
tance in your home country can be found in the
Contact brochure.
With BMW Assist you can contact the Roadside
Assistance of the BMW Group for assistance in
the event of a breakdown directly via iDrive,
refer to page183.
Jump starting
When your battery is discharged, you can use
two jumper cables to start your BMW with
power from the battery in a second vehicle. You
can also use the same method to help start
another vehicle. Use only jumper cables with
fully-insulated clamp handles.
To avoid the risk of potentially fatal injury,
always avoid all contact with electrical
components while the engine is running. Care-fully adhere to the following sequence, both to
prevent damage to one or both vehicles, and to
guard against possible personal injuries.<
Preparation
1.Check whether the battery of the other
vehicle has a voltage of 12 Volts and
approximately the same capacitance in Ah.
This information can be found on the bat-
tery.
2.Switch off the engine of the assisting vehi-
cle.
3.Switch off any electrical systems and com-
ponents in both vehicles.
There must not be any contact between
the bodies of the two vehicles, otherwise
there is a danger of shorting.<
Connecting jumper cables
To avoid personal injury from sparks, fol-
low this sequence when connecting
jumper cables.<
In your BMW M5, the so-called jump-starting
terminal in the engine compartment serves as a
positive terminal for the battery, also refer to
engine compartment overview on page200.
The cover cap is marked with a +.
1.Fold open the cover of the BMW jump-
starting terminal. To do so, pull the tab.
2.Attach one end of the jumper cable plus/+
to the positive terminal of the battery or a
jump-starting terminal of the vehicle provid-
ing assistance.
3.Attach the second end of the cable to the
positive terminal of the battery or to a start-
ing-aid terminal of the vehicle to be started.
Page 218 of 253
Giving and receiving assistance
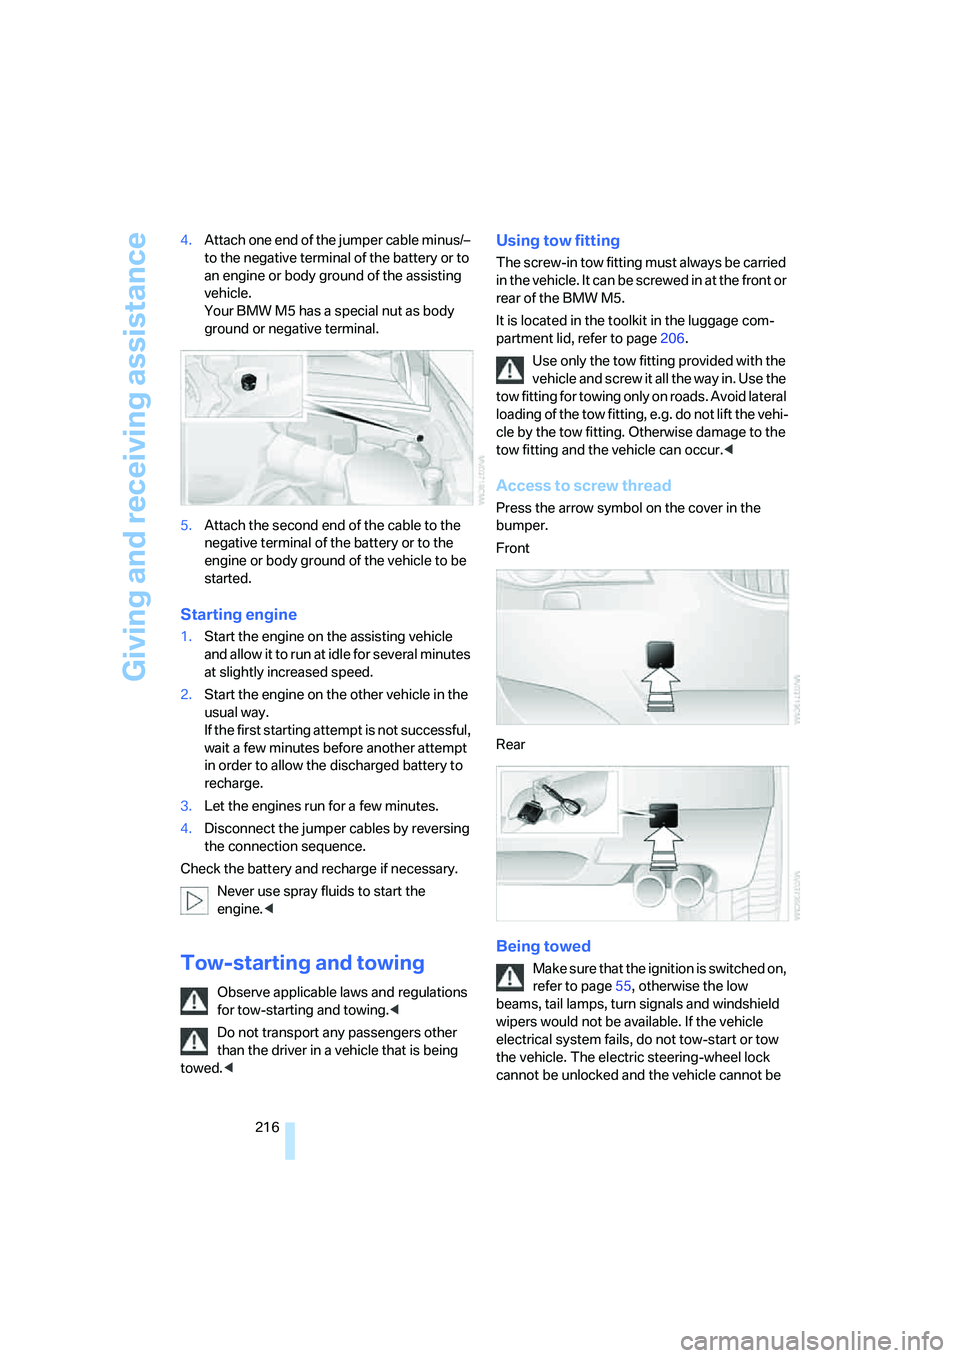
216 4.Attach one end of the jumper cable minus/–
to the negative terminal of the battery or to
an engine or body ground of the assisting
vehicle.
Your BMW M5 has a special nut as body
ground or negative terminal.
5.Attach the second end of the cable to the
negative terminal of the battery or to the
engine or body ground of the vehicle to be
started.
Starting engine
1.Start the engine on the assisting vehicle
and allow it to run at idle for several minutes
at slightly increased speed.
2.Start the engine on the other vehicle in the
usual way.
If the first starting attempt is not successful,
wait a few minutes before another attempt
in order to allow the discharged battery to
recharge.
3.Let the engines run for a few minutes.
4.Disconnect the jumper cables by reversing
the connection sequence.
Check the battery and recharge if necessary.
Never use spray fluids to start the
engine.<
Tow-starting and towing
Observe applicable laws and regulations
for tow-starting and towing.<
Do not transport any passengers other
than the driver in a vehicle that is being
towed.<
Using tow fitting
The screw-in tow fitting must always be carried
in the vehicle. It can be screwed in at the front or
rear of the BMW M5.
It is located in the toolkit in the luggage com-
partment lid, refer to page206.
Use only the tow fitting provided with the
vehicle and screw it all the way in. Use the
tow fitting for towing only on roads. Avoid lateral
loading of the tow fitting, e.g. do not lift the vehi-
cle by the tow fitting. Otherwise damage to the
tow fitting and the vehicle can occur.<
Access to screw thread
Press the arrow symbol on the cover in the
bumper.
Front
Rear
Being towed
Make sure that the ignition is switched on,
refer to page55, otherwise the low
beams, tail lamps, turn signals and windshield
wipers would not be available. If the vehicle
electrical system fails, do not tow-start or tow
the vehicle. The electric steering-wheel lock
cannot be unlocked and the vehicle cannot be
Page 220 of 253
Giving and receiving assistance
218 4.Tow-start with the clutch completely
depressed and slowly release the clutch.
After the engine starts, immediately
depress the clutch again completely.
5.Stop at a suitable location, remove the tow
bar or rope and switch off the hazard warn-
ing flashers.
6.Have the vehicle checked.
Sequential Manual Transmission with
Drivelogic
1.Switch on the hazard warning flashers,
comply with country-specific regulations.
2.Switch on the ignition, refer to page55.
3.Tow-start in selector lever position N.
4.Move the selector lever into the drive posi-
tion and pull toward + within 2 seconds.
The correct gear will be selected and
engaged automatically.
5.Stop at a suitable location, remove the tow
bar or rope and switch off the hazard warn-
ing flashers.
6.Have the vehicle checked.
Page 232 of 253
Everything from A to Z
230
Everything from A to Z
Index
"..." Identifies Control Display
texts used to select
individual functions, and
indicates where to find them
in the text.
A
ABS Antilock Brake
System79
– indicator/warning lamp81
Accepted calls174
Accessories6
Accident, refer to Emergency
call214
Acoustic signal, refer to Check
Control71
Activated-charcoal filter for
automatic climate
control100
"Activation time" for parked
car ventilation100
Active head restraints,
front45
"Active seat back"50
Active seat ventilation47
Adapter for spare key28
Adaptive brake lamps, refer to
Brake force display86
Adaptive Head Light93
"Add digits" for mobile
phone175
Additives
– coolant202
– engine oil, refer to Approved
engine oils202
"Address book" for
navigation128Address for navigation
– deleting130
– entering121,124
– selecting129
– storing129
– storing current position129
"Add to address book"128
"Add to destination
list"124,126
Adjusting active backrest
width43
Adjusting interior
temperature97
Adjusting the tone during
audio operation, refer to
Tone control147
Adjusting thigh support42
Adjustment in audio mode
– front/rear balance148
– right/left balance148
"After door opened"44
"After unlocking"44
Airbags87
– indicator/warning lamp88
– indicator lamp for front
passenger airbags88
– sitting safely41
Air distribution
– automatic97
– manual98
Airing, refer to Ventilation99
Air recirculation
– AUC Automatic
recirculated-air control99
– recirculated-air mode99
"Air recirculation on / off"49
Air supply, automatic climate
control96
Air volume98
AKI, refer to Fuel quality193Alarm system35
– avoiding unintentional
alarms36
– interior motion sensor35
– switching off alarm35
– switching off tilt alarm
sensor and interior motion
sensor36
– tilt alarm sensor35
"All channels"156
"All doors"31
All-season tires, refer to
Winter tires198
"All stations" calling up with
radio150,153
Alterations, technical, refer to
For your own safety5
Altering stretch of road137
Alternate route, refer to
Bypassing traffic
congestion140
"AM", reception
range147,150
Antenna, refer to Caring for
your vehicle brochure
Antenna for mobile phone168
Antifreeze
– coolant202
– washer fluid63
Antilock Brake System
ABS79
– indicator/warning lamp81
Anti-theft alarm system, refer
to Alarm system35
Anti-theft system, refer to
Central locking system30
Approved axle loads, refer to
Weights224
Approved engine oils202
Approved gross vehicle
weight, refer to Weights224
Armrest, refer to Center
armrest, rear107
Page 235 of 253
Reference 233
At a glance
Controls
Driving tips
Communications
Navigation
Entertainment
Mobility
CD changer159
– controls146
– fast forward/reverse163
– installation location163
– random order162
– repeating a track162
– sampling tracks161
– selecting a CD159
– selecting a track160
– switching on/off146
– tone control147
– volume147
CD player159
– controls146
– fast forward/reverse163
– random order162
– repeating a track162
– sampling a track161
– selecting a track160
– switching on/off146
– tone control147
– volume147
Center armrest
– front104
– rear107
Center brake lamp207
Center console14
"Central locking"30
Central locking
– from inside32
– from outside30
Central locking system30
– comfort access36
Change "Route
preference"131
Changes, technical, refer to
For your own safety5
Changes, technical, refer to
Parts and accessories6
Changing language on
Control Display76
Changing scale for
navigation135
Changing units of measure on
Control Display76
Changing wheels197,210
CHECK button72
Check Control71"Check Control
messages"72
Check Gas Cap192
Checking the air pressure,
refer to Tire inflation
pressure194
Child restraint fixing system
LATCH53
Child restraint systems52
Child-safety lock54
Child seats, refer to
Transporting children
safely52
Chime, refer to Check
Control71
Chock211
Chrome parts, refer to Caring
for your vehicle brochure
Cigarette lighter106
Cigarette lighter socket, refer
to Connecting electrical
devices106
Cleaning, refer to Caring for
your vehicle brochure
"Climate"46,97
Clock67
– 12h/24h mode75
– hour signal75
– setting time and date74
Closing
– from inside32
– from outside30
Closing fuel filler cap192
Clothes hooks105
Cockpit10
Cold start, refer to Starting
engine56
"Comfort", active backrest
width adjustment43
Comfort access36
– replacing battery, remote
control37
Comfort area, refer to Around
the center console14Comfort operation
– glass sunroof31
– windows31
– windows with comfort
access37
– with comfort access37
"Comfort" with EDC82
"Communication"173,183
Compact Disc
– refer to CD changer159
– refer to CD player159
Compartment for remote
control, refer to Ignition
lock55
Compartments, refer to
Storage compartments105
Compressed audio files159
Computer67
– clock67
– displays on Control
Display68
– hour signal75
"Concert hall", refer to Tone
control148
"Concierge"
185
Condensation, refer to When
vehicle is parked114
Condition Based Service
CBS204
"Confirmation"31
Confirmation signals for
locking and unlocking31
Connecting car vacuum
cleaner, refer to Connecting
electrical devices106
Consumption, refer to
Average fuel
consumption68
Consumption statistics, refer
to Average fuel
consumption68
"Continue guidance to
destination?"134
Control Center, refer to
iDrive16