warning BMW M5 SEDAN 2013 Owners Manual
[x] Cancel search | Manufacturer: BMW, Model Year: 2013, Model line: M5 SEDAN, Model: BMW M5 SEDAN 2013Pages: 230, PDF Size: 6.29 MB
Page 11 of 230
scribed in this Owner's Manual may differ from
those in your vehicle.
Updates made after the editorial
deadline
Any updates made after the editorial deadline
for the Owner's Manuals are located in the ap‐
pendix of the printed quick reference for the
vehicle.
For your own safety
Maintenance and repairs
Advanced technology, e.g., the use of modern
materials and high-performance electronics,
requires suitable maintenance and repair
methods.
Therefore, have this work performed only by a
BMW center or a workshop that works accord‐
ing to BMW repair procedures with appropri‐
ately trained personnel.
If this work is not carried out properly, there is
the danger of subsequent damage and related
safety hazards.
Parts and Accessories
Seite 7Notes7
Online Edition for Part no. 01 40 2 909 953 - VI/13
California Proposition 65 Warning
California laws require us to state the following
warning:
Engine exhaust and a wide variety of automo‐
bile components and parts, including compo‐
nents found in the interior furnishings in a vehi‐
cle, contain or emit chemicals known to the
State of California to cause cancer and birth
defects and reproductive harm. In addition,
certain fluids contained in vehicles and certain
products of component wear contain or emit
chemicals known to the State of California to
cause cancer and birth defects or other repro‐
ductive harm. Battery posts, terminals and re‐
lated accessories contain lead and lead com‐
pounds. Wash your hands after handling. Used
engine oil contains chemicals that have caused
cancer in laboratory animals. Always protect
your skin by washing thoroughly with soap and
water.
Service and warranty
We recommend that you read this publication
thoroughly. Your vehicle is covered by the fol‐
lowing warranties:
BMW recommends using parts and
accessories approved by BMW for this
Your BMW center is the right contact for
genuine BMW parts and accessories, other
products approved by BMW and related
qualified advice.
BMW has tested these products for safety and
suitability in relation to BMW vehicles.
BMW can assume responsibility for them.
However, we cannot assume any responsibility
whatsoever for parts and accessories that have
not been specifically approved by BMW.
BMW cannot evaluate whether each individual
product from another manufacturer can be
used with BMW vehicles without presenting a
safety hazard. This guarantee is also not
applicable when country-specific government
approval has been granted. Testing of this kind
may fail to embrace the entire range of
potential operating conditions to which
components might be exposed on BMW
vehicles. Such products could conceivably fail
to comply with BMW's own stringent quality
standards.
purpose.
Page 16 of 230
CockpitVehicle equipment
All standard, country-specific and optional
equipment that is offered in the model series is
described in this chapter. Therefore, equip‐ment is also described that is not available in a
vehicle, e. g., because of the selected optional
equipment or country variant. This also applies
for safety-related functions and systems.
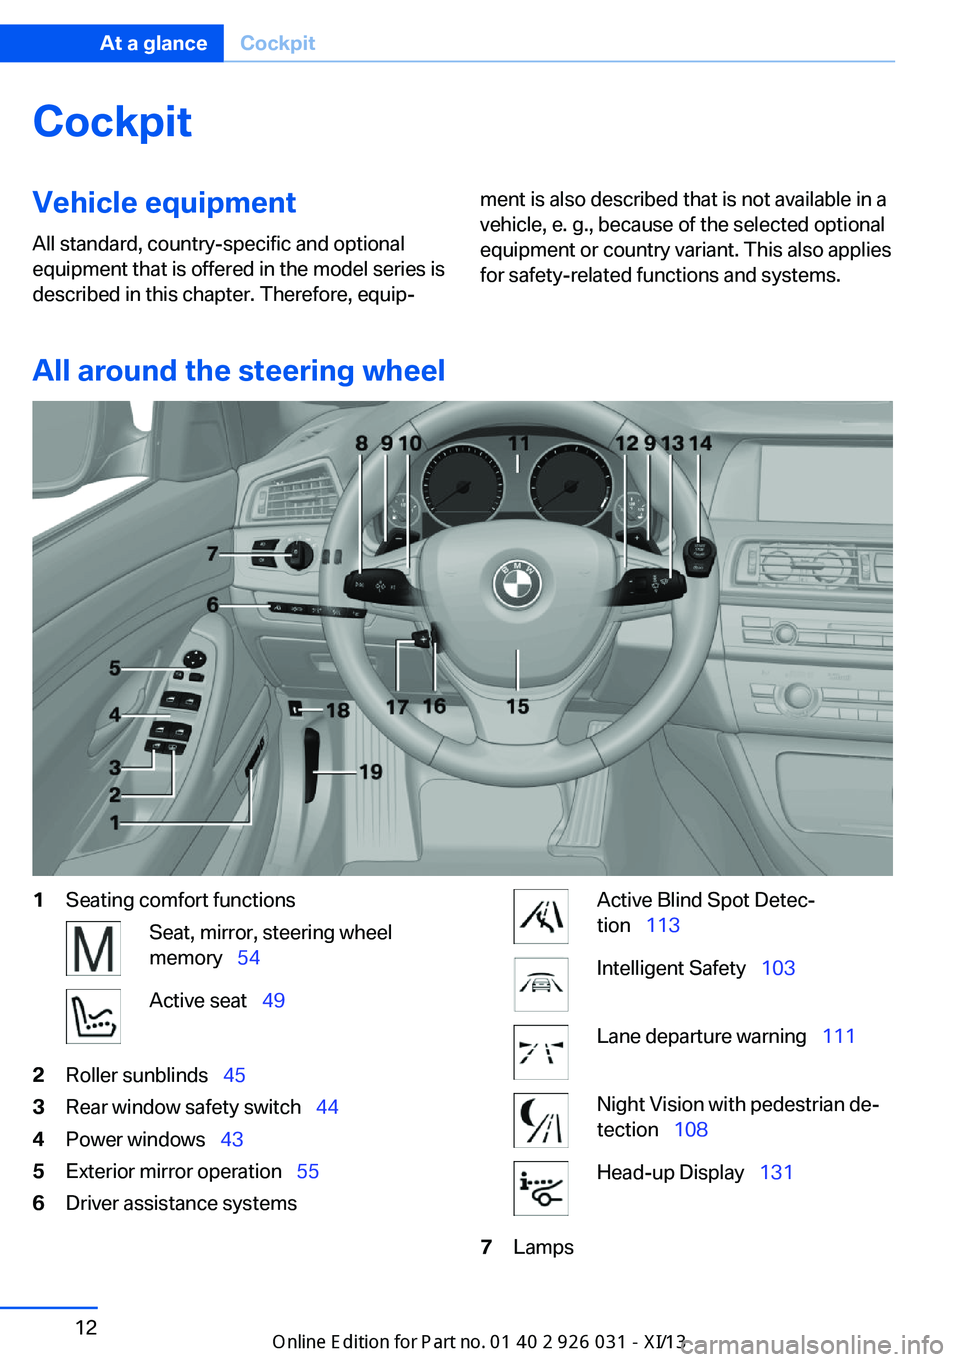
All around the steering wheel
1Seating comfort functionsSeat, mirror, steering wheel
memory 54Active seat 492Roller sunblinds 453Rear window safety switch 444Power windows 435Exterior mirror operation 556Driver assistance systemsActive Blind Spot Detec‐
tion 113Intelligent Safety 103Lane departure warning 111Night Vision with pedestrian de‐
tection 108Head-up Display 1317LampsSeite 12At a glanceCockpit12
Online Edition for Part no. 01 40 2 909 953 - VI/13
Page 18 of 230
19Unlocking the hood
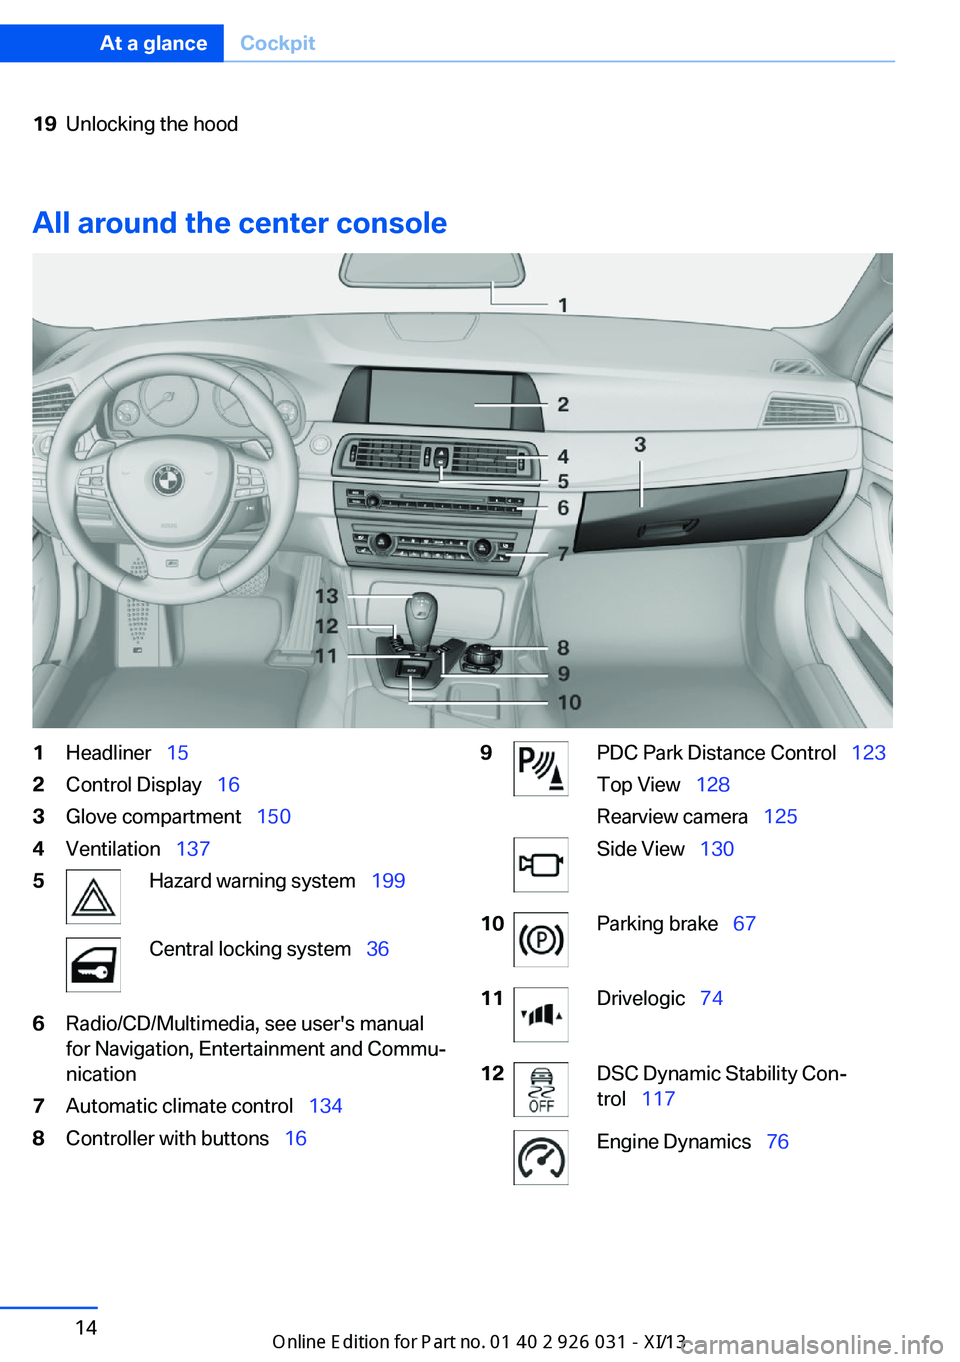
All around the center console
1Headliner 152Control Display 163Glove compartment 1504Ventilation 1375Hazard warning system 199Central locking system 366Radio/CD/Multimedia, see user's manual
for Navigation, Entertainment and Commu‐
nication7Automatic climate control 1348Controller with buttons 169PDC Park Distance Control 123
Top View 128
Rearview camera 125Side View 13010Parking brake 6711Drivelogic 7412DSC Dynamic Stability Con‐
trol 117Engine Dynamics 76Seite 14At a glanceCockpit14
Online Edition for Part no. 01 40 2 909 953 - VI/13
Page 36 of 230
Profile management
Opening the profiles A different profile can be called up than the
one associated with the remote control cur‐
rently in use.1."Settings"2."Profiles"3.Select a profile.
Called up profile is assigned to the remote
control being used at the time.
Renaming profiles
1."Settings"2."Profiles"
The current profile is selected.3.Open "Options".4."Rename current profile"
Resetting profiles The settings of the active profile are reset to
their default values.
1."Settings"2."Profiles"
The current profile is selected.3.Open "Options".4."Reset current profile"
Importing profiles
Existing settings and contacts are overwritten
with the imported profile.
1."Settings"2."Profiles"3."Import profile"4.BMW Online: "BMW Online"
USB interface, refer to page 146: "USB
device"Exporting profiles
Most settings of the active profile and the
saved contacts can be exported.
This can be helpful for securing and retrieving
personal settings, before delivering the vehicle
to a workshop for example.1."Settings"2."Profiles"3."Export profile"4.BMW Online: "BMW Online"
USB interface, refer to page 146: "USB
device"
Using the guest profile
The guest profile can be used to make individ‐
ual settings without affecting the three Per‐
sonal Profiles.
This can be useful for drivers who are using
the vehicle temporarily and do not have their
own profile.
1."Settings"2."Profiles"
The current profile is selected.3.Open "Guest".4.Create the settings.
Note: the guest profile cannot be renamed.
Display profile list during start
The profile list can be displayed during each
start for selecting the desired profile.
1."Settings"2."Profiles"3.Open "Options".4."Display user list at startup"
Personal Profile settings
The following functions and settings can be
stored in a profile.
▷Collision warning: warning time.Seite 32ControlsOpening and closing32
Online Edition for Part no. 01 40 2 909 953 - VI/13
Page 37 of 230
▷Exterior mirror position.▷CD/Multimedia: audio source listened to
last.▷Unlocking/locking of the vehicle: settings.▷Driver's seat position: automatic retrieval
after unlocking.▷Programmable memory buttons: assign‐
ment.▷Head-up Display: selection, brightness,
position and rotation of the display.▷Headlamp courtesy delay feature: time set‐
ting.▷Tone: tone settings.▷Automatic climate control: settings.▷Steering wheel position.▷M Drive: configurations.▷Navigation: map views, route criteria, voice
output on/off.▷Night Vision with pedestrian detection.▷Intelligent Safety: individual settings.▷Park Distance Control PDC: adjusting the
signal tone volume.▷Radio: stored stations, station listened to
last, special settings.▷Rearview camera: selection of functions
and type of display.▷Side View: selection of the display type.▷Language on the Control Display.▷Lane departure warning: last setting, on/
off.▷Active Blind Spot Detection: last setting,
on/off.▷Daytime running lights: current setting.▷Triple turn signal activation.▷Locking the vehicle: after a brief period or
after starting to drive.Central locking system
The concept The central locking system becomes active
when the driver's door is closed.
The system simultaneously engages and re‐
leases the locks on the following:▷Doors.▷Trunk lid.▷Fuel filler flap.
Operating from the outside
▷Via the remote control.▷Via the driver's door lock.▷Via the door handles.▷Via the button in the trunk lid.
The following takes place simultaneously
when locking/unlocking the vehicle via the re‐
mote control:
▷Depending on how the vehicle is equipped,
the theft protection is activated/deacti‐
vated. Theft protection prevents the doors
from being unlocked using the lock but‐
tons or the door opener.▷The welcome lamps, interior lamps and
courtesy lamps are switched on and off.▷The alarm system, refer to page 42, is
armed or disarmed.
Operating from the inside
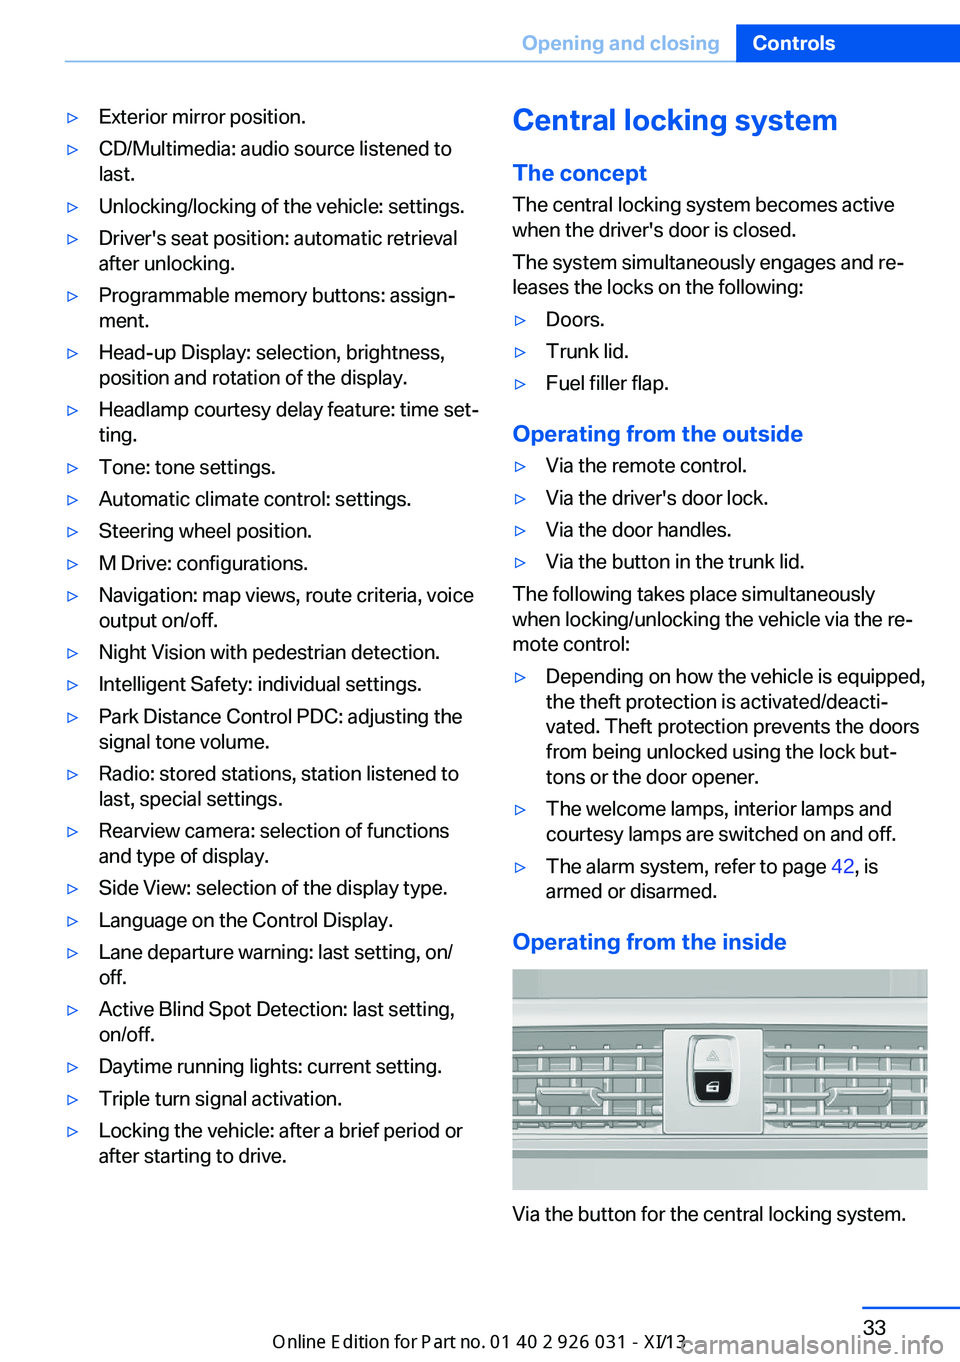
Via the button for the central locking system.
Seite 33Opening and closingControls33
Online Edition for Part no. 01 40 2 909 953 - VI/13
Page 38 of 230
If the vehicle has been locked from inside, the
fuel filler flap remains unlocked.
If an accident of a certain severity occurs, the
central locking system unlocks automatically.
The hazard warning system and interior lamps
come on.
Opening and closing: from
the outside
Using the remote control
General information Take the remote control with you
People or animals left unattended in a
parked vehicle can lock the doors from the in‐
side. Always take the remote control with you
when leaving the vehicle so that the vehicle
can then be opened from the outside.◀
Unlocking Press the button on the remote con‐
trol.
The vehicle is unlocked.
Welcome lamps, interior lamp and courtesy
lamps are switched on.
You can set how the vehicle is to be unlocked.
Create the settings, refer to page 41.
Convenient opening The remote control can be used to simultane‐
ously open the windows and the glass sunroof.
Press and hold the button on the re‐
mote control.
The windows and the glass sunroof open.
Releasing the button stops the motion.Locking
Press the button on the remote control.
Locking from the outside
Do not lock the vehicle from the outside
if there are people in it, as the vehicle cannot
be unlocked from inside without special knowl‐
edge.◀
Switching on interior lamps and
courtesy lamps
Press the button on the remote control
with the vehicle locked.
Panic mode
You can trigger the alarm system if you find
yourself in a dangerous situation.
Press the button on the remote con‐
trol for at least 3 seconds.
To switch off the alarm: press any button.
Switching on the headlamp courtesy
delay feature
Briefly press the button on the remote
control.
The duration can be set in the Control Display.
Opening the trunk lid Press the button on the remote con‐
trol for approx. 1 second.
The trunk lid opens, regardless of whether it
was previously locked or unlocked.
During opening, the trunk lid pivots back and
up. Ensure that adequate clearance is available
before opening.
In some vehicle equipment variants, the trunk
lid can only be opened using the remote con‐
trol if the vehicle has been unlocked.Seite 34ControlsOpening and closing34
Online Edition for Part no. 01 40 2 909 953 - VI/13
Page 44 of 230
Convenient closingPress the area on the door handle, arrow 2,
with the finger and hold it down.
In addition to locking, the windows and the
glass sunroof are closed.
Monitor the closing process
Monitor the closing process to ensure
that no one becomes trapped.◀
Unlocking the trunk lid separately
Press the button on the exterior of the trunk
lid, refer to page 36.
This corresponds to pressing the
but‐
ton on the remote control.
Do not place the remote control in the
cargo area
Take the remote control with you and do not
leave it in the cargo area; otherwise, the re‐
mote control is locked inside the vehicle when
the trunk lid is closed.◀
Opening/closing trunk lid with no-
touch activation
With Comfort Access, the trunk lid can be opened or closed with no-touch activation us‐
ing the remote control you are carrying.
A sensor detects a directed foot motion in the
center of the area at the rear of the car and the trunk lid opens.
Foot movement to be carried out Do not touch vehicle
With the foot motion, make sure there is
steady stance and do not touch the vehicle;
otherwise, there is a danger of injury, e. g. from
hot exhaust system parts.◀
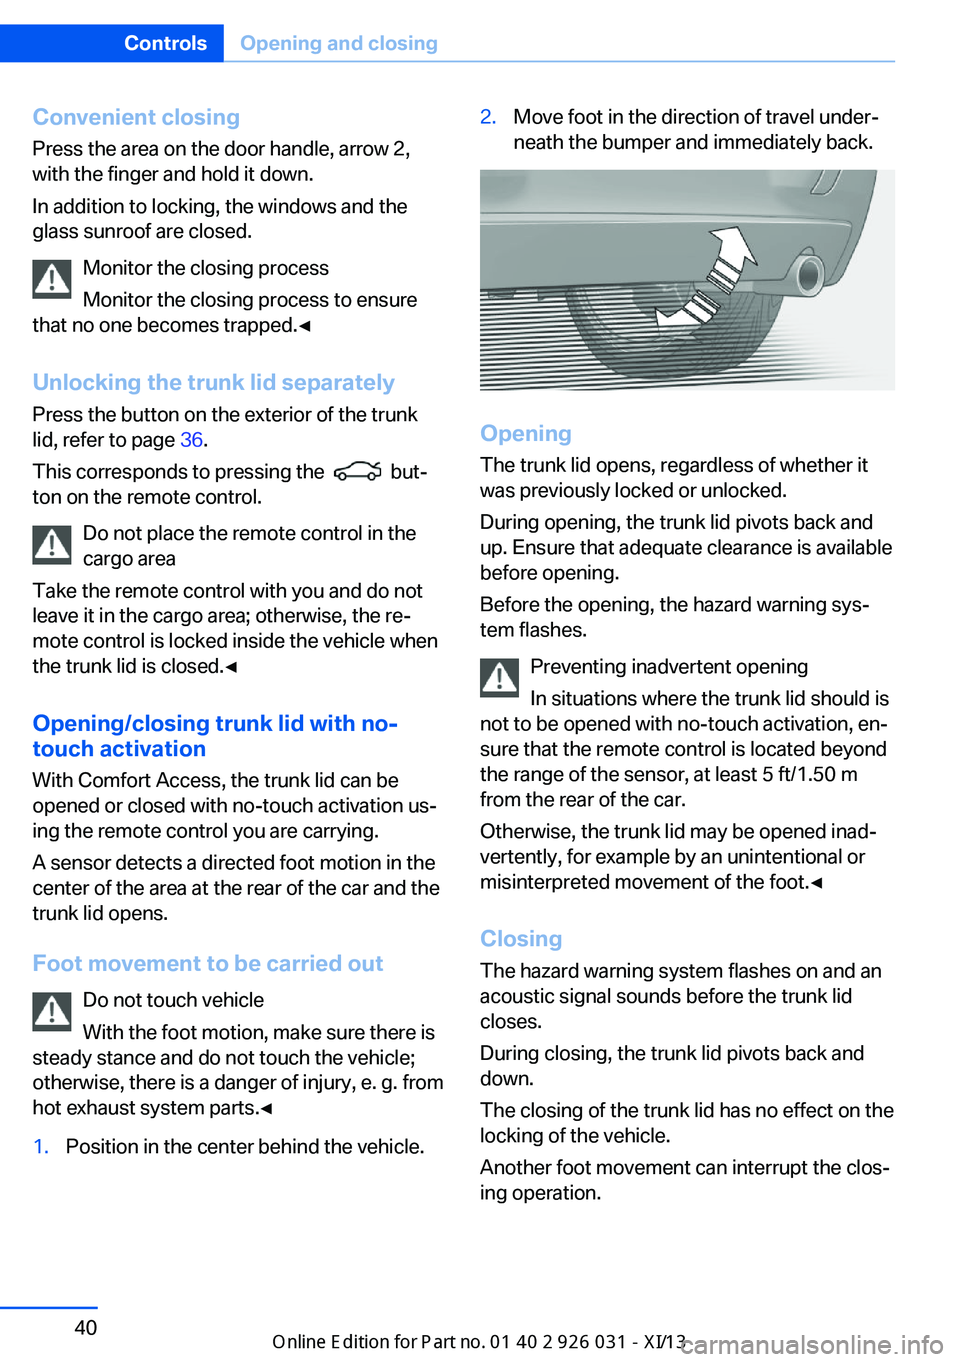
1.Position in the center behind the vehicle.2.Move foot in the direction of travel under‐
neath the bumper and immediately back.
Opening
The trunk lid opens, regardless of whether it
was previously locked or unlocked.
During opening, the trunk lid pivots back and
up. Ensure that adequate clearance is available
before opening.
Before the opening, the hazard warning sys‐
tem flashes.
Preventing inadvertent opening
In situations where the trunk lid should is
not to be opened with no-touch activation, en‐
sure that the remote control is located beyond
the range of the sensor, at least 5 ft/1.50 m
from the rear of the car.
Otherwise, the trunk lid may be opened inad‐
vertently, for example by an unintentional or
misinterpreted movement of the foot.◀
ClosingThe hazard warning system flashes on and an
acoustic signal sounds before the trunk lid
closes.
During closing, the trunk lid pivots back and
down.
The closing of the trunk lid has no effect on the
locking of the vehicle.
Another foot movement can interrupt the clos‐
ing operation.
Seite 40ControlsOpening and closing40
Online Edition for Part no. 01 40 2 909 953 - VI/13
Page 46 of 230
▷When a seat position switch is pressed.▷When a button of the seat, mirror, and
steering wheel memory is pressed briefly.
Activating the setting
1."Settings"2."Doors/key"3."Last seat position autom."
Alarm system
The conceptThe vehicle alarm system responds to:
▷Opening of a door, the hood or the trunk
lid.▷Movements in the vehicle.▷Changes in the vehicle tilt, e.g., during at‐
tempts to steal a wheel or when towing the
car.▷Interruptions in battery voltage.
The alarm system briefly indicates tampering:
▷By sounding an acoustic alarm.▷By switching on the hazard warning sys‐
tem.▷By flashing the high beams.
Arming and disarming the alarm
system
General information
When you lock or unlock the vehicle, either
with the remote control, Comfort Access or at
the door lock the alarm system is armed or dis‐
armed at the same time.
Door lock and armed alarm systemUnlocking via the door lock will trigger the
alarm on some country-specific versions.
In order to terminate this alarm, unlock vehicle
with the remote control or switch on the igni‐
tion, if necessary, by emergency detection of
the remote control.
Trunk lid and armed alarm system The trunk lid can be opened even when the
alarm system is armed.
Press the button on the remote con‐
trol for approx. 1 second.
With Comfort Access the trunk lid opens with
no-touch activation, refer to page 40.
After the trunk lid is closed, it is locked and
monitored again if the doors are locked. The
hazard warning system flashes once.
In some vehicle equipment variants, the trunk
lid can only be opened using the remote con‐
trol if the vehicle was unlocked first.
Panic mode You can trigger the alarm system if you find
yourself in a dangerous situation.
Press the button on the remote con‐
trol for at least 3 seconds.
To switch off the alarm: press any button.
Switching off the alarm▷Unlock the vehicle using the remote con‐
trol.▷With Comfort Access: If you are carrying
the remote control with you, pull on the
driver side or front passenger side door
handle.Seite 42ControlsOpening and closing42
Online Edition for Part no. 01 40 2 909 953 - VI/13
Page 67 of 230
DrivingVehicle equipment
All standard, country-specific and optional
equipment that is offered in the model series is
described in this chapter. Therefore, equip‐
ment is also described that is not available in a
vehicle, e. g., because of the selected optional
equipment or country variant. This also applies
for safety-related functions and systems.
Start/Stop button The concept Pressing the Start/Stop button
switches the ignition on or off
and starts the engine.
Double-clutch transmission:
The engine starts if the brake is
depressed while pressing the Start/Stop but‐
ton.
Manual transmission: the engine starts if the
clutch pedal is depressed when the Start/Stop
button is pressed.
Ignition onDouble-clutch transmission: Press the Start/
Stop button but do not depress the brake.
Manual-shift transmission: press the Start/
Stop button, and do not press on the clutch
pedal at the same time.
All vehicle systems are ready for operation.
Most of the indicator and warning lamps in the
instrument cluster light up for varying lengths
of time.
To save battery power when the engine is off,
switch off the ignition and any unnecessary
electronic systems/power consumers.
The ignition switches off automatically:▷When locking the vehicle, even if the low
beams are switched on.▷Shortly before the battery is discharged
completely, so that the engine can still be
started.
Note
If the engine is switched off and the ignition is
switched on, the system automatically
switches to the radio ready state when the
door is opened if the lights are switched off or
the daytime running lights are switched on.
Ignition off
Double-clutch transmission: Press the Start/
Stop button again, but do not depress the
brake.
Manual-shift transmission: press the Start/
Stop button again, and do not press on the
clutch pedal at the same time.
All indicator lamps in the instrument cluster go
out.
To save battery power when the engine is off,
switch off the ignition and any unnecessary
electronic systems/power consumers.
Transmission position P with the ignition
off
When the ignition is switched off, position P is
engaged automatically. When in an automatic
car wash, for example, ensure that the ignition
is not switched off accidentally.◀
The ignition automatically cuts off while the
vehicle is stationary and the engine is stopped:
▷When locking the vehicle, and when the
low beams are activated.▷Shortly before the battery is discharged
completely, so that the engine can still be
started. This function is only available
when the low beams are switched off.Seite 63DrivingControls63
Online Edition for Part no. 01 40 2 909 953 - VI/13
Page 73 of 230
Putting the parking brake into
operation1.Switch on the ignition.2. Press the switch while the brake is
depressed or transmission position P is
engaged.
It may take several seconds for the brake to be
put into operation. Any sounds associated with
this are normal.
The indicator lamp in the instrument
cluster goes out as soon as the parking
brake is ready for operation.
Lower lamp: indicator lamp in Canadian
models.
Turn signal, high beams, headlamp flasher
Turn signal Do not fold in the exterior mirrors
Do not fold in the exterior mirror while
driving and when the turn signals/warning
flashers are working, or else the additional
flasher lights in the exterior mirror will no lon‐
ger be in the prescribed position and will be
difficult to see.◀
Using turn signals
Press the lever beyond the resistance point.
To switch off manually, press the lever to the
resistance point.
Unusually rapid flashing of the indicator lamp
indicates that a turn signal bulb has failed.
Triple turn signal activation Press the lever to the resistance point.
The turn signal flashes three times.
The function can be activated or deactivated:1."Settings"2."Lighting"3."Triple turn signal"
Signaling briefly
Press the lever to the resistance point and hold
it there for as long as you want the turn signal
to flash.
High beams, headlamp flasher
▷High beams, arrow 1.▷Headlamp flasher, arrow 2.
Washer/wiper system Switching the wipers on/off and brief
wipe
Do not switch on the wipers if frozen
Do not switch on the wipers if they are
frozen onto the windshield; otherwise, the wiper blades and the windshield wiper motor
may be damaged.◀
Seite 69DrivingControls69
Online Edition for Part no. 01 40 2 909 953 - VI/13