navigation system BMW M6 CONVERTIBLE 2007 E64 User Guide
[x] Cancel search | Manufacturer: BMW, Model Year: 2007, Model line: M6 CONVERTIBLE, Model: BMW M6 CONVERTIBLE 2007 E64Pages: 256, PDF Size: 8.11 MB
Page 39 of 256
Controls
37Reference
At a glance
Driving tips
Communications
Navigation
Entertainment
Mobility
Comfort access*
Comfort access enables you to access your
vehicle without having to hold the remote con-
trol in your hand. It is sufficient to carry the
remote control with you, e.g. in your jacket
pocket. The vehicle automatically detects the
related remote control in the immediate vicinity
or in the interior.
Comfort access supports the following func-
tions:
>Unlocking/locking vehicle
>Comfort closing with Coupe
>Opening luggage compartment lid sepa-
rately
>Starting engine
Functional requirement
>The vehicle or the luggage compartment lid
can only be locked if the vehicle detects that
the remote control you are carrying is out-
side the vehicle.
>The next unlocking and locking cycle is not
possible until after approx. 2 seconds.
>The engine can only be started if the vehicle
detects that the remote control is located in
the vehicle.
Comparison with ordinary remote
control
You can control the functions mentioned previ-
ously with the comfort access or by pressing
the buttons on the remote control. Before doing
so, please familiarize yourself with the informa-
tion on opening and closing, starting on
page28.
The special features when using comfort
access are described below.
Should a short delay occur when opening
or closing the windows or the convertible
top, the system is checking whether a remote
control is located in the vehicle. Please repeat
opening or closing if necessary.<
Unlocking
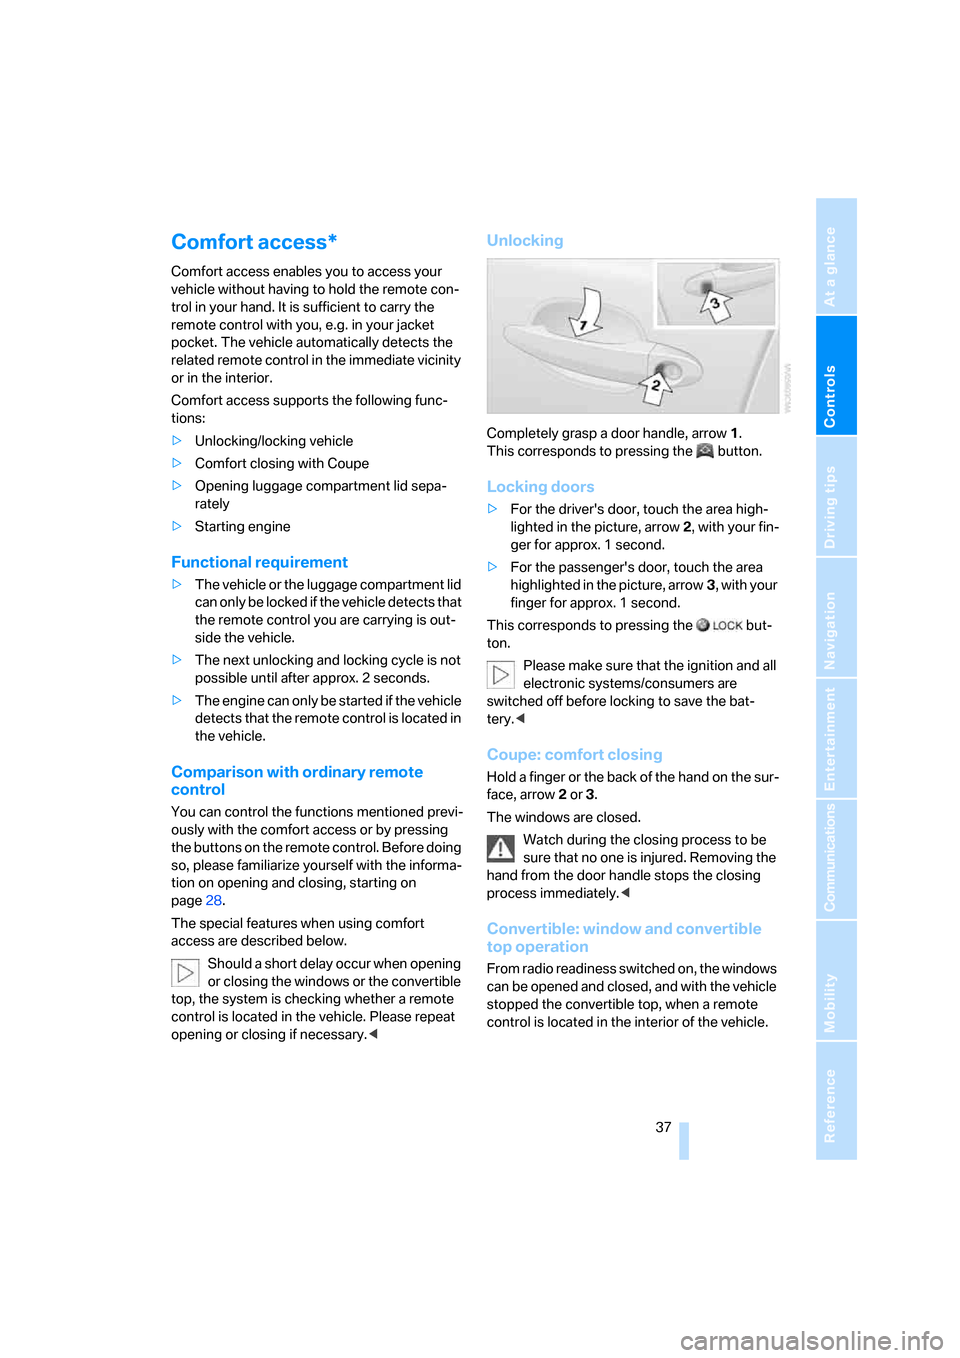
Completely grasp a door handle, arrow1.
This corresponds to pressing the button.
Locking doors
>For the driver's door, touch the area high-
lighted in the picture, arrow2, with your fin-
ger for approx. 1 second.
>For the passenger's door, touch the area
highlighted in the picture, arrow3, with your
finger for approx. 1 second.
This corresponds to pressing the but-
ton.
Please make sure that the ignition and all
electronic systems/consumers are
switched off before locking to save the bat-
tery.<
Coupe: comfort closing
Hold a finger or the back of the hand on the sur-
face, arrow2 or 3.
The windows are closed.
Watch during the closing process to be
sure that no one is injured. Removing the
hand from the door handle stops the closing
process immediately.<
Convertible: window and convertible
top operation
From radio readiness switched on, the windows
can be opened and closed, and with the vehicle
stopped the convertible top, when a remote
control is located in the interior of the vehicle.
Page 49 of 256
Controls
47Reference
At a glance
Driving tips
Communications
Navigation
Entertainment
Mobility
Seats
Note before adjusting
Never attempt to adjust your seat while
operating the vehicle. The seat could
respond with unexpected movement and the
ensuing loss of vehicle control could lead to an
accident.
On the front passenger side as well, do not tilt
the backrest too far toward the rear. Failure to
observe this precaution can prevent the belt
from providing effective protection against
injury, as the passenger could slide under the
belt in an accident.<
Also follow the instructions regarding damage
to the safety belt on page51.
Convertible: with the wind deflector fitted,
do not incline the front seat backrests too
far backward if the seat is to be moved back to
the end position. Otherwise, the wind deflector
will be damaged.<
Adjusting seat
To ensure that the safety systems con-
tinue to provide optimized protection,
please follow the adjustment instructions on
page46.<
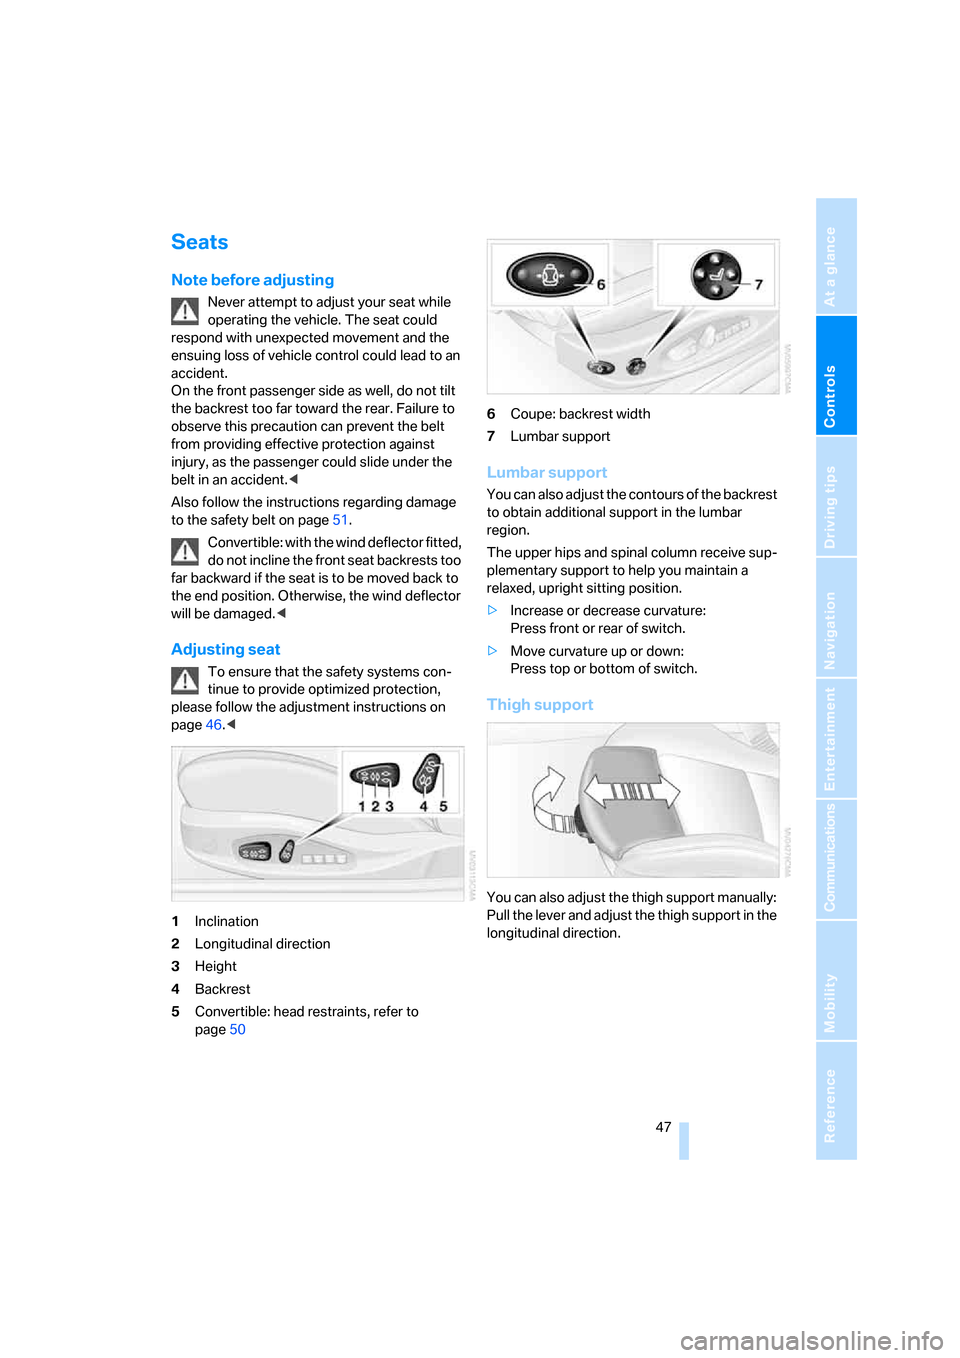
1Inclination
2Longitudinal direction
3Height
4Backrest
5Convertible: head restraints, refer to
page506Coupe: backrest width
7Lumbar support
Lumbar support
You can also adjust the contours of the backrest
to obtain additional support in the lumbar
region.
The upper hips and spinal column receive sup-
plementary support to help you maintain a
relaxed, upright sitting position.
>Increase or decrease curvature:
Press front or rear of switch.
>Move curvature up or down:
Press top or bottom of switch.
Thigh support
You can also adjust the thigh support manually:
Pull the lever and adjust the thigh support in the
longitudinal direction.
Page 53 of 256
Controls
51Reference
At a glance
Driving tips
Communications
Navigation
Entertainment
Mobility
Lock backrest warning lamp:
Lights up when the backrest is not
locked. At the same time, a message is
shown on the Control Display.
Safety belts
To ensure that the safety systems con-
tinue to provide optimized protection,
please follow the adjustment instructions on
page46.<
Before every drive, make sure that safety belts
are being worn at all of the occupied seats. Air-
bags complement the safety belt as an addi-
tional safety device, but they do not represent a
substitute.
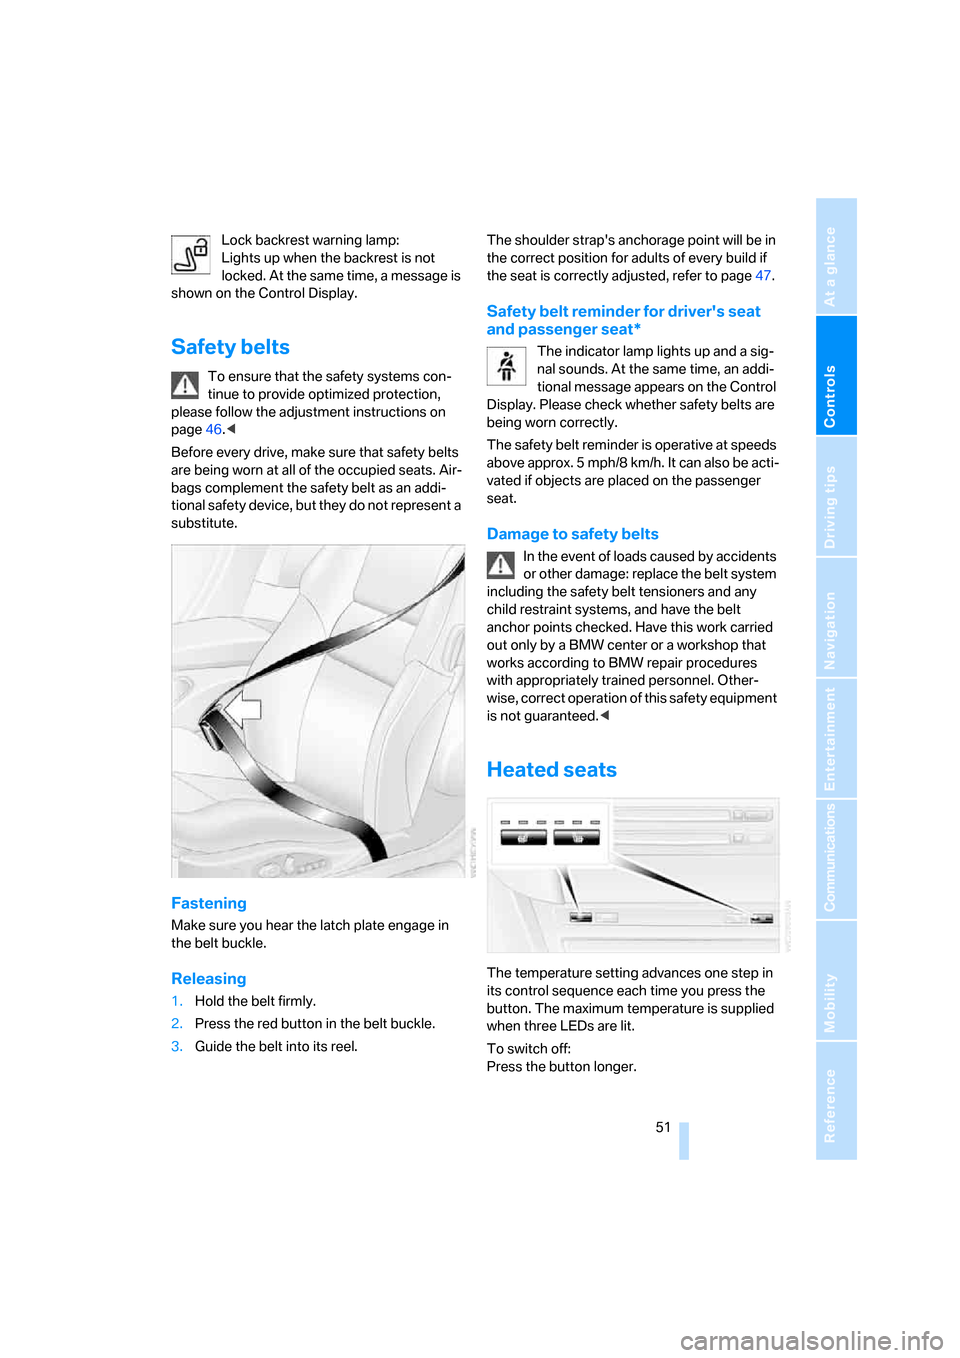
Fastening
Make sure you hear the latch plate engage in
the belt buckle.
Releasing
1.Hold the belt firmly.
2.Press the red button in the belt buckle.
3.Guide the belt into its reel.The shoulder strap's anchorage point will be in
the correct position for adults of every build if
the seat is correctly adjusted, refer to page47.
Safety belt reminder for driver's seat
and passenger seat*
The indicator lamp lights up and a sig-
nal sounds. At the same time, an addi-
tional message appears on the Control
Display. Please check whether safety belts are
being worn correctly.
The safety belt reminder is operative at speeds
above approx. 5 mph/8 km/h. It can also be acti-
vated if objects are placed on the passenger
seat.
Damage to safety belts
In the event of loads caused by accidents
or other damage: replace the belt system
including the safety belt tensioners and any
child restraint systems, and have the belt
anchor points checked. Have this work carried
out only by a BMW center or a workshop that
works according to BMW repair procedures
with appropriately trained personnel. Other-
wise, correct operation of this safety equipment
is not guaranteed.<
Heated seats
The temperature setting advances one step in
its control sequence each time you press the
button. The maximum temperature is supplied
when three LEDs are lit.
To switch off:
Press the button longer.
Page 57 of 256
Controls
55Reference
At a glance
Driving tips
Communications
Navigation
Entertainment
Mobility
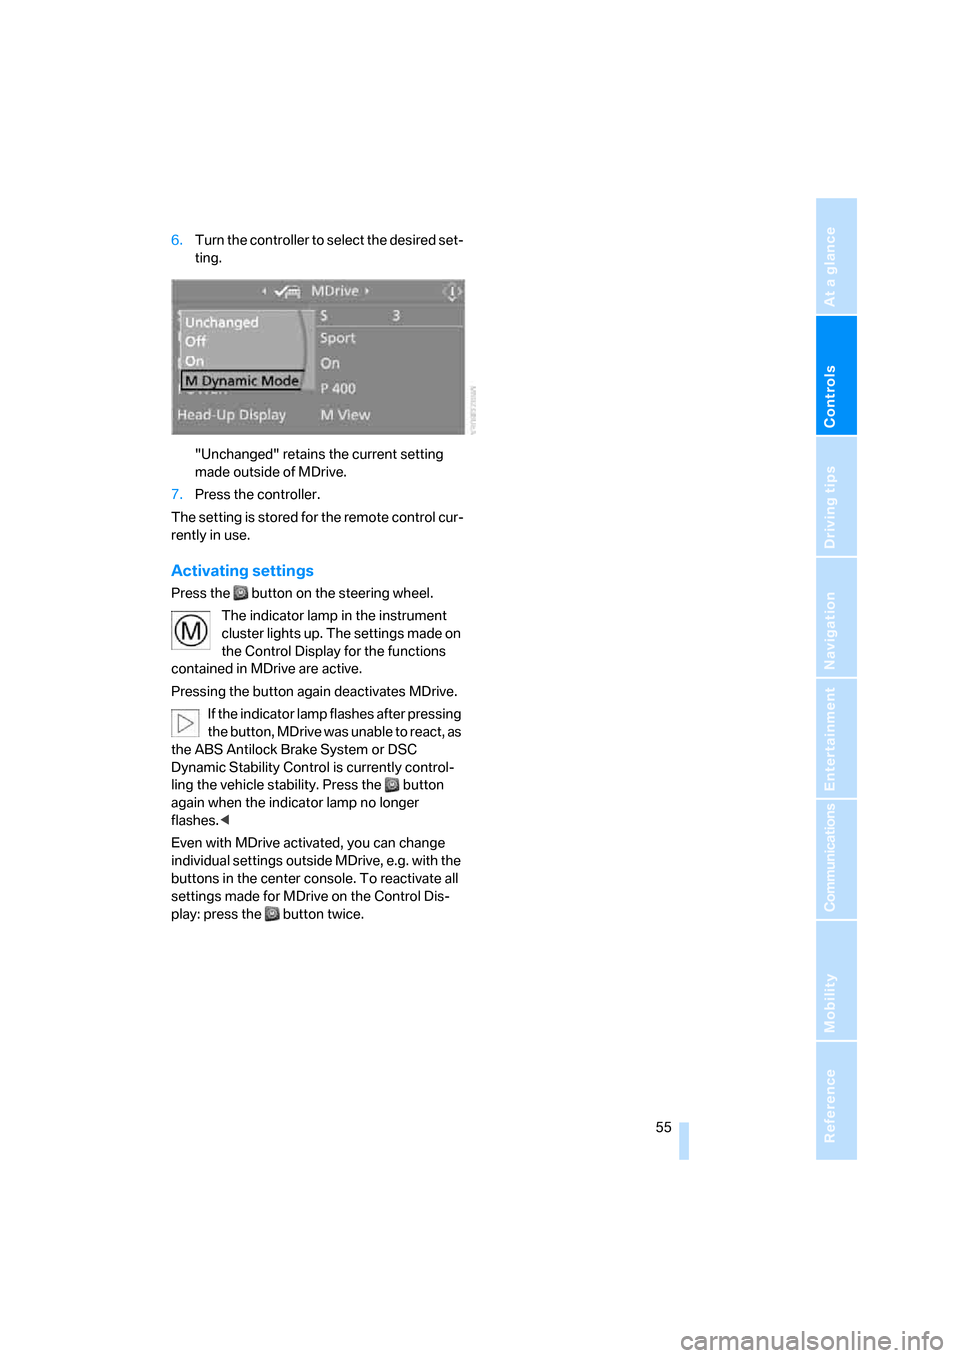
6.Turn the controller to select the desired set-
ting.
"Unchanged" retains the current setting
made outside of MDrive.
7.Press the controller.
The setting is stored for the remote control cur-
rently in use.
Activating settings
Press the button on the steering wheel.
The indicator lamp in the instrument
cluster lights up. The settings made on
the Control Display for the functions
contained in MDrive are active.
Pressing the button again deactivates MDrive.
If the indicator lamp flashes after pressing
the button, MDrive was unable to react, as
the ABS Antilock Brake System or DSC
Dynamic Stability Control is currently control-
ling the vehicle stability. Press the button
again when the indicator lamp no longer
flashes.<
Even with MDrive activated, you can change
individual settings outside MDrive, e.g. with the
buttons in the center console. To reactivate all
settings made for MDrive on the Control Dis-
play: press the button twice.
Page 59 of 256
Controls
57Reference
At a glance
Driving tips
Communications
Navigation
Entertainment
Mobility
Unlocking safety belt
1.Open the belt buckle.
2.Remove the child restraint system.
3.Allow the belt webbing to be pulled in com-
pletely.
Coupe: child restraint system with
tether strap
Only use the tether-strap mounting
points to secure child restraint systems,
otherwise the mounting points could be dam-
aged.<
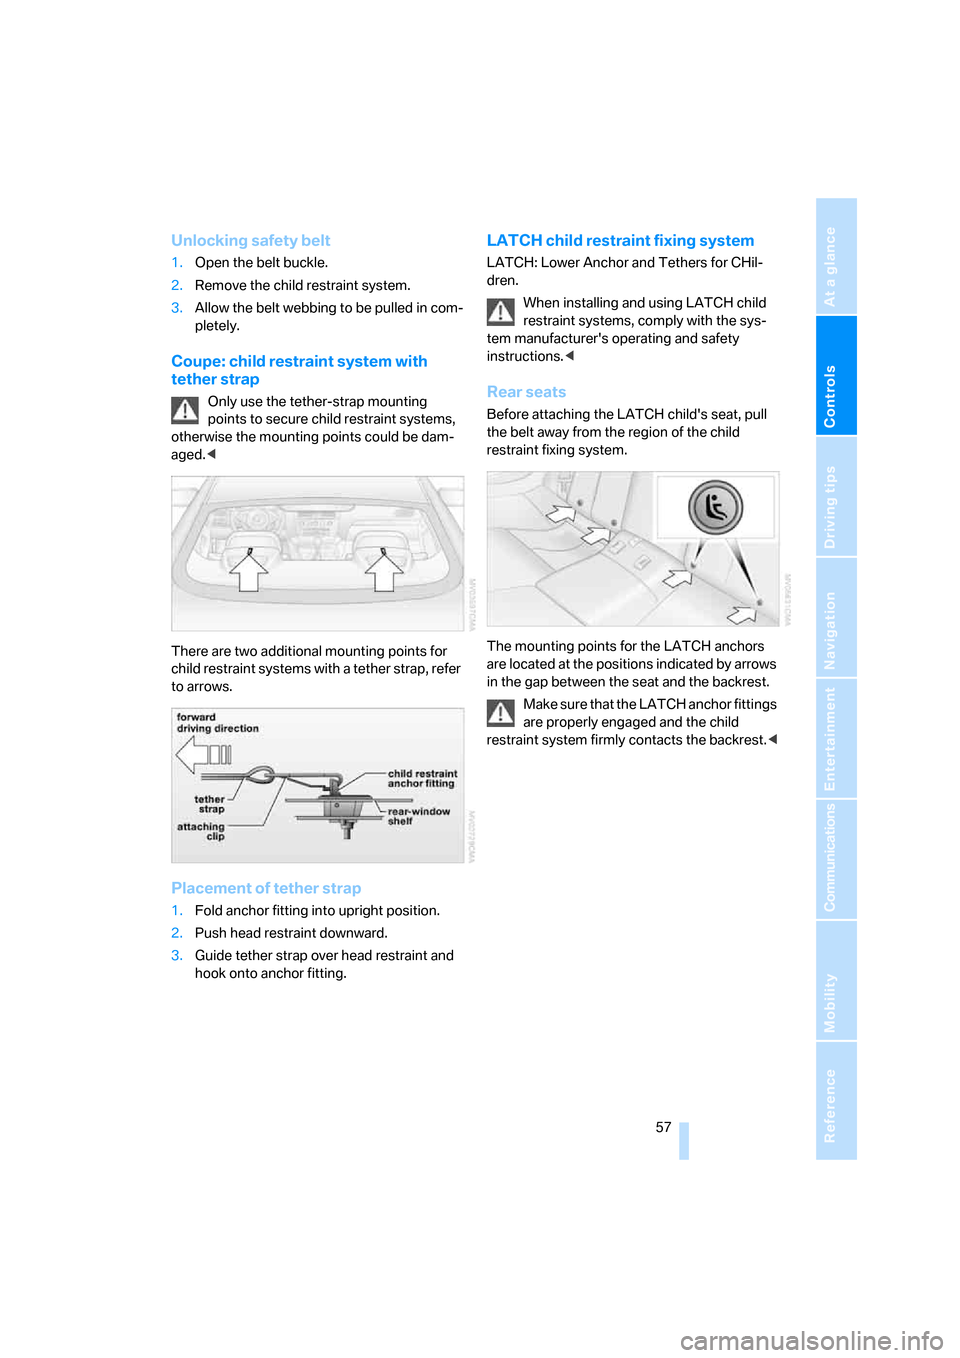
There are two additional mounting points for
child restraint systems with a tether strap, refer
to arrows.
Placement of tether strap
1.Fold anchor fitting into upright position.
2.Push head restraint downward.
3.Guide tether strap over head restraint and
hook onto anchor fitting.
LATCH child restraint fixing system
LATCH: Lower Anchor and Tethers for CHil-
dren.
When installing and using LATCH child
restraint systems, comply with the sys-
tem manufacturer's operating and safety
instructions.<
Rear seats
Before attaching the LATCH child's seat, pull
the belt away from the region of the child
restraint fixing system.
The mounting points for the LATCH anchors
are located at the positions indicated by arrows
in the gap between the seat and the backrest.
Make sure that the LATCH anchor fittings
are properly engaged and the child
restraint system firmly contacts the backrest.<
Page 61 of 256
Controls
59Reference
At a glance
Driving tips
Communications
Navigation
Entertainment
Mobility
Radio readiness and ignition off
All indicator and warning lamps in the instru-
ment cluster go out.
Starting engine
Do not run the engine in closed rooms,
otherwise the inhalation of toxic exhaust
gases can cause unconsciousness and death.
The exhaust gases contain carbon monoxide,
an odorless and colorless, but highly toxic gas.
Never leave an unattended vehicle with the
engine running, as such a vehicle represents a
potential safety hazard.
Before leaving the vehicle with the engine run-
ning, shift into neutral
* or move the selector
lever into position N and firmly apply the hand-
brake, otherwise the vehicle can begin to roll.<
Do not allow the engine to warm up by leaving it
running while the vehicle remains stationary.
Instead, drive off at a moderate engine speed.
Avoid frequent starting in quick succes-
sion or repeated starting attempts in
which the engine does not start. Otherwise, the
fuel is not burned at all or is burned inade-
quately and there is a danger of overheating and
damage to the catalytic converter.<
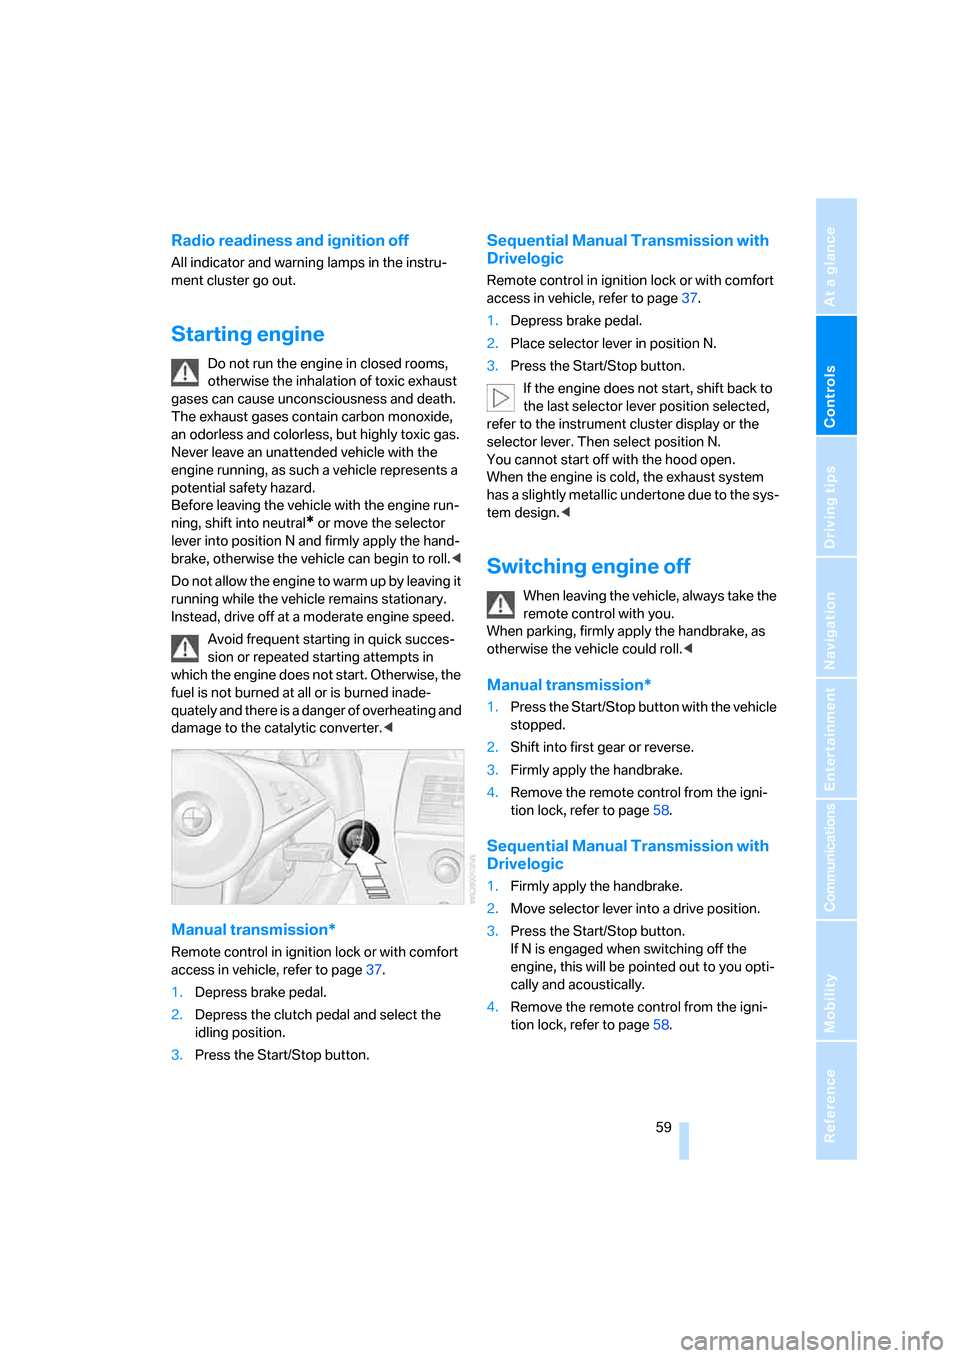
Manual transmission*
Remote control in ignition lock or with comfort
access in vehicle, refer to page37.
1.Depress brake pedal.
2.Depress the clutch pedal and select the
idling position.
3.Press the Start/Stop button.
Sequential Manual Transmission with
Drivelogic
Remote control in ignition lock or with comfort
access in vehicle, refer to page37.
1.Depress brake pedal.
2.Place selector lever in position N.
3.Press the Start/Stop button.
If the engine does not start, shift back to
the last selector lever position selected,
refer to the instrument cluster display or the
selector lever. Then select position N.
You cannot start off with the hood open.
When the engine is cold, the exhaust system
has a slightly metallic undertone due to the sys-
tem design.<
Switching engine off
When leaving the vehicle, always take the
remote control with you.
When parking, firmly apply the handbrake, as
otherwise the vehicle could roll.<
Manual transmission*
1.Press the Start/Stop button with the vehicle
stopped.
2.Shift into first gear or reverse.
3.Firmly apply the handbrake.
4.Remove the remote control from the igni-
tion lock, refer to page58.
Sequential Manual Transmission with
Drivelogic
1.Firmly apply the handbrake.
2.Move selector lever into a drive position.
3.Press the Start/Stop button.
If N is engaged when switching off the
engine, this will be pointed out to you opti-
cally and acoustically.
4.Remove the remote control from the igni-
tion lock, refer to page58.
Page 63 of 256
Controls
61Reference
At a glance
Driving tips
Communications
Navigation
Entertainment
Mobility
Sequential Manual
Transmission with Drivelogic
The concept
The SMG Sequential Manual Transmission
with Drivelogic is an automated manual trans-
mission in which an electrohydraulic system
handles the clutching and gear changes.
The Sequential Manual Transmission is oper-
ated with the selector lever and two shift pad-
dles on the steering wheel.
It offers the following functions:
>Choice of manual or automatic mode:
Sequential mode or Drive mode
>Selection option between different driving
programs, Drivelogic, refer to page62
>Upshift display, shift lights, refer to page63
>Automatic downshifting and prevention of
incorrect shifting even in sequential opera-
tion
>Automatic double clutching
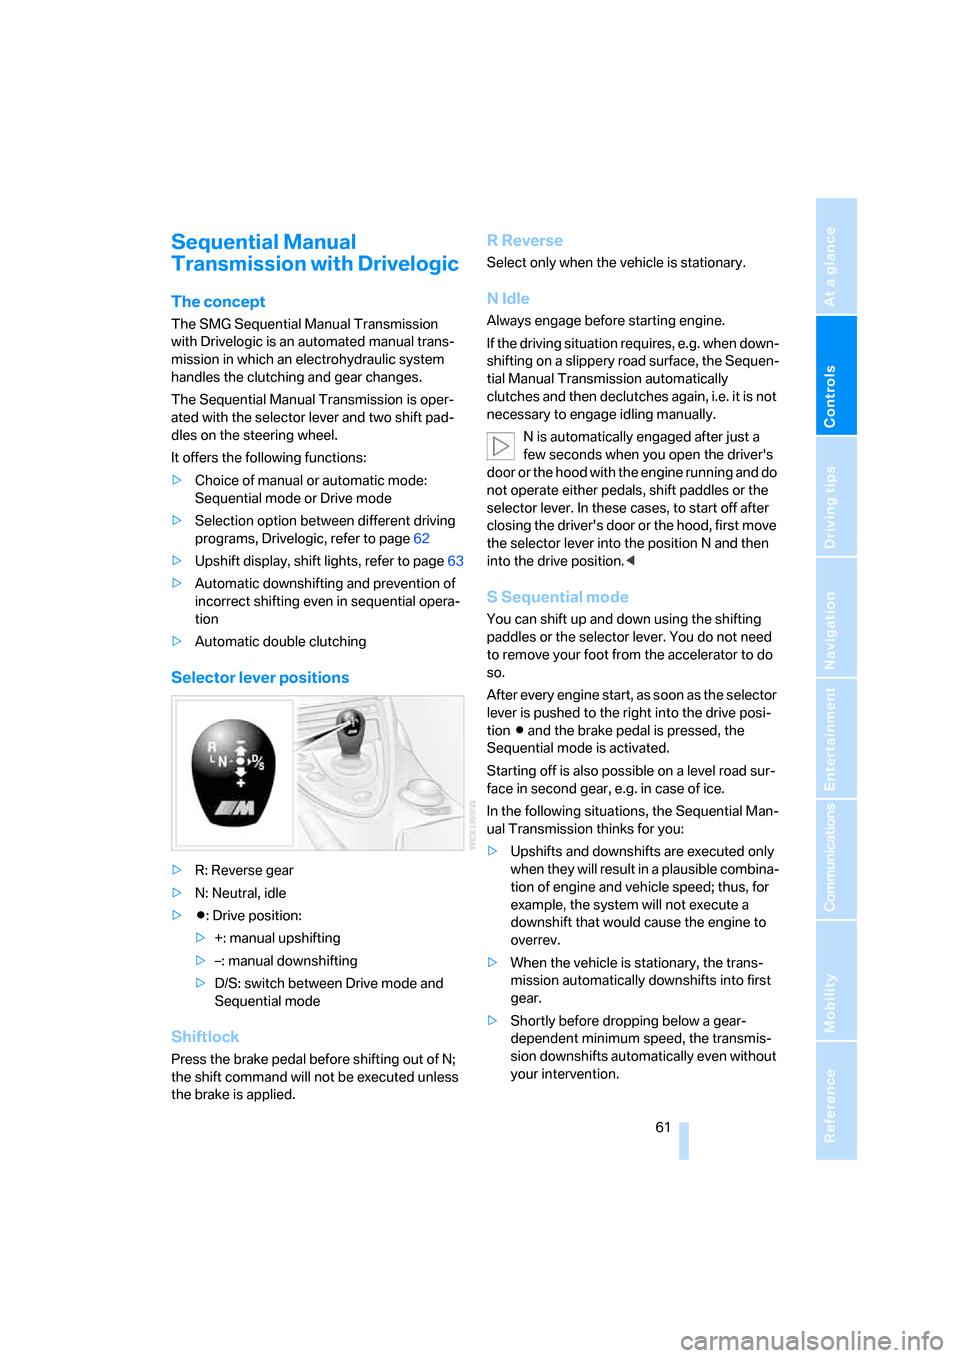
Selector lever positions
>R: Reverse gear
>N: Neutral, idle
>Β: Drive position:
>+: manual upshifting
>–: manual downshifting
>D/S: switch between Drive mode and
Sequential mode
Shiftlock
Press the brake pedal before shifting out of N;
the shift command will not be executed unless
the brake is applied.
R Reverse
Select only when the vehicle is stationary.
N Idle
Always engage before starting engine.
If the driving situation requires, e.g. when down-
shifting on a slippery road surface, the Sequen-
tial Manual Transmission automatically
clutches and then declutches again, i.e. it is not
necessary to engage idling manually.
N is automatically engaged after just a
few seconds when you open the driver's
door or the hood with the engine running and do
not operate either pedals, shift paddles or the
selector lever. In these cases, to start off after
closing the driver's door or the hood, first move
the selector lever into the position N and then
into the drive position.<
S Sequential mode
You can shift up and down using the shifting
paddles or the selector lever. You do not need
to remove your foot from the accelerator to do
so.
After every engine start, as soon as the selector
lever is pushed to the right into the drive posi-
tion Β and the brake pedal is pressed, the
Sequential mode is activated.
Starting off is also possible on a level road sur-
face in second gear, e.g. in case of ice.
In the following situations, the Sequential Man-
ual Transmission thinks for you:
>Upshifts and downshifts are executed only
when they will res ult in a plausible combina-
tion of engine and vehicle speed; thus, for
example, the system will not execute a
downshift that would cause the engine to
overrev.
>When the vehicle is stationary, the trans-
mission automatically downshifts into first
gear.
>Shortly before dropping below a gear-
dependent minimum speed, the transmis-
sion downshifts automatically even without
your intervention.
Page 67 of 256
Controls
65Reference
At a glance
Driving tips
Communications
Navigation
Entertainment
Mobility
5.Change to upper field if necessary. Turn the
controller until "Lighting" is selected and
press the controller.
6.Select "Triple turn signal" and press the
controller.
Triple turn signal is activated.
The setting is stored for the remote control cur-
rently in use.
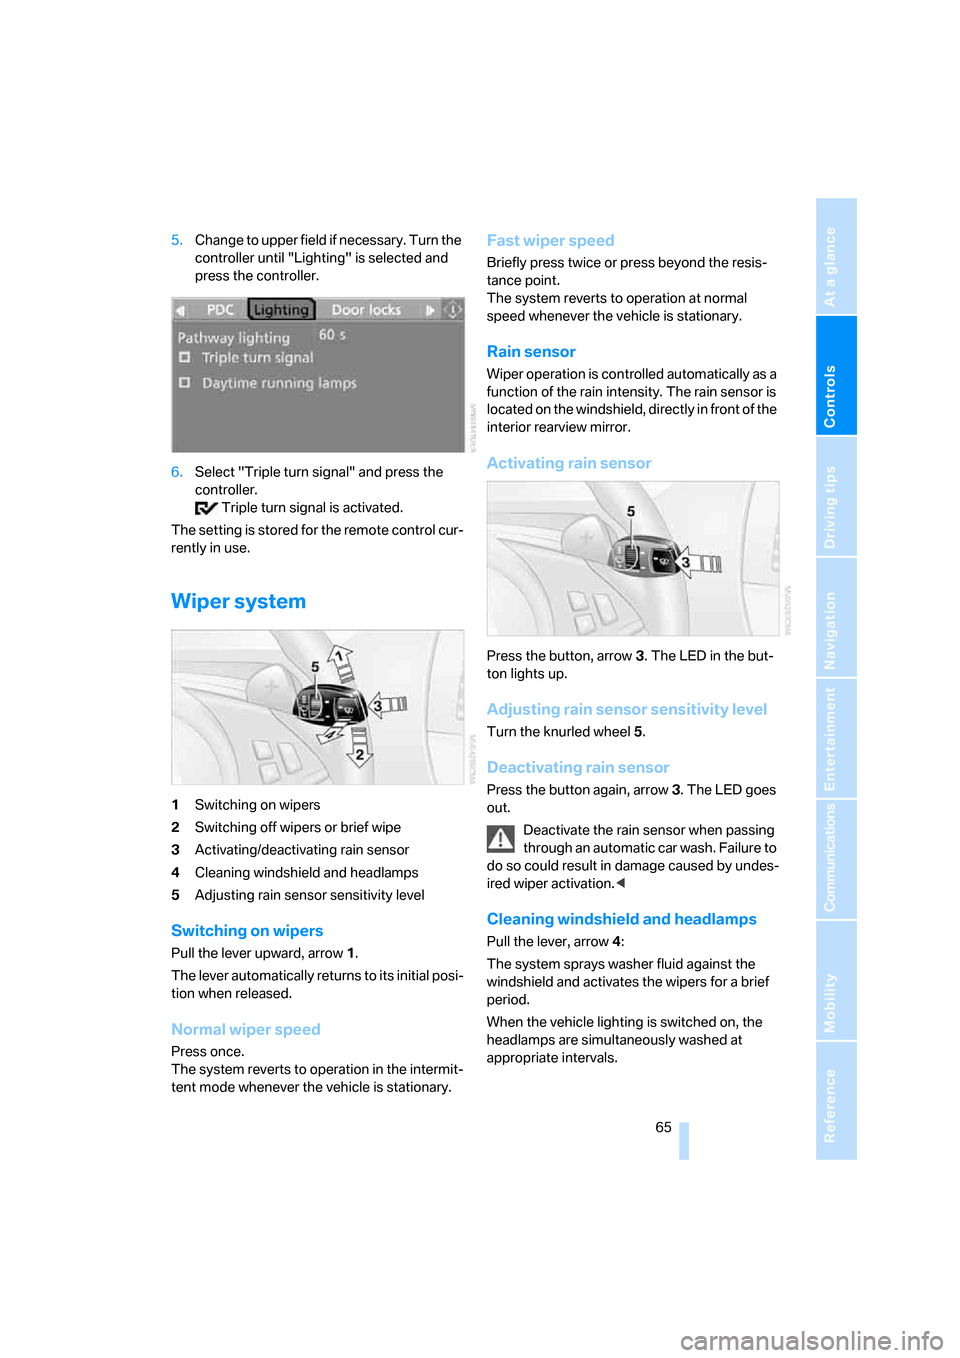
Wiper system
1Switching on wipers
2Switching off wipers or brief wipe
3Activating/deactivating rain sensor
4Cleaning windshield and headlamps
5Adjusting rain sensor sensitivity level
Switching on wipers
Pull the lever upward, arrow1.
The lever automatically returns to its initial posi-
tion when released.
Normal wiper speed
Press once.
The system reverts to operation in the intermit-
tent mode whenever the vehicle is stationary.
Fast wiper speed
Briefly press twice or press beyond the resis-
tance point.
The system reverts to operation at normal
speed whenever the vehicle is stationary.
Rain sensor
Wiper operation is controlled automatically as a
function of the rain intensity. The rain sensor is
located on the windshield, directly in front of the
interior rearview mirror.
Activating rain sensor
Press the button, arrow3. The LED in the but-
ton lights up.
Adjusting rain sensor sensitivity level
Turn the knurled wheel5.
Deactivating rain sensor
Press the button again, arrow3. The LED goes
out.
Deactivate the rain sensor when passing
through an automatic car wash. Failure to
do so could result in damage caused by undes-
ired wiper activation.<
Cleaning windshield and headlamps
Pull the lever, arrow4:
The system sprays washer fluid against the
windshield and activates the wipers for a brief
period.
When the vehicle lighting is switched on, the
headlamps are simultaneously washed at
appropriate intervals.
Page 69 of 256
Controls
67Reference
At a glance
Driving tips
Communications
Navigation
Entertainment
Mobility
and stores your current speed as soon as you
release the lever.
Press the lever beyond the resistance point:
Increase speed each time to the next fives place
on the mph speedometer or to the next tens
place on the km/h speedometer.
If, on a downhill grade, the engine's braking
effect is not sufficient, the controlled speed can
be exceeded. Speed can drop on uphill grades if
the engine output is insufficient.
Maintaining speed, storing speed, and
decelerating
Pull the lever, arrow2:
Functions are the same as1, only the vehicle
speed is reduced.
Interrupting cruise control
Press the lever up or down, arrow3.
Cruise control is also interrupted automatically:
>When you apply pressure to the brake pedal
>When you shift manually with the shift pad-
dles or the selector lever
>When DSC controls
Resuming stored speed
Press button4:
The vehicle accelerates to and maintains the
stored speed.
Deactivating system
When the ignition is switched off, the system is
deactivated and the stored speed is deleted.
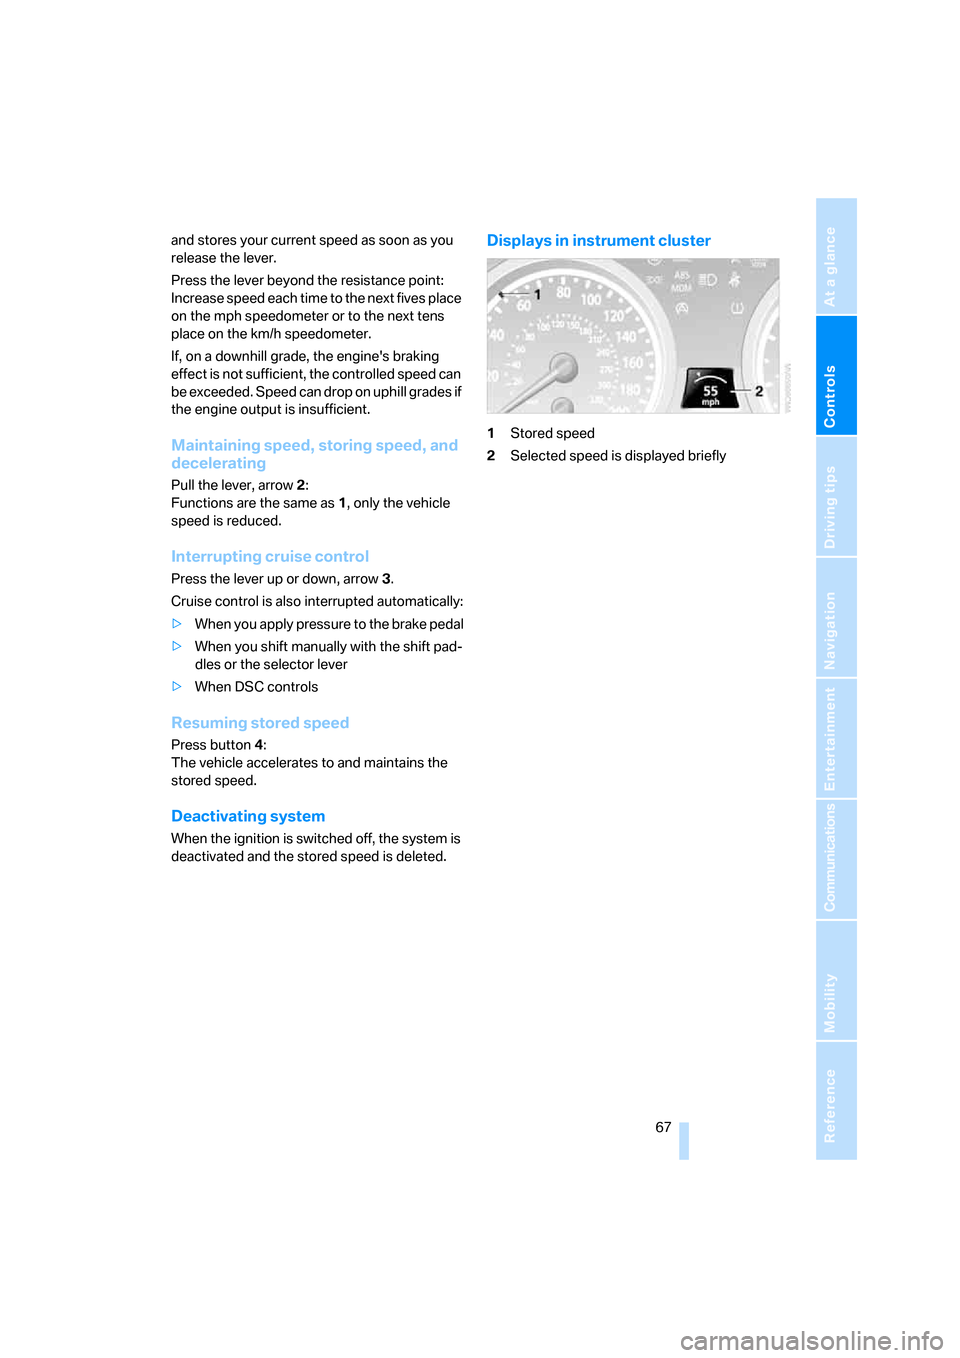
Displays in instrument cluster
1Stored speed
2Selected speed is displayed briefly
Page 72 of 256
Everything under control
70
Cruising range
Displays the estimated cruising range available
with the remaining fuel. The range is projected
based on the driving style over the last 20 miles/
30 km.
Refuel as soon as possible once your
cruising range falls below 30 miles/
50 km, otherwise engine functions are not
ensured and damage can occur.<
Average fuel consumption
The average fuel consumption is calculated for
the time during which the engine is running.
To reset the average fuel consumption: press
the BC button in the turn signal lever for approx.
2 seconds.
For different routes
You can display the average speed for two dif-
ferent routes on the Control Display, refer to the
following and to Trip computer.
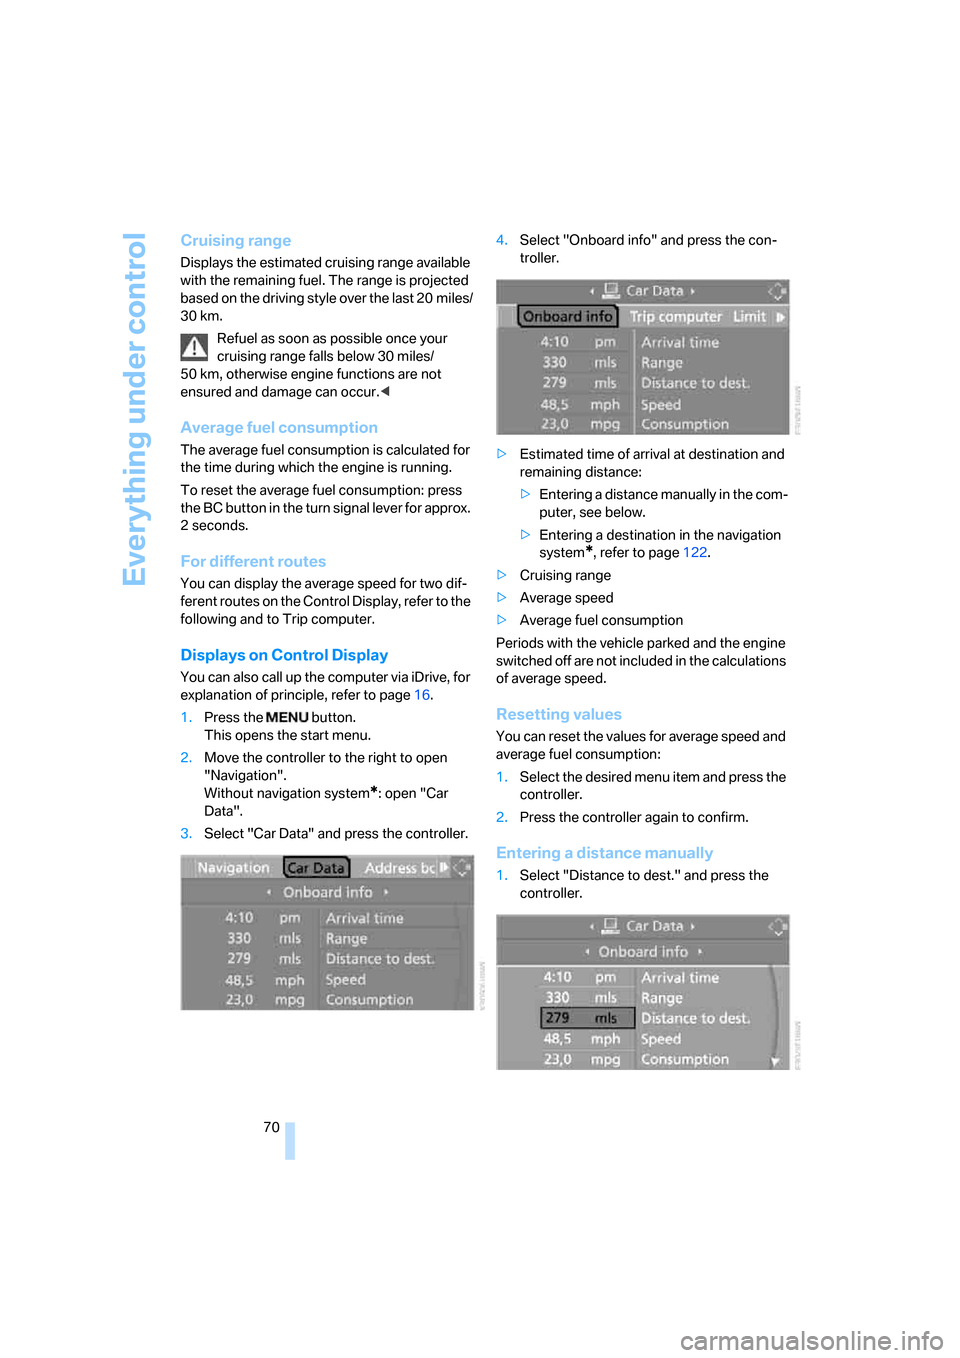
Displays on Control Display
You can also call up the computer via iDrive, for
explanation of principle, refer to page16.
1.Press the button.
This opens the start menu.
2.Move the controller to the right to open
"Navigation".
Without navigation system
*: open "Car
Data".
3.Select "Car Data" and press the controller.4.Select "Onboard info" and press the con-
troller.
>Estimated time of arrival at destination and
remaining distance:
>Entering a distance manually in the com-
puter, see below.
>Entering a destination in the navigation
system
*, refer to page122.
>Cruising range
>Average speed
>Average fuel consumption
Periods with the vehicle parked and the engine
switched off are not included in the calculations
of average speed.
Resetting values
You can reset the values for average speed and
average fuel consumption:
1.Select the desired menu item and press the
controller.
2.Press the controller again to confirm.
Entering a distance manually
1.Select "Distance to dest." and press the
controller.