radio controls BMW M6 CONVERTIBLE 2010 E64 User Guide
[x] Cancel search | Manufacturer: BMW, Model Year: 2010, Model line: M6 CONVERTIBLE, Model: BMW M6 CONVERTIBLE 2010 E64Pages: 250, PDF Size: 8.4 MB
Page 47 of 250
Controls
45Reference
At a glance
Driving tips
Communications
Navigation
Entertainment
Mobility
Seat, mirror and steering
wheel memory
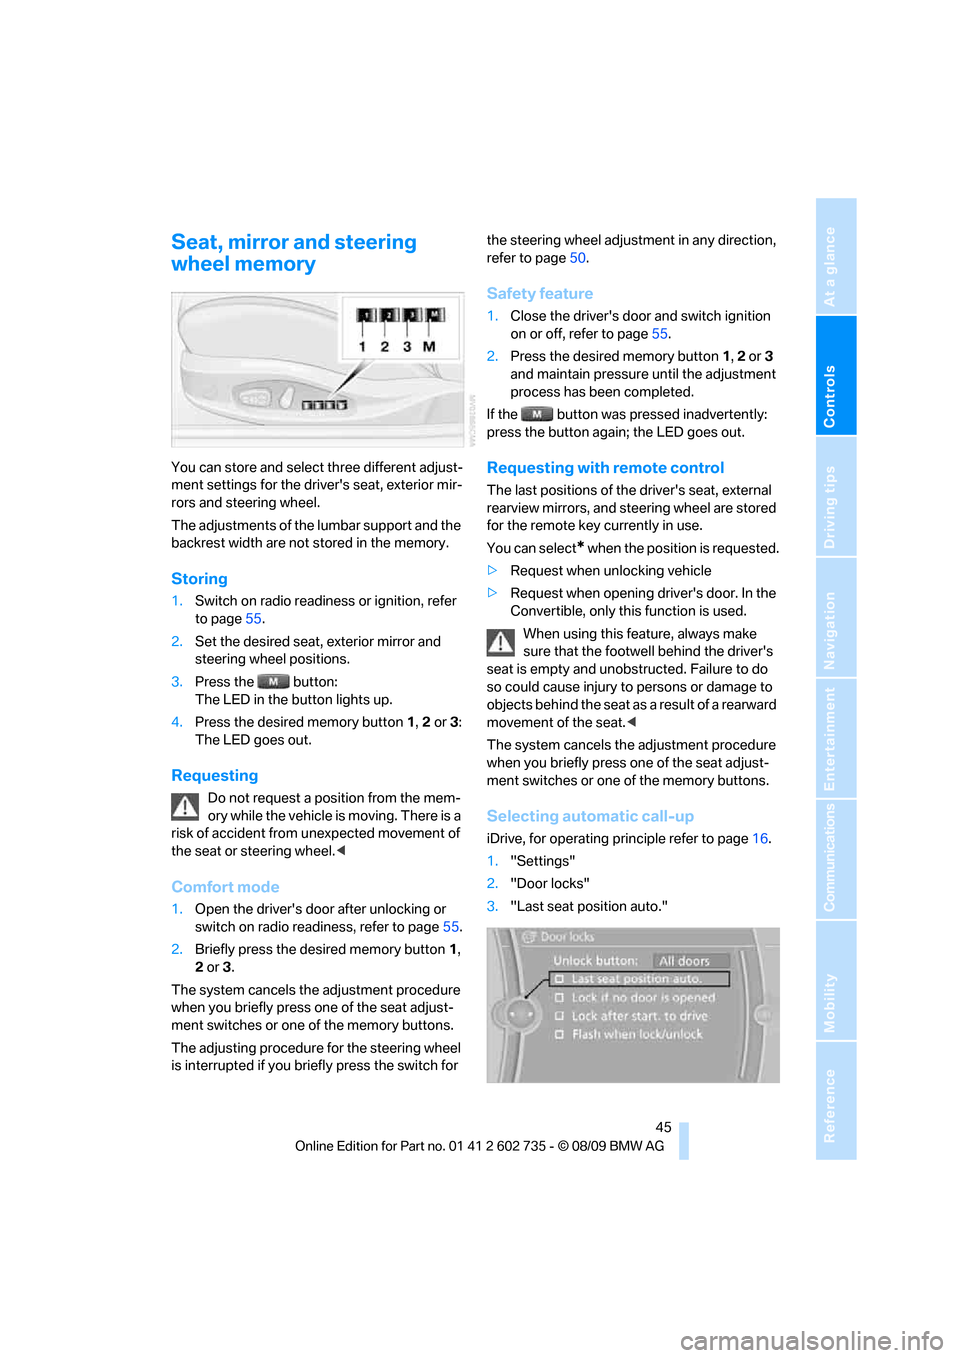
You can store and select three different adjust-
ment settings for the driver's seat, exterior mir-
rors and steering wheel.
The adjustments of the lumbar support and the
backrest width are not stored in the memory.
Storing
1.Switch on radio readiness or ignition, refer
to page55.
2.Set the desired seat, exterior mirror and
steering wheel positions.
3.Press the button:
The LED in the button lights up.
4.Press the desired memory button 1, 2 or3:
The LED goes out.
Requesting
Do not request a position from the mem-
ory while the vehicle is moving. There is a
risk of accident from unexpected movement of
the seat or steering wheel.<
Comfort mode
1.Open the driver's door after unlocking or
switch on radio readiness, refer to page55.
2.Briefly press the desired memory button1,
2 or3.
The system cancels the adjustment procedure
when you briefly press one of the seat adjust-
ment switches or one of the memory buttons.
The adjusting procedure for the steering wheel
is interrupted if you briefly press the switch for the steering wheel adjustment in any direction,
refer to page50.
Safety feature
1.Close the driver's door and switch ignition
on or off, refer to page55.
2.Press the desired memory button 1, 2 or3
and maintain pressure until the adjustment
process has been completed.
If the button was pressed inadvertently:
press the button again; the LED goes out.
Requesting with remote control
The last positions of the driver's seat, external
rearview mirrors, and steering wheel are stored
for the remote key currently in use.
You can select
* when the position is requested.
>Request when unlocking vehicle
>Request when opening driver's door. In the
Convertible, only this function is used.
When using this feature, always make
sure that the footwell behind the driver's
seat is empty and unobstructed. Failure to do
so could cause injury to persons or damage to
objects behind the seat as a result of a rearward
movement of the seat.<
The system cancels the adjustment procedure
when you briefly press one of the seat adjust-
ment switches or one of the memory buttons.
Selecting automatic call-up
iDrive, for operating principle refer to page16.
1."Settings"
2."Door locks"
3."Last seat position auto."
Page 57 of 250
Controls
55Reference
At a glance
Driving tips
Communications
Navigation
Entertainment
Mobility
Driving
Ignition lock
Inserting remote control into ignition
lock
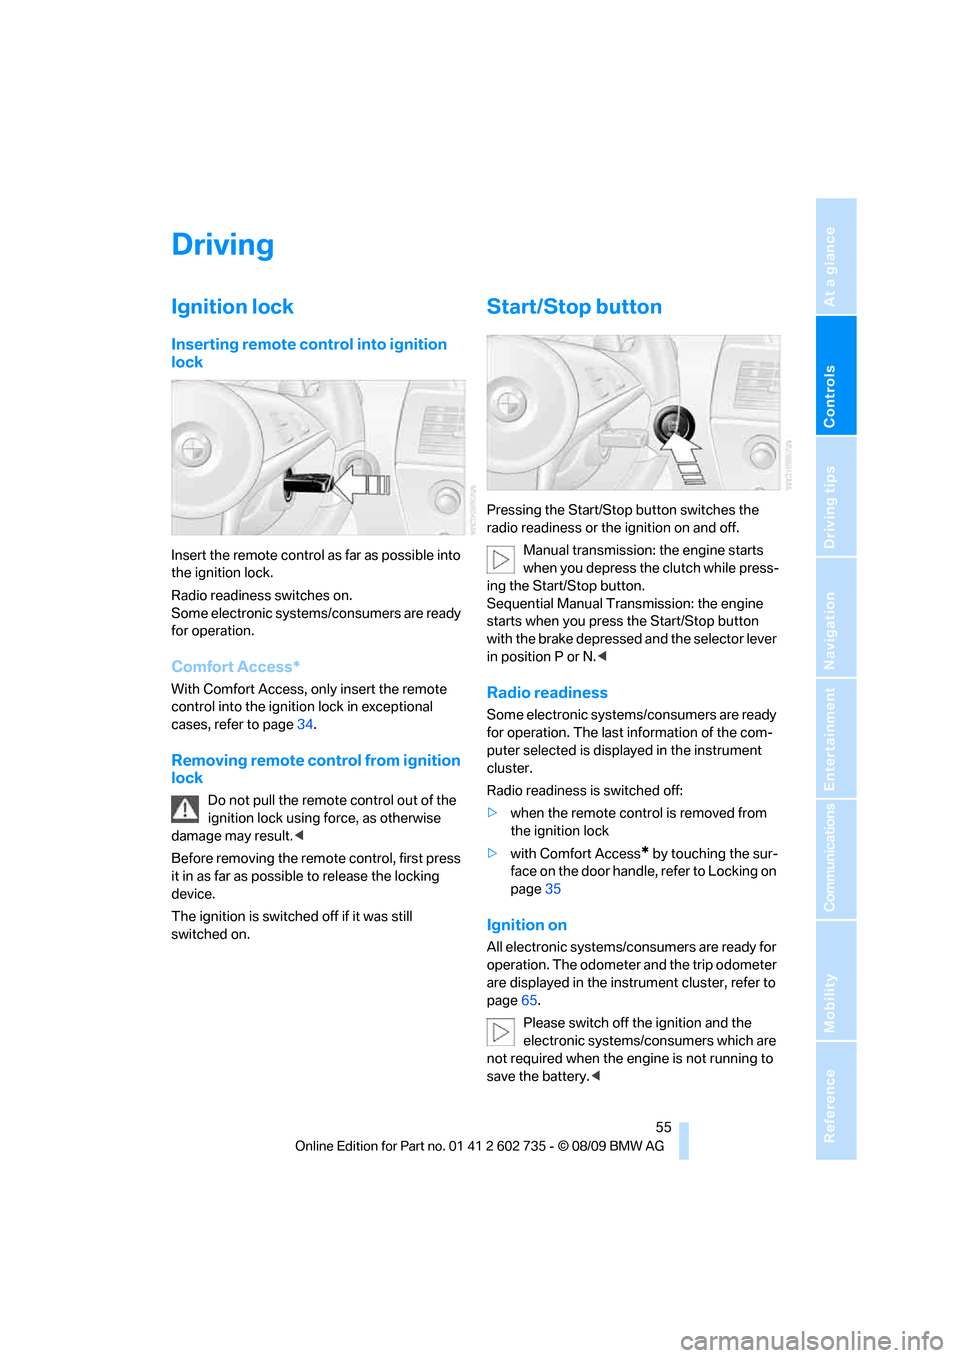
Insert the remote control as far as possible into
the ignition lock.
Radio readiness switches on.
Some electronic systems/consumers are ready
for operation.
Comfort Access*
With Comfort Access, only insert the remote
control into the ignition lock in exceptional
cases, refer to page34.
Removing remote control from ignition
lock
Do not pull the remote control out of the
ignition lock using force, as otherwise
damage may result.<
Before removing the remote control, first press
it in as far as possible to release the locking
device.
The ignition is switched off if it was still
switched on.
Start/Stop button
Pressing the Start/Stop button switches the
radio readiness or the ignition on and off.
Manual transmission: the engine starts
when you depress the clutch while press-
ing the Start/Stop button.
Sequential Manual Transmission: the engine
starts when you press the Start/Stop button
with the brake depressed and the selector lever
in position P or N.<
Radio readiness
Some electronic systems/consumers are ready
for operation. The last information of the com-
puter selected is displayed in the instrument
cluster.
Radio readiness is switched off:
>when the remote control is removed from
the ignition lock
>with Comfort Access
* by touching the sur-
face on the door handle, refer to Locking on
page35
Ignition on
All electronic systems/consumers are ready for
operation. The odometer and the trip odometer
are displayed in the instrument cluster, refer to
page65.
Please switch off the ignition and the
electronic systems/consumers which are
not required when the engine is not running to
save the battery.<
Page 83 of 250
Controls
81Reference
At a glance
Driving tips
Communications
Navigation
Entertainment
Mobility
Indication of a flat tire
The warning lamp lights up red. A mes-
sage appears on the Control Display.
In addition, an acoustic signal sounds.
There is a flat tire or extensive inflation pressure
loss.
1.Reduce speed and stop the vehicle care-
fully. Avoid sudden braking and steering
maneuvers.
2.Identify damaged tire. To do this, check the
tire inflation pressure using the M Mobility
System, refer to Producing tire inflation
pressure on page207.
3.Repair the flat tire with the M Mobility Sys-
tem, refer to page205, or replace the dam-
aged wheel, refer to Changing wheels on
page207.
TPM Tire Pressure Monitor*
The concept
TPM checks the tire inflation pressure in the
four mounted tires. The system reports when
the tire inflation pressure has dropped consid-
erably in one or several tires.
Functional requirement
In order to assure the reliable reporting of a flat
tire, the system must have been reset with the
correct tire inflation pressure.
Always use wheels with TPM electronics, oth-
erwise fault-free operation of the system is not
ensured.
Reset the system again after each correc-
tion of the tire inflation pressure and after
every tire or wheel change.<
System limits
TPM cannot announce sudden serious
tire damage caused by external influ-
ences.<
The system does not function properly if it has
not been reset, e.g. a flat tire is reported despite
correct tire inflation pressures.The system is inactive and cannot display a flat
tire if a wheel has been mounted without TPM
electronics, or if TPM is temporarily interfered
with by other systems or devices which use the
same radio frequency.
Status display on Control Display
The tire and system status is indicated by the
color of the tires.
TPM takes the fact that the tire pressure
changes during driving into account. A correc-
tion is only required if requested by TPM with
the color.
Green
The tire pressure matches the learned set state.
"TPM" appears on the Control Display.
One wheel is yellow
Flat tire or a major drop in inflation pressure in
the indicated tire. A message appears on the
Control Display.
All wheels are yellow
Flat tire or a major drop in inflation pressure in
several tires. A message appears on the Control
Display.
Gray
The system cannot detect a flat tire.
Reasons for this can be:
>TPM is being reset
>Temporary interference due to systems or
devices which use the same radio fre-
quency
>Malfunction
Resetting system
Reset the system again after each correc-
tion of the tire inflation pressure and after
every tire or wheel change.<
Resetting finishes during driving, which can be
interrupted at any time. When driving resumes,
resetting is continued automatically.
iDrive, for operating principle refer to page16.
Page 87 of 250
Controls
85Reference
At a glance
Driving tips
Communications
Navigation
Entertainment
Mobility
side depending on whether the seat is occu-
pied. The indicator lamp shows whether the
front passenger airbags are activated or deacti-
vated.
>The indicator lamp lights up when a child in
a child restraint system intended for the
purpose is properly detected on the seat.
The front, knee and side airbags on the front
passenger side are deactivated.
Most child seats are detected by the sys-
tem, especially the child seats required by
the NHTSA at the time the vehicle is manufac-
tured. After installing a child seat, make sure
that the indicator lamp for the front passenger
airbags lights up. This indicates that the child
seat has been detected and the front passenger
airbags are not activated.<
>The indicator lamp does not light up if, for
example, the system detects a person of
sufficient size seated correctly on the seat.
The front, knee and side airbags on the front
passenger side are activated.
>The indicator lamp does not light up when
the seat is empty.
But the front, knee and side airbags on the
front passenger side are still deactivated.
Operational readiness of airbag system
From radio readiness, refer to page55, the
warning lamp lights up briefly, indicating the
operational readiness of the entire airbag sys-
tem and the safety belt tensioners.
Airbag system malfunction
>Warning lamp does not light up from radio
readiness.
>Warning lamp lights up continuously.Have the airbag system checked immedi-
ately in case of a malfunction, otherwise
there is a danger that the airbag system may not
respond in the expected manner in an accident
despite an impact of corresponding intensity.<
Convertible: rollover
protection system
The rollover protection system is automatically
activated in the event of an accident or a critical
driving situation, extreme inclination on the lon-
gitudinal axis, or loss of ground contact. The
rollover bars located behind the rear head
restraints are deployed within fractions of a sec-
ond.
As a supplement to the rollover bar integrated
into the windshield frame, the rollover protec-
tion system ensures that all vehicle occupants
have the necessary headroom.
Always keep the path of movement of the
rollover protection system clear.
In minor accidents, you are protected by the
fastened safety belt and, depending on acci-
dent severity, by the safety belt tensioner and
multi-phase airbag retention system.<
Lowering
If the rollover protection system experienced no
impact after automatic activation, then it can be
lowered again. No tools are necessary for this
purpose.
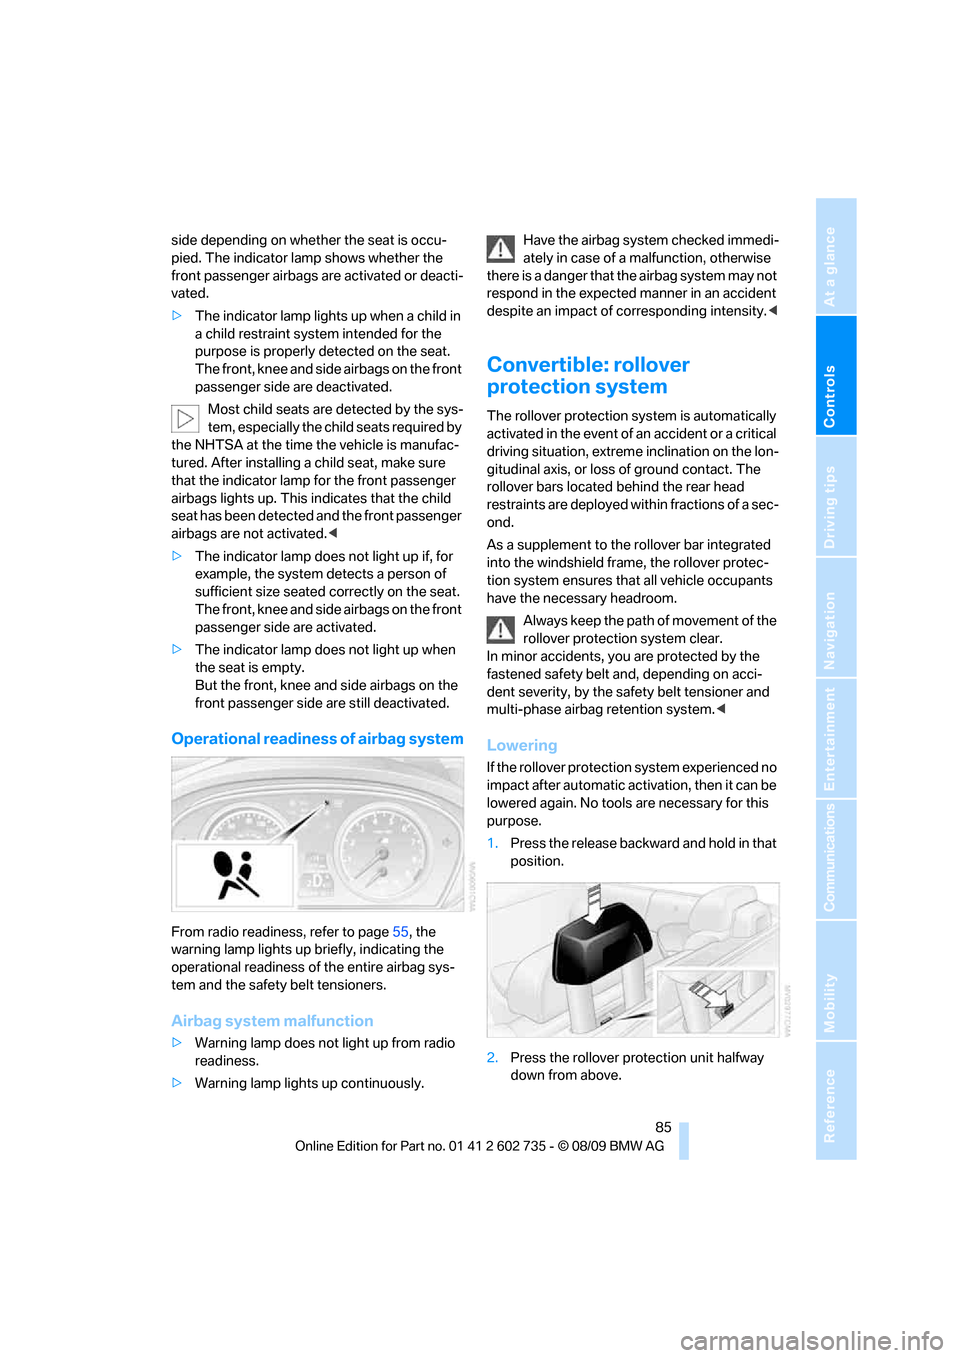
1.Press the release backward and hold in that
position.
2.Press the rollover protection unit halfway
down from above.
Page 95 of 250
Controls
93Reference
At a glance
Driving tips
Communications
Navigation
Entertainment
Mobility
Instrument lighting
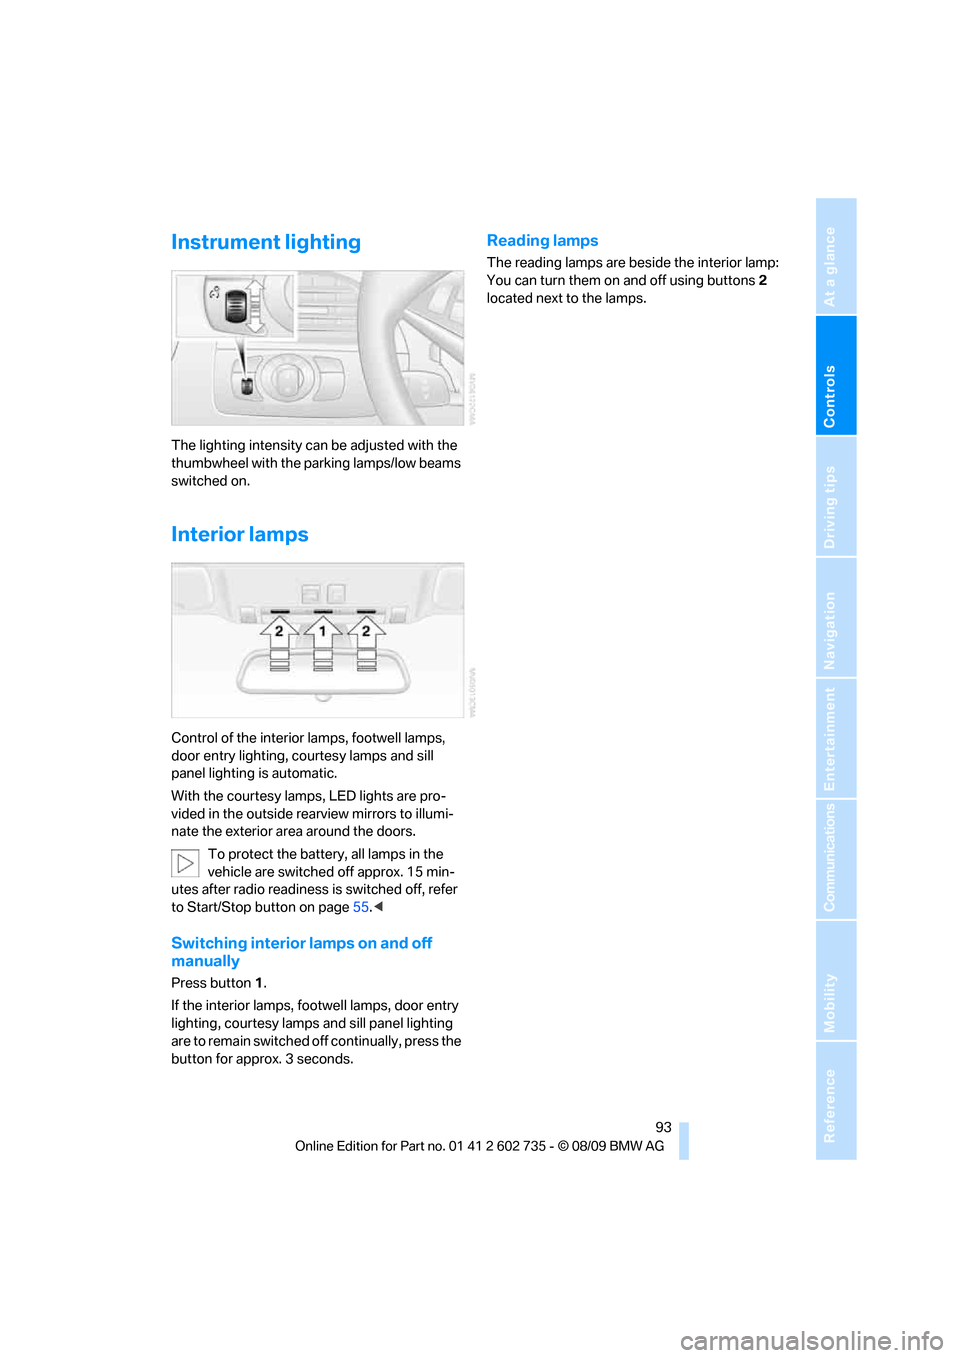
The lighting intensity can be adjusted with the
thumbwheel with the parking lamps/low beams
switched on.
Interior lamps
Control of the interior lamps, footwell lamps,
door entry lighting, courtesy lamps
and sill
panel lighting
is automatic.
With the courtesy lamps,
LED lights are pro-
vided in the outside rearview mirrors to illumi-
nate the exterior area around the doors.
To protect the battery, all lamps in the
vehicle are switched off approx. 15 min-
utes after radio readiness is switched off, refer
to Start/Stop button on page55.<
Switching interior lamps on and off
manually
Press button 1.
If the interior lamps, footwell lamps, door entry
lighting, courtesy lamps and sill panel lighting
are to remain switched off continually, press the
button for approx. 3 seconds.
Reading lamps
The reading lamps are beside the interior lamp:
You can turn them on and off using buttons2
located next to the lamps.
Page 99 of 250
Controls
97Reference
At a glance
Driving tips
Communications
Navigation
Entertainment
Mobility
ity inside the vehicle deteriorates continu-
ously.<
Residual heat
The heat stored in the engine is
used to heat the passenger com-
partment, e.g. while stopped at a
school to pick up a child.
1.Switch off the engine.
2.Turn to the right, refer to arrow.
The function can be switched on when the fol-
lowing conditions are met:
>up to 15 minutes after switching off the
engine
>with engine at operating temperature
>with sufficient battery voltage
>at an outside temperature below 777/
256
From radio readiness the interior temperature,
the air volume and the air distribution can be
set.
Switching automatic climate control on
and off
1.Turn to the left to minimum air volume.
2.After approx. 1 second, turn to the left
again.
You switch on the system again by pressing any
button of the automatic climate control.
Ventilation
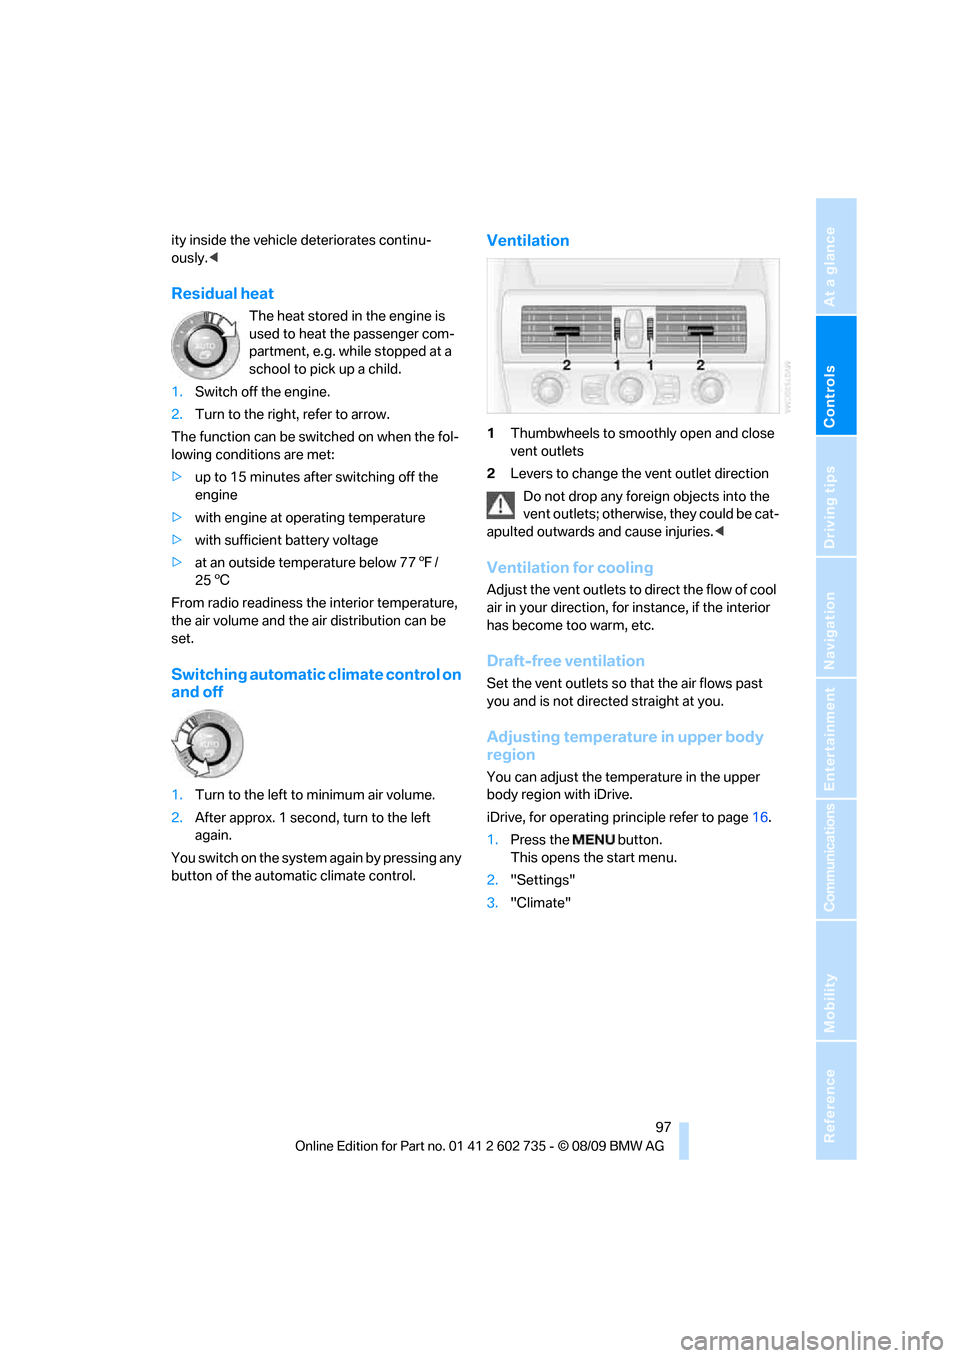
1Thumbwheels to smoothly open and close
vent outlets
2Levers to change the vent outlet direction
Do not drop any foreign objects into the
vent outlets; otherwise, they could be cat-
apulted outwards and cause injuries.<
Ventilation for cooling
Adjust the vent outlets to direct the flow of cool
air in your direction, for instance, if the interior
has become too warm, etc.
Draft-free ventilation
Set the vent outlets so that the air flows past
you and is not directed straight at you.
Adjusting temperature in upper body
region
You can adjust the temperature in the upper
body region with iDrive.
iDrive, for operating principle refer to page16.
1.Press the button.
This opens the start menu.
2."Settings"
3."Climate"
Page 131 of 250
Navigation
Driving tips
129Reference
At a glance
Controls
Communications
Entertainment
Mobility
3.Press the controller.
Changing the map section
Select the interactive map.
>To shift the map: move the controller in the
required direction.
>To shift the map diagonally: move the con-
troller in the required direction and turn it.
Changing the scale
1.Select the symbol.
2.Turn the controller to adjust the scale.
Automatic scaling of the map
In the map view facing north, turn the controller
in any direction until AUTO is displayed as the
map scale.
The map shows the entire range from your loca-
tion to the destination.
Settings for the map view
The map is shown on the Control Display.
1.Open "Options".
2."Settings"
3.Set the optimized map view.
>"Day/night mode"
Select and create the necessary settings
depending on the light conditions. When
the traffic bulletin map is activated, this
setting is disregarded.
>"Satellite images"
Satellite images
* are displayed depend-
ing on availability and resolution.
>"Perspective view in 3D"
Displays a spatial view. Prominent areas
that are contained in the navigation data
are displayed on the map in 3D.
>"Traffic Info map"
The map is optimized for displaying traf-
fic bulletins. Symbols for the special
destinations are no longer displayed.
Map view for the split screen display
The map view for the split screen can be
selected separately from the main screen.1.Open "Options".
2."Split screen"
The split screen is switched on.
3.Move the controller to the right repeatedly
until the split screen content is selected.
4.Select the map view:
>"Arrow display"
>"Map facing north"
>"Map direction of travel"
>"Map view with perspective"
>"Exit ramp view"
Changing the scale
1.Move the controller to the right until the
split screen is selected.
2.Turn the controller.
Traffic information*
You can display the traffic bulletins from radio
stations that broadcast the TMC (Traffic Mes-
sage Channel) of a traffic information service.
This information from the traffic information
service is continuously updated on the basis of
measurement data from traffic control centers
and information on traffic congestion.
During destination guidance, traffic bulletins
that are relevant to areas along the route are
automatically displayed and taken into account
in the route planning. You can open all traffic
bulletins manually via iDrive.
The traffic bulletins are shown in the map view.
Real Time Traffic Information End-User
Provisions
Certain BMW models equipped with navigation
have the capability to display real-time traffic
information. If your system has this capability
the following additional terms and conditions
apply:
An End-User shall no longer have the right to
use the Traffic Data in the event that the End-
User is in material breach of the terms and con-
ditions contained herein.
Page 138 of 250
On/off and tone
136
On/off and tone
The following audio and video sources share
the same control elements and adjustments:
>Radio
>CD/DVD player
>CD changer
*
>Video*
>External devices, e.g. MP3 player
Controls
The audio and video sources can be controlled
using the:
>Buttons in the area of the CD/DVD player
>iDrive
>Buttons on the steering wheel, refer to
page11
>Programmable memory buttons, refer to
page20
>Voice activation system
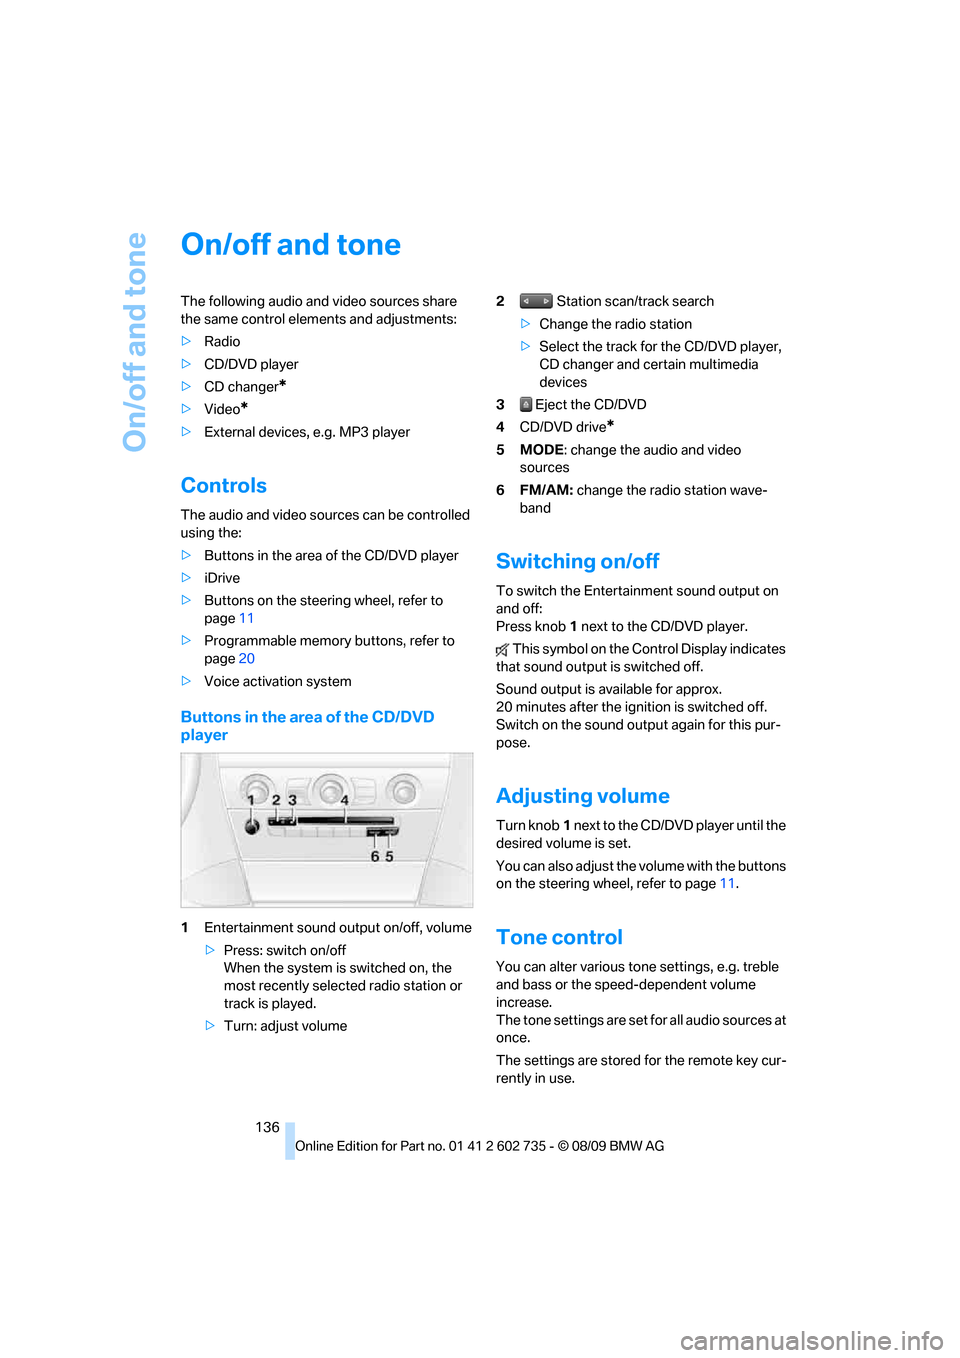
Buttons in the area of the CD/DVD
player
1Entertainment sound output on/off, volume
>Press: switch on/off
When the system is switched on, the
most recently selected radio station or
track is played.
>Turn: adjust volume2 Station scan/track search
>Change the radio station
>Select the track for the CD/DVD player,
CD changer and certain multimedia
devices
3 Eject the CD/DVD
4CD/DVD drive
*
5MODE: change the audio and video
sources
6FM/AM: change the radio station wave-
band
Switching on/off
To switch the Entertainment sound output on
and off:
Press knob1 next to the CD/DVD player.
This symbol on the Control Display indicates
that sound output is switched off.
Sound output is available for approx.
20 minutes after the ignition is switched off.
Switch on the sound output again for this pur-
pose.
Adjusting volume
Turn knob1 next to the CD/DVD player until the
desired volume is set.
You can also adjust the volume with the buttons
on the steering wheel, refer to page11.
Tone control
You can alter various tone settings, e.g. treble
and bass or the speed-dependent volume
increase.
The tone settings are set for all audio sources at
once.
The settings are stored for the remote key cur-
rently in use.
Page 139 of 250
Navigation
Entertainment
Driving tips
137Reference
At a glance
Controls
Communications
Mobility
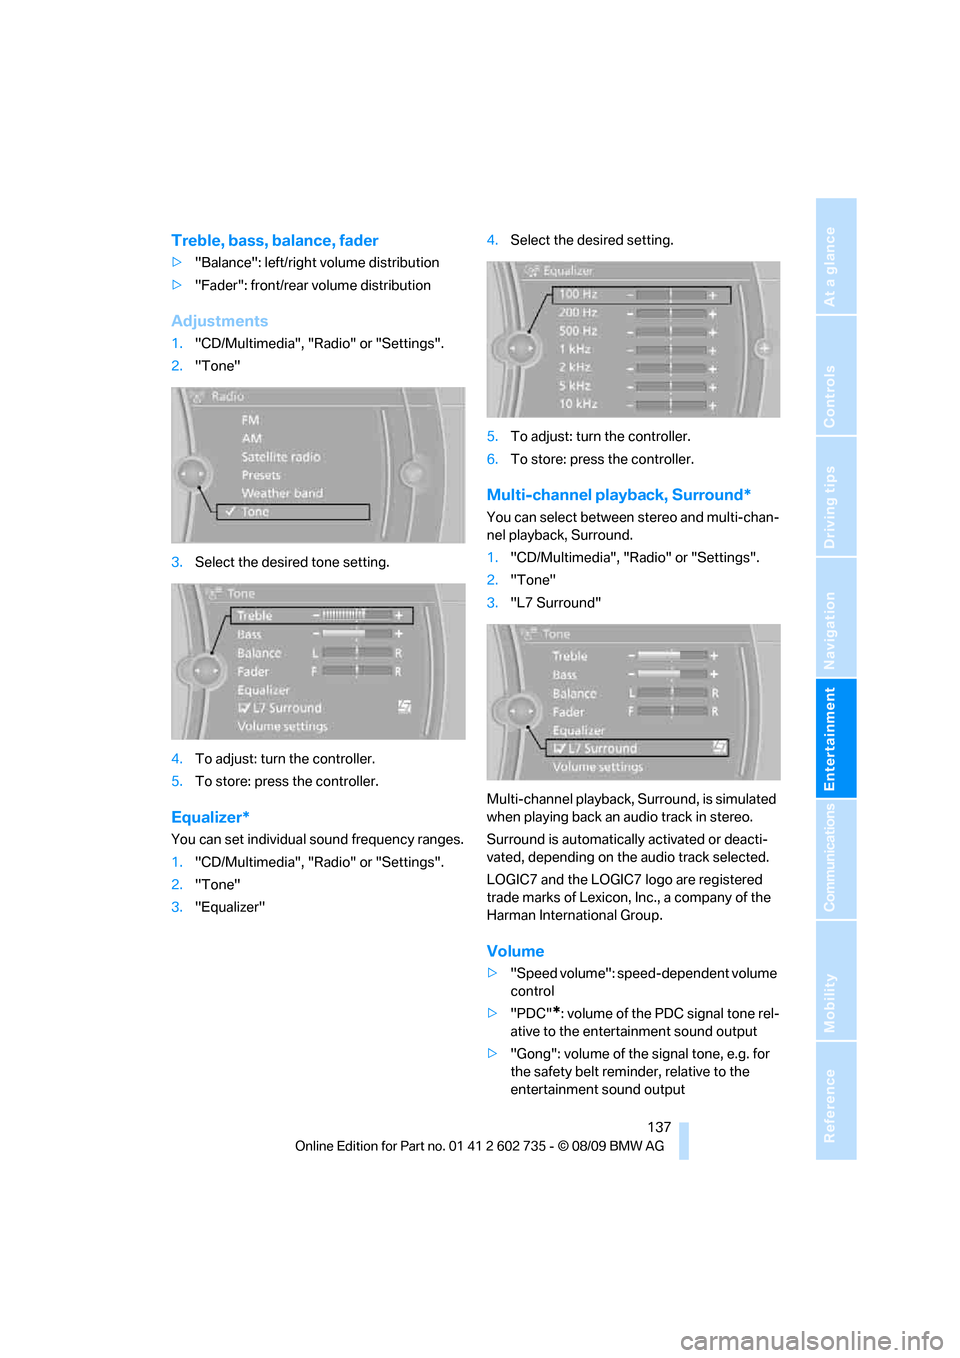
Treble, bass, balance, fader
>"Balance": left/right volume distribution
>"Fader": front/rear volume distribution
Adjustments
1."CD/Multimedia", "Radio" or "Settings".
2."Tone"
3.Select the desired tone setting.
4.To adjust: turn the controller.
5.To store: press the controller.
Equalizer*
You can set individual sound frequency ranges.
1."CD/Multimedia", "Radio" or "Settings".
2."Tone"
3."Equalizer"4.Select the desired setting.
5.To adjust: turn the controller.
6.To store: press the controller.
Multi-channel playback, Surround*
You can select between stereo and multi-chan-
nel playback, Surround.
1."CD/Multimedia", "Radio" or "Settings".
2."Tone"
3."L7 Surround"
Multi-channel playback, Surround, is simulated
when playing back an audio track in stereo.
Surround is automatically activated or deacti-
vated, depending on the audio track selected.
LOGIC7 and the LOGIC7 logo are registered
trade marks of Lexicon, Inc., a company of the
Harman International Group.
Volume
>"Speed volume": speed-dependent volume
control
>"PDC"
*: volume of the PDC signal tone rel-
ative to the entertainment sound output
>"Gong": volume of the signal tone, e.g. for
the safety belt reminder, relative to the
entertainment sound output
Page 141 of 250
Navigation
Entertainment
Driving tips
139Reference
At a glance
Controls
Communications
Mobility
Radio
Your radio is designed for reception of the fol-
lowing stations:
>FM and AM
>HD Radio
*
>Weather Band*
>Satellite radio*
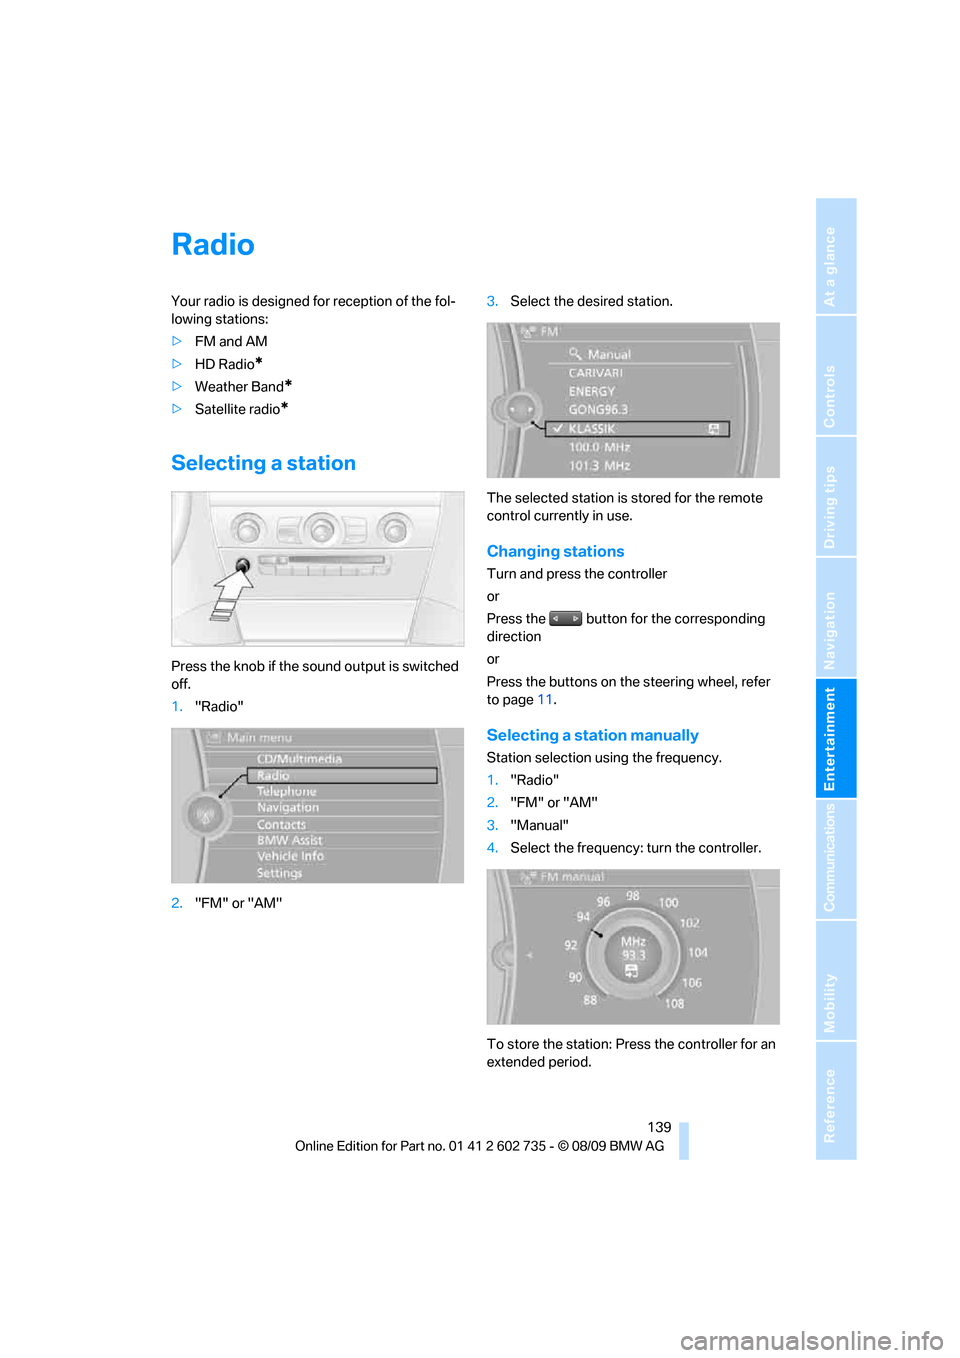
Selecting a station
Press the knob if the sound output is switched
off.
1."Radio"
2."FM" or "AM"3.Select the desired station.
The selected station is stored for the remote
control currently in use.
Changing stations
Turn and press the controller
or
Press the button for the corresponding
direction
or
Press the buttons on the steering wheel, refer
to page11.
Selecting a station manually
Station selection using the frequency.
1."Radio"
2."FM" or "AM"
3."Manual"
4.Select the frequency: turn the controller.
To store the station: Press the controller for an
extended period.