navigation system BMW M6 CONVERTIBLE 2010 E64 Repair Manual
[x] Cancel search | Manufacturer: BMW, Model Year: 2010, Model line: M6 CONVERTIBLE, Model: BMW M6 CONVERTIBLE 2010 E64Pages: 250, PDF Size: 8.4 MB
Page 197 of 250
Mobility
195Reference
At a glance
Controls
Driving tips
Communications
Navigation
Entertainment
>"Measurement not possible at this time."
>"Measuring engine oil level...":
This can take about 3 minutes if the car is at
a standstill on a level surface and the engine
is running, and about 5 minutes while the
car is moving.
If the engine oil has been topped off, the
measurement of the oil level can take up to
30 minutes.
>"Engine oil level below minimum. Add 1
quart!":
Add a maximum of 1 US quart/1 liter of
engine oil at the next opportunity, refer also
to Adding engine oil below. If the oil level
displayed is below minimum, add engine oil
immediately. Failure to do so may lead to
engine damage.
>"Engine oil level too high! Have this
checked.":
Too much oil will harm the engine.
Have the vehicle checked without
delay.<
>"Measurement inactive. Have this
checked.":
Do not add engine oil. You can continue
your journey. Note the newly calculated dis-
tance remaining to the next oil service, refer
to Service requirements on page68. Have
the system checked as soon as possible.
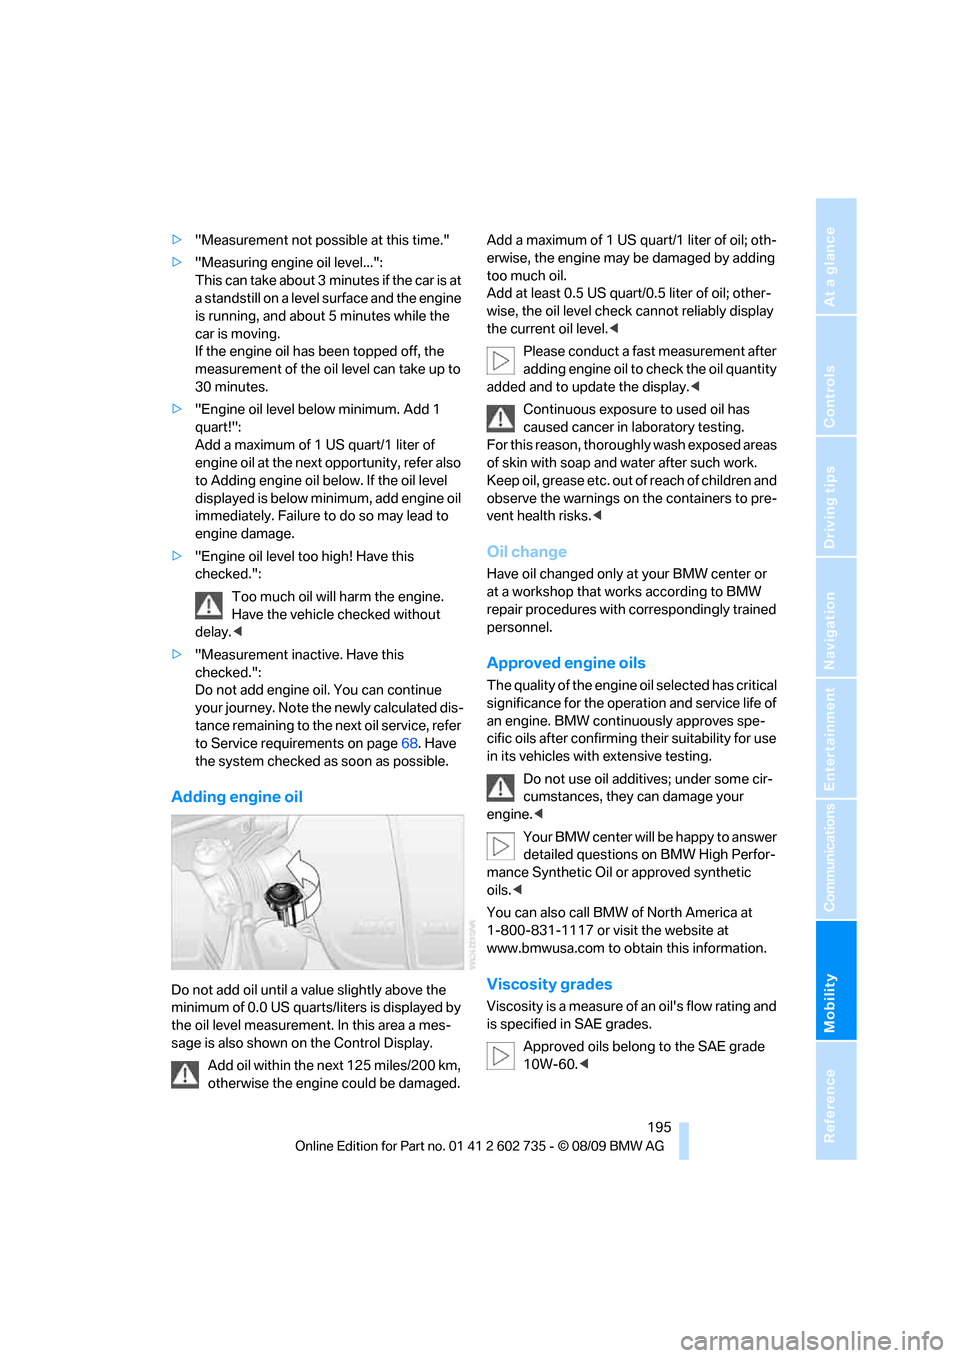
Adding engine oil
Do not add oil until a value slightly above the
minimum of 0.0 US quarts/liters is displayed by
the oil level measurement. In this area a mes-
sage is also shown on the Control Display.
Add oil within the next 125 miles/200 km,
otherwise the engine could be damaged.Add a maximum of 1 US quart/1 liter of oil; oth-
erwise, the engine may be damaged by adding
too much oil.
Add at least 0.5 US quart/0.5 liter of oil; other-
wise, the oil level check cannot reliably display
the current oil level.<
Please conduct a fast measurement after
adding engine oil to check the oil quantity
added and to update the display.<
Continuous exposure to used oil has
caused cancer in laboratory testing.
For this reason, thoroughly wash exposed areas
of skin with soap and water after such work.
Keep oil, grease etc. out of reach of children and
observe the warnings on the containers to pre-
vent health risks.<
Oil change
Have oil changed only at your BMW center or
at a workshop that works according to BMW
repair procedures with correspondingly trained
personnel.
Approved engine oils
The quality of the engine oil selected has critical
significance for the operation and service life of
an engine. BMW continuously approves spe-
cific oils after confirming their suitability for use
in its vehicles with extensive testing.
Do not use oil additives; under some cir-
cumstances, they can damage your
engine.<
Your BMW center will be happy to answer
detailed questions on BMW High Perfor-
mance Synthetic Oil or approved synthetic
oils.<
You can also call BMW of North America at
1-800-831-1117 or visit the website at
www.bmwusa.com to obtain this information.
Viscosity grades
Viscosity is a measure of an oil's flow rating and
is specified in SAE grades.
Approved oils belong to the SAE grade
10W-60.<
Page 199 of 250
Mobility
197Reference
At a glance
Controls
Driving tips
Communications
Navigation
Entertainment
Maintenance
BMW maintenance system
The BMW maintenance system supports the
preservation of the traffic and operating safety
of your BMW. The service schedule also
includes operations related to the vehicle's
comfort and convenience features, such as
replacement of the filters for the inside air.
The ultimate objective is to ensure economical
maintenance by providing the ideal service for
your vehicle.
Should the day come when you decide to sell
your BMW, a complete center service history
will prove to be an asset of inestimable value.
CBS Condition Based Service
Sensors and special algorithms take the differ-
ent driving conditions of your BMW into
account. Condition Based Service uses this to
determine the current and future service
requirements. By letting you define a service
and maintenance regimen that reflects your
own individual requirements, the system builds
the basis for trouble-free driving.
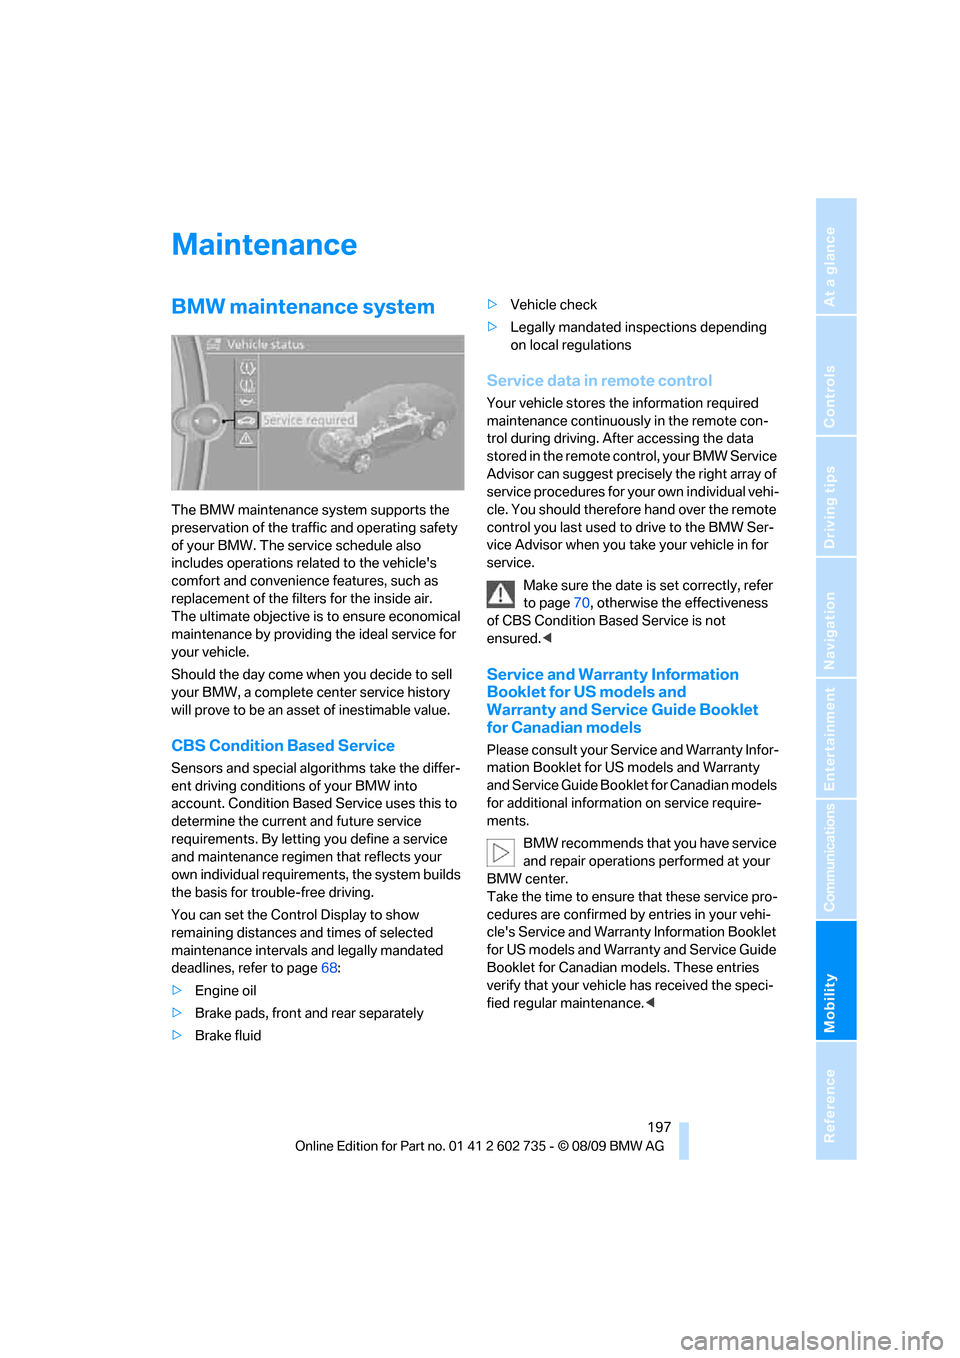
You can set the Control Display to show
remaining distances and times of selected
maintenance intervals and legally mandated
deadlines, refer to page68:
>Engine oil
>Brake pads, front and rear separately
>Brake fluid>Vehicle check
>Legally mandated inspections depending
on local regulations
Service data in remote control
Your vehicle stores the information required
maintenance continuously in the remote con-
trol during driving. After accessing the data
stored in the remote control, your BMW Service
Advisor can suggest precisely the right array of
service procedures for your own individual vehi-
cle. You should therefore hand over the remote
control you last used to drive to the BMW Ser-
vice Advisor when you take your vehicle in for
service.
Make sure the date is set correctly, refer
to page70, otherwise the effectiveness
of CBS Condition Based Service is not
ensured.<
Service and Warranty Information
Booklet for US models and
Warranty and Service Guide Booklet
for Canadian models
Please consult your Service and Warranty Infor-
mation Booklet for US models and Warranty
and Service Guide Booklet for Canadian models
for additional information on service require-
ments.
BMW recommends that you have service
and repair operations performed at your
BMW center.
Take the time to ensure that these service pro-
cedures are confirmed by entries in your vehi-
cle's Service and Warranty Information Booklet
for US models and Warranty and Service Guide
Booklet for Canadian models. These entries
verify that your vehicle has received the speci-
fied regular maintenance.<
Page 203 of 250
Mobility
201Reference
At a glance
Controls
Driving tips
Communications
Navigation
Entertainment
Waxing
Sealant is required when water no longer beads
on the clean surface of the paint. Use only prod-
ucts that contain carnauba wax or synthetic wax
to seal your finish.
Rubber gaskets
Treat only with water or a rubber care product.
To avoid noise or damage, do not use
products that contain silicone to care for
rubber gaskets.<
Chrome components
Particularly after exposure to road salt, thor-
oughly cleanse parts like the radiator grille, door
handles, or window frames with plenty of water
with shampoo added to it. For additional treat-
ment, use chrome polish.
Alloy wheels
Depending on your system, braking can gener-
ate dust, which settles on the light-alloy wheels.
Remove this dust regularly with acid-free wheel
cleaner.
Do not use aggressive, acid-containing,
strongly alkaline, or coarse cleansers and
do not use steam cleaners at temperatures
greater than 140 °F/606, otherwise you may
damage your vehicle.<
Outside sensors
Sensors on the outside of the vehicle, such as
Park Distance Control sensors or radar sensors,
should be kept clean and free of ice to retain
their full function.
Interior care
Upholstery/fabrics
Clean regularly with a vacuum cleaner in order
to remove surface dirt.
In the event of more serious soiling such as bev-
erage stains, use a soft sponge or a lint-free
microfiber cloth in combination with suitable interior cleaners. Follow the instructions on the
packaging.
Clean upholstery material over a large
area extending out to the seams. Avoid
intense friction.<
Open Velcro fasteners on pants or other
items of clothing can cause damage to
the seat covering. Make sure that the Velcro
fasteners are closed.<
Leather/leather coverings
The leather used by BMW is a high quality
natural product. Slight patterns in the
grain are part of the typical properties of a natu-
ral leather.<
Dust and dirt from the road chafe in pores and
folds and result in considerable wear and cause
the leather surface to become prematurely brit-
tle. We therefore suggest that you clean the
leather with a dust cloth or vacuum cleaner at
regular intervals.
Particularly with light-colored leather, make
sure to clean it regularly since it has a greater
tendency to become soiled.
Treat the leather twice a year with a leather
lotion since dirt and grease harm the protective
layer of the leather.
Carpets/cargo area
Carpeting, floor mats, and luggage compart-
ment rugs and paneling can be cleaned with a
vacuum or in the event of more serious soiling,
cleansed with an interior cleaner.
Floor mats and luggage compartment rugs can
be removed for cleaning. When inserting into
place, make sure that the seat rails do not pro-
trude over the floor mats; otherwise floor mats
can be damaged.
Fluff on new floor mats is a result of the produc-
tion process and can be removed by repeated
vacuuming.
Plastic components inside
Clean the glass cover of the instrument panel,
imitation leather surfaces, lamp lenses, and
Page 205 of 250
Mobility
203Reference
At a glance
Controls
Driving tips
Communications
Navigation
Entertainment
Replacing components
Onboard vehicle tool kit
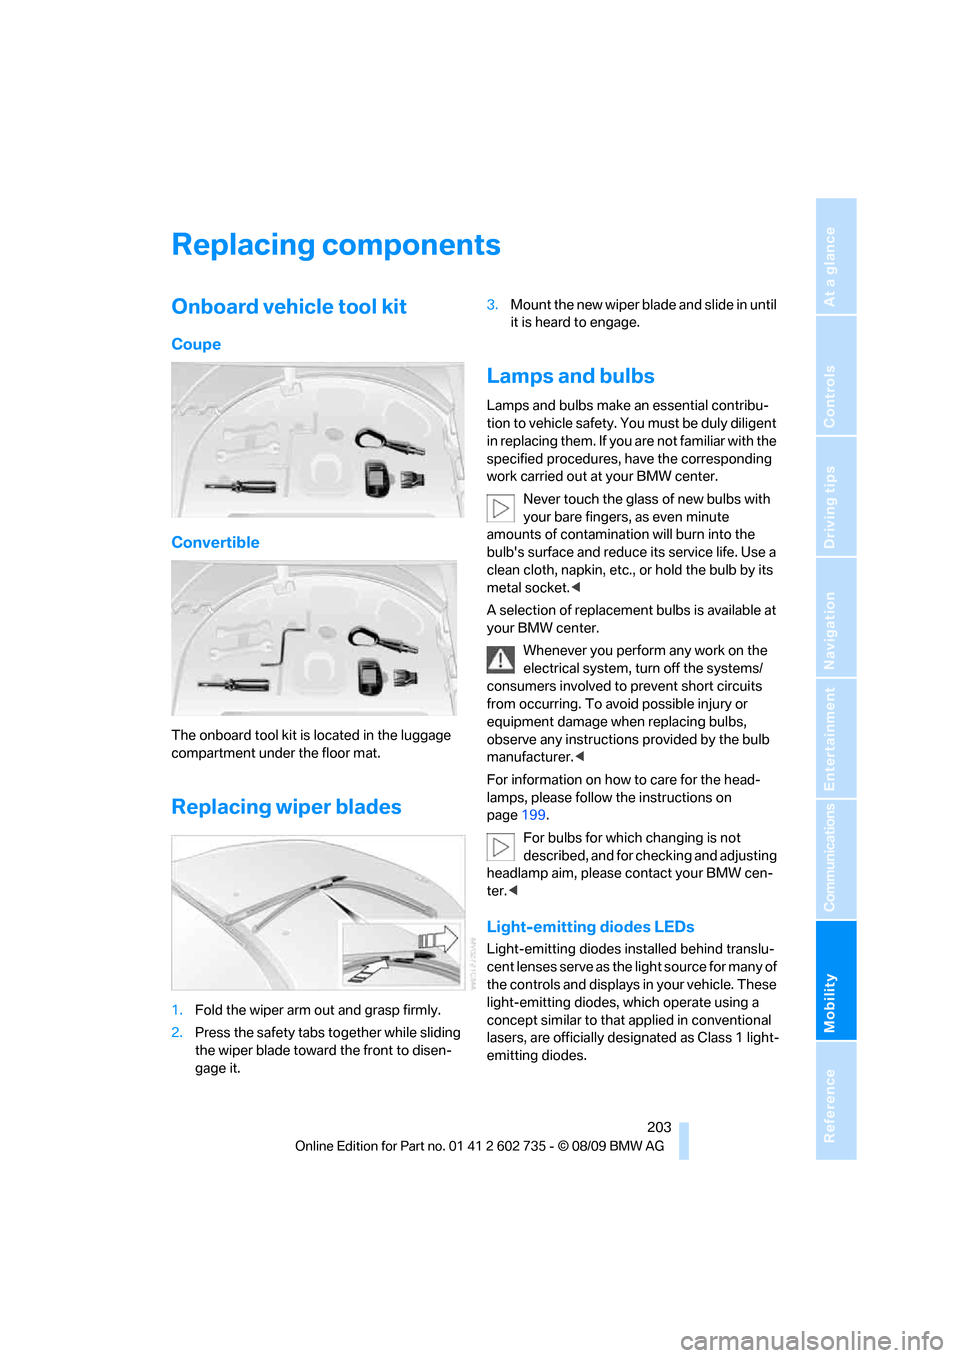
Coupe
Convertible
The onboard tool kit is located in the luggage
compartment under the floor mat.
Replacing wiper blades
1.Fold the wiper arm out and grasp firmly.
2.Press the safety tabs together while sliding
the wiper blade toward the front to disen-
gage it.3.Mount the new wiper blade and slide in until
it is heard to engage.
Lamps and bulbs
Lamps and bulbs make an essential contribu-
tion to vehicle safety. You must be duly diligent
in replacing them. If you are not familiar with the
specified procedures, have the corresponding
work carried out at your BMW center.
Never touch the glass of new bulbs with
your bare fingers, as even minute
amounts of contamination will burn into the
bulb's surface and reduce its service life. Use a
clean cloth, napkin, etc., or hold the bulb by its
metal socket.<
A selection of replacement bulbs is available at
your BMW center.
Whenever you perform any work on the
electrical system, turn off the systems/
consumers involved to prevent short circuits
from occurring. To avoid possible injury or
equipment damage when replacing bulbs,
observe any instructions provided by the bulb
manufacturer.<
For information on how to care for the head-
lamps, please follow the instructions on
page199.
For bulbs for which changing is not
described, and for checking and adjusting
headlamp aim, please contact your BMW cen-
ter.<
Light-emitting diodes LEDs
Light-emitting diodes installed behind translu-
cent lenses serve as the light source for many of
the controls and displays in your vehicle. These
light-emitting diodes, which operate using a
concept similar to that applied in conventional
lasers, are officially designated as Class 1 light-
emitting diodes.
Page 207 of 250
Mobility
205Reference
At a glance
Controls
Driving tips
Communications
Navigation
Entertainment
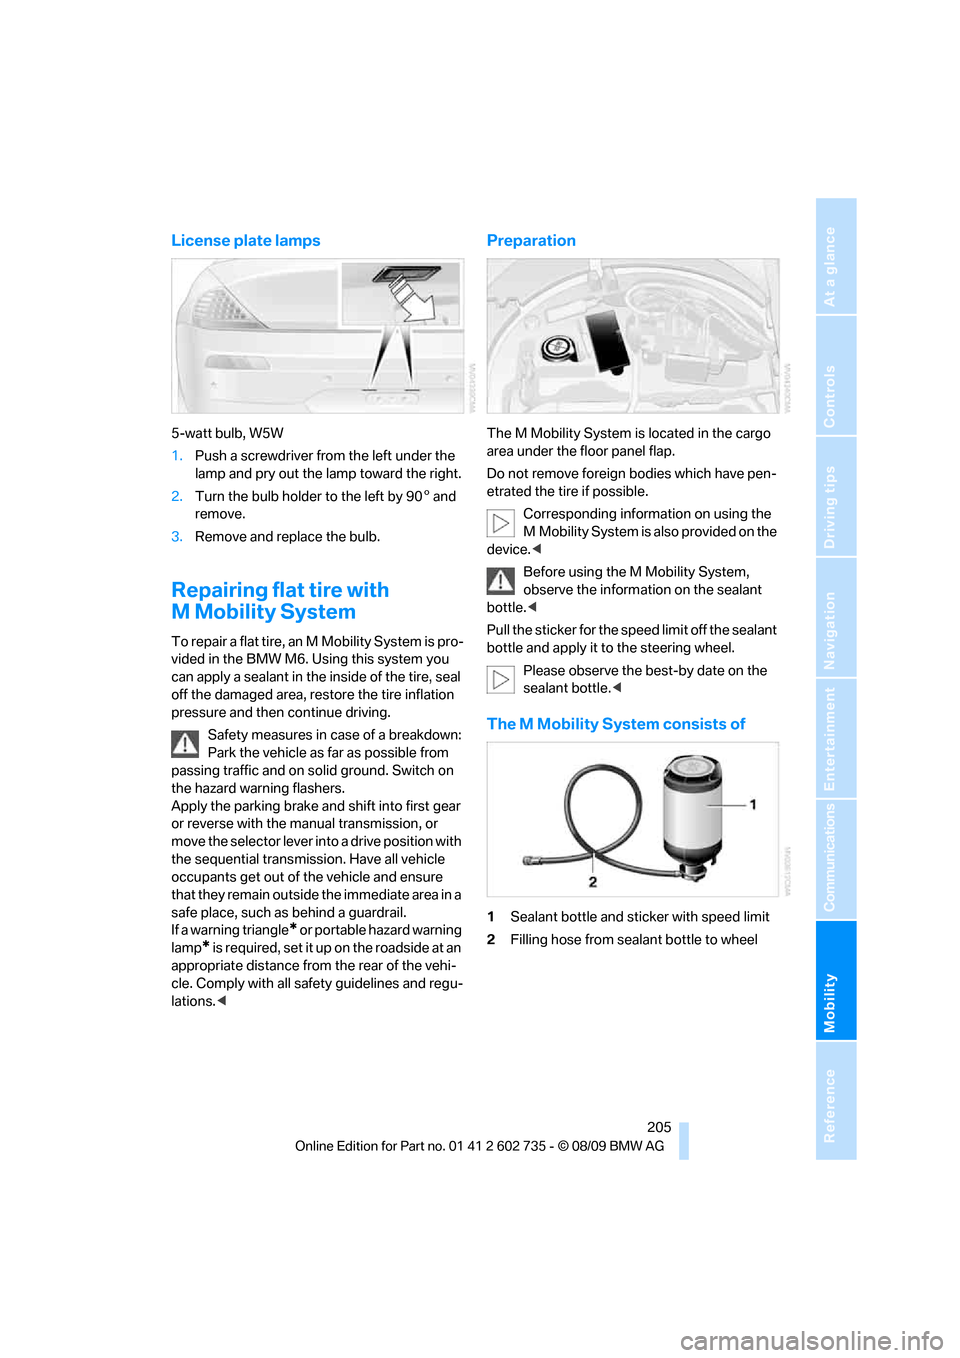
License plate lamps
5-watt bulb, W5W
1.Push a screwdriver from the left under the
lamp and pry out the lamp toward the right.
2.Turn the bulb holder to the left by 905 and
remove.
3.Remove and replace the bulb.
Repairing flat tire with
M Mobility System
To repair a flat tire, an M Mobility System is pro-
vided in the BMW M6. Using this system you
can apply a sealant in the inside of the tire, seal
off the damaged area, restore the tire inflation
pressure and then continue driving.
Safety measures in case of a breakdown:
Park the vehicle as far as possible from
passing traffic and on solid ground. Switch on
the hazard warning flashers.
Apply the parking brake and shift into first gear
or reverse with the manual transmission, or
move the selector lever into a drive position with
the sequential transmission. Have all vehicle
occupants get out of the vehicle and ensure
that they remain outside the immediate area in a
safe place, such as behind a guardrail.
If a warning triangle
* or portable hazard warning
lamp
* is required, set it up on the roadside at an
appropriate distance from the rear of the vehi-
cle. Comply with all safety guidelines and regu-
lations.<
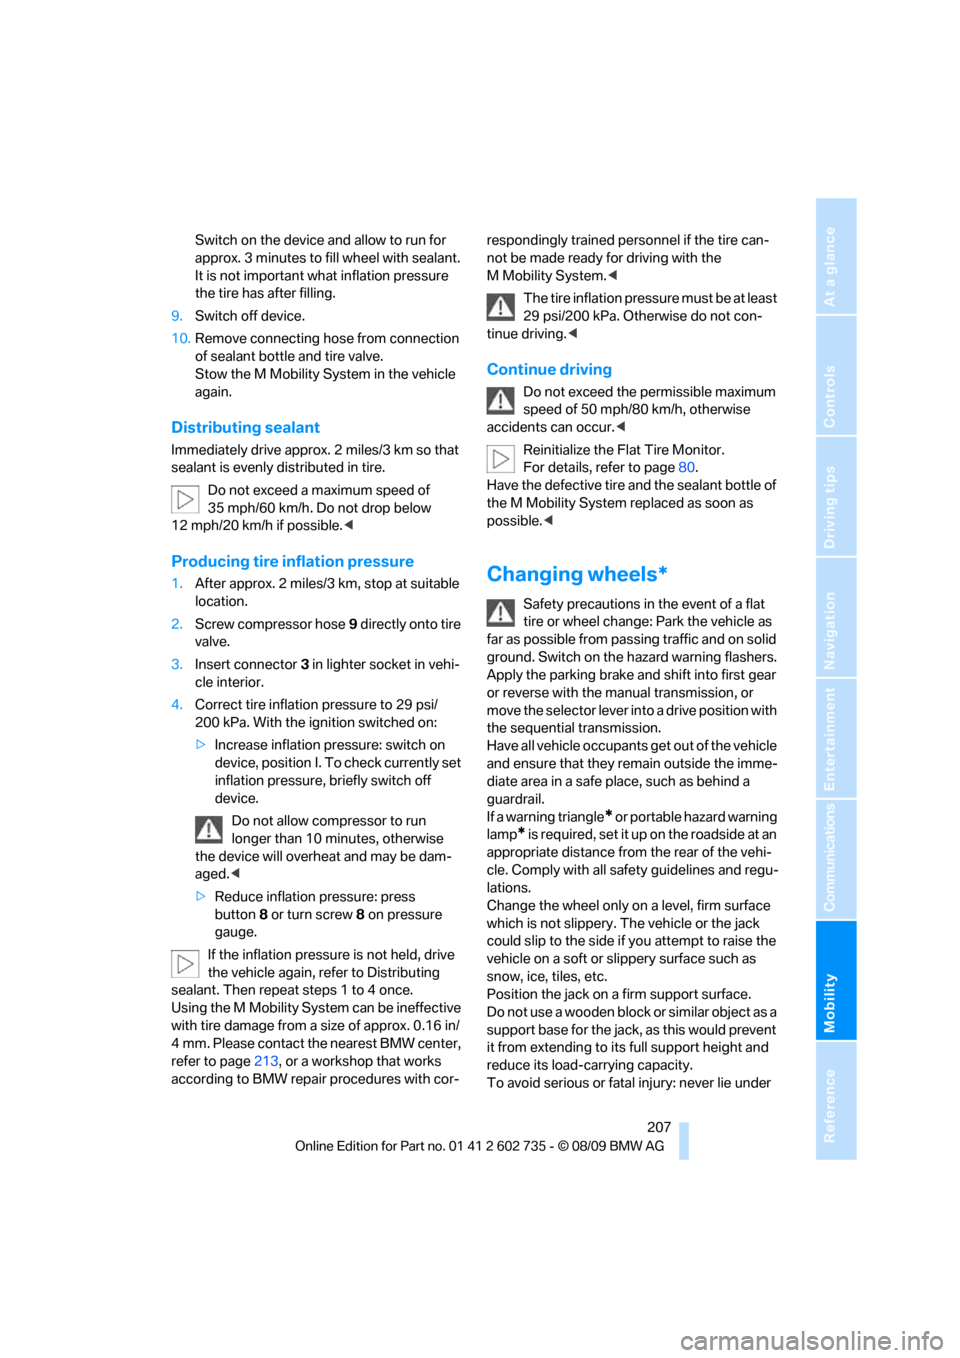
Preparation
The M Mobility System is located in the cargo
area under the floor panel flap.
Do not remove foreign bodies which have pen-
etrated the tire if possible.
Corresponding information on using the
M Mobility System is also provided on the
device.<
Before using the M Mobility System,
observe the information on the sealant
bottle.<
Pull the sticker for the speed limit off the sealant
bottle and apply it to the steering wheel.
Please observe the best-by date on the
sealant bottle.<
The M Mobility System consists of
1Sealant bottle and sticker with speed limit
2Filling hose from sealant bottle to wheel
Page 209 of 250
Mobility
207Reference
At a glance
Controls
Driving tips
Communications
Navigation
Entertainment
Switch on the device and allow to run for
approx. 3 minutes to fill wheel with sealant.
It is not important what inflation pressure
the tire has after filling.
9.Switch off device.
10.Remove connecting hose from connection
of sealant bottle and tire valve.
Stow the M Mobility System in the vehicle
again.
Distributing sealant
Immediately drive approx. 2 miles/3 km so that
sealant is evenly distributed in tire.
Do not exceed a maximum speed of
35 mph/60 km/h. Do not drop below
12 mph/20 km/h if possible.<
Producing tire inflation pressure
1.After approx. 2 miles/3 km, stop at suitable
location.
2.Screw compressor hose9 directly onto tire
valve.
3.Insert connector 3 in lighter socket in vehi-
cle interior.
4.Correct tire inflation pressure to 29 psi/
200 kPa. With the ignition switched on:
>Increase inflation pressure: switch on
device, position I. To check currently set
inflation pressure, briefly switch off
device.
Do not allow compressor to run
longer than 10 minutes, otherwise
the device will overheat and may be dam-
aged.<
>Reduce inflation pressure: press
button8 or turn screw8 on pressure
gauge.
If the inflation pressure is not held, drive
the vehicle again, refer to Distributing
sealant. Then repeat steps 1 to 4 once.
Using the M Mobility System can be ineffective
with tire damage from a size of approx. 0.16 in/
4 mm. Please contact the nearest BMW center,
refer to page213, or a workshop that works
according to BMW repair procedures with cor-respondingly trained personnel if the tire can-
not be made ready for driving with the
M Mobility System.<
The tire inflation pressure must be at least
29 psi/200 kPa. Otherwise do not con-
tinue driving.<
Continue driving
Do not exceed the permissible maximum
speed of 50 mph/80 km/h, otherwise
accidents can occur.<
Reinitialize the Flat Tire Monitor.
For details, refer to page80.
Have the defective tire and the sealant bottle of
the M Mobility System replaced as soon as
possible.<
Changing wheels*
Safety precautions in the event of a flat
tire or wheel change: Park the vehicle as
far as possible from passing traffic and on solid
ground. Switch on the hazard warning flashers.
Apply the parking brake and shift into first gear
or reverse with the manual transmission, or
move the selector lever into a drive position with
the sequential transmission.
Have all vehicle occupants get out of the vehicle
and ensure that they remain outside the imme-
diate area in a safe place, such as behind a
guardrail.
If a warning triangle
* or portable hazard warning
lamp
* is required, set it up on the roadside at an
appropriate distance from the rear of the vehi-
cle. Comply with all safety guidelines and regu-
lations.
Change the wheel only on a level, firm surface
which is not slippery. The vehicle or the jack
could slip to the side if you attempt to raise the
vehicle on a soft or slippery surface such as
snow, ice, tiles, etc.
Position the jack on a firm support surface.
Do not use a wooden block or similar object as a
support base for the jack, as this would prevent
it from extending to its full support height and
reduce its load-carrying capacity.
To avoid serious or fatal injury: never lie under
Page 212 of 250
Replacing components
210 mal wheel should be remounted as soon as
possible.<
Vehicle battery
Battery care
The battery is 100 % maintenance-free, i.e., the
electrolyte will last for the life of the battery
when the vehicle is operated in a temperate cli-
mate.
Your BMW center will be glad to advise in all
matters concerning the battery.
Charging battery
Only charge the battery in the vehicle via the
terminals in the engine compartment with the
engine switched off. Connections, refer to
Jump starting on page213.
Disposal
Have old batteries disposed of by your
BMW center or bring them a recycling
center. Maintain the battery in an upright posi-
tion for transport and storage. Always restrain
the battery to prevent it from tipping over during
transport.<
Power failure
Following a temporary power failure, e.g. due to
a discharged battery, the use of some equip-
ment will be restricted, requiring its reinitializa-
tion. In the same way, individual settings are lost
and must be updated again:
>Seat, mirror and steering wheel
* memory
The positions must be stored again, refer to
page45.
>Time and date
Must be updated again, refer to page69.
>Radio
Radio stations need to be stored again,
refer to page140.
>Navigation system
You must wait until the system becomes
functional again, refer to page116.>Power windows
The pinch prevention system for the power
windows must be reinitialized, refer to
page36.
Talk to your BMW center before placing
the stored vehicle back in service. <
Fuses
Never attempt to repair a blown fuse and
do not replace a defective fuse with a sub-
stitute of another color or amperage rating, as
this could lead to a circuit overload, ultimately
resulting in a fire in the vehicle.<
Spare fuses and a pair of plastic tweezers are
located in the compartment for the onboard tool
kit, refer to page203.
Information on fuse allocation is located below
the bracket for the onboard tool kit, see below.
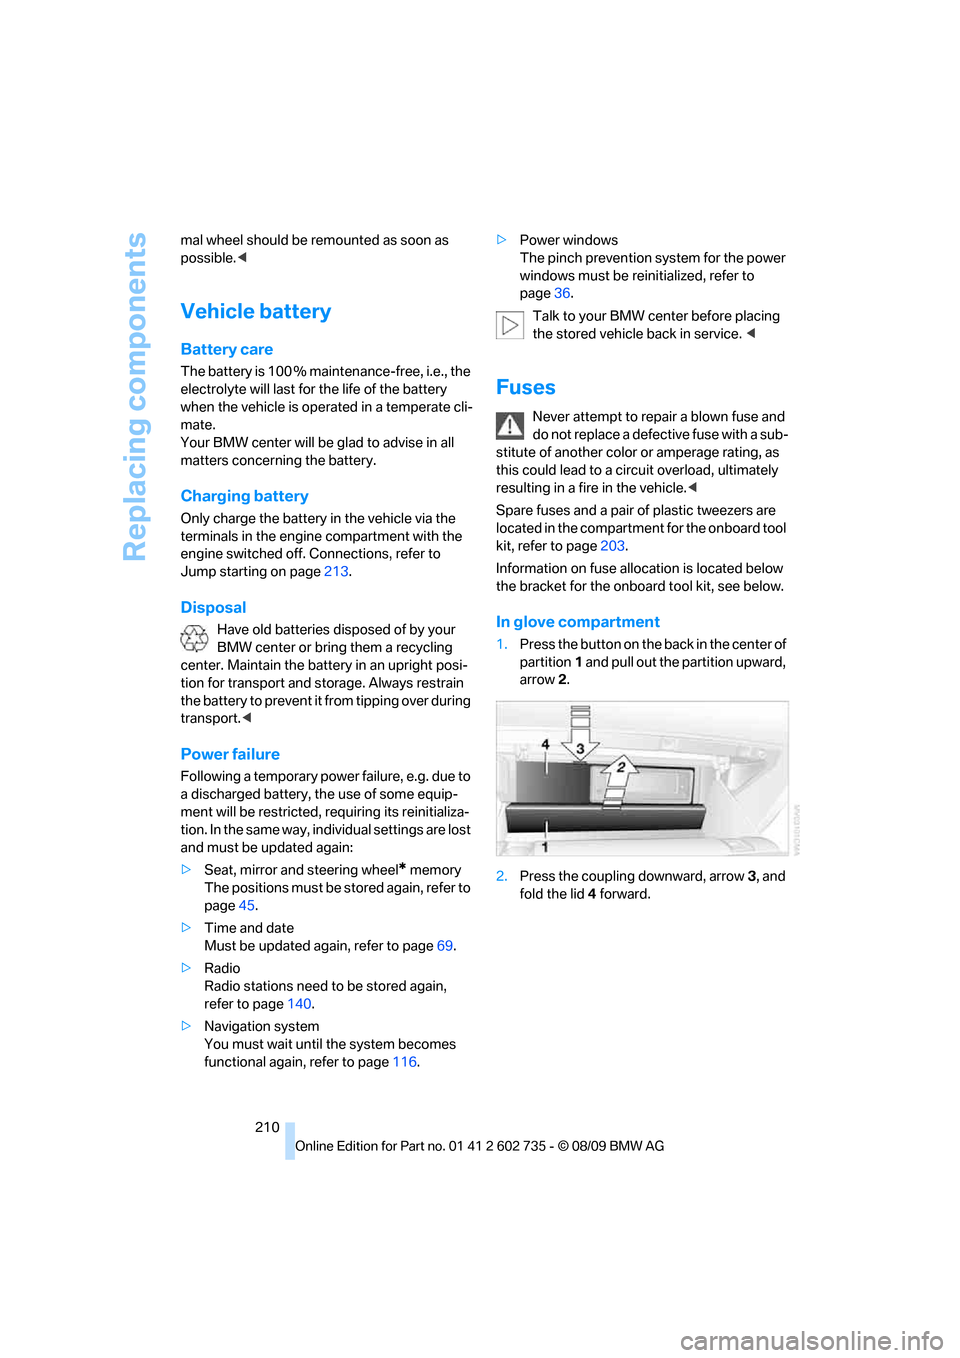
In glove compartment
1.Press the button on the back in the center of
partition1 and pull out the partition upward,
arrow2.
2.Press the coupling downward, arrow3, and
fold the lid 4 forward.
Page 215 of 250
Mobility
213Reference
At a glance
Controls
Driving tips
Communications
Navigation
Entertainment
Warning triangle*
The warning triangle is located on the left-hand
side in the luggage compartment.
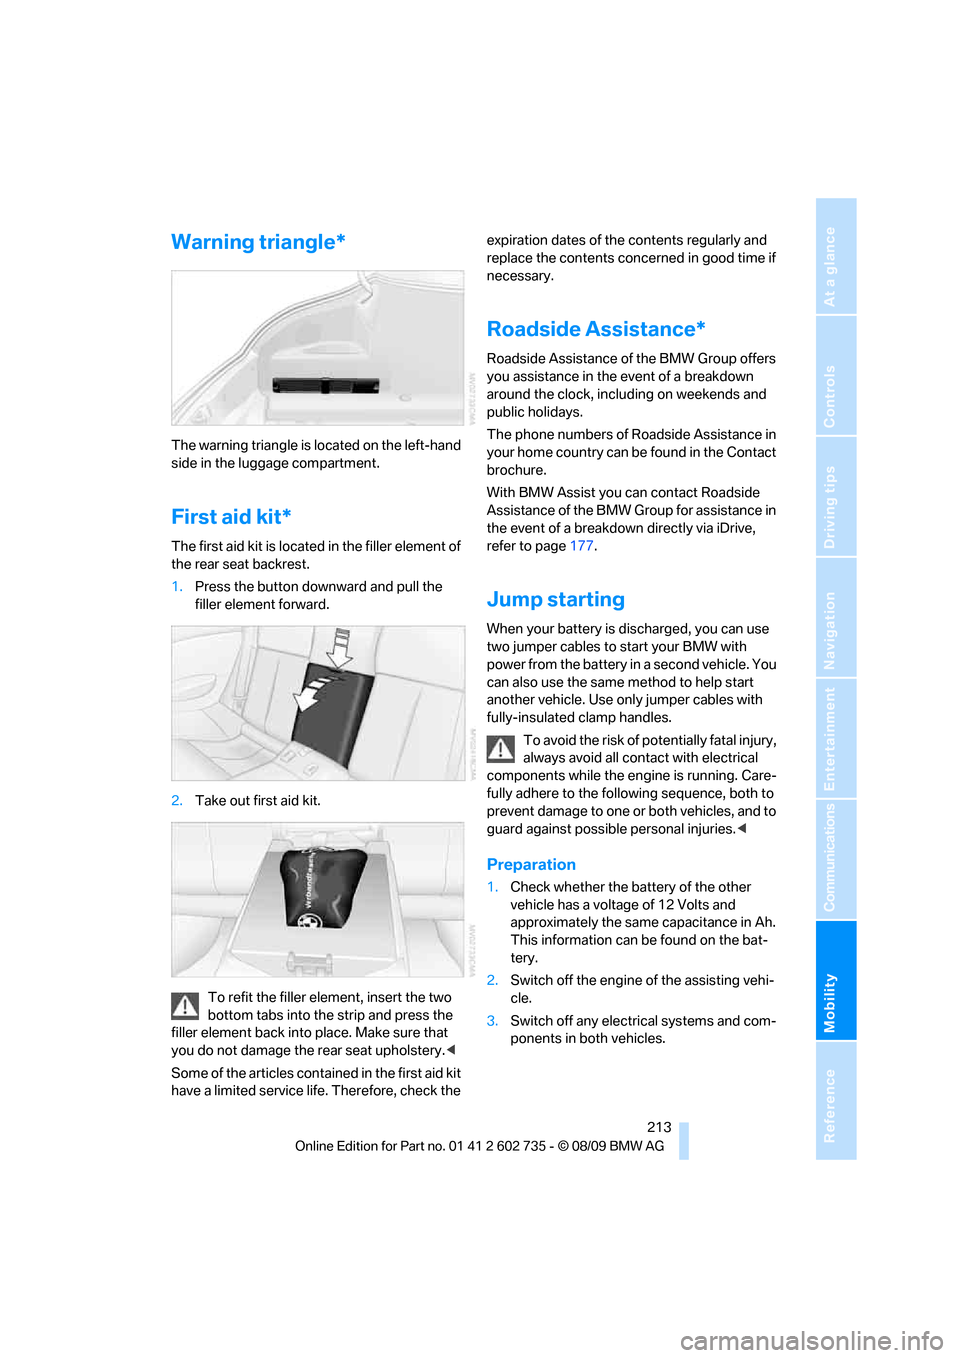
First aid kit*
The first aid kit is located in the filler element of
the rear seat backrest.
1.Press the button downward and pull the
filler element forward.
2.Take out first aid kit.
To refit the filler element, insert the two
bottom tabs into the strip and press the
filler element back into place. Make sure that
you do not damage the rear seat upholstery.<
Some of the articles contained in the first aid kit
have a limited service life. Therefore, check the expiration dates of the contents regularly and
replace the contents concerned in good time if
necessary.
Roadside Assistance*
Roadside Assistance of the BMW Group offers
you assistance in the event of a breakdown
around the clock, including on weekends and
public holidays.
The phone numbers of Roadside Assistance in
your home country can be found in the Contact
brochure.
With BMW Assist you can contact Roadside
Assistance of the BMW Group for assistance in
the event of a breakdown directly via iDrive,
refer to page177.
Jump starting
When your battery is discharged, you can use
two jumper cables to start your BMW with
power from the battery in a second vehicle. You
can also use the same method to help start
another vehicle. Use only jumper cables with
fully-insulated clamp handles.
To avoid the risk of potentially fatal injury,
always avoid all contact with electrical
components while the engine is running. Care-
fully adhere to the following sequence, both to
prevent damage to one or both vehicles, and to
guard against possible personal injuries.<
Preparation
1.Check whether the battery of the other
vehicle has a voltage of 12 Volts and
approximately the same capacitance in Ah.
This information can be found on the bat-
tery.
2.Switch off the engine of the assisting vehi-
cle.
3.Switch off any electrical systems and com-
ponents in both vehicles.
Page 225 of 250
Reference 223
At a glance
Controls
Driving tips
Communications
Navigation
Entertainment
Mobility
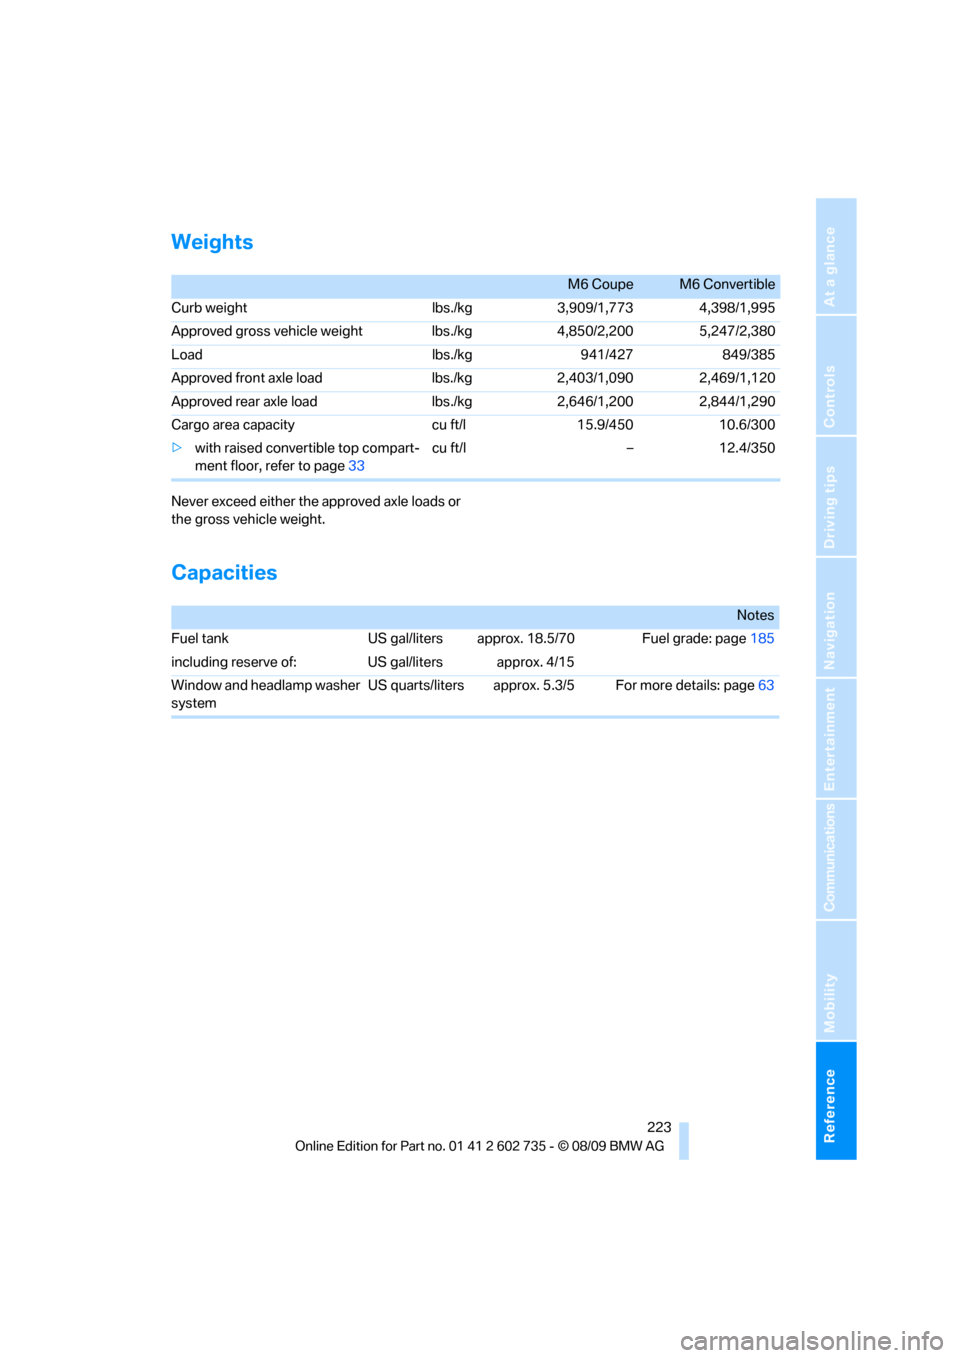
Weights
Never exceed either the approved axle loads or
the gross vehicle weight.
Capacities
M6 CoupeM6 Convertible
Curb weight lbs./kg 3,909/1,773 4,398/1,995
Approved gross vehicle weight lbs./kg 4,850/2,200 5,247/2,380
Load lbs./kg 941/427 849/385
Approved front axle load lbs./kg 2,403/1,090 2,469/1,120
Approved rear axle load lbs./kg 2,646/1,200 2,844/1,290
Cargo area capacity cu ft/l 15.9/450 10.6/300
>with raised convertible top compart-
ment floor, refer to page33cu ft/l – 12.4/350
Notes
Fuel tank US gal/liters approx. 18.5/70 Fuel grade: page185
including reserve of: US gal/liters approx. 4/15
Window and headlamp washer
systemUS quarts/liters approx. 5.3/5 For more details: page63
Page 228 of 250
Short commands of voice activation system
226
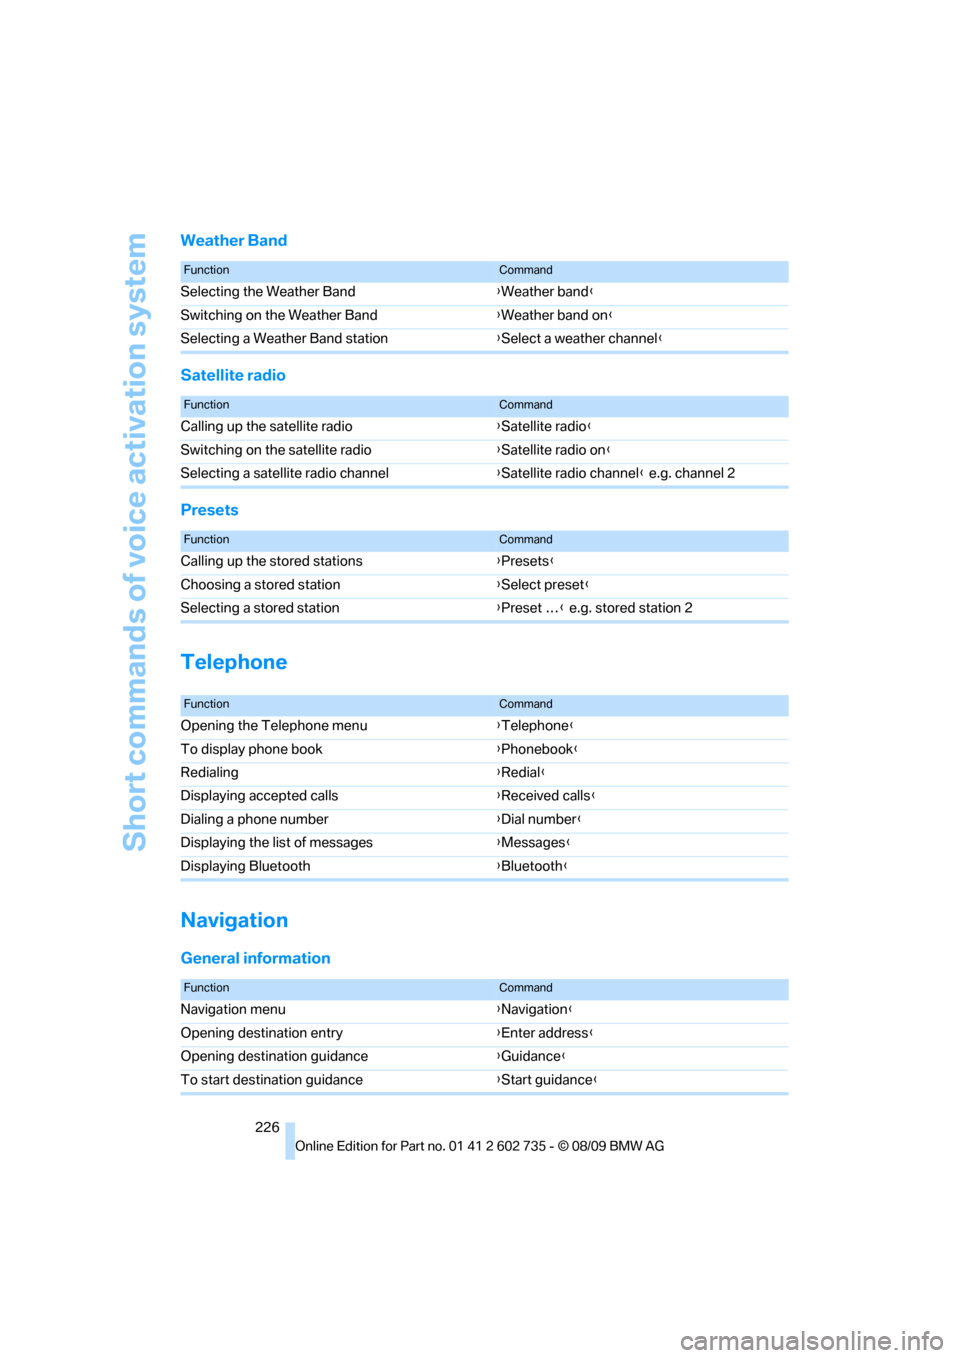
Weather Band
Satellite radio
Presets
Telephone
Navigation
General information
FunctionCommand
Selecting the Weather Band{Weather band}
Switching on the Weather Band{Weather band on}
Selecting a Weather Band station{Select a weather channel}
FunctionCommand
Calling up the satellite radio{Satellite radio}
Switching on the satellite radio{Satellite radio on}
Selecting a satellite radio channel{Satellite radio channel} e.g. channel 2
FunctionCommand
Calling up the stored stations{Presets}
Choosing a stored station{Select preset}
Selecting a stored station{Preset …} e.g. stored station 2
FunctionCommand
Opening the Telephone menu{Telephone}
To display phone book{Phonebook}
Redialing{Redial}
Displaying accepted calls{Received calls}
Dialing a phone number{Dial number}
Displaying the list of messages{Messages}
Displaying Bluetooth{Bluetooth}
FunctionCommand
Navigation menu{Navigation}
Opening destination entry{Enter address}
Opening destination guidance{Guidance}
To start destination guidance{Start guidance}