headlamp BMW M6 CONVERTIBLE 2010 E64 Owner's Manual
[x] Cancel search | Manufacturer: BMW, Model Year: 2010, Model line: M6 CONVERTIBLE, Model: BMW M6 CONVERTIBLE 2010 E64Pages: 250, PDF Size: 8.4 MB
Page 12 of 250
Cockpit
10
Cockpit
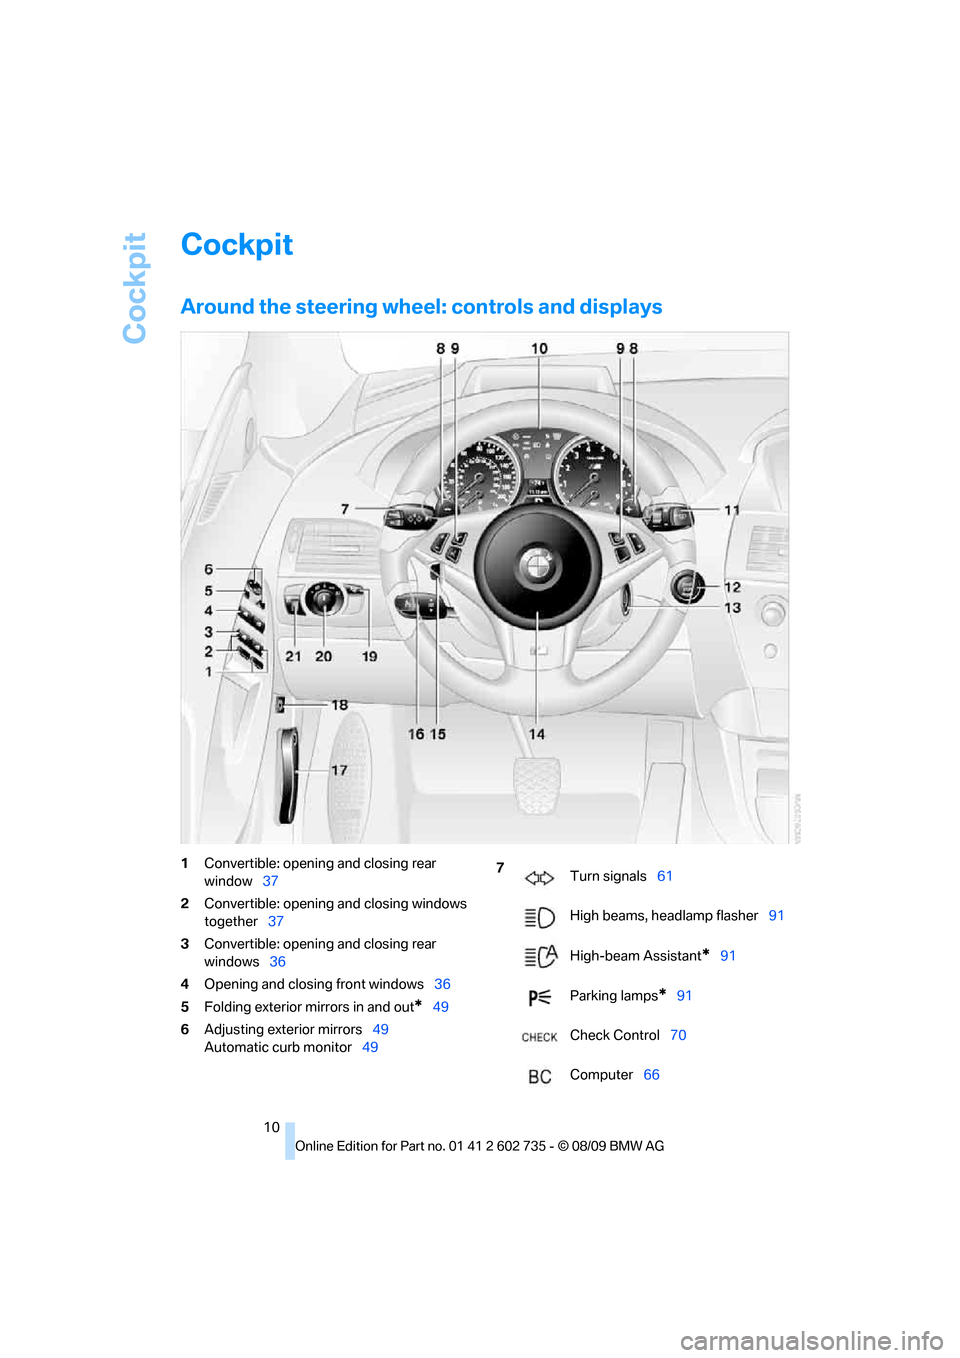
Around the steering wheel: controls and displays
1Convertible: opening and closing rear
window37
2Convertible: opening and closing windows
together37
3Convertible: opening and closing rear
windows36
4Opening and closing front windows36
5Folding exterior mirrors in and out
*49
6Adjusting exterior mirrors49
Automatic curb monitor49
7
Turn signals61
High beams, headlamp flasher91
High-beam Assistant
*91
Parking lamps
*91
Check Control70
Computer66
Page 13 of 250
At a glance
11Reference
Controls
Driving tips
Communications
Navigation
Entertainment
Mobility
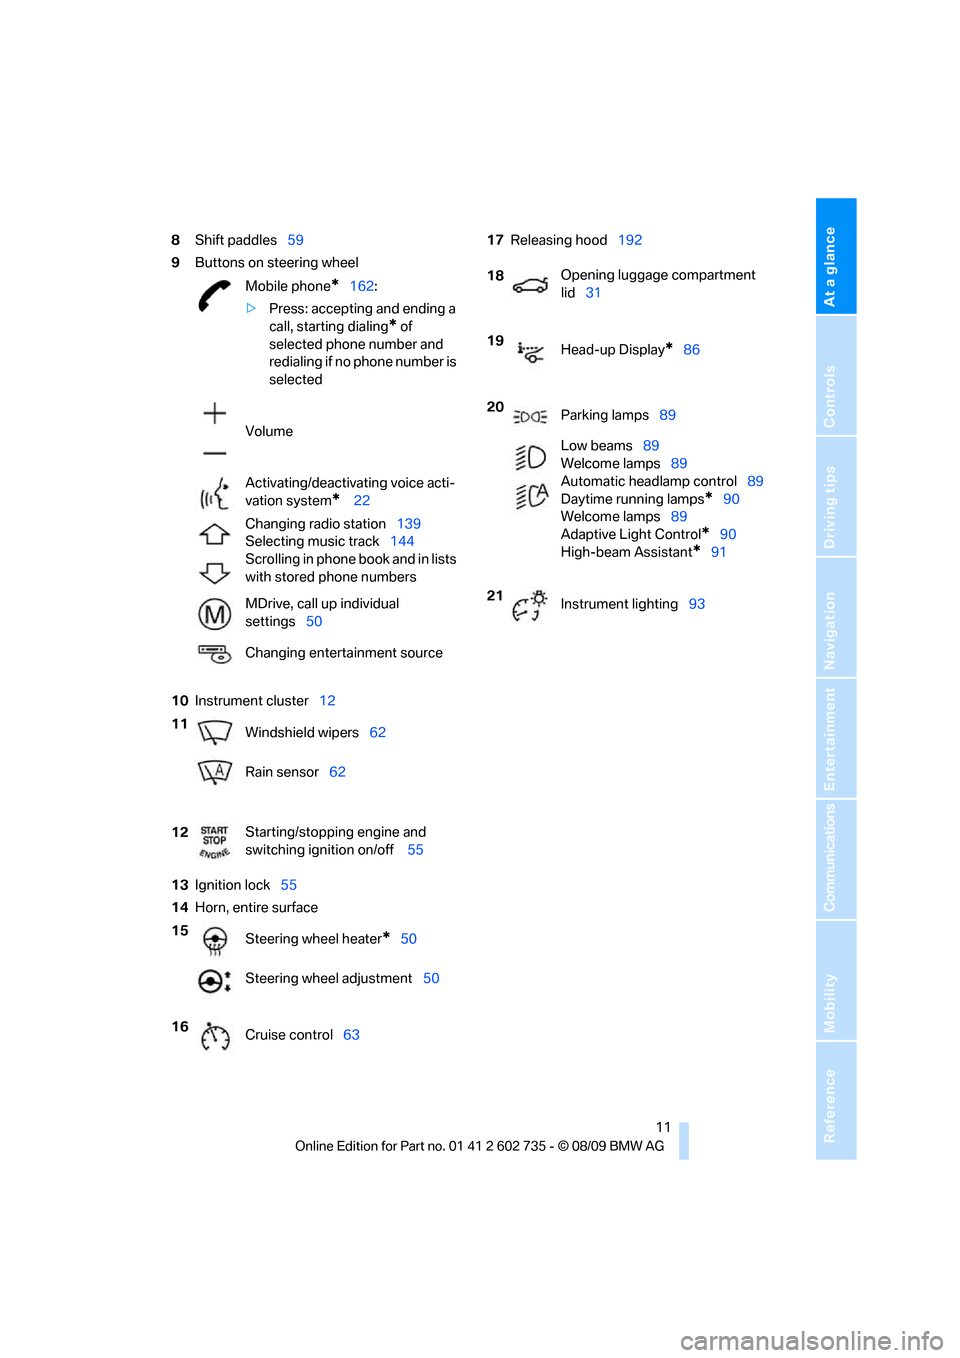
8Shift paddles59
9Buttons on steering wheel
10Instrument cluster12
13Ignition lock55
14Horn, entire surface17Releasing hood192
Mobile phone
*162:
>Press: accepting and ending a
call, starting dialing
* of
selected phone number and
redialing if no phone number is
selected
Volume
Activating/deactivating voice acti-
vation system
* 22
Changing radio station139
Selecting music track144
Scrolling in phone book and in lists
with stored phone numbers
MDrive, call up individual
settings50
Changing entertainment source
11
Windshield wipers62
Rain sensor62
12Starting/stopping engine and
switching ignition on/off 55
15
Steering wheel heater
*50
Steering wheel adjustment50
16
Cruise control63
18Opening luggage compartment
lid31
19
Head-up Display
*86
20
Parking lamps89
Low beams89
Welcome lamps89
Automatic headlamp control89
Daytime running lamps
*90
Welcome lamps89
Adaptive Light Control
*90
High-beam Assistant
*91
21
Instrument lighting93
Page 15 of 250
At a glance
13Reference
Controls
Driving tips
Communications
Navigation
Entertainment
Mobility
Indicator and warning lamps
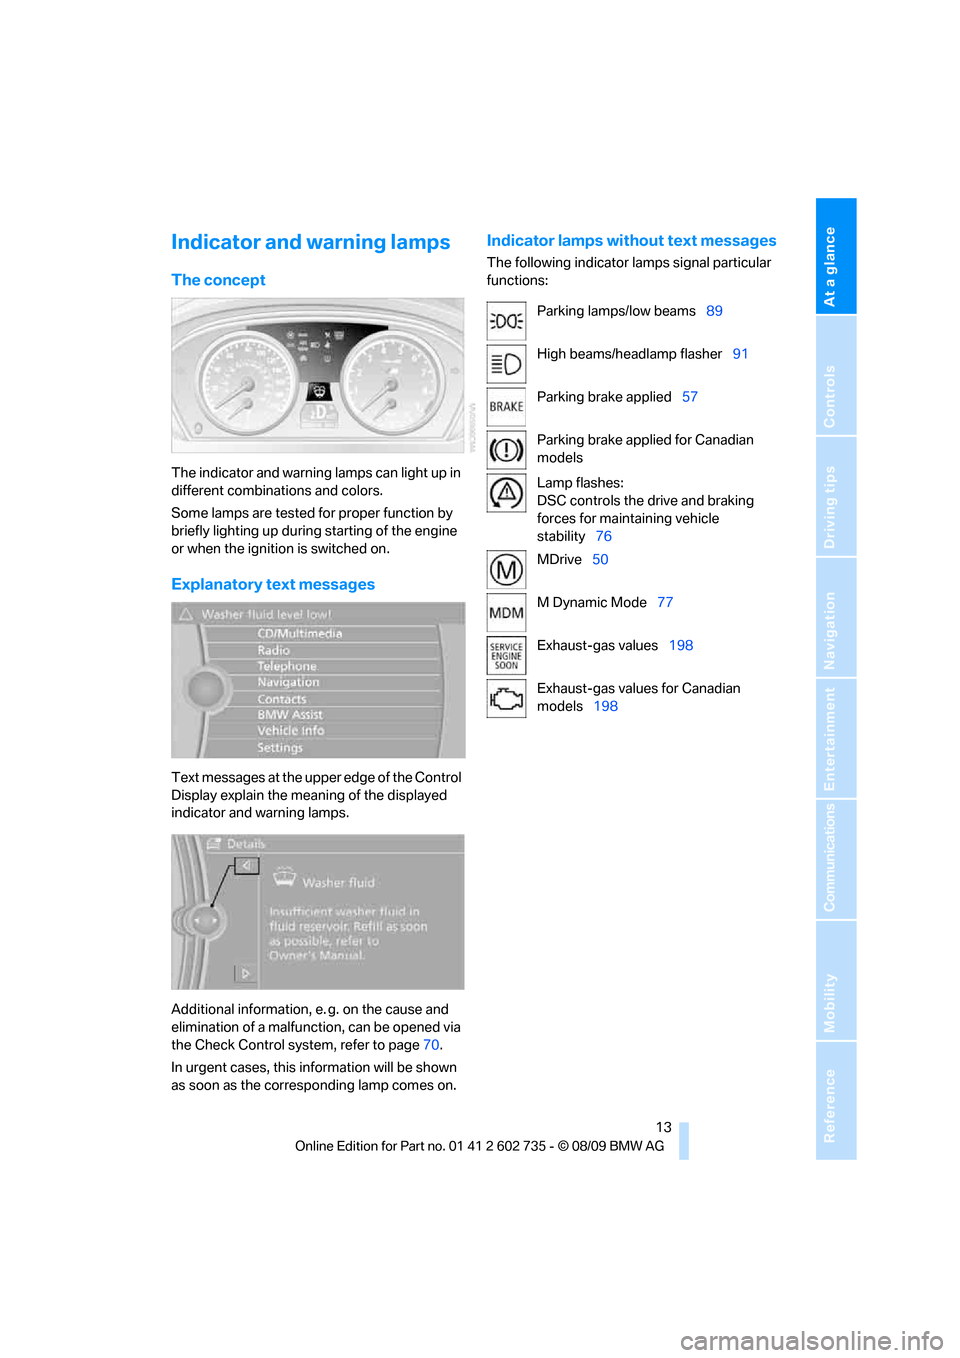
The concept
The indicator and warning lamps can light up in
different combinations and colors.
Some lamps are tested for proper function by
briefly lighting up during starting of the engine
or when the ignition is switched on.
Explanatory text messages
Text messages at the upper edge of the Control
Display explain the meaning of the displayed
indicator and warning lamps.
Additional information, e. g. on the cause and
elimination of a malfunction, can be opened via
the Check Control system, refer to page70.
In urgent cases, this information will be shown
as soon as the corresponding lamp comes on.
Indicator lamps without text messages
The following indicator lamps signal particular
functions:
Parking lamps/low beams89
High beams/headlamp flasher91
Parking brake applied57
Parking brake applied for Canadian
models
Lamp flashes:
DSC controls the drive and braking
forces for maintaining vehicle
stability76
MDrive50
M Dynamic Mode77
Exhaust-gas values198
Exhaust-gas values for Canadian
models198
Page 63 of 250
Controls
61Reference
At a glance
Driving tips
Communications
Navigation
Entertainment
Mobility
tion is minimal and the engine output is
reduced.
"P 500" program
The "P 500" program provides maximum per-
formance and more spontaneous reaction of
the engine to accelerator pedal movements.
"P 500 Sport" program
In the "P 500 Sport" program, the engine
responds to accelerator pedal movements with
a high degree of spontaneity and uncompro-
mising sportiness while exhibiting maximum
performance.
Selecting program
The "P 400" program is activated after each
engine start.
Press the POWER button to activate the
"P 500" program. Pressing the POWER button
repeatedly switches between the programs
"P 400" and "P 500".
You can also activate your preferred program
with the button on the steering wheel, refer
to MDrive on page50. You can activate the
"P 500 Sport" program only with MDrive.
For the programs "P 500" and "P 500 Sport",
the LED in the POWER button lights up.
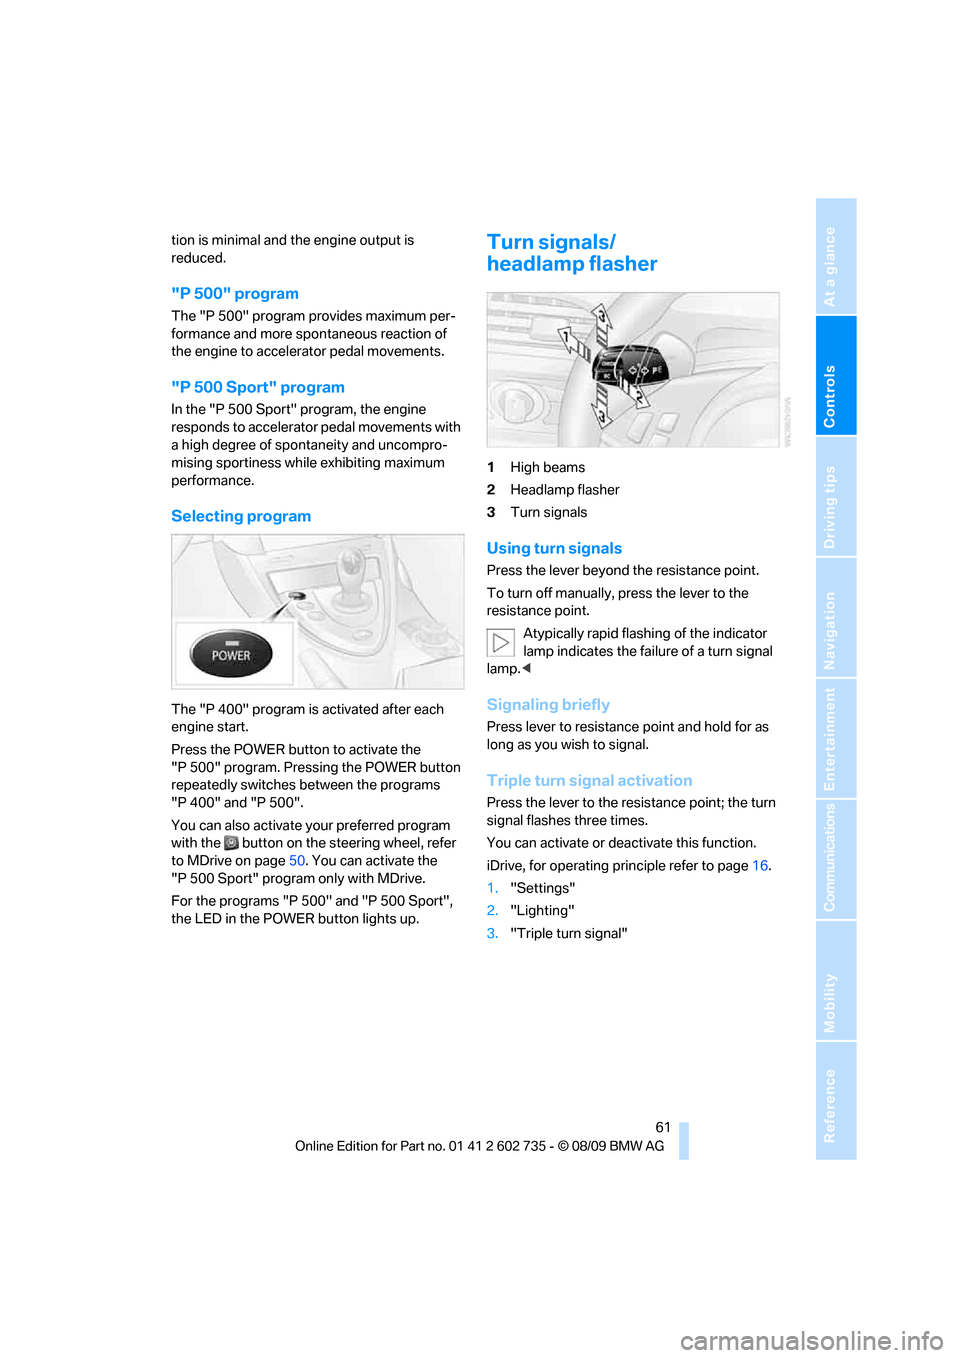
Turn signals/
headlamp flasher
1High beams
2Headlamp flasher
3Turn signals
Using turn signals
Press the lever beyond the resistance point.
To turn off manually, press the lever to the
resistance point.
Atypically rapid flashing of the indicator
lamp indicates the failure of a turn signal
lamp.<
Signaling briefly
Press lever to resistance point and hold for as
long as you wish to signal.
Triple turn signal activation
Press the lever to the resistance point; the turn
signal flashes three times.
You can activate or deactivate this function.
iDrive, for operating principle refer to page16.
1."Settings"
2."Lighting"
3."Triple turn signal"
Page 64 of 250
Driving
62 4. Triple turn signal activation is activated
and is stored for the remote control cur-
rently in use.
Wiper system
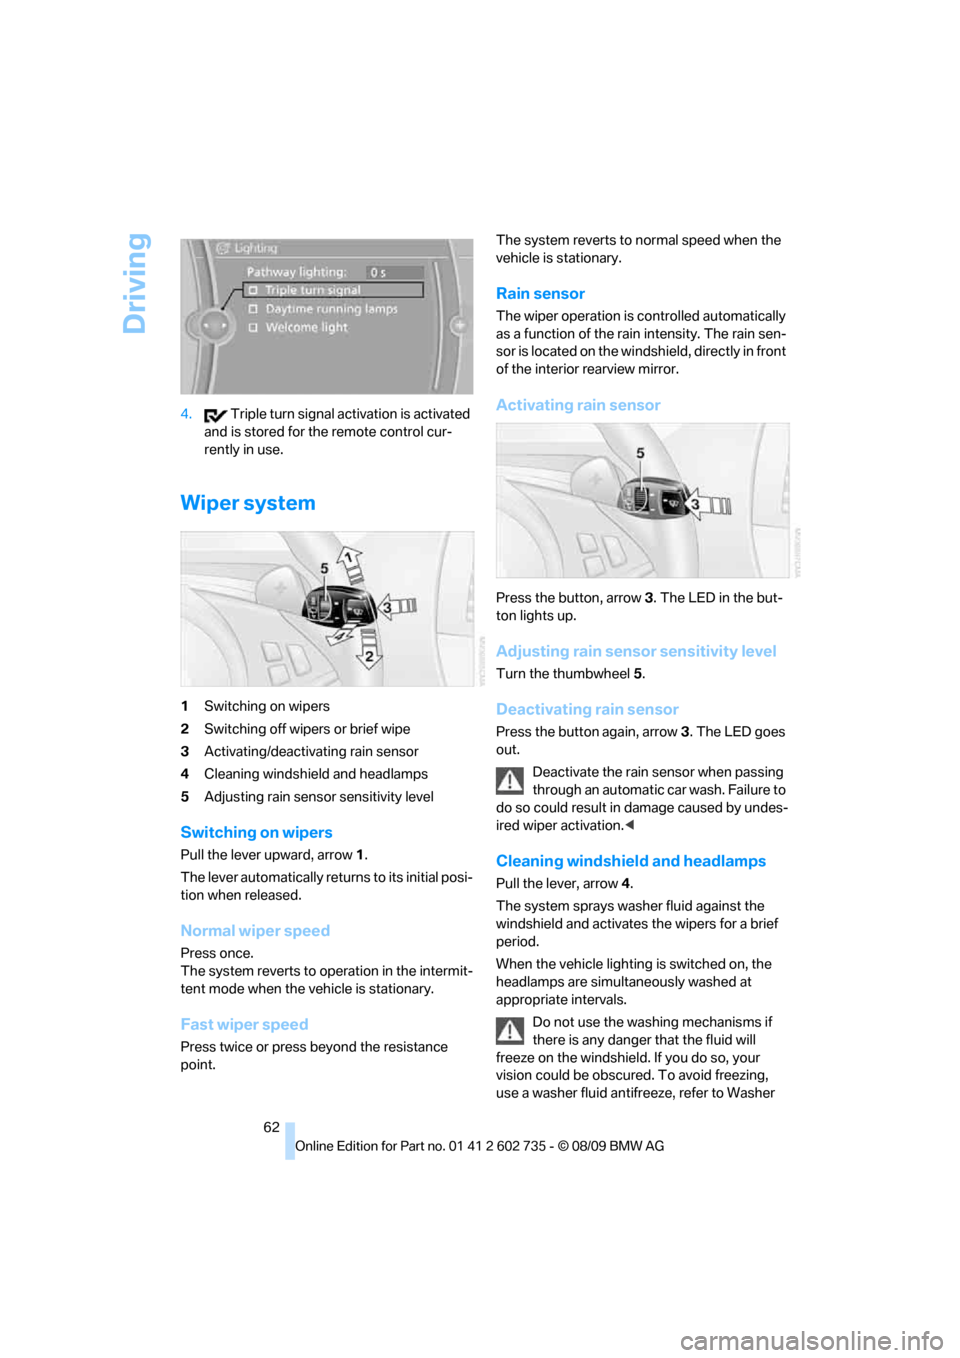
1Switching on wipers
2Switching off wipers or brief wipe
3Activating/deactivating rain sensor
4Cleaning windshield and headlamps
5Adjusting rain sensor sensitivity level
Switching on wipers
Pull the lever upward, arrow1.
The lever automatically returns to its initial posi-
tion when released.
Normal wiper speed
Press once.
The system reverts to operation in the intermit-
tent mode when the vehicle is stationary.
Fast wiper speed
Press twice or press beyond the resistance
point. The system reverts to normal speed when the
vehicle is stationary.
Rain sensor
The wiper operation is controlled automatically
as a function of the rain intensity. The rain sen-
sor is located on the windshield, directly in front
of the interior rearview mirror.
Activating rain sensor
Press the button, arrow3. The LED in the but-
ton lights up.
Adjusting rain sensor sensitivity level
Turn the thumbwheel5.
Deactivating rain sensor
Press the button again, arrow3. The LED goes
out.
Deactivate the rain sensor when passing
through an automatic car wash. Failure to
do so could result in damage caused by undes-
ired wiper activation.<
Cleaning windshield and headlamps
Pull the lever, arrow4.
The system sprays washer fluid against the
windshield and activates the wipers for a brief
period.
When the vehicle lighting is switched on, the
headlamps are simultaneously washed at
appropriate intervals.
Do not use the washing mechanisms if
there is any danger that the fluid will
freeze on the windshield. If you do so, your
vision could be obscured. To avoid freezing,
use a washer fluid antifreeze, refer to Washer
Page 91 of 250
Controls
89Reference
At a glance
Driving tips
Communications
Navigation
Entertainment
Mobility
Lamps
Parking lamps/low beams
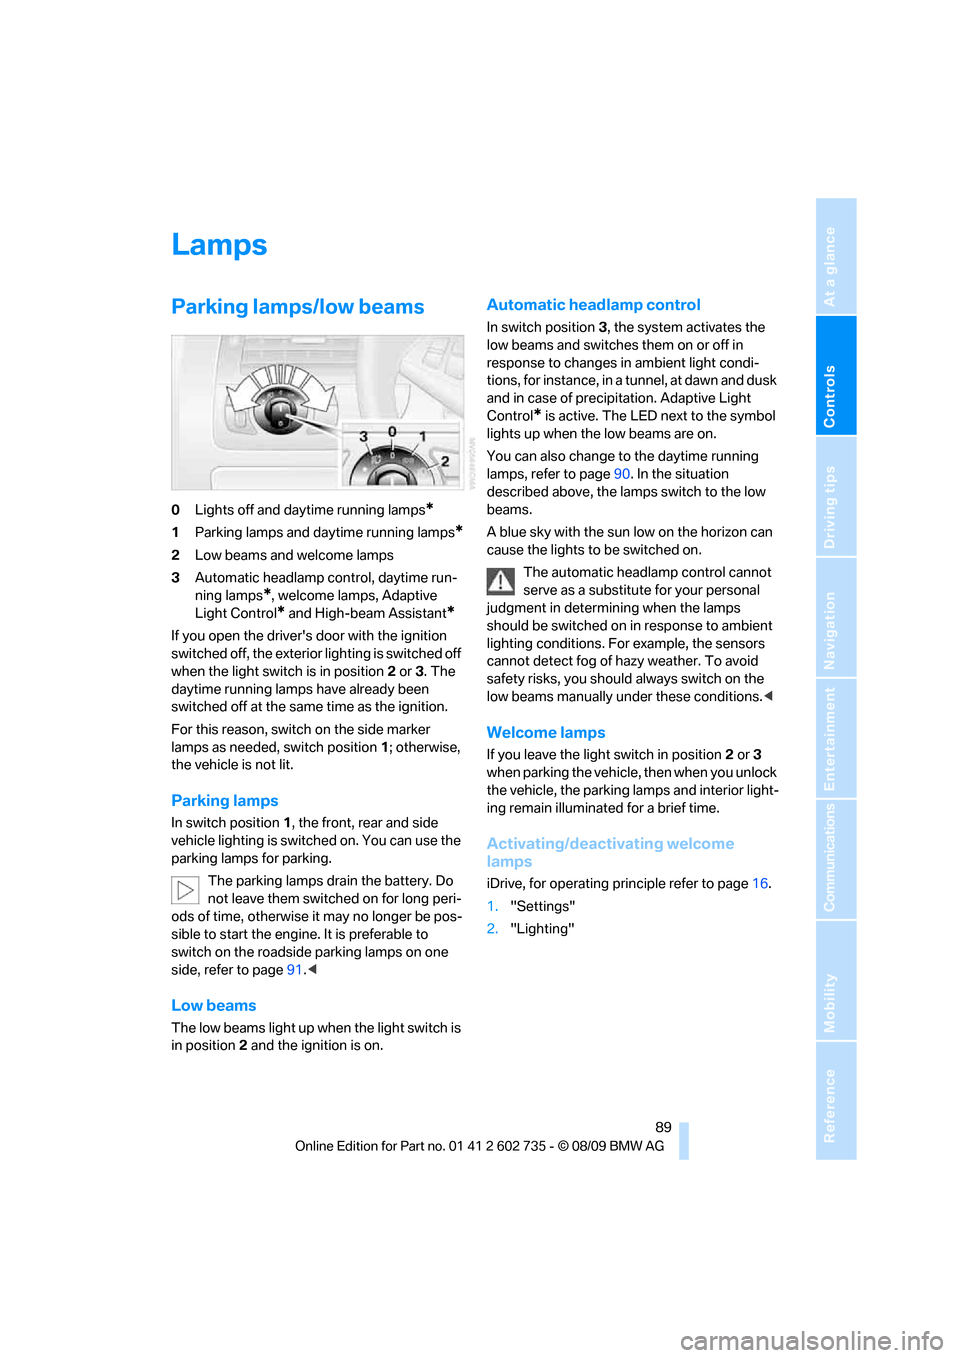
0Lights off and daytime running lamps*
1Parking lamps and daytime running lamps*
2Low beams and welcome lamps
3Automatic headlamp control, daytime run-
ning lamps
*, welcome lamps, Adaptive
Light Control
* and High-beam Assistant*
If you open the driver's door with the ignition
switched off, the exterior lighting is switched off
when the light switch is in position2 or 3. The
daytime running lamps have already been
switched off at the same time as the ignition.
For this reason, switch on the side marker
lamps as needed, switch position1; otherwise,
the vehicle is not lit.
Parking lamps
In switch position1, the front, rear and side
vehicle lighting is switched on. You can use the
parking lamps for parking.
The parking lamps drain the battery. Do
not leave them switched on for long peri-
ods of time, otherwise it may no longer be pos-
sible to start the engine. It is preferable to
switch on the roadside parking lamps on one
side, refer to page91.<
Low beams
The low beams light up when the light switch is
in position 2 and the ignition is on.
Automatic headlamp control
In switch position3, the system activates the
low beams and switches them on or off in
response to changes in ambient light condi-
tions, for instance, in a tunnel, at dawn and dusk
and in case of precipitation. Adaptive Light
Control
* is active. The LED next to the symbol
lights up when the low beams are on.
You can also change to the daytime running
lamps, refer to page90. In the situation
described above, the lamps switch to the low
beams.
A blue sky with the sun low on the horizon can
cause the lights to be switched on.
The automatic headlamp control cannot
serve as a substitute for your personal
judgment in determining when the lamps
should be switched on in response to ambient
lighting conditions. For example, the sensors
cannot detect fog of hazy weather. To avoid
safety risks, you should always switch on the
low beams manually under these conditions.<
Welcome lamps
If you leave the light switch in position2 or 3
when parking the vehicle, then when you unlock
the vehicle, the parking lamps and interior light-
ing remain illuminated for a brief time.
Activating/deactivating welcome
lamps
iDrive, for operating principle refer to page16.
1."Settings"
2."Lighting"
Page 92 of 250
Lamps
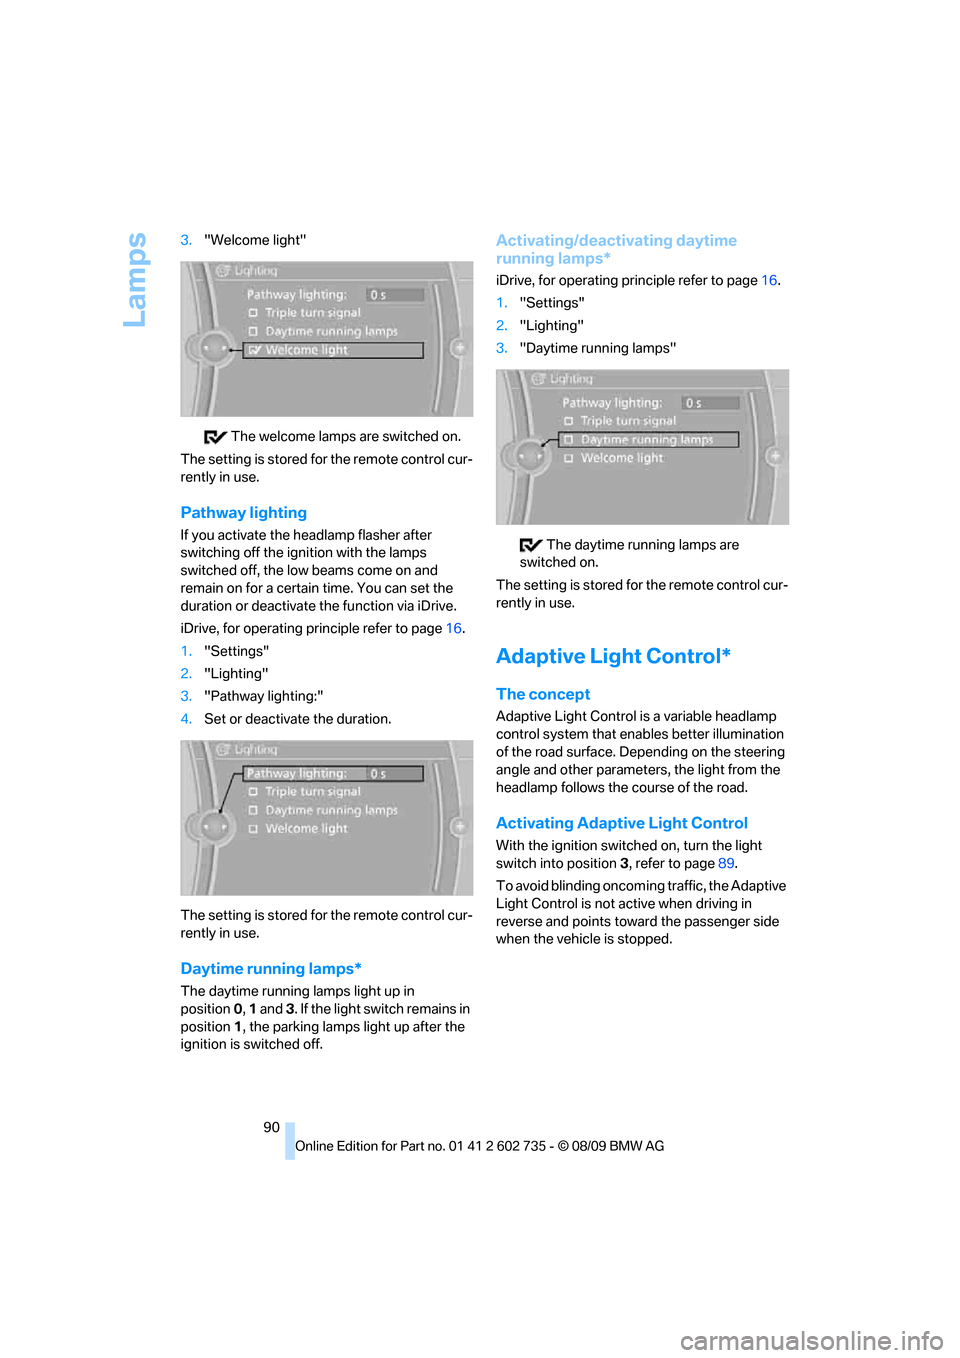
90 3."Welcome light"
The welcome lamps are switched on.
The setting is stored for the remote control cur-
rently in use.
Pathway lighting
If you activate the headlamp flasher after
switching off the ignition with the lamps
switched off, the low beams come on and
remain on for a certain time. You can set the
duration or deactivate the function via iDrive.
iDrive, for operating principle refer to page16.
1."Settings"
2."Lighting"
3."Pathway lighting:"
4.Set or deactivate the duration.
The setting is stored for the remote control cur-
rently in use.
Daytime running lamps*
The daytime running lamps light up in
position0, 1 and 3. If the light switch remains in
position1, the parking lamps light up after the
ignition is switched off.
Activating/deactivating daytime
running lamps*
iDrive, for operating principle refer to page16.
1."Settings"
2."Lighting"
3."Daytime running lamps"
The daytime running lamps are
switched on.
The setting is stored for the remote control cur-
rently in use.
Adaptive Light Control*
The concept
Adaptive Light Control is a variable headlamp
control system that enables better illumination
of the road surface. Depending on the steering
angle and other parameters, the light from the
headlamp follows the course of the road.
Activating Adaptive Light Control
With the ignition switched on, turn the light
switch into position 3, refer to page89.
To avoid blinding oncoming traffic, the Adaptive
Light Control is not active when driving in
reverse and points toward the passenger side
when the vehicle is stopped.
Page 93 of 250
Controls
91Reference
At a glance
Driving tips
Communications
Navigation
Entertainment
Mobility
High beams/
roadside parking lamps
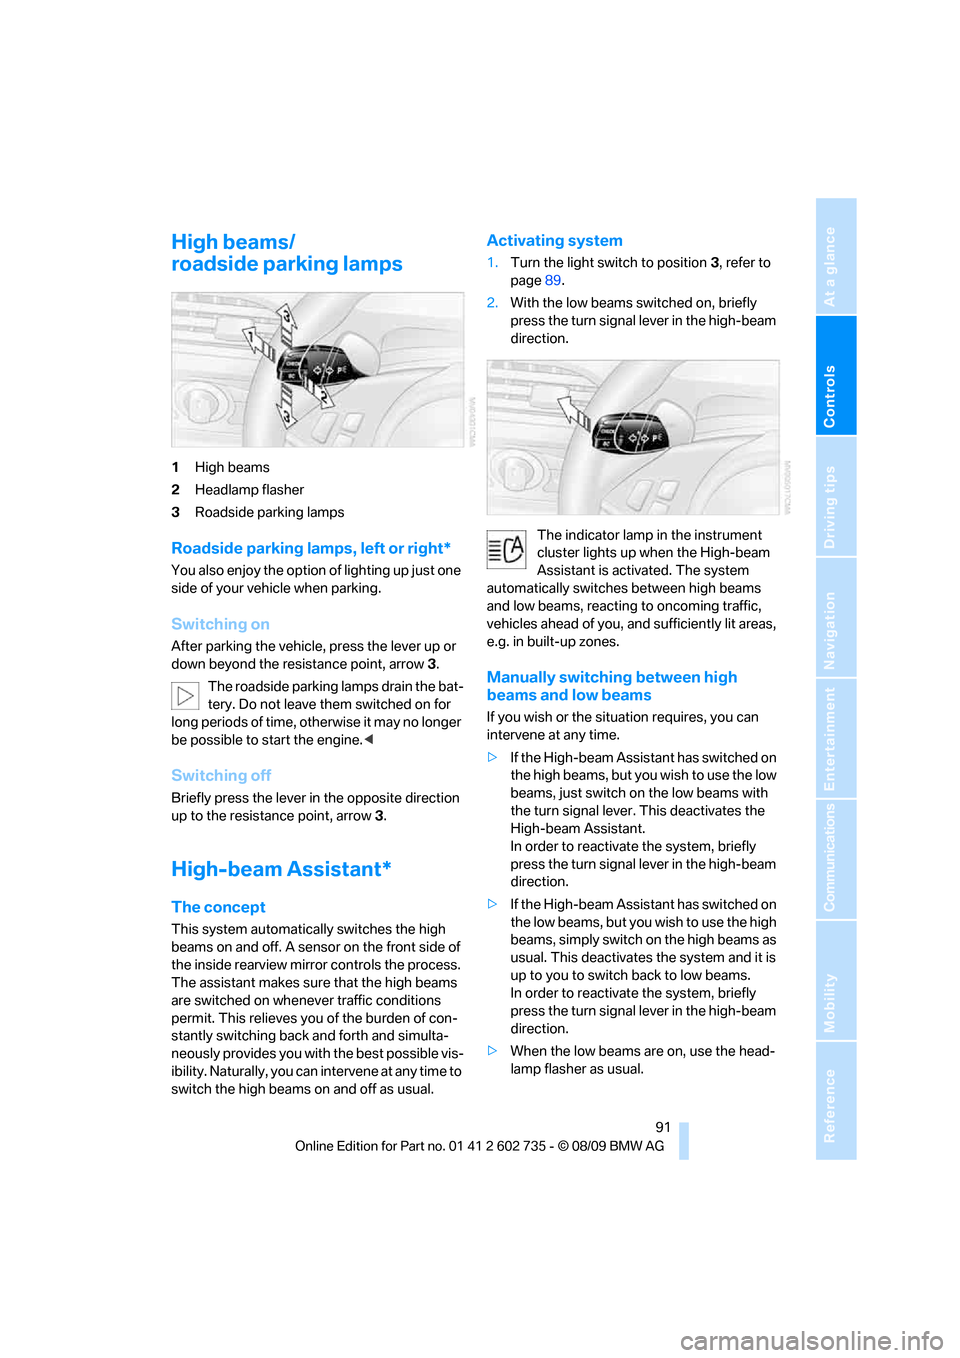
1High beams
2Headlamp flasher
3Roadside parking lamps
Roadside parking lamps, left or right*
You also enjoy the option of lighting up just one
side of your vehicle when parking.
Switching on
After parking the vehicle, press the lever up or
down beyond the resistance point, arrow 3.
The roadside parking lamps drain the bat-
tery. Do not leave them switched on for
long periods of time, otherwise it may no longer
be possible to start the engine.<
Switching off
Briefly press the lever in the opposite direction
up to the resistance point, arrow3.
High-beam Assistant*
The concept
This system automatically switches the high
beams on and off. A sensor on the front side of
the inside rearview mirror controls the process.
The assistant makes sure that the high beams
are switched on whenever traffic conditions
permit. This relieves you of the burden of con-
stantly switching back and forth and simulta-
neously provides you with the best possible vis-
ibility. Naturally, you can intervene at any time to
switch the high beams on and off as usual.
Activating system
1.Turn the light switch to position3, refer to
page89.
2.With the low beams switched on, briefly
press the turn signal lever in the high-beam
direction.
The indicator lamp in the instrument
cluster lights up when the High-beam
Assistant is activated. The system
automatically switches between high beams
and low beams, reacting to oncoming traffic,
vehicles ahead of you, and sufficiently lit areas,
e.g. in built-up zones.
Manually switching between high
beams and low beams
If you wish or the situation requires, you can
intervene at any time.
>If the High-beam Assistant has switched on
the high beams, but you wish to use the low
beams, just switch on the low beams with
the turn signal lever. This deactivates the
High-beam Assistant.
In order to reactivate the system, briefly
press the turn signal lever in the high-beam
direction.
>If the High-beam Assistant has switched on
the low beams, but you wish to use the high
beams, simply switch on the high beams as
usual. This deactivates the system and it is
up to you to switch back to low beams.
In order to reactivate the system, briefly
press the turn signal lever in the high-beam
direction.
>When the low beams are on, use the head-
lamp flasher as usual.
Page 195 of 250
Mobility
193Reference
At a glance
Controls
Driving tips
Communications
Navigation
Entertainment
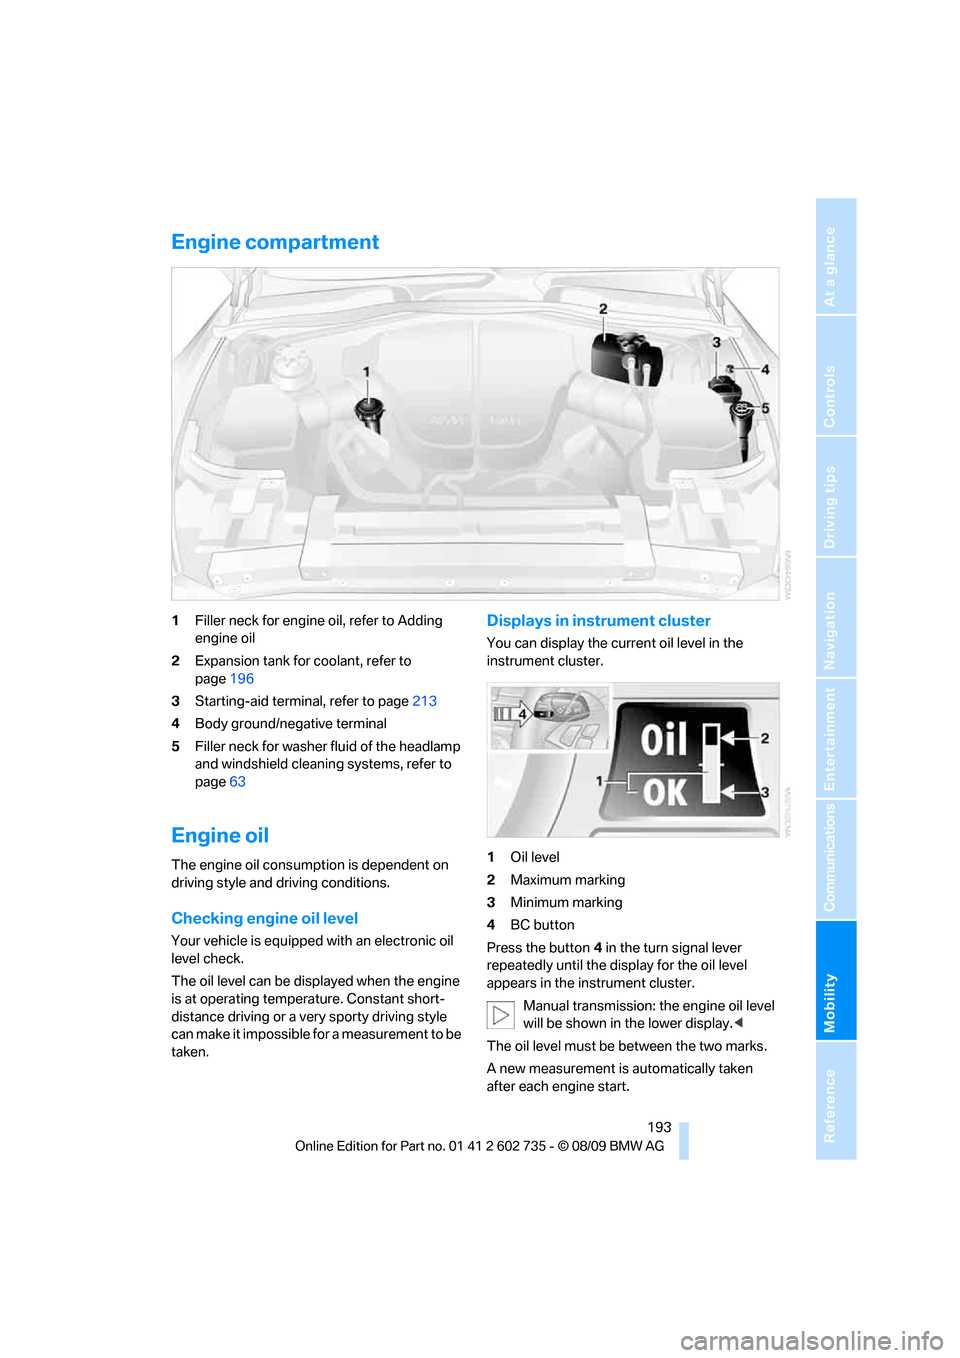
Engine compartment
1Filler neck for engine oil, refer to Adding
engine oil
2Expansion tank for coolant, refer to
page196
3Starting-aid terminal, refer to page213
4Body ground/negative terminal
5Filler neck for washer fluid of the headlamp
and windshield cleaning systems, refer to
page63
Engine oil
The engine oil consumption is dependent on
driving style and driving conditions.
Checking engine oil level
Your vehicle is equipped with an electronic oil
level check.
The oil level can be displayed when the engine
is at operating temperature. Constant short-
distance driving or a very sporty driving style
can make it impossible for a measurement to be
taken.
Displays in instrument cluster
You can display the current oil level in the
instrument cluster.
1Oil level
2Maximum marking
3Minimum marking
4BC button
Press the button4 in the turn signal lever
repeatedly until the display for the oil level
appears in the instrument cluster.
Manual transmission: the engine oil level
will be shown in the lower display.<
The oil level must be between the two marks.
A new measurement is automatically taken
after each engine start.
Page 202 of 250
Care
200 Insufficient distance or excessive pressure or
temperature can damage parts of the vehicle or
can result in water penetration. Follow the oper-
ating instructions for the high-pressure clean-
ing jets.<
When using high-pressure cleaning jets,
do not remain in one place for a long time
and be sure to maintain a distance of at least
12 in/30 cm from sensors, e.g. Park Distance
Control sensors or radar sensors.<
Hand washing
When washing the vehicle by hand, use plenty
of water and car washing shampoo. Clean the
vehicle with gentle pressure using a sponge or a
washing brush.
Before cleaning the windshield, deacti-
vate the rain sensor or switch off the igni-
tion to prevent unwanted wiper operation.<
Follow local guidelines for washing vehi-
cles by hand.<
Headlamps
Do not rub dry and never use abrasives or
strong solvents to clean the covers.
Loosen dirt, e.g. insects, with shampoo or
insect remover and wash away with plenty of
water.
Use a window deicer to remove accumulated
ice and snow, not a scraper.
Windows
Use a glass cleaner to clean the inside and out-
side surfaces of the windows and the glass sur-
faces of the mirrors.
Do not use quartz-containing cleansers
to clean glass surfaces of the mirrors.<
Convertible top care
The appearance and service life of the convert-
ible top depend on proper care and operation.
Please follow these instructions:
>Never stow the convertible top in the con-
vertible top compartment when it is wet or frozen, since this can cause water marks,
mildew stains, and scuff marks.
>If water marks do occur on the headliner,
remove them with a microfiber cloth and
interior cleanser.
>When parking for long intervals in enclosed
spaces, make sure there is sufficient venti-
lation.
>Remove bird droppings immediately
because their caustic properties have a cor-
rosive effect on the convertible top and can
damage the rubber seals.
Do not use stain remover, paint thinner,
solvents, gasoline, or the like to remove
stains. These substances can damage the rub-
ber coating. Improper care and cleaning can
cause leaks to develop in the convertible top
and its seams.<
In the event of more serious soiling, use a spe-
cial convertible top cleaner.
When doing so, follow the manufacturer's
directions for use.
After three to five washings, treat the convert-
ible top with sealant.
Caring for the vehicle finish
Regular care helps your vehicle retain its value
and protects the paint from the long-term
effects of aggressive substances.
Regionally occurring environmental factors can
affect and damage vehicle finish. It is therefore
important to tailor the frequency and extent of
your car care accordingly.
Immediately remove particularly aggressive
substances such as spilled fuel, oil, grease,
brake fluid, tree resin, or bird droppings; other-
wise, they may damage your paint.
Repairing paint damage
Repair stone damage or scratches imme-
diately, depending on the severity of the
damage, to prevent the formation of rust.<
BMW recommends having paint damage pro-
fessionally repaired using Genuine BMW finish
materials in accordance with factory guidelines.