BMW M6 COUPE 2010 E63 User Guide
Manufacturer: BMW, Model Year: 2010, Model line: M6 COUPE, Model: BMW M6 COUPE 2010 E63Pages: 250, PDF Size: 8.4 MB
Page 11 of 250
At a glance
This overview of buttons, switches and displays
is intended to familiarize you with your vehicle's
operating environment.
The section will also assist you in becoming
acquainted with the control concepts
and options available for operating
the various systems.
At a glance
Page 12 of 250
Cockpit
10
Cockpit
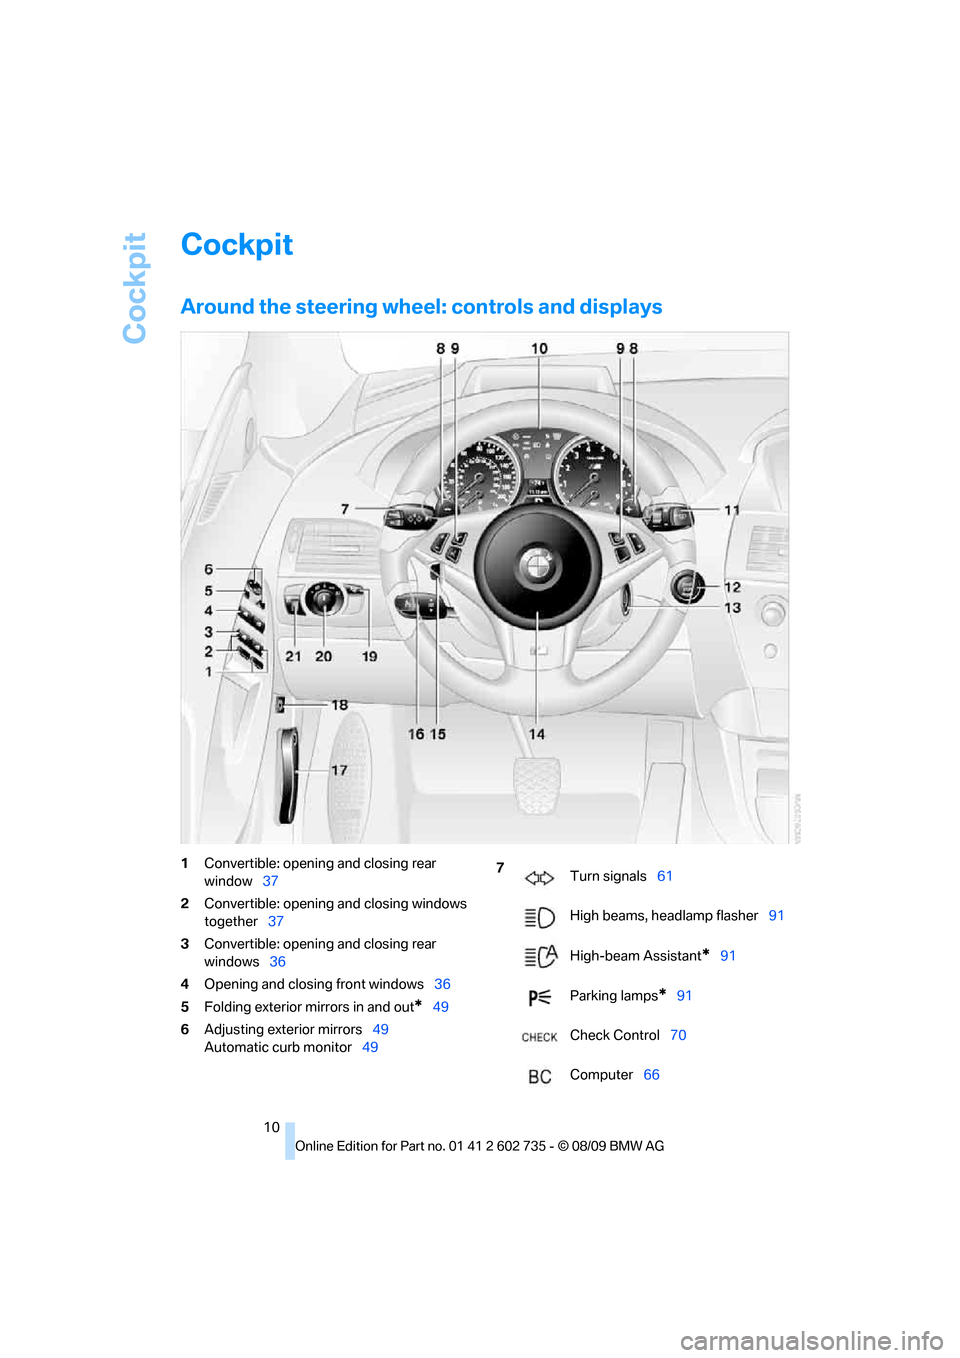
Around the steering wheel: controls and displays
1Convertible: opening and closing rear
window37
2Convertible: opening and closing windows
together37
3Convertible: opening and closing rear
windows36
4Opening and closing front windows36
5Folding exterior mirrors in and out
*49
6Adjusting exterior mirrors49
Automatic curb monitor49
7
Turn signals61
High beams, headlamp flasher91
High-beam Assistant
*91
Parking lamps
*91
Check Control70
Computer66
Page 13 of 250
At a glance
11Reference
Controls
Driving tips
Communications
Navigation
Entertainment
Mobility
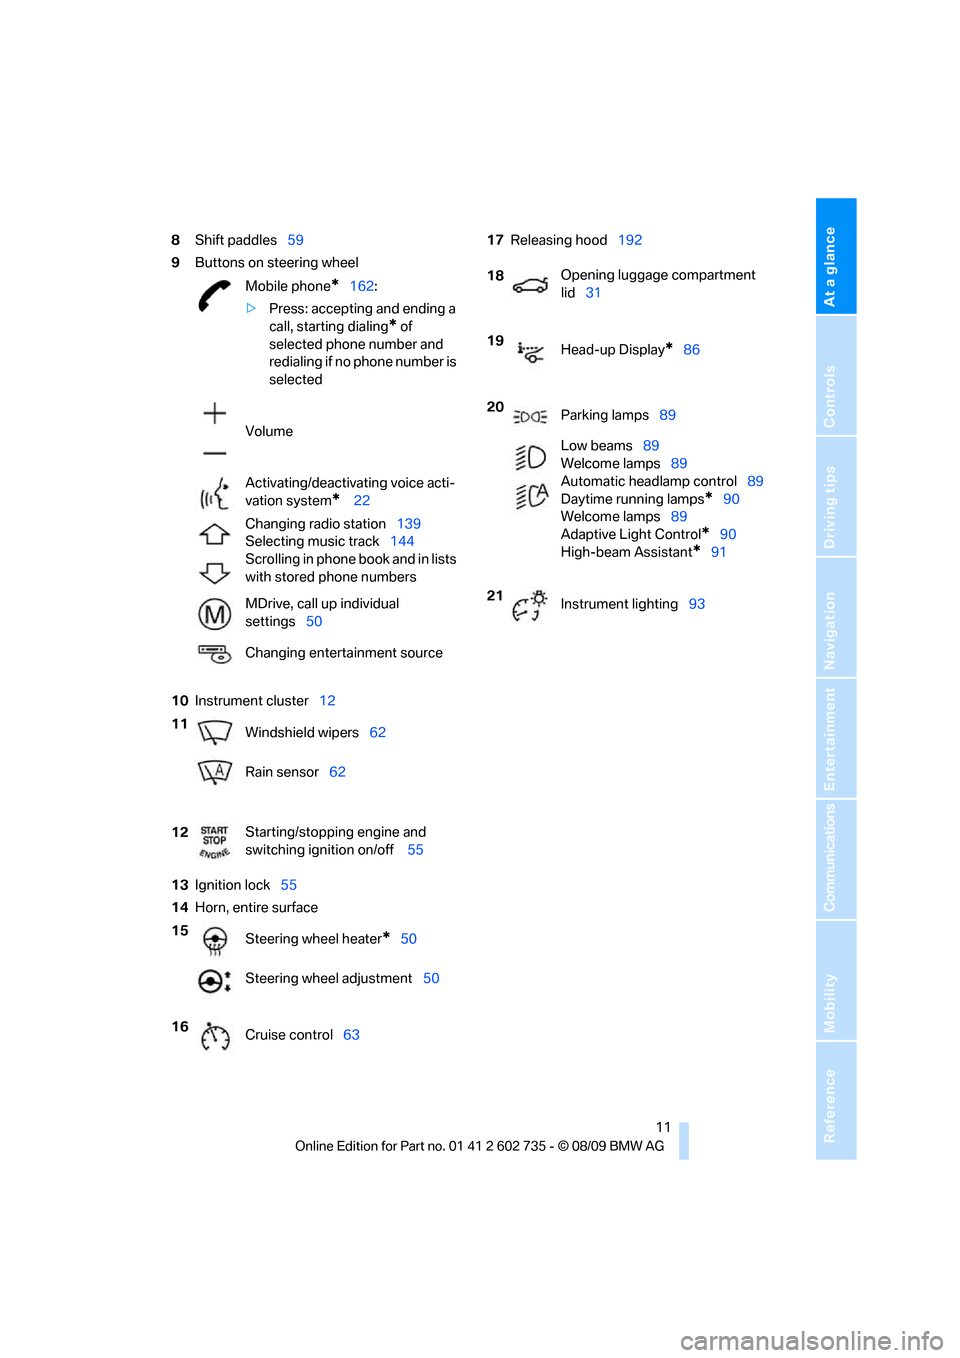
8Shift paddles59
9Buttons on steering wheel
10Instrument cluster12
13Ignition lock55
14Horn, entire surface17Releasing hood192
Mobile phone
*162:
>Press: accepting and ending a
call, starting dialing
* of
selected phone number and
redialing if no phone number is
selected
Volume
Activating/deactivating voice acti-
vation system
* 22
Changing radio station139
Selecting music track144
Scrolling in phone book and in lists
with stored phone numbers
MDrive, call up individual
settings50
Changing entertainment source
11
Windshield wipers62
Rain sensor62
12Starting/stopping engine and
switching ignition on/off 55
15
Steering wheel heater
*50
Steering wheel adjustment50
16
Cruise control63
18Opening luggage compartment
lid31
19
Head-up Display
*86
20
Parking lamps89
Low beams89
Welcome lamps89
Automatic headlamp control89
Daytime running lamps
*90
Welcome lamps89
Adaptive Light Control
*90
High-beam Assistant
*91
21
Instrument lighting93
Page 14 of 250
Cockpit
12
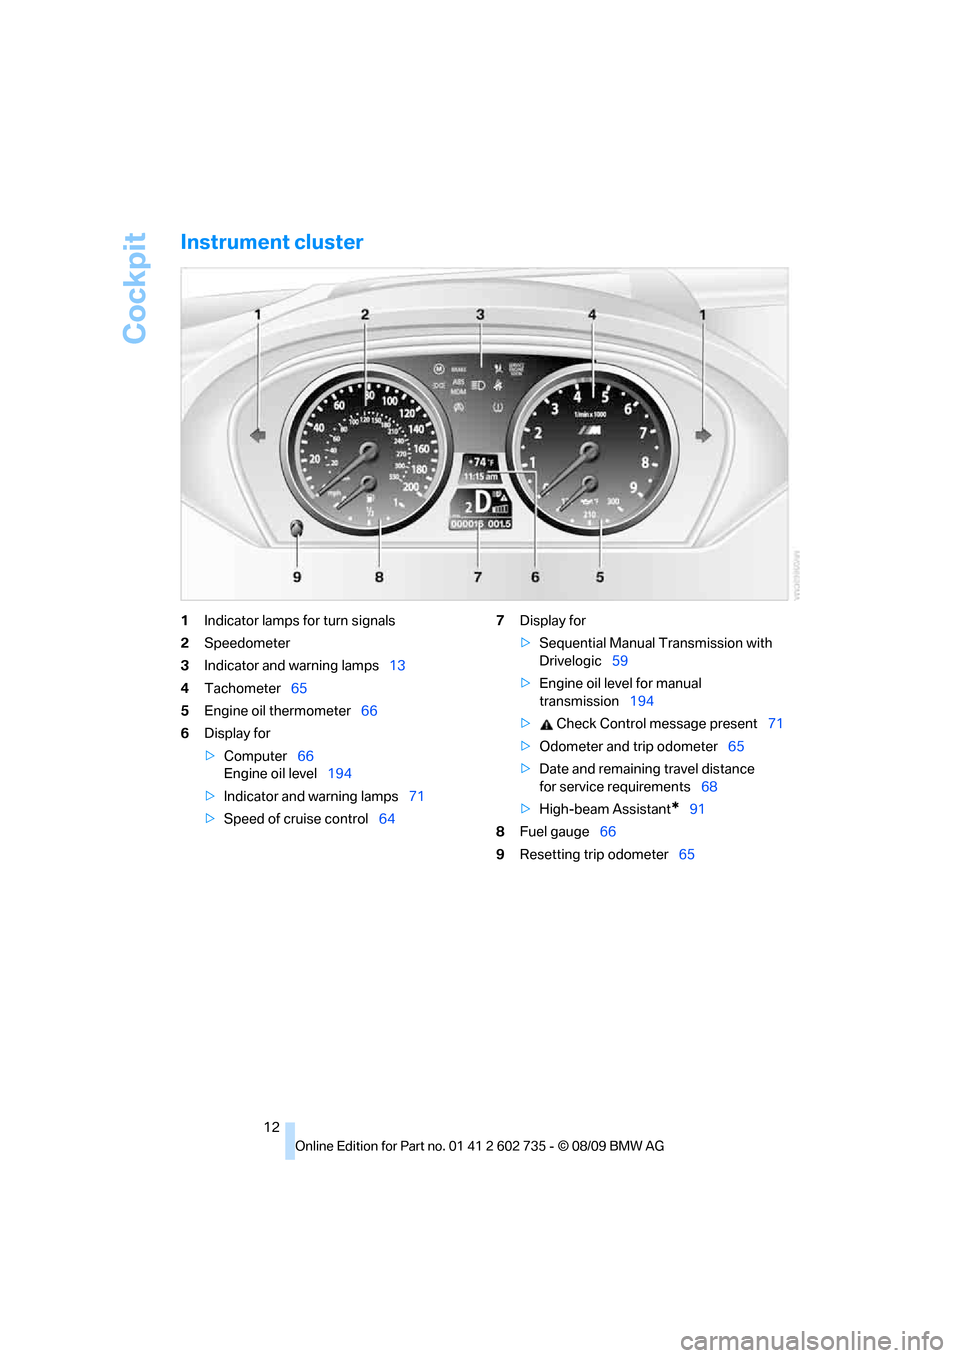
Instrument cluster
1Indicator lamps for turn signals
2Speedometer
3Indicator and warning lamps13
4Tachometer65
5Engine oil thermometer66
6Display for
>Computer66
Engine oil level194
>Indicator and warning lamps71
>Speed of cruise control647Display for
>Sequential Manual Transmission with
Drivelogic59
>Engine oil level for manual
transmission194
> Check Control message present71
>Odometer and trip odometer65
>Date and remaining travel distance
for service requirements68
>High-beam Assistant
*91
8Fuel gauge66
9Resetting trip odometer65
Page 15 of 250
At a glance
13Reference
Controls
Driving tips
Communications
Navigation
Entertainment
Mobility
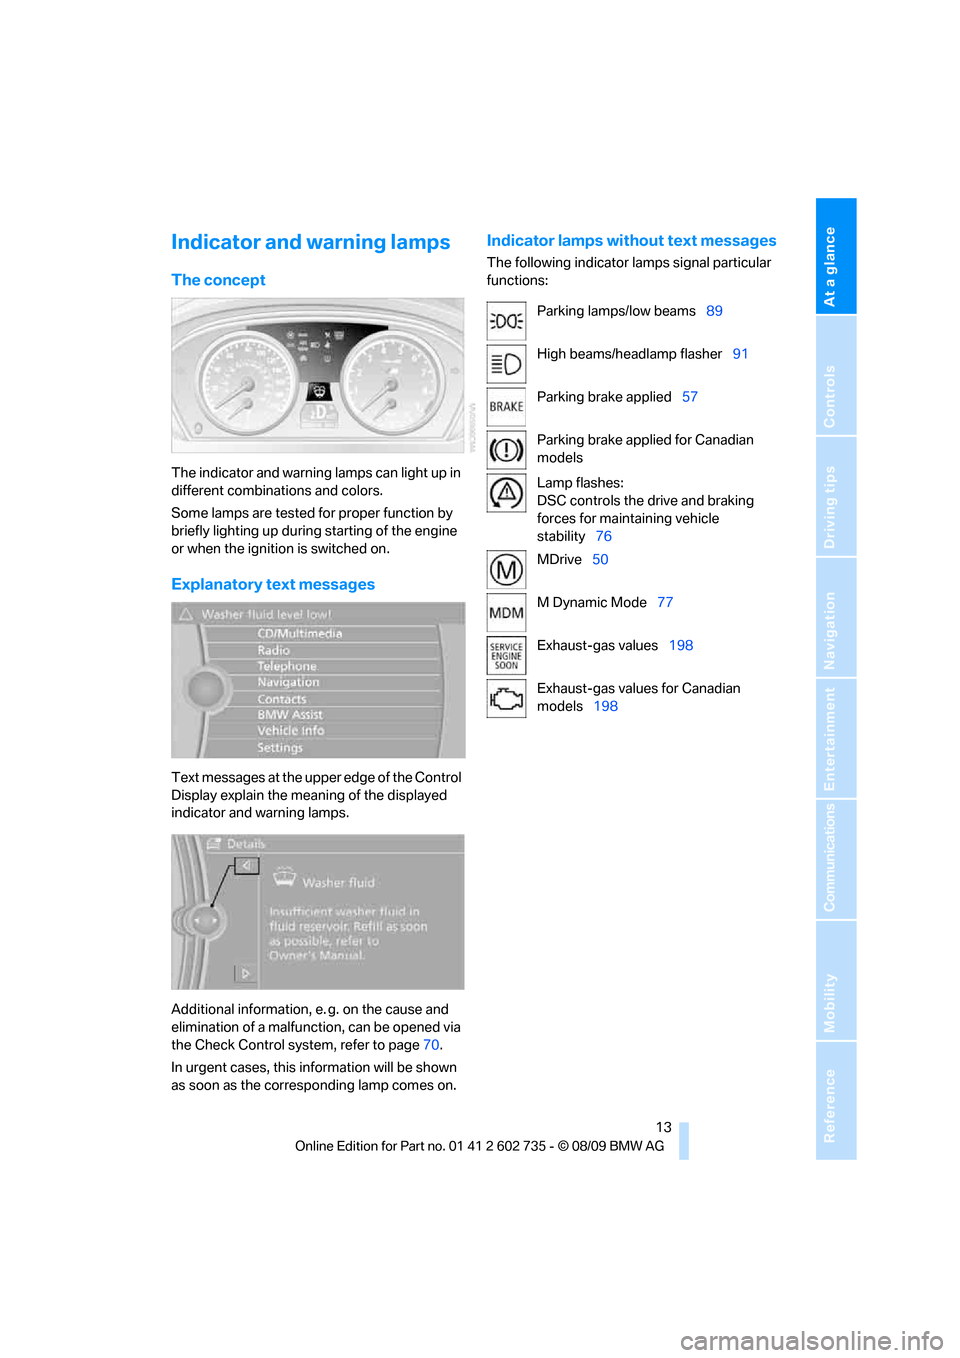
Indicator and warning lamps
The concept
The indicator and warning lamps can light up in
different combinations and colors.
Some lamps are tested for proper function by
briefly lighting up during starting of the engine
or when the ignition is switched on.
Explanatory text messages
Text messages at the upper edge of the Control
Display explain the meaning of the displayed
indicator and warning lamps.
Additional information, e. g. on the cause and
elimination of a malfunction, can be opened via
the Check Control system, refer to page70.
In urgent cases, this information will be shown
as soon as the corresponding lamp comes on.
Indicator lamps without text messages
The following indicator lamps signal particular
functions:
Parking lamps/low beams89
High beams/headlamp flasher91
Parking brake applied57
Parking brake applied for Canadian
models
Lamp flashes:
DSC controls the drive and braking
forces for maintaining vehicle
stability76
MDrive50
M Dynamic Mode77
Exhaust-gas values198
Exhaust-gas values for Canadian
models198
Page 16 of 250
Cockpit
14
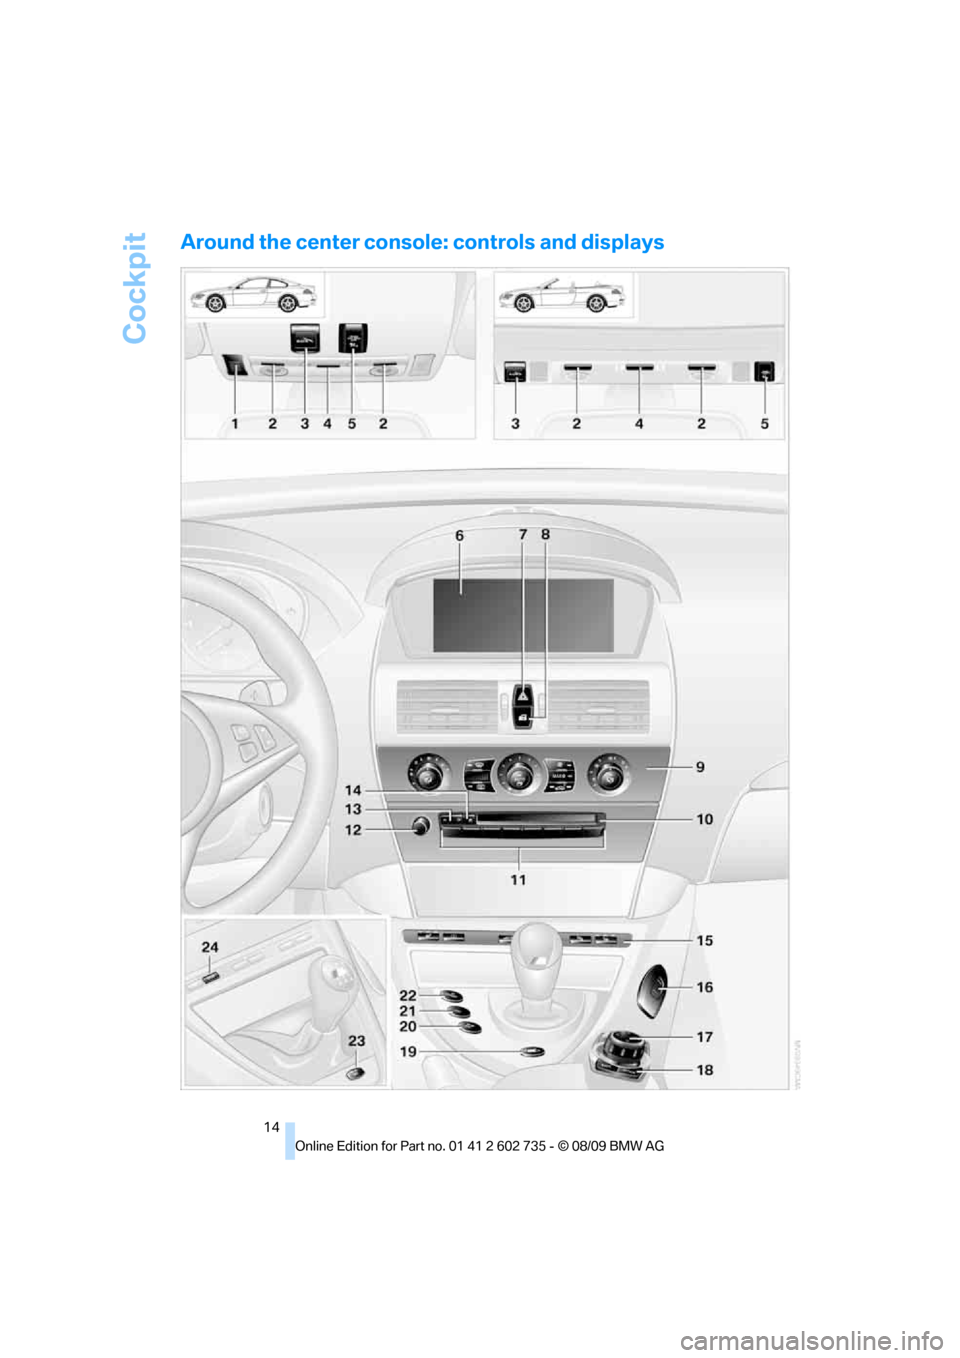
Around the center console: controls and displays
Page 17 of 250
At a glance
15Reference
Controls
Driving tips
Communications
Navigation
Entertainment
Mobility
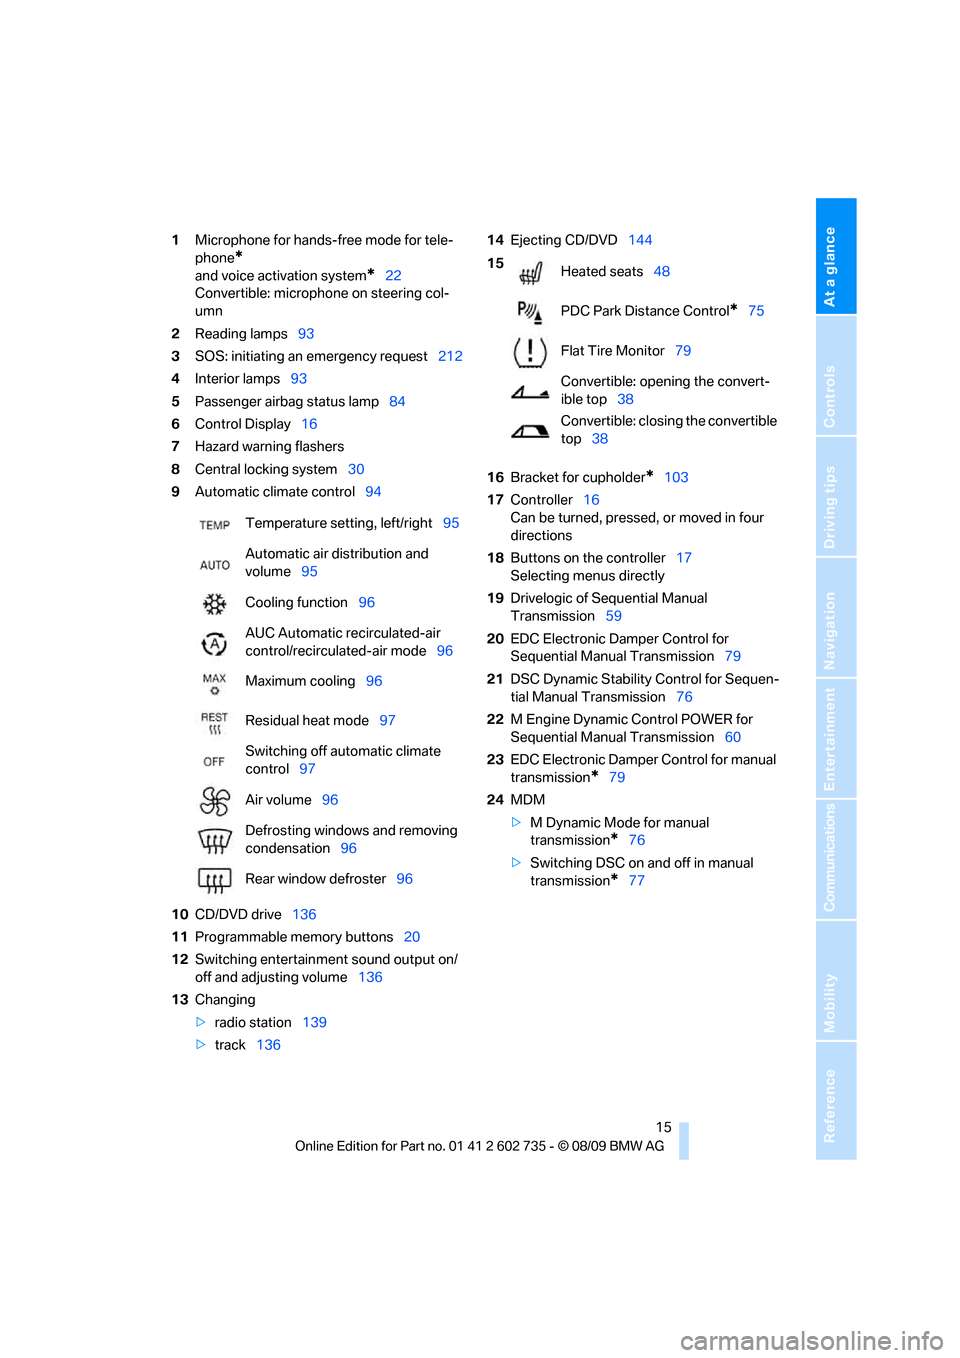
1Microphone for hands-free mode for tele-
phone
*
and voice activation system*22
Convertible: microphone on steering col-
umn
2Reading lamps93
3SOS: initiating
an emergency request212
4Interior lamps93
5Passenger airbag status lamp84
6Control Display16
7Hazard warning flashers
8Central locking system30
9Automatic climate control94
10CD/DVD drive136
11Programmable memory buttons20
12Switching entertainment sound output on/
off and adjusting volume136
13Changing
>radio station139
>track13614Ejecting CD/DVD144
16Bracket for cupholder
*103
17Controller16
Can be turned, pressed, or moved in four
directions
18Buttons on the controller17
Selecting menus directly
19Drivelogic of Sequential Manual
Transmission59
20EDC Electronic Damper Control for
Sequential Manual Transmission79
21DSC Dynamic Stability Control for Sequen-
tial Manual Transmission76
22M Engine Dynamic Control POWER for
Sequential Manual Transmission60
23EDC Electronic Damper Control for manual
transmission
*79
24MDM
>M Dynamic Mode for manual
transmission
*76
>Switching DSC on and off in manual
transmission
*77 Temperature setting, left/right95
Automatic air distribution and
volume95
Cooling function96
AUC Automatic recirculated-air
control/recirculated-air mode96
Maximum cooling96
Residual heat mode97
Switching off automatic climate
control97
Air volume96
Defrosting windows and removing
condensation96
Rear window defroster96
15
Heated seats48
PDC Park Distance Control
*75
Flat Tire Monitor79
Convertible: opening the convert-
ible top38
Convertible: closing the convertible
top38
Page 18 of 250
iDrive
16
iDrive
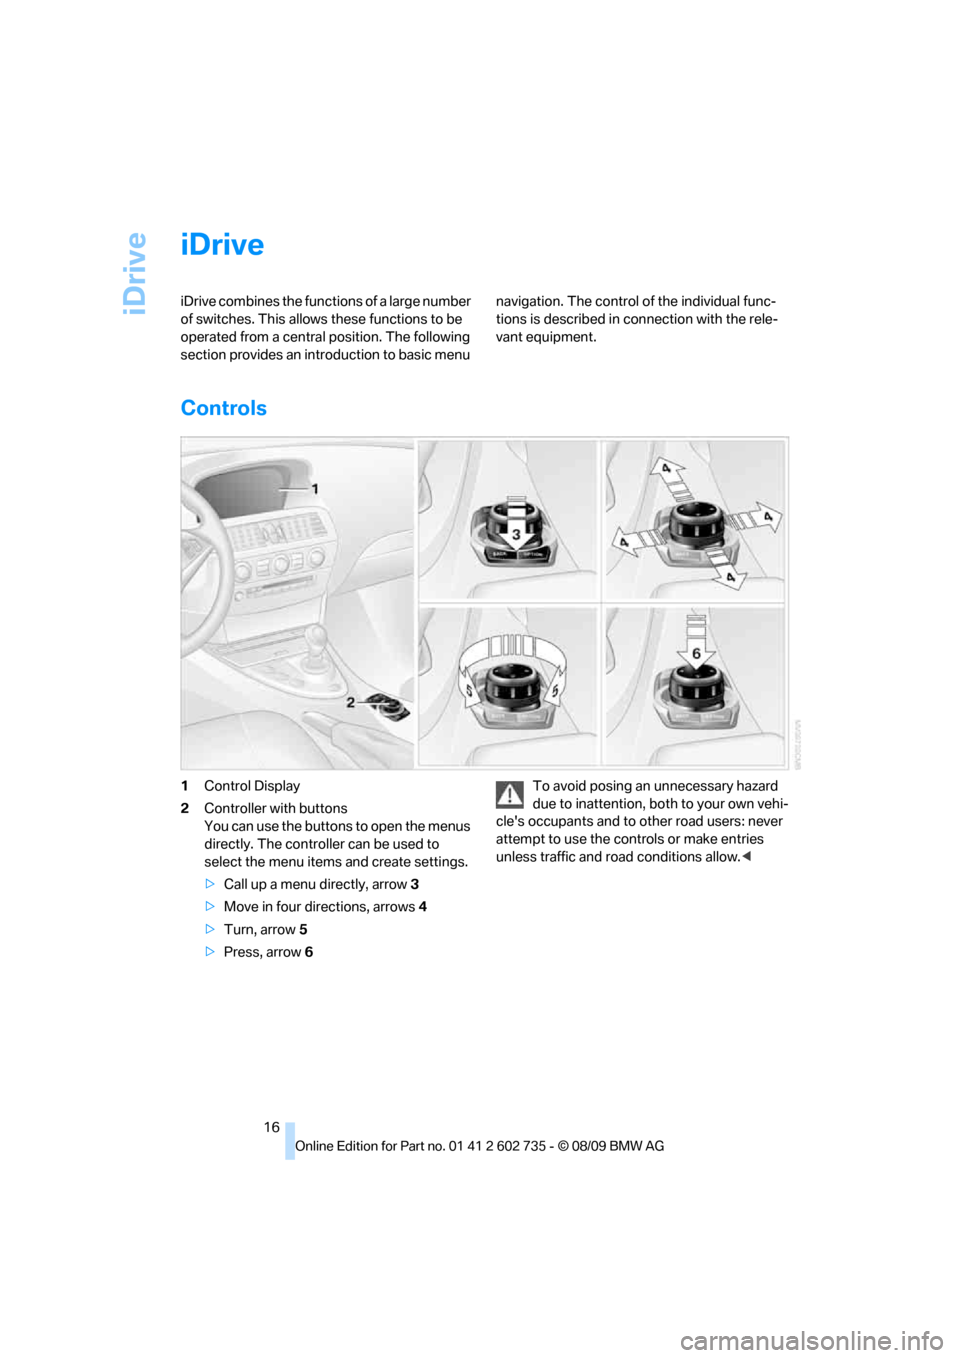
iDrive combines the functions of a large number
of switches. This allows these functions to be
operated from a central position. The following
section provides an introduction to basic menu navigation. The control of the individual func-
tions is described in connection with the rele-
vant equipment.
Controls
1Control Display
2Controller with buttons
You can use the buttons to open the menus
directly. The controller can be used to
select the menu items and create settings.
>Call up a menu directly, arrow3
>Move in four directions, arrows4
>Turn, arrow5
>Press, arrow6To avoid posing an unnecessary hazard
due to inattention, both to your own vehi-
cle's occupants and to other road users: never
attempt to use the controls or make entries
unless traffic and road conditions allow.<
Page 19 of 250
At a glance
17Reference
Controls
Driving tips
Communications
Navigation
Entertainment
Mobility
Basic operation
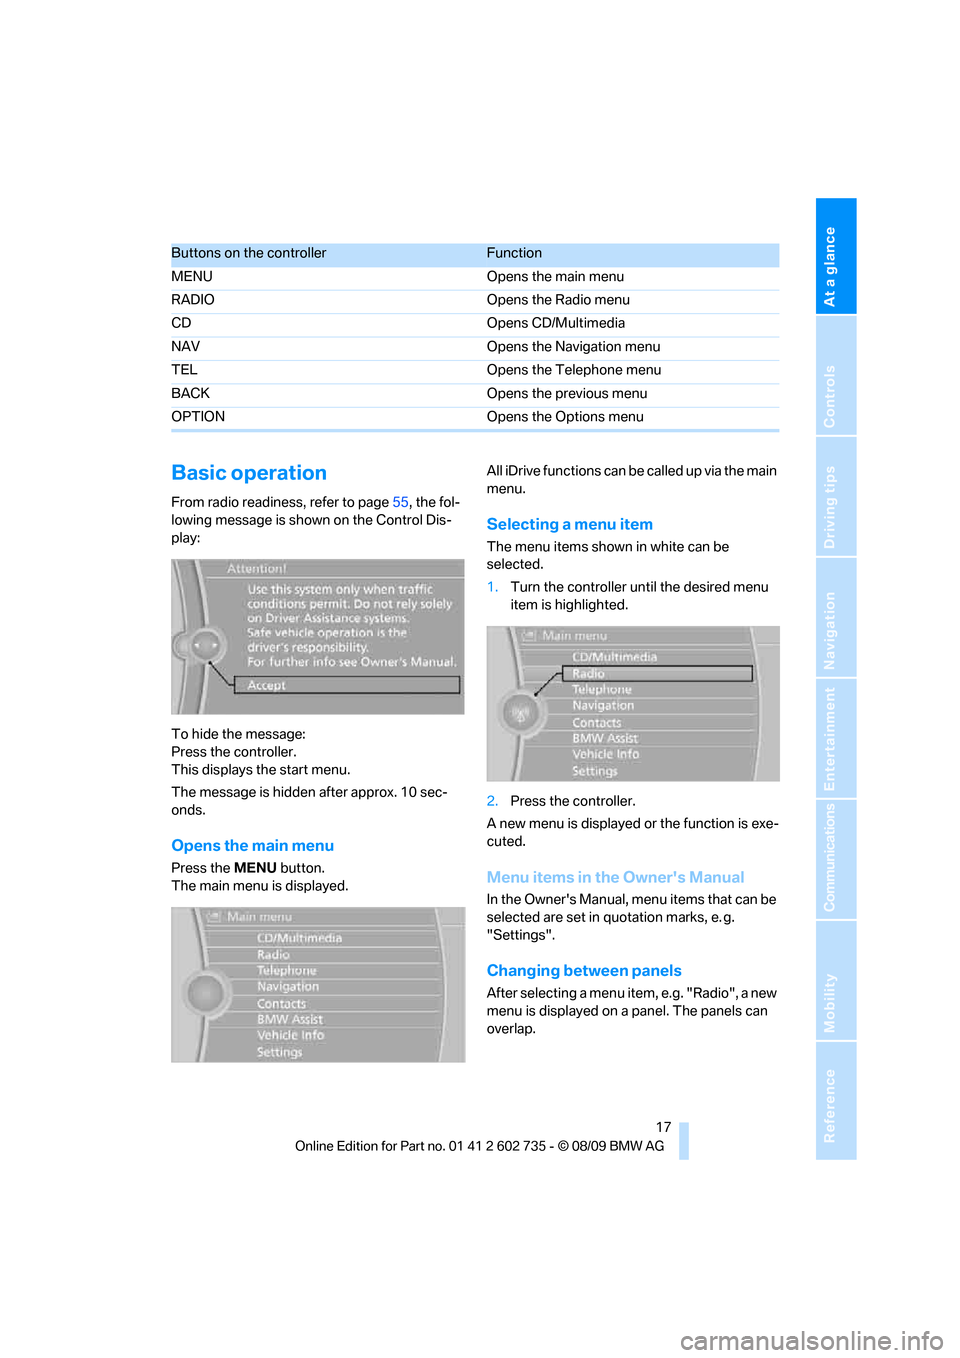
From radio readiness, refer to page55, the fol-
lowing message is shown on the Control Dis-
play:
To hide the message:
Press the controller.
This displays the start menu.
The message is hidden after approx. 10 sec-
onds.
Opens the main menu
Press the MENU button.
The main menu is displayed.All iDrive functions can be called up via the main
menu.
Selecting a menu item
The menu items shown in white can be
selected.
1.Turn the controller until the desired menu
item is highlighted.
2.Press the controller.
A new menu is displayed or the function is exe-
cuted.
Menu items in the Owner's Manual
In the Owner's Manual, menu items that can be
selected are set in quotation marks, e. g.
"Settings".
Changing between panels
After selecting a menu item, e.g. "Radio", a new
menu is displayed on a panel. The panels can
overlap.
Buttons on the controllerFunction
MENU Opens the main menu
RADIO Opens the Radio menu
CD Opens CD/Multimedia
NAV Opens the Navigation menu
TEL Opens the Telephone menu
BACK Opens the previous menu
OPTION Opens the Options menu
Page 20 of 250
iDrive
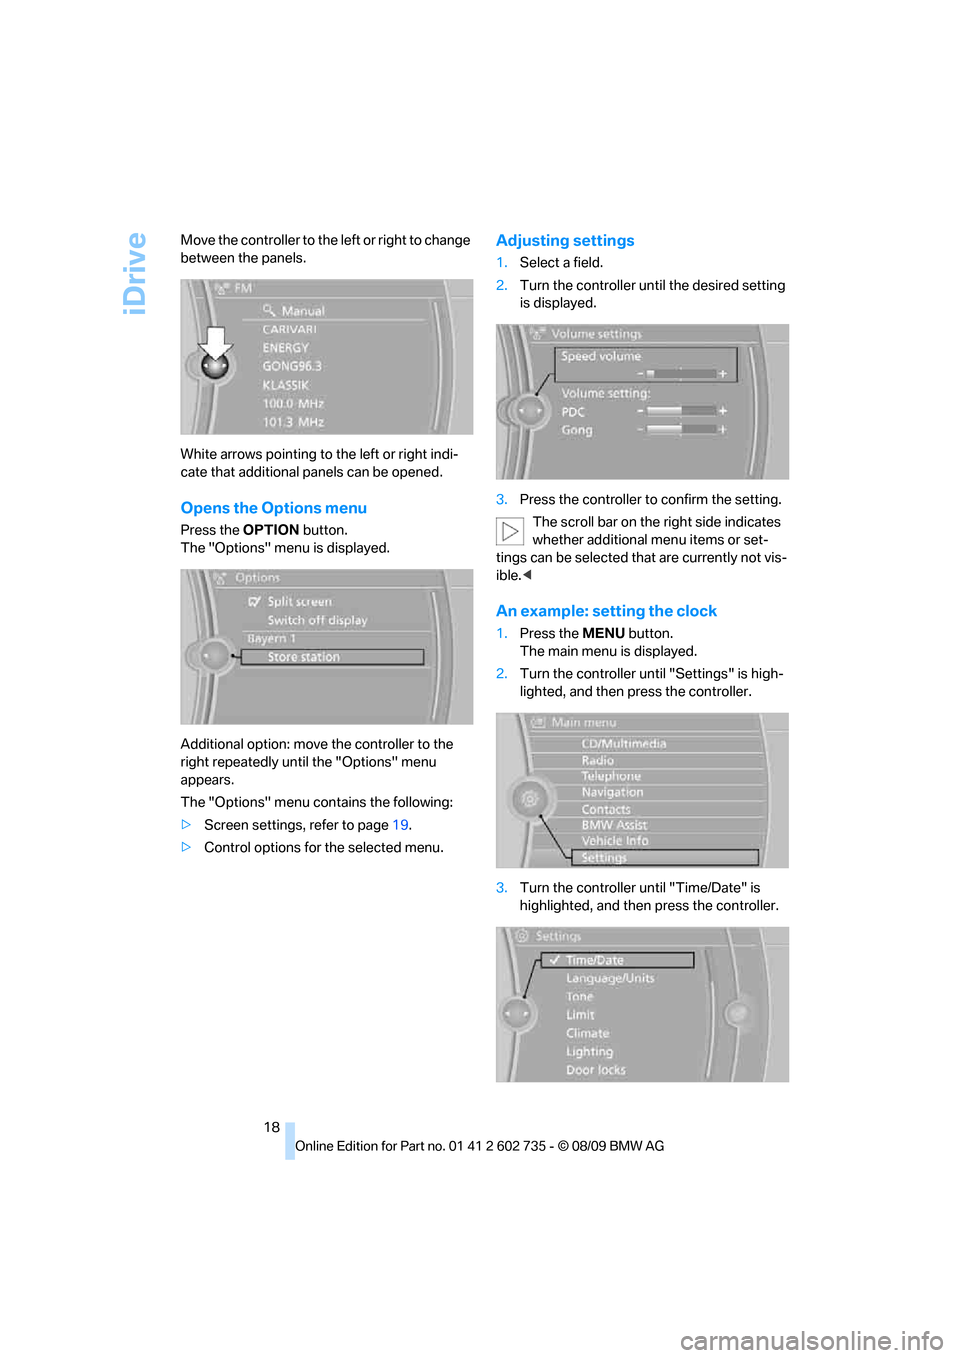
18 Move the controller to the left or right to change
between the panels.
White arrows pointing to the left or right indi-
cate that additional panels can be opened.
Opens the Options menu
Press the OPTION button.
The "Options" menu is displayed.
Additional option: move the controller to the
right repeatedly until the "Options" menu
appears.
The "Options" menu contains the following:
>Screen settings, refer to page19.
>Control options for the selected menu.
Adjusting settings
1.Select a field.
2.Turn the controller until the desired setting
is displayed.
3.Press the controller to confirm the setting.
The scroll bar on the right side indicates
whether additional menu items or set-
tings can be selected that are currently not vis-
ible.<
An example: setting the clock
1.Press the MENU button.
The main menu is displayed.
2.Turn the controller until "Settings" is high-
lighted, and then press the controller.
3.Turn the controller until "Time/Date" is
highlighted, and then press the controller.