battery BMW MOTORRAD K 1200 GT 2007 Rider's Manual (in English)
[x] Cancel search | Manufacturer: BMW MOTORRAD, Model Year: 2007, Model line: K 1200 GT, Model: BMW MOTORRAD K 1200 GT 2007Pages: 173, PDF Size: 2.82 MB
Page 133 of 173
Jump starting
The wires leading to the
power socket do not have
a load-capacity rating adequate
for jump-starting the engine. Ex-
cessively high current can lead
to a cable fire or damage to the
vehicle electronics.
Do not use the on-board socket
to jump-start the engine of the
motorcycle.
Touching live parts of the
ignition system with the
engine running can cause electric
shock.
Do not touch parts of the igni-
tion system when the engine is
running.
A short-circuit can res-
ult if the crocodile clips
of the jump leads are accident-
ally brought into contact with the
motorcycle.
Use only jump leads fitted with fully insulated crocodile clips at
both ends.
Jump-starting with a donor-
battery voltage higher than
12 V can damage the vehicle
electronics.
Make sure that the battery of the
donor vehicle has a voltage rating
of 12 V.
When jump-starting the engine,
do not disconnect the battery
from the on-board electrical
system.
Remove the battery-compart-
ment cover ( 133)
Run the engine of the donor
vehicle during jump-starting.
Begin by connecting one end
of the red jump lead to the
positive terminal of the dis-
charged battery and the other
end to the positive terminal of
the donor battery.
Then connect one end of the
black jump lead to the negative terminal of the donor battery,
and the other end to the neg-
ative terminal of the discharged
battery.
Start the engine of the vehicle
with the discharged battery
in the usual way; if the en-
gine does not start, wait a few
minutes before repeating the
attempt in order to protect the
starter motor and the donor
battery.
Allow both engines to idle for a
few minutes before disconnect-
ing the jump leads.
Disconnect the jump lead from
the negative terminals first,
then disconnect the second
lead from the positive termin-
als.
Install the battery-compartment
cover ( 134)
8131zMaintenance
Page 134 of 173
BatteryMaintenance instructionsCorrect upkeep, recharging and
storage will prolong the life of
the battery and are essential if
warranty claims are to be con-
sidered.
Compliance with the points be-
low is important in order to max-
imise battery life:Keep the surface of the battery
clean and dry
Do not open the battery
Do not top up with water
Be sure to read and comply
with the instructions for char-
ging the battery on the follow-
ing pages
Do not turn the battery upside
down
If the battery is not discon-
nected, the on-board elec-
tronics (e.g. clock, etc.) gradually
drain the battery. This can cause
the battery to run flat. If this hap- pens, warranty claims will not be
accepted.
If the motorcycle is to be out of
use for more than four weeks,
disconnect the battery or con-
nect a suitable trickle charger to
the battery.
BMW Motorrad has de-
veloped a float charger spe-
cially designed for compatibility
with the electronics of your mo-
torcycle. Using this charger, you
can keep the battery charged
during long periods of disuse,
without having to disconnect the
battery from the motorcycle's
on-board systems. You can ob-
tain additional information from
your authorised BMW Motorrad
dealer.
Charging battery when
connected
Charging the connected
battery directly at the bat-
tery terminals can damage the
vehicle electronics.
Always disconnect the battery
from the on-board circuits be-
fore recharging it with a charger
connected directly to the battery
posts.
If you switch on the igni-
tion and the multifunction
display and telltale lights fail to
light up, the battery is completely
flat. Attempting to charge a com-
pletely flat battery via the on-
board socket can cause damage
to the motorcycle's electronics.
If a battery has discharged to the
extent that it is completely flat, it
has to be disconnected from the
on-board circuits and charged
with the charger connected dir-
ectly to the battery posts.
8132zMaintenance
Page 135 of 173
Only chargers suitable for
this mode of charging can
be used to recharge the battery
via the on-board socket. Unsuit-
able chargers could cause dam-
age to the motorcycle's on-board
electrics.
Use BMW chargers with the
part numbers 71 60 7 688 864
(220 V) or, as applicable,
71 60 7 688 865 (110 V). If
you are in doubt, disconnect
the battery from the on-board
systems and connect the charger
directly to the battery.
Charge via the power sock-
et, with the battery connected
to the motorcycle's on-board
electrical system. The motorcycle's on-board
electronics know when the
battery is fully charged. The
on-board socket is switched off
when this happens. Comply with the operating in-
structions of the charger.
If you are unable to charge
the battery through the on-
board socket, you may be using
a charger that is not compatible
with your motorcycle's electron-
ics. If this happens, disconnect
the battery from the on-board
systems and connect the charger
directly to the battery.
Charging battery when
disconnectedCharge the battery using a
suitable charger.
Comply with the operating in-
structions of the charger.
Once the battery is fully
charged, disconnect the
charger's terminal clips from
the battery terminals.
The battery has to be re-
charged at regular intervals
in the course of a lengthy period
of disuse. See the instructions for caring for your battery. Al-
ways fully recharge the battery
before restoring it to use
Removing battery-
compartment cover
If it is not standing firmly,
the motorcycle could topple
in the course of the operations
described below.
Always make sure that the
motorcycle is stable and firmly
supported.
Make sure the ground is level
and firm and place the motor-
cycle on its stand.
8133zMaintenance
Page 136 of 173
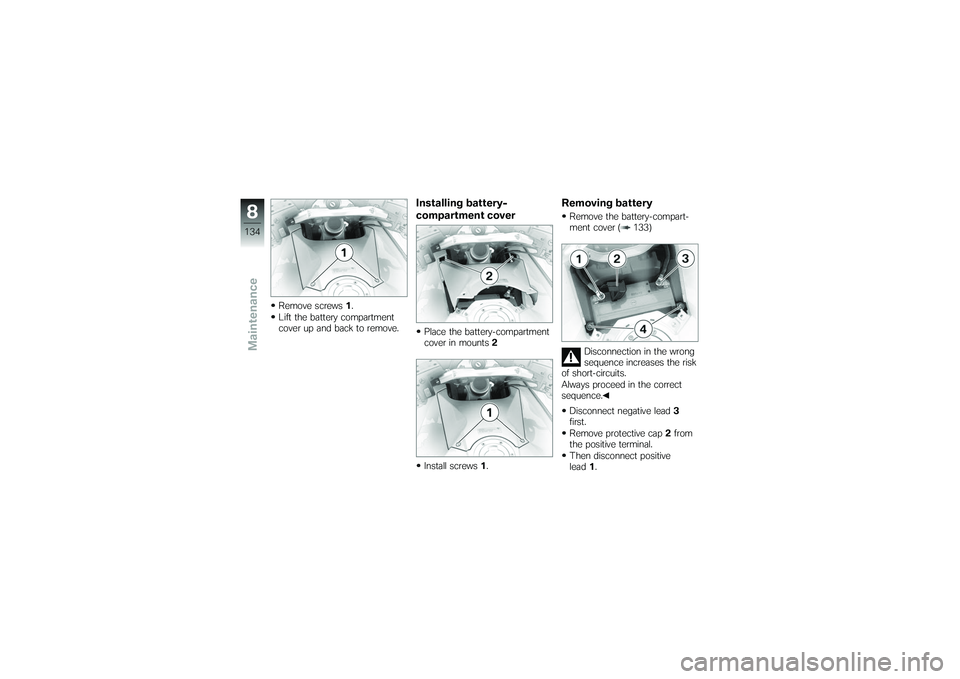
Remove screws1.
Lift the battery compartment
cover up and back to remove.
Installing battery-
compartment coverPlace the battery-compartment
cover in mounts 2
Install screws 1.
Removing batteryRemove the battery-compart-
ment cover ( 133)
Disconnection in the wrong
sequence increases the risk
of short-circuits.
Always proceed in the correct
sequence.
Disconnect negative lead 3
first.
Remove protective cap 2from
the positive terminal.
Then disconnect positive
lead 1.
8134zMaintenance
Page 137 of 173
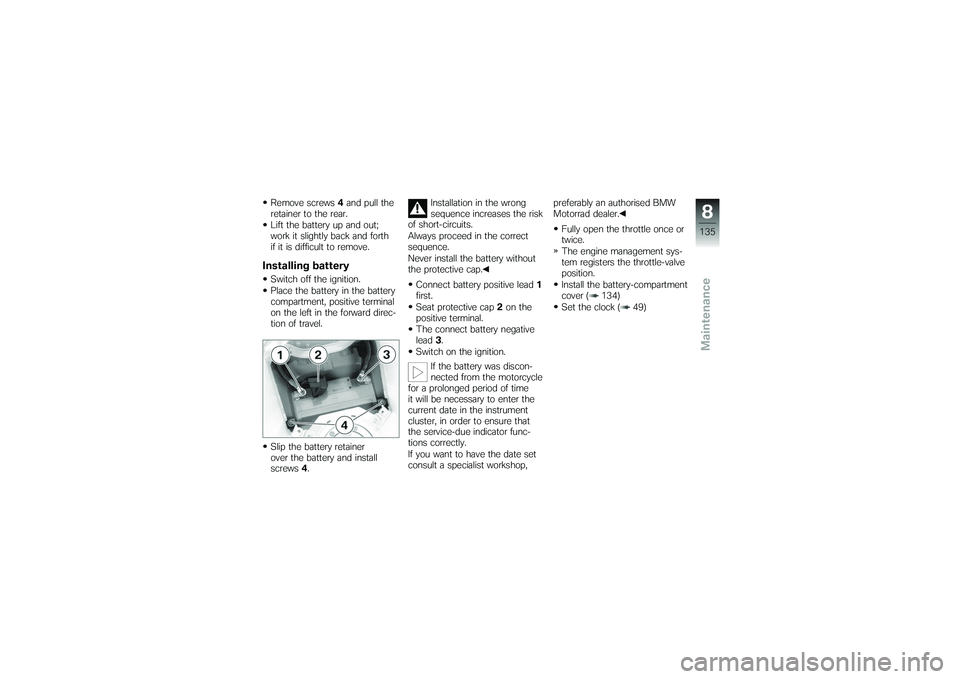
Remove screws4and pull the
retainer to the rear.
Lift the battery up and out;
work it slightly back and forth
if it is difficult to remove.Installing batterySwitch off the ignition.
Place the battery in the battery
compartment, positive terminal
on the left in the forward direc-
tion of travel.
Slip the battery retainer
over the battery and install
screws 4. Installation in the wrong
sequence increases the risk
of short-circuits.
Always proceed in the correct
sequence.
Never install the battery without
the protective cap.
Connect battery positive lead 1
first.
Seat protective cap 2on the
positive terminal.
The connect battery negative
lead 3.
Switch on the ignition.
If the battery was discon-
nected from the motorcycle
for a prolonged period of time
it will be necessary to enter the
current date in the instrument
cluster, in order to ensure that
the service-due indicator func-
tions correctly.
If you want to have the date set
consult a specialist workshop, preferably an authorised BMW
Motorrad dealer.
Fully open the throttle once or
twice.
The engine management sys-
tem registers the throttle-valve
position.
Install the battery-compartment
cover ( 134)
Set the clock ( 49)
8135zMaintenance
Page 142 of 173
Remove stains of this kind im-
mediately, using cleaning-grade
benzene or petroleum spirit on a
clean cloth or ball of cotton wool.
BMW Motorrad recommends
BMW tar remover for removing
specks of tar. Remember to wax
the parts treated in this way.Protective wax coatingBMW Motorrad recommends
applying only BMW car wax or
products containing carnauba
wax or synthetic wax.
It is time to rewax the paint-
work when water "puddles" on
the surface, instead of forming
beads.Laying up the
motorcycleClean the motorcycle.
Remove the battery.
Spray the brake and clutch
lever pivots and the main andside stand pivots with a suit-
able lubricant.
Coat bright metal and chrome-
plated parts with an acid-free
grease (e.g. Vaseline).
Stand the motorcycle in a dry
room in such a way that there
is no load on either wheel.
Before laying the vehicle
up out of use, have the en-
gine oil and the oil filter element
changed by a specialist work-
shop, preferably an authorised
BMW Motorrad dealer. Com-
bine work for laying up/restoring
to use with a BMW service or
inspection.
Restoring motorcycle
to useRemove the protective wax
coating.
Clean the motorcycle.
Install a charged battery. Before starting: work through
the checklist.
9140zCare
Page 144 of 173
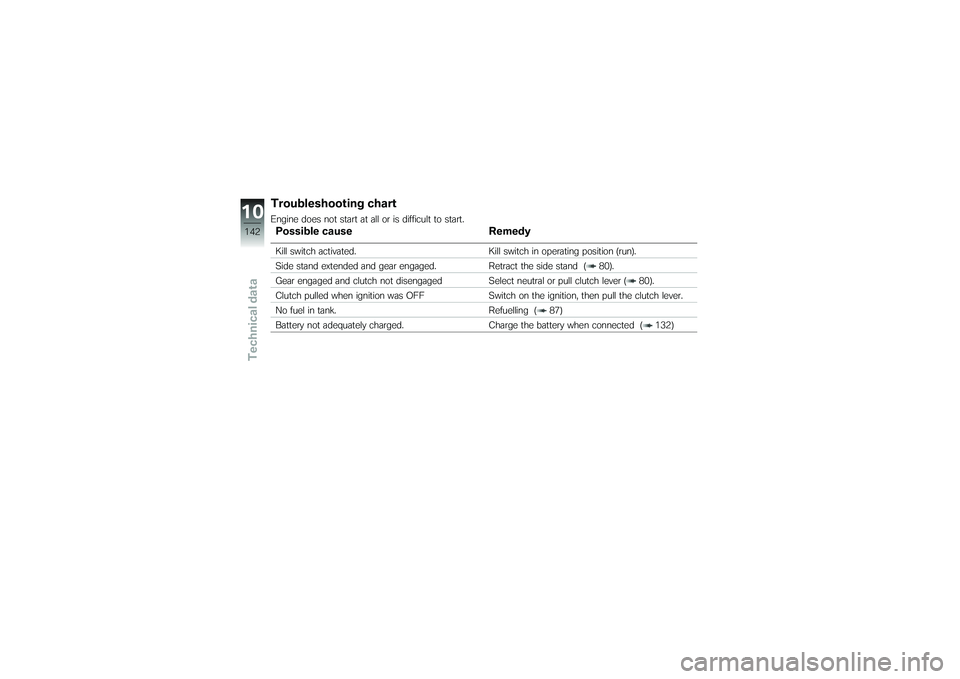
Troubleshooting chartEngine does not start at all or is difficult to start.Possible causeRemedyKill switch activated. Kill switch in operating position (run).
Side stand extended and gear engaged. Retract the side stand ( 80).
Gear engaged and clutch not disengaged Select neutral or pull clutch lever ( 80).
Clutch pulled when ignition was OFF Switch on the ignition, then pull the clutch lever.
No fuel in tank. Refuelling ( 87)
Battery not adequately charged. Charge the battery when connected ( 132)
10142zTechnical data
Page 153 of 173
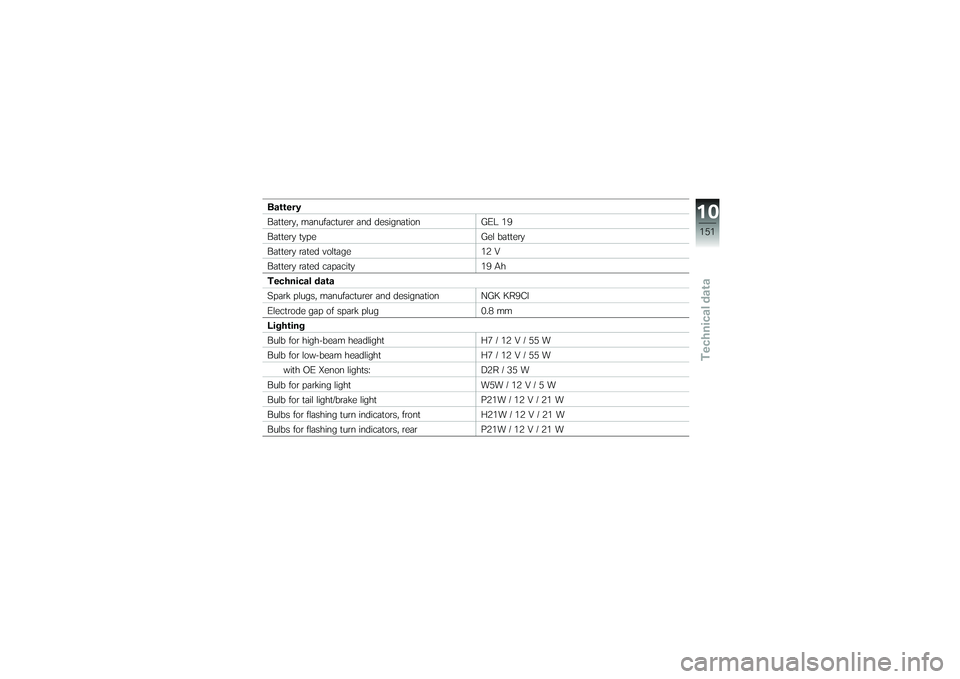
Battery
Battery, manufacturer and designationGEL 19
Battery type Gel battery
Battery rated voltage 12 V
Battery rated capacity 19 Ah
Technical data
Spark plugs, manufacturer and designation NGK KR9CI
Electrode gap of spark plug 0.8 mm
Lighting
Bulb for high-beam headlight H7 / 12 V / 55 W
Bulb for low-beam headlight H7 / 12 V / 55 W
with OE Xenon lights: D2R / 35 W
Bulb for parking light W5W / 12 V / 5 W
Bulb for tail light/brake light P21W / 12 V / 21 W
Bulbs for flashing turn indicators, front H21W / 12 V / 21 W
Bulbs for flashing turn indicators, rear P21W / 12 V / 21 W
10151zTechnical data
Page 167 of 173
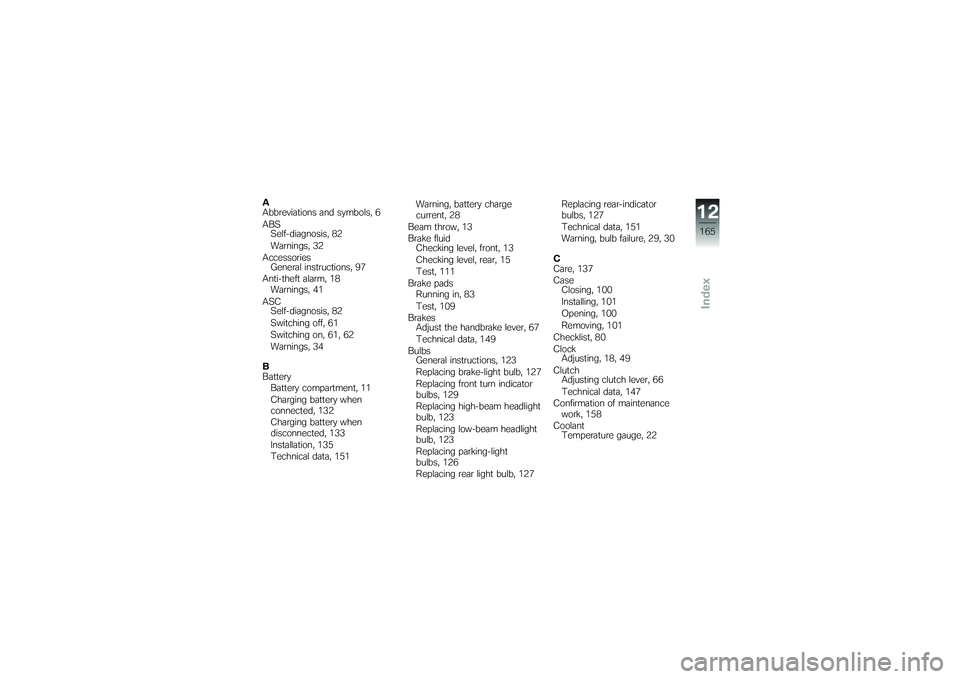
A
Abbreviations and symbols, 6
ABSSelf-diagnosis, 82
Warnings, 32
Accessories General instructions, 97
Anti-theft alarm, 18 Warnings, 41
ASC Self-diagnosis, 82
Switching off, 61
Switching on, 61, 62
Warnings, 34
B
Battery Battery compartment, 11
Charging battery when
connected, 132
Charging battery when
disconnected, 133
Installation, 135
Technical data, 151 Warning, battery charge
current, 28
Beam throw, 13
Brake fluid Checking level, front, 13
Checking level, rear, 15
Test, 111
Brake pads Running in, 83
Test, 109
Brakes Adjust the handbrake lever, 67
Technical data, 149
Bulbs General instructions, 123
Replacing brake-light bulb, 127
Replacing front turn indicator
bulbs, 129
Replacing high-beam headlight
bulb, 123
Replacing low-beam headlight
bulb, 123
Replacing parking-light
bulbs, 126
Replacing rear light bulb, 127 Replacing rear-indicator
bulbs, 127
Technical data, 151
Warning, bulb failure, 29, 30
C
Care, 137
Case Closing, 100
Installing, 101
Opening, 100
Removing, 101
Checklist, 80
Clock Adjusting, 18, 49
Clutch Adjusting clutch lever, 66
Technical data, 147
Confirmation of maintenance work, 158
Coolant Temperature gauge, 22
12165zIndex
Page 170 of 173
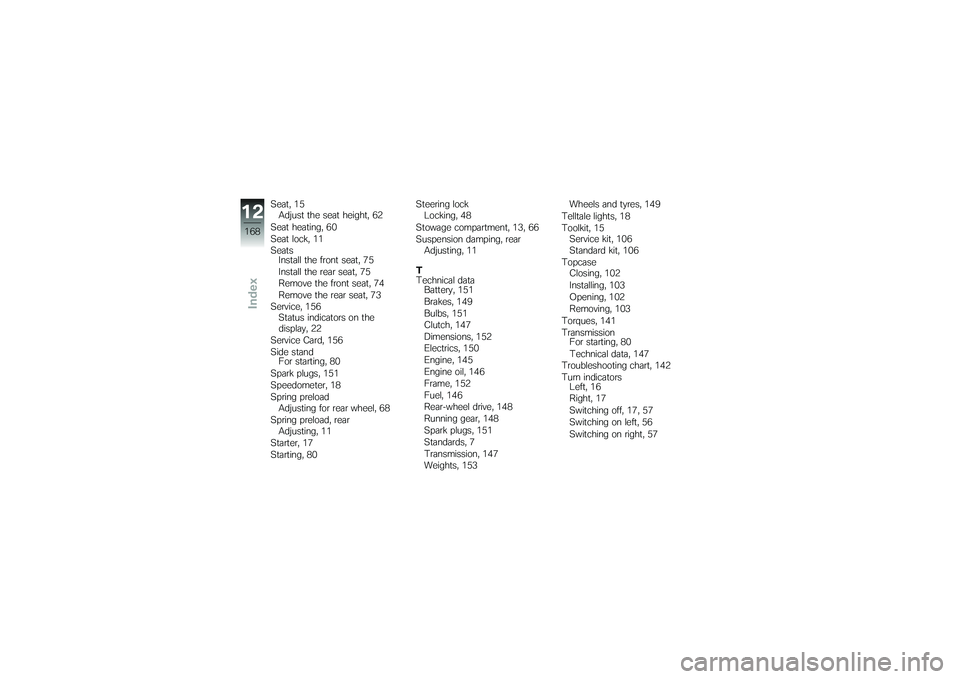
Seat, 15Adjust the seat height, 62
Seat heating, 60
Seat lock, 11
Seats Install the front seat, 75
Install the rear seat, 75
Remove the front seat, 74
Remove the rear seat, 73
Service, 156 Status indicators on the
display, 22
Service Card, 156
Side stand For starting, 80
Spark plugs, 151
Speedometer, 18
Spring preload Adjusting for rear wheel, 68
Spring preload, rear Adjusting, 11
Starter, 17
Starting, 80 Steering lock
Locking, 48
Stowage compartment, 13, 66
Suspension damping, rear Adjusting, 11
T
Technical data Battery, 151
Brakes, 149
Bulbs, 151
Clutch, 147
Dimensions, 152
Electrics, 150
Engine, 145
Engine oil, 146
Frame, 152
Fuel, 146
Rear-wheel drive, 148
Running gear, 148
Spark plugs, 151
Standards, 7
Transmission, 147
Weights, 153 Wheels and tyres, 149
Telltale lights, 18
Toolkit, 15 Service kit, 106
Standard kit, 106
Topcase Closing, 102
Installing, 103
Opening, 102
Removing, 103
Torques, 141
Transmission For starting, 80
Technical data, 147
Troubleshooting chart, 142
Turn indicators Left, 16
Right, 17
Switching off, 17, 57
Switching on left, 56
Switching on right, 57
12168zIndex