ignition BMW MOTORRAD K 1200 GT 2007 Rider's Manual (in English)
[x] Cancel search | Manufacturer: BMW MOTORRAD, Model Year: 2007, Model line: K 1200 GT, Model: BMW MOTORRAD K 1200 GT 2007Pages: 173, PDF Size: 2.82 MB
Page 126 of 173
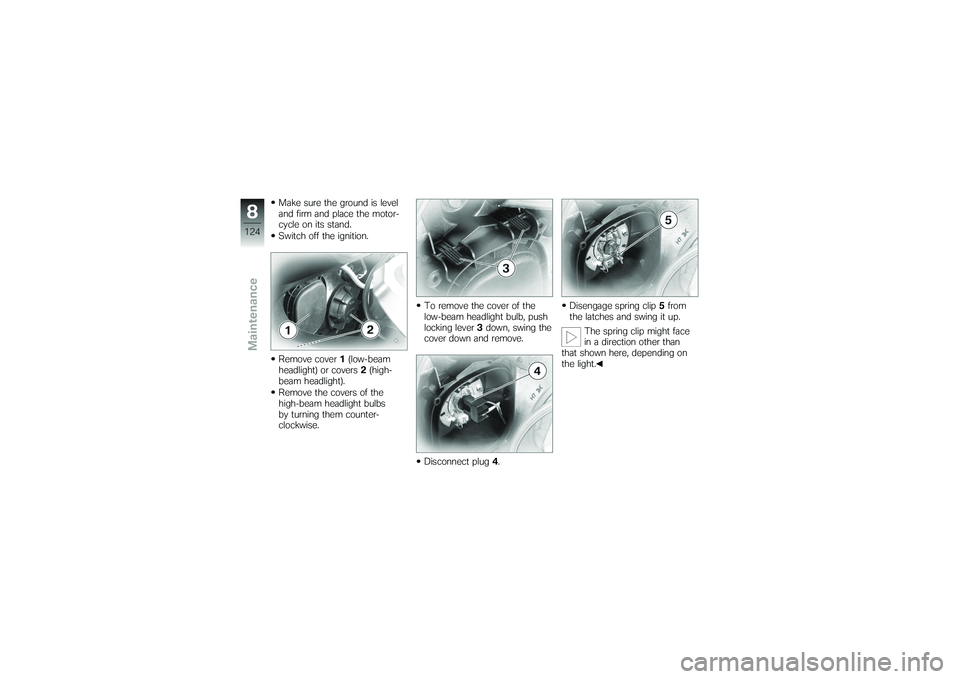
Make sure the ground is level
and firm and place the motor-
cycle on its stand.
Switch off the ignition.
Remove cover1(low-beam
headlight) or covers 2(high-
beam headlight).
Remove the covers of the
high-beam headlight bulbs
by turning them counter-
clockwise. To remove the cover of the
low-beam headlight bulb, push
locking lever
3down, swing the
cover down and remove.
Disconnect plug 4. Disengage spring clip
5from
the latches and swing it up.
The spring clip might face
in a direction other than
that shown here, depending on
the light.
8124zMaintenance
Page 128 of 173
Replacing parking-light
bulbs
If it is not standing firmly,
the motorcycle could topple
in the course of the operations
described below.
Always make sure that the
motorcycle is stable and firmly
supported.
Make sure the ground is level
and firm and place the motor-
cycle on its stand.
Switch off the ignition.
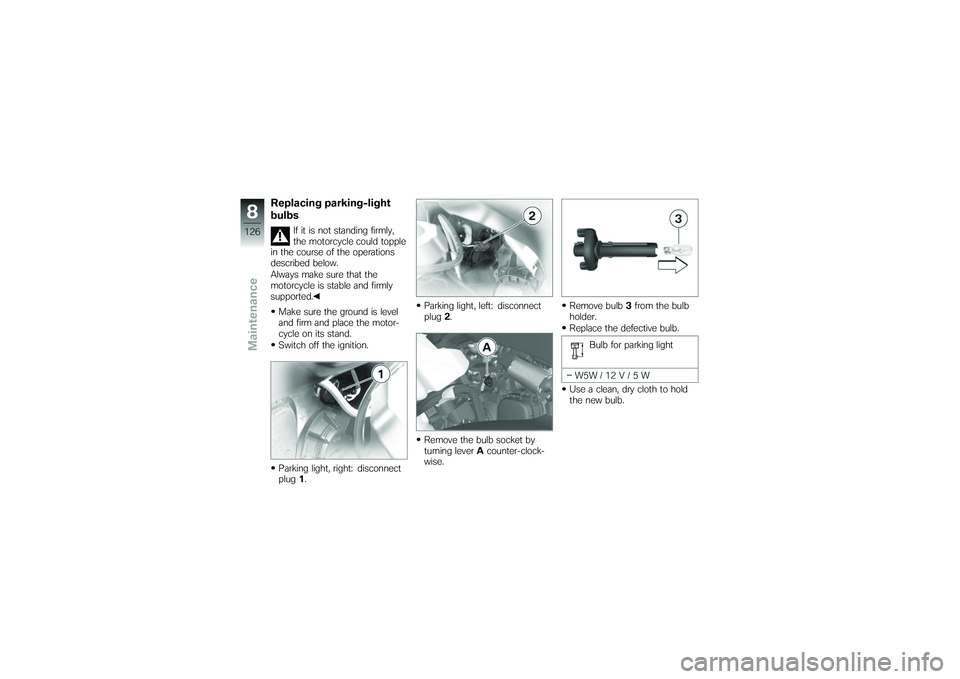
Parking light, right: disconnect
plug 1. Parking light, left: disconnect
plug
2.
Remove the bulb socket by
turning lever Acounter-clock-
wise. Remove bulb
3from the bulb
holder.
Replace the defective bulb.
Bulb for parking light
W5W / 12 V / 5 W
Use a clean, dry cloth to hold
the new bulb.
8126zMaintenance
Page 129 of 173
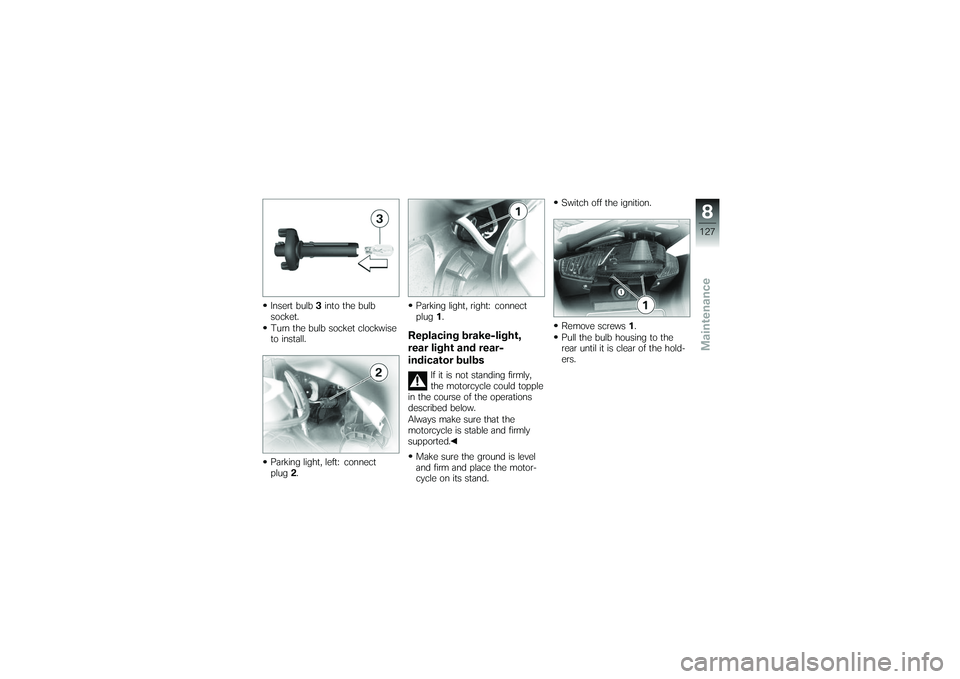
Insert bulb3into the bulb
socket.
Turn the bulb socket clockwise
to install.
Parking light, left: connect
plug 2. Parking light, right: connect
plug
1.
Replacing brake-light,
rear light and rear-
indicator bulbs
If it is not standing firmly,
the motorcycle could topple
in the course of the operations
described below.
Always make sure that the
motorcycle is stable and firmly
supported.
Make sure the ground is level
and firm and place the motor-
cycle on its stand. Switch off the ignition.
Remove screws
1.
Pull the bulb housing to the
rear until it is clear of the hold-
ers.
8127zMaintenance
Page 131 of 173
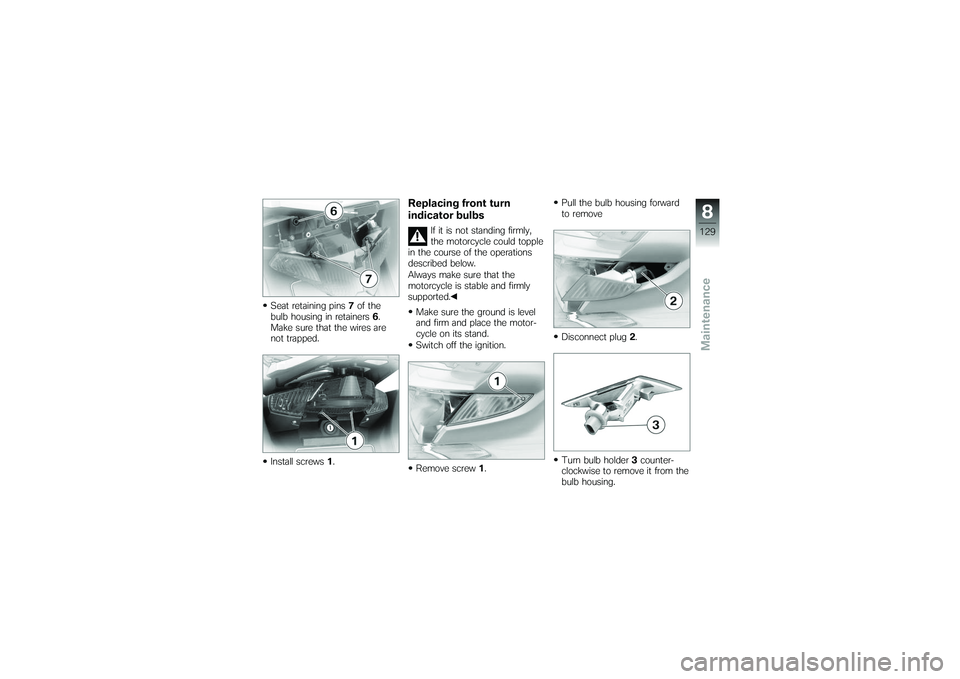
Seat retaining pins7of the
bulb housing in retainers 6.
Make sure that the wires are
not trapped.
Install screws 1.
Replacing front turn
indicator bulbs
If it is not standing firmly,
the motorcycle could topple
in the course of the operations
described below.
Always make sure that the
motorcycle is stable and firmly
supported.
Make sure the ground is level
and firm and place the motor-
cycle on its stand.
Switch off the ignition.
Remove screw 1. Pull the bulb housing forward
to remove
Disconnect plug
2.
Turn bulb holder 3counter-
clockwise to remove it from the
bulb housing.
8129zMaintenance
Page 133 of 173
Jump starting
The wires leading to the
power socket do not have
a load-capacity rating adequate
for jump-starting the engine. Ex-
cessively high current can lead
to a cable fire or damage to the
vehicle electronics.
Do not use the on-board socket
to jump-start the engine of the
motorcycle.
Touching live parts of the
ignition system with the
engine running can cause electric
shock.
Do not touch parts of the igni-
tion system when the engine is
running.
A short-circuit can res-
ult if the crocodile clips
of the jump leads are accident-
ally brought into contact with the
motorcycle.
Use only jump leads fitted with fully insulated crocodile clips at
both ends.
Jump-starting with a donor-
battery voltage higher than
12 V can damage the vehicle
electronics.
Make sure that the battery of the
donor vehicle has a voltage rating
of 12 V.
When jump-starting the engine,
do not disconnect the battery
from the on-board electrical
system.
Remove the battery-compart-
ment cover ( 133)
Run the engine of the donor
vehicle during jump-starting.
Begin by connecting one end
of the red jump lead to the
positive terminal of the dis-
charged battery and the other
end to the positive terminal of
the donor battery.
Then connect one end of the
black jump lead to the negative terminal of the donor battery,
and the other end to the neg-
ative terminal of the discharged
battery.
Start the engine of the vehicle
with the discharged battery
in the usual way; if the en-
gine does not start, wait a few
minutes before repeating the
attempt in order to protect the
starter motor and the donor
battery.
Allow both engines to idle for a
few minutes before disconnect-
ing the jump leads.
Disconnect the jump lead from
the negative terminals first,
then disconnect the second
lead from the positive termin-
als.
Install the battery-compartment
cover ( 134)
8131zMaintenance
Page 137 of 173
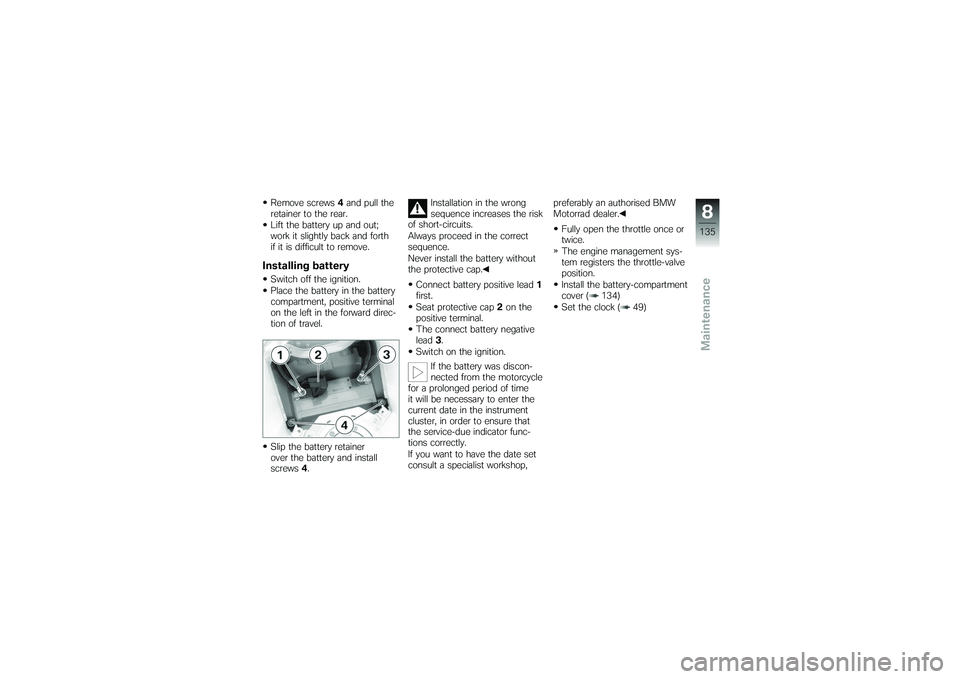
Remove screws4and pull the
retainer to the rear.
Lift the battery up and out;
work it slightly back and forth
if it is difficult to remove.Installing batterySwitch off the ignition.
Place the battery in the battery
compartment, positive terminal
on the left in the forward direc-
tion of travel.
Slip the battery retainer
over the battery and install
screws 4. Installation in the wrong
sequence increases the risk
of short-circuits.
Always proceed in the correct
sequence.
Never install the battery without
the protective cap.
Connect battery positive lead 1
first.
Seat protective cap 2on the
positive terminal.
The connect battery negative
lead 3.
Switch on the ignition.
If the battery was discon-
nected from the motorcycle
for a prolonged period of time
it will be necessary to enter the
current date in the instrument
cluster, in order to ensure that
the service-due indicator func-
tions correctly.
If you want to have the date set
consult a specialist workshop, preferably an authorised BMW
Motorrad dealer.
Fully open the throttle once or
twice.
The engine management sys-
tem registers the throttle-valve
position.
Install the battery-compartment
cover ( 134)
Set the clock ( 49)
8135zMaintenance
Page 144 of 173
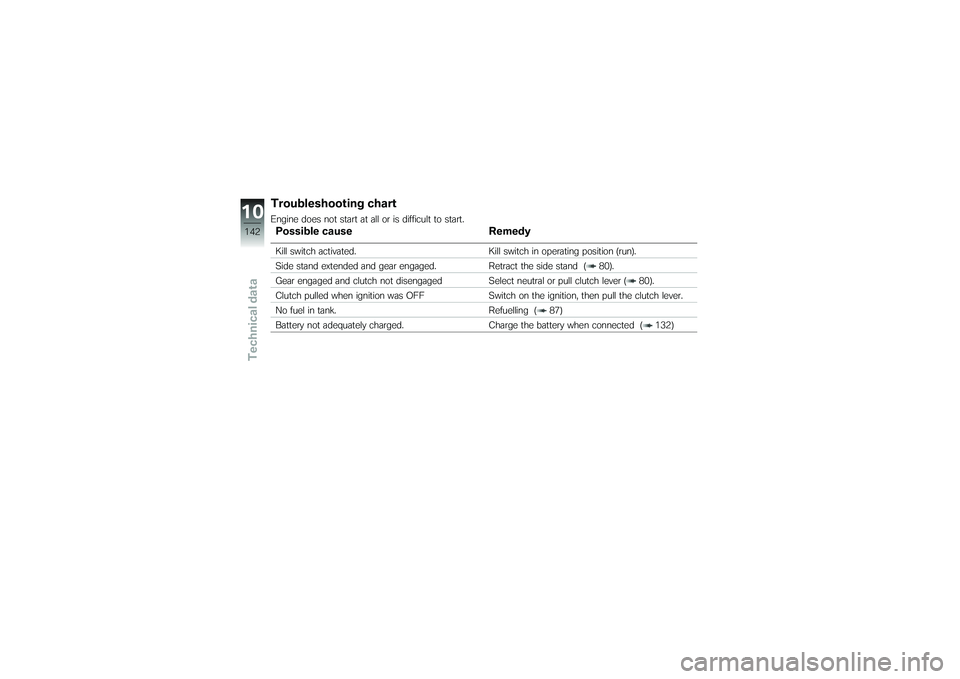
Troubleshooting chartEngine does not start at all or is difficult to start.Possible causeRemedyKill switch activated. Kill switch in operating position (run).
Side stand extended and gear engaged. Retract the side stand ( 80).
Gear engaged and clutch not disengaged Select neutral or pull clutch lever ( 80).
Clutch pulled when ignition was OFF Switch on the ignition, then pull the clutch lever.
No fuel in tank. Refuelling ( 87)
Battery not adequately charged. Charge the battery when connected ( 132)
10142zTechnical data
Page 152 of 173
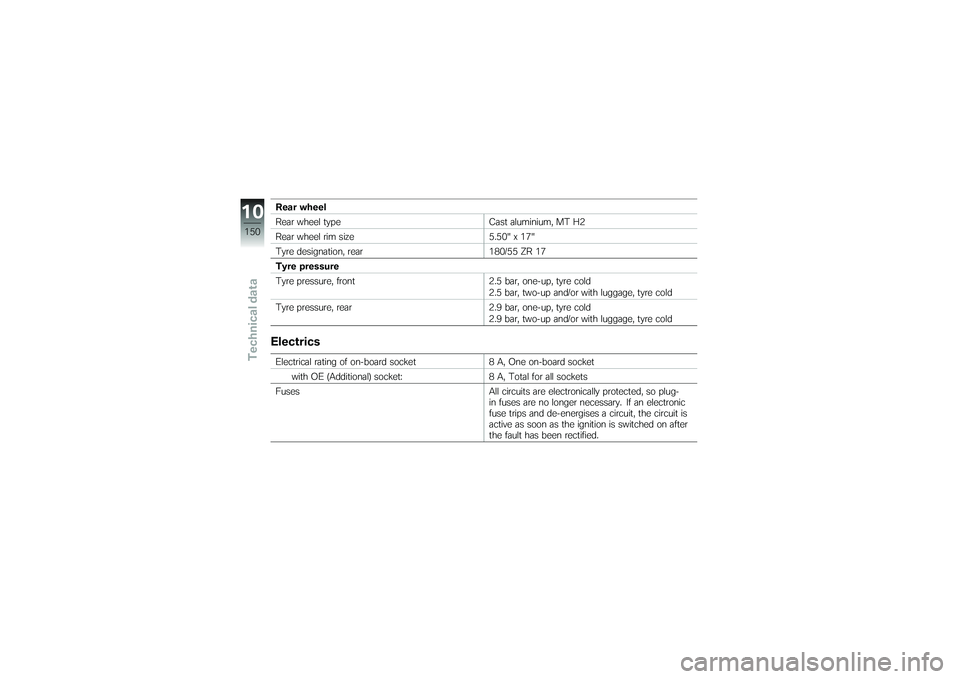
Rear wheel
Rear wheel typeCast aluminium, MT H2
Rear wheel rim size 5.50" x 17"
Tyre designation, rear 180/55 ZR 17
Tyre pressure
Tyre pressure, front 2.5 bar, one-up, tyre cold
2.5 bar, two-up and/or with luggage, tyre cold
Tyre pressure, rear 2.9 bar, one-up, tyre cold
2.9 bar, two-up and/or with luggage, tyre coldElectricsElectrical rating of on-board socket 8 A, One on-board socket
with OE (Additional) socket: 8 A, Total for all sockets
Fuses All circuits are electronically protected, so plug-
in fuses are no longer necessary. If an electronic
fuse trips and de-energises a circuit, the circuit is
active as soon as the ignition is switched on after
the fault has been rectified.
10150zTechnical data
Page 169 of 173
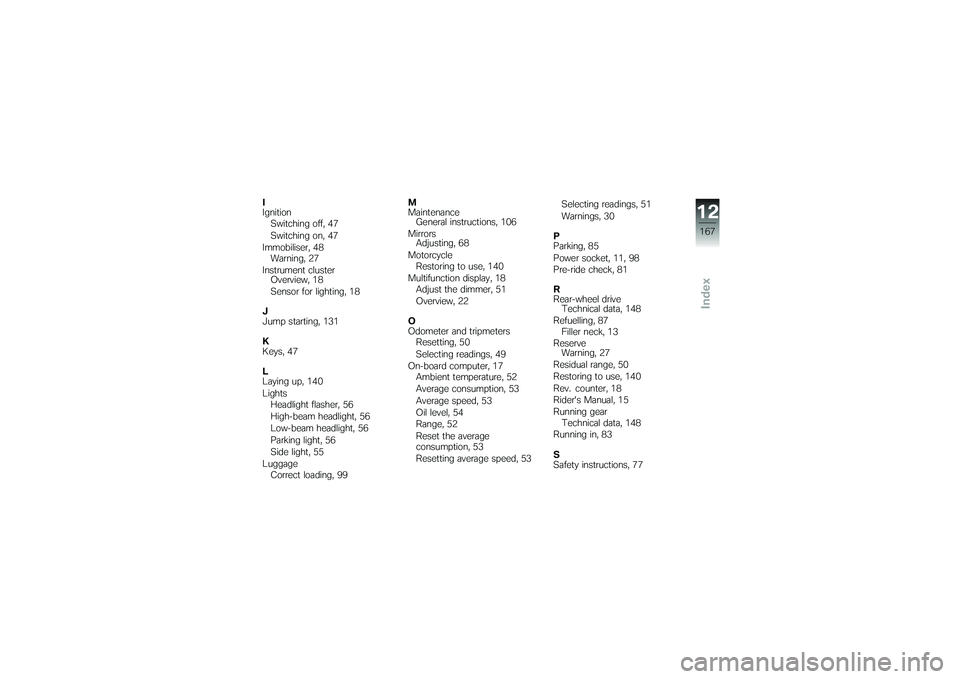
I
IgnitionSwitching off, 47
Switching on, 47
Immobiliser, 48 Warning, 27
Instrument cluster Overview, 18
Sensor for lighting, 18
J
Jump starting, 131
K
Keys, 47
L
Laying up, 140
Lights Headlight flasher, 56
High-beam headlight, 56
Low-beam headlight, 56
Parking light, 56
Side light, 55
Luggage Correct loading, 99 M
Maintenance
General instructions, 106
Mirrors Adjusting, 68
Motorcycle Restoring to use, 140
Multifunction display, 18 Adjust the dimmer, 51
Overview, 22
O
Odometer and tripmeters Resetting, 50
Selecting readings, 49
On-board computer, 17 Ambient temperature, 52
Average consumption, 53
Average speed, 53
Oil level, 54
Range, 52
Reset the average
consumption, 53
Resetting average speed, 53 Selecting readings, 51
Warnings, 30
P
Parking, 85
Power socket, 11, 98
Pre-ride check, 81
R
Rear-wheel drive Technical data, 148
Refuelling, 87 Filler neck, 13
Reserve Warning, 27
Residual range, 50
Restoring to use, 140
Rev. counter, 18
Rider's Manual, 15
Running gear Technical data, 148
Running in, 83
S
Safety instructions, 77
12167zIndex