headlamp BMW X3 2017 Owners Manual
[x] Cancel search | Manufacturer: BMW, Model Year: 2017, Model line: X3, Model: BMW X3 2017Pages: 265, PDF Size: 5.37 MB
Page 15 of 265
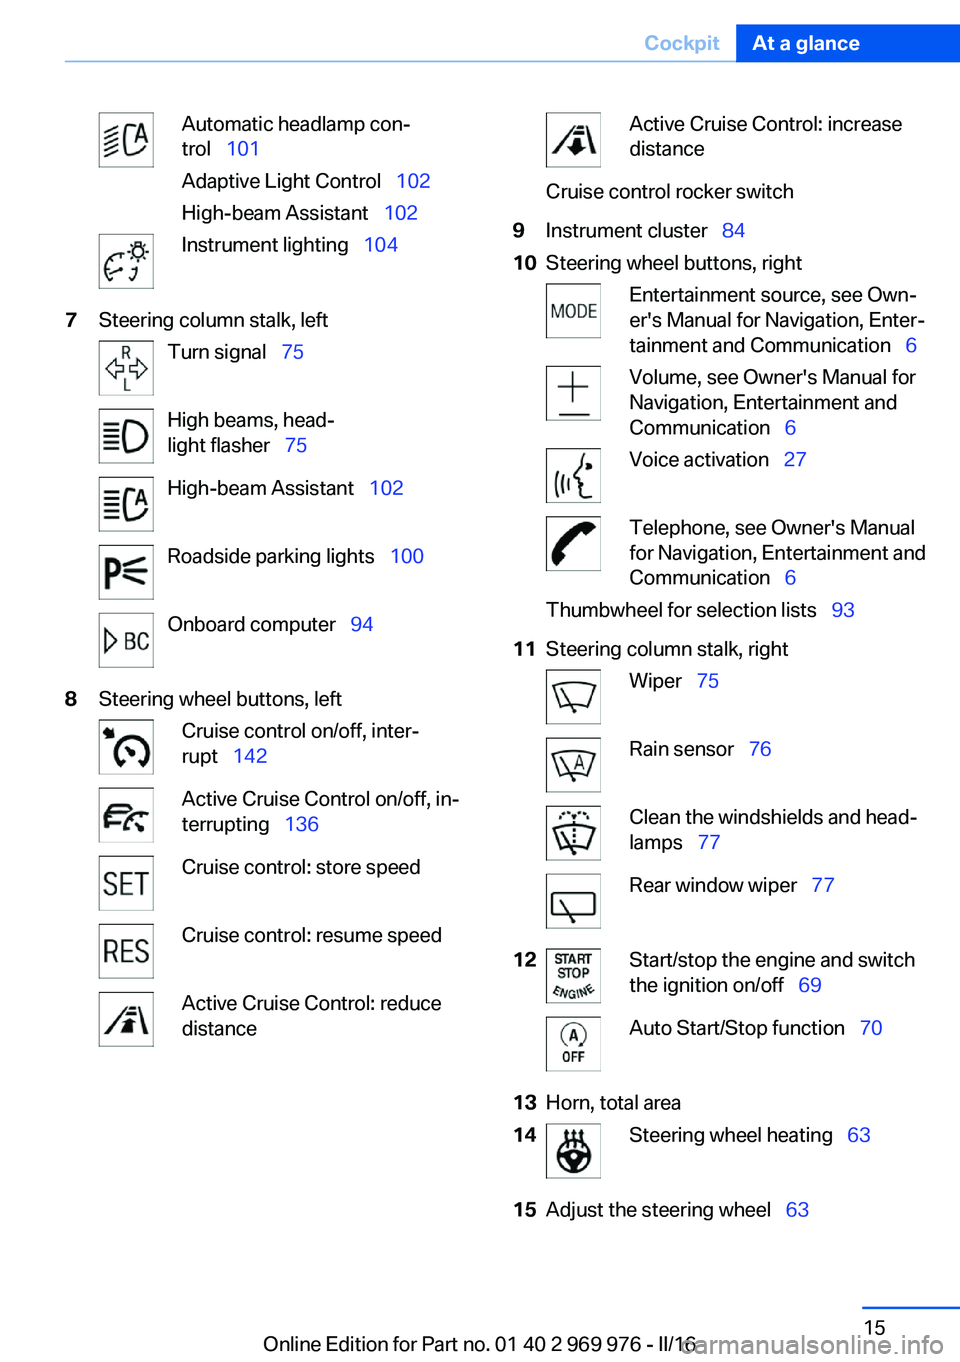
Automatic headlamp con‐
trol 101
Adaptive Light Control 102
High-beam Assistant 102Instrument lighting 1047Steering column stalk, leftTurn signal 75High beams, head‐
light flasher 75High-beam Assistant 102Roadside parking lights 100Onboard computer 948Steering wheel buttons, leftCruise control on/off, inter‐
rupt 142Active Cruise Control on/off, in‐
terrupting 136Cruise control: store speedCruise control: resume speedActive Cruise Control: reduce
distanceActive Cruise Control: increase
distanceCruise control rocker switch9Instrument cluster 8410Steering wheel buttons, rightEntertainment source, see Own‐
er's Manual for Navigation, Enter‐
tainment and Communication 6Volume, see Owner's Manual for
Navigation, Entertainment and
Communication 6Voice activation 27Telephone, see Owner's Manual
for Navigation, Entertainment and
Communication 6Thumbwheel for selection lists 9311Steering column stalk, rightWiper 75Rain sensor 76Clean the windshields and head‐
lamps 77Rear window wiper 7712Start/stop the engine and switch
the ignition on/off 69Auto Start/Stop function 7013Horn, total area14Steering wheel heating 6315Adjust the steering wheel 63Seite 15CockpitAt a glance15
Online Edition for Part no. 01 40 2 969 976 - II/16
Page 77 of 265
When wipers are frozen to windshield, wiper
operation is deactivated.
ATTENTION
If the rain sensor is activated, the wipers
can accidentally start moving in vehicle
washes. There is a risk of damage to property.
Deactivate the rain sensor in vehicle washes.◀
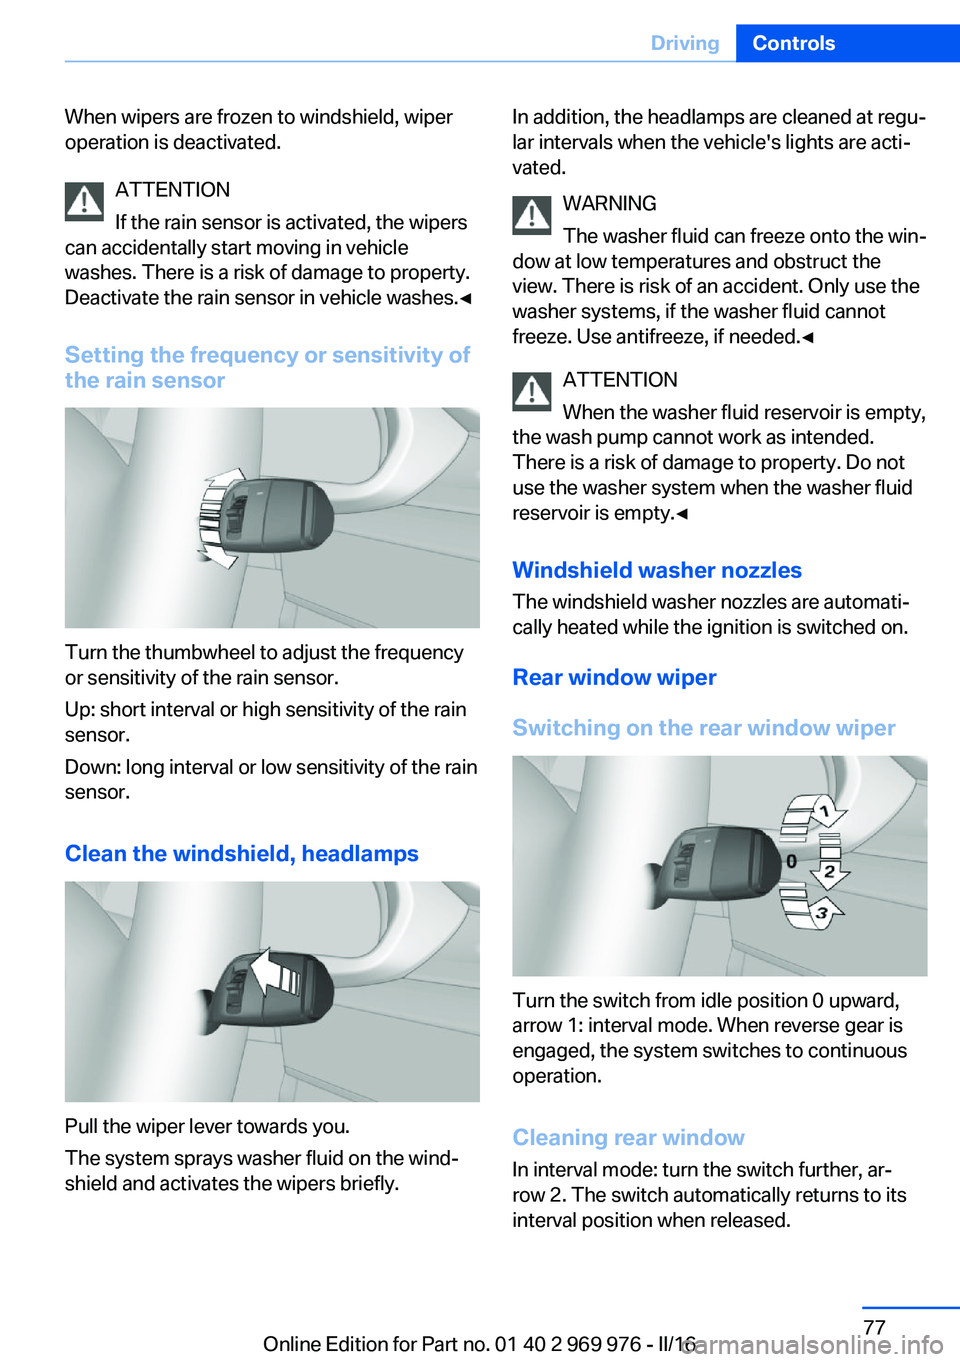
Setting the frequency or sensitivity of
the rain sensor
Turn the thumbwheel to adjust the frequency
or sensitivity of the rain sensor.
Up: short interval or high sensitivity of the rain
sensor.
Down: long interval or low sensitivity of the rain
sensor.
Clean the windshield, headlamps
Pull the wiper lever towards you.
The system sprays washer fluid on the wind‐
shield and activates the wipers briefly.
In addition, the headlamps are cleaned at regu‐
lar intervals when the vehicle's lights are acti‐
vated.
WARNING
The washer fluid can freeze onto the win‐
dow at low temperatures and obstruct the
view. There is risk of an accident. Only use the
washer systems, if the washer fluid cannot
freeze. Use antifreeze, if needed.◀
ATTENTION
When the washer fluid reservoir is empty,
the wash pump cannot work as intended.
There is a risk of damage to property. Do not
use the washer system when the washer fluid
reservoir is empty.◀
Windshield washer nozzles
The windshield washer nozzles are automati‐
cally heated while the ignition is switched on.
Rear window wiper
Switching on the rear window wiper
Turn the switch from idle position 0 upward,
arrow 1: interval mode. When reverse gear is
engaged, the system switches to continuous
operation.
Cleaning rear window
In interval mode: turn the switch further, ar‐
row 2. The switch automatically returns to its
interval position when released.
Seite 77DrivingControls77
Online Edition for Part no. 01 40 2 969 976 - II/16
Page 87 of 265
▷TPM was unable to complete the reset.
Reset the system again.▷A wheel without TPM electronics is
mounted: Have it checked by a dealer’s
service center or another qualified service
center or repair shop as needed.▷Malfunction: have the system checked by a
dealer’s service center or another qualified
service center or repair shop.
For more information, see Tire Pressure Moni‐
tor, refer to page 108.
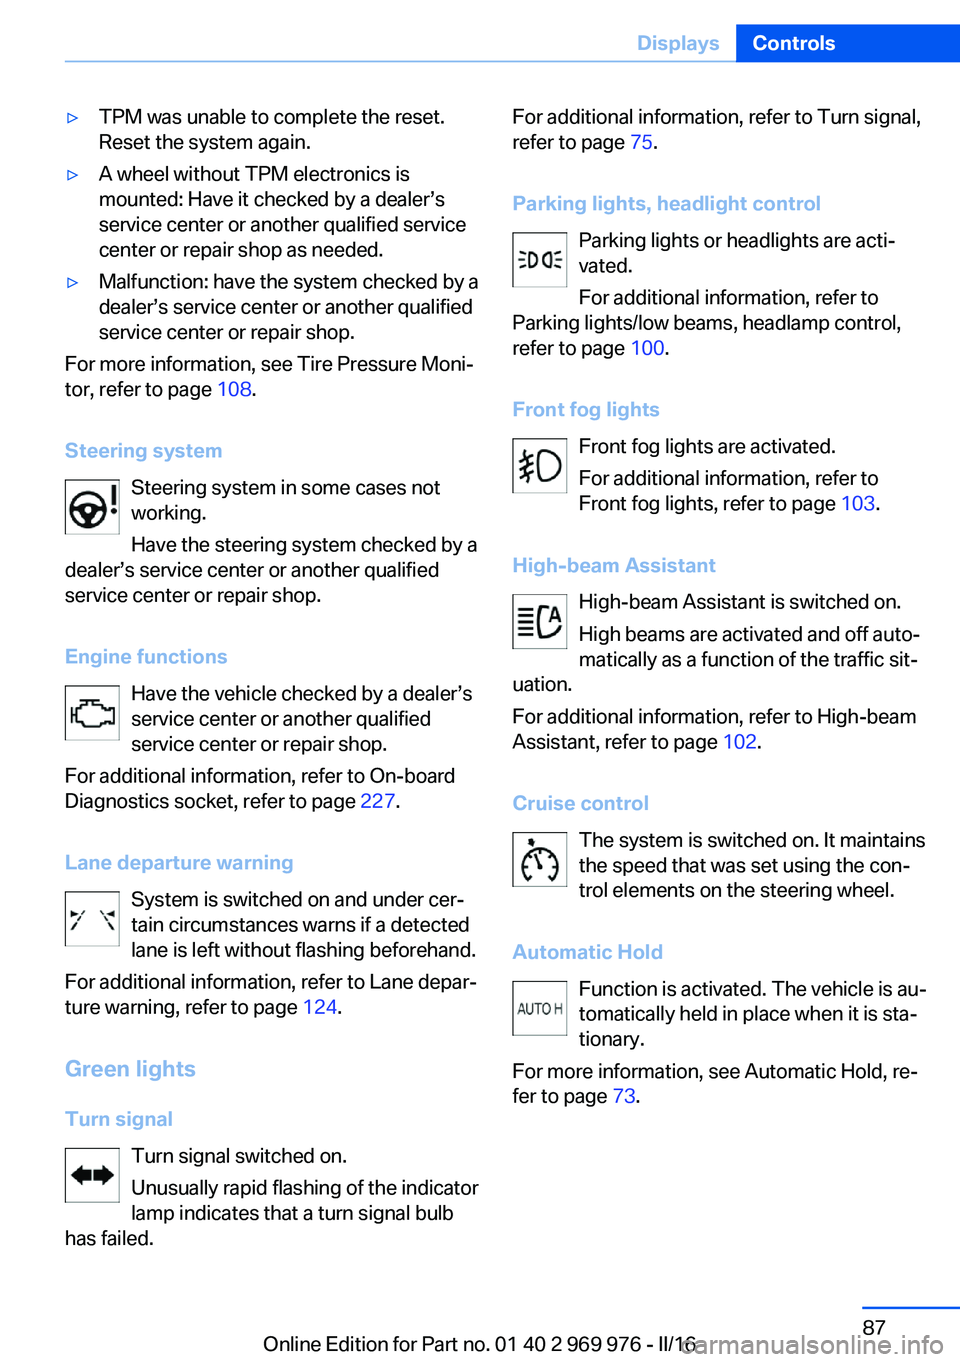
Steering system Steering system in some cases not
working.
Have the steering system checked by a
dealer’s service center or another qualified
service center or repair shop.
Engine functions Have the vehicle checked by a dealer’s
service center or another qualified
service center or repair shop.
For additional information, refer to On-board
Diagnostics socket, refer to page 227.
Lane departure warning System is switched on and under cer‐
tain circumstances warns if a detected
lane is left without flashing beforehand.
For additional information, refer to Lane depar‐
ture warning, refer to page 124.
Green lights Turn signal Turn signal switched on.
Unusually rapid flashing of the indicator
lamp indicates that a turn signal bulb
has failed.
For additional information, refer to Turn signal,
refer to page 75.
Parking lights, headlight control Parking lights or headlights are acti‐
vated.
For additional information, refer to
Parking lights/low beams, headlamp control,
refer to page 100.
Front fog lights Front fog lights are activated.
For additional information, refer to
Front fog lights, refer to page 103.
High-beam Assistant High-beam Assistant is switched on.
High beams are activated and off auto‐
matically as a function of the traffic sit‐
uation.
For additional information, refer to High-beam
Assistant, refer to page 102.
Cruise control The system is switched on. It maintains
the speed that was set using the con‐
trol elements on the steering wheel.
Automatic Hold Function is activated. The vehicle is au‐
tomatically held in place when it is sta‐
tionary.
For more information, see Automatic Hold, re‐
fer to page 73.Seite 87DisplaysControls87
Online Edition for Part no. 01 40 2 969 976 - II/16
Page 100 of 265
LightsVehicle features and optionsThis chapter describes all standard, country-
specific and optional features offered with the
series. It also describes features that are not
necessarily available in your car, e. g., due to
the selected options or country versions. This
also applies to safety-related functions and
systems. The respectively applicable country
provisions must be observed when using the
respective features and systems.
Overview Switches in the vehicle
The light switch element is located next to the
steering wheel.
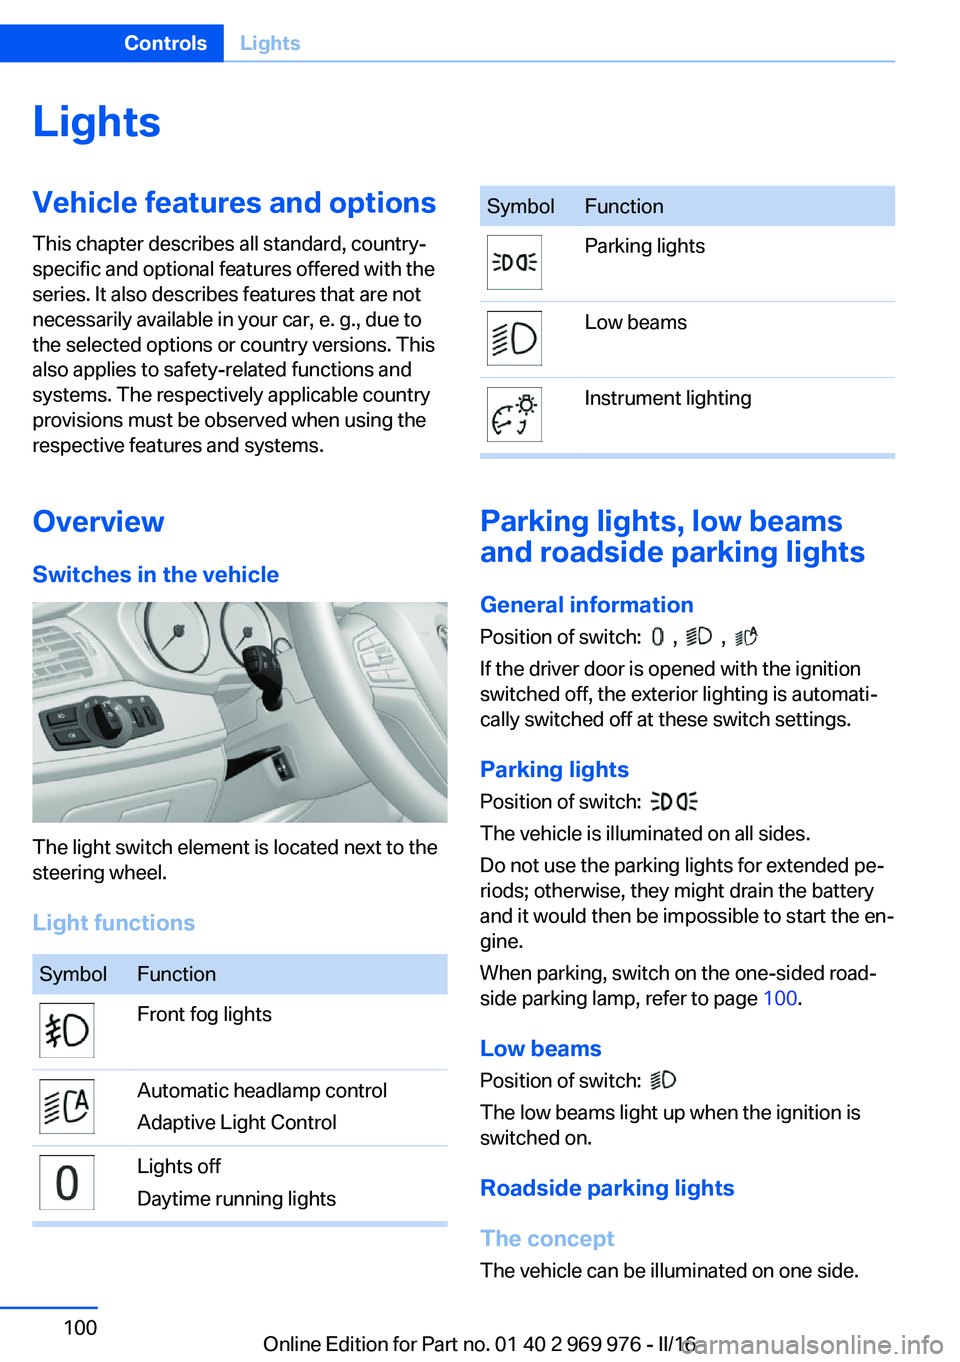
Light functions
SymbolFunctionFront fog lightsAutomatic headlamp control
Adaptive Light ControlLights off
Daytime running lightsSymbolFunctionParking lightsLow beamsInstrument lighting
Parking lights, low beams
and roadside parking lights
General information
Position of switch:
, ,
If the driver door is opened with the ignition
switched off, the exterior lighting is automati‐
cally switched off at these switch settings.
Parking lights
Position of switch:
The vehicle is illuminated on all sides.
Do not use the parking lights for extended pe‐
riods; otherwise, they might drain the battery
and it would then be impossible to start the en‐
gine.
When parking, switch on the one-sided road‐
side parking lamp, refer to page 100.
Low beams Position of switch:
The low beams light up when the ignition is
switched on.
Roadside parking lights
The concept
The vehicle can be illuminated on one side.
Seite 100ControlsLights100
Online Edition for Part no. 01 40 2 969 976 - II/16
Page 101 of 265
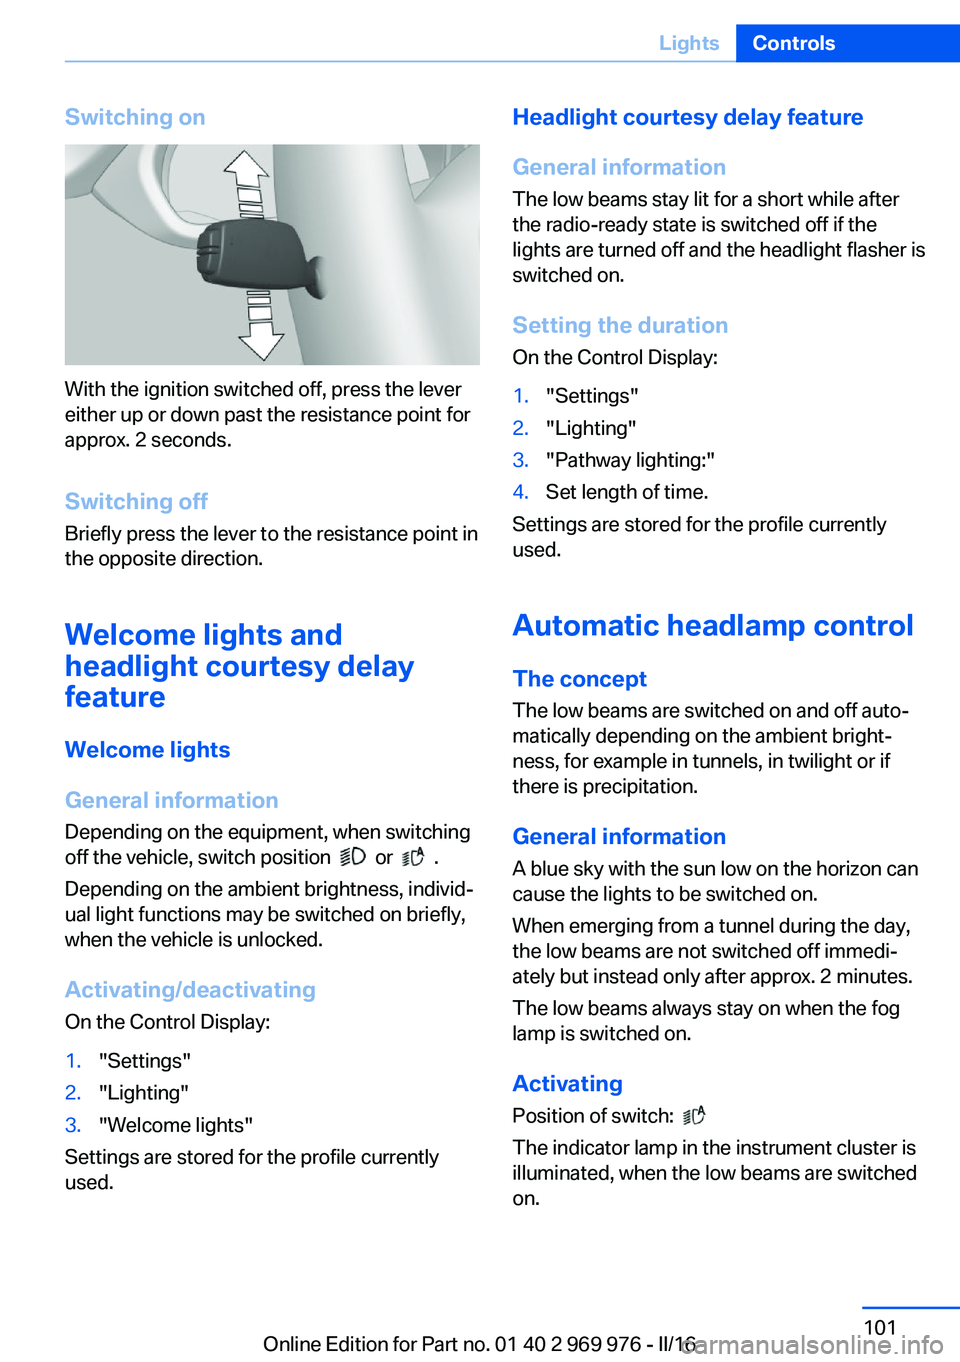
Switching on
With the ignition switched off, press the lever
either up or down past the resistance point for
approx. 2 seconds.
Switching off Briefly press the lever to the resistance point in
the opposite direction.
Welcome lights and
headlight courtesy delay
feature
Welcome lights
General information Depending on the equipment, when switching
off the vehicle, switch position
or .
Depending on the ambient brightness, individ‐
ual light functions may be switched on briefly,
when the vehicle is unlocked.
Activating/deactivating
On the Control Display:
1."Settings"2."Lighting"3."Welcome lights"
Settings are stored for the profile currently
used.
Headlight courtesy delay feature
General information
The low beams stay lit for a short while after
the radio-ready state is switched off if the
lights are turned off and the headlight flasher is
switched on.
Setting the durationOn the Control Display:1."Settings"2."Lighting"3."Pathway lighting:"4.Set length of time.
Settings are stored for the profile currently
used.
Automatic headlamp control
The concept The low beams are switched on and off auto‐
matically depending on the ambient bright‐
ness, for example in tunnels, in twilight or if
there is precipitation.
General information
A blue sky with the sun low on the horizon can
cause the lights to be switched on.
When emerging from a tunnel during the day,
the low beams are not switched off immedi‐
ately but instead only after approx. 2 minutes.
The low beams always stay on when the fog
lamp is switched on.
ActivatingPosition of switch:
The indicator lamp in the instrument cluster is
illuminated, when the low beams are switched
on.
Seite 101LightsControls101
Online Edition for Part no. 01 40 2 969 976 - II/16
Page 102 of 265
System limits
The automatic headlamp control cannot serve
as a substitute for your personal judgment of
lighting conditions.
E.g. the sensors are unable to detect fog or
hazy weather. To avoid safety risks under
these conditions, you should always switch on
the lights manually.
Daytime running lights
General information Position of switch:
, ,
The daytime running lights light up when the
ignition is switched on. After the ignition is
switched off, the parking lights light up in posi‐
tion
.
Activating/deactivating In some countries, daytime running lights are
mandatory, so it may not be possible to deacti‐
vate the daytime running lights.
On the Control Display:
1."Settings"2."Lighting"3."Daytime running lamps"
Settings are stored for the profile currently
used.
Adaptive Light Control
The concept Adaptive Light Control is a variable headlight
control system that enables dynamic illumina‐
tion of the road surface.
General information
Depending on the steering angle and other pa‐
rameters, the light from the headlamp follows
the course of the road.
To avoid blinding oncoming traffic, the Adap‐
tive Light Control does not swivel to the driv‐
er's side when the vehicle is at a standstill.
Depending on the equipment version, Adap‐
tive Light Control consists of one or several
systems:▷Cornering light, refer to page 102.▷Self-leveling headlights, refer to page 102.
Activating
Position of switch
with the ignition
switched on.
Cornering lights
The cornering lights are automatically
switched on depending on the steering angle
or the use of turn signals.
When driving in reverse, the cornering lights
may be automatically switched on regardless
of the steering angle.
Self-leveling headlights
The self-leveling headlights compensate for
acceleration and braking operations in order
not to blind the oncoming traffic and to achieve
optimum illumination of the roadway.
Malfunction
A Check Control message is displayed.
Adaptive Light Control is malfunctioning or has
failed. Have the system immediately checked
by a dealer’s service center or another quali‐
fied service center or repair shop.
High-beam Assistant
The concept The high-beam Assistant detects other traffic
participants early on and automatically
switches the high beams on or off depending
on the traffic situation. The assistant ensures
that the high beams are switched on, when‐
ever the traffic situation allows. In the low
Seite 102ControlsLights102
Online Edition for Part no. 01 40 2 969 976 - II/16
Page 103 of 265
speed range, the high beams are not switched
on by the system.
General information The system responds to light from oncoming
traffic and traffic driving ahead of you, and to
adequate illumination, for example, in towns
and cities.
The driver can intervene at any time and switch
the high beams on and off as usual.
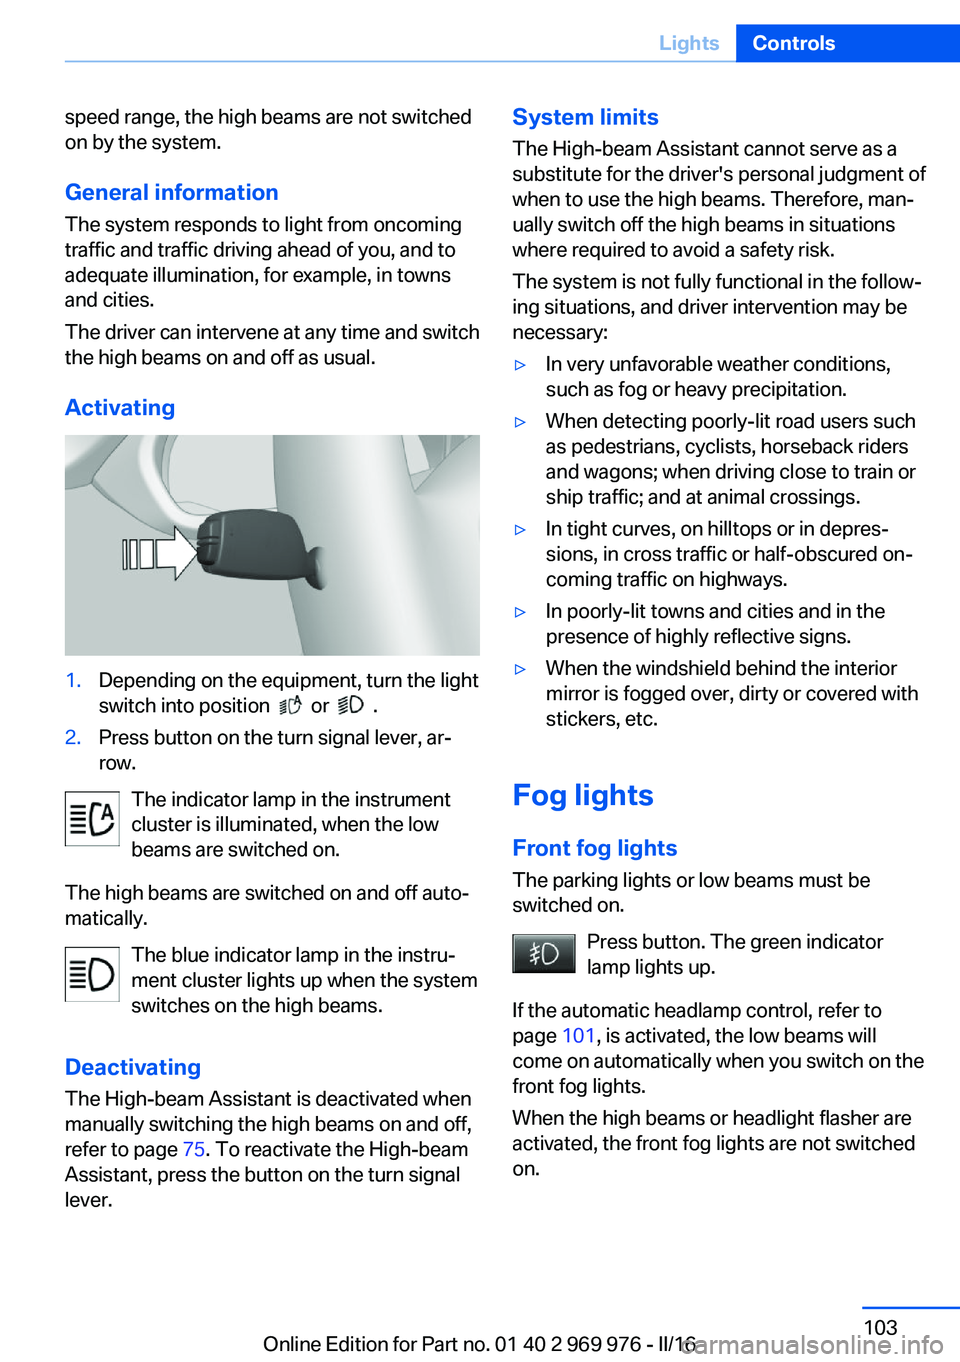
Activating1.Depending on the equipment, turn the light
switch into position
or .
2.Press button on the turn signal lever, ar‐
row.
The indicator lamp in the instrument
cluster is illuminated, when the low
beams are switched on.
The high beams are switched on and off auto‐
matically.
The blue indicator lamp in the instru‐
ment cluster lights up when the system
switches on the high beams.
Deactivating The High-beam Assistant is deactivated when
manually switching the high beams on and off,
refer to page 75. To reactivate the High-beam
Assistant, press the button on the turn signal
lever.
System limits
The High-beam Assistant cannot serve as a
substitute for the driver's personal judgment of
when to use the high beams. Therefore, man‐
ually switch off the high beams in situations
where required to avoid a safety risk.
The system is not fully functional in the follow‐
ing situations, and driver intervention may be
necessary:▷In very unfavorable weather conditions,
such as fog or heavy precipitation.▷When detecting poorly-lit road users such
as pedestrians, cyclists, horseback riders
and wagons; when driving close to train or
ship traffic; and at animal crossings.▷In tight curves, on hilltops or in depres‐
sions, in cross traffic or half-obscured on‐
coming traffic on highways.▷In poorly-lit towns and cities and in the
presence of highly reflective signs.▷When the windshield behind the interior
mirror is fogged over, dirty or covered with
stickers, etc.
Fog lights
Front fog lights
The parking lights or low beams must be
switched on.
Press button. The green indicator
lamp lights up.
If the automatic headlamp control, refer to
page 101, is activated, the low beams will
come on automatically when you switch on the
front fog lights.
When the high beams or headlight flasher are
activated, the front fog lights are not switched
on.
Seite 103LightsControls103
Online Edition for Part no. 01 40 2 969 976 - II/16
Page 231 of 265
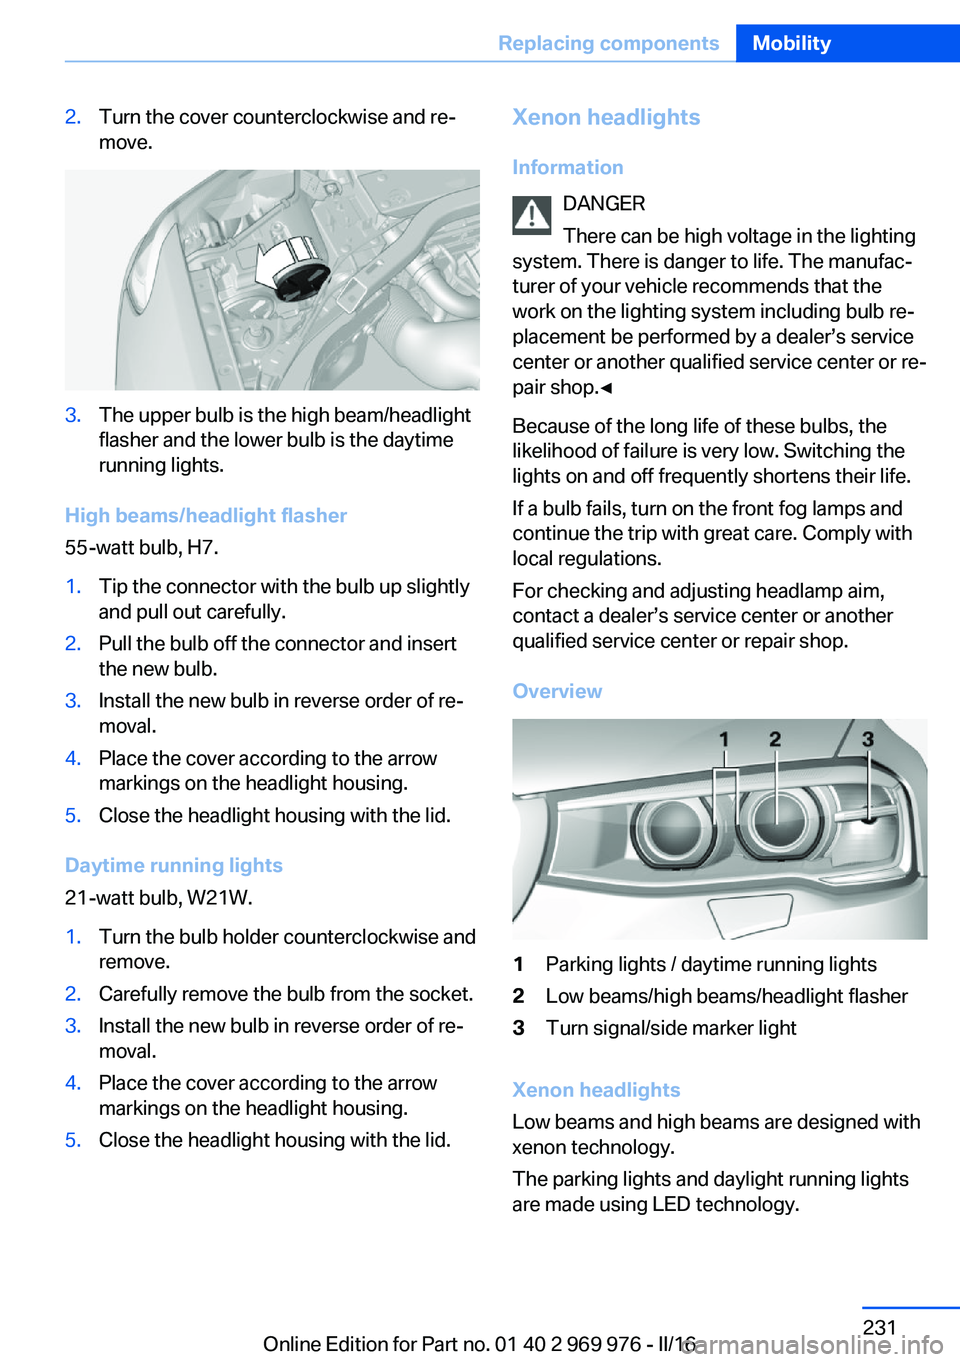
2.Turn the cover counterclockwise and re‐
move.3.The upper bulb is the high beam/headlight
flasher and the lower bulb is the daytime
running lights.
High beams/headlight flasher
55-watt bulb, H7.
1.Tip the connector with the bulb up slightly
and pull out carefully.2.Pull the bulb off the connector and insert
the new bulb.3.Install the new bulb in reverse order of re‐
moval.4.Place the cover according to the arrow
markings on the headlight housing.5.Close the headlight housing with the lid.
Daytime running lights
21-watt bulb, W21W.
1.Turn the bulb holder counterclockwise and
remove.2.Carefully remove the bulb from the socket.3.Install the new bulb in reverse order of re‐
moval.4.Place the cover according to the arrow
markings on the headlight housing.5.Close the headlight housing with the lid.Xenon headlights
Information DANGER
There can be high voltage in the lighting
system. There is danger to life. The manufac‐
turer of your vehicle recommends that the
work on the lighting system including bulb re‐
placement be performed by a dealer’s service
center or another qualified service center or re‐
pair shop.◀
Because of the long life of these bulbs, the
likelihood of failure is very low. Switching the
lights on and off frequently shortens their life.
If a bulb fails, turn on the front fog lamps and
continue the trip with great care. Comply with
local regulations.
For checking and adjusting headlamp aim,
contact a dealer’s service center or another
qualified service center or repair shop.
Overview1Parking lights / daytime running lights2Low beams/high beams/headlight flasher3Turn signal/side marker light
Xenon headlights
Low beams and high beams are designed with
xenon technology.
The parking lights and daylight running lights
are made using LED technology.
Seite 231Replacing componentsMobility231
Online Edition for Part no. 01 40 2 969 976 - II/16
Page 254 of 265
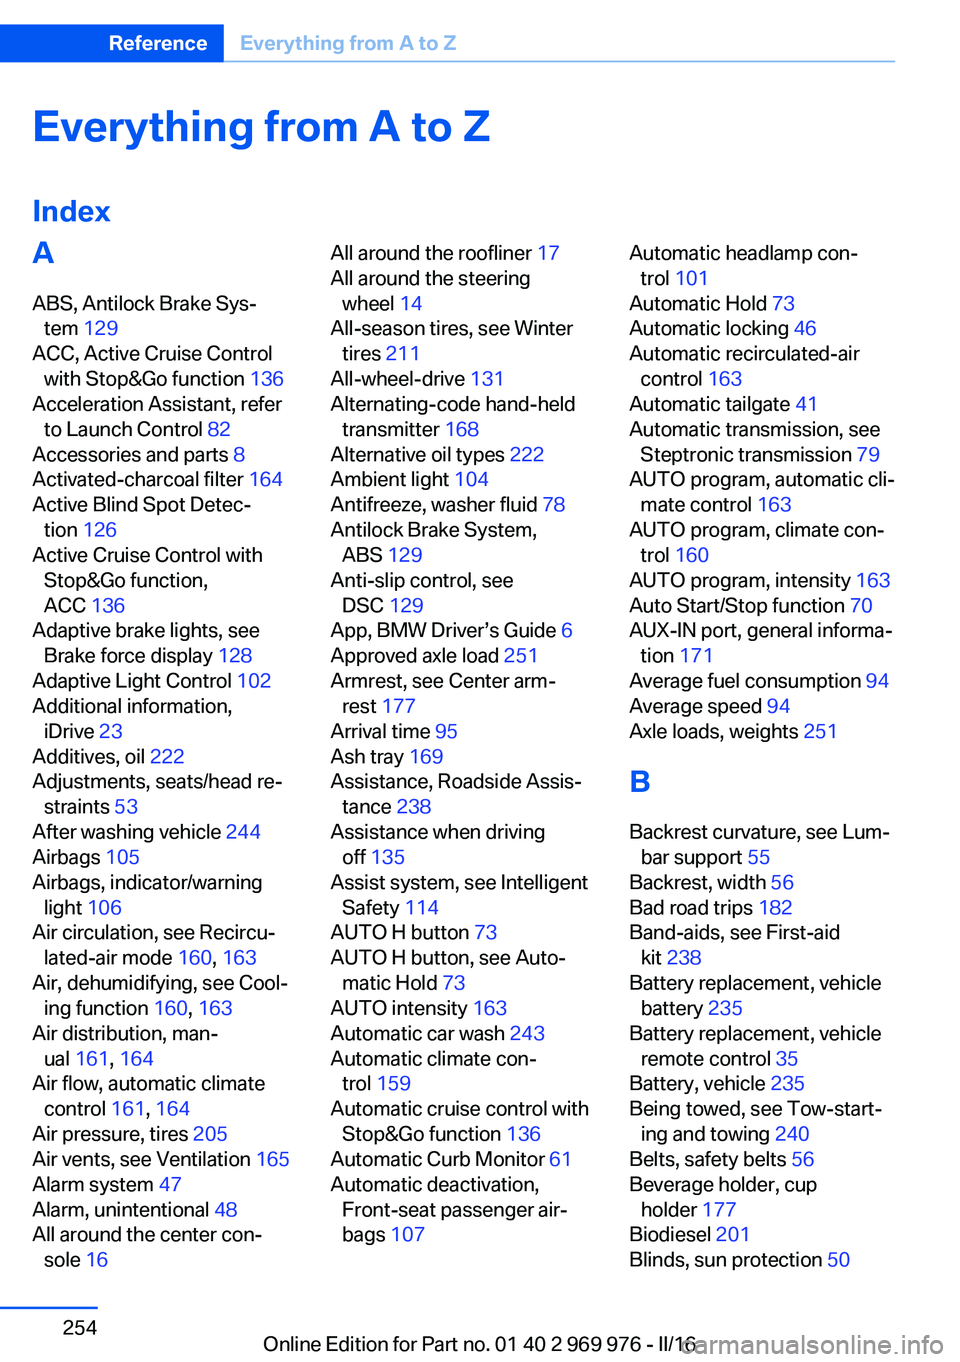
Everything from A to Z
IndexA ABS, Antilock Brake Sys‐ tem 129
ACC, Active Cruise Control with Stop&Go function 136
Acceleration Assistant, refer to Launch Control 82
Accessories and parts 8
Activated-charcoal filter 164
Active Blind Spot Detec‐ tion 126
Active Cruise Control with Stop&Go function,
ACC 136
Adaptive brake lights, see Brake force display 128
Adaptive Light Control 102
Additional information, iDrive 23
Additives, oil 222
Adjustments, seats/head re‐ straints 53
After washing vehicle 244
Airbags 105
Airbags, indicator/warning light 106
Air circulation, see Recircu‐ lated-air mode 160, 163
Air, dehumidifying, see Cool‐ ing function 160, 163
Air distribution, man‐ ual 161 , 164
Air flow, automatic climate control 161, 164
Air pressure, tires 205
Air vents, see Ventilation 165
Alarm system 47
Alarm, unintentional 48
All around the center con‐ sole 16 All around the roofliner 17
All around the steering wheel 14
All-season tires, see Winter tires 211
All-wheel-drive 131
Alternating-code hand-held transmitter 168
Alternative oil types 222
Ambient light 104
Antifreeze, washer fluid 78
Antilock Brake System, ABS 129
Anti-slip control, see DSC 129
App, BMW Driver’s Guide 6
Approved axle load 251
Armrest, see Center arm‐ rest 177
Arrival time 95
Ash tray 169
Assistance, Roadside Assis‐ tance 238
Assistance when driving off 135
Assist system, see Intelligent Safety 114
AUTO H button 73
AUTO H button, see Auto‐ matic Hold 73
AUTO intensity 163
Automatic car wash 243
Automatic climate con‐ trol 159
Automatic cruise control with Stop&Go function 136
Automatic Curb Monitor 61
Automatic deactivation, Front-seat passenger air‐
bags 107 Automatic headlamp con‐
trol 101
Automatic Hold 73
Automatic locking 46
Automatic recirculated-air control 163
Automatic tailgate 41
Automatic transmission, see Steptronic transmission 79
AUTO program, automatic cli‐ mate control 163
AUTO program, climate con‐ trol 160
AUTO program, intensity 163
Auto Start/Stop function 70
AUX-IN port, general informa‐ tion 171
Average fuel consumption 94
Average speed 94
Axle loads, weights 251
B Backrest curvature, see Lum‐ bar support 55
Backrest, width 56
Bad road trips 182
Band-aids, see First-aid kit 238
Battery replacement, vehicle battery 235
Battery replacement, vehicle remote control 35
Battery, vehicle 235
Being towed, see Tow-start‐ ing and towing 240
Belts, safety belts 56
Beverage holder, cup holder 177
Biodiesel 201
Blinds, sun protection 50 Seite 254ReferenceEverything from A to Z254
Online Edition for Part no. 01 40 2 969 976 - II/16
Page 258 of 265
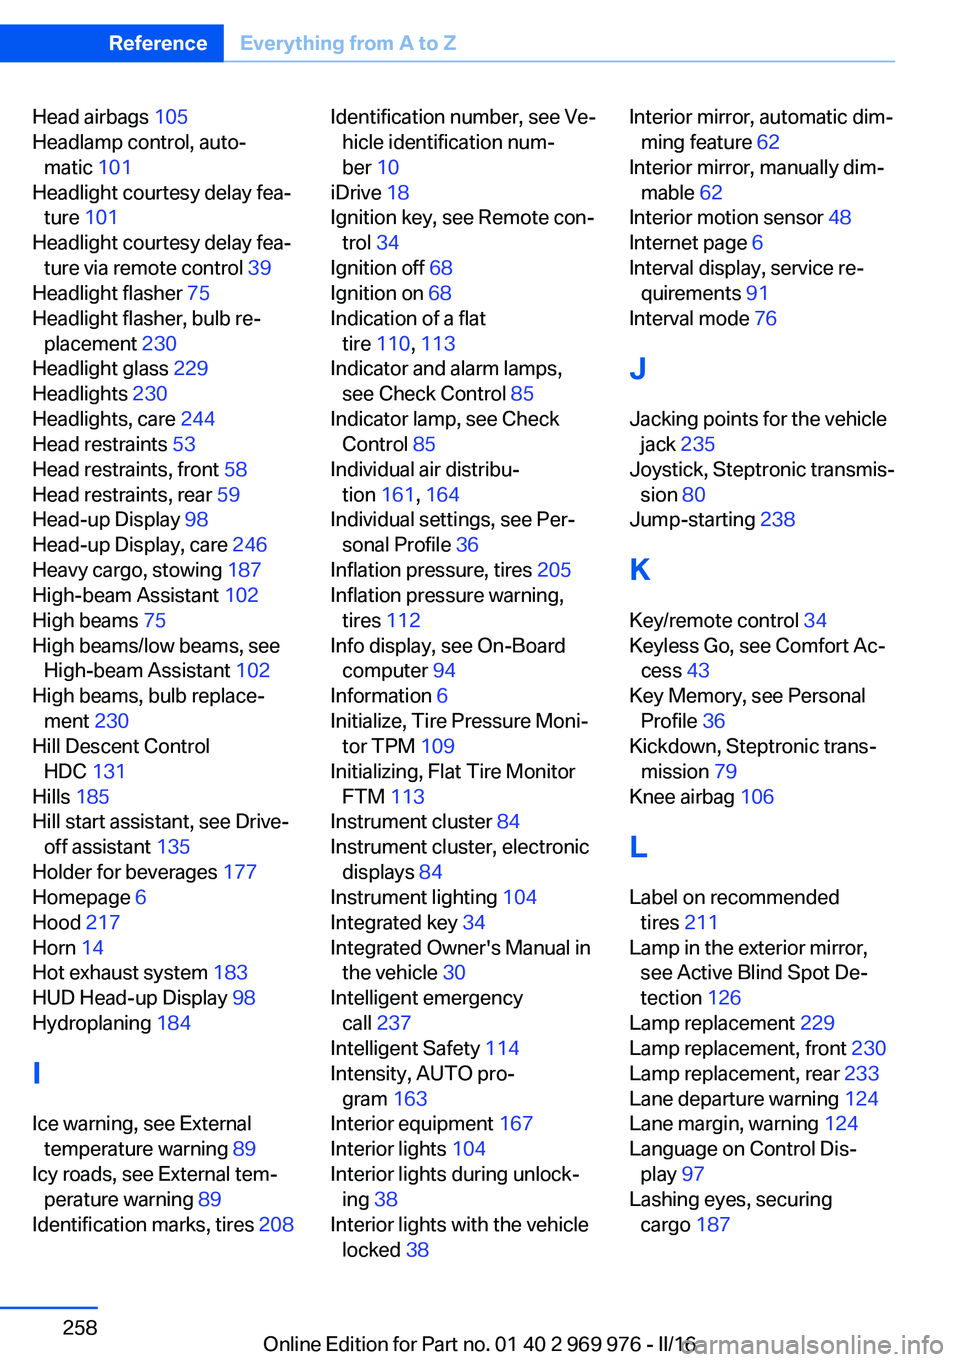
Head airbags 105
Headlamp control, auto‐ matic 101
Headlight courtesy delay fea‐ ture 101
Headlight courtesy delay fea‐ ture via remote control 39
Headlight flasher 75
Headlight flasher, bulb re‐ placement 230
Headlight glass 229
Headlights 230
Headlights, care 244
Head restraints 53
Head restraints, front 58
Head restraints, rear 59
Head-up Display 98
Head-up Display, care 246
Heavy cargo, stowing 187
High-beam Assistant 102
High beams 75
High beams/low beams, see High-beam Assistant 102
High beams, bulb replace‐ ment 230
Hill Descent Control HDC 131
Hills 185
Hill start assistant, see Drive- off assistant 135
Holder for beverages 177
Homepage 6
Hood 217
Horn 14
Hot exhaust system 183
HUD Head-up Display 98
Hydroplaning 184
I Ice warning, see External temperature warning 89
Icy roads, see External tem‐ perature warning 89
Identification marks, tires 208 Identification number, see Ve‐
hicle identification num‐
ber 10
iDrive 18
Ignition key, see Remote con‐ trol 34
Ignition off 68
Ignition on 68
Indication of a flat tire 110 , 113
Indicator and alarm lamps, see Check Control 85
Indicator lamp, see Check Control 85
Individual air distribu‐ tion 161, 164
Individual settings, see Per‐ sonal Profile 36
Inflation pressure, tires 205
Inflation pressure warning, tires 112
Info display, see On-Board computer 94
Information 6
Initialize, Tire Pressure Moni‐ tor TPM 109
Initializing, Flat Tire Monitor FTM 113
Instrument cluster 84
Instrument cluster, electronic displays 84
Instrument lighting 104
Integrated key 34
Integrated Owner's Manual in the vehicle 30
Intelligent emergency call 237
Intelligent Safety 114
Intensity, AUTO pro‐ gram 163
Interior equipment 167
Interior lights 104
Interior lights during unlock‐ ing 38
Interior lights with the vehicle locked 38 Interior mirror, automatic dim‐
ming feature 62
Interior mirror, manually dim‐ mable 62
Interior motion sensor 48
Internet page 6
Interval display, service re‐ quirements 91
Interval mode 76
J
Jacking points for the vehicle jack 235
Joystick, Steptronic transmis‐ sion 80
Jump-starting 238
K
Key/remote control 34
Keyless Go, see Comfort Ac‐ cess 43
Key Memory, see Personal Profile 36
Kickdown, Steptronic trans‐ mission 79
Knee airbag 106
L Label on recommended tires 211
Lamp in the exterior mirror, see Active Blind Spot De‐
tection 126
Lamp replacement 229
Lamp replacement, front 230
Lamp replacement, rear 233
Lane departure warning 124
Lane margin, warning 124
Language on Control Dis‐ play 97
Lashing eyes, securing cargo 187 Seite 258ReferenceEverything from A to Z258
Online Edition for Part no. 01 40 2 969 976 - II/16