display BMW X5 2009 E70 Owner's Manual
[x] Cancel search | Manufacturer: BMW, Model Year: 2009, Model line: X5, Model: BMW X5 2009 E70Pages: 317, PDF Size: 9.56 MB
Page 262 of 317
Under the hood
260
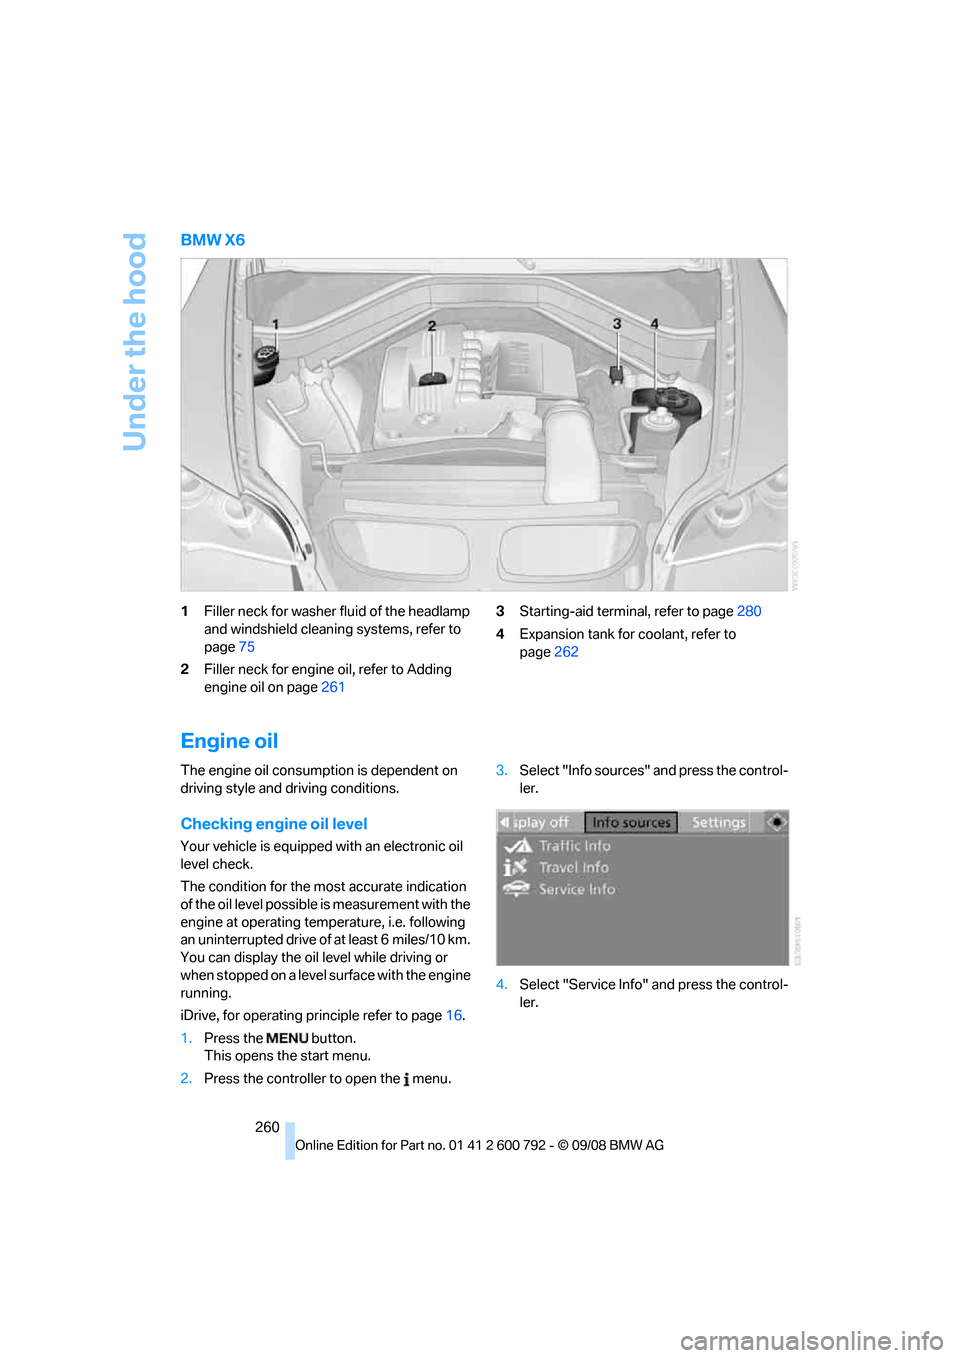
BMW X6
1Filler neck for washer fluid of the headlamp
and windshield cleaning systems, refer to
page 75
2 Filler neck for engine oil, refer to Adding
engine oil on page 261 3
Starting-aid termin al, refer to page280
4 Expansion tank for coolant, refer to
page 262
Engine oil
The engine oil consumption is dependent on
driving style and driving conditions.
Checking engine oil level
Your vehicle is equipped with an electronic oil
level check.
The condition for the most accurate indication
of the oil level possible is measurement with the
engine at operating temperature, i.e. following
an uninterrupted drive of at least 6 miles/10 km.
You can display the oil level while driving or
when stopped on a level surface with the engine
running.
iDrive, for operating pr inciple refer to page16.
1. Press the button.
This opens the start menu.
2. Press the controller to open the menu. 3.
Select "Info sources" and press the control-
ler.
4. Select "Service Info" and press the control-
ler.
Page 263 of 317
Mobility
261Reference
At a glance
Controls
Driving tips
Communications
Navigation
Entertainment
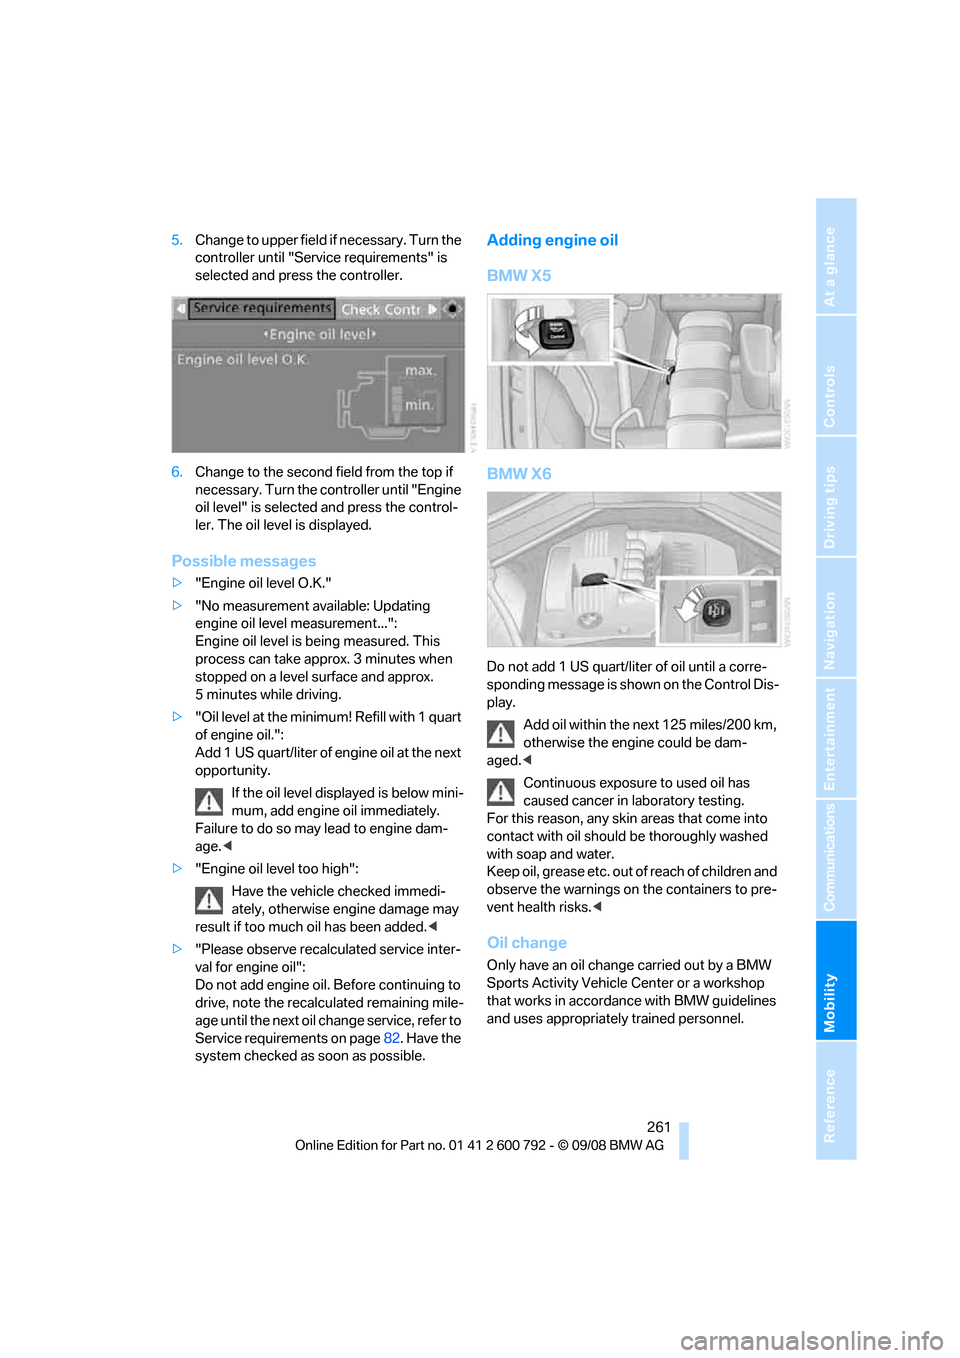
5.Change to upper field if necessary. Turn the
controller until "Service requirements" is
selected and press the controller.
6. Change to the second field from the top if
necessary. Turn the controller until "Engine
oil level" is selected and press the control-
ler. The oil level is displayed.
Possible messages
>"Engine oil level O.K."
> "No measurement available: Updating
engine oil level measurement...":
Engine oil level is being measured. This
process can take approx. 3 minutes when
stopped on a level surface and approx.
5 minutes while driving.
> "Oil level at the minimum! Refill with 1 quart
of engine oil.":
Add 1 US quart/liter of engine oil at the next
opportunity.
If the oil level displayed is below mini-
mum, add engine oil immediately.
Failure to do so may lead to engine dam-
age. <
> "Engine oil level too high":
Have the vehicle checked immedi-
ately, otherwise engine damage may
result if too much oil has been added. <
> "Please observe recalc ulated service inter-
val for engine oil":
Do not add engine oil. Before continuing to
drive, note the recalculated remaining mile-
age until the next oil ch ange service, refer to
Service requirements on page 82. Have the
system checked as soon as possible.
Adding engine oil
BMW X5
BMW X6
Do not add 1 US quart/liter of oil until a corre-
sponding message is shown on the Control Dis-
play.
Add oil within the next 125 miles/200 km,
otherwise the engine could be dam-
aged. <
Continuous exposure to used oil has
caused cancer in laboratory testing.
For this reason, any skin areas that come into
contact with oil should be thoroughly washed
with soap and water.
K e e p o i l , g r e a s e e t c . o u t o f r e a c h o f c h i l d r e n a n d
observe the warnings on the containers to pre-
vent health risks. <
Oil change
Only have an oil change carried out by a BMW
Sports Activity Vehicle Center or a workshop
that works in accordance with BMW guidelines
and uses appropriately trained personnel.
Page 265 of 317
Mobility
263Reference
At a glance
Controls
Driving tips
Communications
Navigation
Entertainment
Maintenance
BMW maintenance system
The BMW maintenance system supports the
preservation of the traffic and operating safety
of your BMW. The service schedule also
includes operations related to the vehicle's
comfort and convenience features, such as
replacement of the filters for the inside air.
The ultimate objective is to ensure economical
maintenance by providing the ideal service for
your vehicle.
Should the day come when you decide to sell
your BMW, a complete dealer service history
will prove to be an asset of inestimable value.
CBS Condition Based Service
Sensors and special algo rithms take the differ-
ent driving conditions of your BMW into
account. Condition Based Service uses this to
determine the current and future service
requirements. By letting you define a service
and maintenance regimen that reflects your
own individual requirements, the system builds
the basis for trouble-free driving.
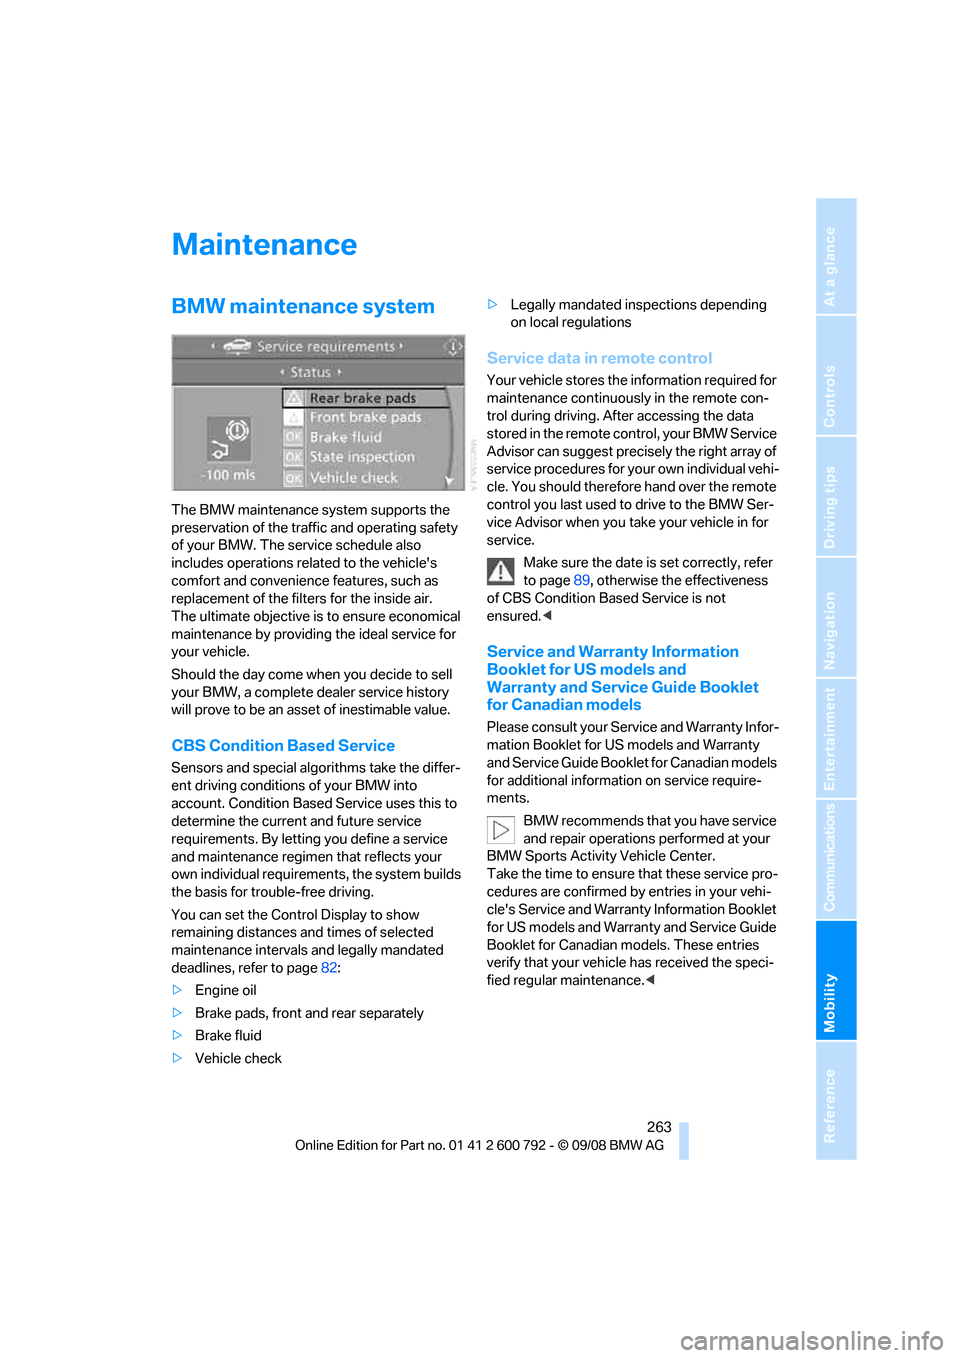
You can set the Contro l Display to show
remaining distances and times of selected
maintenance intervals and legally mandated
deadlines, refer to page 82:
> Engine oil
> Brake pads, front and rear separately
> Brake fluid
> Vehicle check >
Legally mandated inspections depending
on local regulations
Service data in remote control
Your vehicle stores the information required for
maintenance continuously in the remote con-
trol during driving. After accessing the data
stored in the remote co ntrol, your BMW Service
Advisor can suggest precisely the right array of
service procedures for yo ur own individual vehi-
cle. You should therefore hand over the remote
control you last used to drive to the BMW Ser-
vice Advisor when you take your vehicle in for
service.
Make sure the date is set correctly, refer
to page 89, otherwise the effectiveness
of CBS Condition Based Service is not
ensured. <
Service and Warranty Information
Booklet for US models and
Warranty and Service Guide Booklet
for Canadian models
Please consult your Service and Warranty Infor-
mation Booklet for US models and Warranty
and Service Guide Booklet for Canadian models
for additional information on service require-
ments.
BMW recommends that you have service
and repair operations performed at your
BMW Sports Activity Vehicle Center.
Take the time to ensure that these service pro-
cedures are confirmed by entries in your vehi-
cle's Service and Warranty Information Booklet
for US models and Warranty and Service Guide
Booklet for Canadian models. These entries
verify that your vehicle has received the speci-
fied regular maintenance.<
Page 266 of 317
Maintenance
264
Socket for OBD Onboard
Diagnostics interface
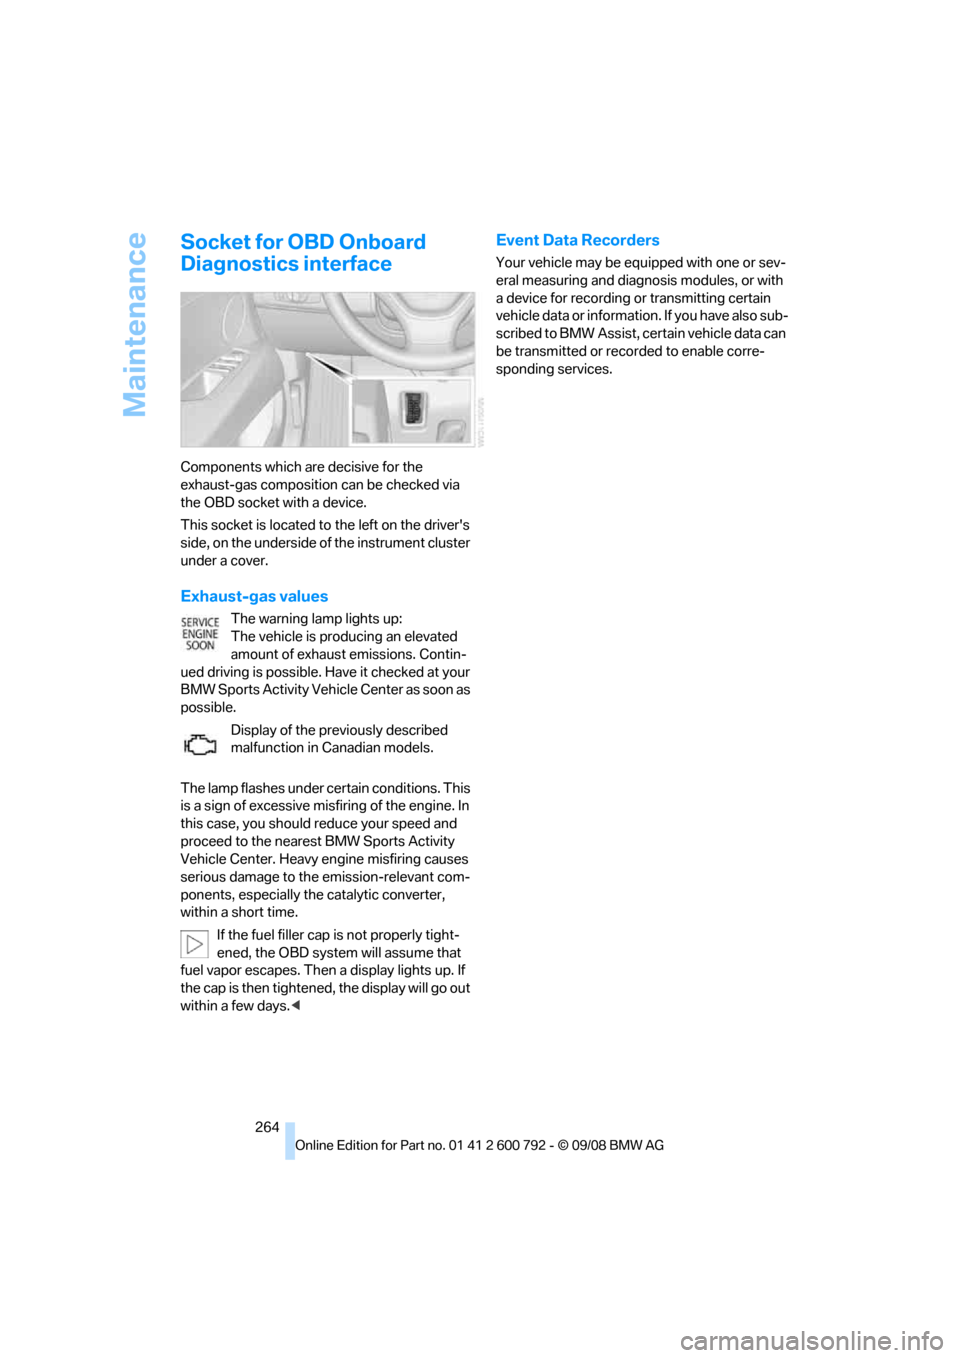
Components which are decisive for the
exhaust-gas composition can be checked via
the OBD socket with a device.
This socket is located to the left on the driver's
side, on the underside of the instrument cluster
under a cover.
Exhaust-gas values
The warning lamp lights up:
The vehicle is producing an elevated
amount of exhaust emissions. Contin-
ued driving is possible. Have it checked at your
BMW Sports Activity Vehicle Center as soon as
possible.
Display of the previously described
malfunction in Canadian models.
The lamp flashes under ce rtain conditions. This
is a sign of excessive misfiring of the engine. In
this case, you should reduce your speed and
proceed to the nearest BMW Sports Activity
Vehicle Center. Heavy engine misfiring causes
serious damage to the emission-relevant com-
ponents, especially th e catalytic converter,
within a short time.
If the fuel filler cap is not properly tight-
ened, the OBD system will assume that
fuel vapor escapes. Then a display lights up. If
the cap is then tightened, the display will go out
within a few days. <
Event Data Recorders
Your vehicle may be equipped with one or sev-
eral measuring and diagnosis modules, or with
a device for recording or transmitting certain
v e hi c l e d a t a o r i n f o r m a t i o n . I f y o u h a v e a l s o s u b -
scribed to BMW Assist, ce rtain vehicle data can
be transmitted or reco rded to enable corre-
sponding services.
Page 270 of 317
Care
268
Safety belts
Do not use cleansers to clean the safety
belts since this can destroy the web-
bing. <
Inside sens ors/cameras
Clean inside sensors and cameras, such as
those of the high-beam assistant, using a lint-
free cloth moistened with glass cleaner.
Displays
Clean displays like the ra dio or the instrument
cluster using a display-cleaning cloth or a soft,
nonabrasive lint-free cloth.
Avoid using excessive pressure when
cleaning displays; otherwise, you could
damage them. <
Never use chemical-based cleansers or
household scouring products. Keep all
liquids away from the equipment. Otherwise
surfaces or electrical components could be
attacked or damaged. <
CD/DVD-player
Do not use cleaning CDs; they can dam-
age parts of the player. <
Storing your vehicle
When storing your vehicle for longer than three
months, please seek the advice of your BMW
Sports Activity Vehicle Center or a workshop
that works in accordance with BMW guidelines.
Page 272 of 317
Replacing components
270
When performing care and maintenance on the
headlamps, please observe the information on
page
266.
For bulbs for which replacement is not
described and for checking and adjusting
headlamp aim, please contact your BMW
Sports Activity Vehicle Center. <
Light-emitting diodes LEDs
Light-emitting diodes installed behind translu-
cent lenses serve as the light source for many of
the controls and displays in your vehicle. These
light-emitting diodes, which operate using a
concept similar to that applied in conventional
lasers, are officially designated as Class 1 light-
emitting diodes.
Do not remove the covers, and never
stare into the unfilter ed light for several
hours, as irritation of the retina could result. <
BMW X5: changing lamps
Xenon light
These bulbs have a very long service life and
the probability of a failure is very low. If one of
these bulbs should nevertheless fail, it is possi-
ble to continue driving with great caution using
the fog lamps, provided traffic laws in your area
do not prohibit this.
Have work on the xenon light unit includ-
ing changing the bulb carried out only by
your BMW Sports Activity Vehicle Center or a
workshop that works according to BMW repair
procedures with correspondingly trained per-
sonnel. Due to the high voltage present in the
system, there is a danger of fatal injuries when
work is carried out improperly.<
Halogen bulbs:
Parking lamps and roadside parking
lamps, daytime driving lamps
35-Watt bulb, H8
The bulb is pressurized. Therefore, wear
safety glasses and protective gloves.
Otherwise there is a danger of injuries if the bulb is accidentally
damaged during replace-
ment. <
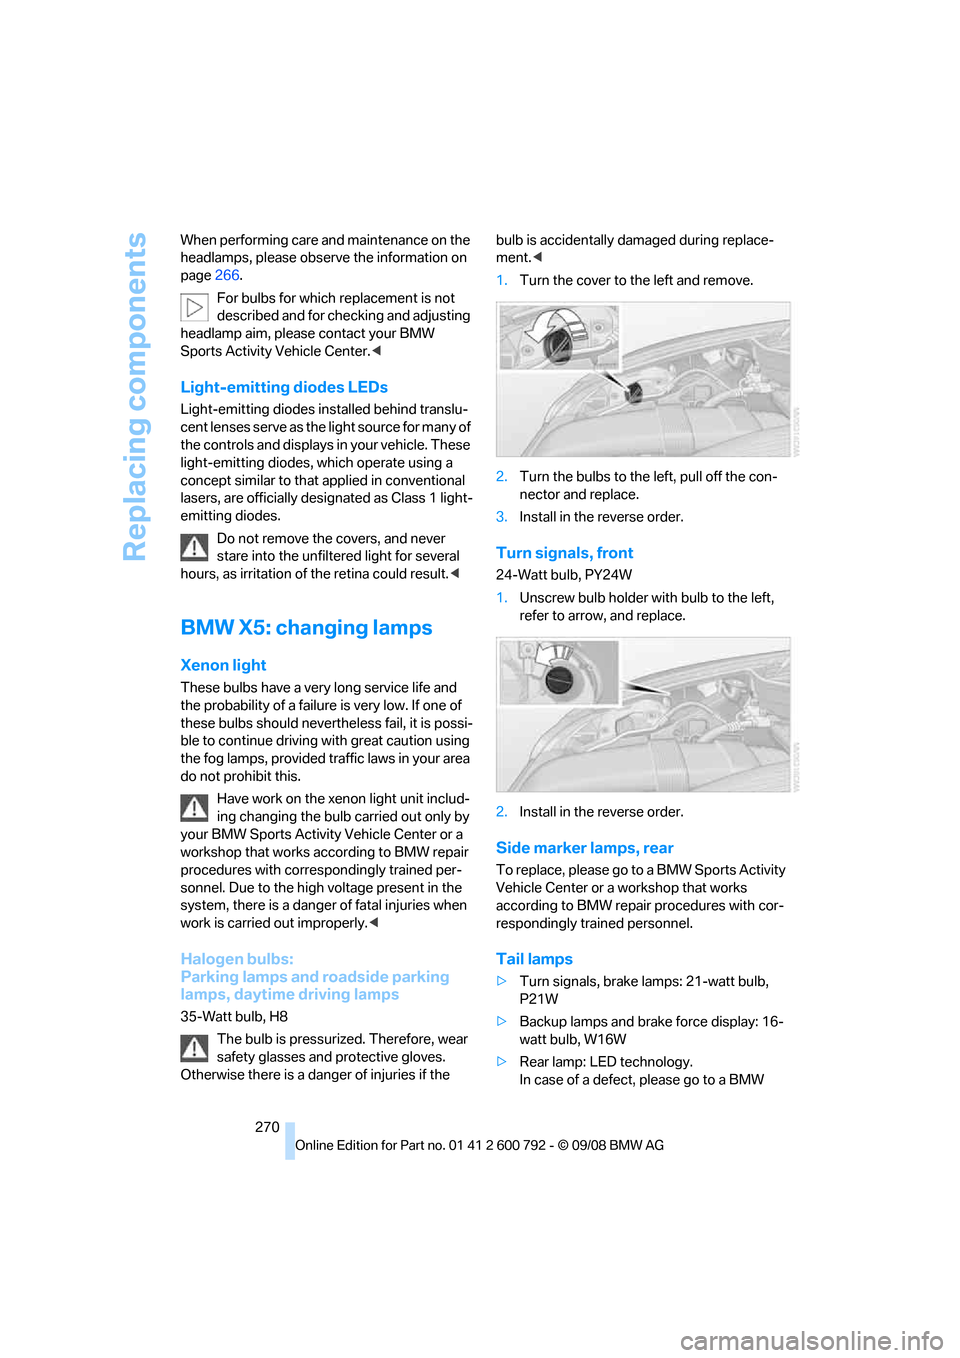
1. Turn the cover to the left and remove.
2. Turn the bulbs to the left, pull off the con-
nector and replace.
3. Install in the reverse order.
Turn signals, front
24-Watt bulb, PY24W
1.Unscrew bulb holder with bulb to the left,
refer to arrow, and replace.
2. Install in the reverse order.
Side marker lamps, rear
To replace, please go to a BMW Sports Activity
Vehicle Center or a workshop that works
according to BMW repair procedures with cor-
respondingly trained personnel.
Tail lamps
> Turn signals, brake lamps: 21-watt bulb,
P21W
> Backup lamps and brake force display: 16-
watt bulb, W16W
> Rear lamp: LE D technology.
In case of a defect, please go to a BMW
Page 273 of 317
Mobility
271Reference
At a glance
Controls
Driving tips
Communications
Navigation
Entertainment
Sports Activity Vehicle Center or a work-
shop that works according to BMW repair
procedures with correspondingly trained
personnel.
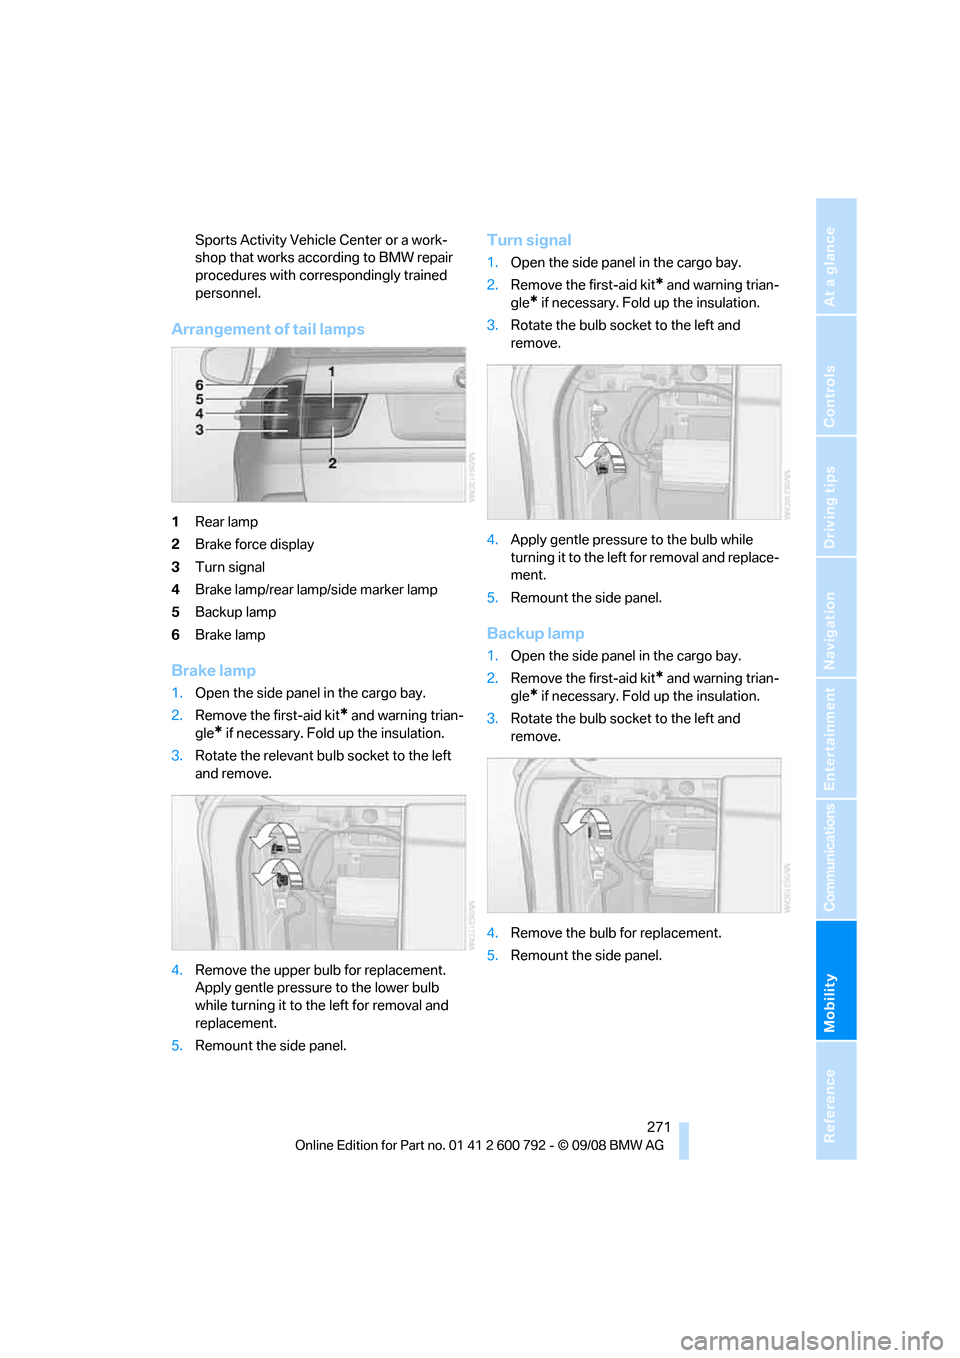
Arrangement of tail lamps
1Rear lamp
2 Brake force display
3 Turn signal
4 Brake lamp/rear lamp/side marker lamp
5 Backup lamp
6 Brake lamp
Brake lamp
1.Open the side panel in the cargo bay.
2. Remove the first-aid kit
* and warning trian-
gle
* if necessary. Fold up the insulation.
3. Rotate the relevant bulb socket to the left
and remove.
4. Remove the upper bulb for replacement.
Apply gentle pressure to the lower bulb
while turning it to the left for removal and
replacement.
5. Remount the side panel.
Turn signal
1.Open the side panel in the cargo bay.
2. Remove the first-aid kit
* and warning trian-
gle
* if necessary. Fold up the insulation.
3. Rotate the bulb sock et to the left and
remove.
4. Apply gentle pressure to the bulb while
turning it to the left for removal and replace-
ment.
5. Remount the side panel.
Backup lamp
1.Open the side panel in the cargo bay.
2. Remove the first-aid kit
* and warning trian-
gle
* if necessary. Fold up the insulation.
3. Rotate the bulb sock et to the left and
remove.
4. Remove the bulb for replacement.
5. Remount the side panel.
Page 274 of 317
Replacing components
272
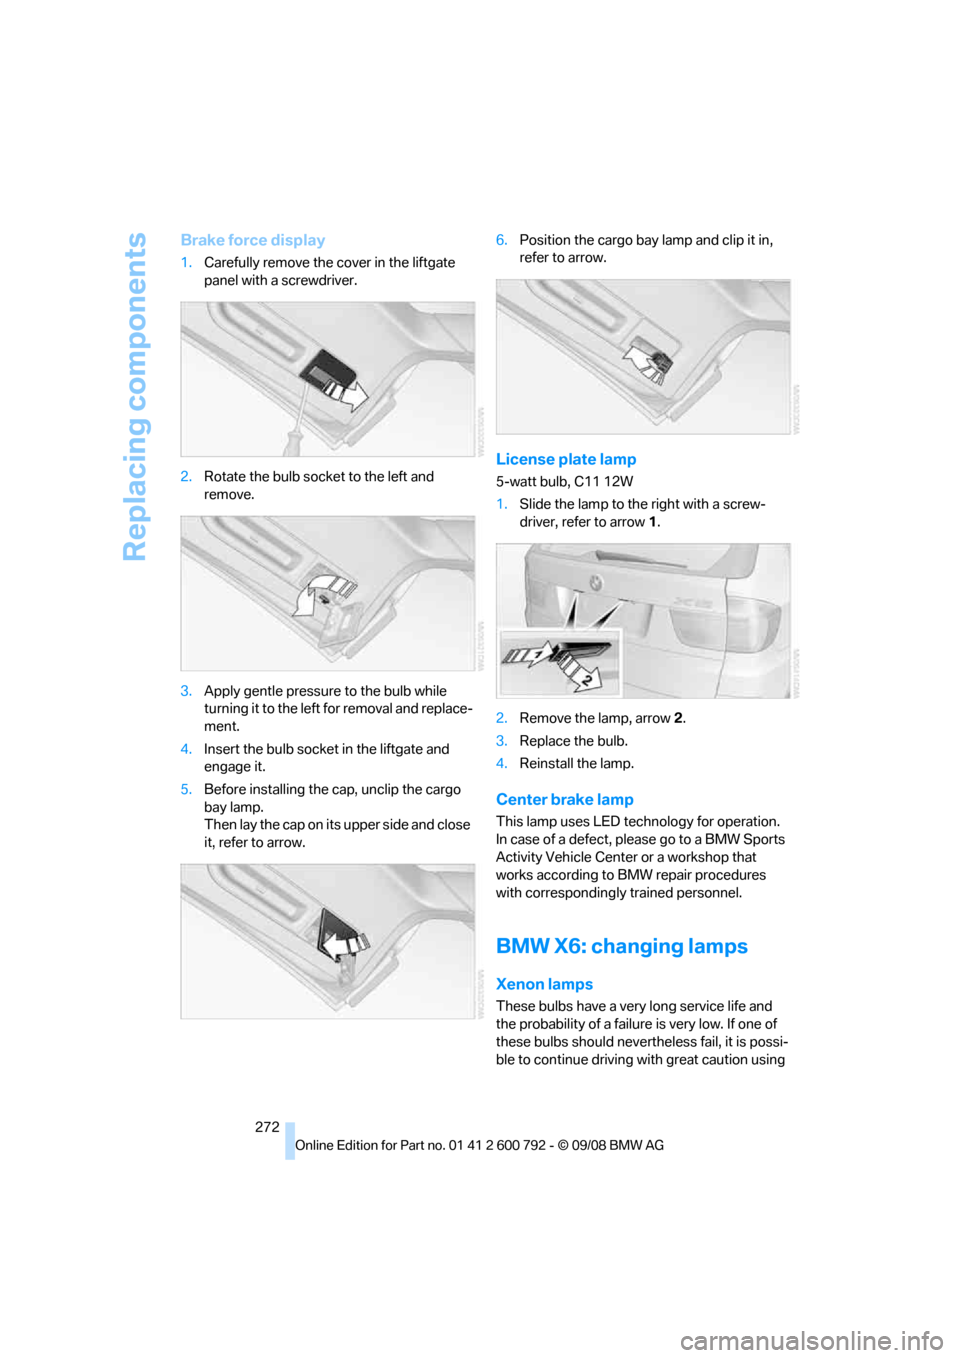
Brake force display
1.Carefully remove the cover in the liftgate
panel with a screwdriver.
2. Rotate the bulb socket to the left and
remove.
3. Apply gentle pressure to the bulb while
turning it to the left for removal and replace-
ment.
4. Insert the bulb socket in the liftgate and
engage it.
5. Before installing the cap, unclip the cargo
bay lamp.
Then lay the cap on its upper side and close
it, refer to arrow. 6.
Position the cargo bay lamp and clip it in,
refer to arrow.
License plate lamp
5-watt bulb, C11 12W
1.Slide the lamp to th e right with a screw-
driver, refer to arrow 1.
2. Remove the lamp, arrow 2.
3. Replace the bulb.
4. Reinstall the lamp.
Center brake lamp
This lamp uses LED technology for operation.
In case of a defect, please go to a BMW Sports
Activity Vehicle Center or a workshop that
works according to BMW repair procedures
with correspondingly trained personnel.
BMW X6: changing lamps
Xenon lamps
These bulbs have a very long service life and
the probability of a failure is very low. If one of
these bulbs should nevertheless fail, it is possi-
ble to continue driving with great caution using
Page 275 of 317
Mobility
273Reference
At a glance
Controls
Driving tips
Communications
Navigation
Entertainment
the fog lamps, provided traffic laws in your area
do not prohibit this.
Have work on the xenon light unit includ-
ing changing the bulb carried out only by
your BMW Sports Activity Vehicle Center or a
workshop that works according to BMW repair
procedures with corres pondingly trained per-
sonnel. Due to the high voltage present in the
system, there is a danger of fatal injuries when
work is carried out improperly. <
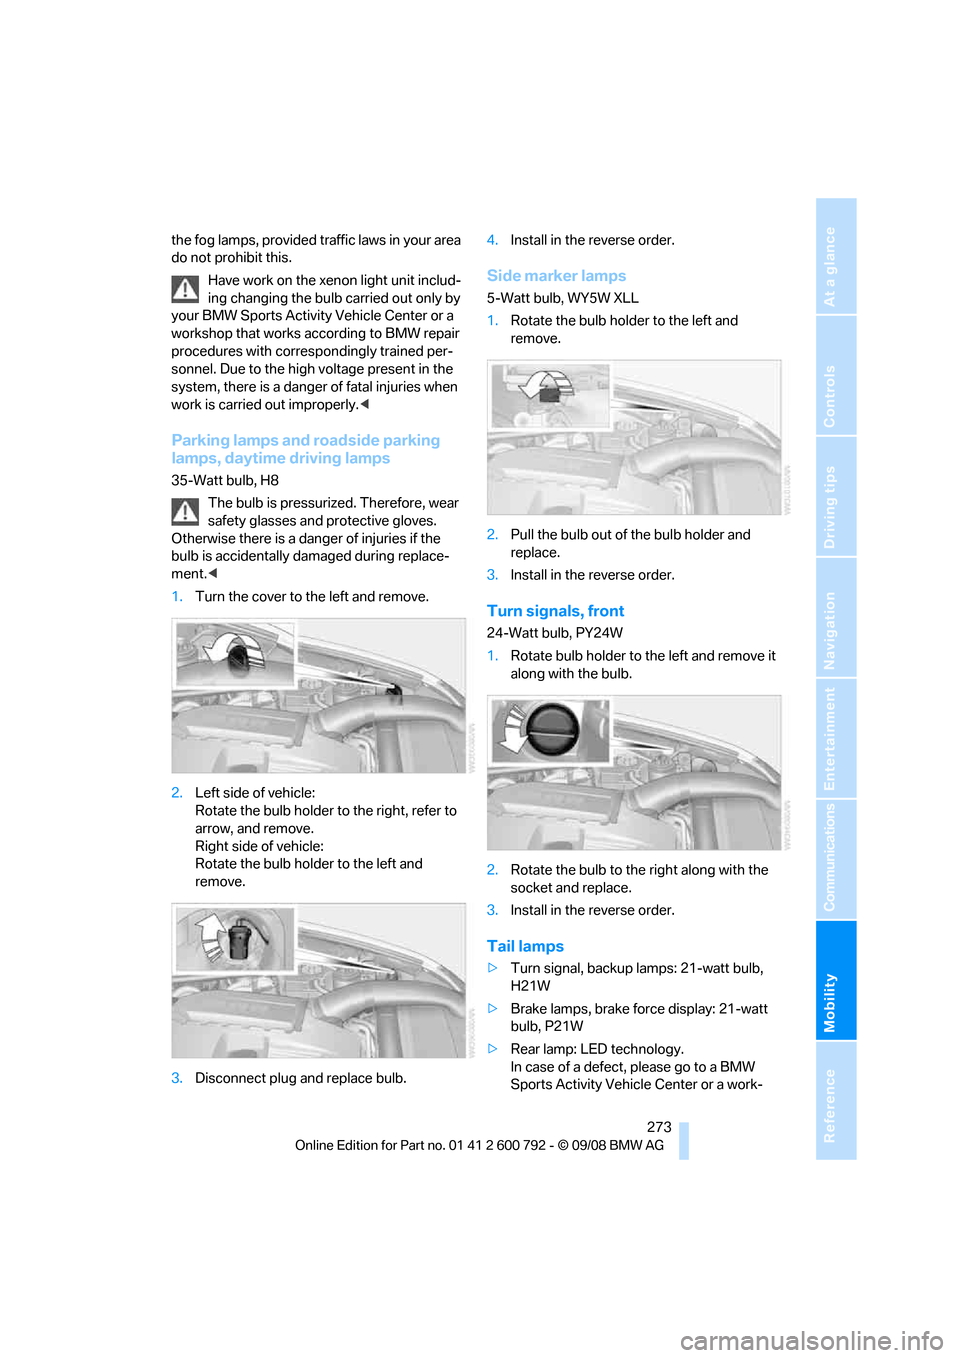
Parking lamps and roadside parking
lamps, daytime driving lamps
35-Watt bulb, H8
The bulb is pressurized. Therefore, wear
safety glasses and protective gloves.
Otherwise there is a dang er of injuries if the
bulb is accidentally damaged during replace-
ment. <
1. Turn the cover to th e left and remove.
2. Left side of vehicle:
Rotate the bulb holder to the right, refer to
arrow, and remove.
Right side of vehicle:
Rotate the bulb hold er to the left and
remove.
3. Disconnect plug and replace bulb. 4.
Install in the reverse order.
Side marker lamps
5-Watt bulb, WY5W XLL
1.Rotate the bulb hold er to the left and
remove.
2. Pull the bulb out of the bulb holder and
replace.
3. Install in the reverse order.
Turn signals, front
24-Watt bulb, PY24W
1.Rotate bulb holder to the left and remove it
along with the bulb.
2. Rotate the bulb to th e right along with the
socket and replace.
3. Install in the reverse order.
Tail lamps
>Turn signal, backup lamps: 21-watt bulb,
H21W
> Brake lamps, brake force display: 21-watt
bulb, P21W
> Rear lamp: LED technology.
In case of a defect, please go to a BMW
Sports Activity Vehicle Center or a work-
Page 276 of 317
Replacing components
274
shop that works according to BMW repair
procedures with correspondingly trained
personnel.
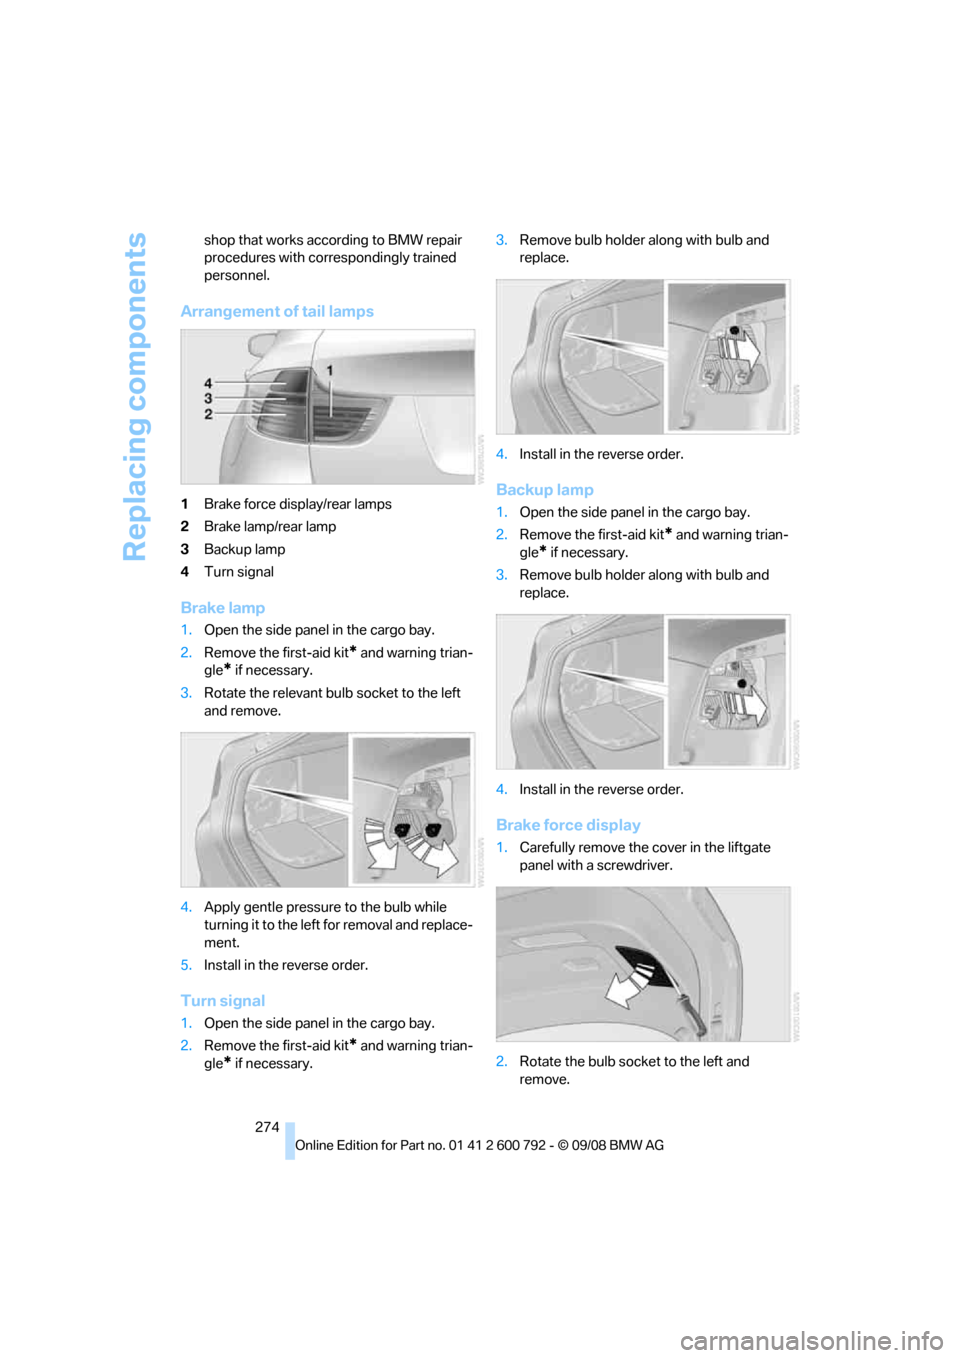
Arrangement of
tail lamps
1Brake force display/rear lamps
2 Brake lamp/rear lamp
3 Backup lamp
4 Turn signal
Brake lamp
1.Open the side panel in the cargo bay.
2. Remove the first-aid kit
* and warning trian-
gle
* if necessary.
3. Rotate the relevant bulb socket to the left
and remove.
4. Apply gentle pressure to the bulb while
turning it to the left for removal and replace-
ment.
5. Install in the reverse order.
Turn signal
1.Open the side panel in the cargo bay.
2. Remove the first-aid kit
* and warning trian-
gle
* if necessary. 3.
Remove bulb holder along with bulb and
replace.
4. Install in the reverse order.
Backup lamp
1.Open the side panel in the cargo bay.
2. Remove the first-aid kit
* and warning trian-
gle
* if necessary.
3. Remove bulb holder along with bulb and
replace.
4. Install in the reverse order.
Brake force display
1.Carefully remove the cover in the liftgate
panel with a screwdriver.
2. Rotate the bulb socket to the left and
remove.