stop start BMW X5 2009 E70 User Guide
[x] Cancel search | Manufacturer: BMW, Model Year: 2009, Model line: X5, Model: BMW X5 2009 E70Pages: 317, PDF Size: 9.56 MB
Page 102 of 317
Technology for comfort, convenience and safety
100
longer holds the vehicle
after approx. 2 seconds
and it begins to roll back. <
Self-leveling suspension*
Malfunction
The warning lamp for self-leveling
suspension lights up yellow and a
message is shown on the Control
Display. A malfunction has occurred in the self-
leveling suspension. Stop and check the vehi-
cle. If it is considerably lower at the rear than at
the front, and possibly also on one side – rear
left compared to rear right –, proceed to the
nearest BMW Sports Activi ty Vehicle Center or
a workshop that works according to BMW
repair procedures with correspondingly trained
personnel. Drive with a ppropriate caution in the
meantime. The vehicle has reduced ground
clearance and driving co mfort may be notice-
ably reduced. Even if th e orientation of the vehi-
cle is normal, when a malfunction is indicated
on the display, you should proceed to the near-
est BMW Sports Activity Vehicle Center or a
workshop that works according to BMW guide-
lines and uses appropriately trained personnel.
FTM Flat Tire Monitor*
The concept
The Flat Tire Monitor detects a pressure loss in
one tire by comparing the speeds of the individ-
ual wheels during driving.
In the event of a pressure loss, there is a change
in the rolling circumference and therefore the
rotation speed of the corresponding wheel. The
system detects this change and reports it as a
flat tire.
Function requirements
In order to assure the re liable reporting of a flat
tire, the system must be initialized for the cor-
rect tire inflation pressure. The initialization must be repeated after
each time the tire inflation pressure is cor-
rected and after every tire or wheel change. <
System limits
The Flat Tire Monitor cannot indicate
sudden severe tire damage caused by
outside factors and does not detect a natural,
even pressure drop in all four tires. <
In the following situatio ns, the system could be
delayed or malfunction:
> System has not been initialized
> Driving on snowy or slippery road surface
> Sporty driving style: slip in the drive wheels,
high lateral acceleration
> Driving with snow chains
*
When you are driving with the compact wheel*
the Flat Tire Monitor is unable to function.
Initializing system
The initialization finishes during driving,
which can be interrupted at any time.
When driving resumes, th e initialization is con-
tinued automatically. Do not initialize the sys-
tem when driving with snow chains
* or with the
compact wheel
*. <
iDrive, for operating pr inciple refer to page16.
1. Press the button.
This opens the start menu.
2. Press the controller to open the menu.
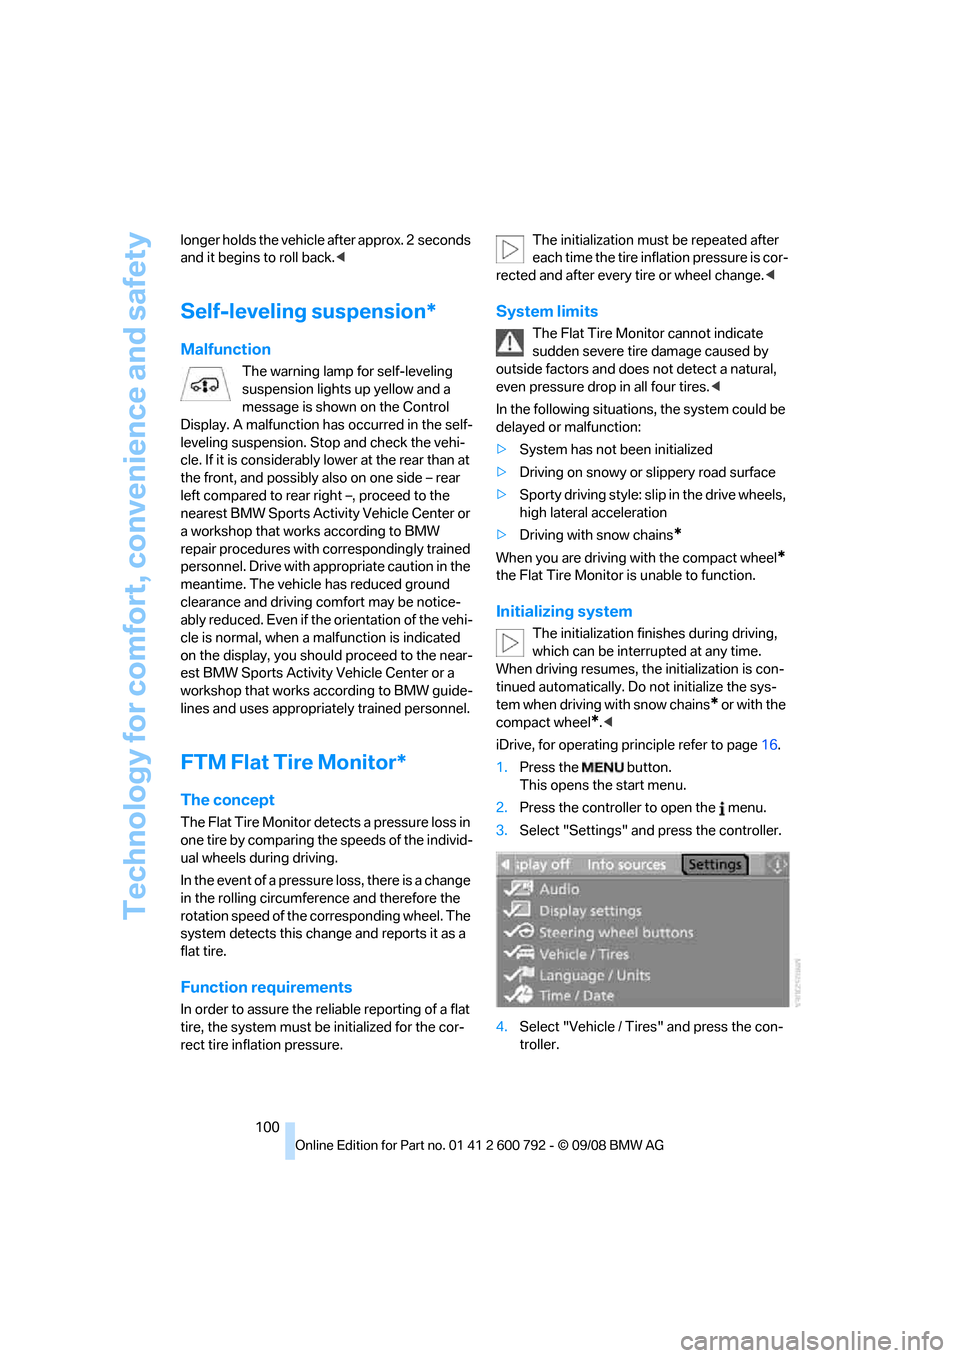
3. Select "Settings" an d press the controller.
4. Select "Vehicle / Tire s" and press the con-
troller.
Page 103 of 317
Controls
101Reference
At a glance
Driving tips
Communications
Navigation
Entertainment
Mobility
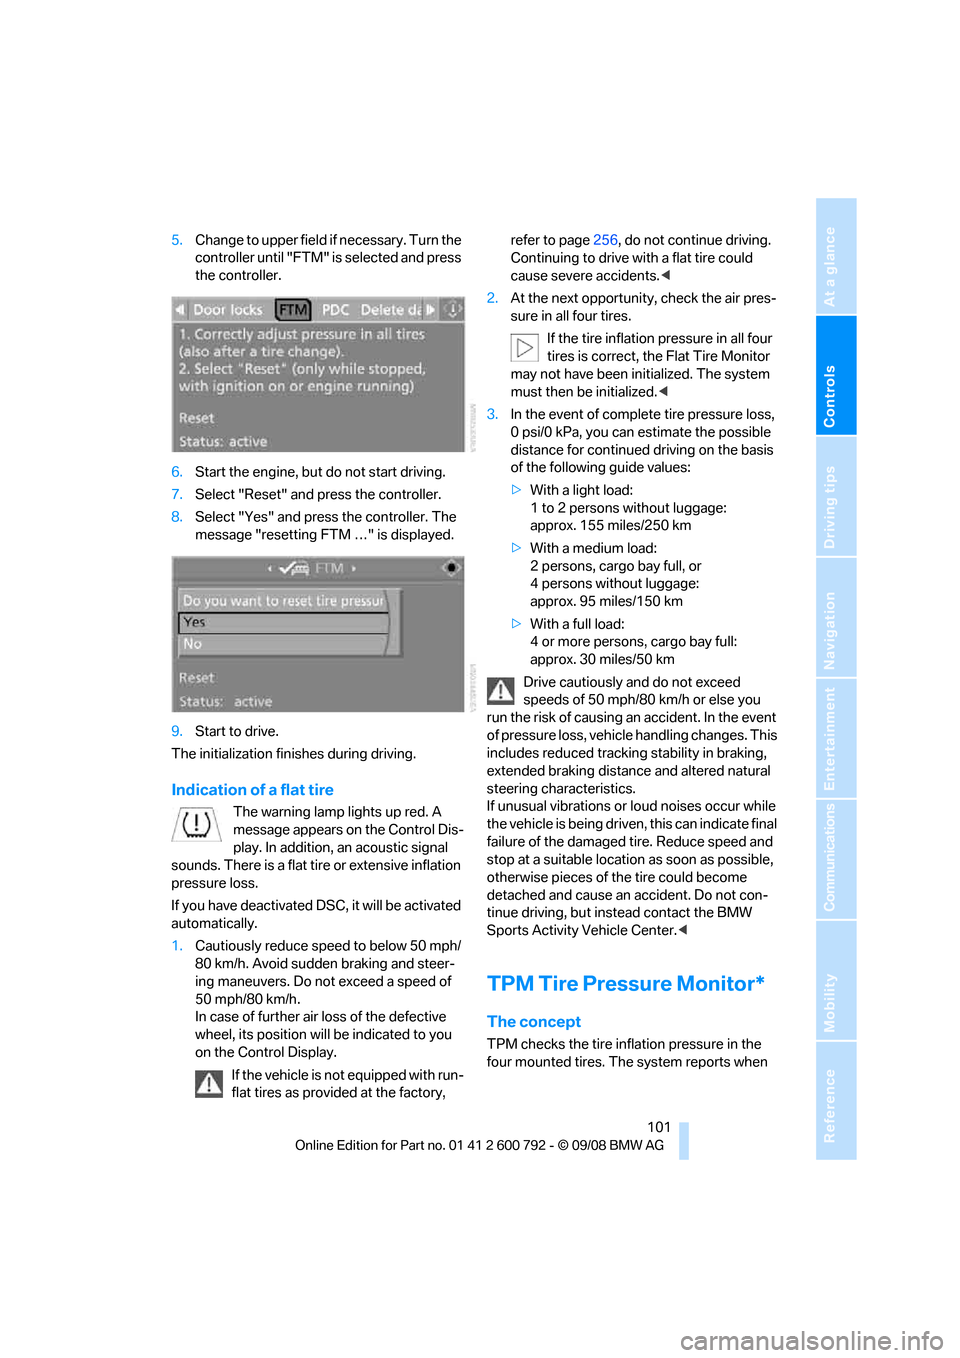
5.Change to upper field if necessary. Turn the
controller until "FTM" is selected and press
the controller.
6. Start the engine, but do not start driving.
7. Select "Reset" and press the controller.
8. Select "Yes" and press the controller. The
message "resetting FTM …" is displayed.
9. Start to drive.
The initialization finishes during driving.
Indication of a flat tire
The warning lamp lights up red. A
message appears on the Control Dis-
play. In addition, an acoustic signal
sounds. There is a flat tire or extensive inflation
pressure loss.
If you have deactivated DS C, it will be activated
automatically.
1. Cautiously reduce speed to below 50 mph/
80 km/h. Avoid sudden braking and steer-
ing maneuvers. Do not exceed a speed of
50 mph/80 km/h.
In case of further air loss of the defective
wheel, its position will be indicated to you
on the Control Display.
If the vehicle is not equipped with run-
flat tires as provided at the factory, refer to page
256, do not continue driving.
Continuing to drive with a flat tire could
cause severe accidents. <
2. At the next opportunity, check the air pres-
sure in all four tires.
If the tire inflation pressure in all four
tires is correct, the Flat Tire Monitor
may not have been initialized. The system
must then be initialized. <
3. In the event of complete tire pressure loss,
0 psi/0 kPa, you can estimate the possible
distance for continued driving on the basis
of the following guide values:
> With a light load:
1 to 2 persons without luggage:
approx. 155 miles/250 km
> With a medium load:
2 persons, cargo bay full, or
4 persons without luggage:
approx. 95 miles/150 km
> With a full load:
4 or more persons, cargo bay full:
approx. 30 miles/50 km
Drive cautiously and do not exceed
speeds of 50 mph/80 km/h or else you
run the risk of causing an accident. In the event
of pressure loss, vehicl e handling changes. This
includes reduced tracking stability in braking,
extended braking distance and altered natural
steering characteristics.
If unusual vibrations or loud noises occur while
the vehicle is being driven , this can indicate final
failure of the damaged tire. Reduce speed and
stop at a suitable location as soon as possible,
otherwise pieces of the tire could become
detached and cause an accident. Do not con-
tinue driving, but instead contact the BMW
Sports Activity Vehicle Center. <
TPM Tire Pressure Monitor*
The concept
TPM checks the tire inflation pressure in the
four mounted tires. The system reports when
Page 105 of 317
Controls
103Reference
At a glance
Driving tips
Communications
Navigation
Entertainment
Mobility
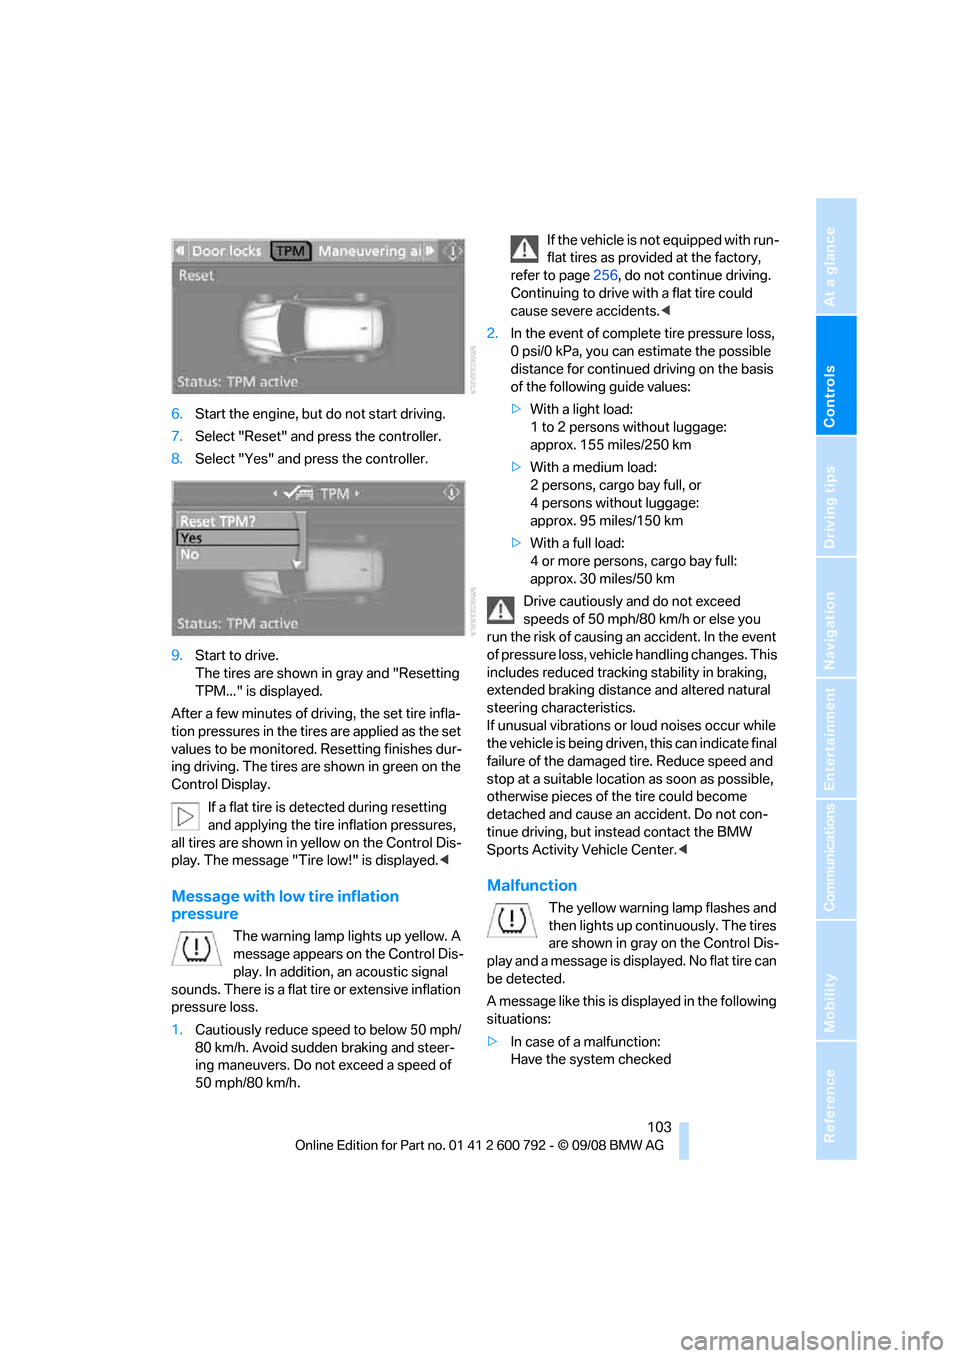
6.Start the engine, but do not start driving.
7. Select "Reset" and press the controller.
8. Select "Yes" and press the controller.
9. Start to drive.
The tires are shown in gray and "Resetting
TPM..." is displayed.
After a few minutes of driving, the set tire infla-
tion pressures in the tire s are applied as the set
values to be monitored. Resetting finishes dur-
ing driving. The tires ar e shown in green on the
Control Display.
If a flat tire is detected during resetting
and applying the tire inflation pressures,
all tires are shown in yellow on the Control Dis-
play. The message "Tir e low!" is displayed.<
Message with low tire inflation
pressure
The warning lamp lights up yellow. A
message appears on the Control Dis-
play. In addition, an acoustic signal
sounds. There is a flat tire or extensive inflation
pressure loss.
1. Cautiously reduce speed to below 50 mph/
80 km/h. Avoid sudden braking and steer-
ing maneuvers. Do not exceed a speed of
50 mph/80 km/h. If the vehicle is not equipped with run-
flat tires as provided at the factory,
refer to page 256, do not continue driving.
Continuing to drive with a flat tire could
cause severe accidents. <
2. In the event of complete tire pressure loss,
0 psi/0 kPa, you can estimate the possible
distance for continued driving on the basis
of the following guide values:
> With a light load:
1 to 2 persons without luggage:
approx. 155 miles/250 km
> With a medium load:
2 persons, cargo bay full, or
4 persons without luggage:
approx. 95 miles/150 km
> With a full load:
4 or more persons, cargo bay full:
approx. 30 miles/50 km
Drive cautiously and do not exceed
speeds of 50 mph/80 km/h or else you
run the risk of causing an accident. In the event
of pressure loss, vehicl e handling changes. This
includes reduced tracking stability in braking,
extended braking distance and altered natural
steering characteristics.
If unusual vibrations or loud noises occur while
the vehicle is being driven , this can indicate final
failure of the damaged tire. Reduce speed and
stop at a suitable location as soon as possible,
otherwise pieces of the tire could become
detached and cause an accident. Do not con-
tinue driving, but instead contact the BMW
Sports Activity Vehicle Center. <
Malfunction
The yellow warning lamp flashes and
then lights up continuously. The tires
are shown in gray on the Control Dis-
play and a message is displayed. No flat tire can
be detected.
A message like this is displayed in the following
situations:
> In case of a malfunction:
Have the system checked
Page 106 of 317
Technology for comfort, convenience and safety
104
>
If a wheel without TPM electronics is
mounted, e.g. a compact wheel
*
>If TPM is temporarily interfered with by
other systems or devices which use the
same radio frequency
Explanation according to the NHTSA/
FMVSS 138 Tire Pressure Monitoring
Systems
Each tire, including the spare (if provided),
should be checked monthly when cold and
inflated to the inflation pressure recommended
by the vehicle manufacturer on the vehicle plac-
ard or tire inflation pressu re label. (If your vehi-
cle has tires of a different size than the size indi-
cated on the vehicle plac ard or tire inflation
pressure label, you should determine the
proper tire inflation pr essure for those tires.)
As an added safety feature, your vehicle has
been equipped with a tire pressure monitoring
system (TPMS) that illumi nates a low tire pres-
sure telltale when one or more of your tires is
significantly underinflate d. Accordingly, when
the low tire pressure telltale illuminates, you
should stop and check your tires as soon as
possible, and inflate them to the proper pres-
sure. Driving on a significantly underinflated tire
causes the tire to overhe at and can lead to tire
failure. Underinflation also reduces fuel effi-
ciency and tire tread life, and may affect the
vehicle's handling and stopping ability.
Please note that the TP MS is not a substitute
for proper tire maintenance, and it is the driver's
responsibility to maintain correct tire pressure,
even if underinflation has not reached the level
to trigger illumination of the TPMS low tire
pressure telltale.
Your vehicle has also been equipped with a
TPMS malfunction indicator to indicate when
the system is not operating properly. The
TPMS malfunction indicator is combined with
the low tire pressure telltale. When the system
detects a malfunction, the telltale will flash for
approximately one minute and then remain con-
tinuously illuminated. Th is sequence will con-
tinue upon subsequent vehicle start-ups as
long as the malfunction exists. When the mal- function indicator is illuminated, the system
may not be able to detect or signal low tire pres-
sure as intended. TPMS malfunctions may
occur for a variety of reasons, including the
installation of replacement or alternate tires or
wheels on the vehicle that prevent the TPMS
from functioning properly. Always check the
TPMS malfunction telltale after replacing one or
more tires or wheels on your vehicle to ensure
that the replacement or alternate tires and
wheels allow the TPMS to
continue to function
properly.
Active steering*
The concept
The active steering active ly varies the steering
angle of the front wheels in relation to the steer-
ing wheel movements. In addition, it also varies
the steering force required for steering depend-
ing on the vehicle's speed.
When you are driving in the low road speed
range, e.g. in a town or when parking, the steer-
ing angle increases, i.e. the steering becomes
very direct. In the higher speed range, on the
other hand, the steering angle is reduced more
and more. This improves the handling capability
of your BMW over the entire speed range.
In critical situations, the system can make tar-
geted corrections to th e steering angle pro-
vided by the driver and thus stabilize the vehicle
before the driver intervenes.
Malfunction
The warning lamp lights up yellow
and a message is shown on the Con-
trol Display. The active steering is
defective or has been temporarily
deactivated. At low speeds, greater steering
wheel movements are required, whereas at
higher speeds, the vehicle reacts more sensi-
tively to steering wheel movements. The stabil-
ity-promoting intervention can also be deacti-
vated. Proceed cautiously and drive
defensively. If active st eering is defective, have
the system checked.
Page 115 of 317
Controls
113Reference
At a glance
Driving tips
Communications
Navigation
Entertainment
Mobility
Instrument lighting
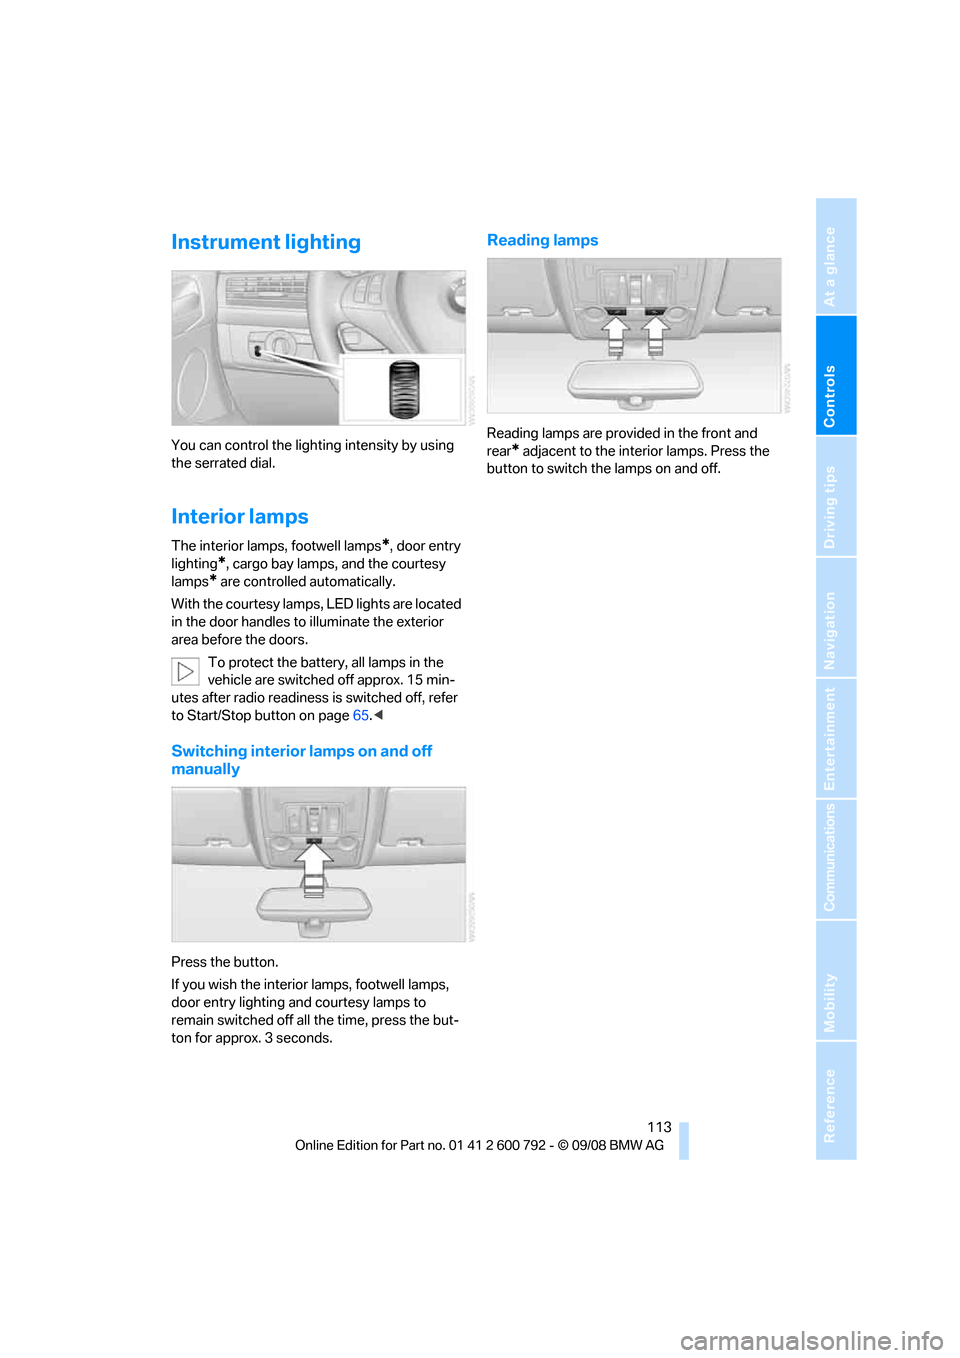
You can control the lighting intensity by using
the serrated dial.
Interior lamps
The interior lamps, footwell lamps*, door entry
lighting
*, cargo bay lamps, and the courtesy
lamps
* are controlled automatically.
With the courtesy lamps, LED lights are located
in the door handles to illuminate the exterior
area before the doors.
To protect the battery, all lamps in the
vehicle are switched off approx. 15 min-
utes after radio readiness is switched off, refer
to Start/Stop button on page 65.<
Switching interior lamps on and off
manually
Press the button.
If you wish the interior lamps, footwell lamps,
door entry lighting and courtesy lamps to
remain switched off all the time, press the but-
ton for approx. 3 seconds.
Reading lamps
Reading lamps are provided in the front and
rear
* adjacent to the inte rior lamps. Press the
button to switch the lamps on and off.
Page 164 of 317
Destination guidance
162
Destination guidance
Starting destination
guidance
Via iDrive
iDrive, for operating principle refer to page16.
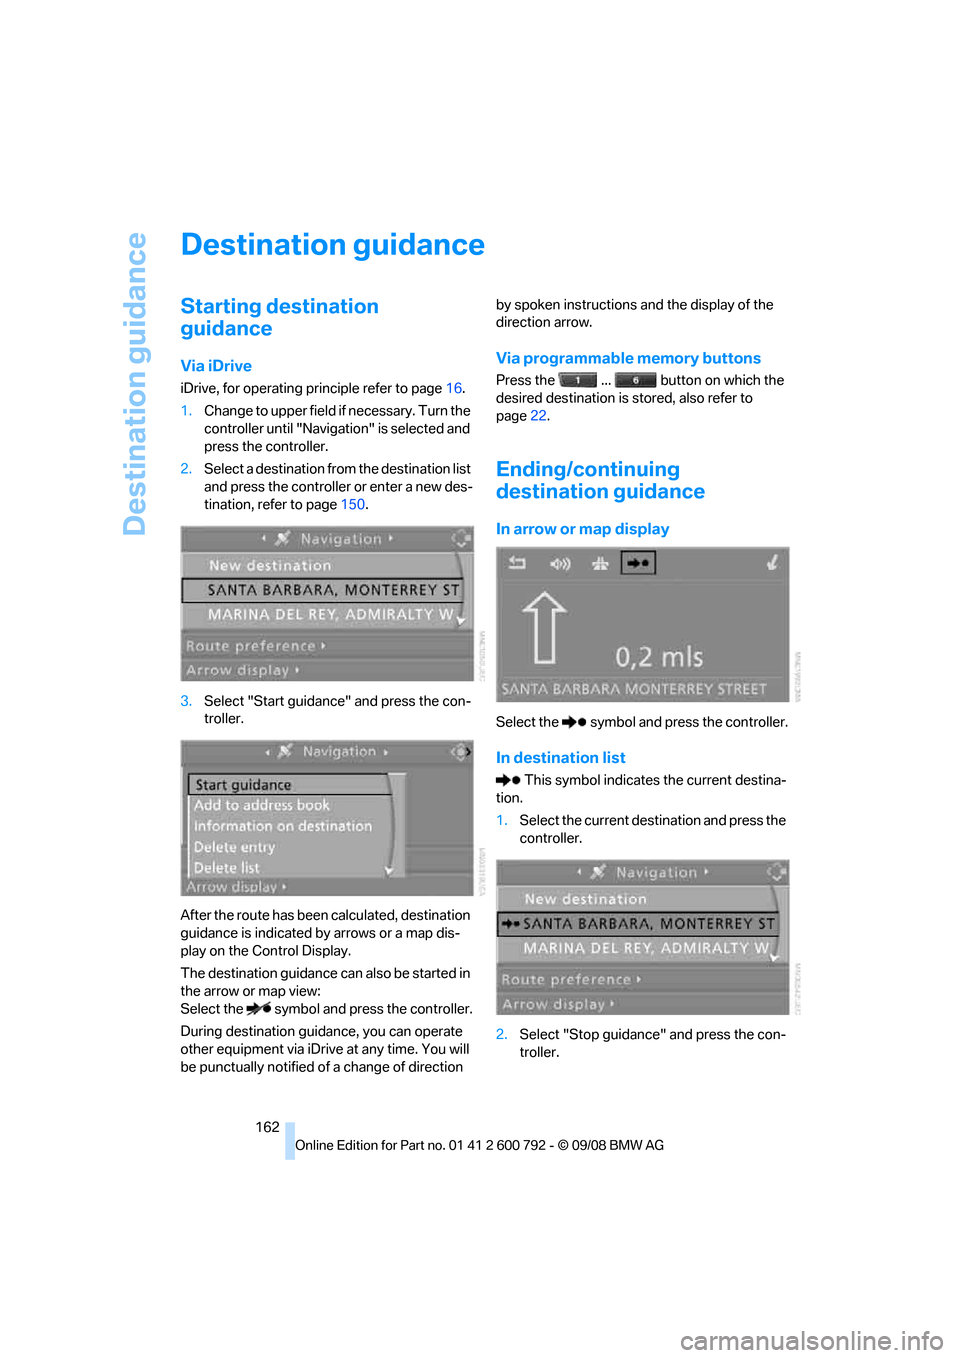
1. Change to upper field if necessary. Turn the
controller until "Navigation" is selected and
press the controller.
2. Select a destination from the destination list
and press the controller or enter a new des-
tination, refer to page 150.
3. Select "Start guidance" and press the con-
troller.
After the route has been calculated, destination
guidance is indicated by arrows or a map dis-
play on the Control Display.
The destination guidance can also be started in
the arrow or map view:
Select the symbol and press the controller.
During destination guid ance, you can operate
other equipment via iDrive at any time. You will
be punctually notified of a change of direction by spoken instructions
and the display of the
direction arrow.
Via programmable memory buttons
Press the ... button on which the
desired destination is stored, also refer to
page 22.
Ending/continuing
destination guidance
In arrow or map display
Select the symbol and press the controller.
In destination list
This symbol indicates the current destina-
tion.
1. Select the current destination and press the
controller.
2. Select "Stop guidance" and press the con-
troller.
Page 172 of 317
What to do if …
170
What to do if …
What to do if …
>a navigation DVD is inserted, but an instruc-
tion to insert the DVD appears on the Con-
trol Display?
The navigation DVD ma y not be the correct
DVD for the navigation system. This infor-
mation is indicated on the DVD label.
> you request the current position of your
vehicle, but do not receive a precise dis-
play?
The system is unable to receive enough
GPS signals at your cu rrent position due to
obstructions, your position is not yet avail-
able on your navigation DVD, or the system
is in the process of calculating your posi-
tion. Reception is best when you have an
unobstructed view to the sky.
> the destination guidance does not accept a
destination?
The data of the destination is not stored on
the navigation DVD that is loaded. Select a
destination that is as close as possible to
the original.
> the destination guidance does not accept
an address without the street name?
On the navigation DVD, no downtown area
can be determined fo r the city or town
entered. Enter any street, or a destination
such as the railway st ation in the selected
town, and then start the destination guid-
ance.
> you want to enter a de stination for the des-
tination guidance, but it is not possible to
select the letters fo r your desired entry?
The data of the destination is not stored on
the navigation DVD that is loaded. In this
case, the system will not offer you any let-
ters to choose from. Select a destination
that is as close as possible to the original. >
the system stops furnishing directions on
which way to turn as you approach intersec-
tions?
You are driving in an area that has not yet
been completely reco rded on the naviga-
tion DVD. Instead of an arrow indicating a
turn, you will see an arrow which indicates
the general direction of your planned route.
Or you have left the recommended route
and the system requires a few seconds to
calculate a new recommended route.
> the navigation system does not react to
entries?
If the battery was disconnected, it takes
about 10 minutes before the system is once
again operational.
Page 196 of 317
DVD changer
194
Removing all DVDs from DVD changer
1.Hold down the button.
The DVDs are pushed partially out of the
DVD changer in sequence.
2. Remove the DVDs individually.
Malfunctions
If all of the LEDs on the DVD changer flash rap-
idly, then a malfunction is occurring. In this
case, proceed as follows.
1. Press the button or button.
The DVD last inserted is ejected.
2. Remove the DVD.
The DVD changer tests the DVD compartments
and the rapid flashing of the LEDs stops. The
DVD changer is once more operational.
DVD country codes
Your DVD player only plays DVDs with the cod-
ing of your home regi on, e.g. Europe = 2. The
country codes supported by your DVD are con-
tained in the information on your DVD. It is not
possible to change this coding. An overview of
the six coding zones:
DVDs with the code 0 can be played back
on all units. <
Playing DVDs
Depending on the equipment in your vehicle,
you have the option of playing back both the
audio track and video track of DVDs or only their
audio track.
>Vehicles with two drives: audio and video
playback
> Vehicles with a single drive: audio playback,
refer to page 197
Audio and video playback
For your own safety, the picture only appears on
the Control Display at sp eeds of up to about
2 mph/3 km/h. For certain national-market ver-
sions, the picture does not appear on the Con-
trol Display unless the ve hicle is stationary and
the transmission is in Park.
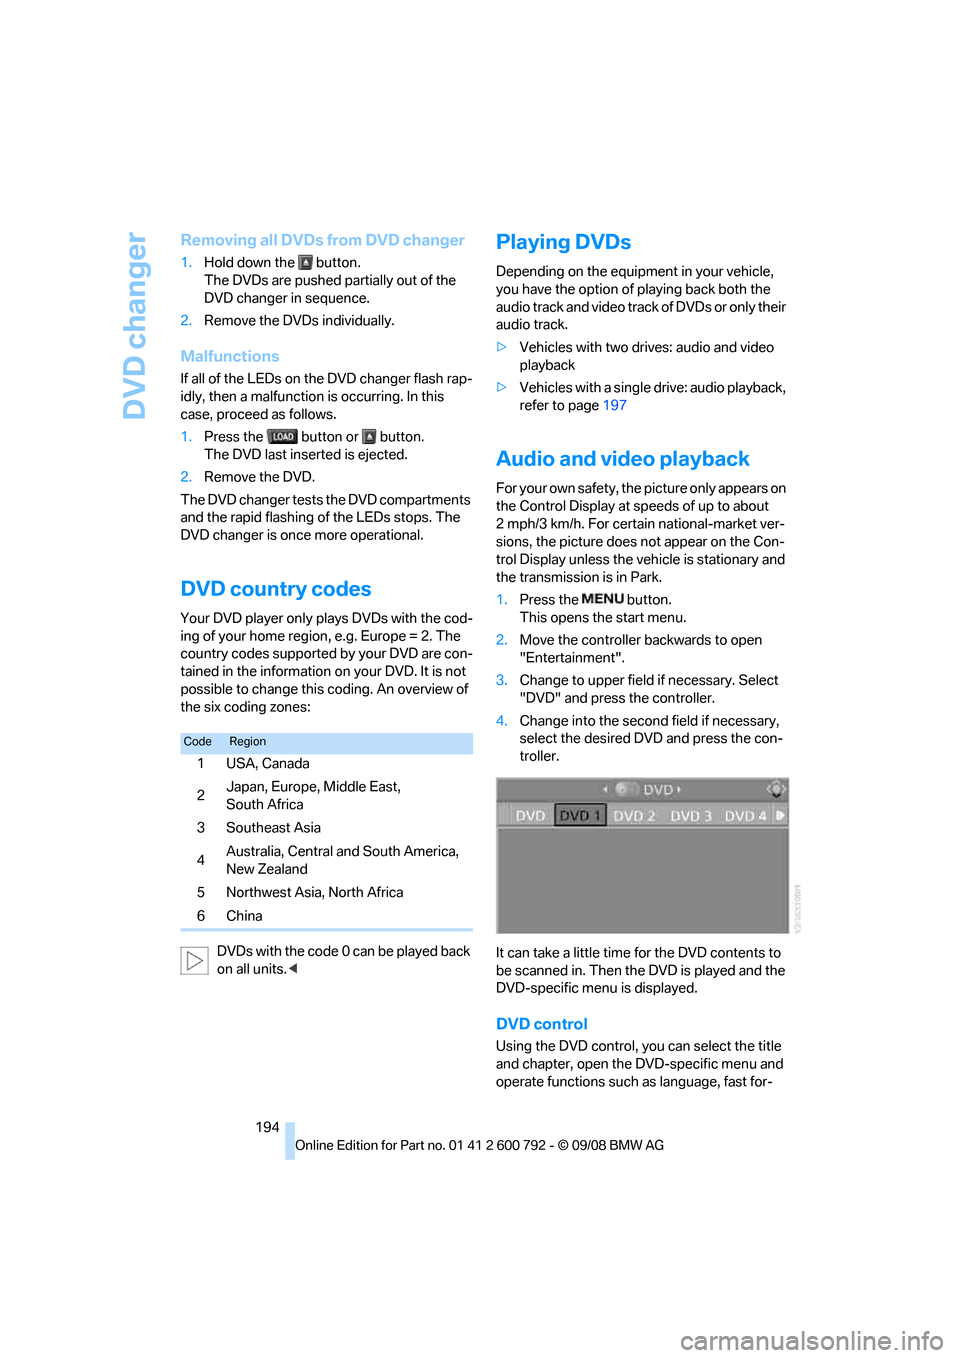
1. Press the button.
This opens the start menu.
2. Move the controller backwards to open
"Entertainment".
3. Change to upper field if necessary. Select
"DVD" and press the controller.
4. Change into the second field if necessary,
select the desired DVD and press the con-
troller.
It can take a little time for the DVD contents to
be scanned in. Then the DVD is played and the
DVD-specific menu is displayed.
DVD control
Using the DVD control, yo u can select the title
and chapter, open the DVD-specific menu and
operate functions such as language, fast for-
CodeRegion
1USA, Canada
2Japan, Europe, Middle East,
South Africa
3Southeast Asia
4 Australia, Central and South America,
New Zealand
5 Northwest Asia, North Africa
6China
Page 197 of 317
Navigation
Entertainment
Driving tips
195Reference
At a glance
Controls
Communications
Mobility
ward and reverse, or freeze frame.
A DVD can briefly deactivate functions of the
DVD control, under certain circumstances even
while the entire DVD is being played. It is not
possible to operate the DVD control under
these circumstances. In this case, try to make
the selection using the DVD-specific menu.
During playback:
1. Press the controller.
2. Select "DVD control bar" if needed and
press the controller.
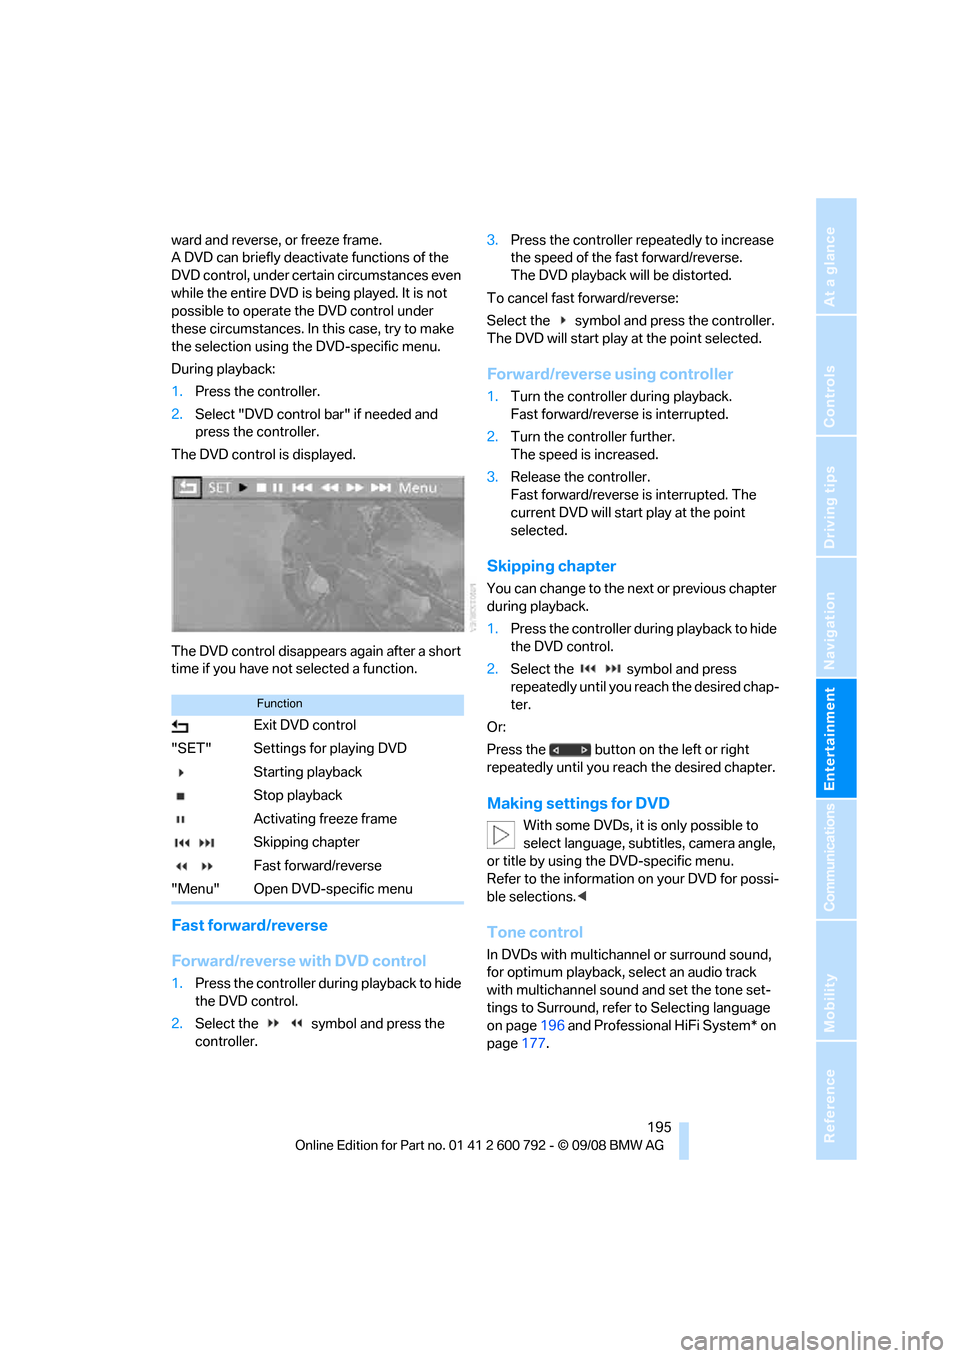
The DVD control is displayed.
The DVD control disappears again after a short
time if you have not selected a function.
Fast forward/reverse
Forward/reverse with DVD control
1.Press the controller during playback to hide
the DVD control.
2. Select the symbol and press the
controller. 3.
Press the controller repe atedly to increase
the speed of the fast forward/reverse.
The DVD playback will be distorted.
To cancel fast forward/reverse:
Select the symbol and press the controller.
The DVD will start play at the point selected.
Forward/reverse using controller
1. Turn the controller during playback.
Fast forward/reverse is interrupted.
2. Turn the controller further.
The speed is increased.
3. Release the controller.
Fast forward/reverse is interrupted. The
current DVD will start play at the point
selected.
Skipping chapter
You can change to the ne xt or previous chapter
during playback.
1. Press the controller during playback to hide
the DVD control.
2. Select the symbol and press
repeatedly until you reach the desired chap-
ter.
Or:
Press the button on the left or right
repeatedly until you reach the desired chapter.
Making settings for DVD
With some DVDs, it is only possible to
select language, subtit les, camera angle,
or title by using the DVD-specific menu.
Refer to the information on your DVD for possi-
ble selections. <
Tone control
In DVDs with multichanne l or surround sound,
for optimum playback, select an audio track
with multichannel sound and set the tone set-
tings to Surround, refer to Selecting language
on page 196 and Professional HiFi System* on
page 177.
Function
Exit DVD control
"SET" Settings for playing DVD
Starting playback
Stop playback
Activating freeze frame
Skipping chapter
Fast forward/reverse
"Menu" Open DVD-specific menu
Page 207 of 317
Navigation
Entertainment
Driving tips
205Reference
At a glance
Controls
Communications
Mobility
1.Turn display screen, arrow 1.
The display screen switches off.
2. Fold in display screen, arrow 2.
The display screen is folded out in the reverse
order.
CD/DVD player
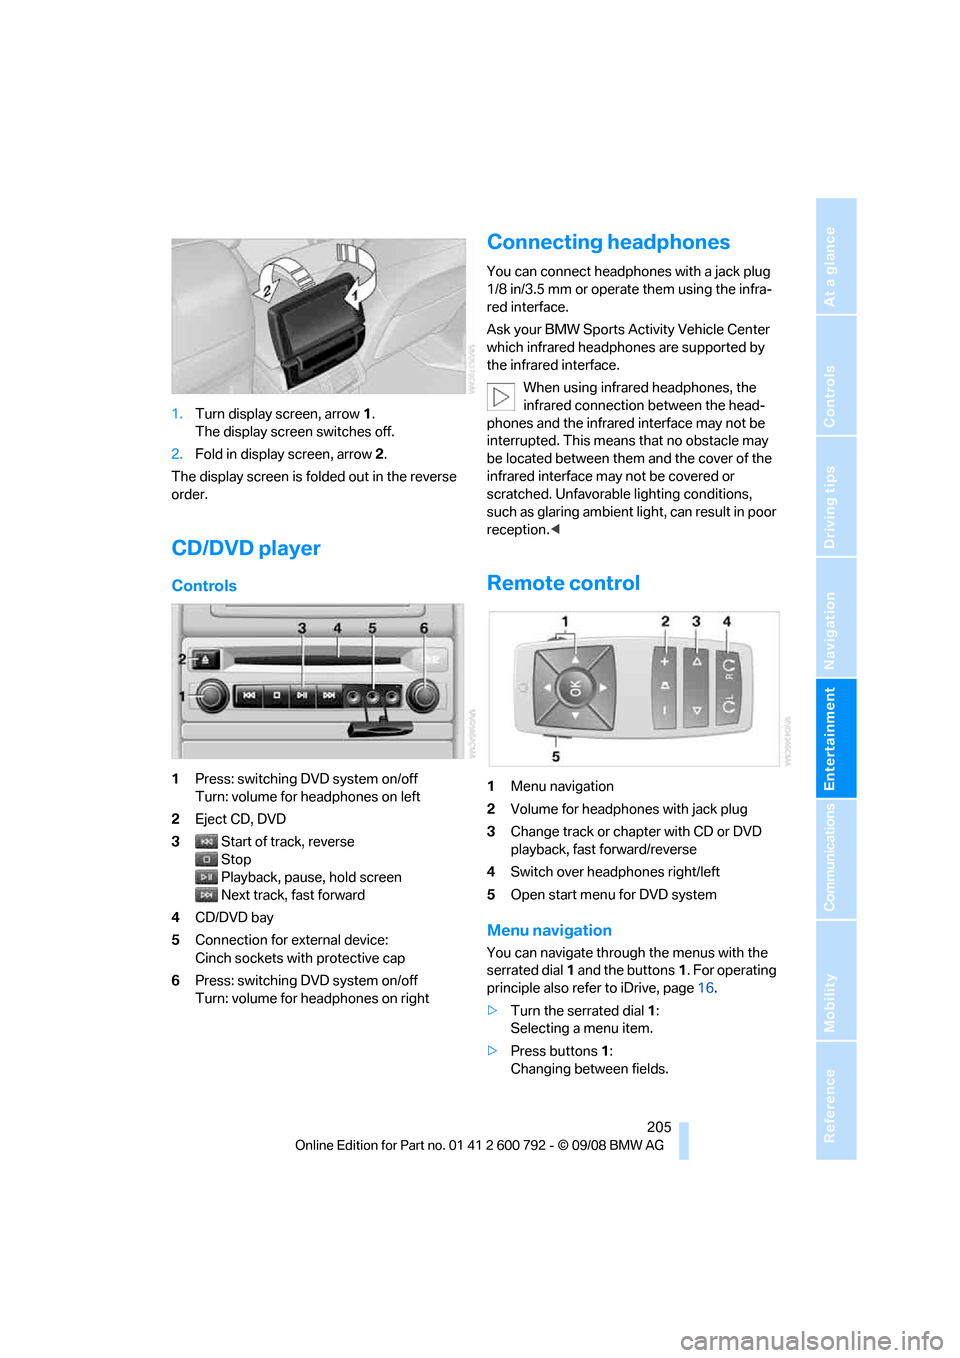
Controls
1 Press: switching DVD system on/off
Turn: volume for he adphones on left
2 Eject CD, DVD
3 Start of track, reverse
Stop
Playback, pause, hold screen
Next track, fast forward
4 CD/DVD bay
5 Connection for external device:
Cinch sockets with protective cap
6 Press: switching DVD system on/off
Turn: volume for he adphones on right
Connecting headphones
You can connect headphones with a jack plug
1/8 in/3.5 mm or operate them using the infra-
red interface.
Ask your BMW Sports Activity Vehicle Center
which infrared headphones are supported by
the infrared interface.
When using infrared headphones, the
infrared connection between the head-
phones and the infrared interface may not be
interrupted. This means that no obstacle may
be located between them and the cover of the
infrared interface may not be covered or
scratched. Unfavorable lighting conditions,
such as glaring ambient lig ht, can result in poor
reception. <
Remote control
1Menu navigation
2 Volume for headphones with jack plug
3 Change track or chapter with CD or DVD
playback, fast forward/reverse
4 Switch over headphones right/left
5 Open start menu for DVD system
Menu navigation
You can navigate throug h the menus with the
serrated dial 1 and the buttons 1. For operating
principle also refer to iDrive, page 16.
> Turn the serrated dial 1:
Selecting a menu item.
> Press buttons 1:
Changing between fields.