range BMW X5 2010 E70 Owner's Guide
[x] Cancel search | Manufacturer: BMW, Model Year: 2010, Model line: X5, Model: BMW X5 2010 E70Pages: 300, PDF Size: 12.41 MB
Page 166 of 300
Radio
164
Storing stations
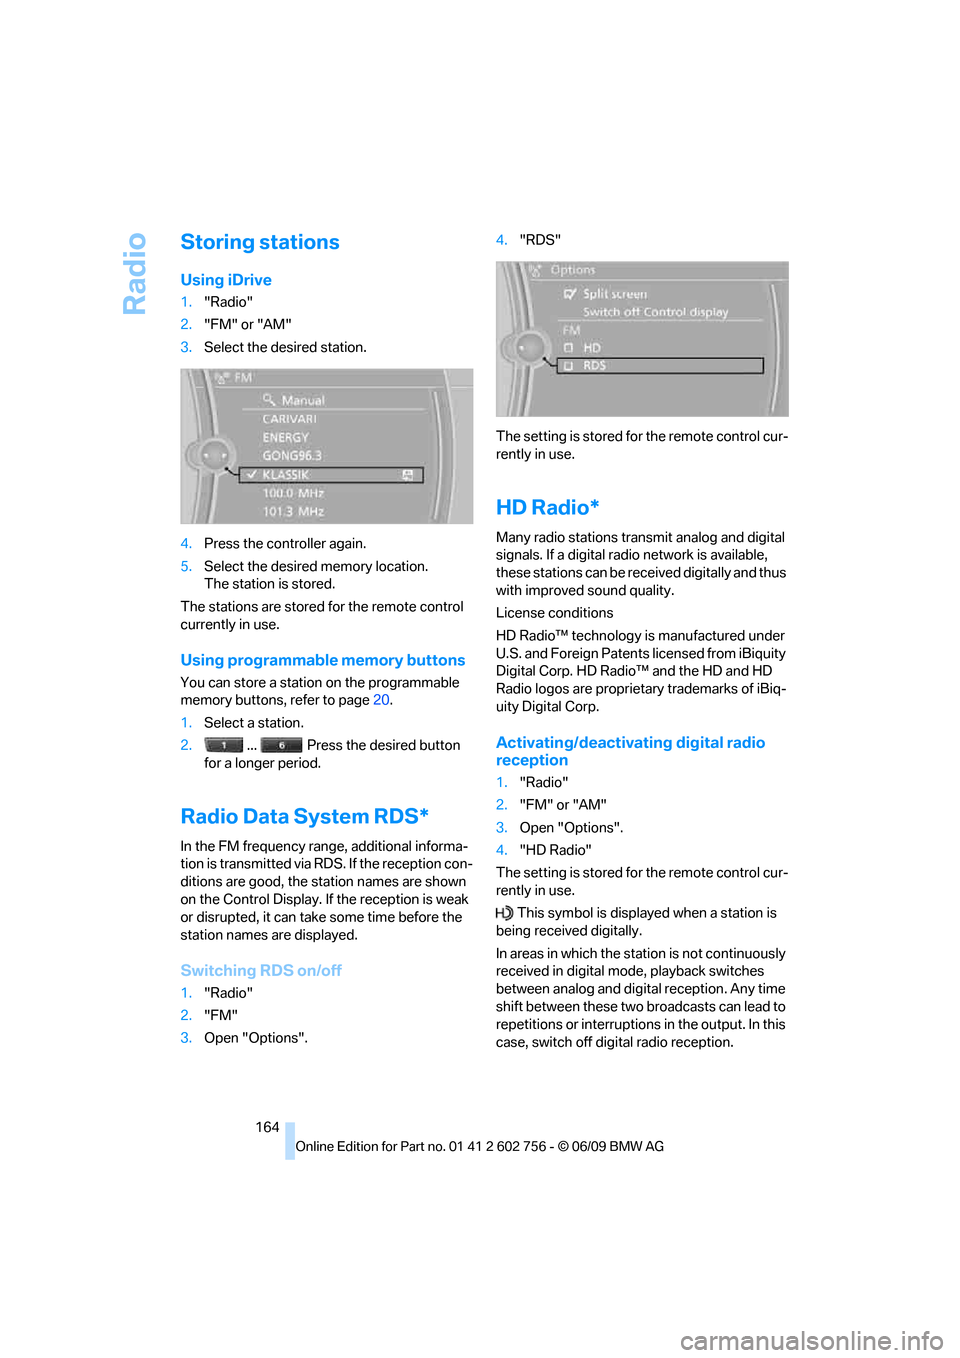
Using iDrive
1."Radio"
2."FM" or "AM"
3.Select the desired station.
4.Press the controller again.
5.Select the desired memory location.
The station is stored.
The stations are stored for the remote control
currently in use.
Using programmable memory buttons
You can store a station on the programmable
memory buttons, refer to page20.
1.Select a station.
2. ... Press the desired button
for a longer period.
Radio Data System RDS*
In the FM frequency range, additional informa-
tion is transmitted via RDS. If the reception con-
ditions are good, the station names are shown
on the Control Display. If the reception is weak
or disrupted, it can take some time before the
station names are displayed.
Switching RDS on/off
1."Radio"
2."FM"
3.Open "Options".4."RDS"
The setting is stored for the remote control cur-
rently in use.
HD Radio*
Many radio stations transmit analog and digital
signals. If a digital radio network is available,
these stations can be received digitally and thus
with improved sound quality.
License conditions
HD Radio™ technology is manufactured under
U.S. and Foreign Patents licensed from iBiquity
Digital Corp. HD Radio™ and the HD and HD
Radio logos are proprietary trademarks of iBiq-
uity Digital Corp.
Activating/deactivating digital radio
reception
1."Radio"
2."FM" or "AM"
3.Open "Options".
4."HD Radio"
The setting is stored for the remote control cur-
rently in use.
This symbol is displayed when a station is
being received digitally.
In areas in which the station is not continuously
received in digital mode, playback switches
between analog and digital reception. Any time
shift between these two broadcasts can lead to
repetitions or interruptions in the output. In this
case, switch off digital radio reception.
ba8_e70ag.book Seite 164 Freitag, 5. Juni 2009 11:42 11
Page 211 of 300
209
Entertainment
Reference
At a glance
Controls
Driving tips Communications
Navigation
Mobility
1.Select the message that contains the
desired number.
2. "Call"
Messages from the concierge service
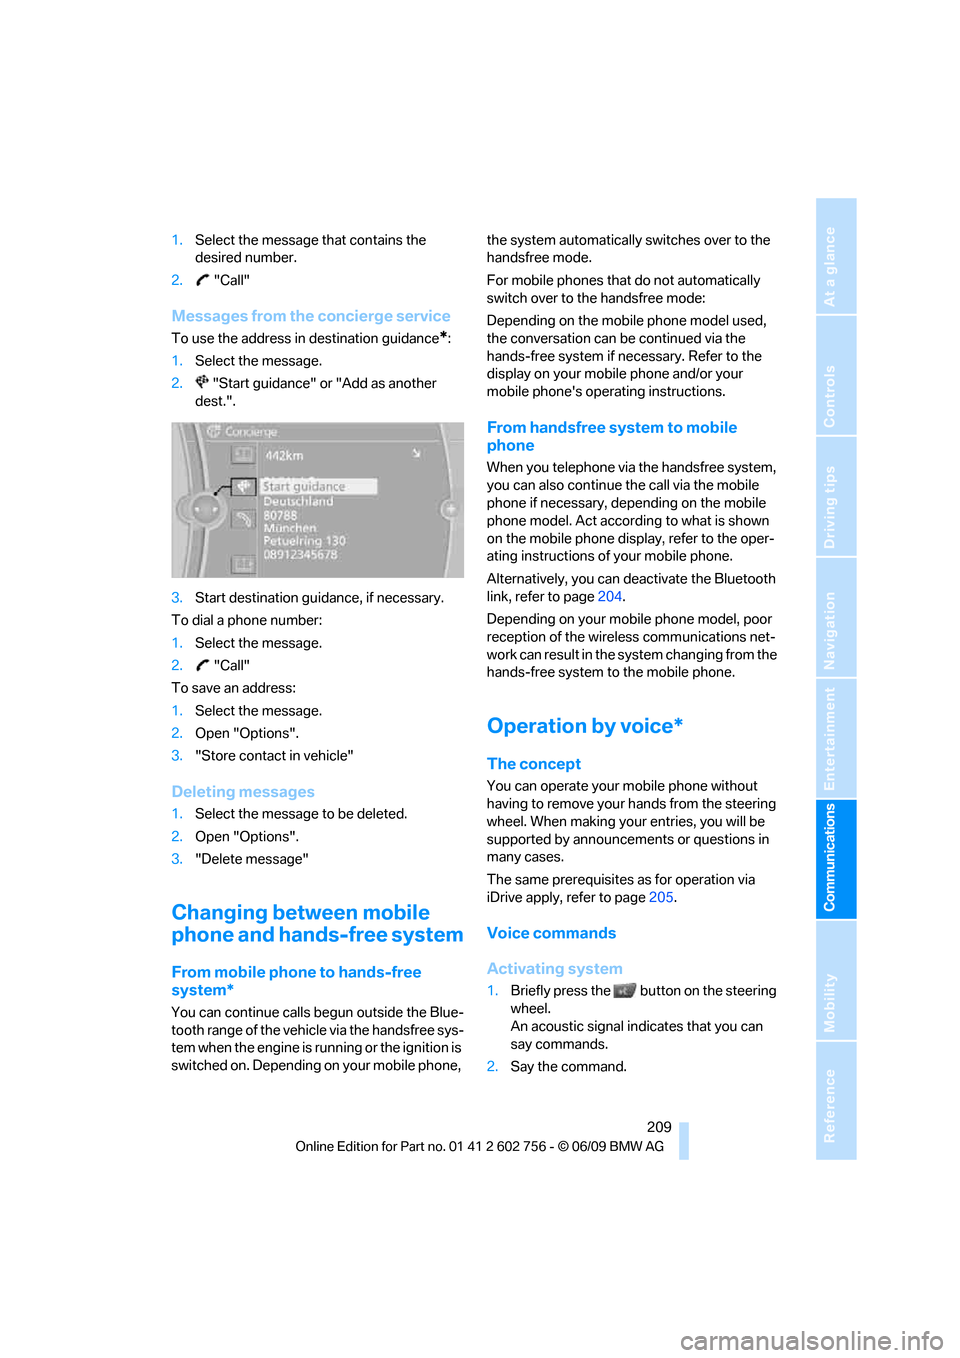
To use the address in destination guidance*:
1.Select the message.
2. "Start guidance" or "Add as another
dest.".
3.Start destination guidance, if necessary.
To dial a phone number:
1.Select the message.
2. "Call"
To save an address:
1.Select the message.
2.Open "Options".
3."Store contact in vehicle"
Deleting messages
1.Select the message to be deleted.
2.Open "Options".
3."Delete message"
Changing between mobile
phone and hands-free system
From mobile phone to hands-free
system*
You can continue calls begun outside the Blue-
tooth range of the vehicle via the handsfree sys-
tem when the engine is running or the ignition is
switched on. Depending on your mobile phone, the system automatically switches over to the
handsfree mode.
For mobile phones that do not automatically
switch over to the handsfree mode:
Depending on the mobile phone model used,
the conversation can be continued via the
hands-free system if necessary. Refer to the
display on your mobile phone and/or your
mobile phone's operating instructions.
From handsfree system to mobile
phone
When you telephone via the handsfree system,
you can also continue the call via the mobile
phone if necessary, depending on the mobile
phone model. Act according to what is shown
on the mobile phone display, refer to the oper-
ating instructions of your mobile phone.
Alternatively, you can deactivate the Bluetooth
link, refer to page204.
Depending on your mobile phone model, poor
reception of the wireless communications net-
work can result in the system changing from the
hands-free system to the mobile phone.
Operation by voice*
The concept
You can operate your mobile phone without
having to remove your hands from the steering
wheel. When making your entries, you will be
supported by announcements or questions in
many cases.
The same prerequisites as for operation via
iDrive apply, refer to page205.
Voice commands
Activating system
1.Briefly press the button on the steering
wheel.
An acoustic signal indicates that you can
say commands.
2.Say the command.
ba8_e70ag.book Seite 209 Freitag, 5. Juni 2009 11:42 11
Page 221 of 300

219
Entertainment
Reference
At a glance
Controls
Driving tips Communications
Navigation
Mobility
Vehicle equipped with BMW Assist or
BMW TeleServices
1."BMW Assist"
2."Customer Relations"
3."Start service"
A voice connection is established to Customer
Relations.
Vehicle not equipped with BMW Assist
or BMW TeleServices
1."BMW Assist"
2."Customer Relations"
The Customer Relations phone number is dis-
played. If the vehicle is equipped with the
mobile phone preparation package, a voice
connection is established.
Service Request*
You can send a request to your BMW Sports
Activity Vehicle Center to arrange a service
appointment. The Teleservice data is transmit-
ted during a Service Request. Your BMW
Sports Activity Vehicle Center will contact you.
Starting a Service Request
1."BMW Assist"
2."Service Request"3."Start service"
Automatic Service Request*
The Teleservice data necessary for servicing
the vehicle are automatically sent to your BMW
Sports Activity Vehicle Center prior to the ser-
vice deadline. The center will contact you and a
service appointment can be arranged.
You can check when the BMW Sports Activity
Vehicle Center was notified.
1."Vehicle Info"
2."Vehicle status"
3.Open "Options".
4."Last Service Request"
BMW Sports Activity Vehicle
Center*
Address and contact data of the BMW Sports
Activity Vehicle Center.
1."BMW Assist"
2."Your BMW center"
ba8_e70ag.book Seite 219 Freitag, 5. Juni 2009 11:42 11
Page 226 of 300
Refueling
224
Refueling
Switch off the engine before refueling.
When handling fuel, always observe all
applicable precautionary measures and regula-
tions. Never transport reserve fuel containers in
the vehicle. These could become leaky and
cause an explosion or a fire in an accident.<
Fuel filler door
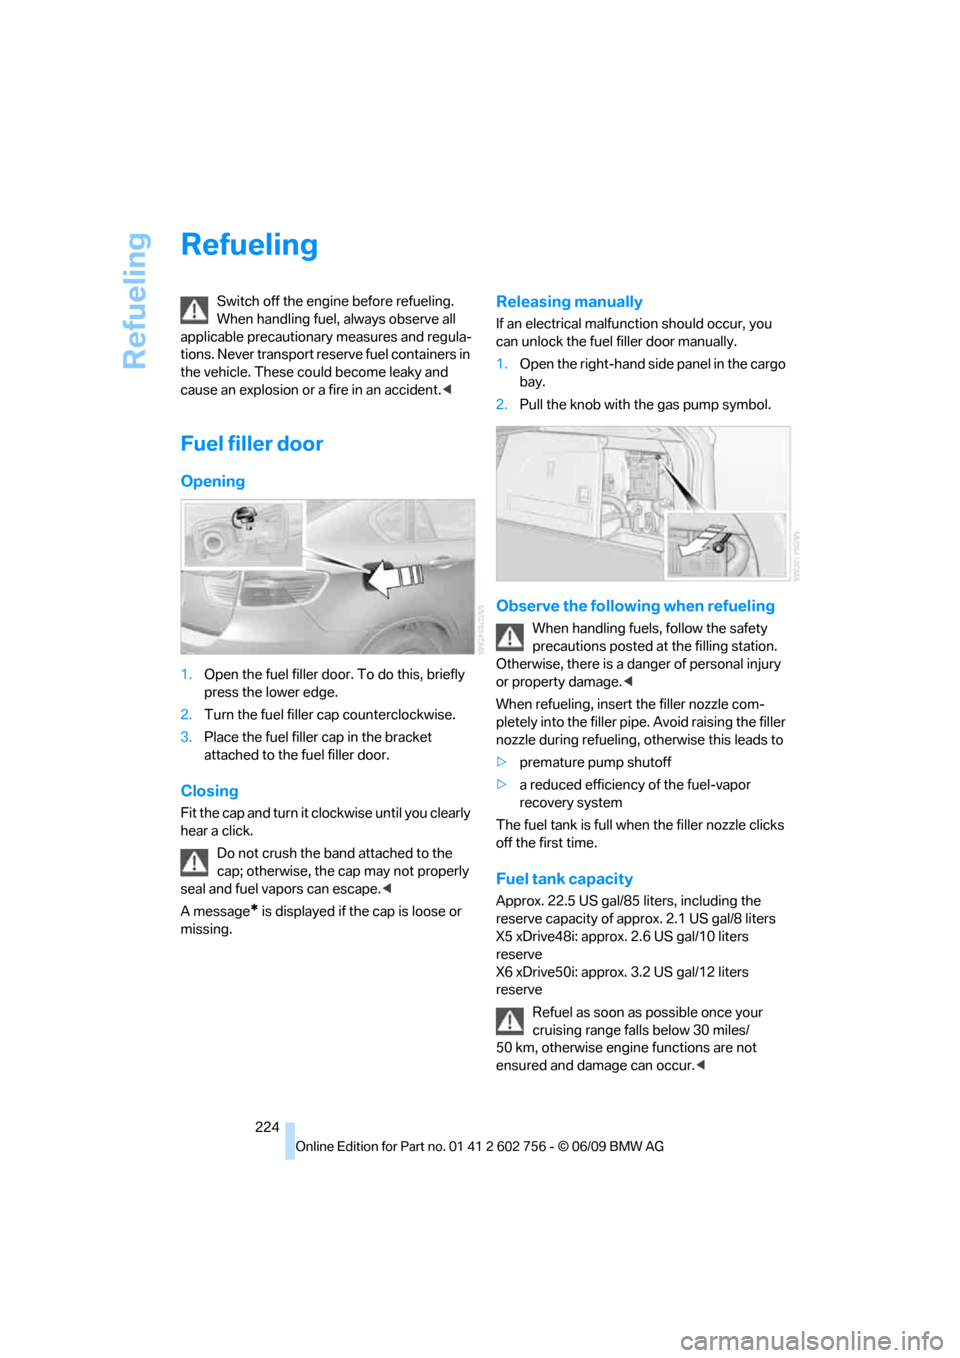
Opening
1.Open the fuel filler door. To do this, briefly
press the lower edge.
2.Turn the fuel filler cap counterclockwise.
3.Place the fuel filler cap in the bracket
attached to the fuel filler door.
Closing
Fit the cap and turn it clockwise until you clearly
hear a click.
Do not crush the band attached to the
cap; otherwise, the cap may not properly
seal and fuel vapors can escape.<
A message
* is displayed if the cap is loose or
missing.
Releasing manually
If an electrical malfunction should occur, you
can unlock the fuel filler door manually.
1.Open the right-hand side panel in the cargo
bay.
2.Pull the knob with the gas pump symbol.
Observe the following when refueling
When handling fuels, follow the safety
precautions posted at the filling station.
Otherwise, there is a danger of personal injury
or property damage.<
When refueling, insert the filler nozzle com-
pletely into the filler pipe. Avoid raising the filler
nozzle during refueling, otherwise this leads to
>premature pump shutoff
>a reduced efficiency of the fuel-vapor
recovery system
The fuel tank is full when the filler nozzle clicks
off the first time.
Fuel tank capacity
Approx. 22.5 US gal/85 liters, including the
reserve capacity of approx. 2.1 US gal/8 liters
X5 xDrive48i: approx. 2.6 US gal/10 liters
reserve
X6 xDrive50i: approx. 3.2 US gal/12 liters
reserve
Refuel as soon as possible once your
cruising range falls below 30 miles/
50 km, otherwise engine functions are not
ensured and damage can occur.<
ba8_e70ag.book Seite 224 Freitag, 5. Juni 2009 11:42 11
Page 254 of 300
Replacing components
252 procedures with correspondingly trained
personnel.
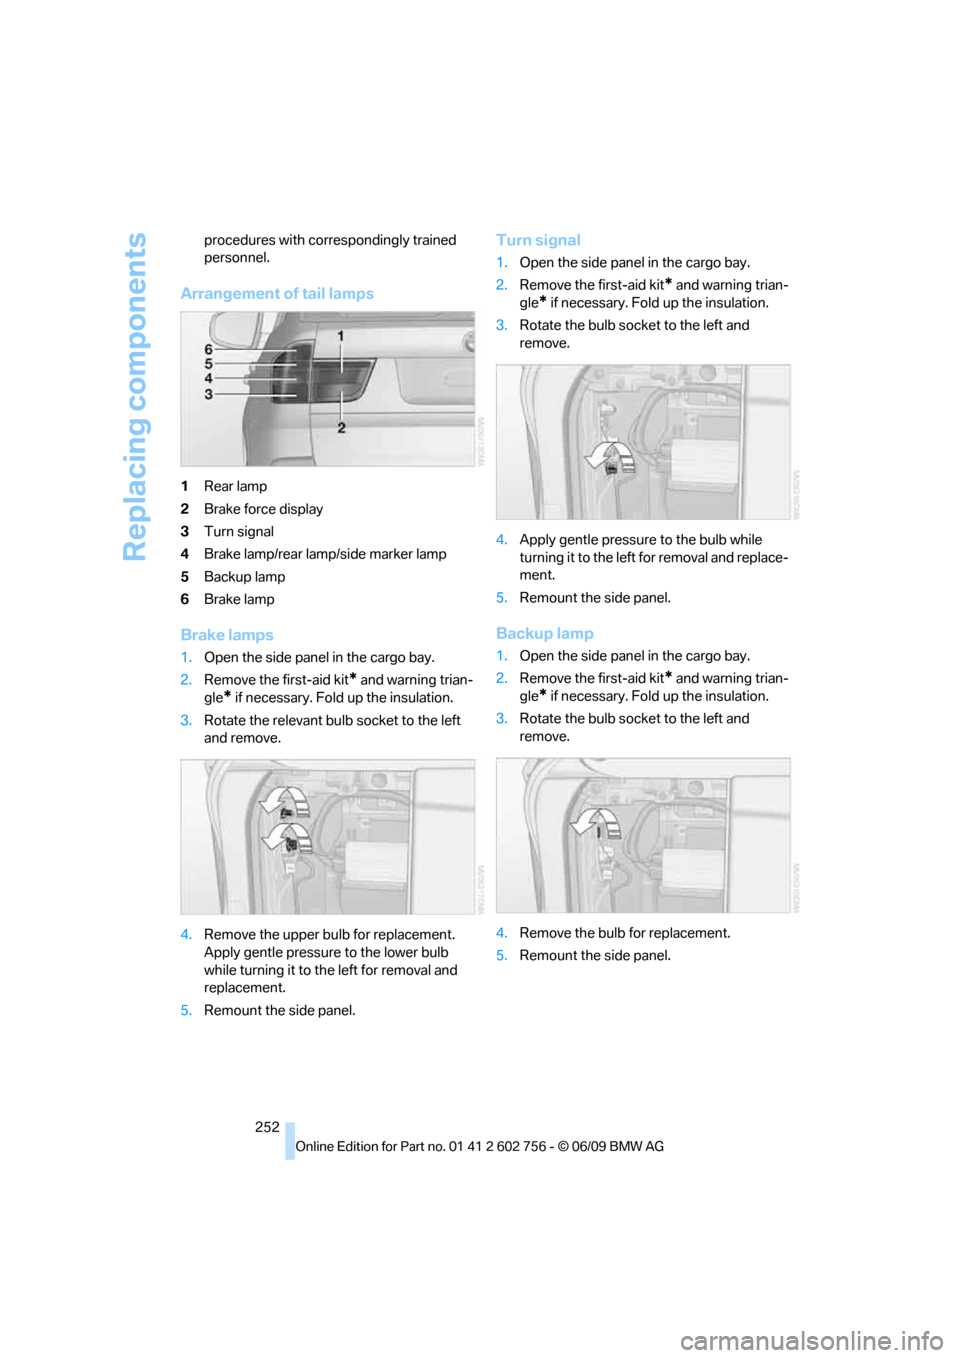
Arrangement of tail lamps
1Rear lamp
2Brake force display
3Turn signal
4Brake lamp/rear lamp/side marker lamp
5Backup lamp
6Brake lamp
Brake lamps
1.Open the side panel in the cargo bay.
2.Remove the first-aid kit
* and warning trian-
gle
* if necessary. Fold up the insulation.
3.Rotate the relevant bulb socket to the left
and remove.
4.Remove the upper bulb for replacement.
Apply gentle pressure to the lower bulb
while turning it to the left for removal and
replacement.
5.Remount the side panel.
Turn signal
1.Open the side panel in the cargo bay.
2.Remove the first-aid kit
* and warning trian-
gle
* if necessary. Fold up the insulation.
3.Rotate the bulb socket to the left and
remove.
4.Apply gentle pressure to the bulb while
turning it to the left for removal and replace-
ment.
5.Remount the side panel.
Backup lamp
1.Open the side panel in the cargo bay.
2.Remove the first-aid kit
* and warning trian-
gle
* if necessary. Fold up the insulation.
3.Rotate the bulb socket to the left and
remove.
4.Remove the bulb for replacement.
5.Remount the side panel.
ba8_e70ag.book Seite 252 Freitag, 5. Juni 2009 11:42 11
Page 257 of 300
Mobility
255Reference
At a glance
Controls
Driving tips
Communications
Navigation
Entertainment
procedures with correspondingly trained
personnel.
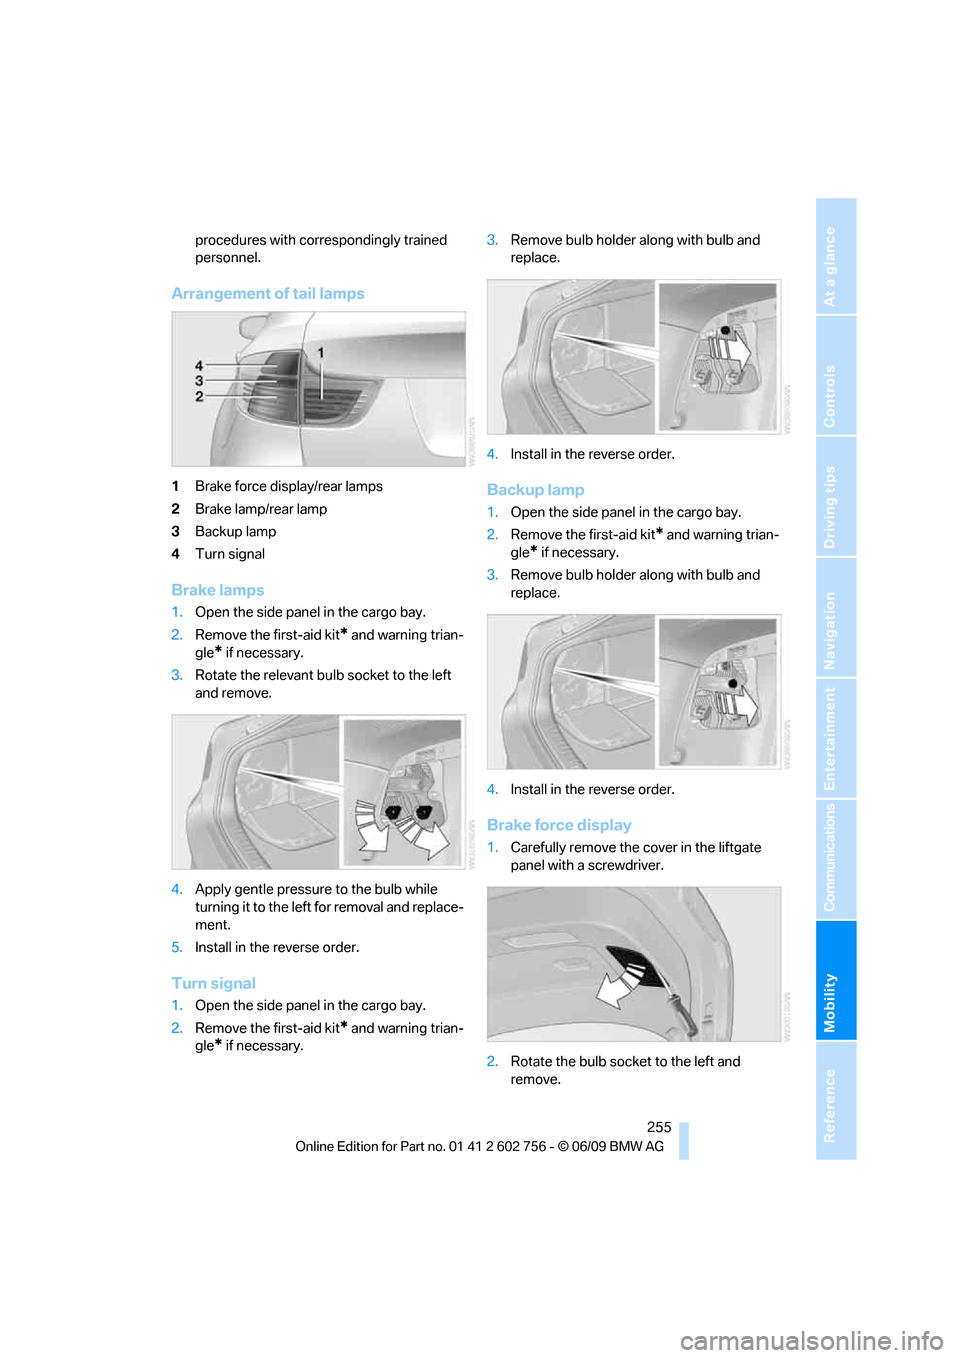
Arrangement of tail lamps
1Brake force display/rear lamps
2Brake lamp/rear lamp
3Backup lamp
4Turn signal
Brake lamps
1.Open the side panel in the cargo bay.
2.Remove the first-aid kit
* and warning trian-
gle
* if necessary.
3.Rotate the relevant bulb socket to the left
and remove.
4.Apply gentle pressure to the bulb while
turning it to the left for removal and replace-
ment.
5.Install in the reverse order.
Turn signal
1.Open the side panel in the cargo bay.
2.Remove the first-aid kit
* and warning trian-
gle
* if necessary.3.Remove bulb holder along with bulb and
replace.
4.Install in the reverse order.
Backup lamp
1.Open the side panel in the cargo bay.
2.Remove the first-aid kit
* and warning trian-
gle
* if necessary.
3.Remove bulb holder along with bulb and
replace.
4.Install in the reverse order.
Brake force display
1.Carefully remove the cover in the liftgate
panel with a screwdriver.
2.Rotate the bulb socket to the left and
remove.
ba8_e70ag.book Seite 255 Freitag, 5. Juni 2009 11:42 11
Page 260 of 300
Replacing components
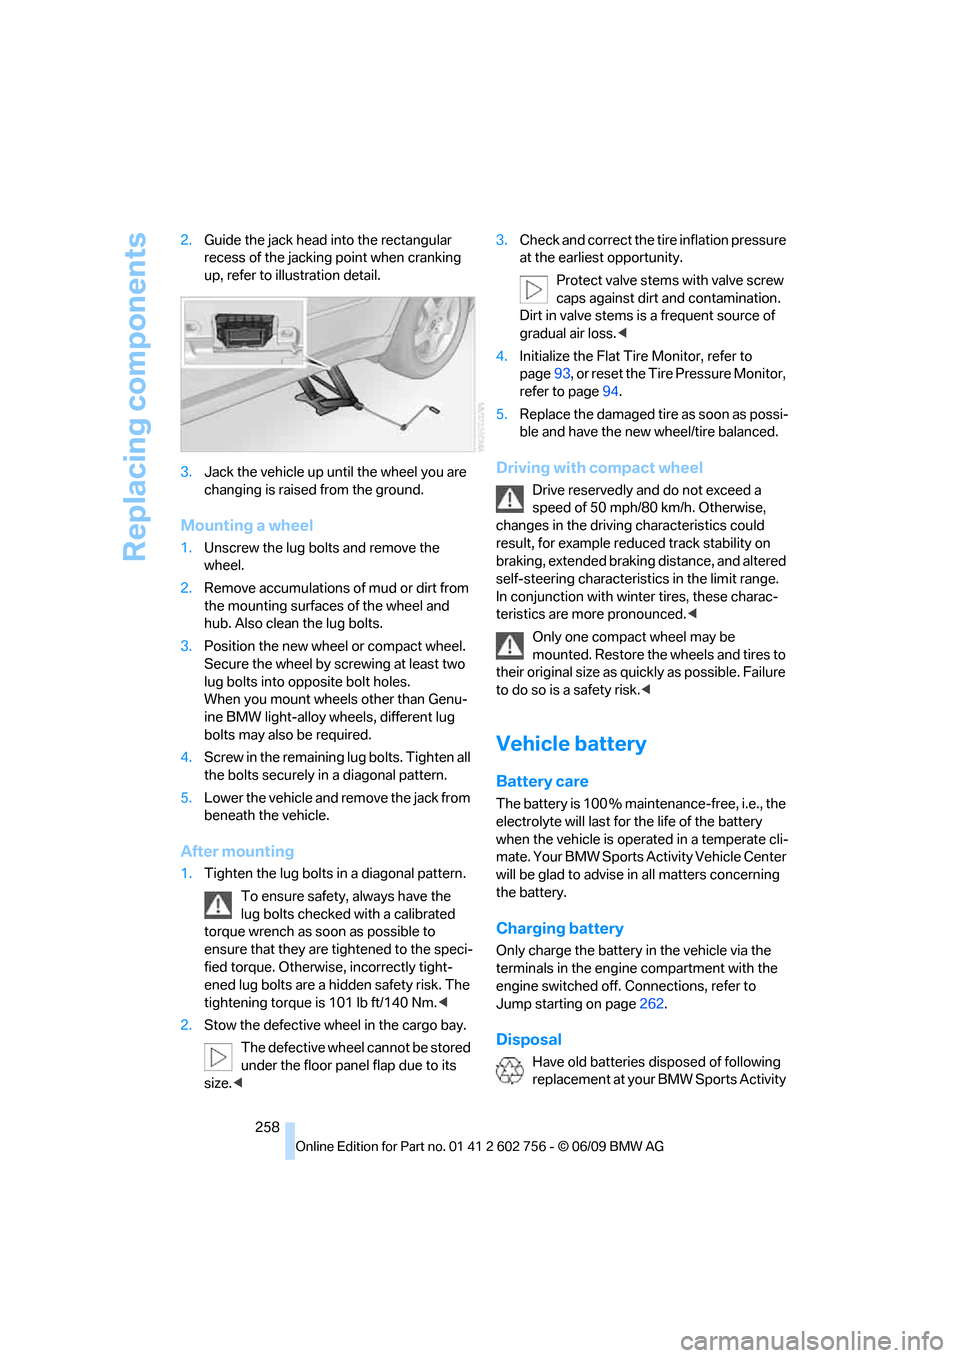
258 2.Guide the jack head into the rectangular
recess of the jacking point when cranking
up, refer to illustration detail.
3.Jack the vehicle up until the wheel you are
changing is raised from the ground.
Mounting a wheel
1.Unscrew the lug bolts and remove the
wheel.
2.Remove accumulations of mud or dirt from
the mounting surfaces of the wheel and
hub. Also clean the lug bolts.
3.Position the new wheel or compact wheel.
Secure the wheel by screwing at least two
lug bolts into opposite bolt holes.
When you mount wheels other than Genu-
ine BMW light-alloy wheels, different lug
bolts may also be required.
4.Screw in the remaining lug bolts. Tighten all
the bolts securely in a diagonal pattern.
5.Lower the vehicle and remove the jack from
beneath the vehicle.
After mounting
1.Tighten the lug bolts in a diagonal pattern.
To ensure safety, always have the
lug bolts checked with a calibrated
torque wrench as soon as possible to
ensure that they are tightened to the speci-
fied torque. Otherwise, incorrectly tight-
ened lug bolts are a hidden safety risk. The
tightening torque is 101 lb ft/140 Nm.<
2.Stow the defective wheel in the cargo bay.
The defective wheel cannot be stored
under the floor panel flap due to its
size.<3.Check and correct the tire inflation pressure
at the earliest opportunity.
Protect valve stems with valve screw
caps against dirt and contamination.
Dirt in valve stems is a frequent source of
gradual air loss.<
4.Initialize the Flat Tire Monitor, refer to
page93, or reset the Tire Pressure Monitor,
refer to page94.
5.Replace the damaged tire as soon as possi-
ble and have the new wheel/tire balanced.
Driving with compact wheel
Drive reservedly and do not exceed a
speed of 50 mph/80 km/h. Otherwise,
changes in the driving characteristics could
result, for example reduced track stability on
braking, extended braking distance, and altered
self-steering characteristics in the limit range.
In conjunction with winter tires, these charac-
teristics are more pronounced.<
Only one compact wheel may be
mounted. Restore the wheels and tires to
their original size as quickly as possible. Failure
to do so is a safety risk.<
Vehicle battery
Battery care
The battery is 100 % maintenance-free, i.e., the
electrolyte will last for the life of the battery
when the vehicle is operated in a temperate cli-
mate. Your BMW Sports Activity Vehicle Center
will be glad to advise in all matters concerning
the battery.
Charging battery
Only charge the battery in the vehicle via the
terminals in the engine compartment with the
engine switched off. Connections, refer to
Jump starting on page262.
Disposal
Have old batteries disposed of following
replacement at your BMW Sports Activity
ba8_e70ag.book Seite 258 Freitag, 5. Juni 2009 11:42 11
Page 263 of 300
Mobility
261Reference
At a glance
Controls
Driving tips
Communications
Navigation
Entertainment
Giving and receiving assistance
Emergency request
Conditions for an emergency request:
>Full preparation package mobile phone.
With this equipment, an emergency request
is still possible when no mobile phone is
paired in the vehicle.
>BMW Assist is activated.
Activating BMW Assist, refer to page215.
>Radio readiness is switched on.
>The BMW Assist system is logged in on a
wireless communications network.
>The emergency request system is opera-
ble.
When the contract of participation with BMW
Assist expires, the BMW Assist system can be
deactivated by a BMW Sports Activity Vehicle
Center without having to visit a workshop. Once
the BMW Assist system has been deactivated,
emergency requests are not possible. The
BMW Assist system be reactivated by a BMW
Sports Activity Vehicle Center after signing a
new contract.
Initiating an emergency request
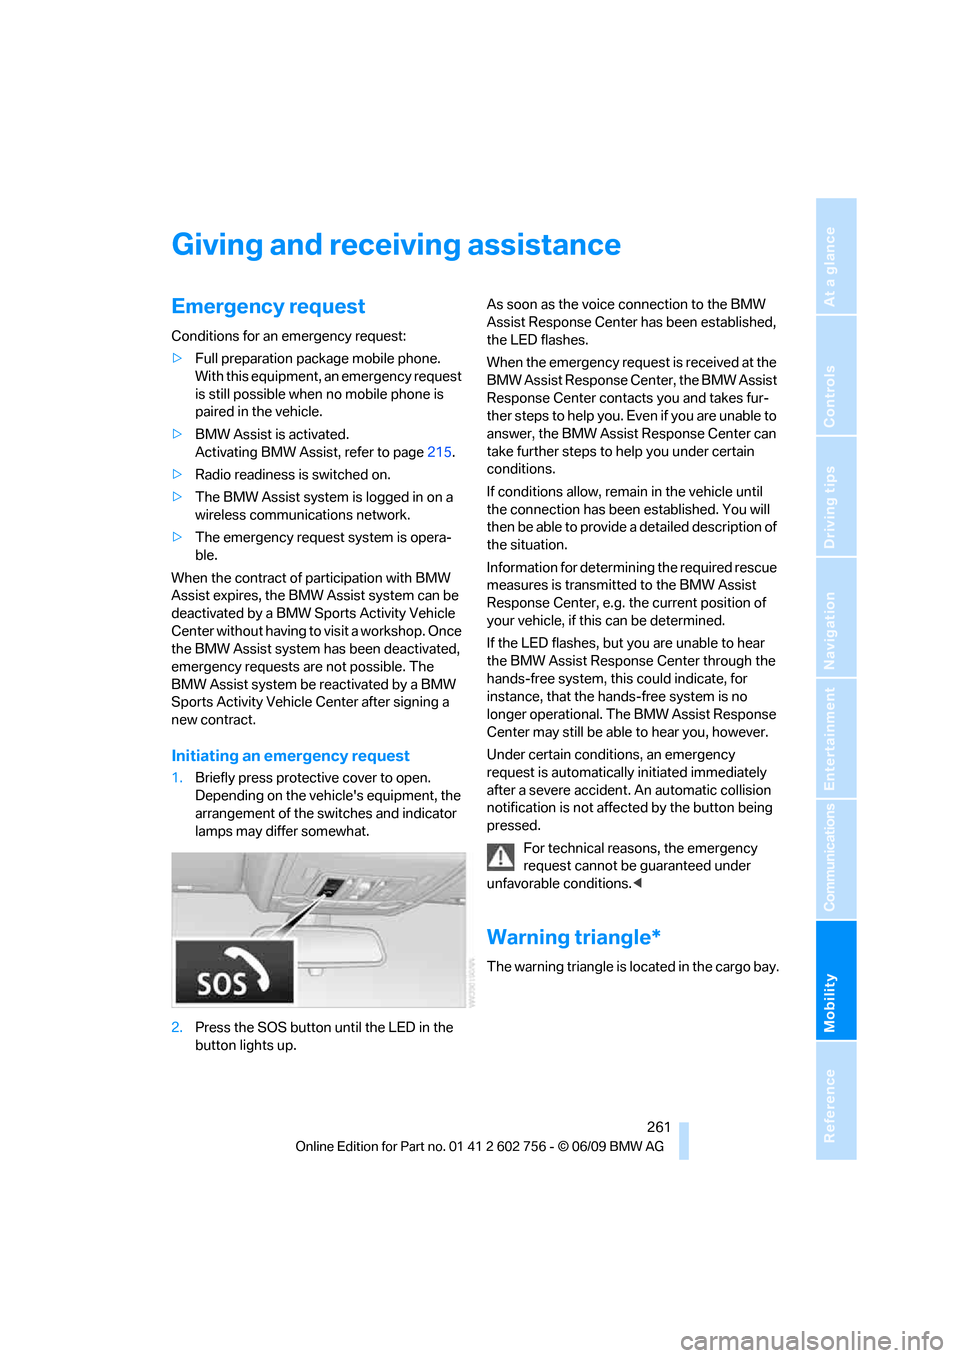
1.Briefly press protective cover to open.
Depending on the vehicle's equipment, the
arrangement of the switches and indicator
lamps may differ somewhat.
2.Press the SOS button until the LED in the
button lights up.As soon as the voice connection to the BMW
Assist Response Center has been established,
the LED flashes.
When the emergency request is received at the
BMW Assist Response Center, the BMW Assist
Response Center contacts you and takes fur-
ther steps to help you. Even if you are unable to
answer, the BMW Assist Response Center can
take further steps to help you under certain
conditions.
If conditions allow, remain in the vehicle until
the connection has been established. You will
then be able to provide a detailed description of
the situation.
Information for determining the required rescue
measures is transmitted to the BMW Assist
Response Center, e.g. the current position of
your vehicle, if this can be determined.
If the LED flashes, but you are unable to hear
the BMW Assist Response Center through the
hands-free system, this could indicate, for
instance, that the hands-free system is no
longer operational. The BMW Assist Response
Center may still be able to hear you, however.
Under certain conditions, an emergency
request is automatically initiated immediately
after a severe accident. An automatic collision
notification is not affected by the button being
pressed.
For technical reasons, the emergency
request cannot be guaranteed under
unfavorable conditions.<
Warning triangle*
The warning triangle is located in the cargo bay.
ba8_e70ag.book Seite 261 Freitag, 5. Juni 2009 11:42 11
Page 276 of 300
Short commands of voice activation system
274
External devices
Tone control
Radio
FM
AM
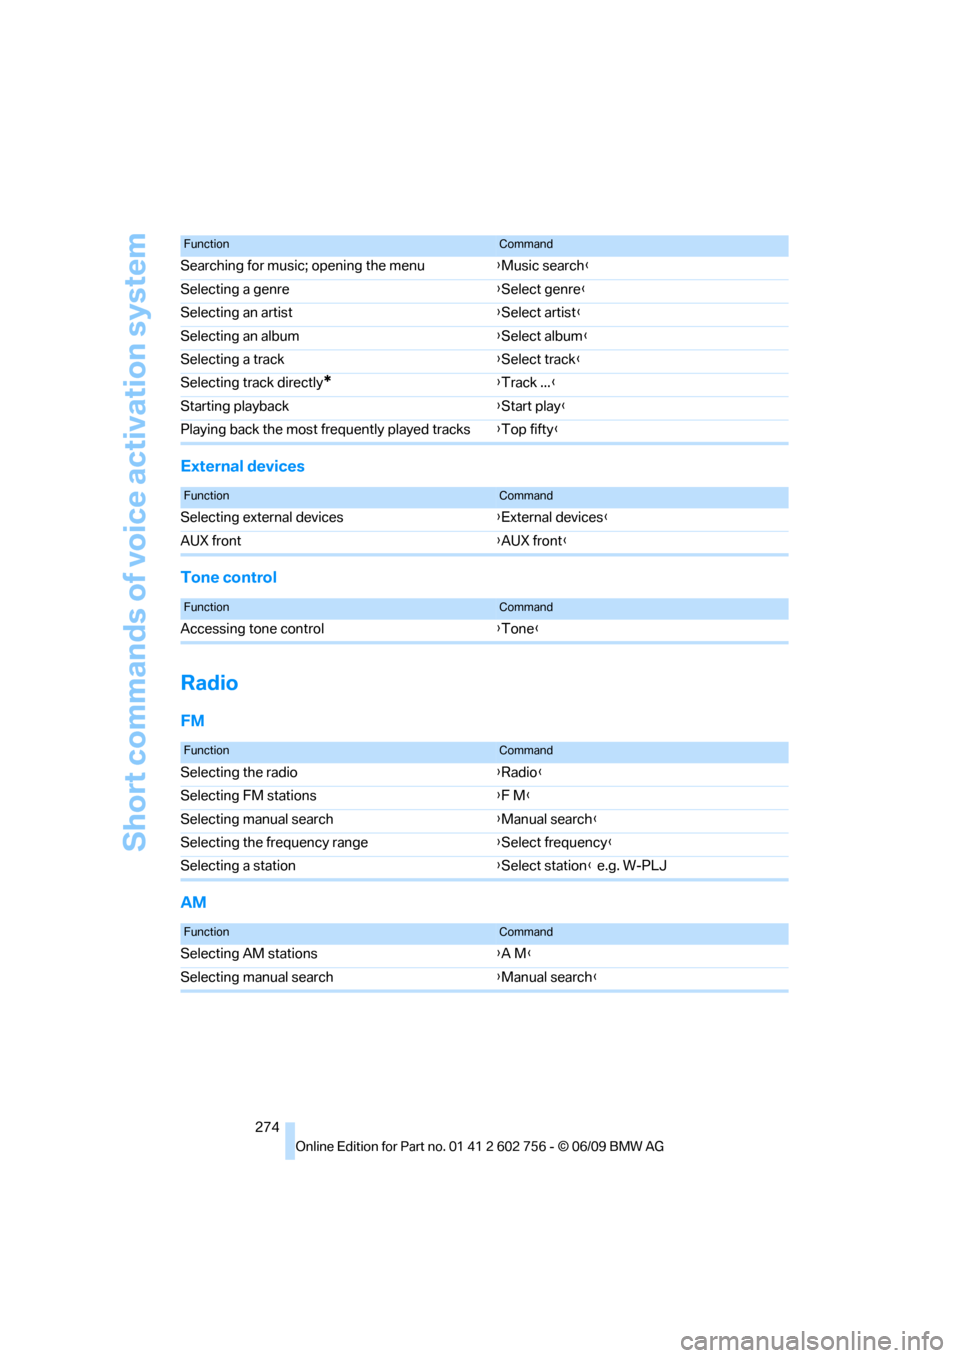
Searching for music; opening the menu{Music search}
Selecting a genre{Select genre}
Selecting an artist{Select artist}
Selecting an album{Select album}
Selecting a track{Select track}
Selecting track directly
*{Track ...}
Starting playback{Start play}
Playing back the most frequently played tracks{Top fifty}
FunctionCommand
FunctionCommand
Selecting external devices{External devices}
AUX front{AUX front}
FunctionCommand
Accessing tone control{Tone}
FunctionCommand
Selecting the radio{Radio}
Selecting FM stations{F M}
Selecting manual search{Manual search}
Selecting the frequency range{Select frequency}
Selecting a station{Select station} e.g. W-PLJ
FunctionCommand
Selecting AM stations{A M}
Selecting manual search{Manual search}
ba8_e70ag.book Seite 274 Freitag, 5. Juni 2009 11:42 11
Page 284 of 300
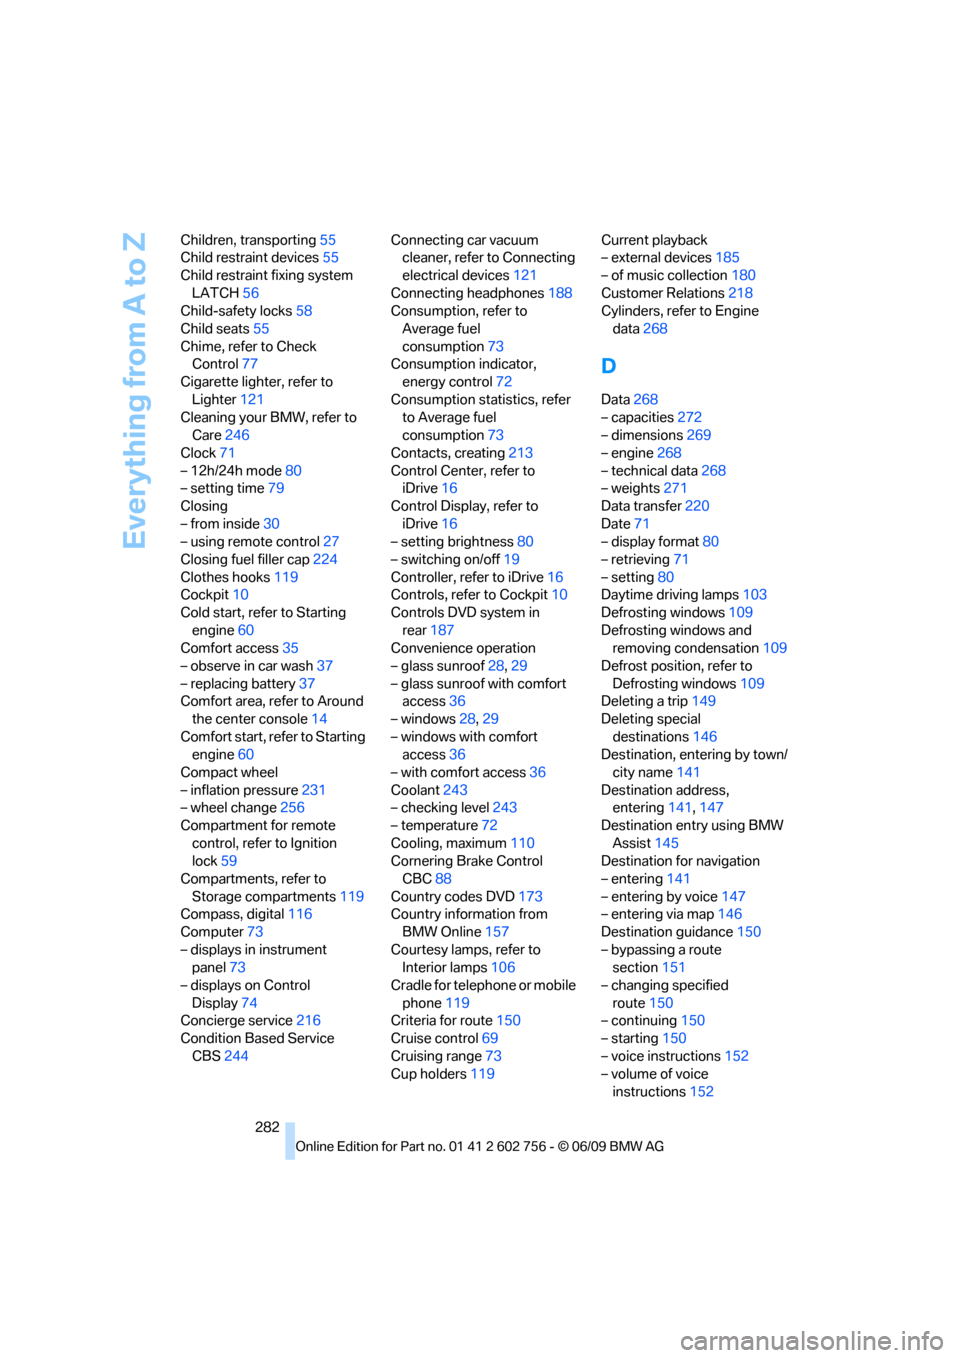
Everything from A to Z
282 Children, transporting55
Child restraint devices55
Child restraint fixing system
LATCH56
Child-safety locks58
Child seats55
Chime, refer to Check
Control77
Cigarette lighter, refer to
Lighter121
Cleaning your BMW, refer to
Care246
Clock71
– 12h/24h mode80
– setting time79
Closing
– from inside30
– using remote control27
Closing fuel filler cap224
Clothes hooks119
Cockpit10
Cold start, refer to Starting
engine60
Comfort access35
– observe in car wash37
– replacing battery37
Comfort area, refer to Around
the center console14
Comfort start, refer to Starting
engine60
Compact wheel
– inflation pressure231
– wheel change256
Compartment for remote
control, refer to Ignition
lock59
Compartments, refer to
Storage compartments119
Compass, digital116
Computer73
– displays in instrument
panel73
– displays on Control
Display74
Concierge service216
Condition Based Service
CBS244Connecting car vacuum
cleaner, refer to Connecting
electrical devices121
Connecting headphones188
Consumption, refer to
Average fuel
consumption73
Consumption indicator,
energy control72
Consumption statistics, refer
to Average fuel
consumption73
Contacts, creating213
Control Center, refer to
iDrive
16
Control Display, refer to
iDrive16
– setting brightness80
– switching on/off19
Controller, refer to iDrive16
Controls, refer to Cockpit10
Controls DVD system in
rear187
Convenience operation
– glass sunroof28,29
– glass sunroof with comfort
access36
– windows28,29
– windows with comfort
access36
– with comfort access36
Coolant243
– checking level243
– temperature72
Cooling, maximum110
Cornering Brake Control
CBC88
Country codes DVD173
Country information from
BMW Online157
Courtesy lamps, refer to
Interior lamps106
Cradle for telephone or mobile
phone119
Criteria for route150
Cruise control69
Cruising range73
Cup holders119Current playback
– external devices185
– of music collection180
Customer Relations218
Cylinders, refer to Engine
data268
D
Data268
– capacities272
– dimensions269
– engine268
– technical data268
– weights271
Data transfer220
Date71
– display format80
– retrieving71
– setting80
Daytime driving lamps103
Defrosting windows109
Defrosting windows and
removing condensation109
Defrost position, refer to
Defrosting windows109
Deleting a trip149
Deleting special
destinations146
Destination, entering by town/
city name141
Destination address,
entering141,147
Destination entry using BMW
Assist145
Destination for navigation
– entering141
– entering by voice147
– entering via map146
Destination guidance150
– bypassing a route
section151
– changing specified
route150
– continuing150
– starting150
– voice instructions152
– volume of voice
instructions152
ba8_e70ag.book Seite 282 Freitag, 5. Juni 2009 11:42 11