Brake Force Display BMW X5 2010 E70 Owner's Manual
[x] Cancel search | Manufacturer: BMW, Model Year: 2010, Model line: X5, Model: BMW X5 2010 E70Pages: 300, PDF Size: 12.41 MB
Page 15 of 300
At a glance
13Reference
Controls
Driving tips
Communications
Navigation
Entertainment
Mobility
Indicator and warning lamps
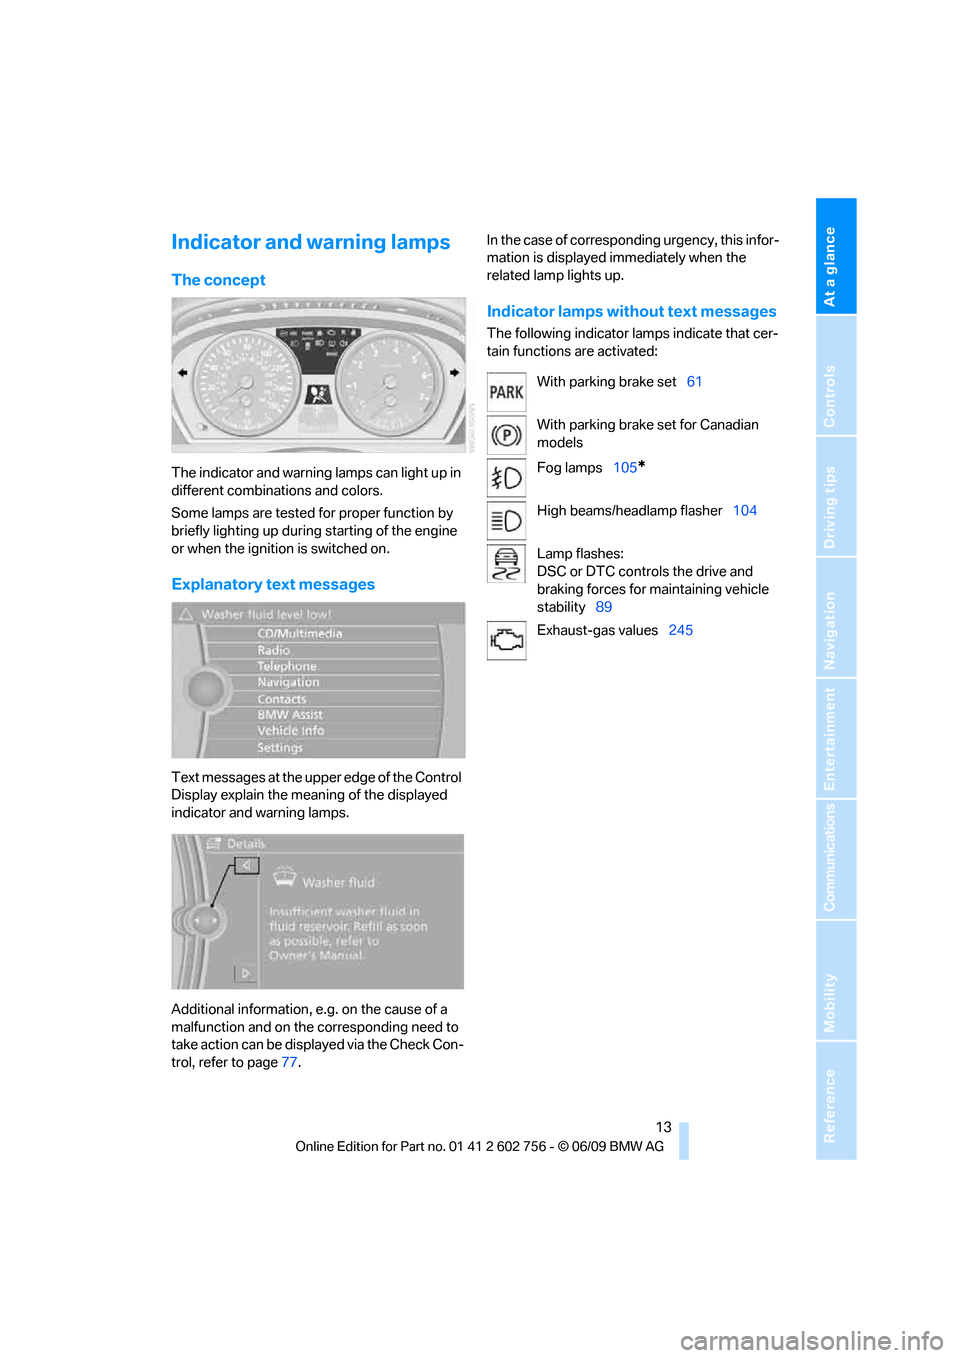
The concept
The indicator and warning lamps can light up in
different combinations and colors.
Some lamps are tested for proper function by
briefly lighting up during starting of the engine
or when the ignition is switched on.
Explanatory text messages
Text messages at the upper edge of the Control
Display explain the meaning of the displayed
indicator and warning lamps.
Additional information, e.g. on the cause of a
malfunction and on the corresponding need to
take action can be displayed via the Check Con-
trol, refer to page77.In the case of corresponding urgency, this infor-
mation is displayed immediately when the
related lamp lights up.
Indicator lamps without text messages
The following indicator lamps indicate that cer-
tain functions are activated:
With parking brake set61
With parking brake set for Canadian
models
Fog lamps105
*
High beams/headlamp flasher104
Lamp flashes:
DSC or DTC controls the drive and
braking forces for maintaining vehicle
stability89
Exhaust-gas values245
ba8_e70ag.book Seite 13 Freitag, 5. Juni 2009 11:42 11
Page 61 of 300
Controls
59Reference
At a glance
Driving tips
Communications
Navigation
Entertainment
Mobility
Driving
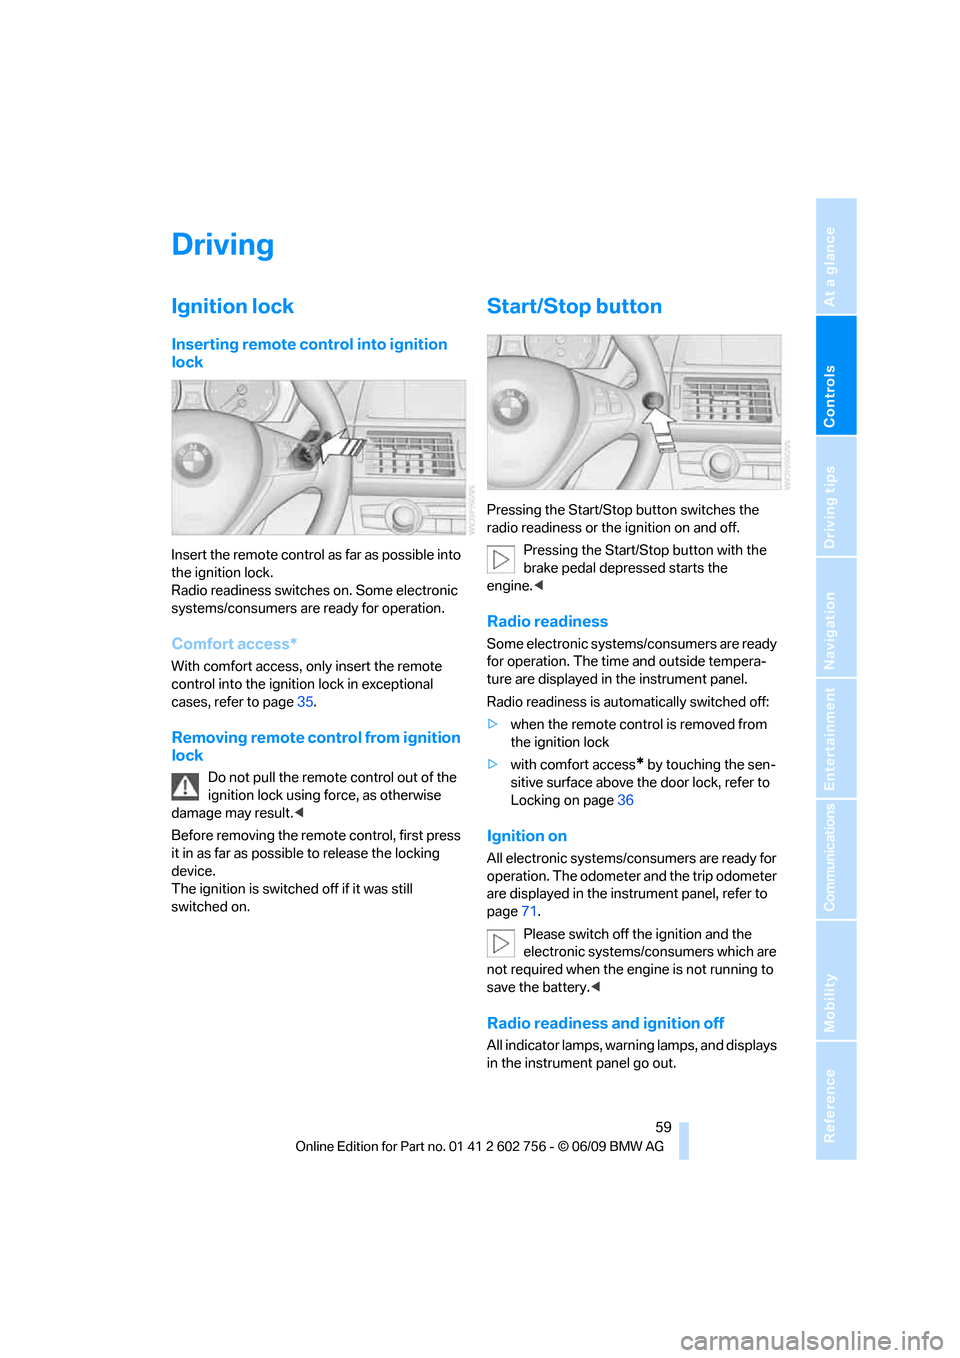
Ignition lock
Inserting remote control into ignition
lock
Insert the remote control as far as possible into
the ignition lock.
Radio readiness switches on. Some electronic
systems/consumers are ready for operation.
Comfort access*
With comfort access, only insert the remote
control into the ignition lock in exceptional
cases, refer to page35.
Removing remote control from ignition
lock
Do not pull the remote control out of the
ignition lock using force, as otherwise
damage may result.<
Before removing the remote control, first press
it in as far as possible to release the locking
device.
The ignition is switched off if it was still
switched on.
Start/Stop button
Pressing the Start/Stop button switches the
radio readiness or the ignition on and off.
Pressing the Start/Stop button with the
brake pedal depressed starts the
engine.<
Radio readiness
Some electronic systems/consumers are ready
for operation. The time and outside tempera-
ture are displayed in the instrument panel.
Radio readiness is automatically switched off:
>when the remote control is removed from
the ignition lock
>with comfort access
* by touching the sen-
sitive surface above the door lock, refer to
Locking on page36
Ignition on
All electronic systems/consumers are ready for
operation. The odometer and the trip odometer
are displayed in the instrument panel, refer to
page71.
Please switch off the ignition and the
electronic systems/consumers which are
not required when the engine is not running to
save the battery.<
Radio readiness and ignition off
All indicator lamps, warning lamps, and displays
in the instrument panel go out.
ba8_e70ag.book Seite 59 Freitag, 5. Juni 2009 11:42 11
Page 65 of 300
Controls
63Reference
At a glance
Driving tips
Communications
Navigation
Entertainment
Mobility
>the vehicle is braked to a stop during driving
In the instrument panel, the indicator
lamp changes from green to red and
the indication AUTO H goes out.
Indicator lamp on Canadian models.
Before you start to drive, either release the
parking brake manually, refer to page61, or
reactivate Automatic Hold, refer to page62.
Before leaving the vehicle with the engine
running, shift the selector lever into posi-
tion P of the automatic transmission and make
sure that the parking brake is set. Otherwise,
the vehicle may begin to roll.<
Malfunction
If the parking brake fails or malfunctions, secure
the vehicle against rolling, e.g. with a wheel
chock, if you leave the vehicle.
Releasing parking brake manually
In the event of an electrical power loss or elec-
trical malfunction, you can release the parking
brake manually.
Before manually releasing the parking
brake and each time you park the vehicle
without setting the parking brake, make sure
that the automatic transmission is in position P,
refer to page65. Be sure to pay attention to the
information in the instrument panel.
In addition, secure the vehicle against rolling,
e.g. with a wheel chock. Otherwise there is a
danger that the vehicle could roll if parked on a
steep slope.<
If it becomes necessary to also release the
transmission lock of the automatic transmission
manually, follow this sequence:
1.If necessary, start by releasing the parking
brake manually.
2.Then release the automatic transmission's
transmission lock manually, refer to
page66.
Jump starting and towing, refer to information
starting on page262.
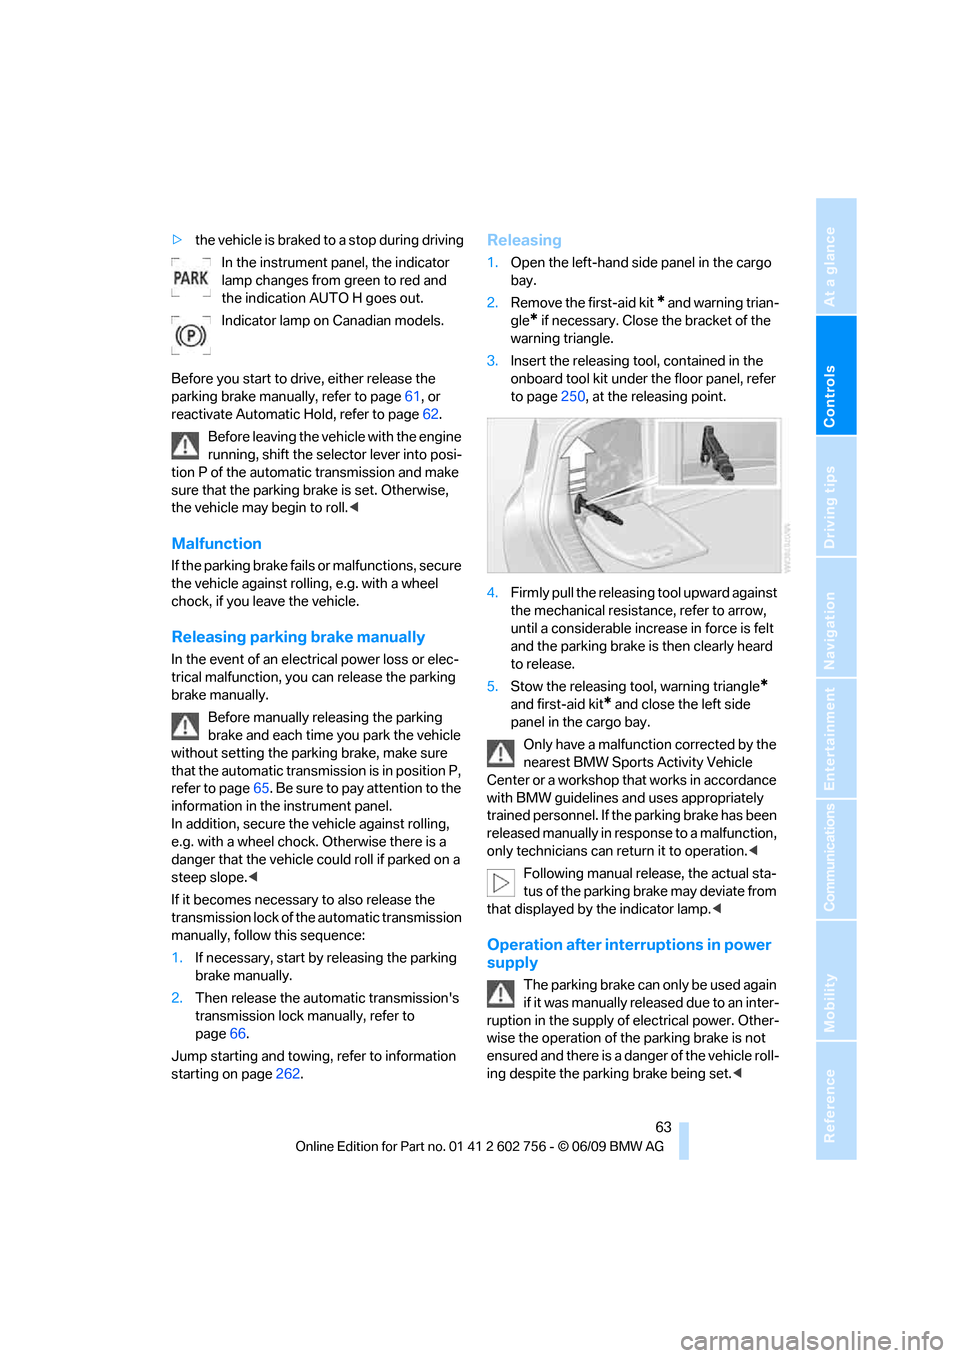
Releasing
1.Open the left-hand side panel in the cargo
bay.
2.Remove the first-aid kit
* and warning trian-
gle
* if necessary. Close the bracket of the
warning triangle.
3.Insert the releasing tool, contained in the
onboard tool kit under the floor panel, refer
to page250, at the releasing point.
4.Firmly pull the releasing tool upward against
the mechanical resistance, refer to arrow,
until a considerable increase in force is felt
and the parking brake is then clearly heard
to release.
5.Stow the releasing tool, warning triangle
*
and first-aid kit* and close the left side
panel in the cargo bay.
Only have a malfunction corrected by the
nearest BMW Sports Activity Vehicle
Center or a workshop that works in accordance
with BMW guidelines and uses appropriately
trained personnel. If the parking brake has been
released manually in response to a malfunction,
only technicians can return it to operation.<
Following manual release, the actual sta-
tus of the parking brake may deviate from
that displayed by the indicator lamp.<
Operation after interruptions in power
supply
The parking brake can only be used again
if it was manually released due to an inter-
ruption in the supply of electrical power. Other-
wise the operation of the parking brake is not
ensured and there is a danger of the vehicle roll-
ing despite the parking brake being set.<
ba8_e70ag.book Seite 63 Freitag, 5. Juni 2009 11:42 11
Page 90 of 300
Technology for comfort, convenience and safety
88
Contrast
With the rear view camera switched on:
1.Select the symbol.
2.Turn the controller until the desired setting
is displayed and then press the controller.
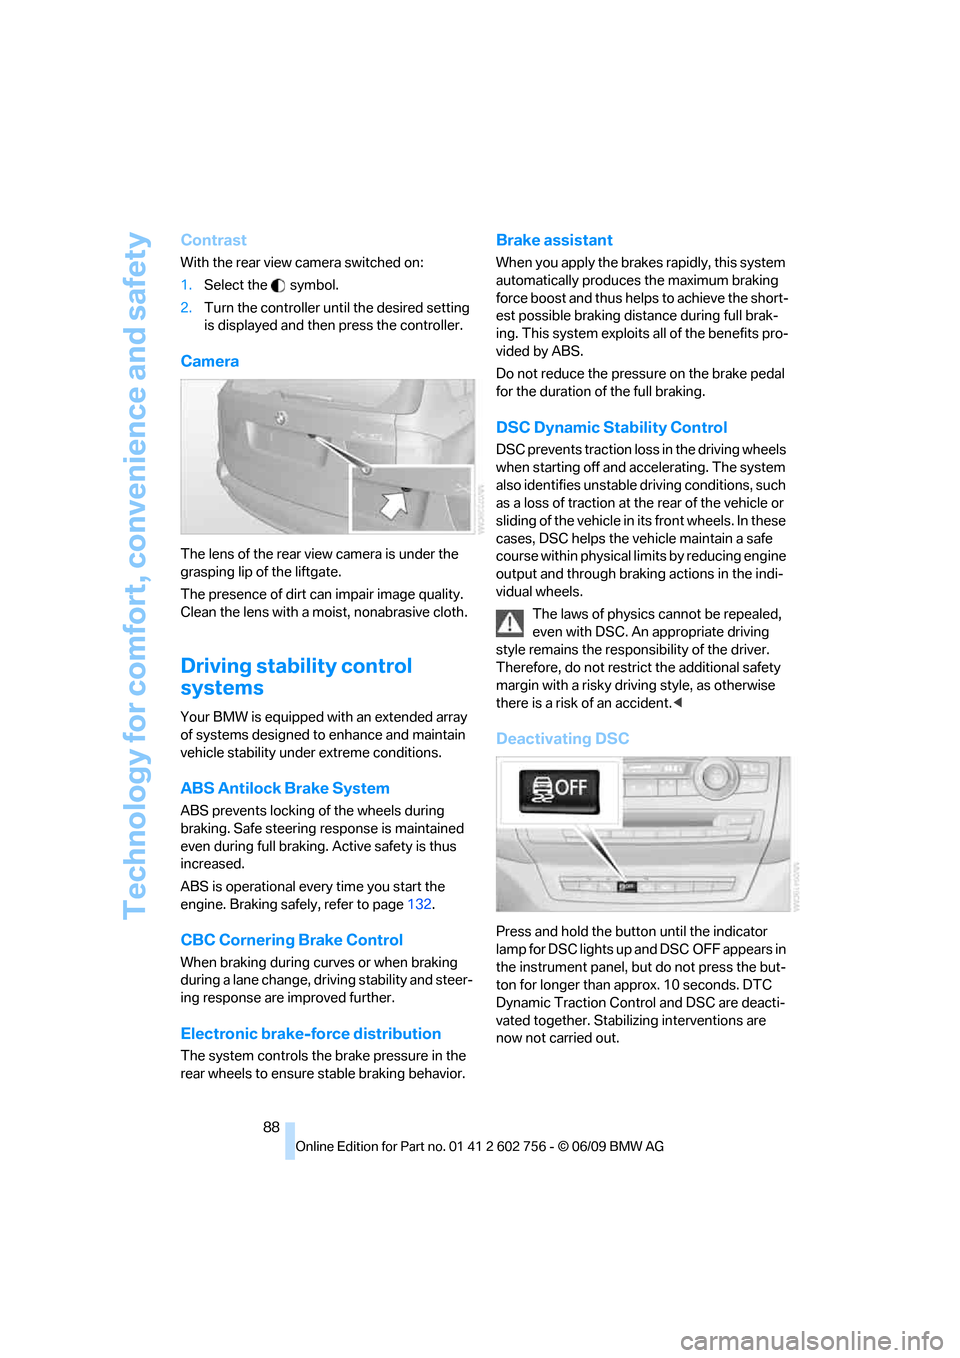
Camera
The lens of the rear view camera is under the
grasping lip of the liftgate.
The presence of dirt can impair image quality.
Clean the lens with a moist, nonabrasive cloth.
Driving stability control
systems
Your BMW is equipped with an extended array
of systems designed to enhance and maintain
vehicle stability under extreme conditions.
ABS Antilock Brake System
ABS prevents locking of the wheels during
braking. Safe steering response is maintained
even during full braking. Active safety is thus
increased.
ABS is operational every time you start the
engine. Braking safely, refer to page132.
CBC Cornering Brake Control
When braking during curves or when braking
during a lane change, driving stability and steer-
ing response are improved further.
Electronic brake-force distribution
The system controls the brake pressure in the
rear wheels to ensure stable braking behavior.
Brake assistant
When you apply the brakes rapidly, this system
automatically produces the maximum braking
force boost and thus helps to achieve the short-
est possible braking distance during full brak-
ing. This system exploits all of the benefits pro-
vided by ABS.
Do not reduce the pressure on the brake pedal
for the duration of the full braking.
DSC Dynamic Stability Control
DSC prevents traction loss in the driving wheels
when starting off and accelerating. The system
also identifies unstable driving conditions, such
as a loss of traction at the rear of the vehicle or
sliding of the vehicle in its front wheels. In these
cases, DSC helps the vehicle maintain a safe
course within physical limits by reducing engine
output and through braking actions in the indi-
vidual wheels.
The laws of physics cannot be repealed,
even with DSC. An appropriate driving
style remains the responsibility of the driver.
Therefore, do not restrict the additional safety
margin with a risky driving style, as otherwise
there is a risk of an accident.<
Deactivating DSC
Press and hold the button until the indicator
lamp for DSC lights up and DSC OFF appears in
the instrument panel, but do not press the but-
ton for longer than approx. 10 seconds. DTC
Dynamic Traction Control and DSC are deacti-
vated together. Stabilizing interventions are
now not carried out.
ba8_e70ag.book Seite 88 Freitag, 5. Juni 2009 11:42 11
Page 91 of 300
Controls
89Reference
At a glance
Driving tips
Communications
Navigation
Entertainment
Mobility
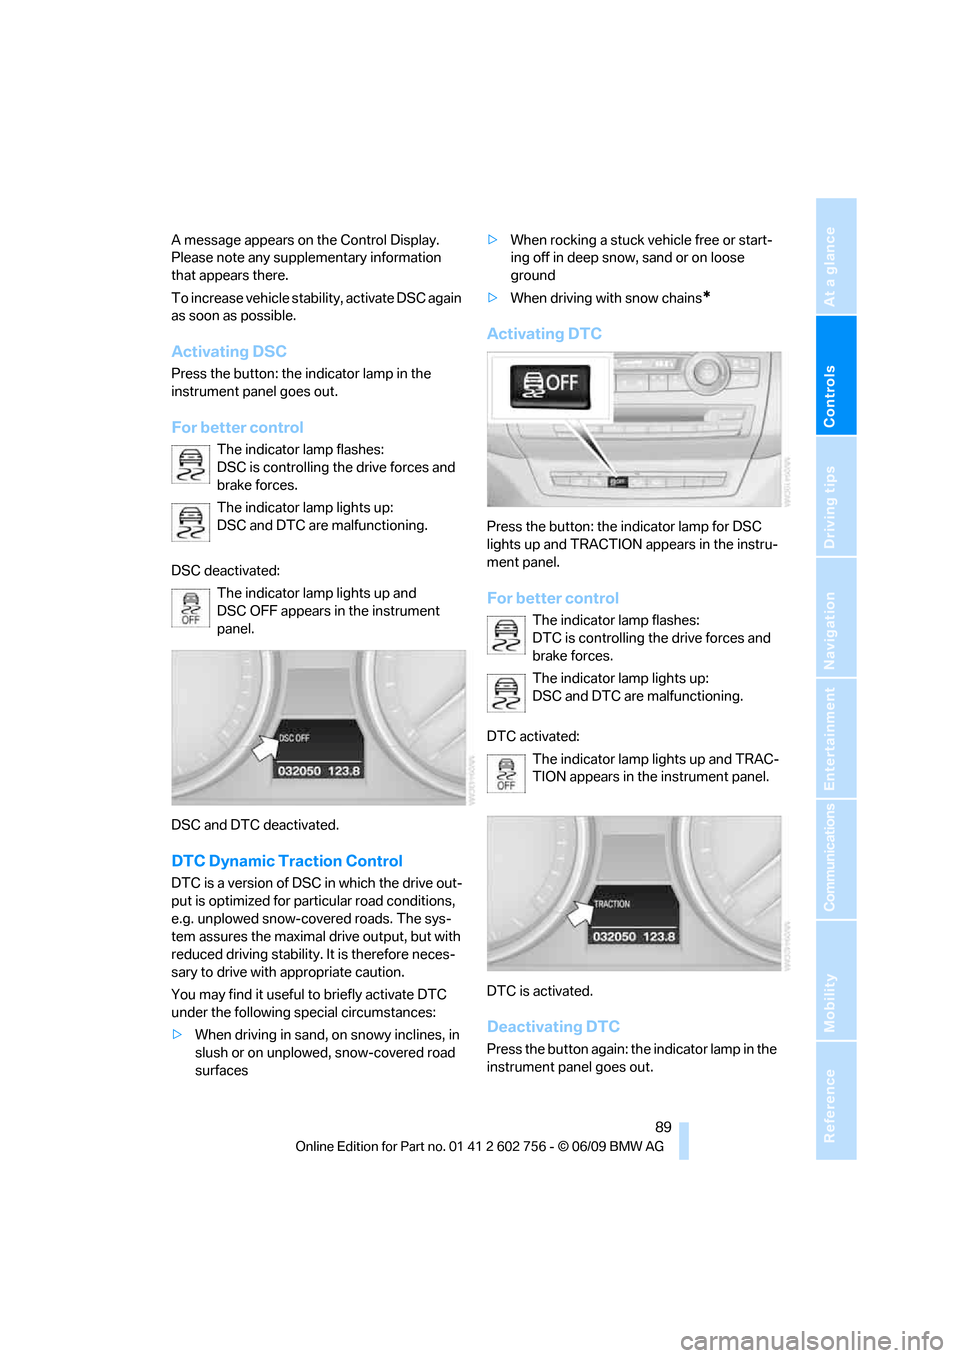
A message appears on the Control Display.
Please note any supplementary information
that appears there.
To increase vehicle stability, activate DSC again
as soon as possible.
Activating DSC
Press the button: the indicator lamp in the
instrument panel goes out.
For better control
The indicator lamp flashes:
DSC is controlling the drive forces and
brake forces.
The indicator lamp lights up:
DSC and DTC are malfunctioning.
DSC deactivated:
The indicator lamp lights up and
DSC OFF appears in the instrument
panel.
DSC and DTC deactivated.
DTC Dynamic Traction Control
DTC is a version of DSC in which the drive out-
put is optimized for particular road conditions,
e.g. unplowed snow-covered roads. The sys-
tem assures the maximal drive output, but with
reduced driving stability. It is therefore neces-
sary to drive with appropriate caution.
You may find it useful to briefly activate DTC
under the following special circumstances:
>When driving in sand, on snowy inclines, in
slush or on unplowed, snow-covered road
surfaces>When rocking a stuck vehicle free or start-
ing off in deep snow, sand or on loose
ground
>When driving with snow chains
*
Activating DTC
Press the button: the indicator lamp for DSC
lights up and TRACTION appears in the instru-
ment panel.
For better control
The indicator lamp flashes:
DTC is controlling the drive forces and
brake forces.
The indicator lamp lights up:
DSC and DTC are malfunctioning.
DTC activated:
The indicator lamp lights up and TRAC-
TION appears in the instrument panel.
DTC is activated.
Deactivating DTC
Press the button again: the indicator lamp in the
instrument panel goes out.
ba8_e70ag.book Seite 89 Freitag, 5. Juni 2009 11:42 11
Page 92 of 300
Technology for comfort, convenience and safety
90
xDrive
xDrive is the 4-wheel drive system of your
BMW. The combined effects of xDrive and DSC
further optimize the traction and dynamic driv-
ing characteristics. The 4-wheel drive system
xDrive variably distributes the drive forces to
the front and rear axle depending on the driving
situation and prevailing road conditions.
Dynamic Performance Control*
The concept
Dynamic Performance Control optimizes the
handling characteristics of your BMW when
starting off, cornering, and during evasive
maneuvers. To achieve this, the system variably
distributes the drive torque of the rear axle to
the two rear wheels. This further increases the
steering precision and tracking stability of your
vehicle.
Display
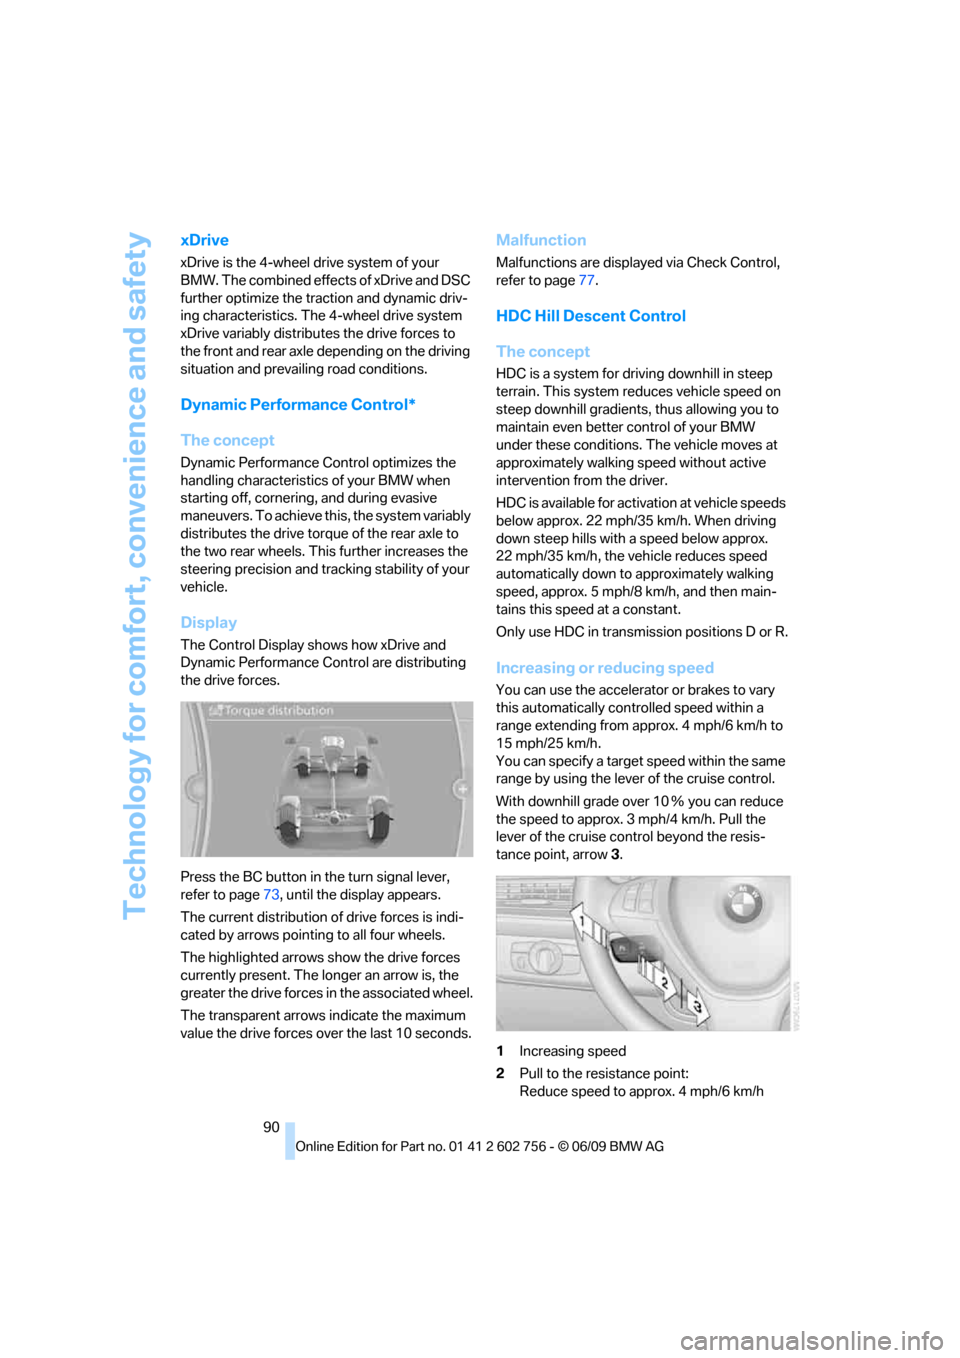
The Control Display shows how xDrive and
Dynamic Performance Control are distributing
the drive forces.
Press the BC button in the turn signal lever,
refer to page73, until the display appears.
The current distribution of drive forces is indi-
cated by arrows pointing to all four wheels.
The highlighted arrows show the drive forces
currently present. The longer an arrow is, the
greater the drive forces in the associated wheel.
The transparent arrows indicate the maximum
value the drive forces over the last 10 seconds.
Malfunction
Malfunctions are displayed via Check Control,
refer to page77.
HDC Hill Descent Control
The concept
HDC is a system for driving downhill in steep
terrain. This system reduces vehicle speed on
steep downhill gradients, thus allowing you to
maintain even better control of your BMW
under these conditions. The vehicle moves at
approximately walking speed without active
intervention from the driver.
HDC is available for activation at vehicle speeds
below approx. 22 mph/35 km/h. When driving
down steep hills with a speed below approx.
22 mph/35 km/h, the vehicle reduces speed
automatically down to approximately walking
speed, approx. 5 mph/8 km/h, and then main-
tains this speed at a constant.
Only use HDC in transmission positions D or R.
Increasing or reducing speed
You can use the accelerator or brakes to vary
this automatically controlled speed within a
range extending from approx. 4 mph/6 km/h to
15 mph/25 km/h.
You can specify a target speed within the same
range by using the lever of the cruise control.
With downhill grade over 10Ξ you can reduce
the speed to approx. 3mph/4km/h. Pull the
lever of the cruise control beyond the resis-
tance point, arrow3.
1Increasing speed
2Pull to the resistance point:
Reduce speed to approx. 4 mph/6 km/h
ba8_e70ag.book Seite 90 Freitag, 5. Juni 2009 11:42 11
Page 99 of 300
Controls
97Reference
At a glance
Driving tips
Communications
Navigation
Entertainment
Mobility
very direct. In the higher speed range, on the
other hand, the steering angle is reduced more
and more. This improves the handling capability
of your BMW over the entire speed range.
In critical situations, the system can make tar-
geted corrections to the steering angle pro-
vided by the driver and thus stabilize the vehicle
before the driver intervenes.
Malfunction
The warning lamp lights up yellow
and a message is shown on the Con-
trol Display. The active steering is
defective or has been temporarily
deactivated. At low speeds, greater steering
wheel movements are required, whereas at
higher speeds, the vehicle reacts more sensi-
tively to steering wheel movements. The stabil-
ity-promoting intervention can also be deacti-
vated. Proceed cautiously and drive
defensively.
Deactivation
Active steering deactivates in order to carry out
an initialization. This deactivation is displayed
by means of a message. The initialization can
take several minutes.
If the message does not disappear during the
current trip, have the system checked.
Defect
In the event of a defect, a corresponding text
message is displayed. Have the system
checked.
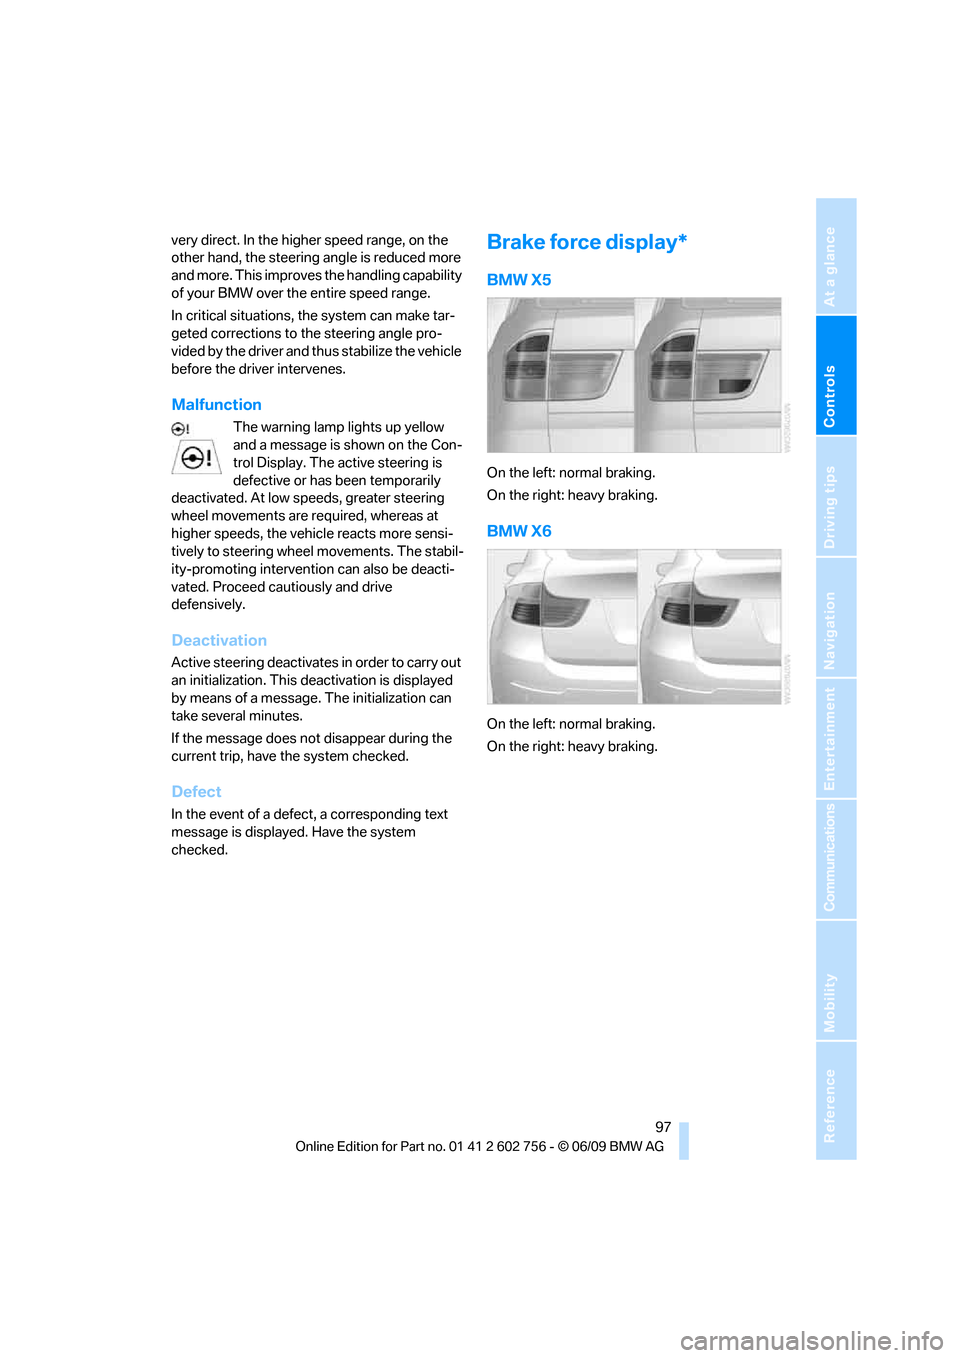
Brake force display*
BMW X5
On the left: normal braking.
On the right: heavy braking.
BMW X6
On the left: normal braking.
On the right: heavy braking.
ba8_e70ag.book Seite 97 Freitag, 5. Juni 2009 11:42 11
Page 253 of 300
Mobility
251Reference
At a glance
Controls
Driving tips
Communications
Navigation
Entertainment
When performing care and maintenance on the
headlamps, please observe the information on
page247.
For bulbs for which replacement is not
described and for checking and adjusting
headlamp aim, please contact your BMW
Sports Activity Vehicle Center.<
Light-emitting diodes LEDs
Light-emitting diodes installed behind translu-
c e n t l e n s e s s e r v e a s t h e l i g h t s o u r c e f o r m a n y o f
the controls and displays in your vehicle. These
light-emitting diodes, which operate using a
concept similar to that applied in conventional
lasers, are officially designated as Class 1 light-
emitting diodes.
Do not remove the covers, and never
stare into the unfiltered light for several
hours, as irritation of the retina could result.<
BMW X5: changing lamps
Xenon lamps
These bulbs have a very long service life and
the probability of a failure is very low. If a lamp
should nevertheless fail, you can continue driv-
ing cautiously with fog lamps
* provided that
this is permitted by the country-specific laws.
Have work on the xenon light unit includ-
ing changing the bulb carried out only by
your BMW Sports Activity Vehicle Center or a
workshop that works according to BMW repair
procedures with correspondingly trained per-
sonnel. Due to the high voltage present in the
system, there is a danger of fatal injuries when
work is carried out improperly.<
Halogen bulbs:
Parking lamps and roadside parking
lamps, daytime driving lamps
35-Watt bulb, H8
The bulb is pressurized. Therefore, wear
safety glasses and protective gloves.
Otherwise there is a danger of injuries if the
bulb is accidentally damaged during replace-
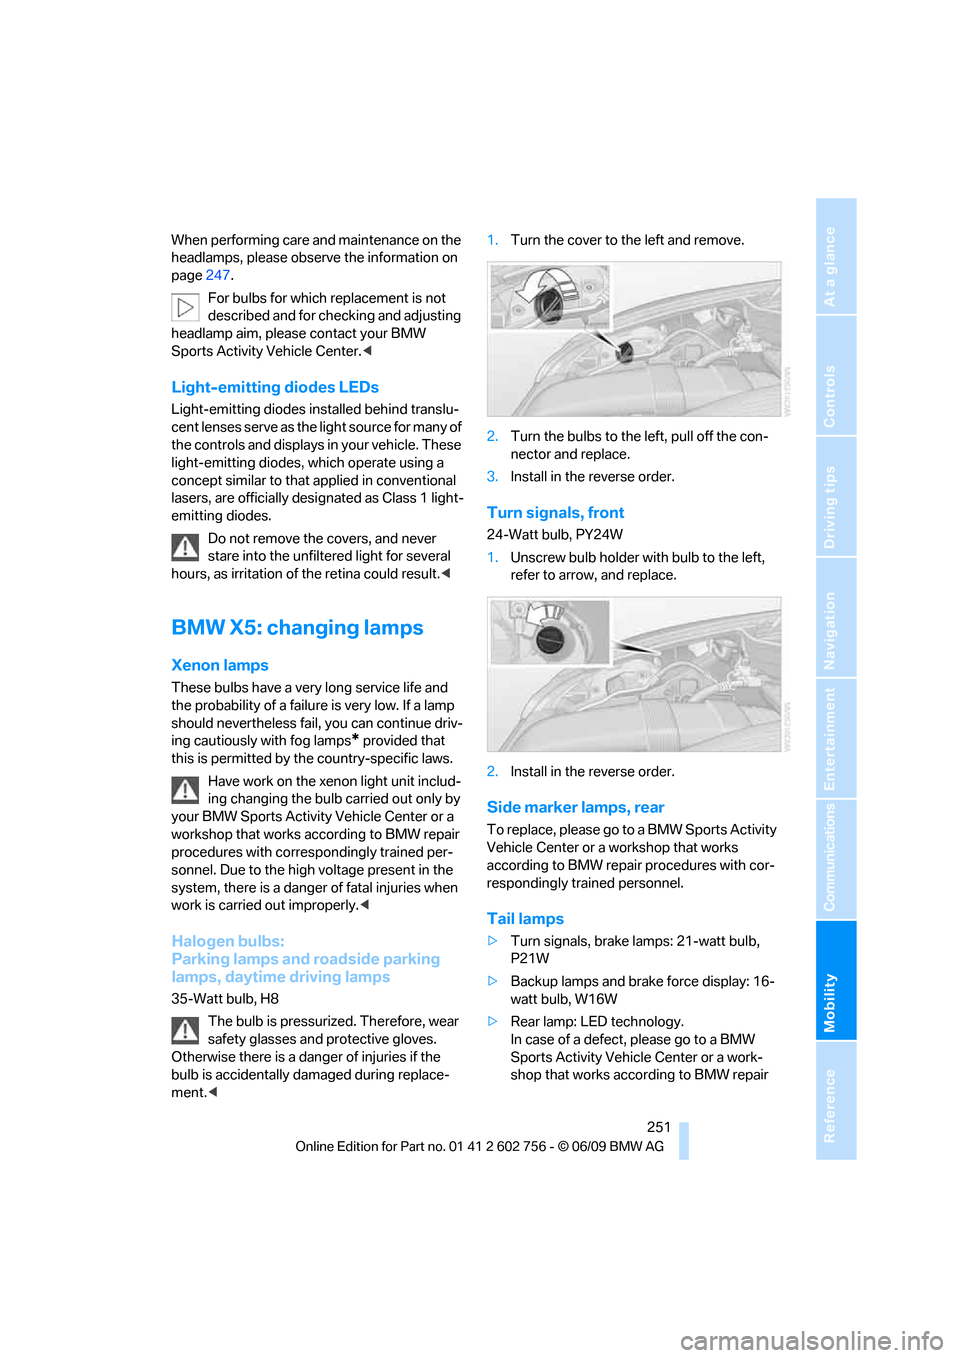
ment.<1.Turn the cover to the left and remove.
2.Turn the bulbs to the left, pull off the con-
nector and replace.
3.Install in the reverse order.
Turn signals, front
24-Watt bulb, PY24W
1.Unscrew bulb holder with bulb to the left,
refer to arrow, and replace.
2.Install in the reverse order.
Side marker lamps, rear
To replace, please go to a BMW Sports Activity
Vehicle Center or a workshop that works
according to BMW repair procedures with cor-
respondingly trained personnel.
Tail lamps
>Turn signals, brake lamps: 21-watt bulb,
P21W
>Backup lamps and brake force display: 16-
watt bulb, W16W
>Rear lamp: LED technology.
In case of a defect, please go to a BMW
Sports Activity Vehicle Center or a work-
shop that works according to BMW repair
ba8_e70ag.book Seite 251 Freitag, 5. Juni 2009 11:42 11
Page 254 of 300
Replacing components
252 procedures with correspondingly trained
personnel.
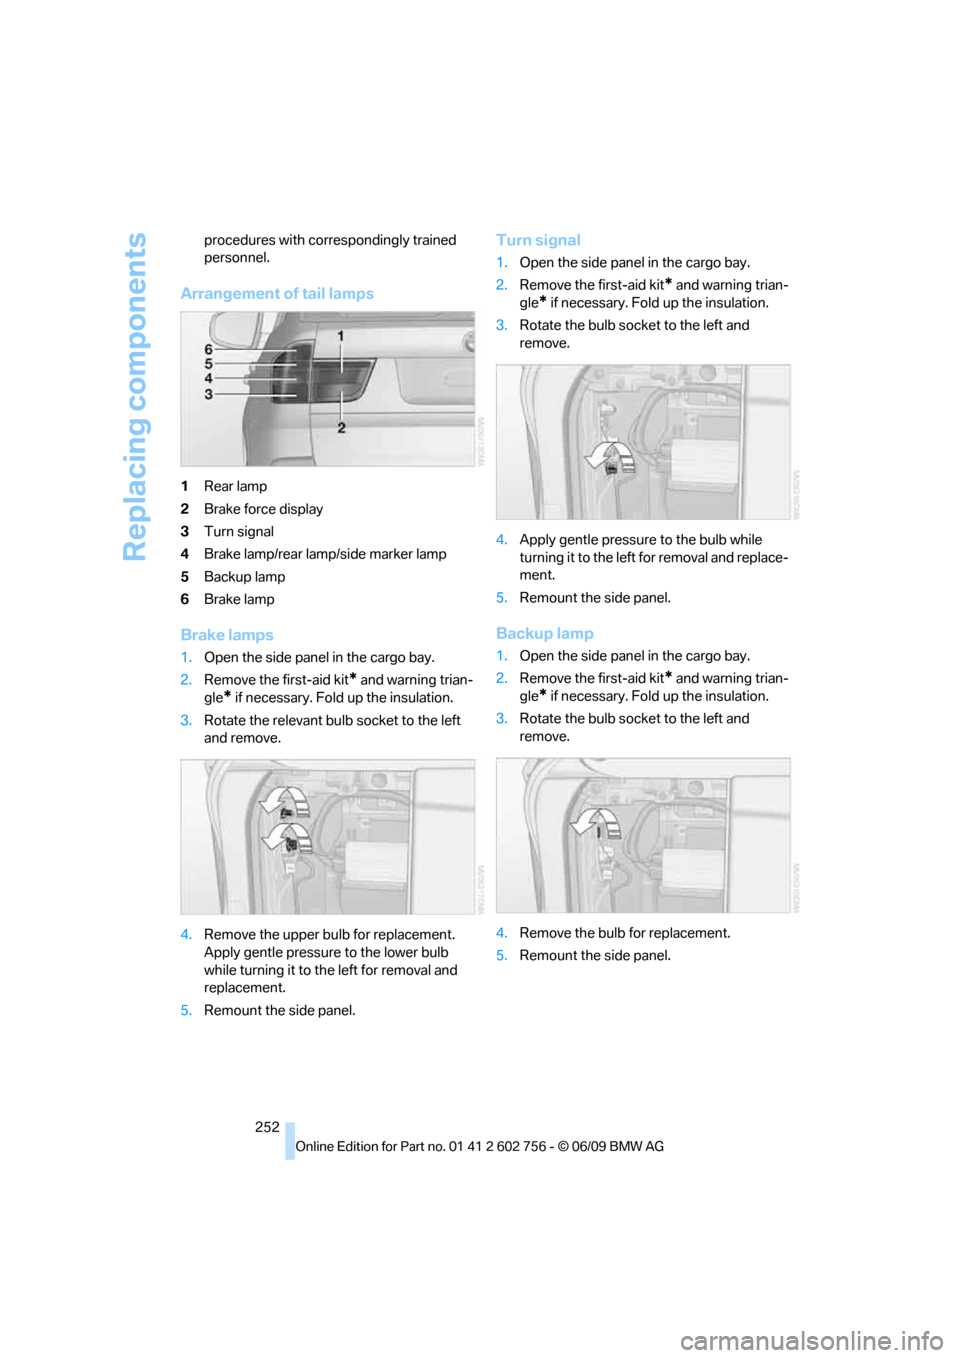
Arrangement of tail lamps
1Rear lamp
2Brake force display
3Turn signal
4Brake lamp/rear lamp/side marker lamp
5Backup lamp
6Brake lamp
Brake lamps
1.Open the side panel in the cargo bay.
2.Remove the first-aid kit
* and warning trian-
gle
* if necessary. Fold up the insulation.
3.Rotate the relevant bulb socket to the left
and remove.
4.Remove the upper bulb for replacement.
Apply gentle pressure to the lower bulb
while turning it to the left for removal and
replacement.
5.Remount the side panel.
Turn signal
1.Open the side panel in the cargo bay.
2.Remove the first-aid kit
* and warning trian-
gle
* if necessary. Fold up the insulation.
3.Rotate the bulb socket to the left and
remove.
4.Apply gentle pressure to the bulb while
turning it to the left for removal and replace-
ment.
5.Remount the side panel.
Backup lamp
1.Open the side panel in the cargo bay.
2.Remove the first-aid kit
* and warning trian-
gle
* if necessary. Fold up the insulation.
3.Rotate the bulb socket to the left and
remove.
4.Remove the bulb for replacement.
5.Remount the side panel.
ba8_e70ag.book Seite 252 Freitag, 5. Juni 2009 11:42 11
Page 255 of 300
Mobility
253Reference
At a glance
Controls
Driving tips
Communications
Navigation
Entertainment
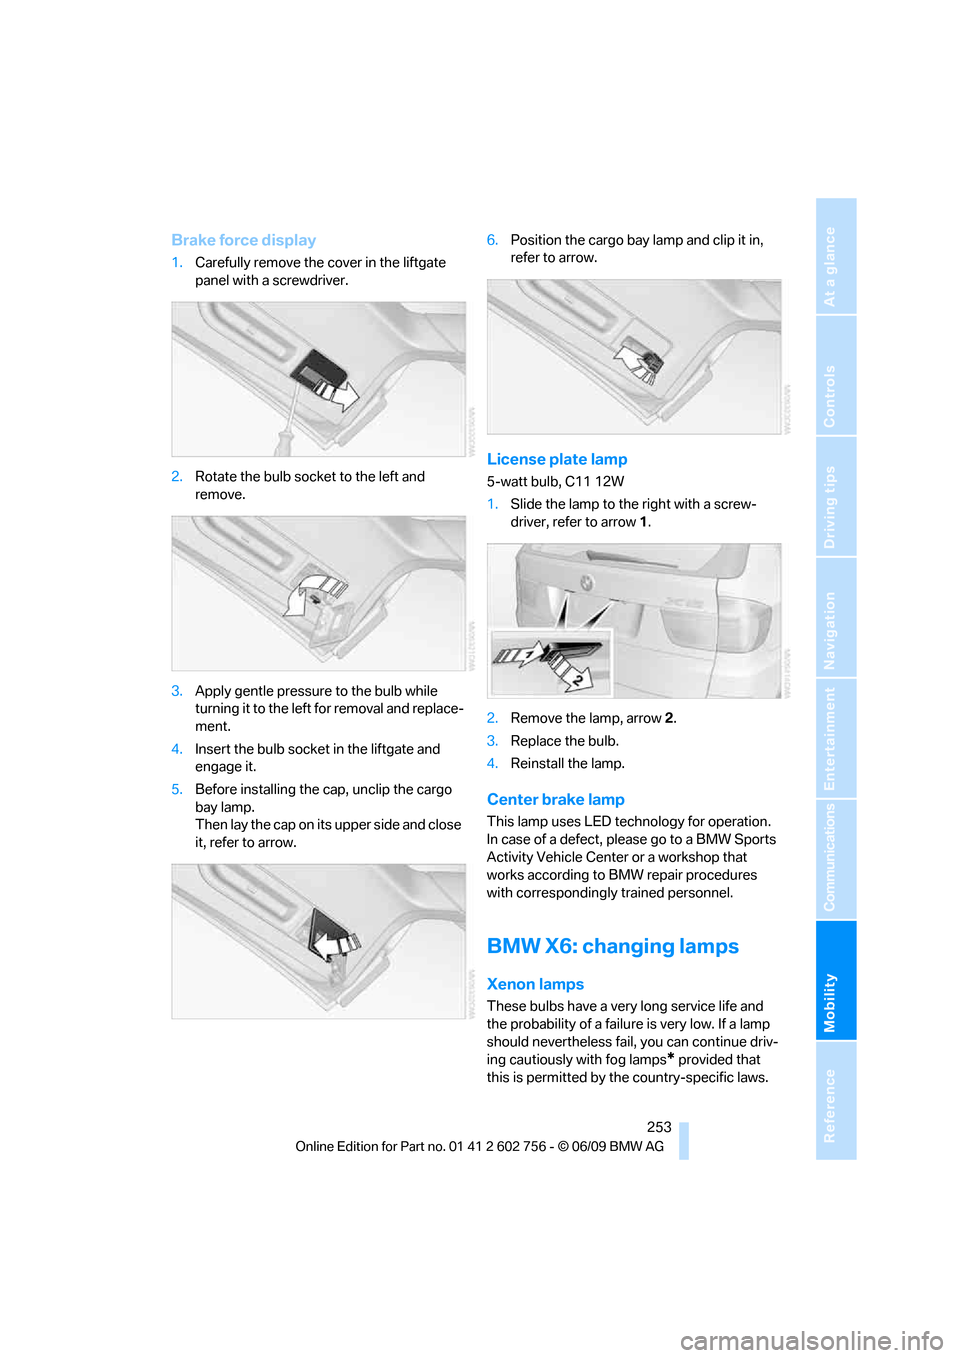
Brake force display
1.Carefully remove the cover in the liftgate
panel with a screwdriver.
2.Rotate the bulb socket to the left and
remove.
3.Apply gentle pressure to the bulb while
turning it to the left for removal and replace-
ment.
4.Insert the bulb socket in the liftgate and
engage it.
5.Before installing the cap, unclip the cargo
bay lamp.
Then lay the cap on its upper side and close
it, refer to arrow.6.Position the cargo bay lamp and clip it in,
refer to arrow.
License plate lamp
5-watt bulb, C11 12W
1.Slide the lamp to the right with a screw-
driver, refer to arrow1.
2.Remove the lamp, arrow2.
3.Replace the bulb.
4.Reinstall the lamp.
Center brake lamp
This lamp uses LED technology for operation.
In case of a defect, please go to a BMW Sports
Activity Vehicle Center or a workshop that
works according to BMW repair procedures
with correspondingly trained personnel.
BMW X6: changing lamps
Xenon lamps
These bulbs have a very long service life and
the probability of a failure is very low. If a lamp
should nevertheless fail, you can continue driv-
ing cautiously with fog lamps
* provided that
this is permitted by the country-specific laws.
ba8_e70ag.book Seite 253 Freitag, 5. Juni 2009 11:42 11