Engine BMW X5 2011 E70 User Guide
[x] Cancel search | Manufacturer: BMW, Model Year: 2011, Model line: X5, Model: BMW X5 2011 E70Pages: 312, PDF Size: 8.91 MB
Page 63 of 312
Controls
61Reference
At a glance
Driving tips
Communications
Navigation
Entertainment
Mobility
Automatic Hold
The concept
This function assists you as you drive by auto-
matically setting and releasing the parking
brake, e.g. when you are stopped at a traffic sig-
nal or in stop-and-go traffic.
When Automatic Hold is activated, the vehicle is
automatically held in place when standing.
When driving up inclines, the system prevents
your vehicle from rolling backward in an undes-
ired way.
After the engine is started, the system can be
activated and deactivated at any time the
driver's seat is occupied until the next time the
engine is switched off.
Activating
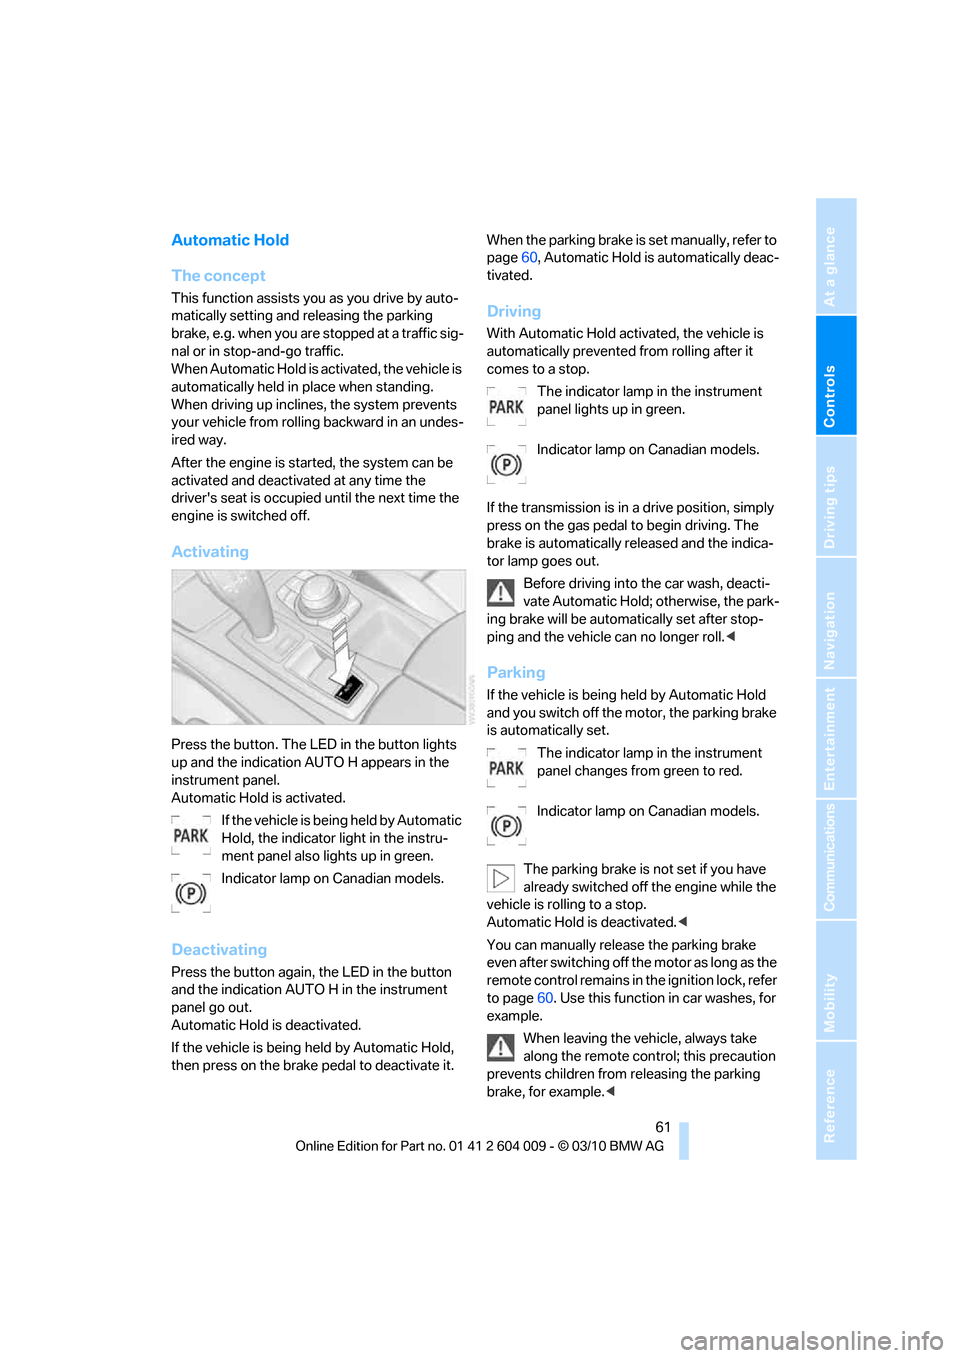
Press the button. The LED in the button lights
up and the indication AUTO H appears in the
instrument panel.
Automatic Hold is activated.
If the vehicle is being held by Automatic
Hold, the indicator light in the instru-
ment panel also lights up in green.
Indicator lamp on Canadian models.
Deactivating
Press the button again, the LED in the button
and the indication AUTO H in the instrument
panel go out.
Automatic Hold is deactivated.
If the vehicle is being held by Automatic Hold,
then press on the brake pedal to deactivate it.When the parking brake is set manually, refer to
page60, Automatic Hold is automatically deac-
tivated.
Driving
With Automatic Hold activated, the vehicle is
automatically prevented from rolling after it
comes to a stop.
The indicator lamp in the instrument
panel lights up in green.
Indicator lamp on Canadian models.
If the transmission is in a drive position, simply
press on the gas pedal to begin driving. The
brake is automatically released and the indica-
tor lamp goes out.
Before driving into the car wash, deacti-
vate Automatic Hold; otherwise, the park-
ing brake will be automatically set after stop-
ping and the vehicle can no longer roll.<
Parking
If the vehicle is being held by Automatic Hold
and you switch off the motor, the parking brake
is automatically set.
The indicator lamp in the instrument
panel changes from green to red.
Indicator lamp on Canadian models.
The parking brake is not set if you have
already switched off the engine while the
vehicle is rolling to a stop.
Automatic Hold is deactivated.<
You can manually release the parking brake
even after switching off the motor as long as the
remote control remains in the ignition lock, refer
to page60. Use this function in car washes, for
example.
When leaving the vehicle, always take
along the remote control; this precaution
prevents children from releasing the parking
brake, for example.<
Page 64 of 312
Driving
62
For your safety
Automatic Hold is automatically deactivated
when:
>The engine is switched off
>The driver's door is open and the safety belt
of the driver is disconnected
>The vehicle is braked to a stop during driv-
ing
In the instrument panel, the indicator
lamp changes from green to red and
the indication AUTO H goes out.
Indicator lamp on Canadian models.
Before you start to drive, either release the
parking brake manually, refer to page60, or
reactivate Automatic Hold, refer to page61.
Before leaving the vehicle with the engine
running, shift the selector lever into posi-
tion P of the automatic transmission and make
sure that the parking brake is set. Otherwise,
the vehicle may begin to roll.<
Malfunction
If the parking brake fails or malfunctions, secure
the vehicle against rolling, e.g. with a wheel
chock, if you leave the vehicle.
Releasing parking brake manually
In the event of an electrical power loss or elec-
trical malfunction, you can release the parking
brake manually.
Before manually releasing the parking
brake and each time you park the vehicle
without setting the parking brake, make sure
that the automatic transmission is in position P,
refer to page64. Be sure to pay attention to the
information in the instrument panel.
In addition, secure the vehicle against rolling,
e.g. with a wheel chock. Otherwise there is a
danger that the vehicle could roll if parked on a
steep slope.<
Jump starting and towing, refer to information
starting on page274.
Releasing
1.Open the left-hand side panel in the cargo
area.
2.Remove the first-aid kit
* and warning trian-
gle
* if necessary. Close the bracket of the
warning triangle.
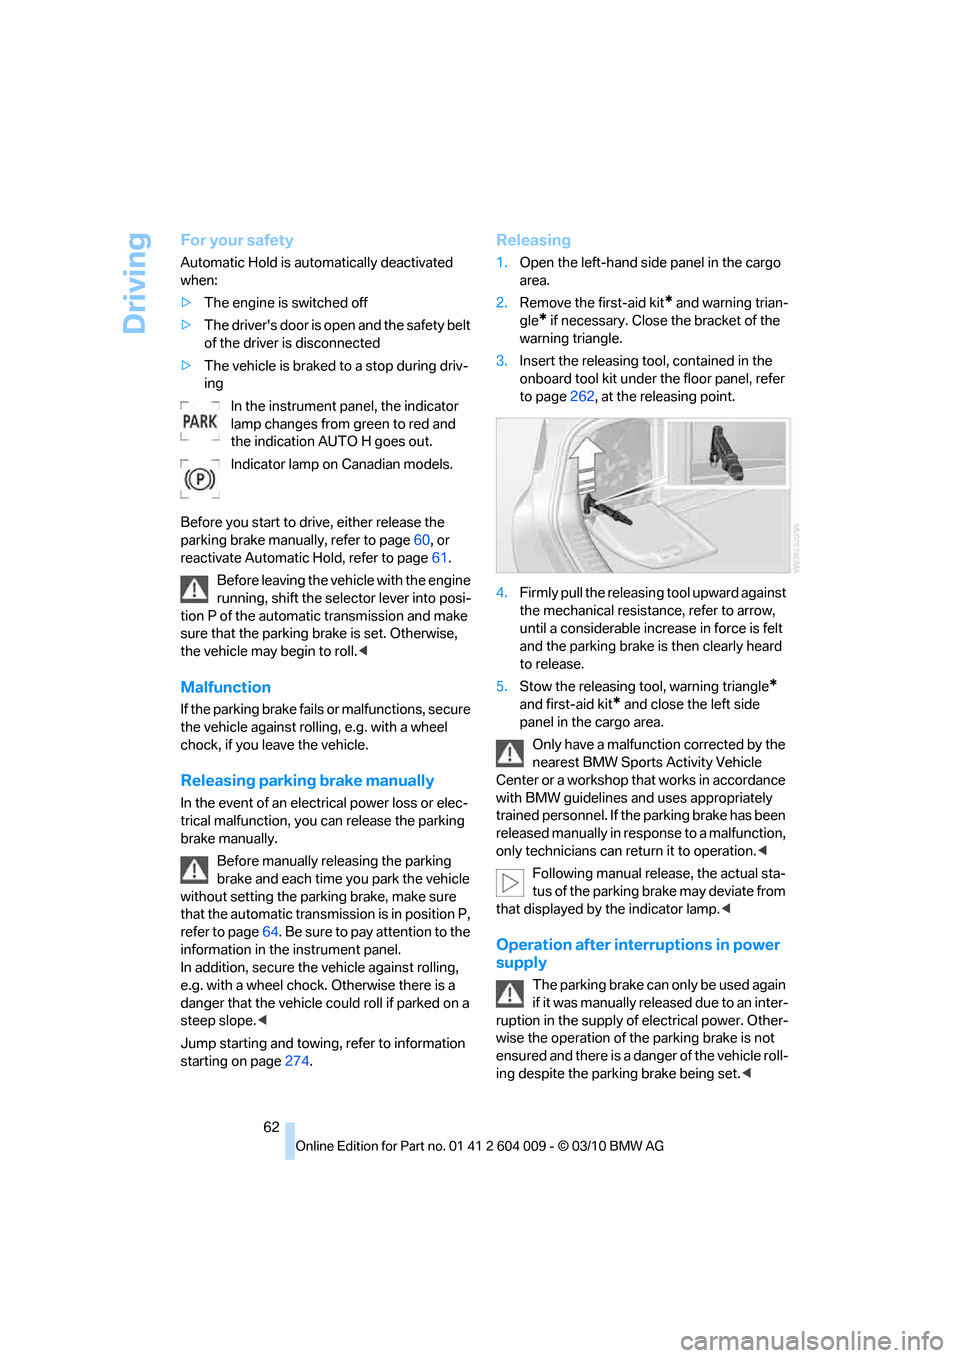
3.Insert the releasing tool, contained in the
onboard tool kit under the floor panel, refer
to page262, at the releasing point.
4.Firmly pull the releasing tool upward against
the mechanical resistance, refer to arrow,
until a considerable increase in force is felt
and the parking brake is then clearly heard
to release.
5.Stow the releasing tool, warning triangle
*
and first-aid kit* and close the left side
panel in the cargo area.
Only have a malfunction corrected by the
nearest BMW Sports Activity Vehicle
Center or a workshop that works in accordance
with BMW guidelines and uses appropriately
trained personnel. If the parking brake has been
released manually in response to a malfunction,
only technicians can return it to operation.<
Following manual release, the actual sta-
tus of the parking brake may deviate from
that displayed by the indicator lamp.<
Operation after interruptions in power
supply
The parking brake can only be used again
if it was manually released due to an inter-
ruption in the supply of electrical power. Other-
wise the operation of the parking brake is not
ensured and there is a danger of the vehicle roll-
ing despite the parking brake being set.<
Page 65 of 312
Controls
63Reference
At a glance
Driving tips
Communications
Navigation
Entertainment
Mobility
Procedure
1.Switch on the ignition.
2.Press the button with the brake depressed.
The indicator lamp in the instrument
panel goes out as soon as the parking
brake is ready for operation again.
Indicator lamp on Canadian models.
Any noises which occur are normal. Startup
may take several seconds.
Automatic transmission with
Steptronic
In addition to fully automatic operation, you can
also manually shift with the Steptronic, refer to
page64.
Transmission positions
P R N D M/S + –
To prevent the vehicle from creeping
after you select a driving position, main-
tain pressure on the brake pedal until you are
ready to start.<
Displays in instrument panel
The transmission position is indicated and, in
manual mode, the gear currently engaged, e.g.
M3.
Engaging transmission position
>You can only engage transmission posi-
tions D, R or N when the engine is running.>With the vehicle stationary, depress the
brake pedal before shifting out of P or N;
otherwise the shift command will not be
executed: shiftlock.
To prevent the vehicle from creeping
after you select a driving position,
maintain pressure on the brake pedal until
you are ready to start.<
Shifting into D, R, N
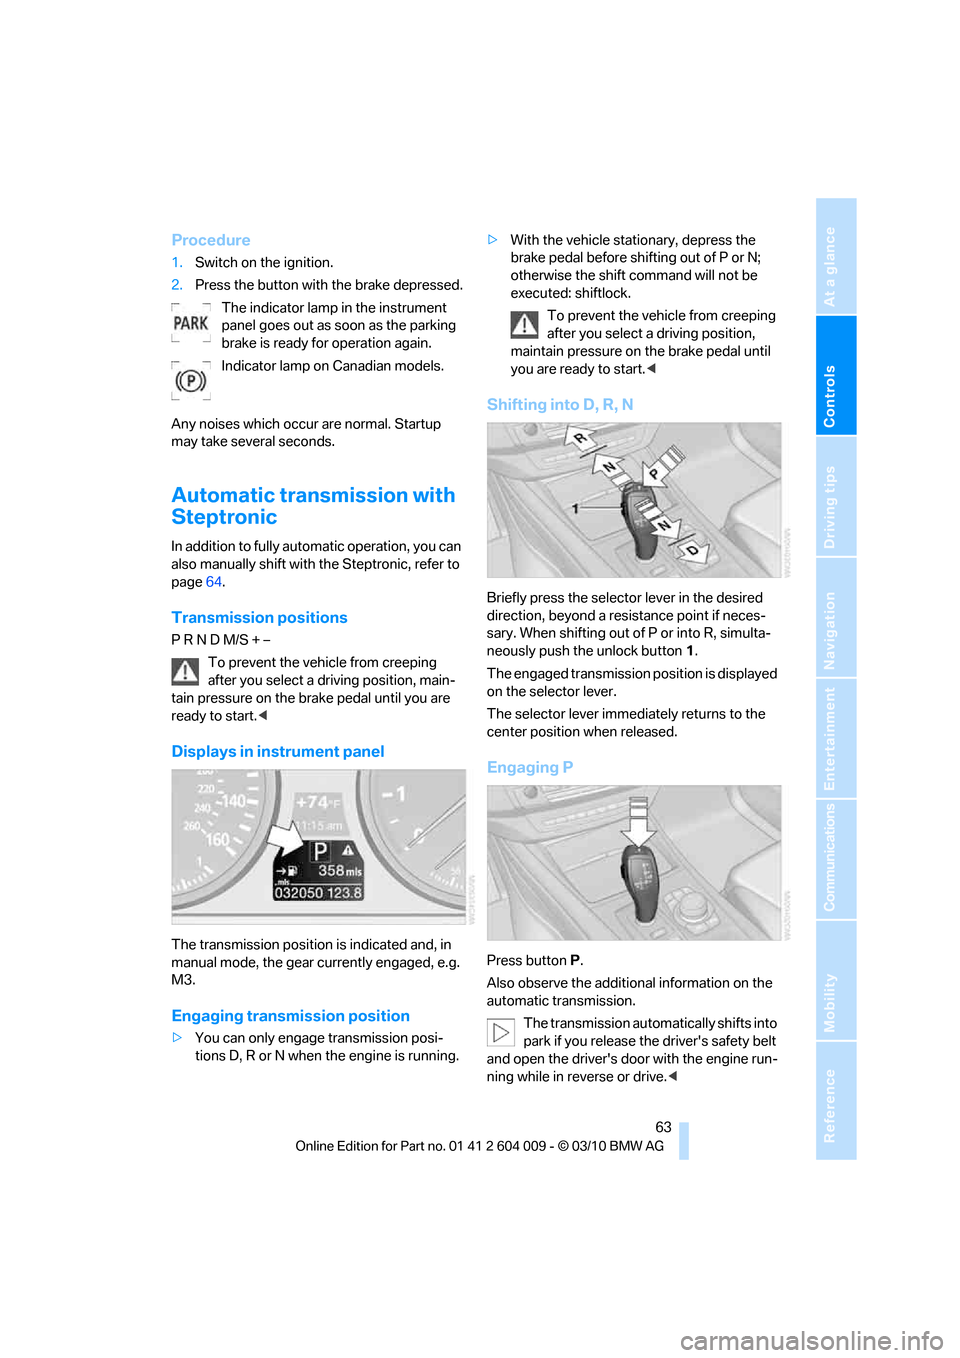
Briefly press the selector lever in the desired
direction, beyond a resistance point if neces-
sary. When shifting out of P or into R, simulta-
neously push the unlock button1.
The engaged transmission position is displayed
on the selector lever.
The selector lever immediately returns to the
center position when released.
Engaging P
Press buttonP.
Also observe the additional information on the
automatic transmission.
The transmission automatically shifts into
park if you release the driver's safety belt
and open the driver's door with the engine run-
ning while in reverse or drive.<
Page 66 of 312
Driving
64
R Reverse
Select only with the vehicle stationary.
A lock prevents the transmission from being
inadvertently shifted into position R. To release
the lock, press the unlock button1.
P Park
Select only with the vehicle stationary. The rear
wheels are locked.
P is engaged automatically as soon as
you switch off the engine unless N is
engaged and on vehicles with Comfort Access
the remote control is inserted in the ignition
lock, refer to page58.<
N Neutral
Can, for example, be engaged in automatic car
washes. The vehicle can roll.
N remains engaged even after the engine
is switched off whenever you leave the
remote control in the ignition lock. This function
is used, for example, in a car wash, refer to
page59. After approx. 30 minutes P is auto-
matically engaged.<
D Drive, automatic position
Position for normal vehicle operation. All for-
ward gears are available.
Under normal operating conditions, the fuel
consumption is lowest when driving in position
D.
Kickdown
The kickdown mode provides maximum accel-
eration.
Press the accelerator pedal beyond the
increased resistance at full throttle.
Sport program and manual mode M/S
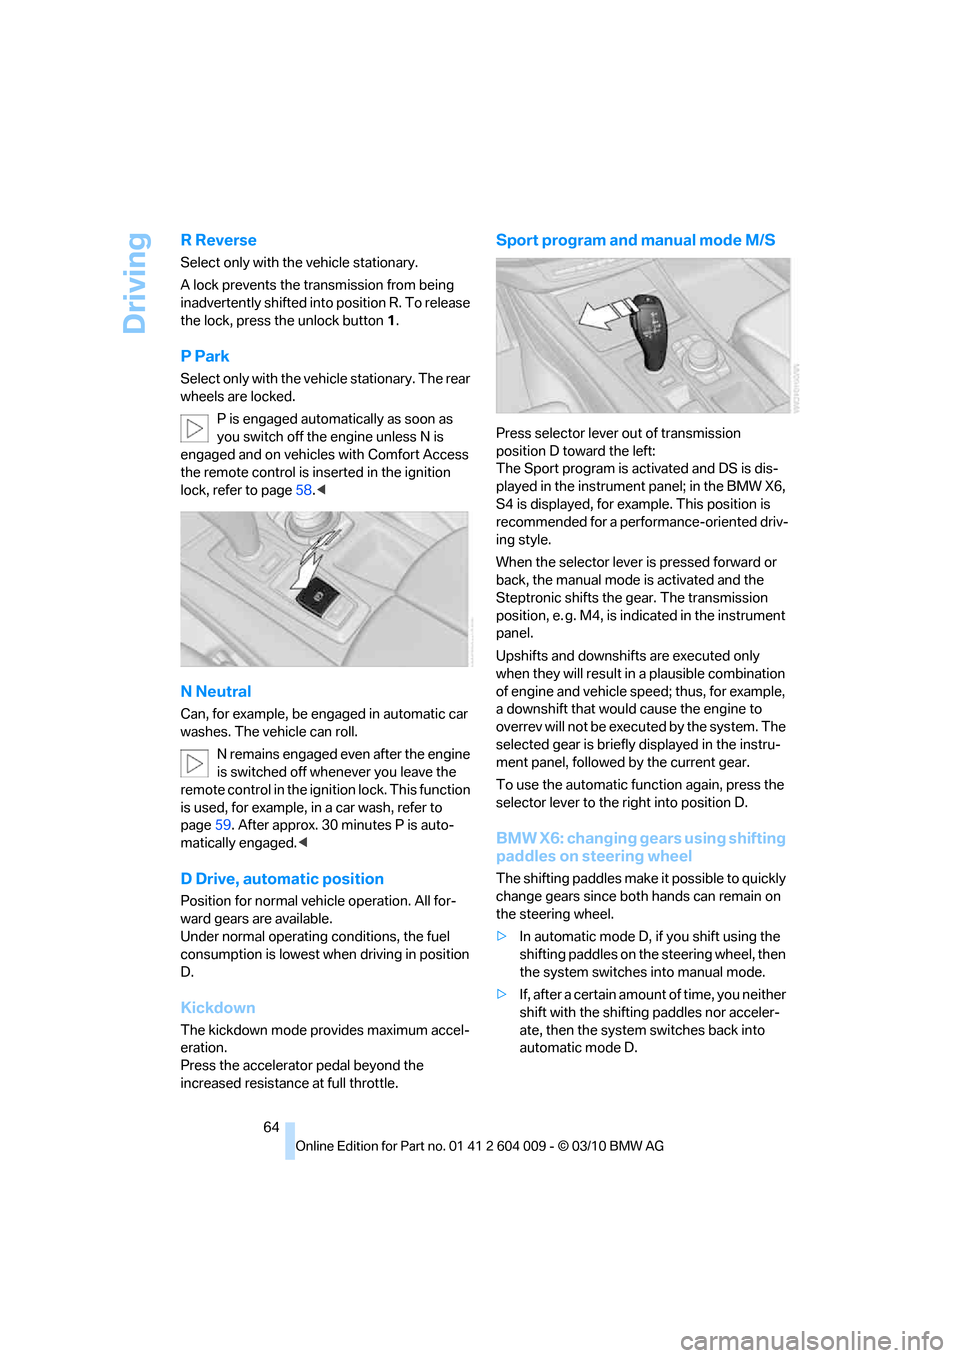
Press selector lever out of transmission
position D toward the left:
The Sport program is activated and DS is dis-
played in the instrument panel; in the BMW X6,
S4 is displayed, for example. This position is
recommended for a performance-oriented driv-
ing style.
When the selector lever is pressed forward or
back, the manual mode is activated and the
Steptronic shifts the gear. The transmission
position, e. g. M4, is indicated in the instrument
panel.
Upshifts and downshifts are executed only
when they will result in a plausible combination
of engine and vehicle speed; thus, for example,
a downshift that would cause the engine to
overrev will not be executed by the system. The
selected gear is briefly displayed in the instru-
ment panel, followed by the current gear.
To use the automatic function again, press the
selector lever to the right into position D.
BMW X6: changing gears using shifting
paddles on steering wheel
The shifting paddles make it possible to quickly
change gears since both hands can remain on
the steering wheel.
>In automatic mode D, if you shift using the
shifting paddles on the steering wheel, then
the system switches into manual mode.
>If, after a certain amount of time, you neither
shift with the shifting paddles nor acceler-
ate, then the system switches back into
automatic mode D.
Page 67 of 312
Controls
65Reference
At a glance
Driving tips
Communications
Navigation
Entertainment
Mobility
With the transmission position M/S
selected, the manual mode remains
active.<
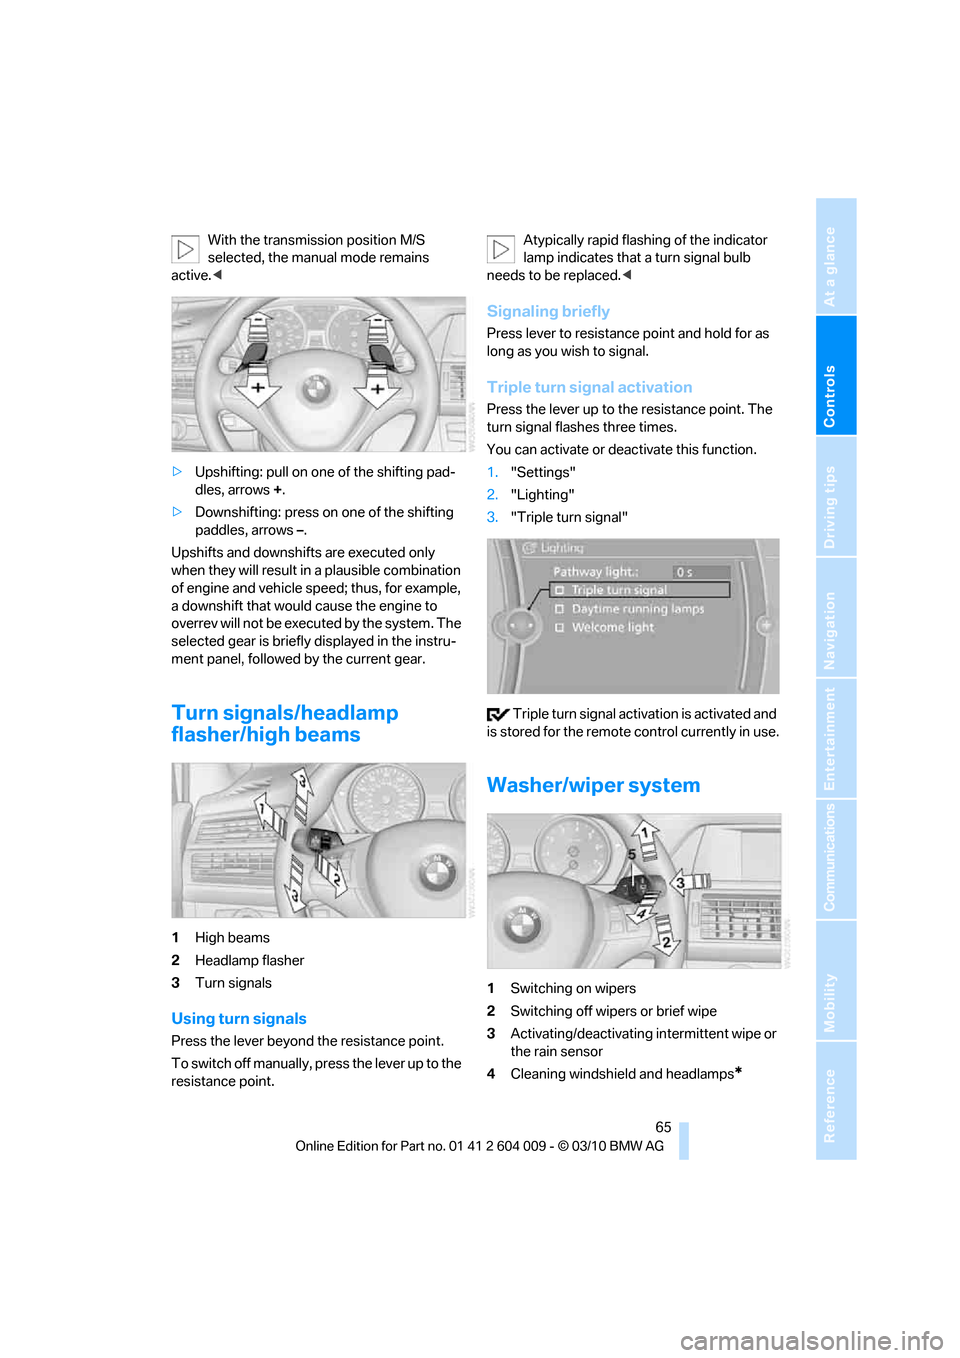
>Upshifting: pull on one of the shifting pad-
dles, arrows +.
>Downshifting: press on one of the shifting
paddles, arrows –.
Upshifts and downshifts are executed only
when they will result in a plausible combination
of engine and vehicle speed; thus, for example,
a downshift that would cause the engine to
overrev will not be executed by the system. The
selected gear is briefly displayed in the instru-
ment panel, followed by the current gear.
Turn signals/headlamp
flasher/high beams
1High beams
2Headlamp flasher
3Turn signals
Using turn signals
Press the lever beyond the resistance point.
To switch off manually, press the lever up to the
resistance point.Atypically rapid flashing of the indicator
lamp indicates that a turn signal bulb
needs to be replaced.<
Signaling briefly
Press lever to resistance point and hold for as
long as you wish to signal.
Triple turn signal activation
Press the lever up to the resistance point. The
turn signal flashes three times.
You can activate or deactivate this function.
1."Settings"
2."Lighting"
3."Triple turn signal"
Triple turn signal activation is activated and
is stored for the remote control currently in use.
Washer/wiper system
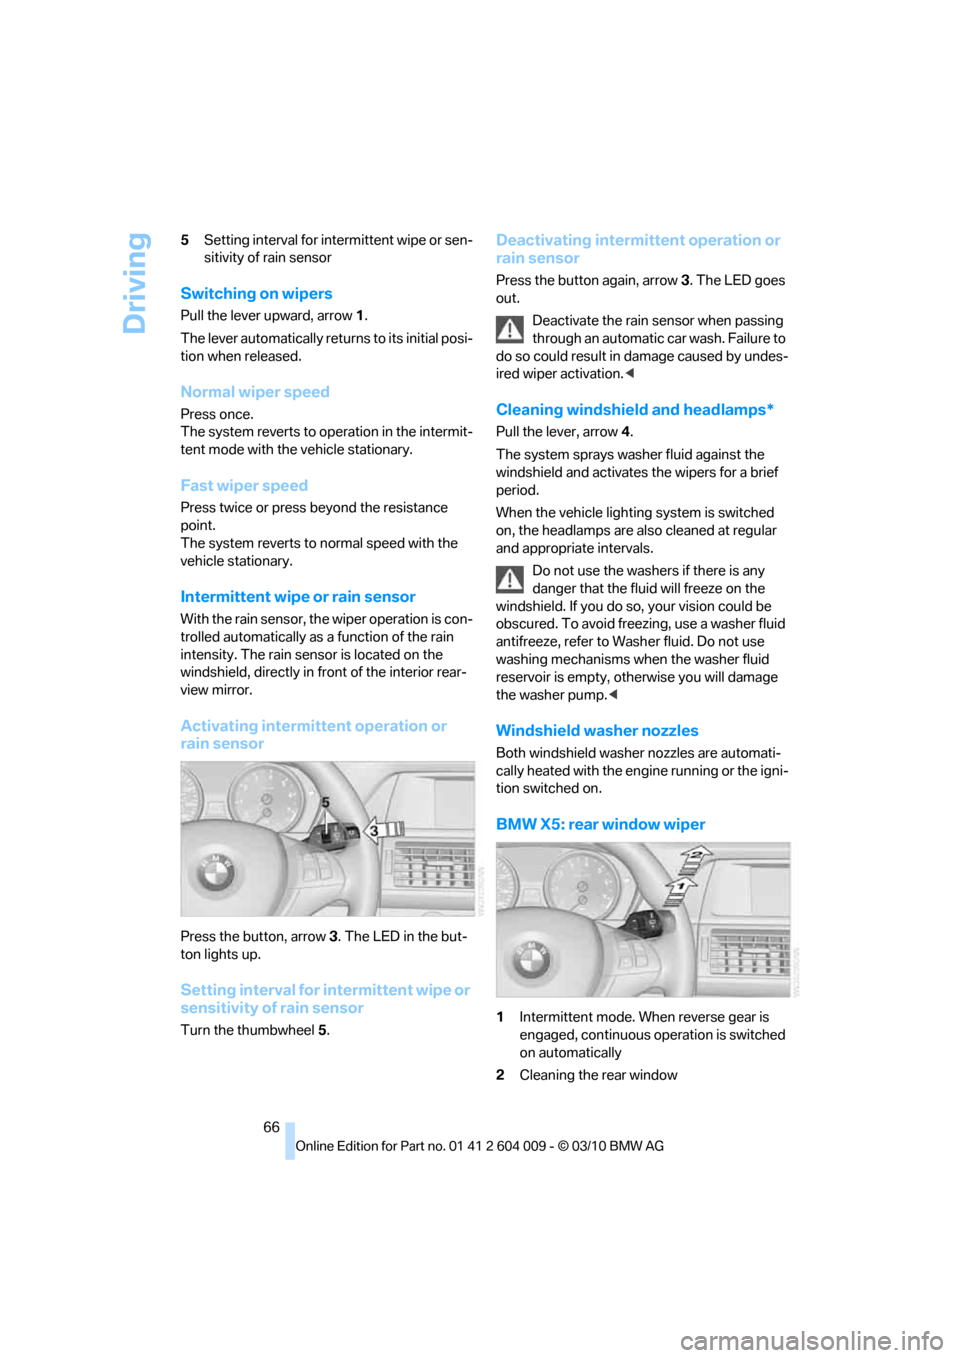
1Switching on wipers
2Switching off wipers or brief wipe
3Activating/deactivating intermittent wipe or
the rain sensor
4Cleaning windshield and headlamps*
Page 68 of 312
Driving
66 5Setting interval for intermittent wipe or sen-
sitivity of rain sensor
Switching on wipers
Pull the lever upward, arrow1.
The lever automatically returns to its initial posi-
tion when released.
Normal wiper speed
Press once.
The system reverts to operation in the intermit-
tent mode with the vehicle stationary.
Fast wiper speed
Press twice or press beyond the resistance
point.
The system reverts to normal speed with the
vehicle stationary.
Intermittent wipe or rain sensor
With the rain sensor, the wiper operation is con-
trolled automatically as a function of the rain
intensity. The rain sensor is located on the
windshield, directly in front of the interior rear-
view mirror.
Activating intermittent operation or
rain sensor
Press the button, arrow3. The LED in the but-
ton lights up.
Setting interval for intermittent wipe or
sensitivity of rain sensor
Turn the thumbwheel5.
Deactivating intermittent operation or
rain sensor
Press the button again, arrow3. The LED goes
out.
Deactivate the rain sensor when passing
through an automatic car wash. Failure to
do so could result in damage caused by undes-
ired wiper activation.<
Cleaning windshield and headlamps*
Pull the lever, arrow4.
The system sprays washer fluid against the
windshield and activates the wipers for a brief
period.
When the vehicle lighting system is switched
on, the headlamps are also cleaned at regular
and appropriate intervals.
Do not use the washers if there is any
danger that the fluid will freeze on the
windshield. If you do so, your vision could be
obscured. To avoid freezing, use a washer fluid
antifreeze, refer to Washer fluid. Do not use
washing mechanisms when the washer fluid
reservoir is empty, otherwise you will damage
the washer pump.<
Windshield washer nozzles
Both windshield washer nozzles are automati-
cally heated with the engine running or the igni-
tion switched on.
BMW X5: rear window wiper
1Intermittent mode. When reverse gear is
engaged, continuous operation is switched
on automatically
2Cleaning the rear window
Page 69 of 312
Controls
67Reference
At a glance
Driving tips
Communications
Navigation
Entertainment
Mobility
Do not use washing mechanisms when
the washer fluid reservoir is empty, other-
wise you will damage the washer pump.<
Washer fluid
Washer fluid antifreeze is flammable. For
this reason, keep it away from ignition
sources and store only in the closed original
container out of reach of children. Otherwise,
there is the danger of bodily injury. Always
observe the instructions for use provided on the
containers.<
Filler neck for washer fluid
Only add washer fluid with the engine
cooled down to exclude contact with hot
engine components. Otherwise there is a dan-
ger of fire and to personal safety if the fluid is
spilled.<
All washer nozzles are supplied from one reser-
voir.
Fill with water and – if required – with a washer
antifreeze, according to manufacturer's recom-
mendations.
In order to maintain the mixture ratio, mix
the washer fluid before filling.<
Capacity
Approx. 6.3 US quarts/6 liters.
Cruise control*
The concept
The cruise control with a braking function is
available for use at speeds of approx. 20 mph/
30 km/h and higher. The vehicle stores and
maintains the speed that you set using the lever
mounted on the steering column. To keep the
specified speed constant, the system brakes if
the engine braking effect is not sufficient on a
downhill grade.
Do not use the cruise control under driv-
ing conditions that do not permit a con-
stant speed, e.g. when driving on winding
roads, in heavy traffic or in poor road conditions
such as snow, rain, ice, and loose road surface.
Otherwise you could lose control of the vehicle
and cause an accident.<
One lever for all functions
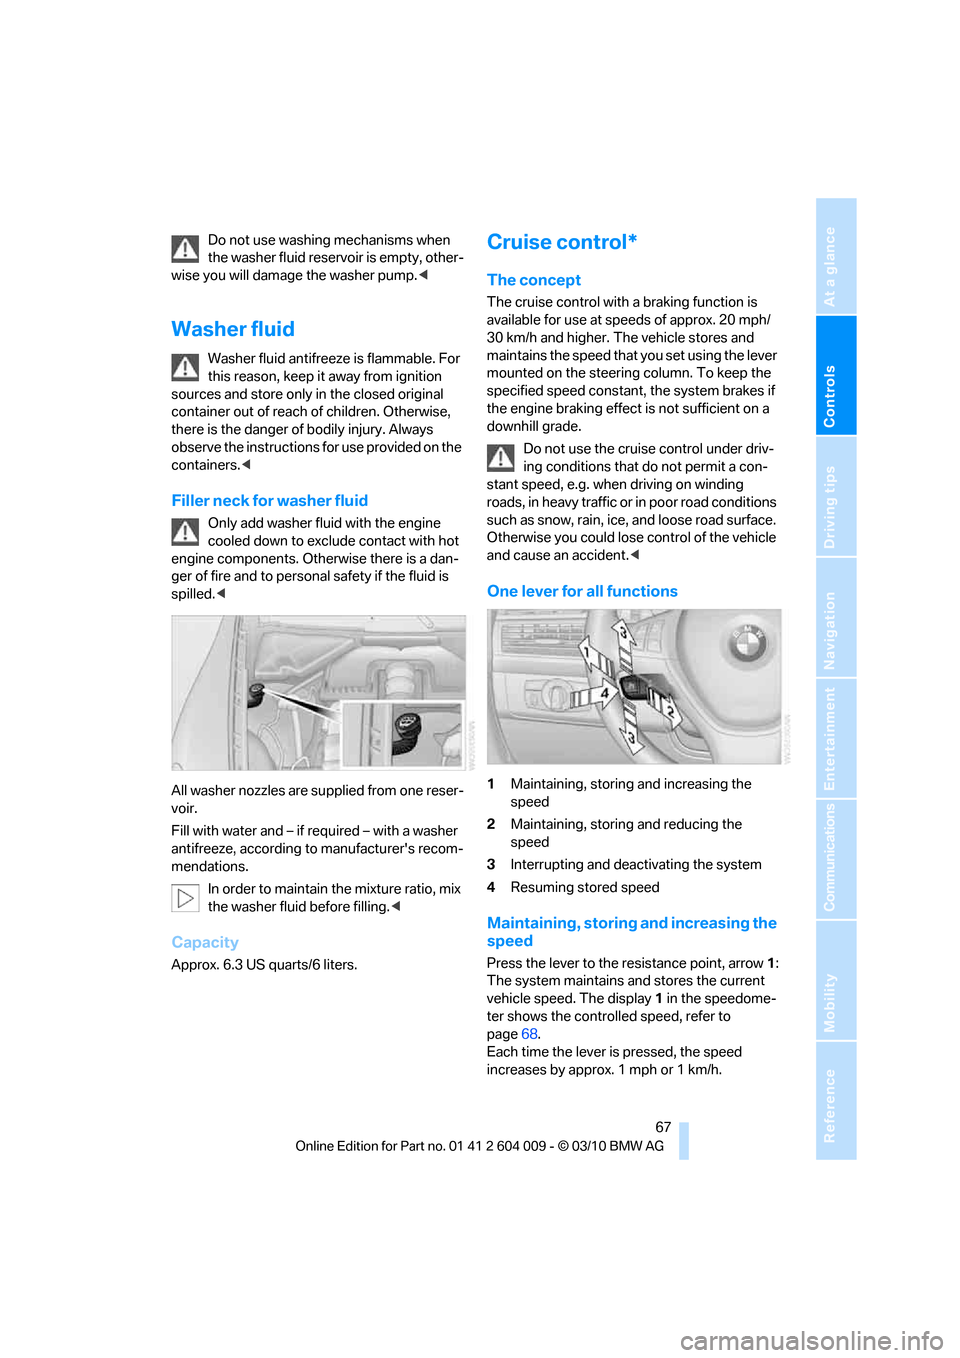
1Maintaining, storing and increasing the
speed
2Maintaining, storing and reducing the
speed
3Interrupting and deactivating the system
4Resuming stored speed
Maintaining, storing and increasing the
speed
Press the lever to the resistance point, arrow1:
The system maintains and stores the current
vehicle speed. The display1 in the speedome-
ter shows the controlled speed, refer to
page68.
Each time the lever is pressed, the speed
increases by approx. 1 mph or 1 km/h.
Page 71 of 312
Controls
69Reference
At a glance
Driving tips
Communications
Navigation
Entertainment
Mobility
cruise control will, within limits, adjust your
vehicle's speed automatically so that you can
flow with the traffic without having to make con-
stant adjustments. If, for example, while cruis-
ing at the selected speed, you begin to
approach a slower vehicle ahead of you in the
same lane, the system will reduce your vehicle's
speed to the same as that of the vehicle ahead
to maintain your selected distance setting. You
can vary the following distance, which will vary
with speed. Based on your selected distance
setting, the system automatically decreases the
throttle setting and lightly applies the brakes if
necessary. In addition, if the vehicle ahead of
you slows to a complete stop, the system can
follow this action within the given scope and
can also accelerate from a complete stop if the
vehicle ahead of you drives off again shortly
thereafter. During braking, your vehicle brake
lamps will automatically illuminate to alert a fol-
lowing driver to take action. In addition, it may
be necessary for your vehicle to downshift the
automatic transmission to maintain the dis-
tance setting selected. As soon as the road in
front of you has no moving vehicles, the system
will accelerate to your desired speed. This set
speed is also maintained on downhill grades,
however the vehicle speed can drop below the
set speed when driving uphill if the engine out-
put is not sufficient.
Active cruise control cannot detect stop
signs, red lights, or any object that is
stopped or is blocking the road.
Active cruise control is not and must not be
used as a collision avoidance/warning system.
Since this active cruise control system is a new
technology and operates differently from con-
ventional cruise control systems to which you
may be accustomed, it is necessary that you
read all of the pages relating to this system
before use. Carefully read and observe the
information on the system limitations beginning
on page73 to obtain a good command of the
system and its range of applications.
the brake pedal, a somewhat different braking
feel results.
Professional navigation system*
If the vehicle is equipped with a Professional
navigation system, the system adapts the
acceleration and deceleration behavior of the
vehicle to the road on which you are currently
driving.
To ensure that the system has the latest
information on the course of the road, use
the most recent version of the navigation
data.<
If the vehicle position is unknown, e. g. if you
have left the region covered by the map, the
navigation system ceases to influence vehicle
behavior.
Applications
Please try the system first during sparse traffic
and clear road conditions so that you can get
used to the system. After you have experience
and understand the system, only then use it
during normal traffic.
As with conventional cruise control systems,
active cruise control in no way reduces or sub-
stitutes for the driver's own personal experi-
ence, responsibility, alertness and awareness in
adjusting speed, braking or otherwise control-
ling the vehicle. The driver should decide when
to use the system on the basis of road, traffic,
visibility, and weather conditions. Active cruise
control is intended for use on highway-type
roadways where traffic is moving relatively
smoothly as well as in slow-moving traffic con-
gestion. Do not use the system in city driving; in
complex driving situations; heavy traffic such as
during rush hour; on curvy, winding roads, slip-
pery roads or roads with sharp curves such as
highway off-ramps; during inclement weather
such as snow, strong rain or fog; or when enter-
ing interchanges, service/parking areas or toll
booths. It is also important to regulate your
vehicle's speed and distance setting within
applicable legal limits. Always be ready to take
Page 73 of 312
Controls
71Reference
At a glance
Driving tips
Communications
Navigation
Entertainment
Mobility
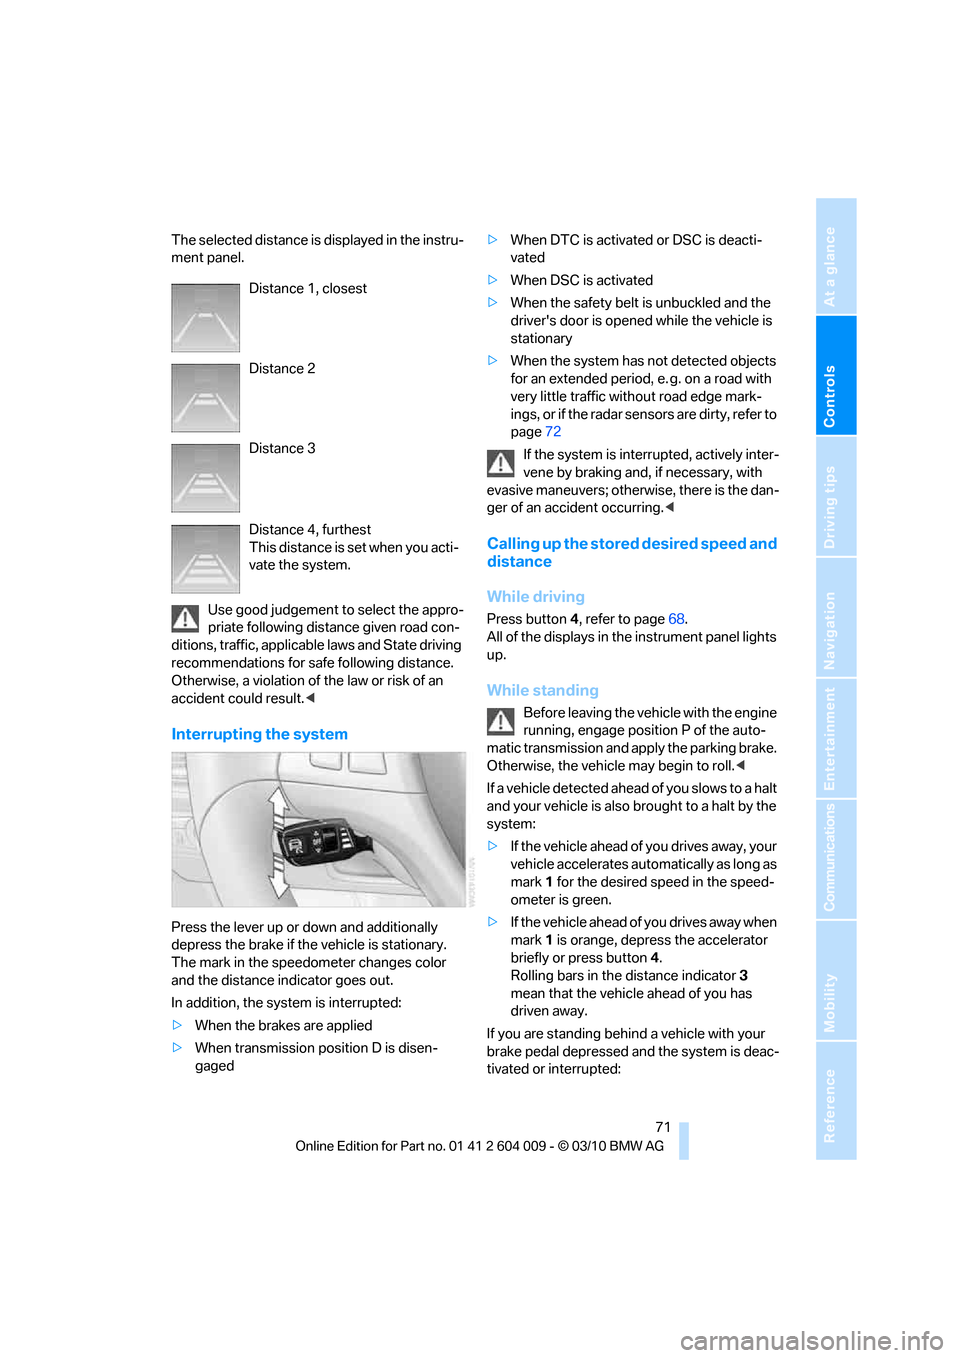
The selected distance is displayed in the instru-
ment panel.
Use good judgement to select the appro-
priate following distance given road con-
ditions, traffic, applicable laws and State driving
recommendations for safe following distance.
Otherwise, a violation of the law or risk of an
accident could result.<
Interrupting the system
Press the lever up or down and additionally
depress the brake if the vehicle is stationary.
The mark in the speedometer changes color
and the distance indicator goes out.
In addition, the system is interrupted:
>When the brakes are applied
>When transmission position D is disen-
gaged>When DTC is activated or DSC is deacti-
vated
>When DSC is activated
>When the safety belt is unbuckled and the
driver's door is opened while the vehicle is
stationary
>When the system has not detected objects
for an extended period, e. g. on a road with
very little traffic without road edge mark-
ings, or if the radar sensors are dirty, refer to
page72
If the system is interrupted, actively inter-
vene by braking and, if necessary, with
evasive maneuvers; otherwise, there is the dan-
ger of an accident occurring.<
Calling up the stored desired speed and
distance
While driving
Press button4, refer to page68.
All of the displays in the instrument panel lights
up.
While standing
Before leaving the vehicle with the engine
running, engage position P of the auto-
matic transmission and apply the parking brake.
Otherwise, the vehicle may begin to roll.<
If a vehicle detected ahead of you slows to a halt
and your vehicle is also brought to a halt by the
system:
>If the vehicle ahead of you drives away, your
vehicle accelerates automatically as long as
mark 1 for the desired speed in the speed-
ometer is green.
>If the vehicle ahead of you drives away when
mark 1 is orange, depress the accelerator
briefly or press button 4.
Rolling bars in the distance indicator 3
mean that the vehicle ahead of you has
driven away.
If you are standing behind a vehicle with your
brake pedal depressed and the system is deac-
tivated or interrupted: Distance 1, closest
Distance 2
Distance 3
Distance 4, furthest
This distance is set when you acti-
vate the system.
Page 79 of 312
Controls
77Reference
At a glance
Driving tips
Communications
Navigation
Entertainment
Mobility
Tachometer
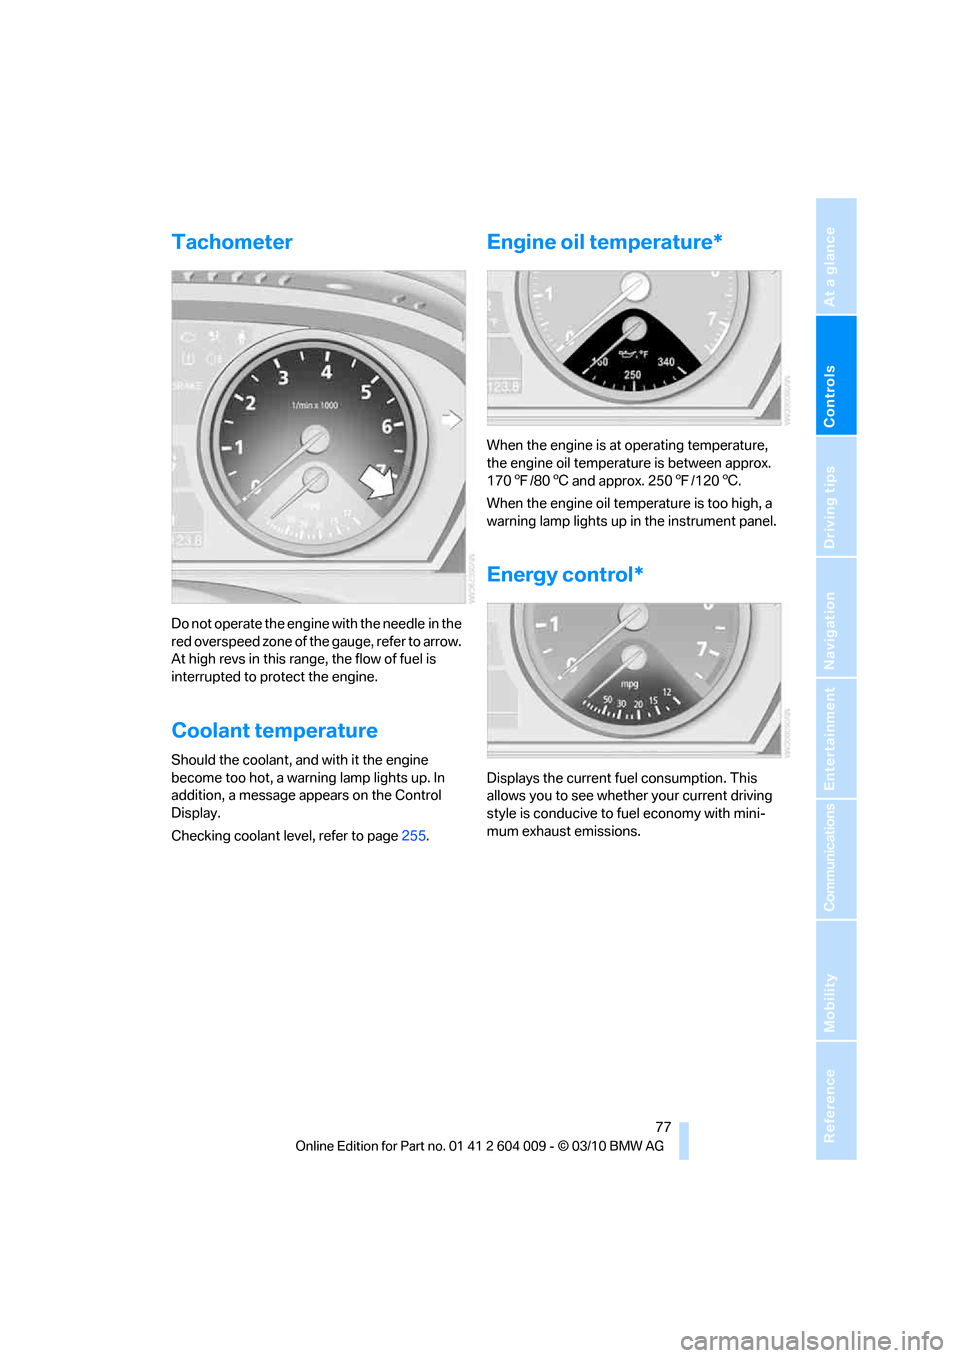
Do not operate the engine with the needle in the
red overspeed zone of the gauge, refer to arrow.
At high revs in this range, the flow of fuel is
interrupted to protect the engine.
Coolant temperature
Should the coolant, and with it the engine
become too hot, a warning lamp lights up. In
addition, a message appears on the Control
Display.
Checking coolant level, refer to page255.
Engine oil temperature*
When the engine is at operating temperature,
the engine oil temperature is between approx.
1707/806 and approx. 2507/1206.
When the engine oil temperature is too high, a
warning lamp lights up in the instrument panel.
Energy control*
Displays the current fuel consumption. This
allows you to see whether your current driving
style is conducive to fuel economy with mini-
mum exhaust emissions.