display BMW X5 2011 E70 Owner's Guide
[x] Cancel search | Manufacturer: BMW, Model Year: 2011, Model line: X5, Model: BMW X5 2011 E70Pages: 312, PDF Size: 8.91 MB
Page 73 of 312
Controls
71Reference
At a glance
Driving tips
Communications
Navigation
Entertainment
Mobility
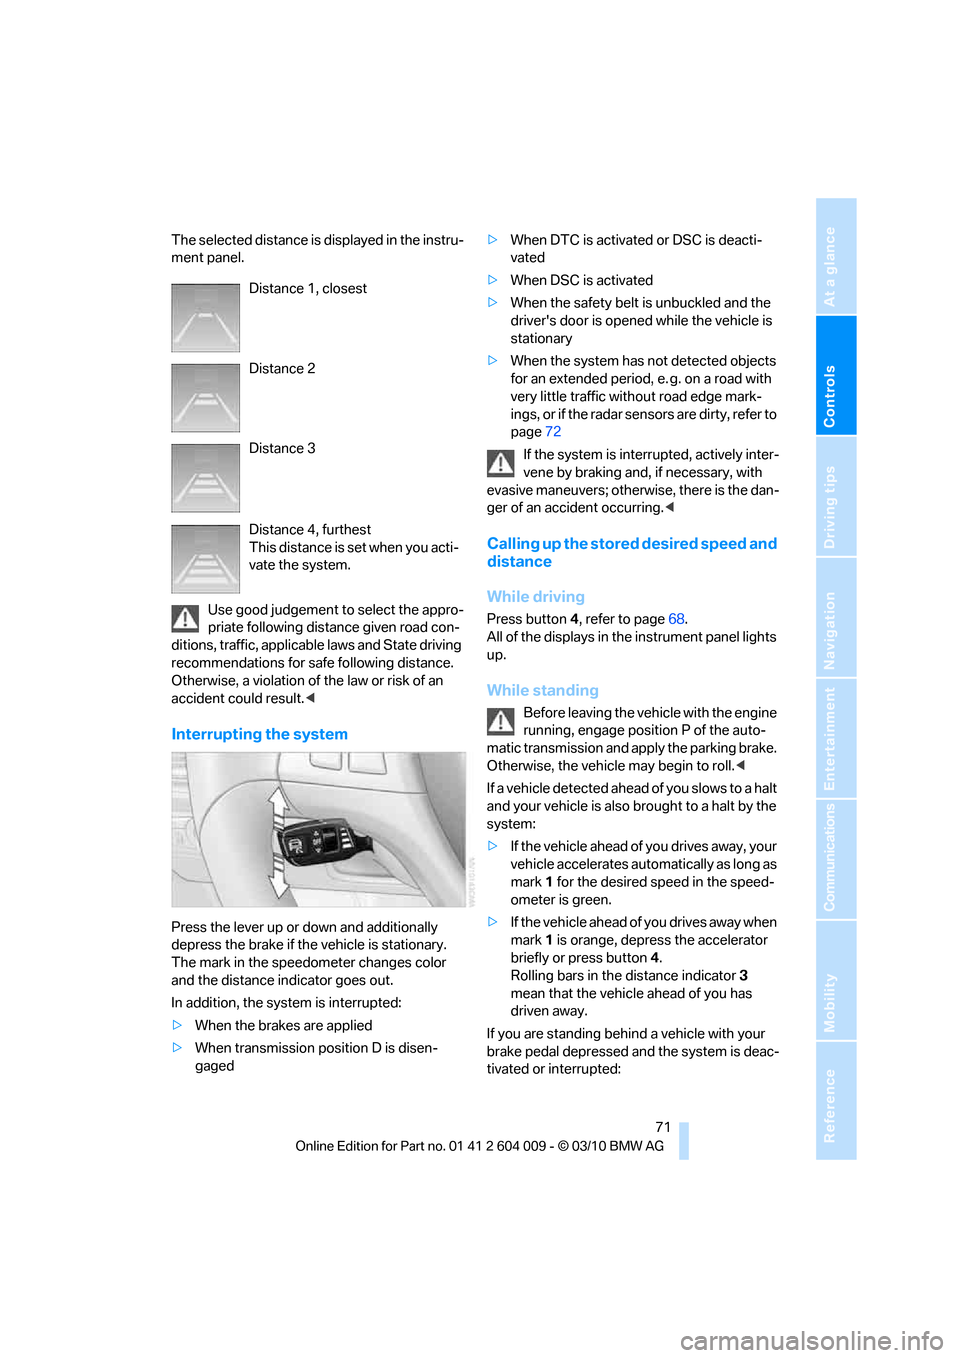
The selected distance is displayed in the instru-
ment panel.
Use good judgement to select the appro-
priate following distance given road con-
ditions, traffic, applicable laws and State driving
recommendations for safe following distance.
Otherwise, a violation of the law or risk of an
accident could result.<
Interrupting the system
Press the lever up or down and additionally
depress the brake if the vehicle is stationary.
The mark in the speedometer changes color
and the distance indicator goes out.
In addition, the system is interrupted:
>When the brakes are applied
>When transmission position D is disen-
gaged>When DTC is activated or DSC is deacti-
vated
>When DSC is activated
>When the safety belt is unbuckled and the
driver's door is opened while the vehicle is
stationary
>When the system has not detected objects
for an extended period, e. g. on a road with
very little traffic without road edge mark-
ings, or if the radar sensors are dirty, refer to
page72
If the system is interrupted, actively inter-
vene by braking and, if necessary, with
evasive maneuvers; otherwise, there is the dan-
ger of an accident occurring.<
Calling up the stored desired speed and
distance
While driving
Press button4, refer to page68.
All of the displays in the instrument panel lights
up.
While standing
Before leaving the vehicle with the engine
running, engage position P of the auto-
matic transmission and apply the parking brake.
Otherwise, the vehicle may begin to roll.<
If a vehicle detected ahead of you slows to a halt
and your vehicle is also brought to a halt by the
system:
>If the vehicle ahead of you drives away, your
vehicle accelerates automatically as long as
mark 1 for the desired speed in the speed-
ometer is green.
>If the vehicle ahead of you drives away when
mark 1 is orange, depress the accelerator
briefly or press button 4.
Rolling bars in the distance indicator 3
mean that the vehicle ahead of you has
driven away.
If you are standing behind a vehicle with your
brake pedal depressed and the system is deac-
tivated or interrupted: Distance 1, closest
Distance 2
Distance 3
Distance 4, furthest
This distance is set when you acti-
vate the system.
Page 74 of 312
Driving
72 1.Select the desired speed using the lever,
arrow 1 or arrow 2, or press button 4 to
retrieve a stored speed.
2.Release the brake pedal.
3.When the vehicle ahead of you drives away,
press on the accelerator briefly or press
button 4.
Deactivating the system
>When driving, press the lever up or down
twice.
>When stationary, do the same while
depressing the brake pedal.
>Switch off the ignition.
The displays go out, and the stored desired
speed and distance are deleted.
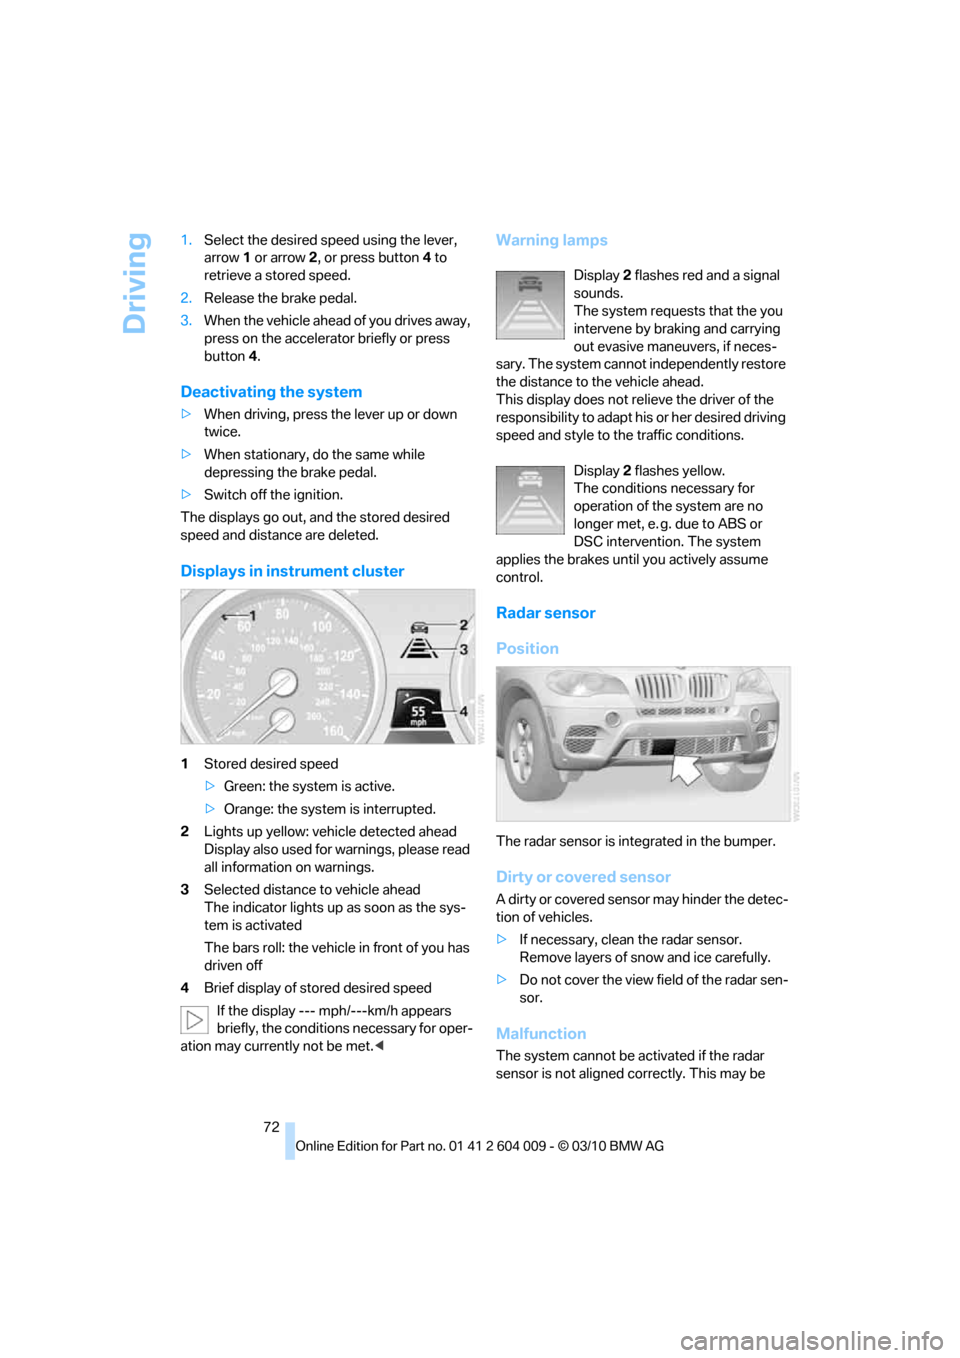
Displays in instrument cluster
1Stored desired speed
>Green: the system is active.
>Orange: the system is interrupted.
2Lights up yellow: vehicle detected ahead
Display also used for warnings, please read
all information on warnings.
3Selected distance to vehicle ahead
The indicator lights up as soon as the sys-
tem is activated
The bars roll: the vehicle in front of you has
driven off
4Brief display of stored desired speed
If the display --- mph/---km/h appears
briefly, the conditions necessary for oper-
ation may currently not be met.<
Warning lamps
Display 2 flashes red and a signal
sounds.
The system requests that the you
intervene by braking and carrying
out evasive maneuvers, if neces-
sary. The system cannot independently restore
the distance to the vehicle ahead.
This display does not relieve the driver of the
responsibility to adapt his or her desired driving
speed and style to the traffic conditions.
Display 2 flashes yellow.
The conditions necessary for
operation of the system are no
longer met, e. g. due to ABS or
DSC intervention. The system
applies the brakes until you actively assume
control.
Radar sensor
Position
The radar sensor is integrated in the bumper.
Dirty or covered sensor
A dirty or covered sensor may hinder the detec-
tion of vehicles.
>If necessary, clean the radar sensor.
Remove layers of snow and ice carefully.
>Do not cover the view field of the radar sen-
sor.
Malfunction
The system cannot be activated if the radar
sensor is not aligned correctly. This may be
Page 78 of 312
Controls Overview
76
Controls Overview
Odometer, outside
temperature display, clock
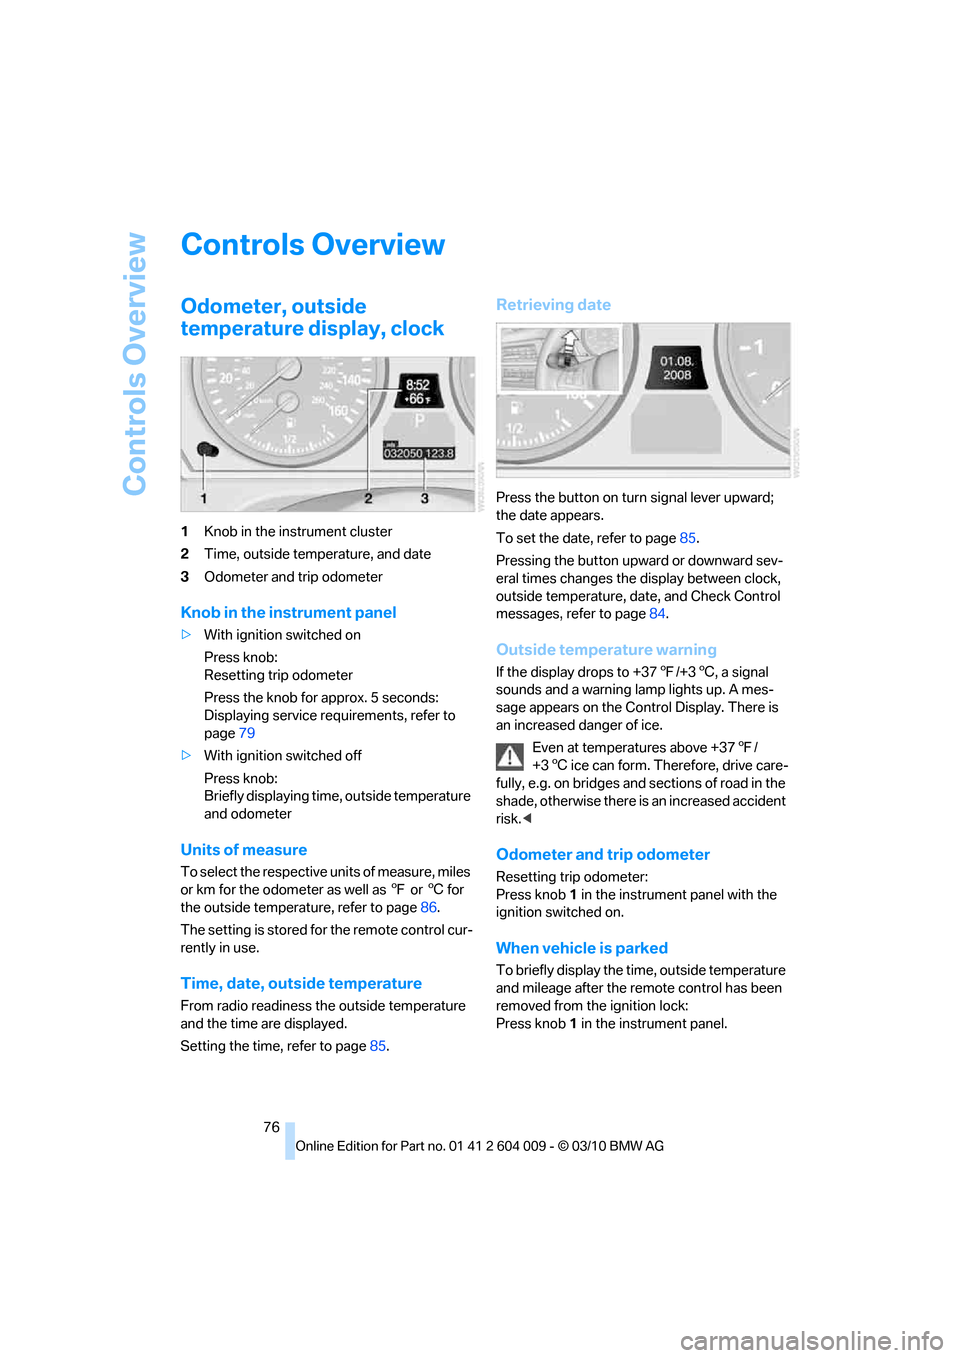
1Knob in the instrument cluster
2Time, outside temperature, and date
3Odometer and trip odometer
Knob in the instrument panel
>With ignition switched on
Press knob:
Resetting trip odometer
Press the knob for approx. 5 seconds:
Displaying service requirements, refer to
page79
>With ignition switched off
Press knob:
Briefly displaying time, outside temperature
and odometer
Units of measure
To select the respective units of measure, miles
or km for the odometer as well as 7 or 6 for
the outside temperature, refer to page86.
The setting is stored for the remote control cur-
rently in use.
Time, date, outside temperature
From radio readiness the outside temperature
and the time are displayed.
Setting the time, refer to page85.
Retrieving date
Press the button on turn signal lever upward;
the date appears.
To set the date, refer to page85.
Pressing the button upward or downward sev-
eral times changes the display between clock,
outside temperature, date, and Check Control
messages, refer to page84.
Outside temperature warning
If the display drops to +377/+36, a signal
sounds and a warning lamp lights up. A mes-
sage appears on the Control Display. There is
an increased danger of ice.
Even at temperatures above +377/
+36 ice can form. Therefore, drive care-
fully, e.g. on bridges and sections of road in the
shade, otherwise there is an increased accident
risk.<
Odometer and trip odometer
Resetting trip odometer:
Press knob 1 in the instrument panel with the
ignition switched on.
When vehicle is parked
To briefly display the time, outside temperature
and mileage after the remote control has been
removed from the ignition lock:
Press knob 1 in the instrument panel.
Page 79 of 312
Controls
77Reference
At a glance
Driving tips
Communications
Navigation
Entertainment
Mobility
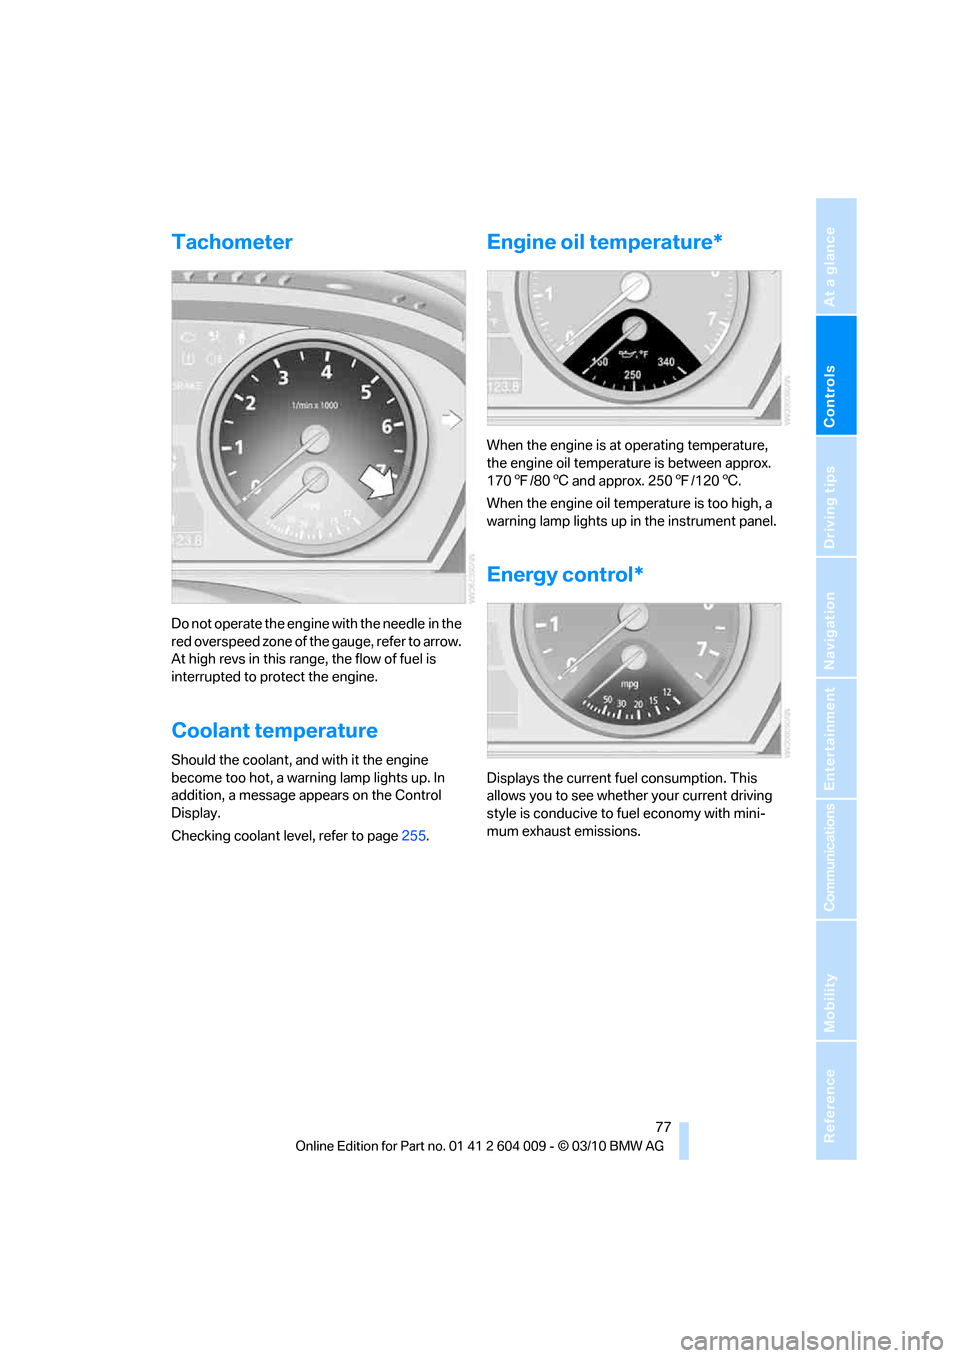
Tachometer
Do not operate the engine with the needle in the
red overspeed zone of the gauge, refer to arrow.
At high revs in this range, the flow of fuel is
interrupted to protect the engine.
Coolant temperature
Should the coolant, and with it the engine
become too hot, a warning lamp lights up. In
addition, a message appears on the Control
Display.
Checking coolant level, refer to page255.
Engine oil temperature*
When the engine is at operating temperature,
the engine oil temperature is between approx.
1707/806 and approx. 2507/1206.
When the engine oil temperature is too high, a
warning lamp lights up in the instrument panel.
Energy control*
Displays the current fuel consumption. This
allows you to see whether your current driving
style is conducive to fuel economy with mini-
mum exhaust emissions.
Page 80 of 312
Controls Overview
78
Fuel gauge
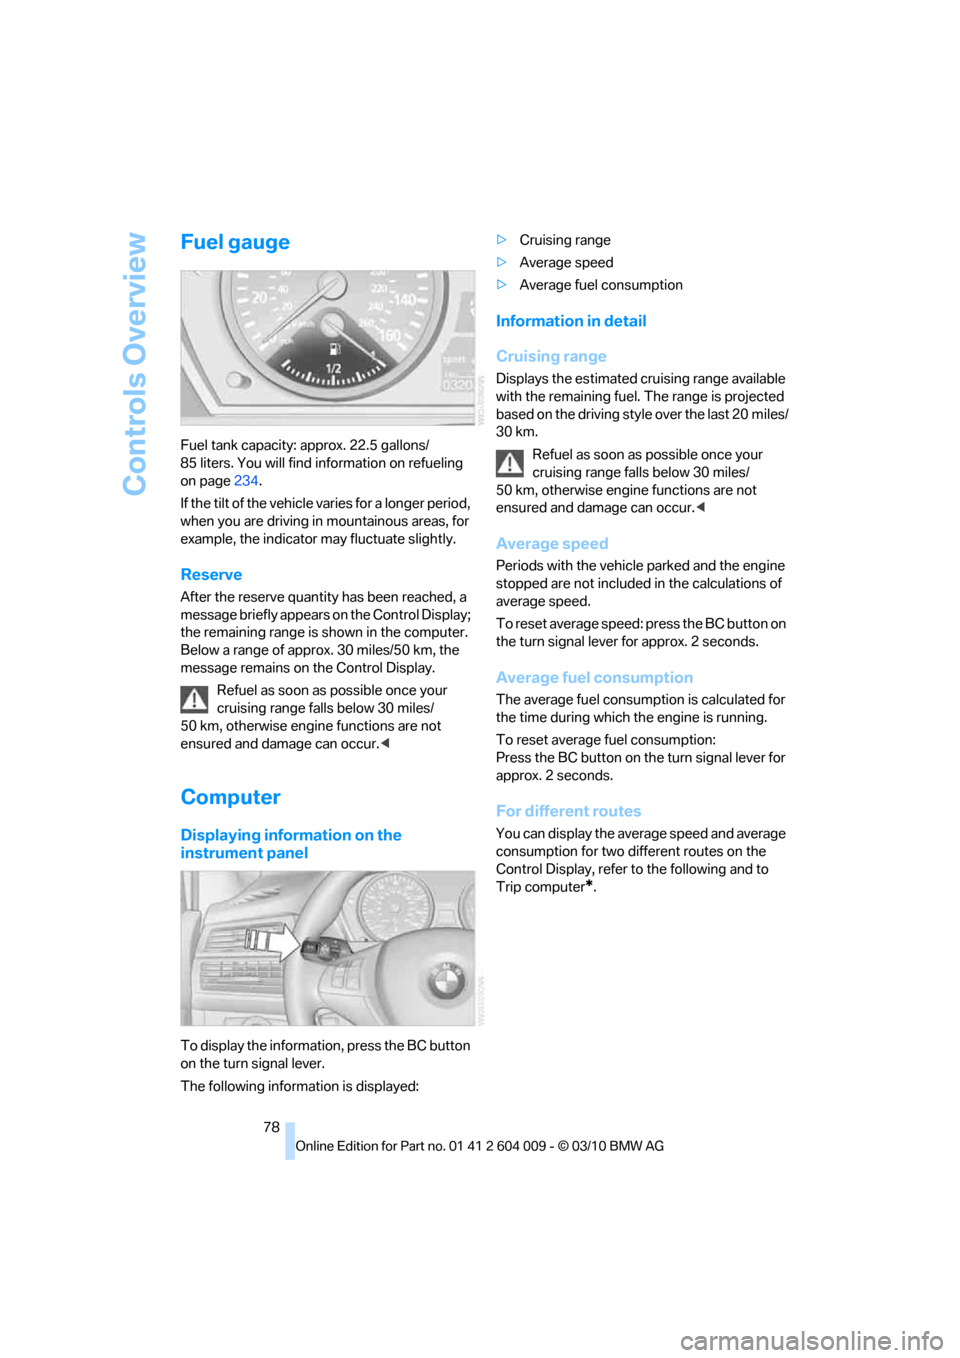
Fuel tank capacity: approx. 22.5 gallons/
85 liters. You will find information on refueling
on page234.
If the tilt of the vehicle varies for a longer period,
when you are driving in mountainous areas, for
example, the indicator may fluctuate slightly.
Reserve
After the reserve quantity has been reached, a
message briefly appears on the Control Display;
the remaining range is shown in the computer.
Below a range of approx. 30 miles/50 km, the
message remains on the Control Display.
Refuel as soon as possible once your
cruising range falls below 30 miles/
50 km, otherwise engine functions are not
ensured and damage can occur.<
Computer
Displaying information on the
instrument panel
To display the information, press the BC button
on the turn signal lever.
The following information is displayed:>Cruising range
>Average speed
>Average fuel consumption
Information in detail
Cruising range
Displays the estimated cruising range available
with the remaining fuel. The range is projected
based on the driving style over the last 20 miles/
30 km.
Refuel as soon as possible once your
cruising range falls below 30 miles/
50 km, otherwise engine functions are not
ensured and damage can occur.<
Average speed
Periods with the vehicle parked and the engine
stopped are not included in the calculations of
average speed.
To reset average speed: press the BC button on
the turn signal lever for approx. 2 seconds.
Average fuel consumption
The average fuel consumption is calculated for
the time during which the engine is running.
To reset average fuel consumption:
Press the BC button on the turn signal lever for
approx. 2 seconds.
For different routes
You can display the average speed and average
consumption for two different routes on the
Control Display, refer to the following and to
Trip computer
*.
Page 81 of 312
Controls
79Reference
At a glance
Driving tips
Communications
Navigation
Entertainment
Mobility
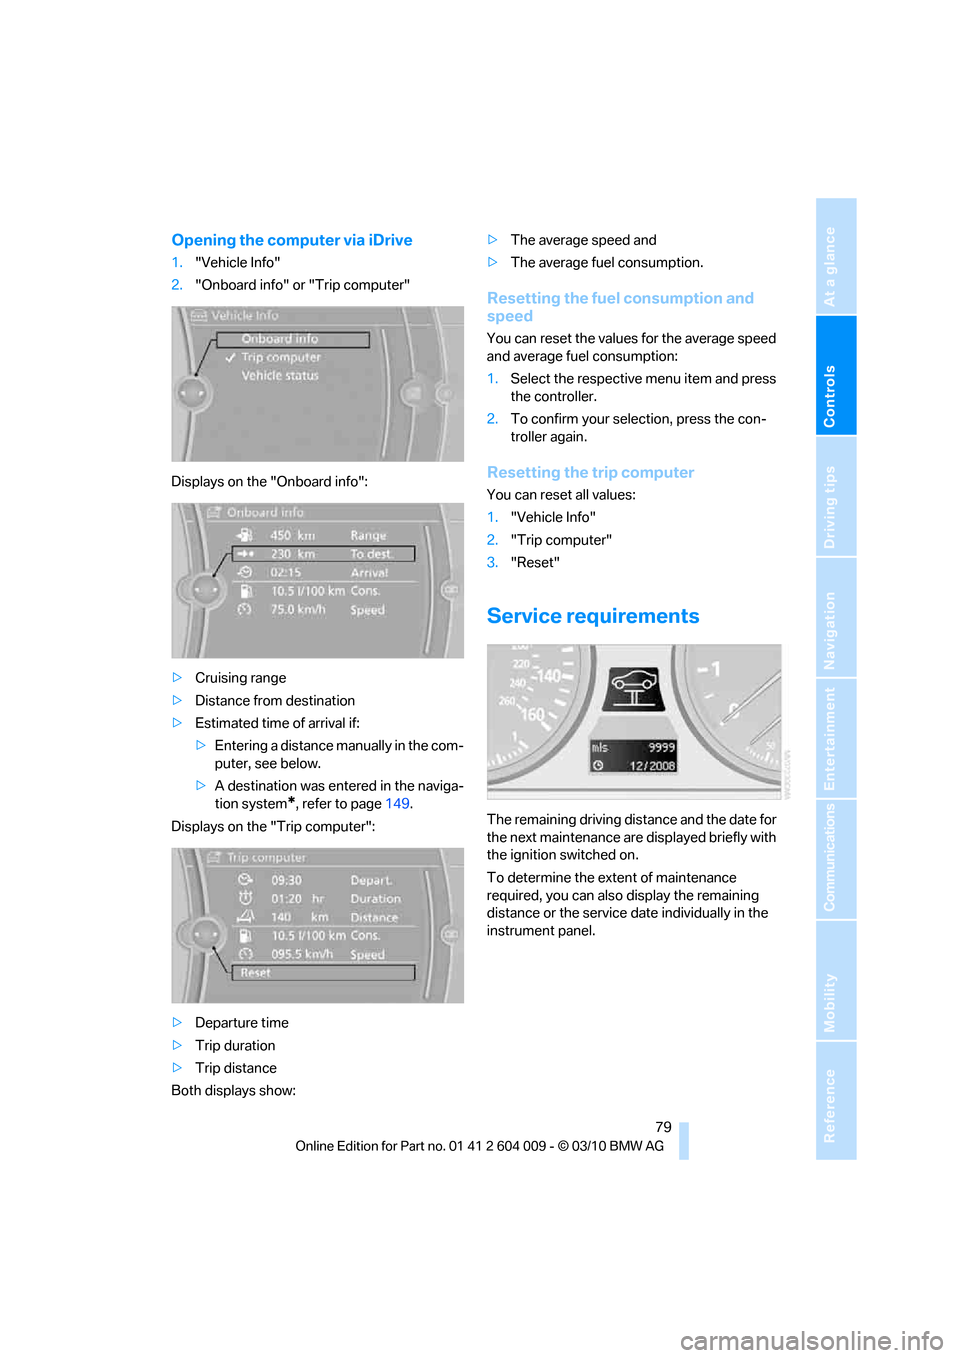
Opening the computer via iDrive
1."Vehicle Info"
2."Onboard info" or "Trip computer"
Displays on the "Onboard info":
>Cruising range
>Distance from destination
>Estimated time of arrival if:
>Entering a distance manually in the com-
puter, see below.
>A destination was entered in the naviga-
tion system
*, refer to page149.
Displays on the "Trip computer":
>Departure time
>Trip duration
>Trip distance
Both displays show:>The average speed and
>The average fuel consumption.
Resetting the fuel consumption and
speed
You can reset the values for the average speed
and average fuel consumption:
1.Select the respective menu item and press
the controller.
2.To confirm your selection, press the con-
troller again.
Resetting the trip computer
You can reset all values:
1."Vehicle Info"
2."Trip computer"
3."Reset"
Service requirements
The remaining driving distance and the date for
the next maintenance are displayed briefly with
the ignition switched on.
To determine the extent of maintenance
required, you can also display the remaining
distance or the service date individually in the
instrument panel.
Page 82 of 312
Controls Overview
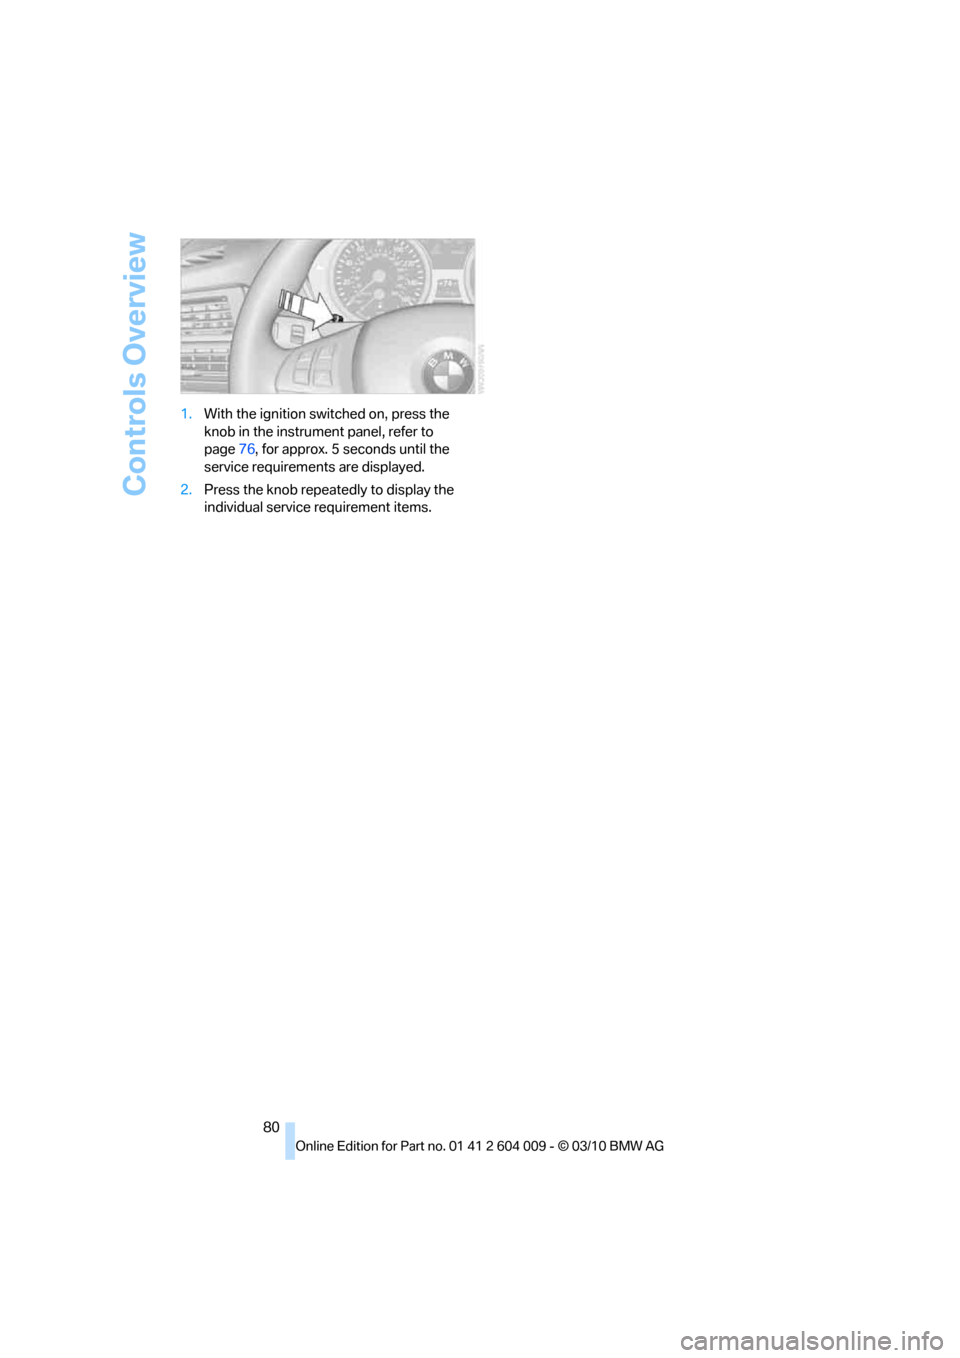
80 1.With the ignition switched on, press the
knob in the instrument panel, refer to
page76, for approx. 5 seconds until the
service requirements are displayed.
2.Press the knob repeatedly to display the
individual service requirement items.
Page 83 of 312
Controls
81Reference
At a glance
Driving tips
Communications
Navigation
Entertainment
Mobility
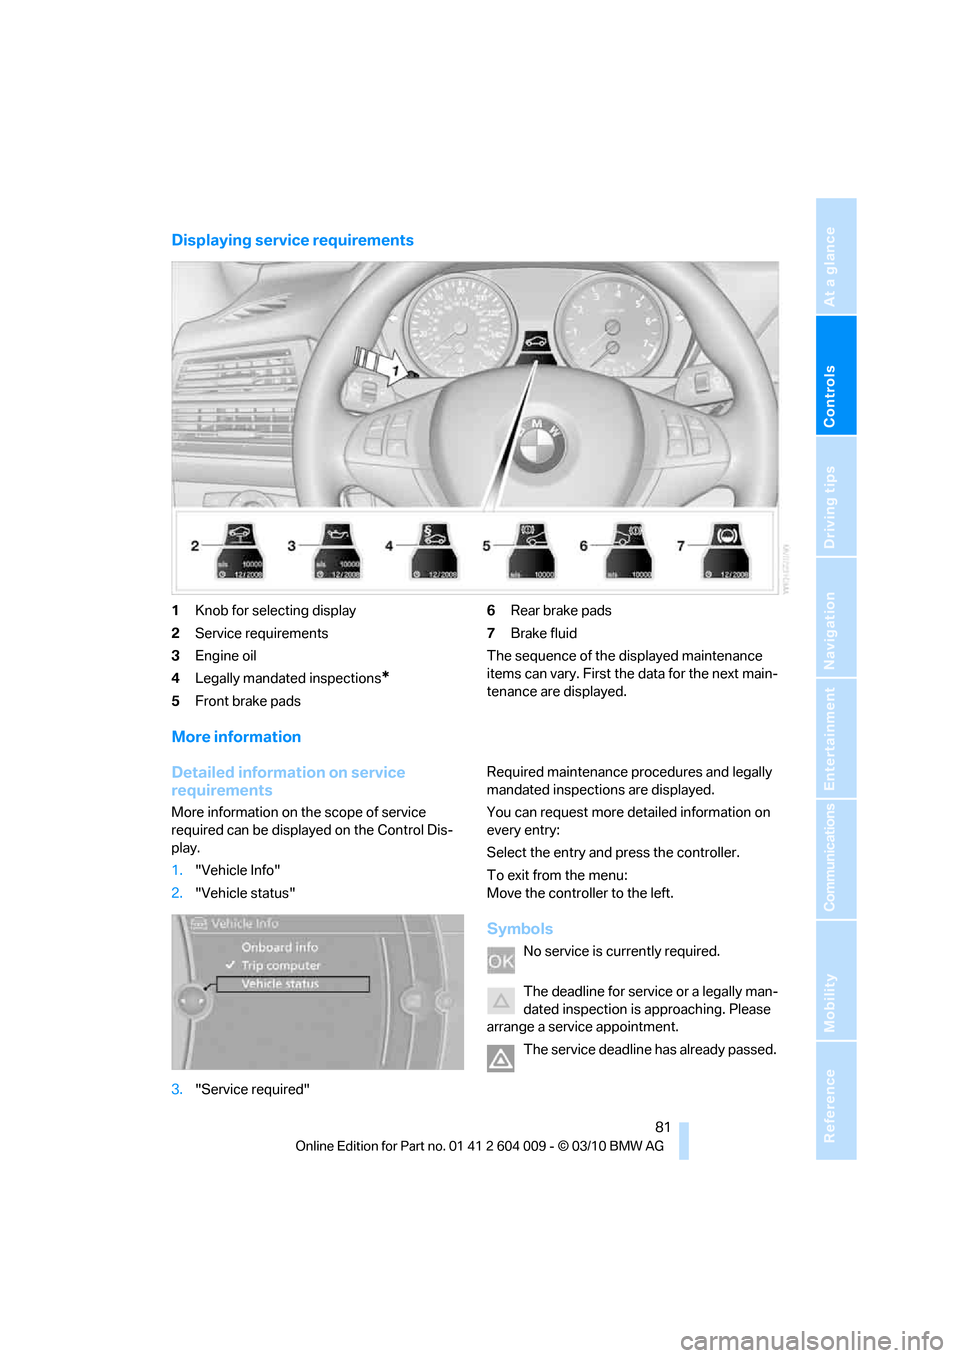
Displaying service requirements
1Knob for selecting display
2Service requirements
3Engine oil
4Legally mandated inspections
*
5Front brake pads6Rear brake pads
7Brake fluid
The sequence of the displayed maintenance
items can vary. First the data for the next main-
tenance are displayed.
More information
Detailed information on service
requirements
More information on the scope of service
required can be displayed on the Control Dis-
play.
1."Vehicle Info"
2."Vehicle status"
3."Service required"Required maintenance procedures and legally
mandated inspections are displayed.
You can request more detailed information on
every entry:
Select the entry and press the controller.
To exit from the menu:
Move the controller to the left.
Symbols
No service is currently required.
The deadline for service or a legally man-
dated inspection is approaching. Please
arrange a service appointment.
The service deadline has already passed.
Page 84 of 312
Controls Overview
82
Entering deadlines for legally
mandated inspections*
Make sure the date on the Control Display is set
correctly, refer to page85; otherwise, the effec-
tiveness of CBS Condition Based Service is not
ensured.
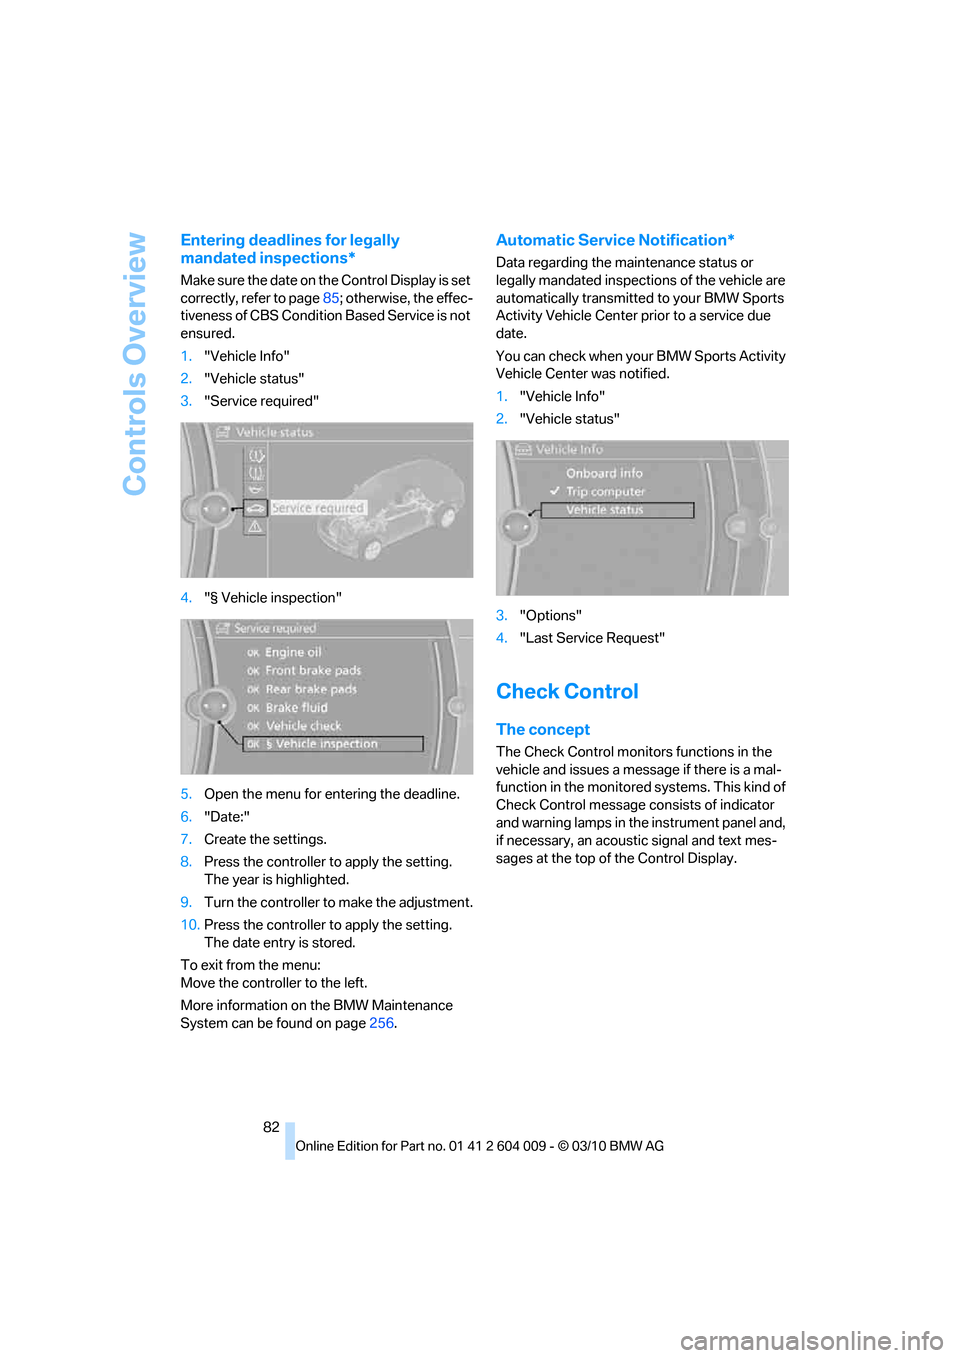
1."Vehicle Info"
2."Vehicle status"
3."Service required"
4."§ Vehicle inspection"
5.Open the menu for entering the deadline.
6."Date:"
7.Create the settings.
8.Press the controller to apply the setting.
The year is highlighted.
9.Turn the controller to make the adjustment.
10.Press the controller to apply the setting.
The date entry is stored.
To exit from the menu:
Move the controller to the left.
More information on the BMW Maintenance
System can be found on page256.
Automatic Service Notification*
Data regarding the maintenance status or
legally mandated inspections of the vehicle are
automatically transmitted to your BMW Sports
Activity Vehicle Center prior to a service due
date.
You can check when your BMW Sports Activity
Vehicle Center was notified.
1."Vehicle Info"
2."Vehicle status"
3."Options"
4."Last Service Request"
Check Control
The concept
The Check Control monitors functions in the
vehicle and issues a message if there is a mal-
function in the monitored systems. This kind of
Check Control message consists of indicator
and warning lamps in the instrument panel and,
if necessary, an acoustic signal and text mes-
sages at the top of the Control Display.
Page 85 of 312
Controls
83Reference
At a glance
Driving tips
Communications
Navigation
Entertainment
Mobility
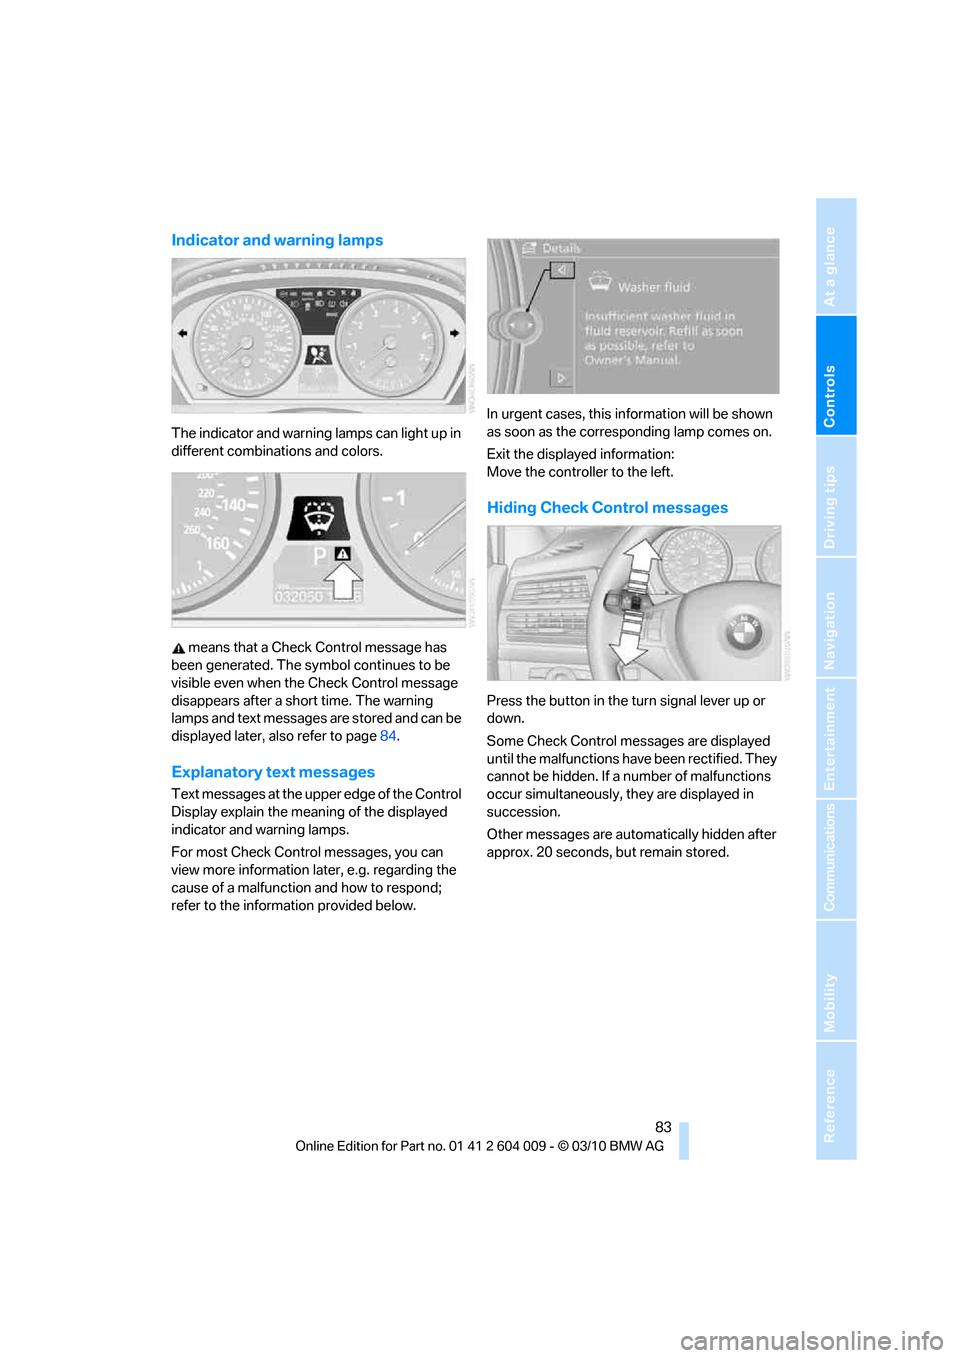
Indicator and warning lamps
The indicator and warning lamps can light up in
different combinations and colors.
means that a Check Control message has
been generated. The symbol continues to be
visible even when the Check Control message
disappears after a short time. The warning
lamps and text messages are stored and can be
displayed later, also refer to page84.
Explanatory text messages
Text messages at the upper edge of the Control
Display explain the meaning of the displayed
indicator and warning lamps.
For most Check Control messages, you can
view more information later, e.g. regarding the
cause of a malfunction and how to respond;
refer to the information provided below.In urgent cases, this information will be shown
as soon as the corresponding lamp comes on.
Exit the displayed information:
Move the controller to the left.
Hiding Check Control messages
Press the button in the turn signal lever up or
down.
Some Check Control messages are displayed
until the malfunctions have been rectified. They
cannot be hidden. If a number of malfunctions
occur simultaneously, they are displayed in
succession.
Other messages are automatically hidden after
approx. 20 seconds, but remain stored.