Parking lamps low beam 90 BMW X5 2013 E70 Owner's Manual
[x] Cancel search | Manufacturer: BMW, Model Year: 2013, Model line: X5, Model: BMW X5 2013 E70Pages: 345, PDF Size: 9.45 MB
Page 13 of 345
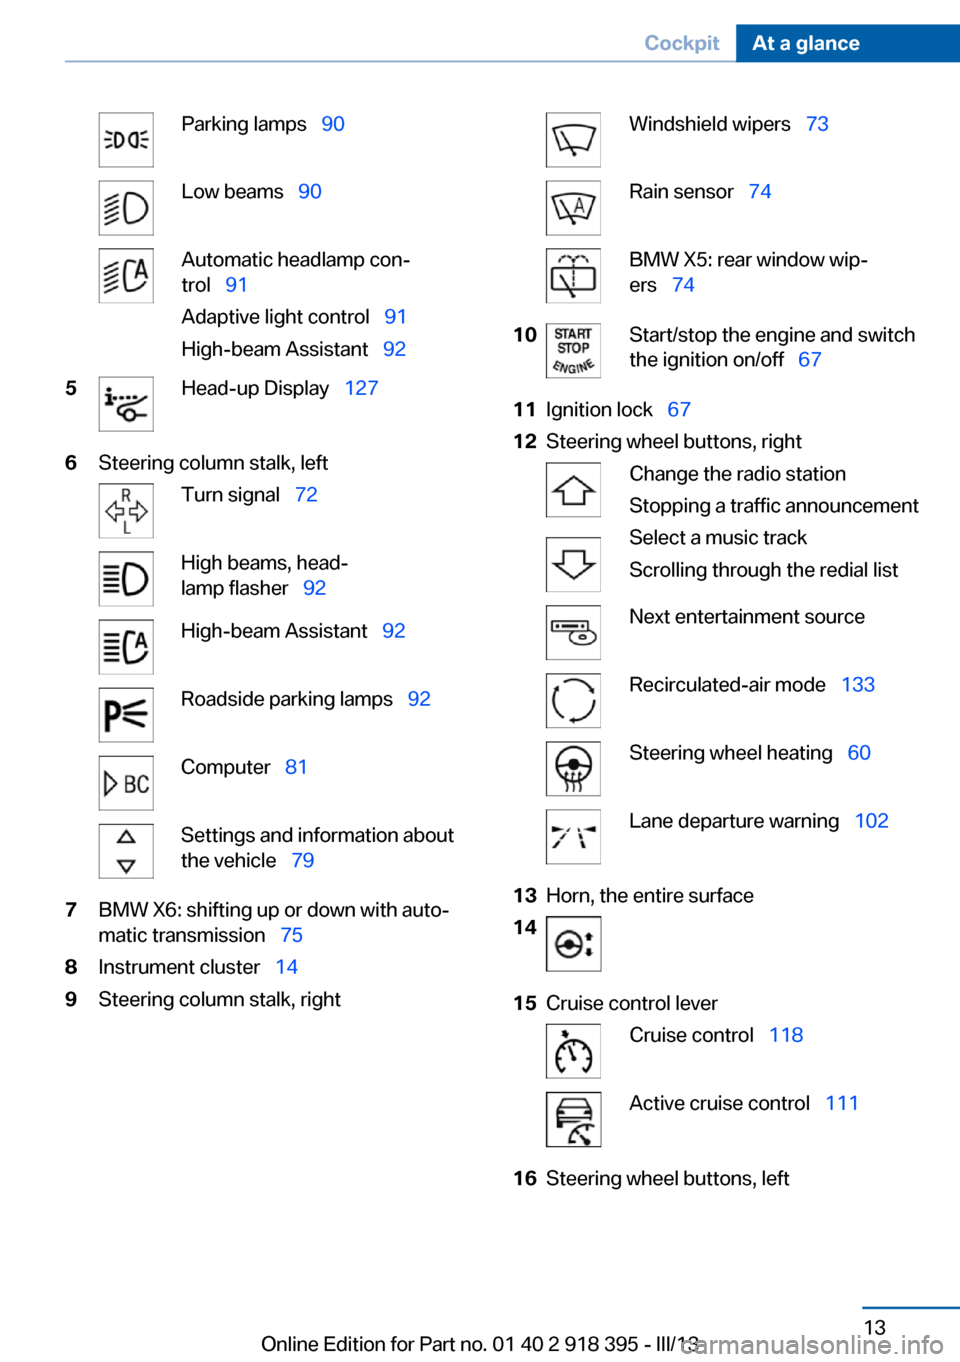
Parking lamps 90Low beams 90Automatic headlamp con‐
trol 91
Adaptive light control 91
High-beam Assistant 925Head-up Display 1276Steering column stalk, leftTurn signal 72High beams, head‐
lamp flasher 92High-beam Assistant 92Roadside parking lamps 92Computer 81Settings and information about
the vehicle 797BMW X6: shifting up or down with auto‐
matic transmission 758Instrument cluster 149Steering column stalk, rightWindshield wipers 73Rain sensor 74BMW X5: rear window wip‐
ers 7410Start/stop the engine and switch
the ignition on/off 6711Ignition lock 6712Steering wheel buttons, rightChange the radio station
Stopping a traffic announcement
Select a music track
Scrolling through the redial listNext entertainment sourceRecirculated-air mode 133Steering wheel heating 60Lane departure warning 10213Horn, the entire surface1415Cruise control leverCruise control 118Active cruise control 11116Steering wheel buttons, leftSeite 13CockpitAt a glance13
Online Edition for Part no. 01 40 2 918 395 - III/13
Page 15 of 345
▷Odometer and trip odometer 79▷High-beam Assistant 92▷ Check Control message
present 85▷Adaptive Drive: sport chassis and sus‐
pension tuning 1099Fuel gauge 8110Resetting the trip odometer 79
Viewing service requirement display 80Indicator/warning lamps
The concept
The indicator and warning lamps can light up in
a variety of combinations and colors.
Several of the lamps are checked for proper
functioning when the engine is started or the
ignition is switched on, and light up briefly.
Text messages Text messages at the upper edge of the Con‐
trol Display explain the meaning of the dis‐
played indicator and warning lamps.
Supplementary text messages
You can call up more information, e.g., on the
cause of a malfunction and on how to respond,
via Check Control, refer to page 85.
In urgent cases, this information will be shown
as soon as the corresponding lamp comes on.
Indicator lamps without text
messages
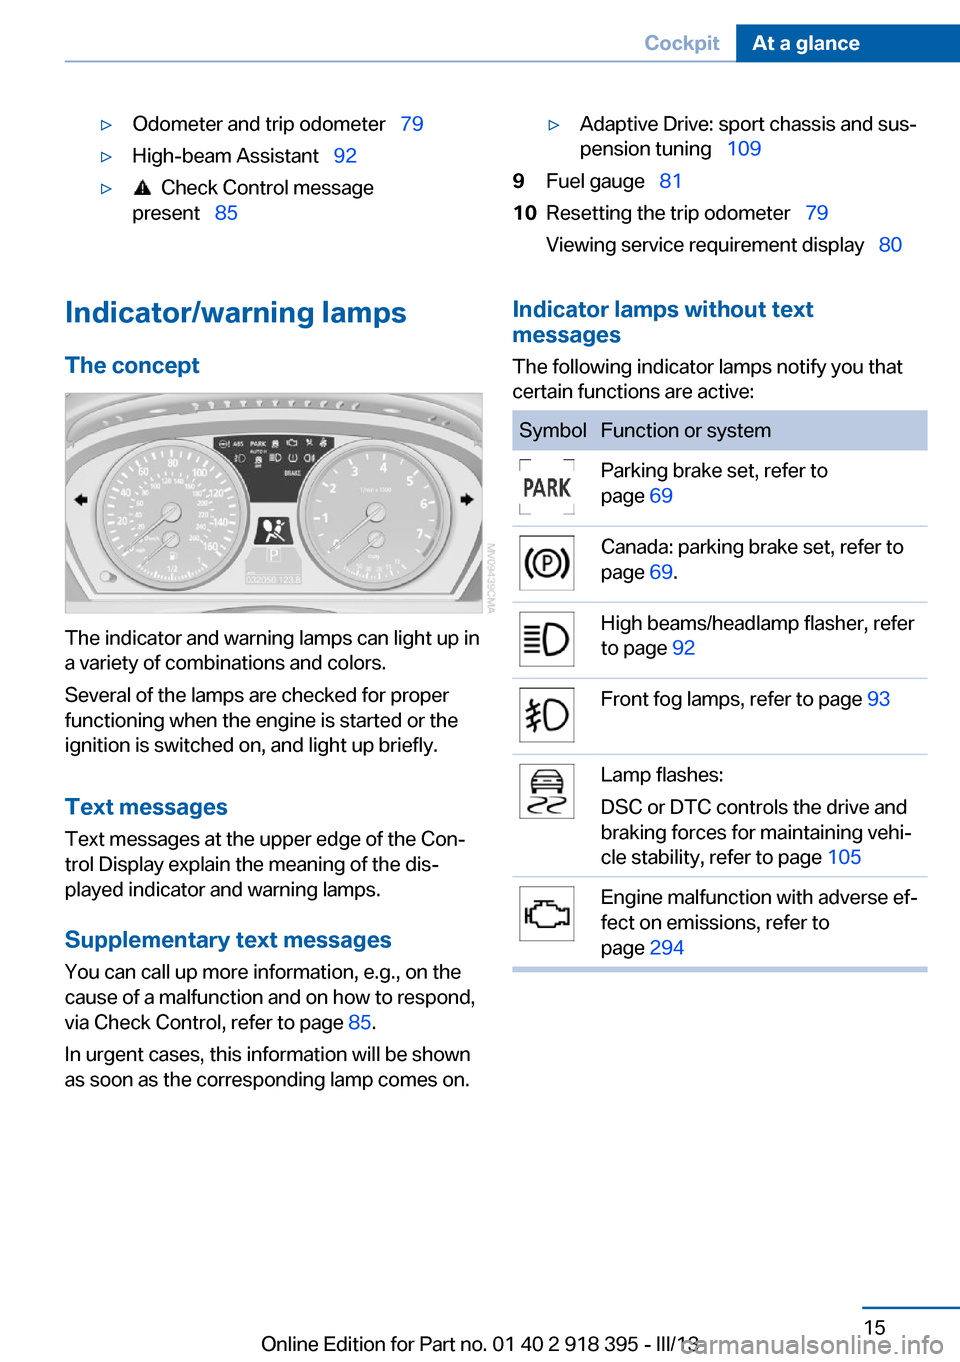
The following indicator lamps notify you that
certain functions are active:SymbolFunction or systemParking brake set, refer to
page 69Canada: parking brake set, refer to
page 69.High beams/headlamp flasher, refer
to page 92Front fog lamps, refer to page 93Lamp flashes:
DSC or DTC controls the drive and
braking forces for maintaining vehi‐
cle stability, refer to page 105Engine malfunction with adverse ef‐
fect on emissions, refer to
page 294Seite 15CockpitAt a glance15
Online Edition for Part no. 01 40 2 918 395 - III/13
Page 68 of 345
Ignition onAll electrical consumers can operate. The od‐
ometer and trip odometer are displayed in the
instrument cluster.
To save battery power when the engine is off,
switch off the ignition and any unnecessary
electronic systems/power consumers.
Radio ready state and ignition off
All indicator and warning lamps as well as dis‐
plays in the instrument cluster go out.
Transmission position P with the ignition
off
When the ignition is switched off, position P is
engaged automatically. When in an automatic
car wash, for example, ensure that the ignition
is not switched off accidentally.◀
For example, the ignition is not switched off in
the following situations:▷The brake is applied.▷The low beams are switched on
Starting the engine
General information Enclosed areas
Do not let the engine run in enclosed
areas; otherwise, breathing of exhaust fumes
may lead to loss of consciousness and death.
The exhaust gases contain carbon monoxide,
an odorless and colorless but highly toxic
gas.◀
Unattended vehicle
Do not leave the car unattended with the
engine running; otherwise, it presents a poten‐
tial source of danger.
Before leaving the vehicle with the engine run‐
ning, set the parking brake and engage trans‐
mission position P; otherwise, the vehicle may
begin to roll.◀
Frequent starting in quick succession
Avoid repeated futile attempts at starting
the car and avoid starting the car frequently in
quick succession. Otherwise, the fuel is not
burned or is inadequately burned, and there is
the danger of overheating and damaging the
catalytic converter.◀
Do not wait for the engine to warm up while the
vehicle remains stationary. Start driving right
away, but at moderate engine speeds.
Starting the engine
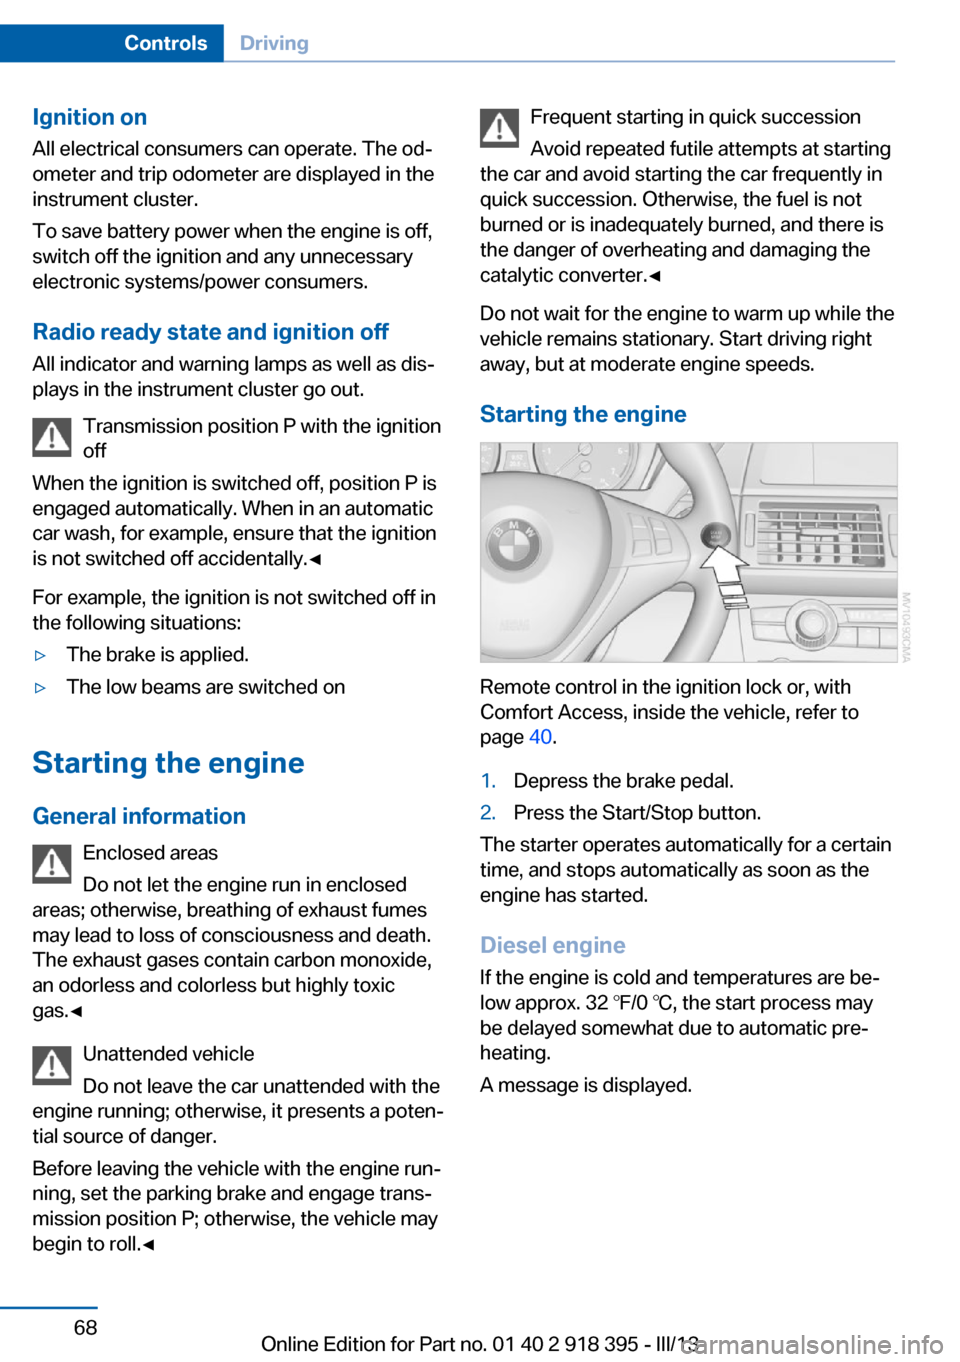
Remote control in the ignition lock or, with
Comfort Access, inside the vehicle, refer to
page 40.
1.Depress the brake pedal.2.Press the Start/Stop button.
The starter operates automatically for a certain
time, and stops automatically as soon as the
engine has started.
Diesel engine
If the engine is cold and temperatures are be‐
low approx. 32 ℉/0 ℃, the start process may
be delayed somewhat due to automatic pre‐
heating.
A message is displayed.
Seite 68ControlsDriving68
Online Edition for Part no. 01 40 2 918 395 - III/13
Page 90 of 345
LampsVehicle equipment
This chapter describes all series equipment as
well as country-specific and special equipment
offered for this model series.Therefore, it also
describes equipment that may not be found in
your vehicle, for instance due to the selected
special equipment or the country version. This
also applies to safety-related functions and
systems.
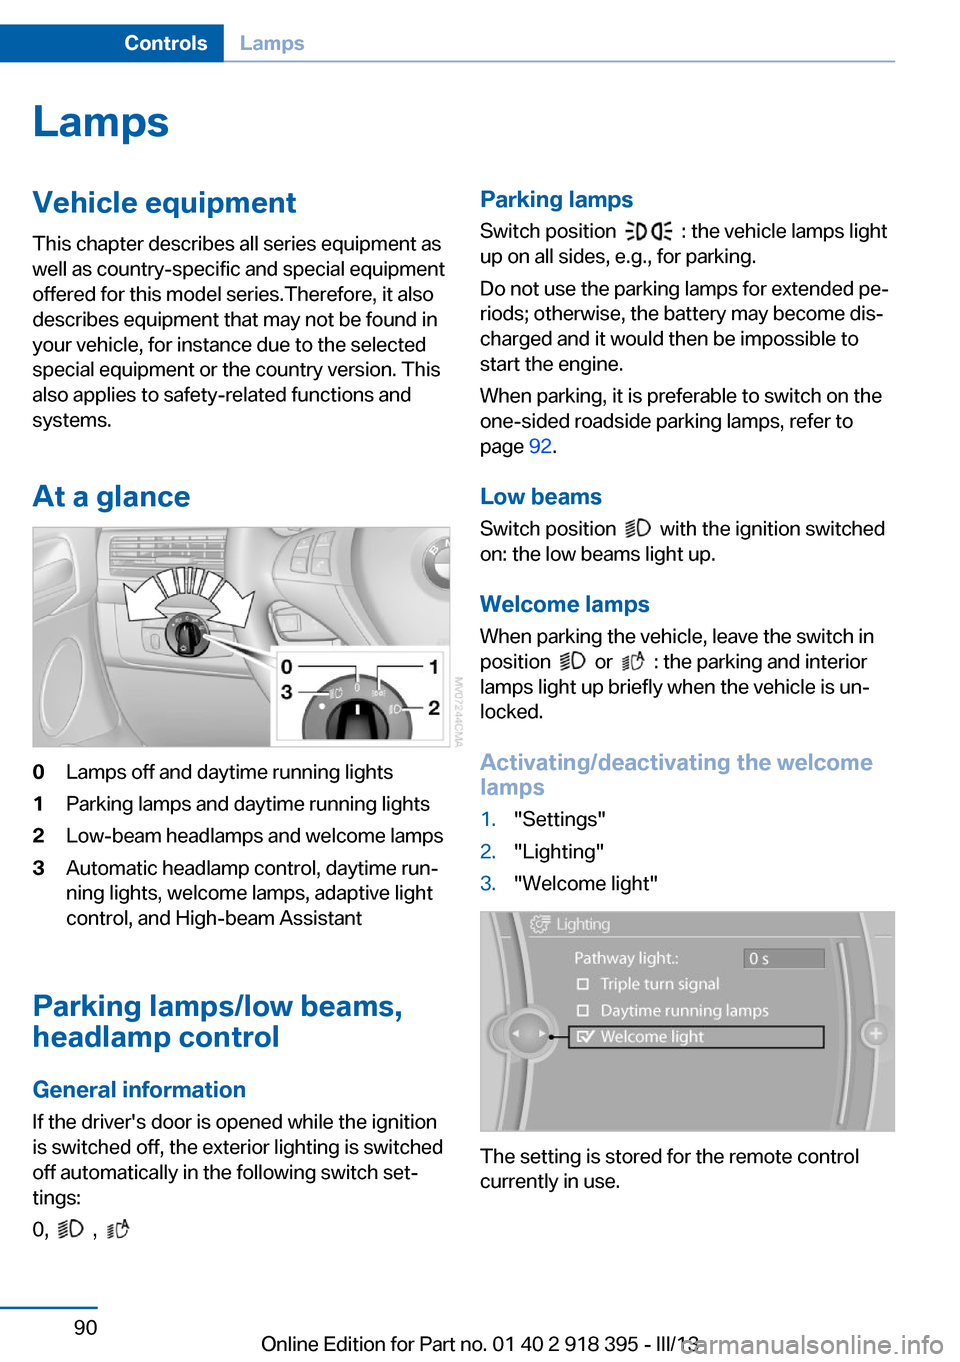
At a glance0Lamps off and daytime running lights1Parking lamps and daytime running lights2Low-beam headlamps and welcome lamps3Automatic headlamp control, daytime run‐
ning lights, welcome lamps, adaptive light
control, and High-beam Assistant
Parking lamps/low beams,
headlamp control
General information If the driver's door is opened while the ignition
is switched off, the exterior lighting is switched
off automatically in the following switch set‐
tings:
0,
,
Parking lamps
Switch position
: the vehicle lamps light
up on all sides, e.g., for parking.
Do not use the parking lamps for extended pe‐
riods; otherwise, the battery may become dis‐
charged and it would then be impossible to
start the engine.
When parking, it is preferable to switch on the
one-sided roadside parking lamps, refer to
page 92.
Low beams Switch position
with the ignition switched
on: the low beams light up.
Welcome lamps When parking the vehicle, leave the switch in
position
or : the parking and interior
lamps light up briefly when the vehicle is un‐
locked.
Activating/deactivating the welcome
lamps
1."Settings"2."Lighting"3."Welcome light"
The setting is stored for the remote control
currently in use.
Seite 90ControlsLamps90
Online Edition for Part no. 01 40 2 918 395 - III/13
Page 91 of 345
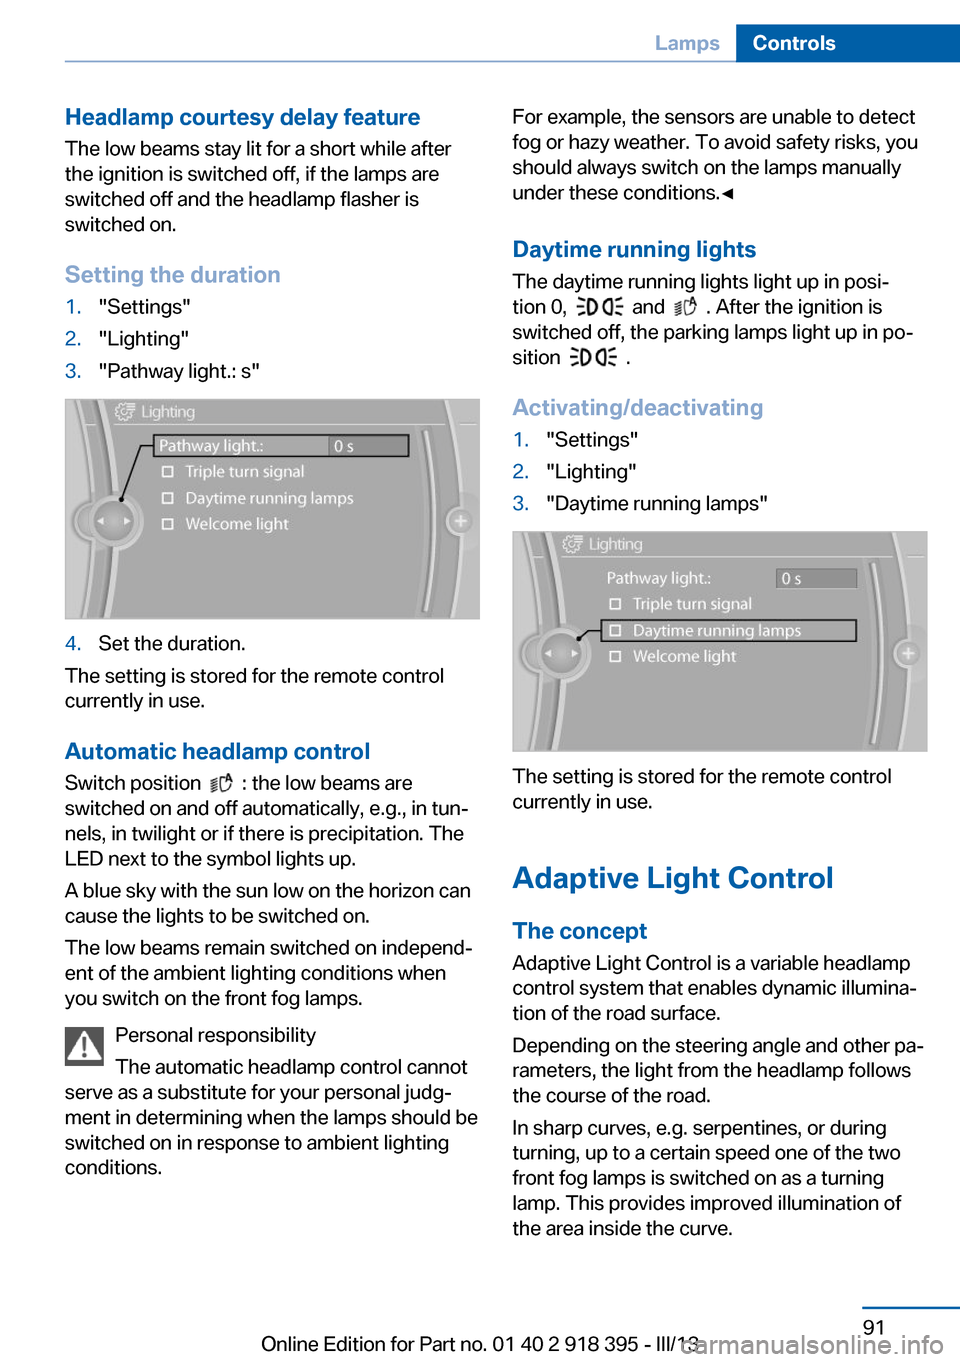
Headlamp courtesy delay feature
The low beams stay lit for a short while after
the ignition is switched off, if the lamps are
switched off and the headlamp flasher is
switched on.
Setting the duration1."Settings"2."Lighting"3."Pathway light.: s"4.Set the duration.
The setting is stored for the remote control
currently in use.
Automatic headlamp control
Switch position
: the low beams are
switched on and off automatically, e.g., in tun‐
nels, in twilight or if there is precipitation. The
LED next to the symbol lights up.
A blue sky with the sun low on the horizon can
cause the lights to be switched on.
The low beams remain switched on independ‐
ent of the ambient lighting conditions when
you switch on the front fog lamps.
Personal responsibility
The automatic headlamp control cannot
serve as a substitute for your personal judg‐
ment in determining when the lamps should be
switched on in response to ambient lighting
conditions.
For example, the sensors are unable to detect
fog or hazy weather. To avoid safety risks, you
should always switch on the lamps manually
under these conditions.◀
Daytime running lights The daytime running lights light up in posi‐
tion 0,
and . After the ignition is
switched off, the parking lamps light up in po‐
sition
.
Activating/deactivating
1."Settings"2."Lighting"3."Daytime running lamps"
The setting is stored for the remote control
currently in use.
Adaptive Light Control
The concept Adaptive Light Control is a variable headlamp
control system that enables dynamic illumina‐
tion of the road surface.
Depending on the steering angle and other pa‐
rameters, the light from the headlamp follows
the course of the road.
In sharp curves, e.g. serpentines, or during
turning, up to a certain speed one of the two
front fog lamps is switched on as a turning
lamp. This provides improved illumination of
the area inside the curve.
Seite 91LampsControls91
Online Edition for Part no. 01 40 2 918 395 - III/13
Page 92 of 345
Controls
Activating Switch position
with the ignition switched
on.
The turning lamps are automatically switched
on depending on the steering angle or the use
of turn signals.
To avoid blinding oncoming traffic, the Adap‐
tive Light Control does not swivel to the driv‐
er's side when the vehicle is at a standstill.
When driving in reverse, both turning lamps
are active.
Malfunction
A message is displayed.
Adaptive Light Control is malfunctioning or has
failed. Have the system checked as soon as
possible.
High beams/roadside
parking lamps
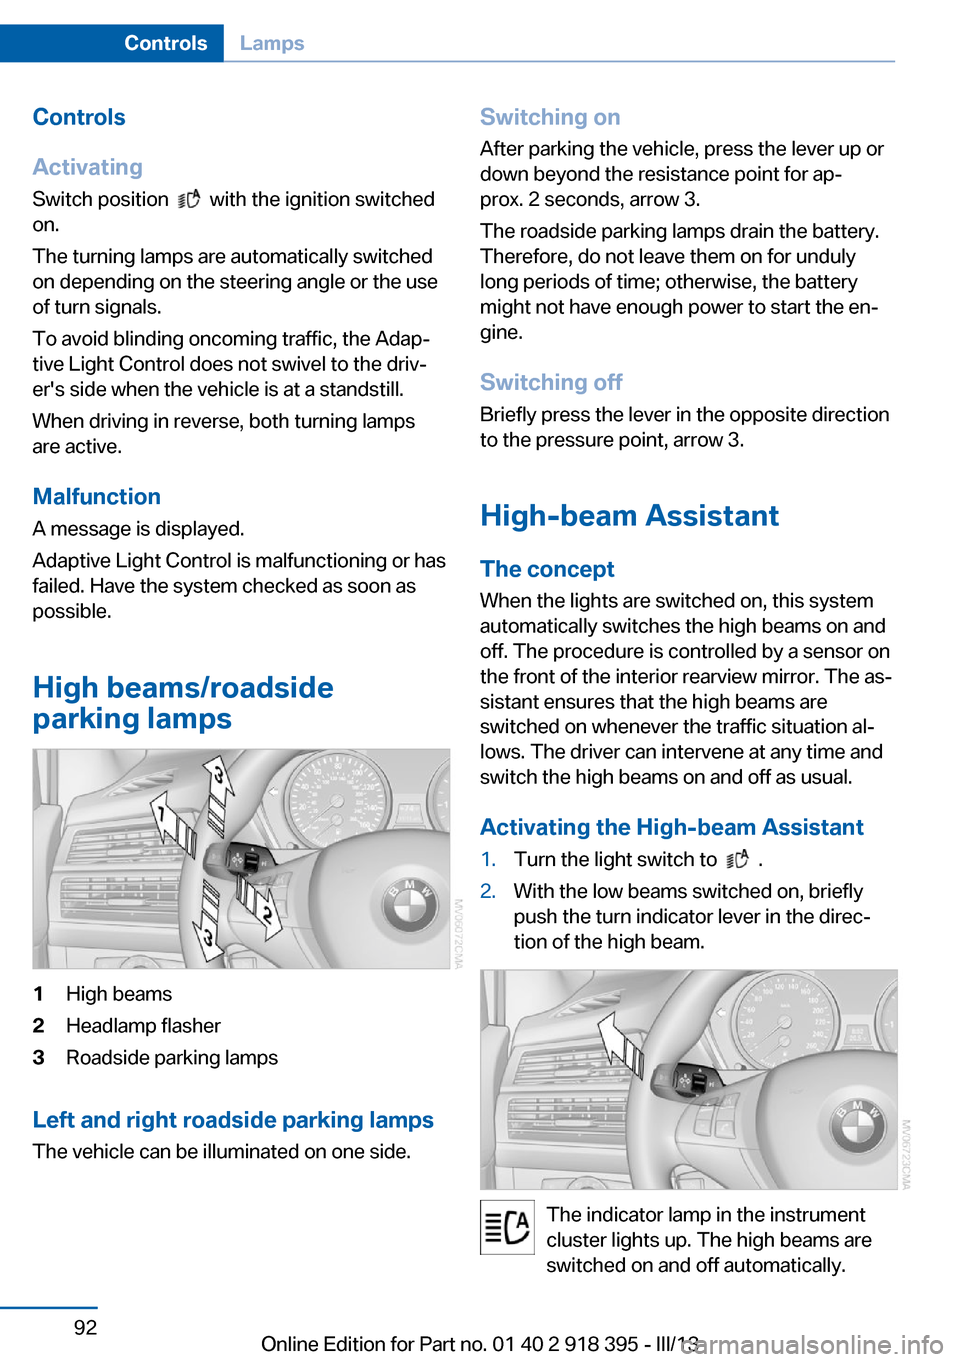
1High beams2Headlamp flasher3Roadside parking lamps
Left and right roadside parking lamps
The vehicle can be illuminated on one side.
Switching onAfter parking the vehicle, press the lever up ordown beyond the resistance point for ap‐
prox. 2 seconds, arrow 3.
The roadside parking lamps drain the battery.
Therefore, do not leave them on for unduly
long periods of time; otherwise, the battery
might not have enough power to start the en‐
gine.
Switching off
Briefly press the lever in the opposite direction
to the pressure point, arrow 3.
High-beam Assistant
The concept When the lights are switched on, this systemautomatically switches the high beams on and
off. The procedure is controlled by a sensor on
the front of the interior rearview mirror. The as‐
sistant ensures that the high beams are
switched on whenever the traffic situation al‐
lows. The driver can intervene at any time and
switch the high beams on and off as usual.
Activating the High-beam Assistant1.Turn the light switch to .2.With the low beams switched on, briefly
push the turn indicator lever in the direc‐
tion of the high beam.
The indicator lamp in the instrument
cluster lights up. The high beams are
switched on and off automatically.
Seite 92ControlsLamps92
Online Edition for Part no. 01 40 2 918 395 - III/13
Page 93 of 345
The system responds to light from oncoming
traffic and traffic driving ahead of you, and to
adequate illumination, e.g., in towns and cities.
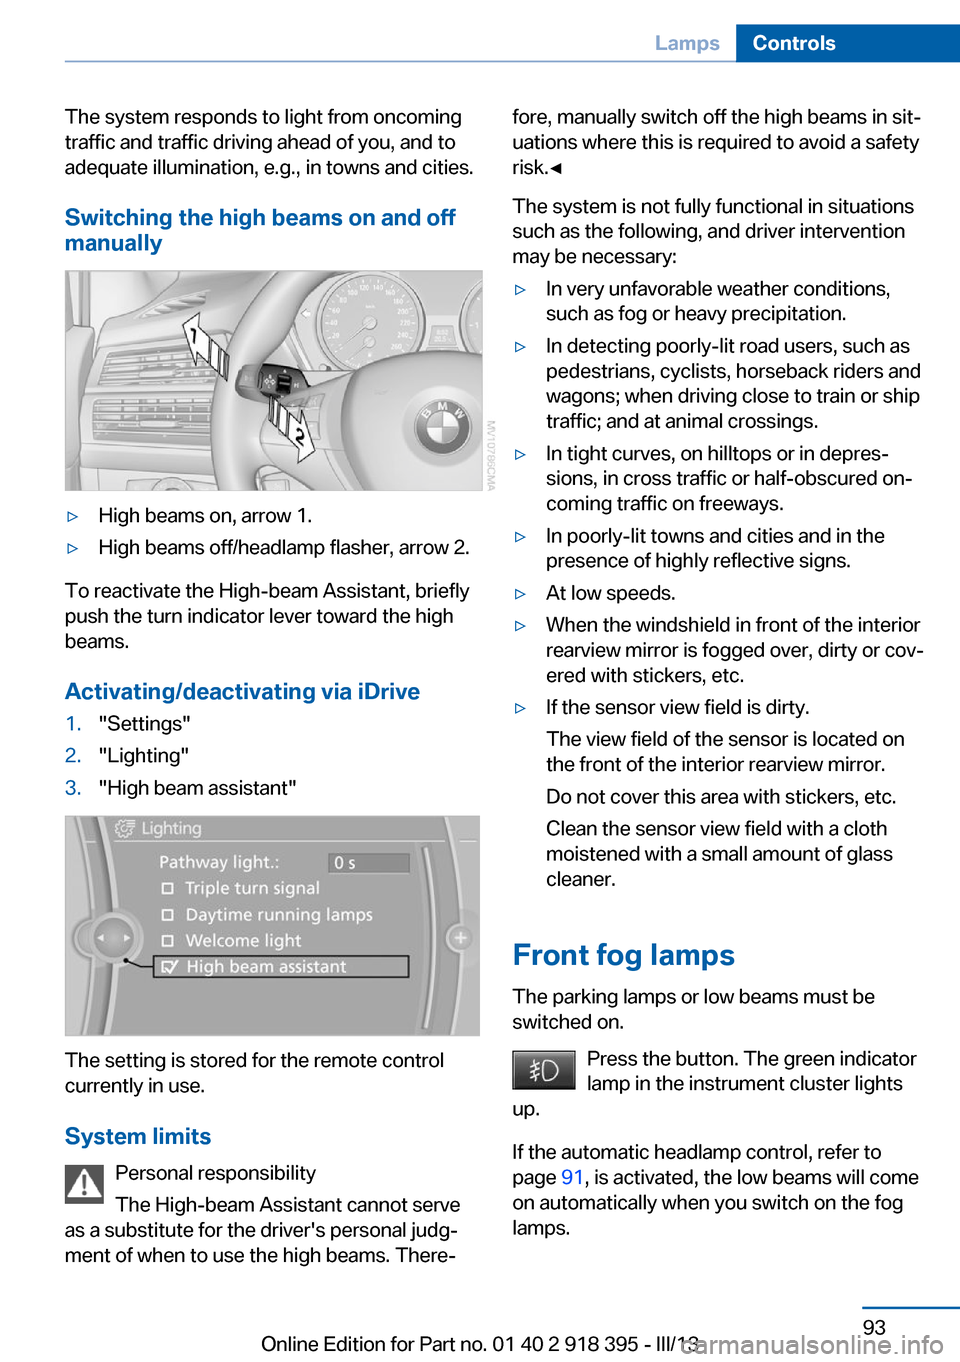
Switching the high beams on and offmanually▷High beams on, arrow 1.▷High beams off/headlamp flasher, arrow 2.
To reactivate the High-beam Assistant, briefly
push the turn indicator lever toward the high
beams.
Activating/deactivating via iDrive
1."Settings"2."Lighting"3."High beam assistant"
The setting is stored for the remote control
currently in use.
System limits Personal responsibility
The High-beam Assistant cannot serve
as a substitute for the driver's personal judg‐
ment of when to use the high beams. There‐
fore, manually switch off the high beams in sit‐
uations where this is required to avoid a safety
risk.◀
The system is not fully functional in situations
such as the following, and driver intervention
may be necessary:▷In very unfavorable weather conditions,
such as fog or heavy precipitation.▷In detecting poorly-lit road users, such as
pedestrians, cyclists, horseback riders and
wagons; when driving close to train or ship
traffic; and at animal crossings.▷In tight curves, on hilltops or in depres‐
sions, in cross traffic or half-obscured on‐
coming traffic on freeways.▷In poorly-lit towns and cities and in the
presence of highly reflective signs.▷At low speeds.▷When the windshield in front of the interior
rearview mirror is fogged over, dirty or cov‐
ered with stickers, etc.▷If the sensor view field is dirty.
The view field of the sensor is located on
the front of the interior rearview mirror.
Do not cover this area with stickers, etc.
Clean the sensor view field with a cloth
moistened with a small amount of glass
cleaner.
Front fog lamps
The parking lamps or low beams must be
switched on.
Press the button. The green indicator
lamp in the instrument cluster lights
up.
If the automatic headlamp control, refer to
page 91, is activated, the low beams will come
on automatically when you switch on the fog
lamps.
Seite 93LampsControls93
Online Edition for Part no. 01 40 2 918 395 - III/13
Page 299 of 345
BMW X6: bulb replacementXenon headlamps
Notes
Because of the long life of these bulbs, the likelihood of failure is very low. Switching the
lamps on and off frequently shortens their life.
If a xenon bulb fails, switch on the front fog lamps and continue the trip with great care.
Comply with local regulations.
Do not perform work/bulb replacement
on xenon headlamps
Have any work on the xenon lighting system,
including bulb replacement, performed only by
a service center.
Due to the high voltage present in the system,
there is the danger of fatal injuries if work is
carried out improperly.◀
Follow the general instructions on lamps and
bulbs, refer to page 295.
Parking lamps, roadside parking
lamps, daytime running lights
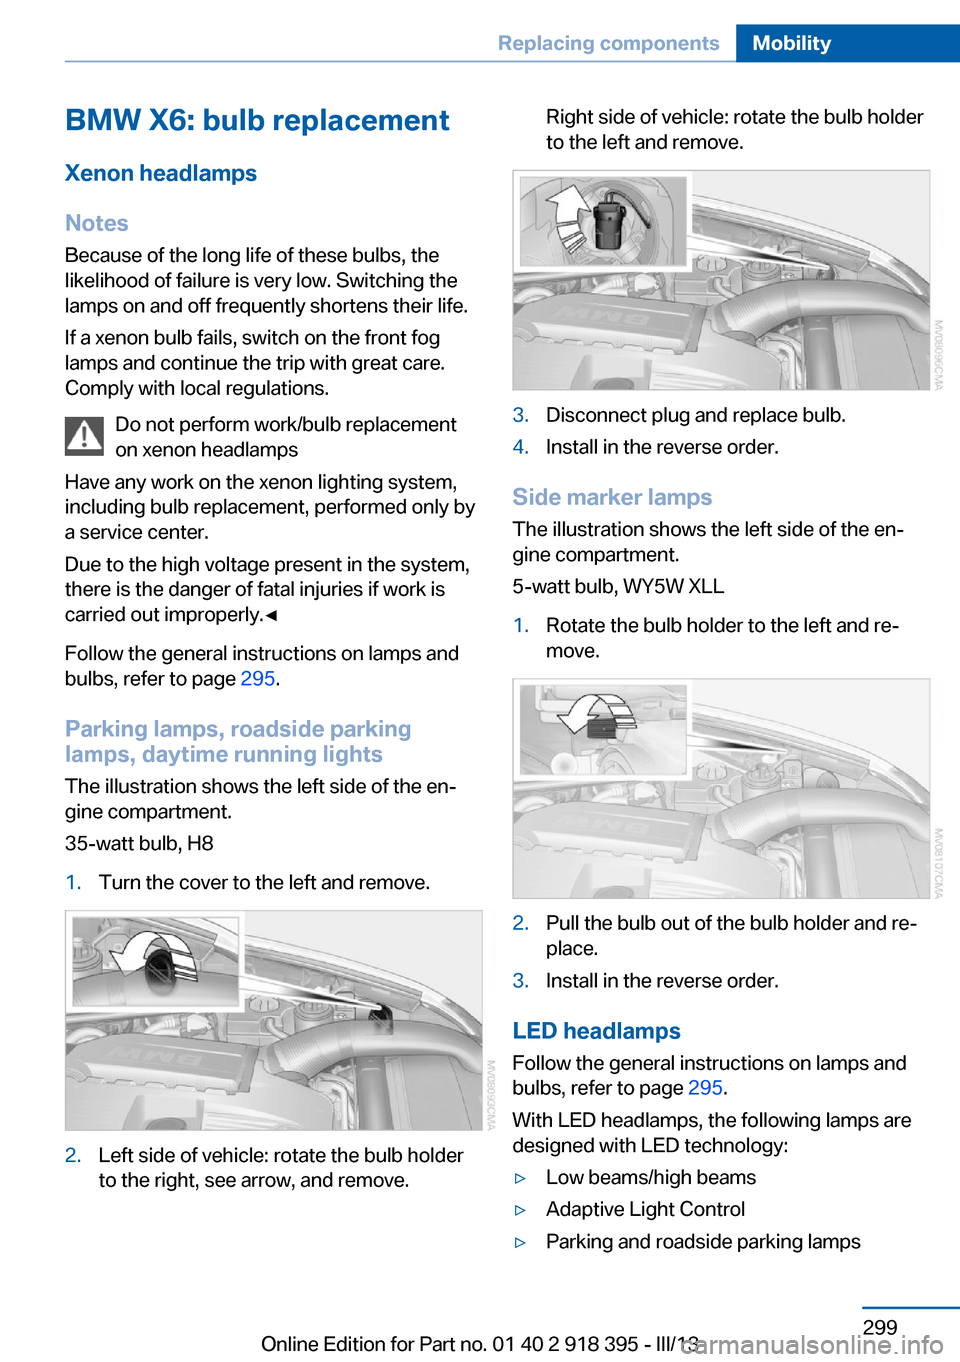
The illustration shows the left side of the en‐
gine compartment.
35-watt bulb, H81.Turn the cover to the left and remove.2.Left side of vehicle: rotate the bulb holder
to the right, see arrow, and remove.Right side of vehicle: rotate the bulb holder
to the left and remove.3.Disconnect plug and replace bulb.4.Install in the reverse order.
Side marker lamps
The illustration shows the left side of the en‐
gine compartment.
5-watt bulb, WY5W XLL
1.Rotate the bulb holder to the left and re‐
move.2.Pull the bulb out of the bulb holder and re‐
place.3.Install in the reverse order.
LED headlamps
Follow the general instructions on lamps and
bulbs, refer to page 295.
With LED headlamps, the following lamps are
designed with LED technology:
▷Low beams/high beams▷Adaptive Light Control▷Parking and roadside parking lampsSeite 299Replacing componentsMobility299
Online Edition for Part no. 01 40 2 918 395 - III/13
Page 337 of 345
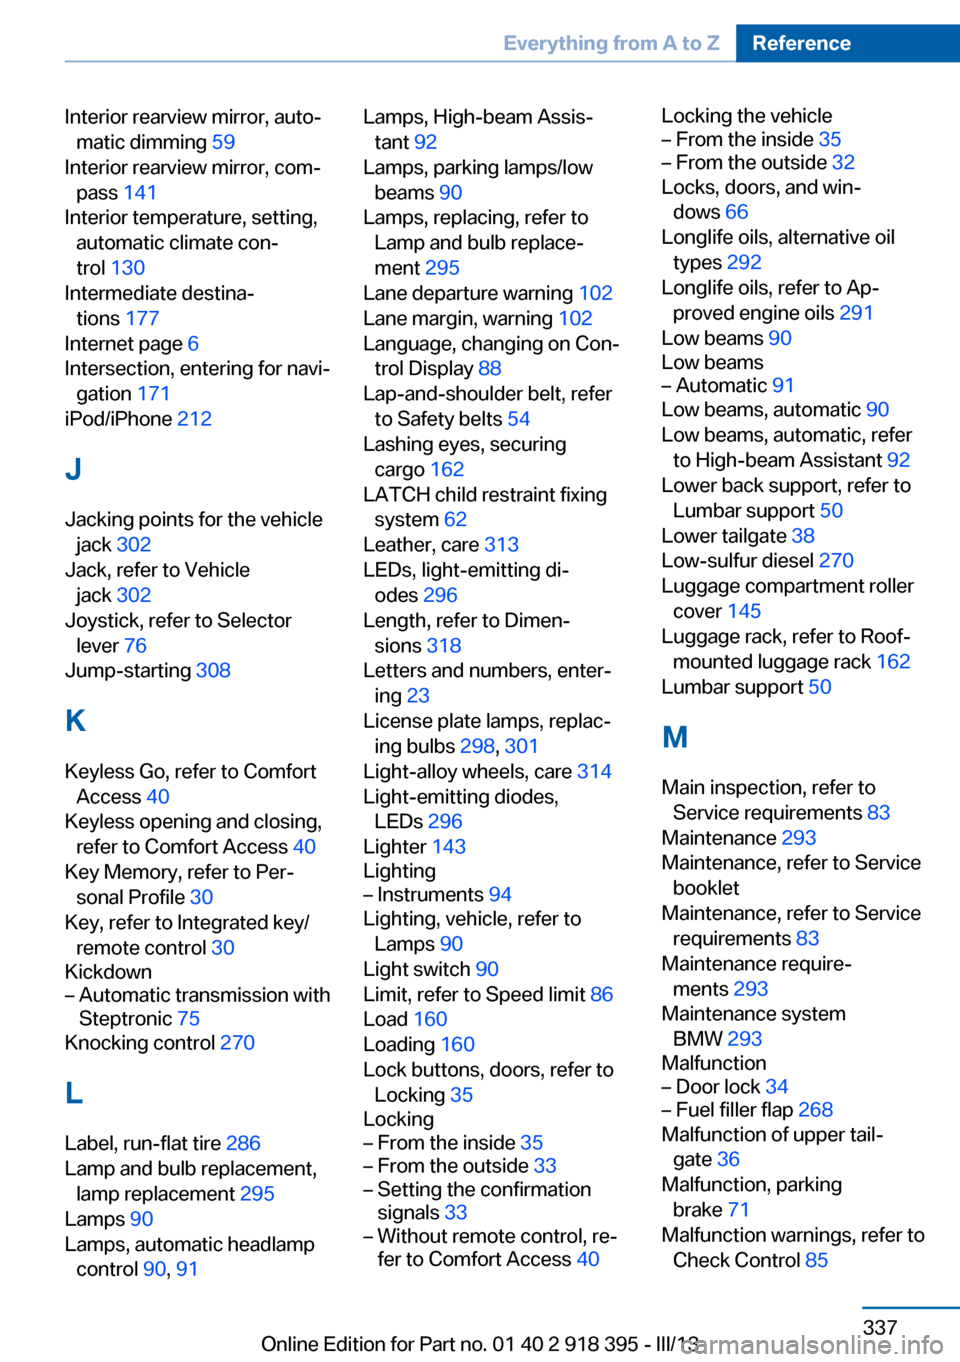
Interior rearview mirror, auto‐matic dimming 59
Interior rearview mirror, com‐ pass 141
Interior temperature, setting, automatic climate con‐
trol 130
Intermediate destina‐ tions 177
Internet page 6
Intersection, entering for navi‐ gation 171
iPod/iPhone 212
J
Jacking points for the vehicle jack 302
Jack, refer to Vehicle jack 302
Joystick, refer to Selector lever 76
Jump-starting 308
K
Keyless Go, refer to Comfort Access 40
Keyless opening and closing, refer to Comfort Access 40
Key Memory, refer to Per‐ sonal Profile 30
Key, refer to Integrated key/ remote control 30
Kickdown– Automatic transmission with
Steptronic 75
Knocking control 270
L
Label, run-flat tire 286
Lamp and bulb replacement, lamp replacement 295
Lamps 90
Lamps, automatic headlamp control 90, 91
Lamps, High-beam Assis‐
tant 92
Lamps, parking lamps/low beams 90
Lamps, replacing, refer to Lamp and bulb replace‐
ment 295
Lane departure warning 102
Lane margin, warning 102
Language, changing on Con‐ trol Display 88
Lap-and-shoulder belt, refer to Safety belts 54
Lashing eyes, securing cargo 162
LATCH child restraint fixing system 62
Leather, care 313
LEDs, light-emitting di‐ odes 296
Length, refer to Dimen‐ sions 318
Letters and numbers, enter‐ ing 23
License plate lamps, replac‐ ing bulbs 298, 301
Light-alloy wheels, care 314
Light-emitting diodes, LEDs 296
Lighter 143
Lighting– Instruments 94
Lighting, vehicle, refer to
Lamps 90
Light switch 90
Limit, refer to Speed limit 86
Load 160
Loading 160
Lock buttons, doors, refer to Locking 35
Locking
– From the inside 35– From the outside 33– Setting the confirmation
signals 33– Without remote control, re‐
fer to Comfort Access 40Locking the vehicle– From the inside 35– From the outside 32
Locks, doors, and win‐
dows 66
Longlife oils, alternative oil types 292
Longlife oils, refer to Ap‐ proved engine oils 291
Low beams 90
Low beams
– Automatic 91
Low beams, automatic 90
Low beams, automatic, refer to High-beam Assistant 92
Lower back support, refer to Lumbar support 50
Lower tailgate 38
Low-sulfur diesel 270
Luggage compartment roller cover 145
Luggage rack, refer to Roof- mounted luggage rack 162
Lumbar support 50
M
Main inspection, refer to Service requirements 83
Maintenance 293
Maintenance, refer to Service booklet
Maintenance, refer to Service requirements 83
Maintenance require‐ ments 293
Maintenance system BMW 293
Malfunction
– Door lock 34– Fuel filler flap 268
Malfunction of upper tail‐
gate 36
Malfunction, parking brake 71
Malfunction warnings, refer to Check Control 85
Seite 337Everything from A to ZReference337
Online Edition for Part no. 01 40 2 918 395 - III/13
Page 339 of 345
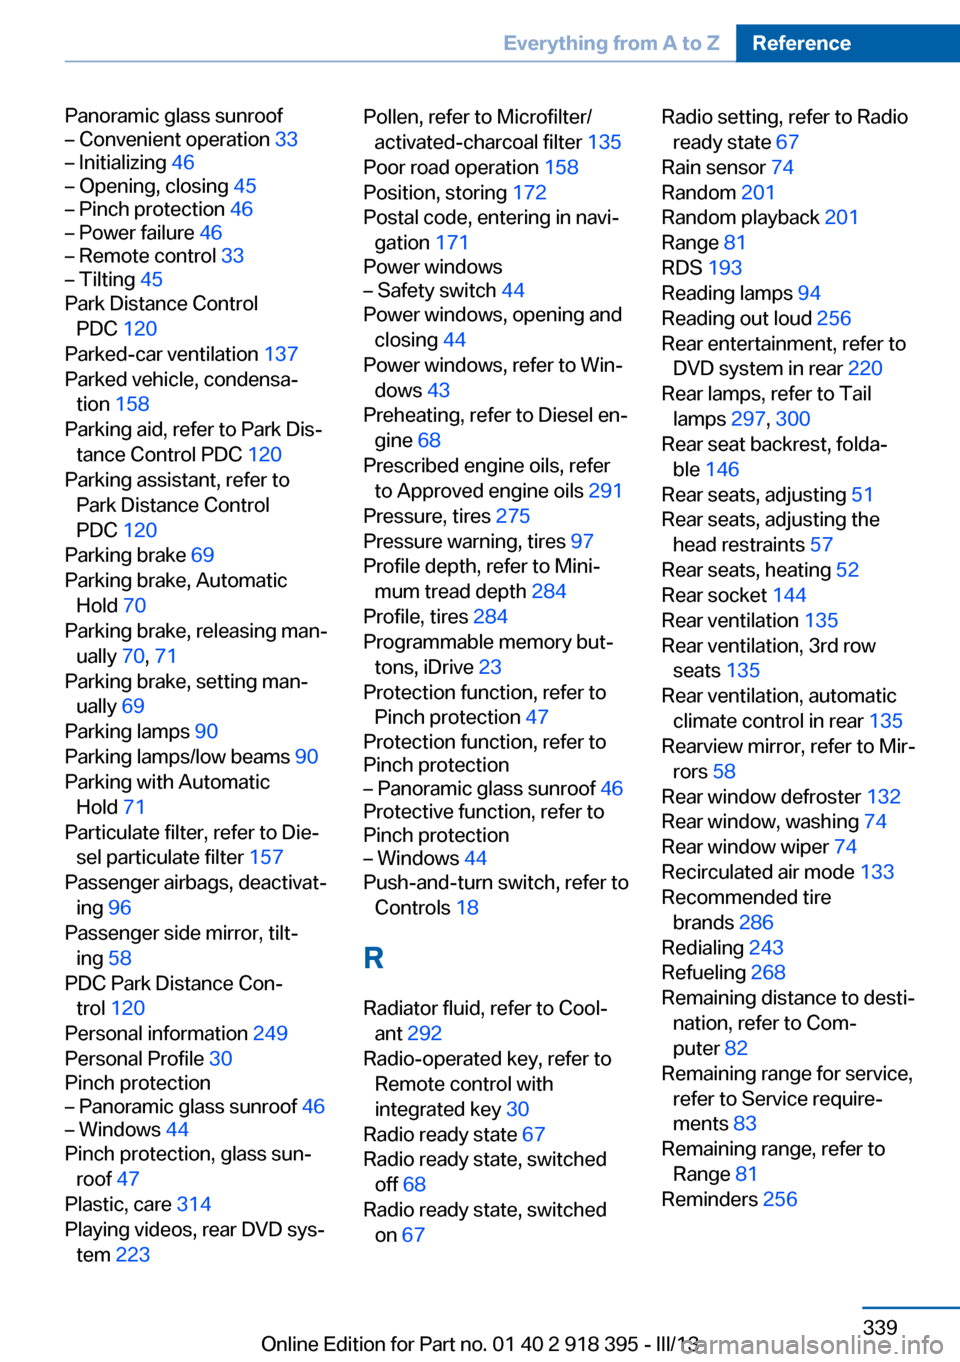
Panoramic glass sunroof– Convenient operation 33– Initializing 46– Opening, closing 45– Pinch protection 46– Power failure 46– Remote control 33– Tilting 45
Park Distance Control
PDC 120
Parked-car ventilation 137
Parked vehicle, condensa‐ tion 158
Parking aid, refer to Park Dis‐ tance Control PDC 120
Parking assistant, refer to Park Distance Control
PDC 120
Parking brake 69
Parking brake, Automatic Hold 70
Parking brake, releasing man‐ ually 70, 71
Parking brake, setting man‐ ually 69
Parking lamps 90
Parking lamps/low beams 90
Parking with Automatic Hold 71
Particulate filter, refer to Die‐ sel particulate filter 157
Passenger airbags, deactivat‐ ing 96
Passenger side mirror, tilt‐ ing 58
PDC Park Distance Con‐ trol 120
Personal information 249
Personal Profile 30
Pinch protection
– Panoramic glass sunroof 46– Windows 44
Pinch protection, glass sun‐
roof 47
Plastic, care 314
Playing videos, rear DVD sys‐ tem 223
Pollen, refer to Microfilter/
activated-charcoal filter 135
Poor road operation 158
Position, storing 172
Postal code, entering in navi‐ gation 171
Power windows– Safety switch 44
Power windows, opening and
closing 44
Power windows, refer to Win‐ dows 43
Preheating, refer to Diesel en‐ gine 68
Prescribed engine oils, refer to Approved engine oils 291
Pressure, tires 275
Pressure warning, tires 97
Profile depth, refer to Mini‐ mum tread depth 284
Profile, tires 284
Programmable memory but‐ tons, iDrive 23
Protection function, refer to Pinch protection 47
Protection function, refer to
Pinch protection
– Panoramic glass sunroof 46
Protective function, refer to
Pinch protection
– Windows 44
Push-and-turn switch, refer to
Controls 18
R Radiator fluid, refer to Cool‐ ant 292
Radio-operated key, refer to Remote control with
integrated key 30
Radio ready state 67
Radio ready state, switched off 68
Radio ready state, switched on 67
Radio setting, refer to Radio
ready state 67
Rain sensor 74
Random 201
Random playback 201
Range 81
RDS 193
Reading lamps 94
Reading out loud 256
Rear entertainment, refer to DVD system in rear 220
Rear lamps, refer to Tail lamps 297, 300
Rear seat backrest, folda‐ ble 146
Rear seats, adjusting 51
Rear seats, adjusting the head restraints 57
Rear seats, heating 52
Rear socket 144
Rear ventilation 135
Rear ventilation, 3rd row seats 135
Rear ventilation, automatic climate control in rear 135
Rearview mirror, refer to Mir‐ rors 58
Rear window defroster 132
Rear window, washing 74
Rear window wiper 74
Recirculated air mode 133
Recommended tire brands 286
Redialing 243
Refueling 268
Remaining distance to desti‐ nation, refer to Com‐
puter 82
Remaining range for service, refer to Service require‐
ments 83
Remaining range, refer to Range 81
Reminders 256 Seite 339Everything from A to ZReference339
Online Edition for Part no. 01 40 2 918 395 - III/13