open hood BMW X5 2014 F15 Owner's Manual
[x] Cancel search | Manufacturer: BMW, Model Year: 2014, Model line: X5, Model: BMW X5 2014 F15Pages: 265, PDF Size: 6.2 MB
Page 45 of 265
Retrieving the seat, mirror, and
steering wheel settings
The driver's seat, exterior mirror, and steering
wheel positions selected last are stored for the
currently used remote control.
When the vehicle is unlocked, these positions
are automatically retrieved if this function was
activated.
Pinch hazard when moving back the seat
If this function is used, first make sure
that the footwell behind the driver's seat is
empty. Otherwise, people can be injured or ob‐
jects damaged when the seat is moved back.◀
The adjustment procedure is interrupted:▷When a seat position switch is pressed.▷When a button of the seat, mirror, and
steering wheel memory is pressed briefly.
Activating the setting
1."Settings"2."Doors/key"3."Last seat position autom."
Alarm system
The conceptThe vehicle alarm system responds to:
▷Opening of a door, the hood or the tailgate.▷Movements in the vehicle.▷Changes in the vehicle tilt, e.g., during at‐
tempts to steal a wheel or when towing the
car.▷Interruptions in battery voltage.
The alarm system briefly indicates tampering:
▷By sounding an acoustic alarm.▷By switching on the hazard warning sys‐
tem.▷By flashing the high beams.Arming and disarming the alarm
system
General information
When you lock or unlock the vehicle, either
with the remote control or via the Comfort Ac‐
cess at the door lock, the alarm system is
armed or disarmed at the same time.
Door lock and armed alarm systemThe alarm system is triggered when the door is
opened, if the vehicle is unlocked via the door
lock.
In order to terminate this alarm, unlock vehicle
with the remote control or switch on the igni‐
tion, if necessary, by emergency detection of
the remote control.
Tailgate and armed alarm system
The tailgate can be opened even when the
alarm system is armed.
Press the button on the remote con‐
trol for approx. 1 second.
After the tailgate is closed, it is locked and
monitored again if the doors are locked. The
hazard warning system flashes once.
In some vehicle equipment variants, the tail‐
gate can only be opened using the remote
control if the vehicle was unlocked first.
Panic mode
You can trigger the alarm system if you find
yourself in a dangerous situation.
Press the button on the remote con‐
trol for at least 3 seconds.
To switch off the alarm: press any button.
Switching off the alarm
To terminate the alarm:▷Unlock the vehicle using the remote con‐
trol.Seite 45Opening and closingControls45
Online Edition for Part no. 01 40 2 926 740 - X/13
Page 46 of 265
▷With Comfort Access: If you are carrying
the remote control with you, grasp the
driver side or front passenger side door
handle completely.
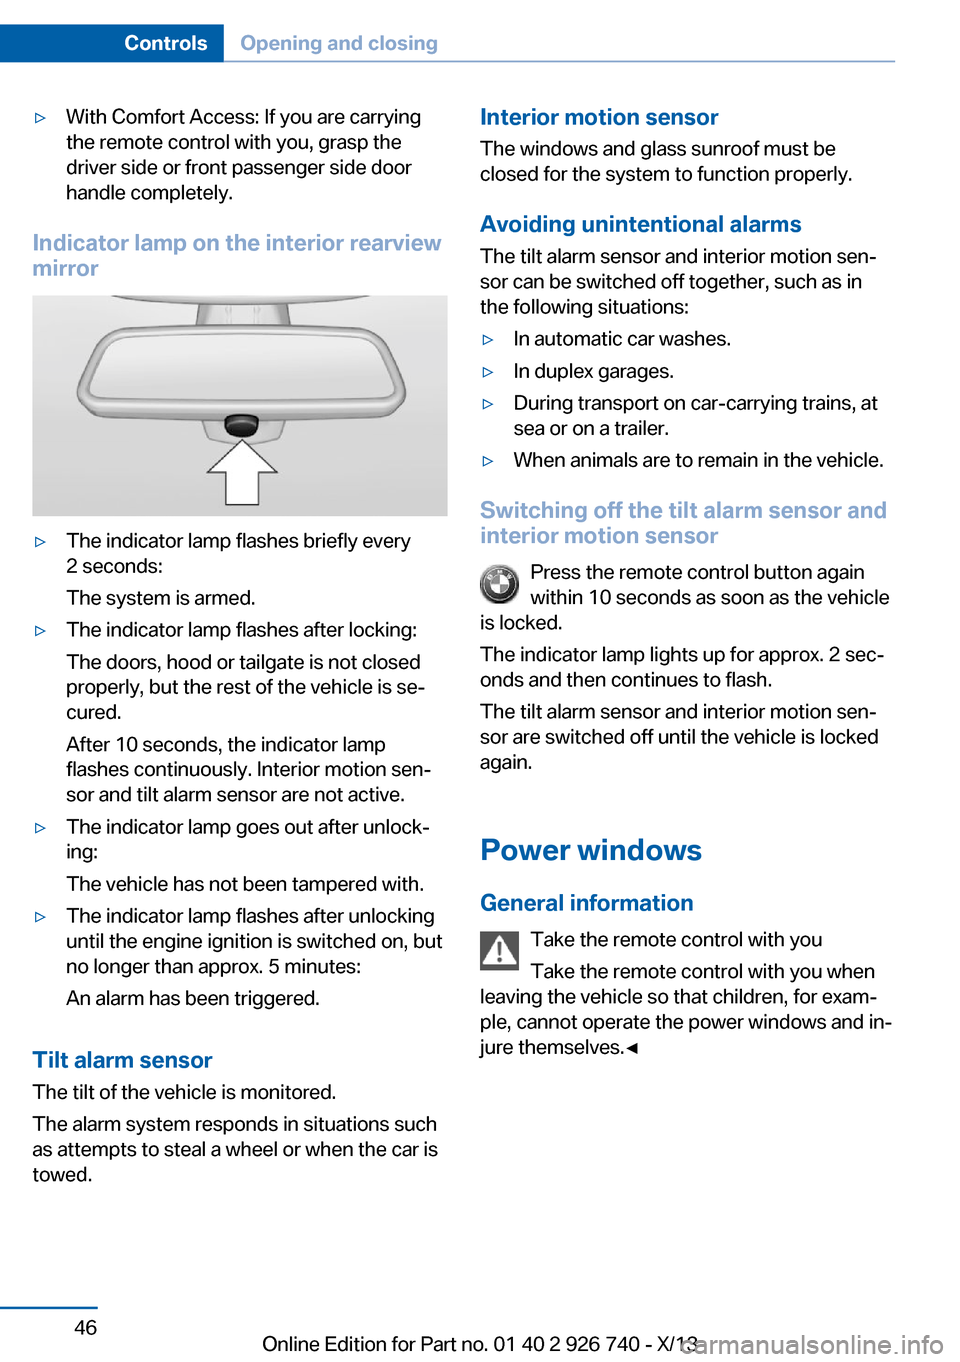
Indicator lamp on the interior rearview
mirror
▷The indicator lamp flashes briefly every
2 seconds:
The system is armed.▷The indicator lamp flashes after locking:
The doors, hood or tailgate is not closed
properly, but the rest of the vehicle is se‐
cured.
After 10 seconds, the indicator lamp
flashes continuously. Interior motion sen‐
sor and tilt alarm sensor are not active.▷The indicator lamp goes out after unlock‐
ing:
The vehicle has not been tampered with.▷The indicator lamp flashes after unlocking
until the engine ignition is switched on, but
no longer than approx. 5 minutes:
An alarm has been triggered.
Tilt alarm sensor The tilt of the vehicle is monitored.
The alarm system responds in situations such
as attempts to steal a wheel or when the car is
towed.
Interior motion sensor
The windows and glass sunroof must be
closed for the system to function properly.
Avoiding unintentional alarms
The tilt alarm sensor and interior motion sen‐
sor can be switched off together, such as in
the following situations:▷In automatic car washes.▷In duplex garages.▷During transport on car-carrying trains, at
sea or on a trailer.▷When animals are to remain in the vehicle.
Switching off the tilt alarm sensor and
interior motion sensor
Press the remote control button again
within 10 seconds as soon as the vehicle
is locked.
The indicator lamp lights up for approx. 2 sec‐
onds and then continues to flash.
The tilt alarm sensor and interior motion sen‐
sor are switched off until the vehicle is locked
again.
Power windows
General information Take the remote control with you
Take the remote control with you when
leaving the vehicle so that children, for exam‐
ple, cannot operate the power windows and in‐
jure themselves.◀
Seite 46ControlsOpening and closing46
Online Edition for Part no. 01 40 2 926 740 - X/13
Page 70 of 265
Starting the engineThe engine starts automatically under the fol‐
lowing conditions:▷Automatic transmission:
By releasing the brake pedal.
When Automatic Hold is activated: press
the accelerator.
After the engine starts, accelerate as usual.
Safety mode
After the engine switches off automatically, it
will not start again automatically if any one of
the following conditions are met.
▷The driver's safety belt is unbuckled and
the driver's door is open.▷The hood was unlocked.
Some indicator lamps light up for varying
lengths of time.
The engine can only be started via the Start/
Stop button.
Note Even if driving away was not intended, the de‐
activated engine starts up automatically in the
following situations:
▷Excessive warming of the passenger com‐
partment when the cooling function is
switched on.▷The steering wheel is turned.▷Automatic transmission: the transmission
position is changed from D to N, R, or M/S.▷Automatic transmission: the transmission
position is changed from P to N, D, R or
M/S.▷Fogging of the windows when the auto‐
matic climate control is switched on.▷Vehicle battery is heavily discharged.▷Excessive cooling of the passenger com‐
partment when the heating is switched on.Preventing an automatic engine stop with automatic transmission
The concept To make it possible to drive away very quickly,
such as at an intersection, the automatic en‐
gine stop can be actively prevented.
Preventing an engine stop using the
brake pedal
The engine stop can be actively prevented
within one second after the vehicle comes to a
standstill.▷Immediately after the vehicle comes to a
standstill, briefly press the brake pedal
forcefully.▷Then press the brake pedal with normal
braking force.
Activating/deactivating the system
manually
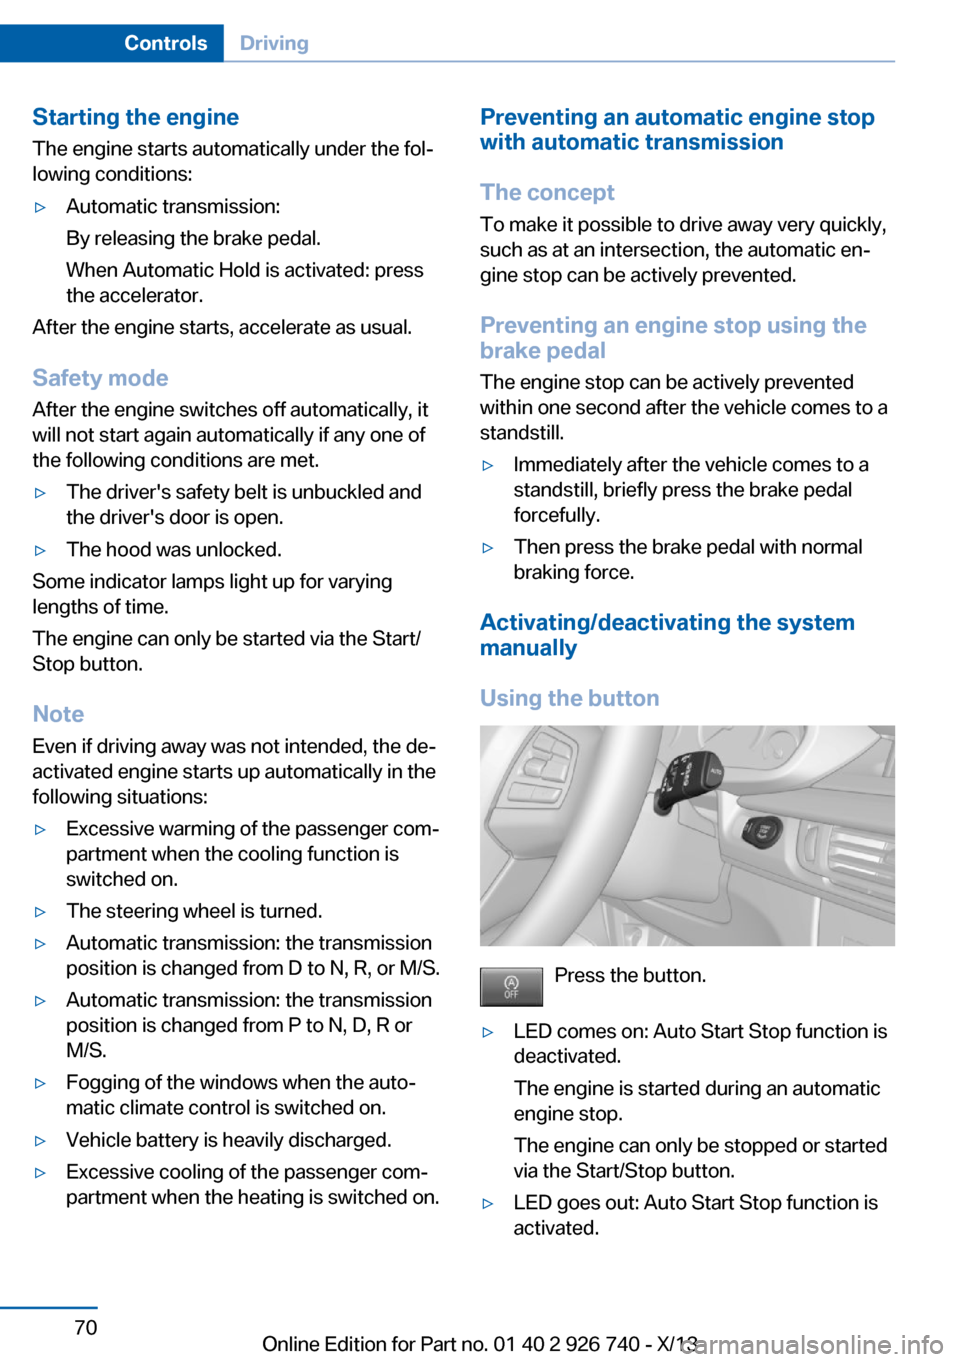
Using the button
Press the button.
▷LED comes on: Auto Start Stop function is
deactivated.
The engine is started during an automatic
engine stop.
The engine can only be stopped or started
via the Start/Stop button.▷LED goes out: Auto Start Stop function is
activated.Seite 70ControlsDriving70
Online Edition for Part no. 01 40 2 926 740 - X/13
Page 209 of 265
Suitable Diesel exhaust fluid▷Preferred: BMW Diesel Exhaust Fluid. With
this bottle and its special adapter, Diesel
exhaust fluid can be replenished simply
and safely.
▷Alternative: NOx reduction agent AUS 32
Diesel exhaust fluid can be purchased at your
Service Center.
Refill quantity
When the Reserve display starts, add at least 2
bottles of reducing agent.
This corresponds to approx. 1 gallon.
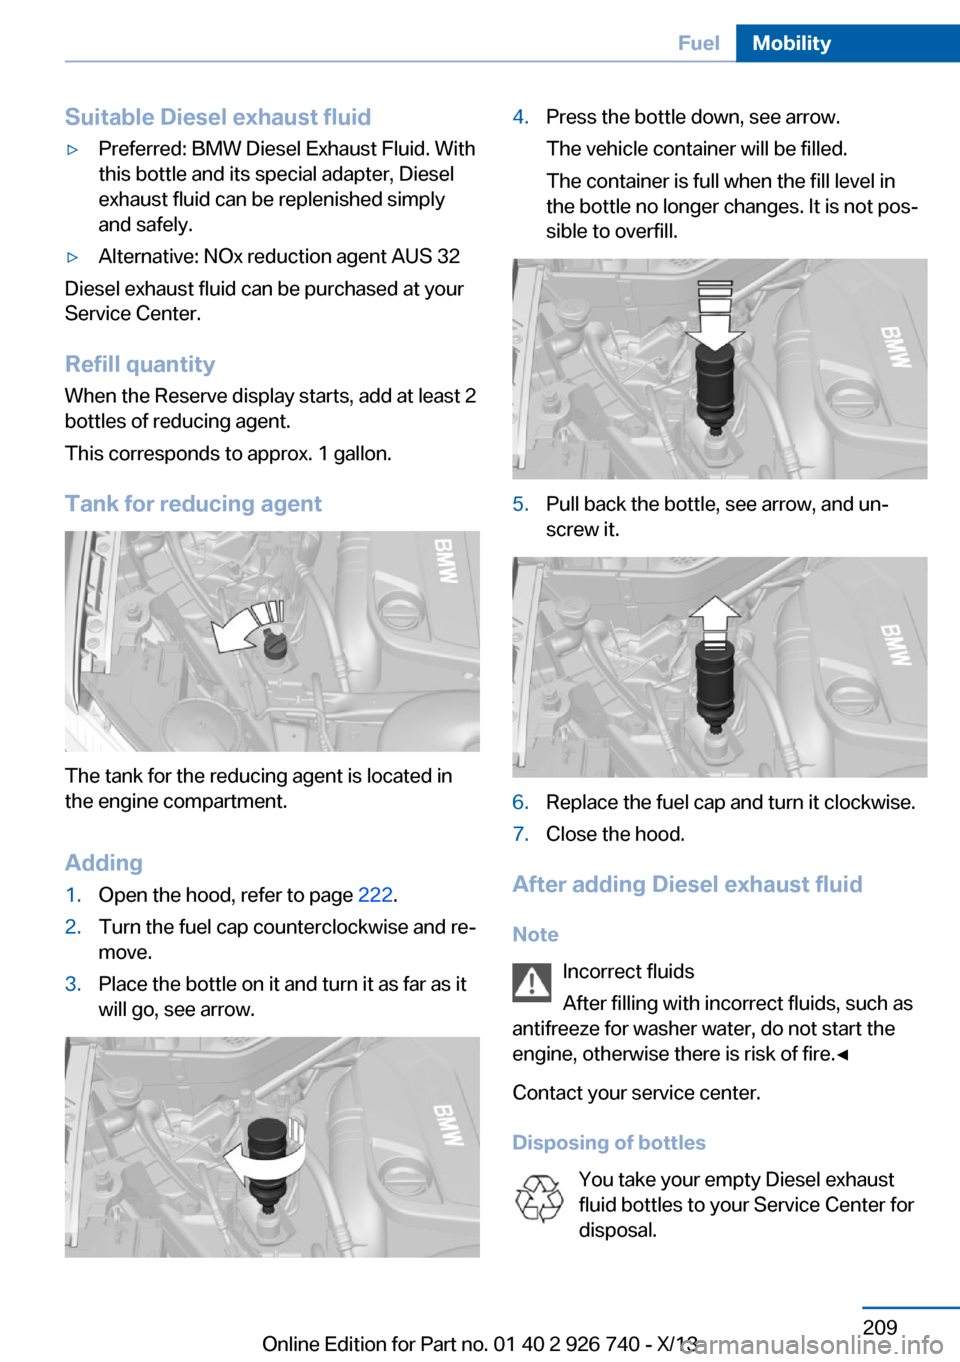
Tank for reducing agent
The tank for the reducing agent is located in
the engine compartment.
Adding
1.Open the hood, refer to page 222.2.Turn the fuel cap counterclockwise and re‐
move.
3.Place the bottle on it and turn it as far as it
will go, see arrow.
4.Press the bottle down, see arrow.
The vehicle container will be filled.
The container is full when the fill level in
the bottle no longer changes. It is not pos‐
sible to overfill.
5.Pull back the bottle, see arrow, and un‐
screw it.
6.Replace the fuel cap and turn it clockwise.7.Close the hood.
After adding Diesel exhaust fluid
Note
Incorrect fluids
After filling with incorrect fluids, such as
antifreeze for washer water, do not start the
engine, otherwise there is risk of fire.◀
Contact your service center.
Disposing of bottles
You take your empty Diesel exhaust
fluid bottles to your Service Center for
disposal.
Seite 209FuelMobility209
Online Edition for Part no. 01 40 2 926 740 - X/13
Page 222 of 265
Engine compartmentVehicle equipmentAll standard, country-specific and optional
equipment that is offered in the model series is
described in this chapter. Therefore, equip‐ment is also described that is not available in a
vehicle, e. g., because of the selected optional
equipment or country variant. This also applies
for safety-related functions and systems.
Important features in the engine compartment
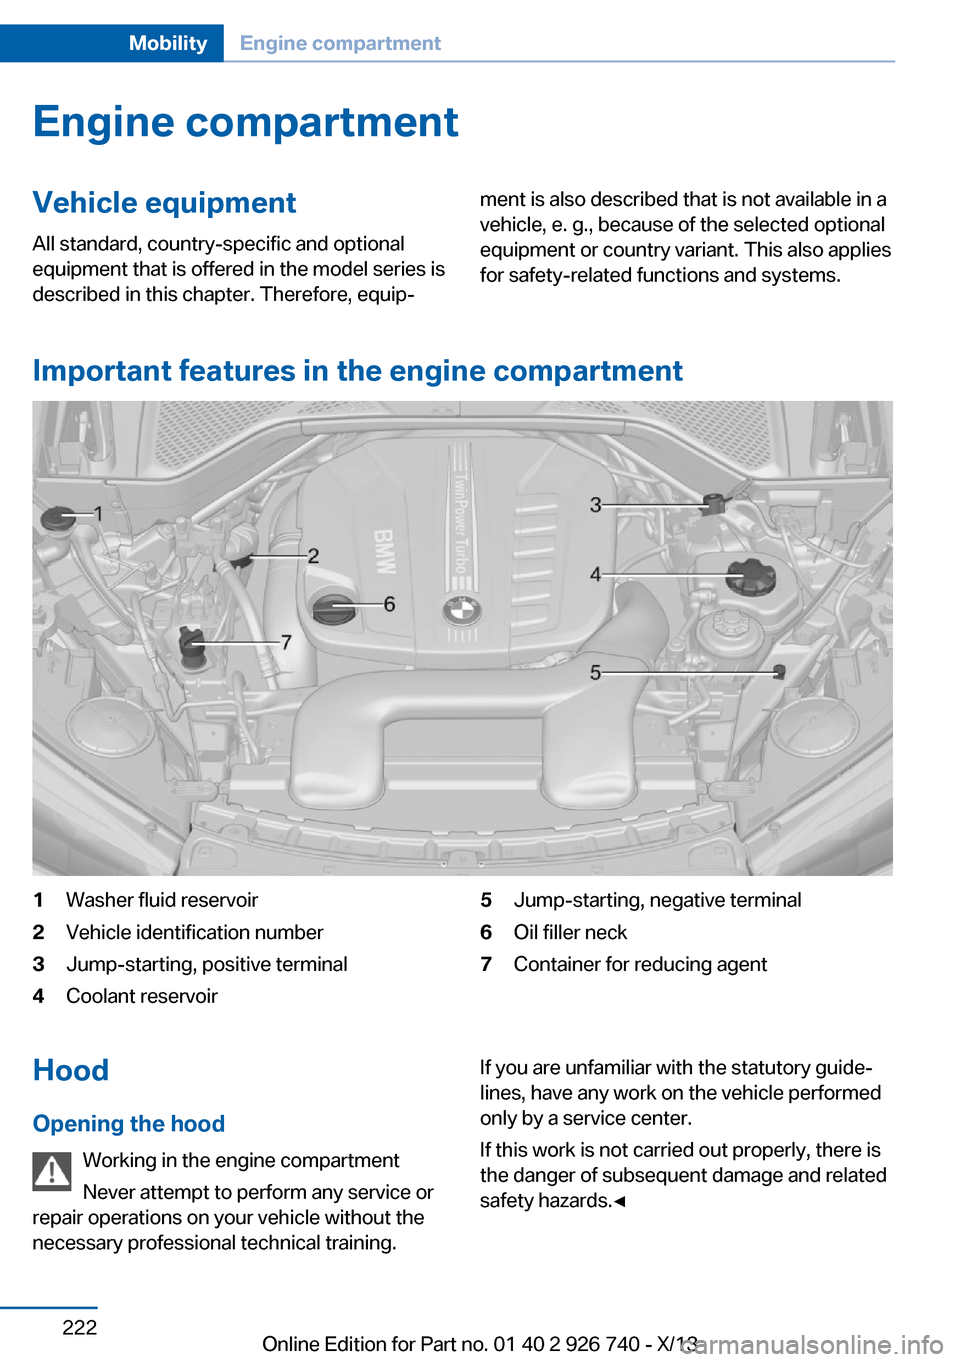
1Washer fluid reservoir2Vehicle identification number3Jump-starting, positive terminal4Coolant reservoir5Jump-starting, negative terminal6Oil filler neck7Container for reducing agentHood
Opening the hood Working in the engine compartment
Never attempt to perform any service or
repair operations on your vehicle without the necessary professional technical training.If you are unfamiliar with the statutory guide‐
lines, have any work on the vehicle performed
only by a service center.
If this work is not carried out properly, there is
the danger of subsequent damage and related
safety hazards.◀Seite 222MobilityEngine compartment222
Online Edition for Part no. 01 40 2 926 740 - X/13
Page 223 of 265
Never reach into the engine compart‐
ment
Never reach into the intermediate spaces or
gaps in the engine compartment. Otherwise,
there is risk of injury, e.g., from rotating or hot
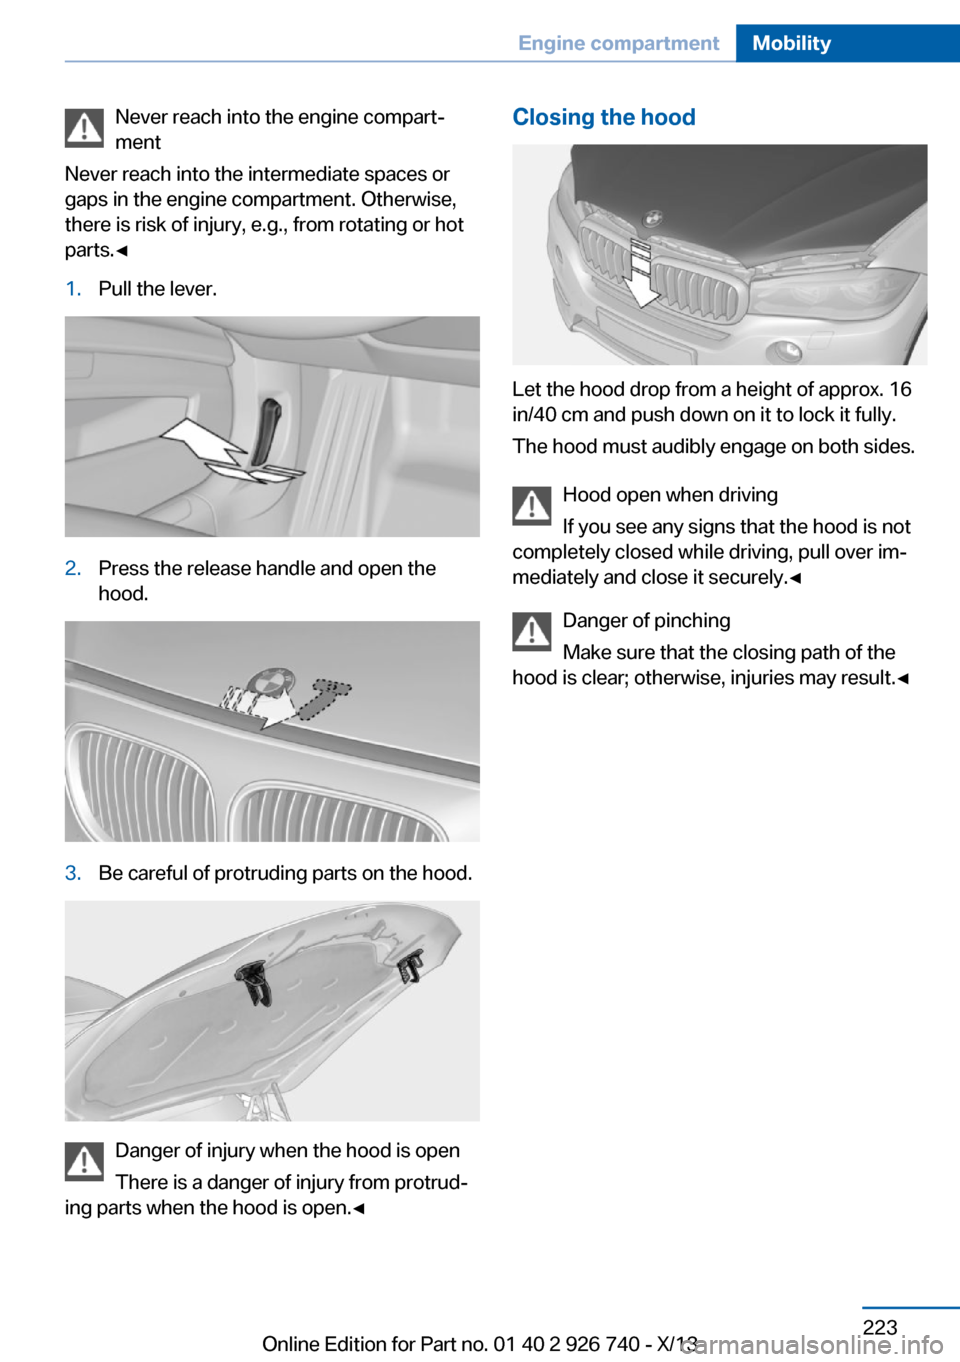
parts.◀1.Pull the lever.2.Press the release handle and open the
hood.3.Be careful of protruding parts on the hood.
Danger of injury when the hood is open
There is a danger of injury from protrud‐
ing parts when the hood is open.◀
Closing the hood
Let the hood drop from a height of approx. 16
in/40 cm and push down on it to lock it fully.
The hood must audibly engage on both sides.
Hood open when driving
If you see any signs that the hood is not
completely closed while driving, pull over im‐
mediately and close it securely.◀
Danger of pinching
Make sure that the closing path of the
hood is clear; otherwise, injuries may result.◀
Seite 223Engine compartmentMobility223
Online Edition for Part no. 01 40 2 926 740 - X/13
Page 231 of 265
Replacing componentsVehicle equipmentAll standard, country-specific and optional
equipment that is offered in the model series is
described in this chapter. Therefore, equip‐
ment is also described that is not available in a
vehicle, e. g., because of the selected optional
equipment or country variant. This also applies
for safety-related functions and systems.
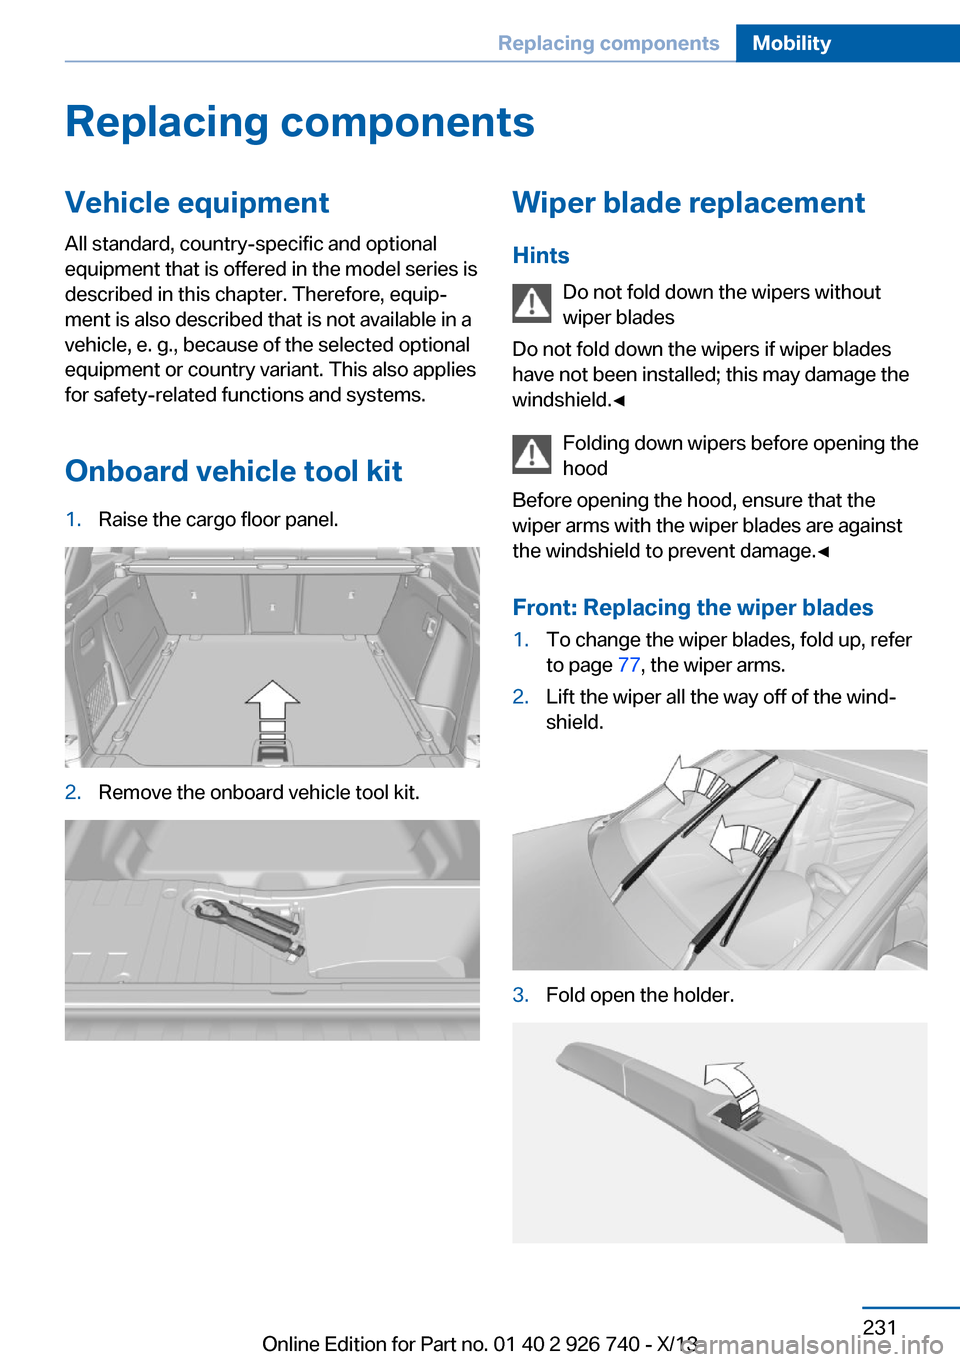
Onboard vehicle tool kit1.Raise the cargo floor panel.2.Remove the onboard vehicle tool kit.Wiper blade replacement Hints Do not fold down the wipers without
wiper blades
Do not fold down the wipers if wiper blades
have not been installed; this may damage the
windshield.◀
Folding down wipers before opening the
hood
Before opening the hood, ensure that the
wiper arms with the wiper blades are against
the windshield to prevent damage.◀
Front: Replacing the wiper blades1.To change the wiper blades, fold up, refer
to page 77, the wiper arms.2.Lift the wiper all the way off of the wind‐
shield.3.Fold open the holder.Seite 231Replacing componentsMobility231
Online Edition for Part no. 01 40 2 926 740 - X/13
Page 234 of 265
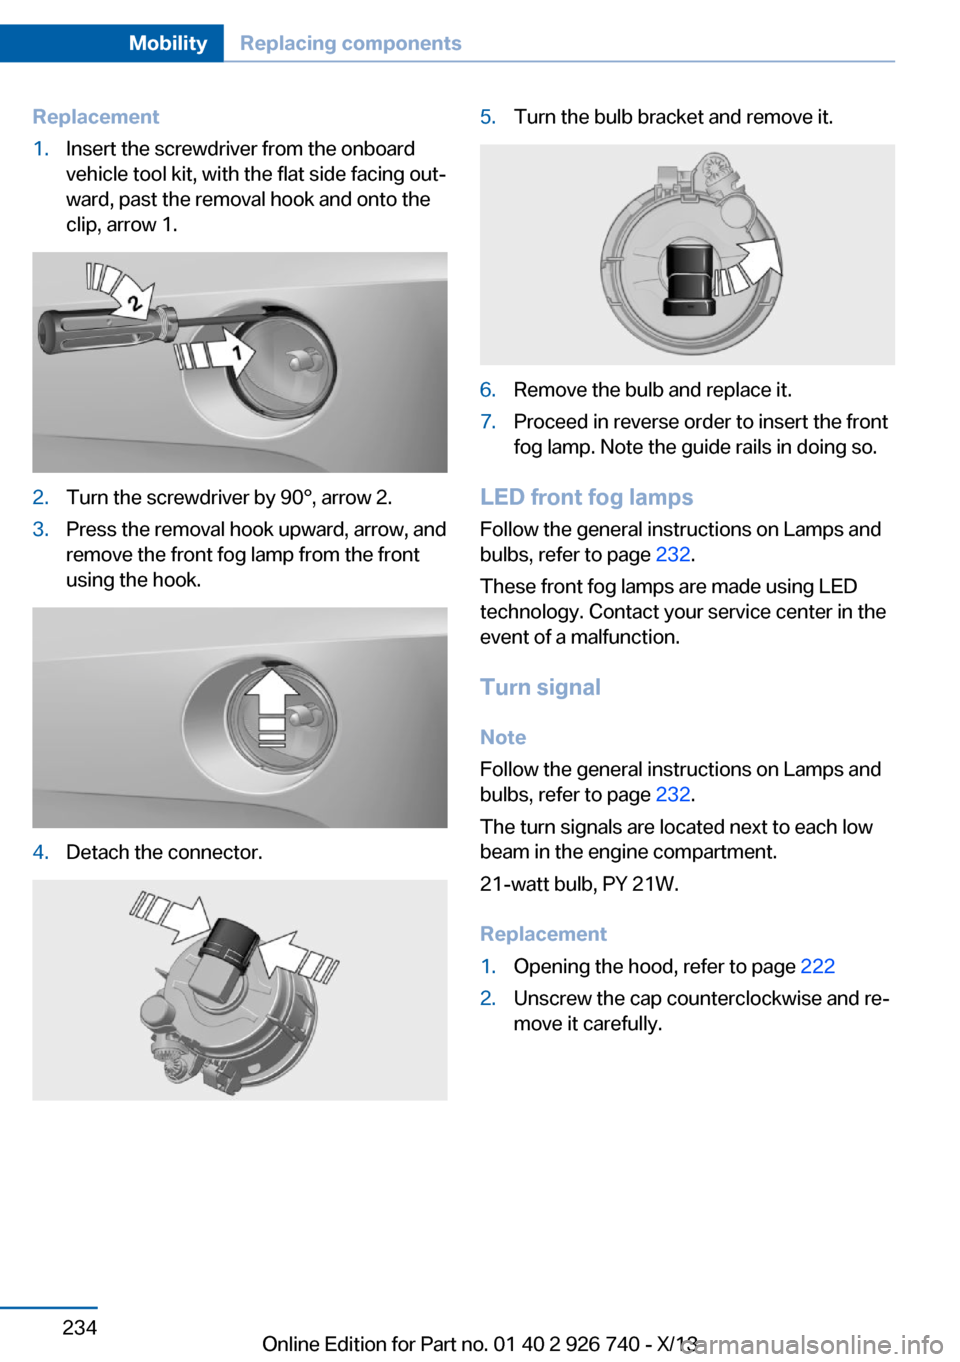
Replacement1.Insert the screwdriver from the onboard
vehicle tool kit, with the flat side facing out‐
ward, past the removal hook and onto the
clip, arrow 1.2.Turn the screwdriver by 90°, arrow 2.3.Press the removal hook upward, arrow, and
remove the front fog lamp from the front
using the hook.4.Detach the connector.5.Turn the bulb bracket and remove it.6.Remove the bulb and replace it.7.Proceed in reverse order to insert the front
fog lamp. Note the guide rails in doing so.
LED front fog lamps
Follow the general instructions on Lamps and
bulbs, refer to page 232.
These front fog lamps are made using LED
technology. Contact your service center in the
event of a malfunction.
Turn signal
Note
Follow the general instructions on Lamps and
bulbs, refer to page 232.
The turn signals are located next to each low
beam in the engine compartment.
21-watt bulb, PY 21W.
Replacement
1.Opening the hood, refer to page 2222.Unscrew the cap counterclockwise and re‐
move it carefully.Seite 234MobilityReplacing components234
Online Edition for Part no. 01 40 2 926 740 - X/13