tailgate BMW X5 3.0I 2004 E53 User Guide
[x] Cancel search | Manufacturer: BMW, Model Year: 2004, Model line: X5 3.0I, Model: BMW X5 3.0I 2004 E53Pages: 200, PDF Size: 3.91 MB
Page 166 of 200
164n
Changing a tire What you will need In order to avoid rattling noises later,
note the position of the tools when you
remove them and return them to their
original position when you are through
using them.
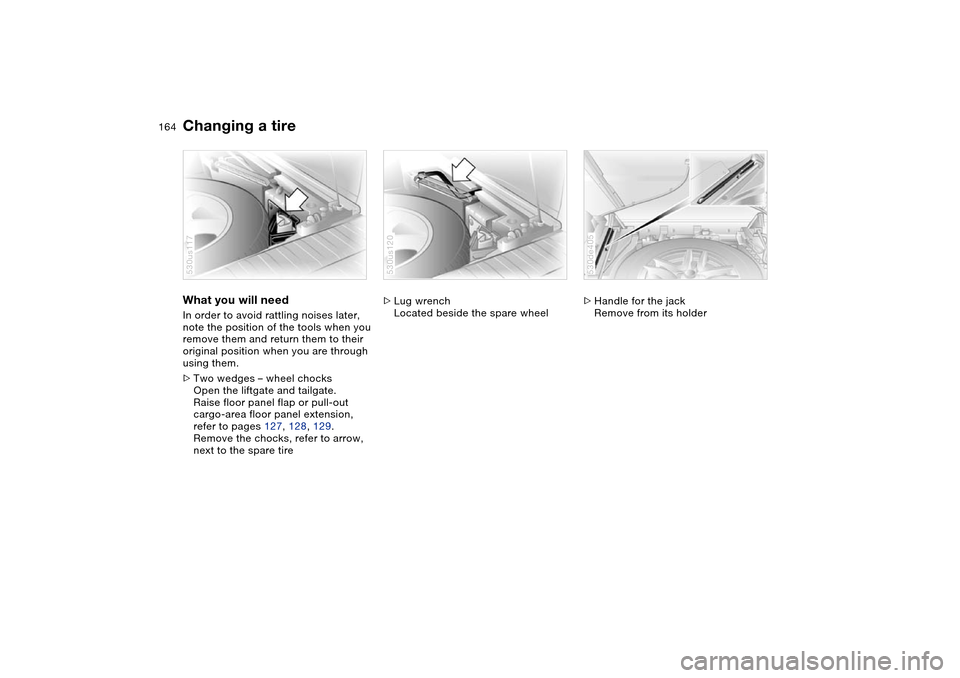
>Two wedges – wheel chocks
Open the liftgate and tailgate.
Raise floor panel flap or pull-out
cargo-area floor panel extension,
refer to pages 127, 128, 129.
Remove the chocks, refer to arrow,
next to the spare tire 530us117
>Lug wrench
Located beside the spare wheel 530us120
>Handle for the jack
Remove from its holder530de405
Page 167 of 200
165n
OverviewControlsMaintenanceRepairsDataIndex
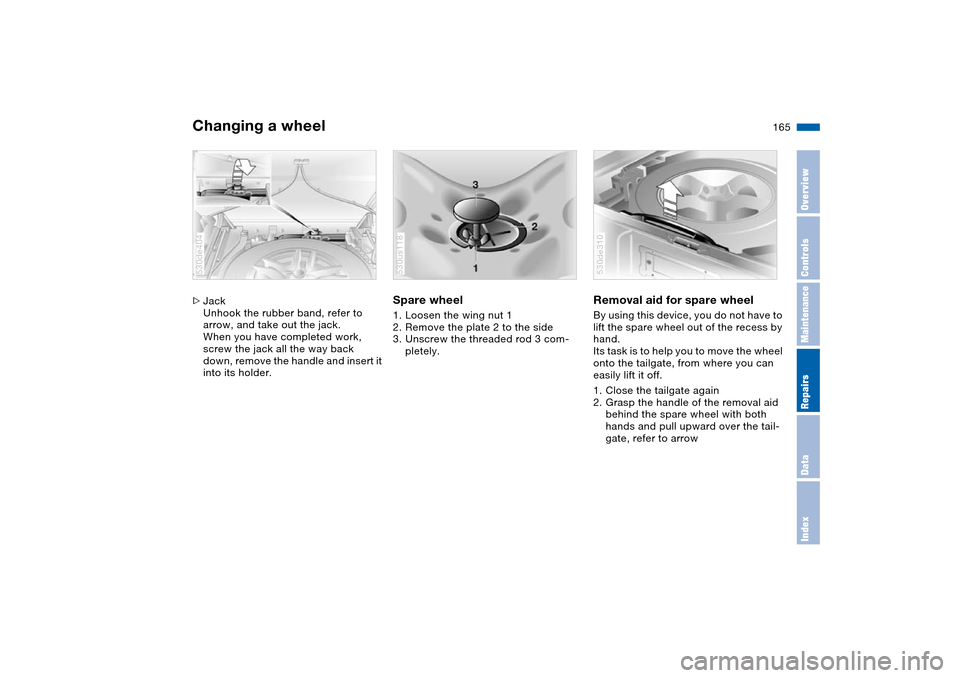
Changing a wheel >Jack
Unhook the rubber band, refer to
arrow, and take out the jack.
When you have completed work,
screw the jack all the way back
down, remove the handle and insert it
into its holder. 530de404
Spare wheel 1. Loosen the wing nut 1
2. Remove the plate 2 to the side
3. Unscrew the threaded rod 3 com-
pletely. 530us118
Removal aid for spare wheel By using this device, you do not have to
lift the spare wheel out of the recess by
hand.
Its task is to help you to move the wheel
onto the tailgate, from where you can
easily lift it off.
1. Close the tailgate again
2. Grasp the handle of the removal aid
behind the spare wheel with both
hands and pull upward over the tail-
gate, refer to arrow 530de310
Page 168 of 200
166n
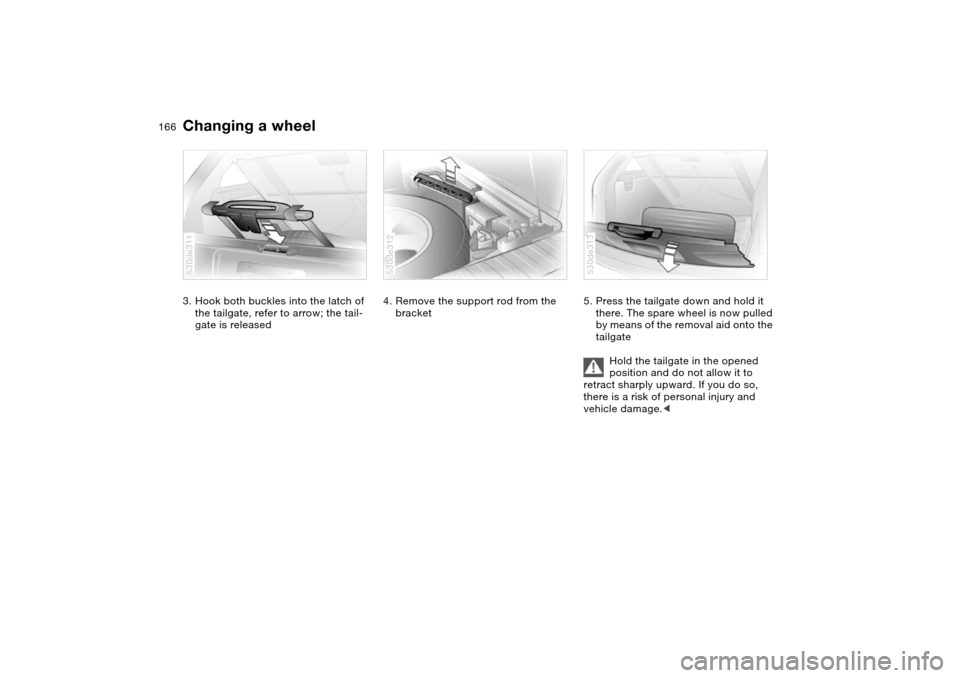
Changing a wheel 3. Hook both buckles into the latch of
the tailgate, refer to arrow; the tail-
gate is released 530de311
4. Remove the support rod from the
bracket 530de312
5. Press the tailgate down and hold it
there. The spare wheel is now pulled
by means of the removal aid onto the
tailgate
Hold the tailgate in the opened
position and do not allow it to
retract sharply upward. If you do so,
there is a risk of personal injury and
vehicle damage.<530de313
Page 169 of 200
167n
OverviewControlsMaintenanceRepairsDataIndex
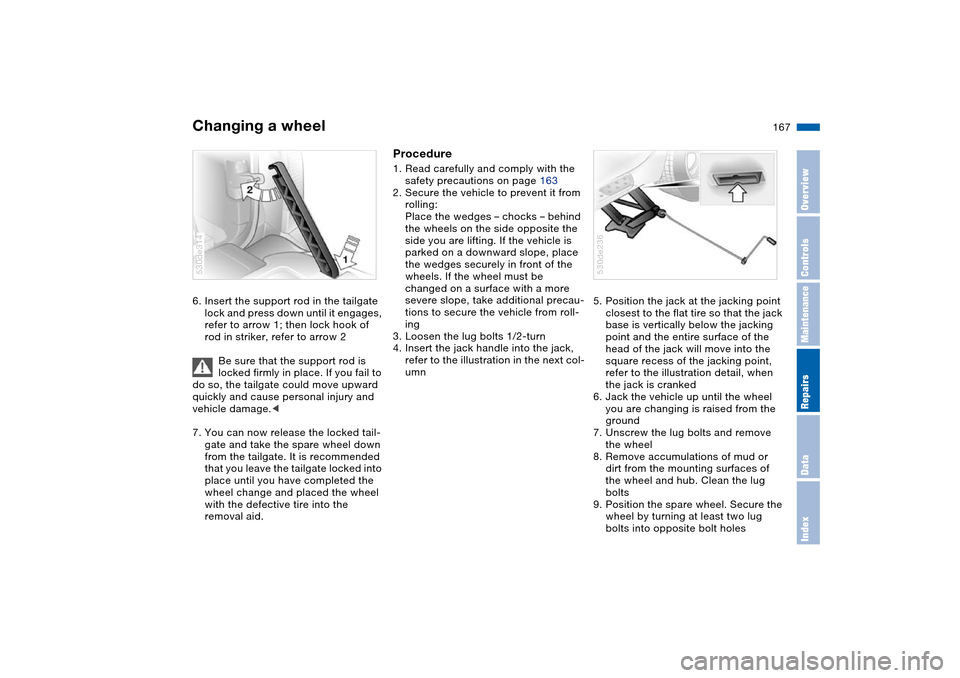
Changing a wheel 6. Insert the support rod in the tailgate
lock and press down until it engages,
refer to arrow 1; then lock hook of
rod in striker, refer to arrow 2
Be sure that the support rod is
locked firmly in place. If you fail to
do so, the tailgate could move upward
quickly and cause personal injury and
vehicle damage.<
7. You can now release the locked tail-
gate and take the spare wheel down
from the tailgate. It is recommended
that you leave the tailgate locked into
place until you have completed the
wheel change and placed the wheel
with the defective tire into the
removal aid. 530de314
Procedure1. Read carefully and comply with the
safety precautions on page 163
2. Secure the vehicle to prevent it from
rolling:
Place the wedges – chocks – behind
the wheels on the side opposite the
side you are lifting. If the vehicle is
parked on a downward slope, place
the wedges securely in front of the
wheels. If the wheel must be
changed on a surface with a more
severe slope, take additional precau-
tions to secure the vehicle from roll-
ing
3. Loosen the lug bolts 1/2-turn
4. Insert the jack handle into the jack,
refer to the illustration in the next col-
umn5. Position the jack at the jacking point
closest to the flat tire so that the jack
base is vertically below the jacking
point and the entire surface of the
head of the jack will move into the
square recess of the jacking point,
refer to the illustration detail, when
the jack is cranked
6. Jack the vehicle up until the wheel
you are changing is raised from the
ground
7. Unscrew the lug bolts and remove
the wheel
8. Remove accumulations of mud or
dirt from the mounting surfaces of
the wheel and hub. Clean the lug
bolts
9. Position the spare wheel. Secure the
wheel by turning at least two lug
bolts into opposite bolt holes
530de236
Page 170 of 200
168n
Changing a wheel Battery 10. Screw in the remaining lug bolts.
Tighten all the bolts securely in a
diagonal pattern
11. Lower the jack and remove it from
beneath the vehicle
12. Tighten the lug bolts in a diagonal
pattern
13. Check and correct the tire inflation
pressure at the earliest opportunity.
After mounting the spare wheel or
correcting the inflation pressure,
reinitialize the Flat Tire Monitor,
refer to page 100.
Protect valve stems and valves from dirt
using screw-on valve stem caps. Dirt in
the valve stems frequently leads to slow
leaks.
The vehicle jack is designed for
changing wheels only. Do not
attempt to raise another vehicle model
with it or to raise any load of any kind.
To do so could cause accidents and
personal injury.
To ensure safety, always have the lug
bolts checked with a calibrated torque
wrench as soon as possible to ensure
that they are tightened to the speci-
fied torque. The tightening torque is
101 lb-ft/140 Nm.<
Store the wheel and the tools in the
order opposite that for removal.
Before removing the support rod,
be sure that the tailgate is held
down firmly. If you fail to do so, it could
retract sharply upward and cause per-
sonal injury and vehicle damage.
After you remove the rod, close the tail-
gate carefully. Continue to hold it firmly
until it is completely closed.<
If light-alloy wheels other than Genuine
BMW light-alloy wheels have been
mounted, it may be necessary to use
different lug bolts for those wheels.
Replace the defective tire as soon as
possible and have the new wheel/tire
balanced.
Driving with spare wheel
Do not exceed a speed of
130 mph/210 km/h, as otherwise
accidents may occur due to tire dam-
age.<
With certain wheel-and-tire com-
binations the size of the spare
wheel differs from that of the other
wheels. However, to restore the original
state, the normal wheel should be
remounted as soon as possible.<
Battery posts, terminals and
related accessories contain lead
and lead compounds. Wash hands after
handling.<
Battery care The battery is maintenance-free, that is,
the original electrolyte will normally last
for the service life of the battery under
moderate climatic conditions. Your
BMW Sport Activity Vehicle center will
be glad to advise in all matters con-
cerning the battery.Charging battery Only charge the battery in the vehicle
via the terminals in the engine compart-
ment with the engine off. For correct
connections, refer to Jump-starting on
page 171. Disposal
Following replacement, have old
batteries disposed of by your
BMW Sports Activity Vehicle center or
hand them in to a recycling center.
Maintain the battery in an upright posi-
tion for transport and storage. Always
restrain the battery to prevent it from
tipping over during transport.<
Page 187 of 200
Everything from A to Z
185n
OverviewControlsMaintenanceRepairsDataIndex
Average fuel
consumption 82, 89
Average speed 82, 90
Avoiding alarms 39
Avoiding fire damage 138
Axle loads, refer to
Weights 180
B
Backrests, refer to Adjusting
seats 45, 46
Backup lamps 67
bulb replacement 161
Battery 168
disposal 168
indicator lamp 19
jump-starting 171
power failure 169
remote control 30
Belts, refer to Safety belts 49
Beverage holders, refer to
Cup holders 120
Black ice, refer to Ice
warning 75
Blower
air conditioner 107
automatic climate
control 111
BMW High Performance
Synthetic Oil 149BMW Maintenance
System 152
Bore, refer to Engine
specifications 178
Bottle holder, refer to Cup
holders 120
Brake fluid 151
adding 151
indicator/warning lamp 19
level 151
replacing 151
Brake Force Display 99
Brake hydraulic system 139
indicator/warning
lamp 19, 20
Brake lamps, bulb
replacement 161
Brake pads 139
breaking-in 136
indicator lamp 19, 21
Brake rotors
brake system 139
breaking-in 136
Brake system 139
brake fluid level 139
brake pads 139
breaking-in 136
disk brakes 139
Brake wear warning
brake pads 139
indicator lamp 19, 21Brakes 139
ABS 93
brake fluid 151
breaking-in 136
indicator/warning
lamp 19, 20
Break-in procedures 136
Breaking-in differential 136
C
California laws
Event Data Recorders 153
Proposition 65
Warning 153
California Proposition 65
Warning 153
Capacities 181
Car care, refer to Caring for
your vehicle brochure
Car jack points 167
Car keys, refer to Keys 30
Car radio, refer to separate
Owner's Manual
Car wash, refer to Caring for
your vehicle brochure
Car-care products, refer to
Caring for your vehicle
brochure
Care, refer to Caring for your
vehicle brochureCargo area 124
capacity 180
cover, refer to Roll-up
cover 125
emergency operation,
refer to Unlocking
manually 35, 37
floor cover 127
increasing volume 124
lamps 105
lid, refer to Liftgate/
tailgate 35, 36
opening from inside 35
opening from outside 35
opening, remote
control 31
opening/closing, refer to
Liftgate 35
opening/closing, refer to
Tailgate 36
volume 180
volume, refer to
Weights 180
Cargo area lamps 105
Cargo bay, refer to Cargo
area 124
Cargo floor, pull-out 128
Cargo loading 131
Cargo-area partition net 125
Caring for leather, refer to
Caring for your vehicle
brochure
Page 189 of 200
Everything from A to Z
187n
OverviewControlsMaintenanceRepairsDataIndex
Courtesy lighting 105
Cruise control 73
buttons on steering
wheel 23
indicator lamp 22
Cruising range 82, 89
Cup holders 120
Curb weight, refer to
Weights 180
Current consumption, refer
to Energy Control 76
Cylinders, refer to Engine
data 178
D
Data, technical 178
dimensions 179
engine 178
filling capacities 181
weights 180
Date
also refer to Owner's
Manual for Onboard
Computer
calling up 84
changing 84
Daytime driving lamps 102
Deactivating the alarm in an
emergency 91Defect
door lock 33
driver's door 33
fuel filler door 24
liftgate 35
panorama glass roof 42
tailgate 37
Defective lamp 159
Defrost position, refer to
Defrosting
windows 108, 111
Defrosting
windows 108, 111
air conditioner 108
automatic climate
control 111
Defrosting windows and
removing condensation
air conditioner 108
automatic climate
control 111
Defrosting windshield, refer
to Defrosting
windows 108, 111
Digital clock 84
also refer to Owner's
Manual for Onboard
Computer
Dimensions 179
Dipstick, engine oil 148Directional indicators, refer
to Turn signals 70
Disk brakes 139
Displacement, refer to
Engine specifications 178
Display lighting, refer to
Instrument lighting 104
Displays, refer to Instrument
cluster 15, 17, 18
Disposal
used oil 149
vehicle battery 168
Distance 88
Distance to destination 88
Distance warning 92
Divided rear seat backrest,
refer to Folding rear seat
back 124
Door keys 30
Door lock 33
DOT Quality Grades 142
Draft-free
ventilation 108, 113
Driving lamps, refer to
Parking lamps/low
beams 102
Driving notes
break-in procedures 136
driving hints 137, 138
Driving on bad roads 137
Driving stability control 94Driving your X5 137
Dry air, refer to Air
conditioning 107, 112
DSC Dynamic Stability
Control 94
indicator lamp 22
E
Electric steering wheel
adjustment 52
Electrical malfunction
door lock 33
driver's door 33
fuel filler door 24
liftgate 35
panorama glass roof 42
tailgate 37
Electronic transmission
control module 69
Emergency call 170
Emergency operation, refer
to Manual operation
driver's door 33
fuel filler door 24
liftgate 35
panorama glass roof 42
tailgate 37
Energy Control 76
Energy-conscious driving,
refer to Energy Control 76
Page 192 of 200
Everything from A to ZInterface socket for onboard
diagnosis 153
Interior lamps 104
remote control 31
Interior mirror
automatic dimming
feature 55
compass 55
Interior motion sensor 39
switching off 31, 39
Interior rearview mirror 54
Interlock, refer to Locking
steering 64
Intermittent operation,
wipers 71
J
Jumpering, refer to Jump-
starting 171
Jump-starting 171
K
Key Memory 63
Keys 30
Kickdown 68
L
Lamps and bulbs 159
Lamps, refer to Parking
lamps/low beams 102
Lashing eyes, refer to
Securing the load 131LATCH child-restraint
fixing 62
LEDs light-emitting
diodes 163
Length, refer to
Dimensions 179
License plate lamp, bulb
replacement 162
Liftgate 35
emergency operation,
refer to Unlocking
manually 35
opening, remote
control 31
Liftgate/tailgate
opening from inside 35
opening from outside 35
remote control 31
unlocking manually 35
Light switch 102
Light-alloy wheels, care,
refer to Caring for your
vehicle brochure
Light-emitting diodes
LEDs 163
Lighter 121, 122
Lighter socket 121
Lighting of instruments 104
Lights on warning 102
Limit 87
Load, refer to Cargo
loading 130Lock buttons, doors, refer to
Locking 34
Locking
from inside 34
from outside 31, 33
Locking and unlocking doors
from inside 34
from outside 31, 33
Locking, vehicle
from inside 34
from outside 31, 33
Low beams 102
automatic 102
bulb replacement 159
Lower back support, refer to
Lumbar support 46
Low-fuel warning light, refer
to Fuel gauge 77
Lug bolts 167
Lug wrench 164
Luggage compartment lid,
refer to Liftgate/tailgate 36
Luggage net 37
Luggage rack, refer to Roof-
mounted luggage rack 132
Luggage straps 37
Lumbar support 46
M
M+S tires, refer to Winter
tires 145
Maintenance system 152Maintenance, refer to
Service Interval Display 78
Manual operation
door lock 33
driver's door 33
fuel filler door 24
liftgate 35
panorama glass roof 42
tailgate 37
Manual transmission 66
Marking, tires 142
Master key 30
with remote control 30
Maximum cooling 112
Maximum roof weight 180
Maximum speed with winter
tires 145
Measurements, refer to
Dimensions 179
Mechanical key, refer to
Spare key 30
Mechanical seats 45
Memo 85
Memory, refer to
Seat, mirror and steering
wheel memory 50
Vehicle Memory, Key
Memory 63
Microfilter
air conditioner 108
automatic climate
control 114
Page 195 of 200
Everything from A to Z
193n
OverviewControlsMaintenanceRepairsDataIndex
Selector lever, automatic
transmission with
Steptronic 68
Selector-lever positions,
automatic transmission
with Steptronic 67
Self-leveling suspension 97
2-axle self-leveling
suspension 97
inactive 97
Service and Warranty Infor-
mation Booklet for US
models 152
Service Interval
Display 78, 152
Service, refer to Roadside
Assistance 170
Setting interior
temperature 107, 111
Setting time, refer to
Preselect switch-on
times 86
Shifting
automatic transmission
with Steptronic 69
manual transmission 66
Shiftlock, refer to Changing
selector lever position 68
Shoulder support 47
Side airbags 57Side Impact Head Protection
System 57
Side tilt, permissible 137
Side turn signals, replacing
bulbs 160
Side window blinds, refer to
Rear window blind 115
Sitting safely 43
with airbags 43
with safety belts 43
Ski bag 123
Snow chains 145
Sockets 121, 128
Spare fuses 169
Spare key 30
Spare wheel 165
removal aid 165
Special wash program 72
Specified engine oils 149
Speed limit 87
Speed, winter tires 145
Speedometer 15, 17, 18
Sport program, automatic
transmission with
Steptronic 69
Sports seat 45
Stability control, refer to
DSC Dynamic Stability
Control 94
xDrive 95Starting assistance, refer to
Jump-starting 171
Starting difficulties,
temperature 65
Starting engine 64
Start-off assistance, DSC
Dynamic Stability
Control 94
Startup difficulties, jump-
starting 171
Status of this Owner's
Manual at time of
printing 9
Steering lock 64
Steering wheel
adjustment 52
adjustment, automatic 53
heater 53
lock 64
memory 50
Steptronic, refer to Manual
mode 69
Stopwatch 85
Storage compartments 119
in the cargo area 127
Storage space, refer to
Cargo area 124
Storage, tires 145
Storing desired speed, refer
to Cruise control 73
Storing seat adjustment 50Storing sitting position, refer
to Seat, mirror and
steering wheel memory 50
Straps, refer to Loading 131
Stroke, refer to Engine
specifications 178
Switches, refer to Cockpit 14
Switching off engine 65
Switch-on times input 86
Symbols 8
Synthetic oils 149
T
Tachometer 76
Tail lamps, replacing
bulbs 161
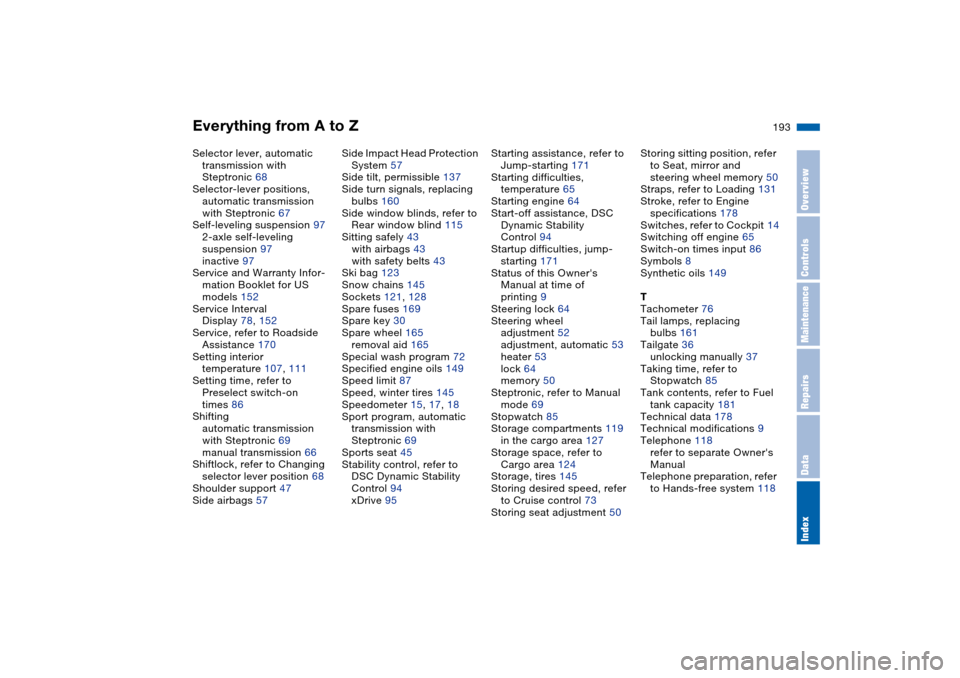
Tailgate 36
unlocking manually 37
Taking time, refer to
Stopwatch 85
Tank contents, refer to Fuel
tank capacity 181
Technical data 178
Technical modifications 9
Telephone 118
refer to separate Owner's
Manual
Telephone preparation, refer
to Hands-free system 118
Page 196 of 200
Everything from A to ZTemperature
air conditioner 107
automatic climate
control 111
Temperature display
ice warning 75
outside
temperature 75, 82
setting the units 75, 82
Temperature gauge, engine
oil 77
Tempomat, refer to Cruise
control 73
Thigh support adjustment 45
Third brake lamp
bulb replacement 162
refer to Center brake
lamp 162
Three-point seat belt, refer
to Safety belts 49
Tilt alarm sensor
remote control 31
switching off 39
Tilt function, passenger-side
mirror 51
Time of arrival 89
Timer, refer to Stopwatch 85
Tire Identification
Number 142
Tire inflation pressure 140
Tire Quality Grading 142Tires
age 142
breaking-in 136
changing 142, 144, 163
condition 143
damage 143
flat 163
inflation pressure 140
size 142
storage 145
tread 143
wear indicators, refer to
Tire tread 143
winter tires 145
Tools, refer to Onboard tool
kit 158
Torque
lug bolts 168
refer to Engine
specifications 178
Tow fittings 173
Tow sockets for tow
fitting 173
Towing 173, 174
with automatic
transmission 174
Tow-starting 173
Track width, refer to
Dimensions 179Transmission
automatic transmission
with Steptronic 67
manual transmission 66
Transmission fault, refer to
Electronic transmission
control module 69
Transmission lockout, refer
to P Park 68
Transporting children
safely 59
Tread depth, refer to Tire
tread 143
Tread wear 142
Trip odometer 75
Trip-distance counter, refer
to Trip odometer 75
Trunk lamps, refer to Cargo
area lamps 105
Trunk lid, refer to
Liftgate 35
Tailgate 36
Trunk, refer to Cargo
area 124
Turn signals 70
bulb
replacement 160, 161
indicator lamp 22
Turn signals, side 160
bulb replacement 160Turning circle, refer to
Dimensions 179
TV function, refer to Owner's
Manual for Onboard
Computer
Two-axle self-leveling
suspension
display 98
lowering 99
raising 98
U
Underbody protection, refer
to Caring for your vehicle
brochure
Uniform Tire Quality
Grading 142
Units, temperature 75, 111
Universal garage door
control 116
Universal remote control 116
Unlocking
engine hood 146
from inside 34
from outside 31, 33
Using antifreeze 148, 150