engine BMW X5 3.0I 2005 E53 Workshop Manual
[x] Cancel search | Manufacturer: BMW, Model Year: 2005, Model line: X5 3.0I, Model: BMW X5 3.0I 2005 E53Pages: 200, PDF Size: 3.55 MB
Page 163 of 200
163n
OverviewControlsMaintenanceRepairsDataIndex
Lamps and bulbs Changing a tire LEDs light-emitting diodes Light-emitting diodes installed behind
translucent lenses serve as the light
source for many of the controls and
displays in your vehicle. The concept
behind their operation is related to that
employed for lasers.
Do not remove the covers, and
never stare into the unfiltered light
several hours, as irritation of the iris
could result.<
Safety precautions to observe in
the event of a flat and during all
tire changes:
Park the vehicle as far as possible from
passing traffic. Park on a firm, flat, sur-
face. Switch on the hazard warning
flashers.
Turn the steering wheel to the straight-
ahead position, remove the key and
engage the steering lock. Shift into 1st
or reverse, selector lever in Park with
automatic transmission, and engage the
handbrake.
All passengers should be outside the
vehicle and well away from your imme-
diate working area, behind a guardrail,
for instance.
If a warning triangle or portable hazard
warning lamp is required, set it up on
the roadside at an appropriate distance
from the rear of the vehicle. Comply
with all safety guidelines and regula-
tions.
Change the wheel only on a level, firm
surface which is not slippery. The vehi-
cle or the jack could slip to the side if
you attempt to raise the vehicle on a
soft or slippery surface such as snow,
ice, tiles, etc.
Position the jack on a firm support sur-
face.
Do not place wooden blocks or similar
objects under the jack. If this is done,
the jack might not be able to reach its
full support capacity because of the
limited height. To avoid serious or fatal
injury: never lie under the vehicle, and
never start the engine while it is sup-
ported by the jack.<
Page 168 of 200
168n
Changing a wheel Vehicle battery 10. Screw in the remaining lug bolts.
Tighten all the bolts securely in a
diagonal pattern
11. Lower the jack and remove it from
beneath the vehicle
12. Tighten the lug bolts in a diagonal
pattern
13. Check and correct the tire inflation
pressure at the earliest opportunity.
After mounting the spare wheel or
correcting the inflation pressure,
reinitialize the Flat Tire Monitor,
refer to page102.
Protect valve stems and valves from dirt
using screw-on valve stem caps. Dirt in
the valve stems frequently leads to slow
leaks.
The vehicle jack is designed for
changing wheels only. Do not
attempt to raise another vehicle model
with it or to raise any load of any kind.
To do so could cause accidents and
personal injury.
To ensure safety, always have the lug
bolts checked with a calibrated torque
wrench as soon as possible to ensure
that they are tightened to the specified
torque. The tightening torque is
101 ft-lb/140 Nm.<
Store the wheel and the tools in the
order opposite that for removal.
Before removing the support rod,
be sure that the tailgate is held
down firmly. If you fail to do so, it could
retract sharply upward and cause per-
sonal injury and vehicle damage.
After you remove the rod, close the tail-
gate carefully. Continue to hold it firmly
until it is completely closed.<
If light-alloy wheels other than Genuine
BMW light-alloy wheels have been
mounted, it may be necessary to use
different lug bolts for those wheels.
Replace the defective tire as soon as
possible and have the new wheel/tire
balanced. Driving with spare wheel
Do not exceed a speed of
130 mph/210 km/h, otherwise tire
damage could lead to accidents.<
With certain wheel-and-tire com-
binations the size of the spare
wheel differs from that of the other
wheels. To restore the original state,
the normal wheel should be remounted
as soon as possible.<
Battery posts, terminals and
related accessories contain lead
and lead compounds. Wash hands after
handling.<
Battery care The battery is maintenance-free, that is,
the original electrolyte will normally last
for the service life of the battery under
moderate climatic conditions. Your
BMW Sports Activity Vehicle center will
be glad to advise in all matters con-
cerning the battery.Charging battery Only charge the battery in the vehicle
via the terminals in the engine compart-
ment with the engine off. For correct
connections, refer to Jump starting on
page171. Disposal
Following replacement, have old
batteries disposed of by your
BMW Sports Activity Vehicle center or
hand them in to a recycling center.
Maintain the battery in an upright posi-
tion for transport and storage. Always
restrain the battery to prevent it from
tipping over during transport.<
Page 171 of 200
171n
OverviewControlsMaintenanceRepairsDataIndex
Jump starting When your battery is discharged you
can used two jumper cables to start
your vehicle with power from the bat-
tery in a second vehicle. You can also
use the same method to help start
another vehicle. Use only jumper cables
with fully-insulated clamp handles.
To avoid the risk of potentially
fatal injury, always avoid all con-
tact with electrical components while
the engine is running. Carefully observe
the following instructions to avoid per-
sonal injury and/or damage to one or
both vehicles.<
Preparing1. Check whether the battery of the
other vehicle has a voltage of
12 Volts and approximately the same
capacitance in Ah. This information
can be found on the battery
2. Switch off the engine of the support
vehicle
3. Switch off any electrical systems and
components in both vehicles.
Ensure that no contact exists
between the bodywork on the two
vehicles, otherwise there is a danger of
short circuits.
sparks, always observe this
sequence when connecting jumper
cables.<
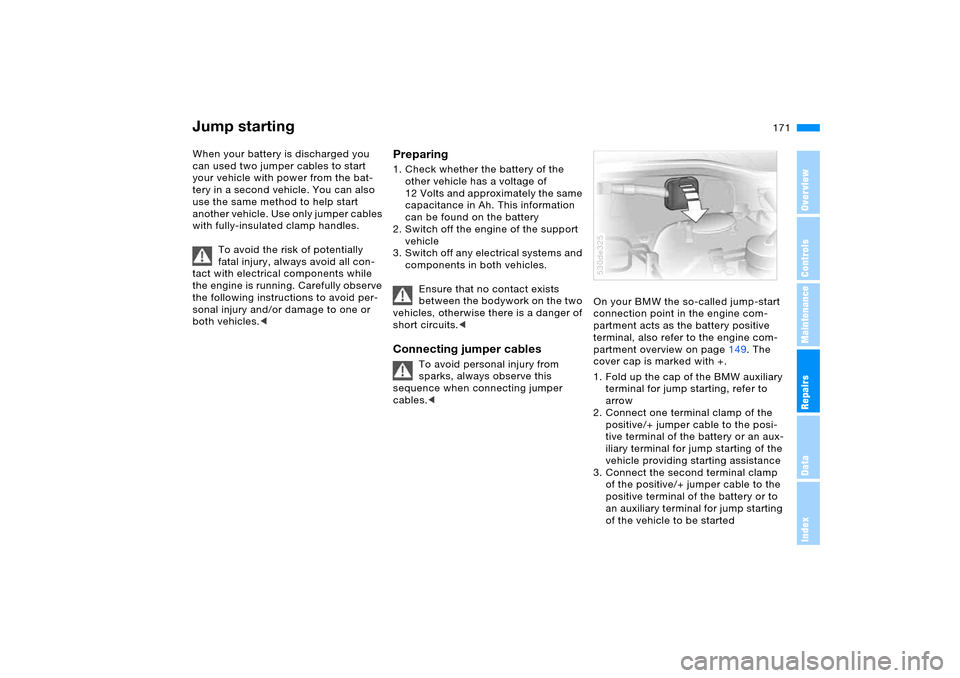
On your BMW the so-called jump-start
connection point in the engine com-
partment acts as the battery positive
terminal, also refer to the engine com-
partment overview on page149. The
cover cap is marked with +.
1. Fold up the cap of the BMW auxiliary
terminal for jump starting, refer to
arrow
2. Connect one terminal clamp of the
positive/+ jumper cable to the posi-
tive terminal of the battery or an aux-
iliary terminal for jump starting of the
vehicle providing starting assistance
3. Connect the second terminal clamp
of the positive/+ jumper cable to the
positive terminal of the battery or to
an auxiliary terminal for jump starting
of the vehicle to be started530de325
Page 172 of 200
172n
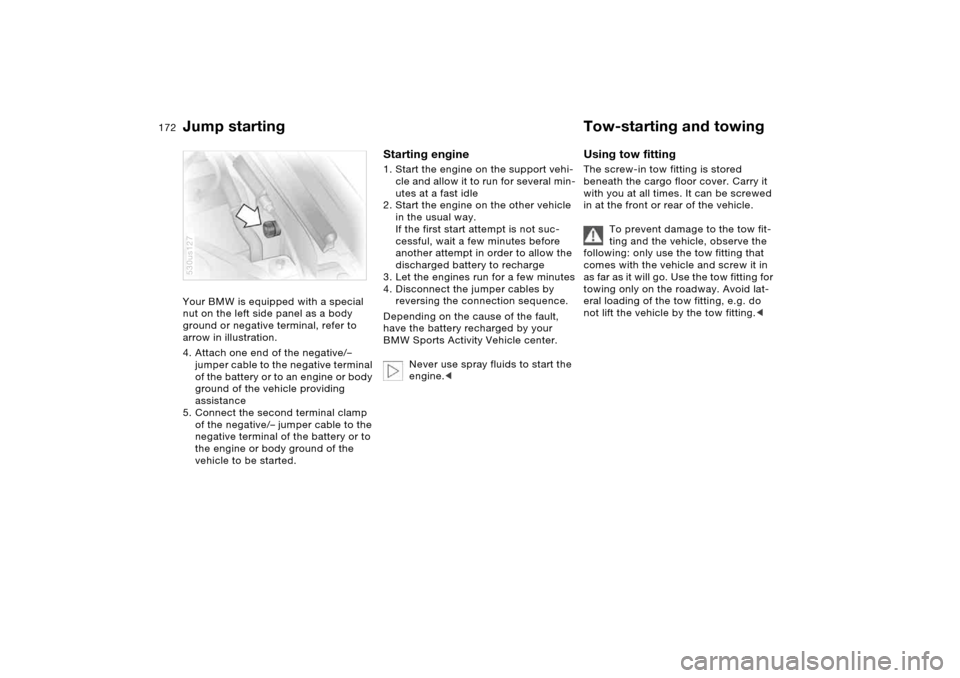
Jump starting Tow-starting and towing Your BMW is equipped with a special
nut on the left side panel as a body
ground or negative terminal, refer to
arrow in illustration.
4. Attach one end of the negative/–
jumper cable to the negative terminal
of the battery or to an engine or body
ground of the vehicle providing
assistance
5. Connect the second terminal clamp
of the negative/– jumper cable to the
negative terminal of the battery or to
the engine or body ground of the
vehicle to be started.530us127
Starting engine1. Start the engine on the support vehi-
cle and allow it to run for several min-
utes at a fast idle
2. Start the engine on the other vehicle
in the usual way.
If the first start attempt is not suc-
cessful, wait a few minutes before
another attempt in order to allow the
discharged battery to recharge
3. Let the engines run for a few minutes
4. Disconnect the jumper cables by
reversing the connection sequence.
Depending on the cause of the fault,
have the battery recharged by your
BMW Sports Activity Vehicle center.
Never use spray fluids to start the
engine.<
Using tow fitting The screw-in tow fitting is stored
beneath the cargo floor cover. Carry it
with you at all times. It can be screwed
in at the front or rear of the vehicle.
To prevent damage to the tow fit-
ting and the vehicle, observe the
following: only use the tow fitting that
comes with the vehicle and screw it in
as far as it will go. Use the tow fitting for
towing only on the roadway. Avoid lat-
eral loading of the tow fitting, e.g. do
not lift the vehicle by the tow fitting.<
Page 173 of 200
173n
OverviewControlsMaintenanceRepairsDataIndex
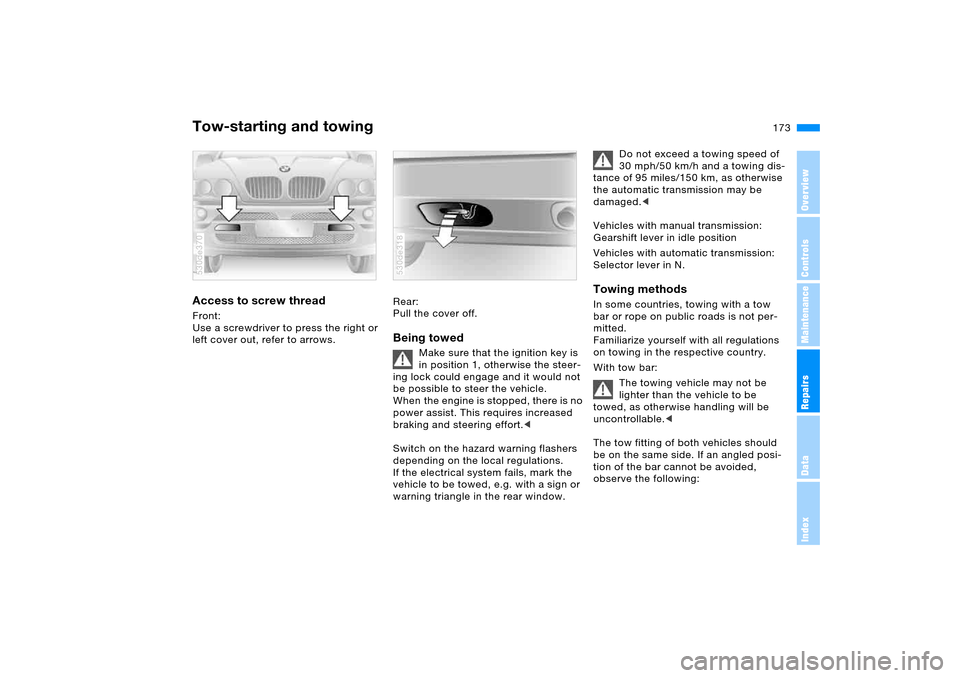
Tow-starting and towingAccess to screw thread Front:
Use a screwdriver to press the right or
left cover out, refer to arrows. 530de370
Rear:
Pull the cover off. Being towed
Make sure that the ignition key is
in position 1, otherwise the steer-
ing lock could engage and it would not
be possible to steer the vehicle.
When the engine is stopped, there is no
power assist. This requires increased
braking and steering effort.<
Switch on the hazard warning flashers
depending on the local regulations.
If the electrical system fails, mark the
vehicle to be towed, e.g. with a sign or
warning triangle in the rear window.
530de318
Do not exceed a towing speed of
30 mph/50 km/h and a towing dis-
tance of 95 miles/150 km, as otherwise
the automatic transmission may be
damaged.<
Vehicles with manual transmission:
Gearshift lever in idle position
Vehicles with automatic transmission:
Selector lever in N.
Towing methodsIn some countries, towing with a tow
bar or rope on public roads is not per-
mitted.
Familiarize yourself with all regulations
on towing in the respective country.
With tow bar:
The towing vehicle may not be
lighter than the vehicle to be
towed, as otherwise handling will be
uncontrollable.<
The tow fitting of both vehicles should
be on the same side. If an angled posi-
tion of the bar cannot be avoided,
observe the following:
Page 174 of 200
174n
Tow-starting and towing>The freedom of movement is
restricted during cornering
>The angled position of the tow bar
creates lateral forces.
Only secure the tow bar on the
tow fittings. Otherwise, damage
could result on other vehicle compo-
nent.<
With tow-rope:
When starting off in the towing vehicle,
make sure that the tow-rope is taut.
Use nylon ropes or nylon straps
for towing, and avoid all too sud-
den jerking movements. Only secure
tow-ropes on the tow fitting. Otherwise,
damage could result on other vehicle
component.<
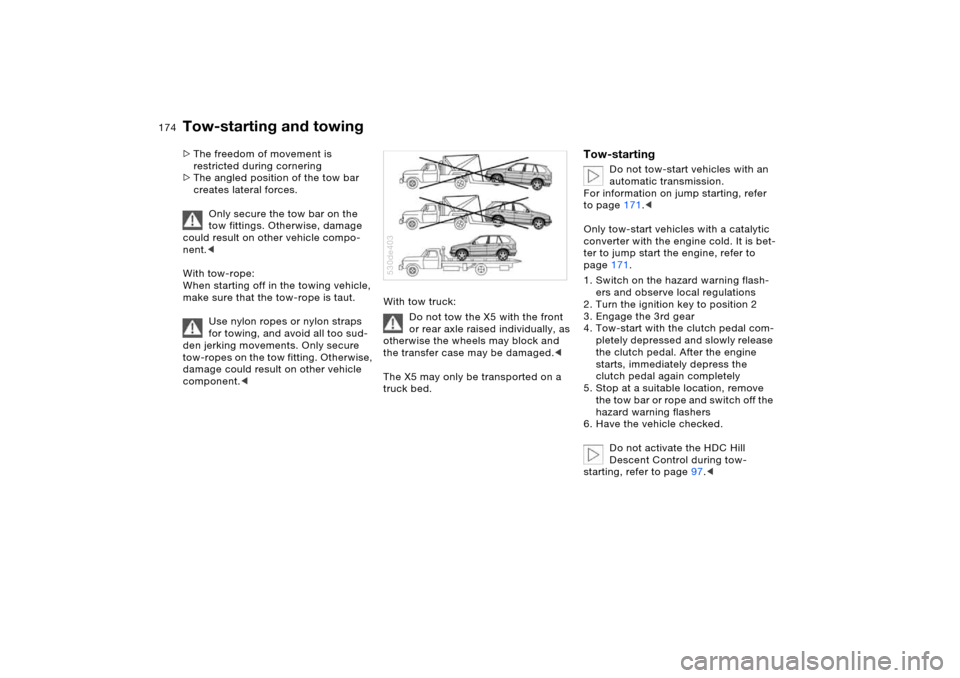
With tow truck:
Do not tow the X5 with the front
or rear axle raised individually, as
otherwise the wheels may block and
the transfer case may be damaged.<
The X5 may only be transported on a
truck bed.530de403
Tow-starting
Do not tow-start vehicles with an
automatic transmission.
For information on jump starting, refer
to page171.<
Only tow-start vehicles with a catalytic
converter with the engine cold. It is bet-
ter to jump start the engine, refer to
page171.
1. Switch on the hazard warning flash-
ers and observe local regulations
2. Turn the ignition key to position 2
3. Engage the 3rd gear
4. Tow-start with the clutch pedal com-
pletely depressed and slowly release
the clutch pedal. After the engine
starts, immediately depress the
clutch pedal again completely
5. Stop at a suitable location, remove
the tow bar or rope and switch off the
hazard warning flashers
6. Have the vehicle checked.
Do not activate the HDC Hill
Descent Control during tow-
starting, refer to page97.<
Page 178 of 200
178n
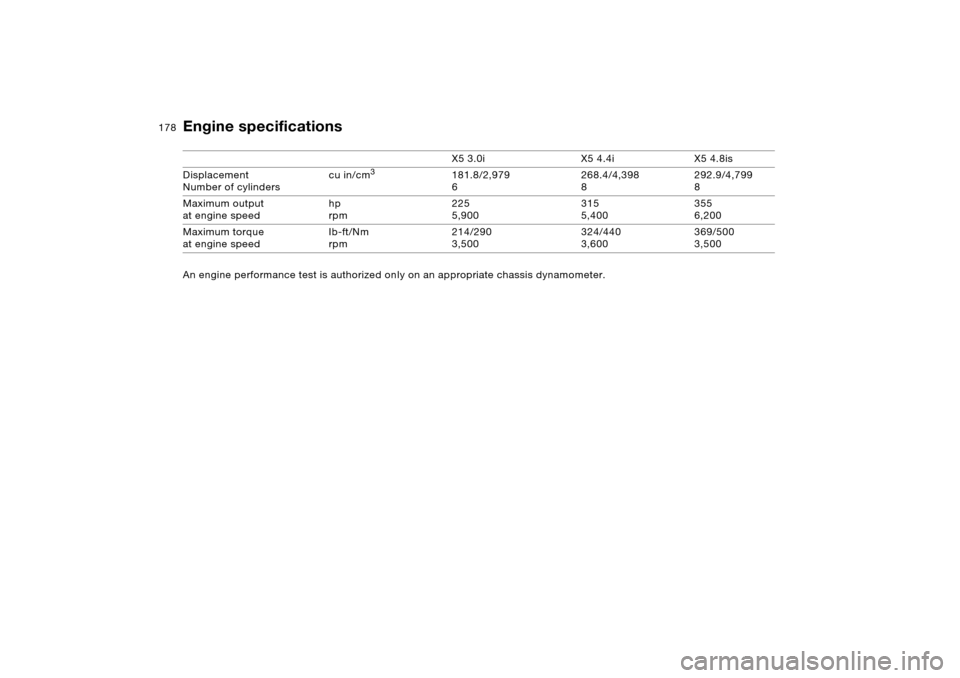
An engine performance test is authorized only on an appropriate chassis dynamometer. X5 3.0i X5 4.4i X5 4.8is
Displacement
Number of cylinders cu in/cm
3
181.8/2,979
6268.4/4,398
8292.9/4,799
8
Maximum output
at engine speed hp
rpm225
5,900315
5,400355
6,200
Maximum torque
at engine speed Ib-ft/Nm
rpm214/290
3,500324/440
3,600369/500
3,500
Engine specifications
Page 181 of 200
181n
OverviewControlsMaintenanceRepairsDataIndex
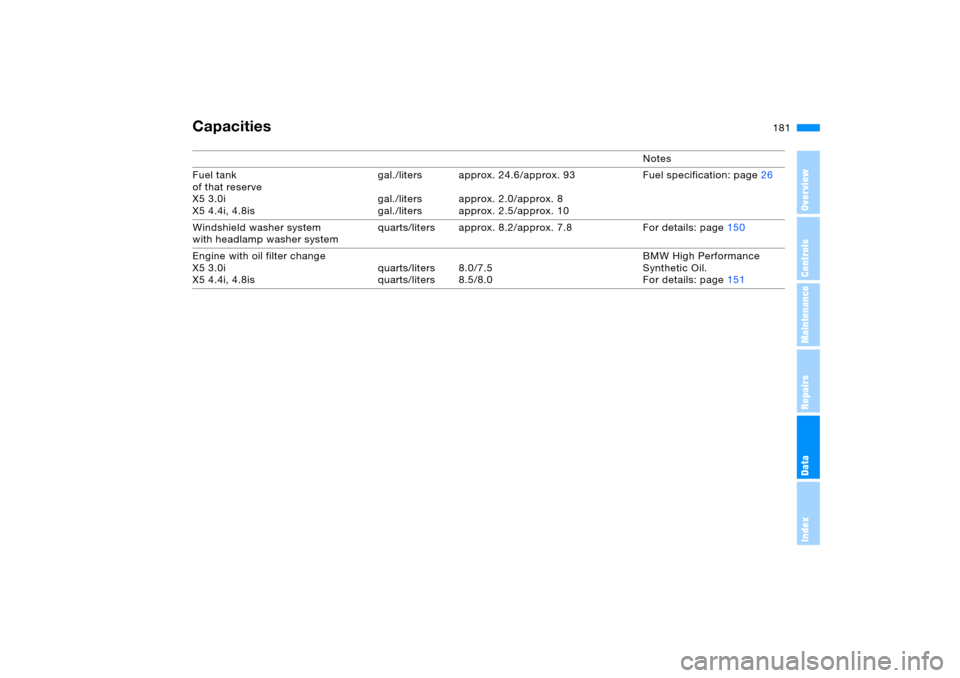
Capacities
Notes
Fuel tank
of that reserve
X5 3.0i
X5 4.4i, 4.8isgal./liters
gal./liters
gal./litersapprox. 24.6/approx. 93
approx. 2.0/approx. 8
approx. 2.5/approx. 10Fuel specification: page26
Windshield washer system
with headlamp washer system quarts/liters approx. 8.2/approx. 7.8 For details: page150
Engine with oil filter change
X5 3.0i
X5 4.4i, 4.8isquarts/liters
quarts/liters8.0/7.5
8.5/8.0BMW High Performance
Synthetic Oil.
For details: page151
Page 186 of 200
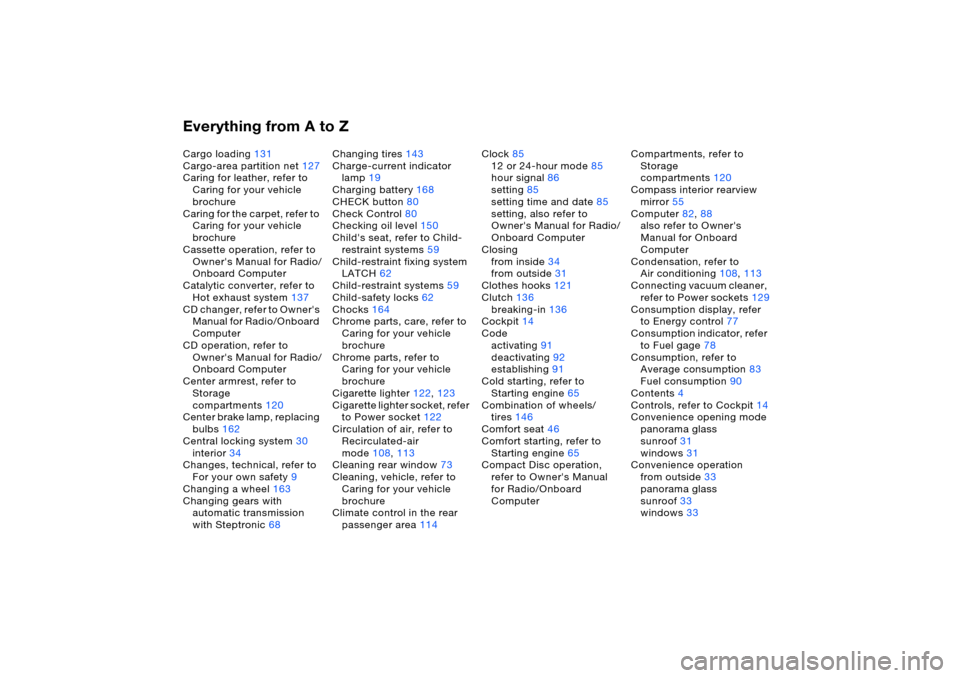
Everything from A to ZCargo loading131
Cargo-area partition net127
Caring for leather, refer to
Caring for your vehicle
brochure
Caring for the carpet, refer to
Caring for your vehicle
brochure
Cassette operation, refer to
Owner's Manual for Radio/
Onboard Computer
Catalytic converter, refer to
Hot exhaust system137
CD changer, refer to Owner's
Manual for Radio/Onboard
Computer
CD operation, refer to
Owner's Manual for Radio/
Onboard Computer
Center armrest, refer to
Storage
compartments120
Center brake lamp, replacing
bulbs162
Central locking system30
interior34
Changes, technical, refer to
For your own safety9
Changing a wheel163
Changing gears with
automatic transmission
with Steptronic68Changing tires143
Charge-current indicator
lamp19
Charging battery168
CHECK button80
Check Control80
Checking oil level150
Child's seat, refer to Child-
restraint systems59
Child-restraint fixing system
LATCH62
Child-restraint systems59
Child-safety locks62
Chocks164
Chrome parts, care, refer to
Caring for your vehicle
brochure
Chrome parts, refer to
Caring for your vehicle
brochure
Cigarette lighter122,123
Cigarette lighter socket, refer
to Power socket122
Circulation of air, refer to
Recirculated-air
mode108,113
Cleaning rear window73
Cleaning, vehicle, refer to
Caring for your vehicle
brochure
Climate control in the rear
passenger area114Clock85
12 or 24-hour mode85
hour signal86
setting85
setting time and date85
setting, also refer to
Owner's Manual for Radio/
Onboard Computer
Closing
from inside34
from outside31
Clothes hooks121
Clutch136
breaking-in136
Cockpit14
Code
activating91
deactivating92
establishing91
Cold starting, refer to
Starting engine65
Combination of wheels/
tires146
Comfort seat46
Comfort starting, refer to
Starting engine65
Compact Disc operation,
refer to Owner's Manual
for Radio/Onboard
ComputerCompartments, refer to
Storage
compartments120
Compass interior rearview
mirror55
Computer82,88
also refer to Owner's
Manual for Onboard
Computer
Condensation, refer to
Air conditioning108,113
Connecting vacuum cleaner,
refer to Power sockets129
Consumption display, refer
to Energy control77
Consumption indicator, refer
to Fuel gage78
Consumption, refer to
Average consumption83
Fuel consumption90
Contents4
Controls, refer to Cockpit14
Convenience opening mode
panorama glass
sunroof31
windows31
Convenience operation
from outside33
panorama glass
sunroof33
windows33
Page 187 of 200
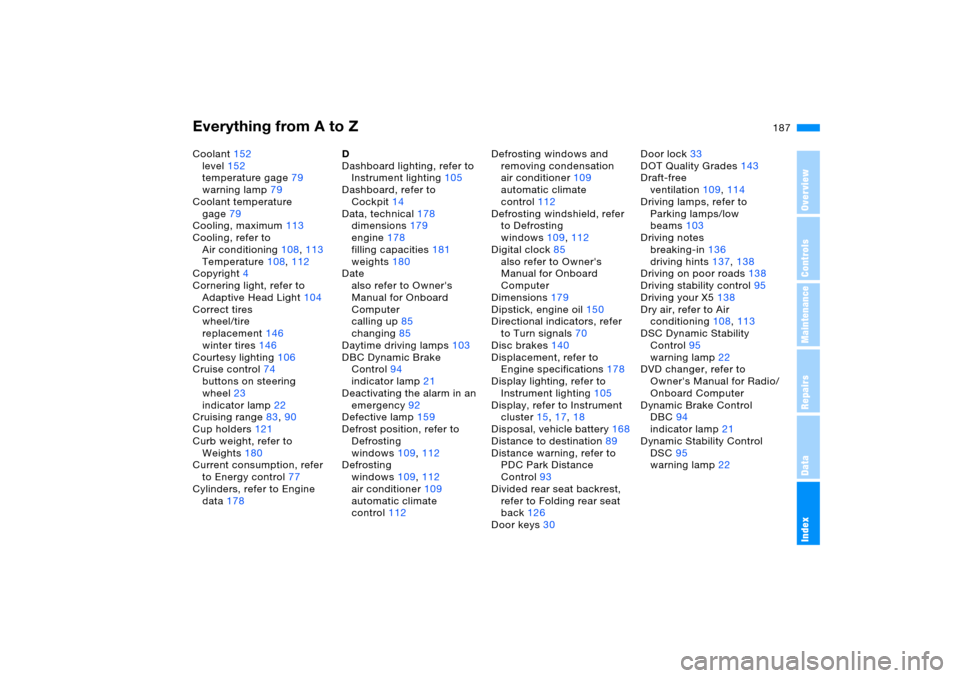
Everything from A to Z
187n
OverviewControlsMaintenanceRepairsDataIndex
Coolant152
level152
temperature gage79
warning lamp79
Coolant temperature
gage79
Cooling, maximum113
Cooling, refer to
Air conditioning108,113
Temperature108,112
Copyright4
Cornering light, refer to
Adaptive Head Light104
Correct tires
wheel/tire
replacement146
winter tires146
Courtesy lighting106
Cruise control74
buttons on steering
wheel23
indicator lamp22
Cruising range83,90
Cup holders121
Curb weight, refer to
Weights180
Current consumption, refer
to Energy control77
Cylinders, refer to Engine
data178D
Dashboard lighting, refer to
Instrument lighting105
Dashboard, refer to
Cockpit14
Data, technical178
dimensions179
engine178
filling capacities181
weights180
Date
also refer to Owner's
Manual for Onboard
Computer
calling up85
changing85
Daytime driving lamps103
DBC Dynamic Brake
Control94
indicator lamp21
Deactivating the alarm in an
emergency92
Defective lamp159
Defrost position, refer to
Defrosting
windows109,112
Defrosting
windows109,112
air conditioner109
automatic climate
control112Defrosting windows and
removing condensation
air conditioner109
automatic climate
control112
Defrosting windshield, refer
to Defrosting
windows109,112
Digital clock85
also refer to Owner's
Manual for Onboard
Computer
Dimensions179
Dipstick, engine oil150
Directional indicators, refer
to Turn signals70
Disc brakes140
Displacement, refer to
Engine specifications178
Display lighting, refer to
Instrument lighting105
Display, refer to Instrument
cluster15,17,18
Disposal, vehicle battery168
Distance to destination89
Distance warning, refer to
PDC Park Distance
Control93
Divided rear seat backrest,
refer to Folding rear seat
back126
Door keys30Door lock33
DOT Quality Grades143
Draft-free
ventilation109,114
Driving lamps, refer to
Parking lamps/low
beams103
Driving notes
breaking-in136
driving hints137,138
Driving on poor roads138
Driving stability control95
Driving your X5138
Dry air, refer to Air
conditioning108,113
DSC Dynamic Stability
Control95
warning lamp22
DVD changer, refer to
Owner's Manual for Radio/
Onboard Computer
Dynamic Brake Control
DBC94
indicator lamp21
Dynamic Stability Control
DSC95
warning lamp22