display BMW X5 3.0I 2007 E70 Repair Manual
[x] Cancel search | Manufacturer: BMW, Model Year: 2007, Model line: X5 3.0I, Model: BMW X5 3.0I 2007 E70Pages: 272, PDF Size: 9.03 MB
Page 107 of 272
Controls
105Reference
At a glance
Driving tips
Communications
Navigation
Entertainment
Mobility
AUC Automatic recirculated-air
control/recirculated-air mode
You can respond to pollutants or
unpleasant odors in the immediate
environment by suspending the
supply of outside air. The system
then recirculates the air currently within the
vehicle. During AUC operation, a sensor
detects pollutants in the outside air and con-
trols the shut-off automatically.
By pressing the button repeatedly, you can
request three operating modes:
>LED off: outside air flows in continuously.
>Left LED on, AUC mode: the system
detects pollutants in the outside air and
shuts off the supply as needed.
>Right LED on, recirculated-air mode: the
supply of outside air is permanently shut off.
If condensation starts to form on the
inside window surfaces during operation
in the recirculated-air mode, you should switch
it off while also increasing the air volume as
required.
The recirculated-air mode should not be used
over an extended period of time, as the air qual-
ity inside the vehicle deteriorates continu-
ously.<
Residual heat
The heat stored in the engine is
used to heat the passenger com-
partment, e.g. while stopped at a
school to pick up a child.
Switching on residual heat utilization
Pressing the right side switches on the residual
heat utilization when the following conditions
are met:
>up to 15 minutes after switching off the
engine
>with the engine at operating temperature
>with sufficient battery voltage
>at an outside temperature below 777/
256REST appears on the display of the automatic
climate control when the residual heat utiliza-
tion is switched on.
From radio readiness the interior temperature,
the air volume and the air distribution can be
set.
If the conditions for the residual heat utili-
zation are met, no display appears.<
Switching off residual heat utilization
You can select the lowest blower speed by
pressing and holding the left side. Pressing
again switches off the residual heat utilization.
REST disappears from the display of the auto-
matic climate control.
Switching off automatic climate control
You can select the lowest blower
speed by pressing and holding the
left side. Pressing again switches
off the automatic climate control. The air vol-
ume, the heater and the cooling function are all
switched off.
You can switch on the system again by pressing
any button of the automatic climate control.
Front ventilation
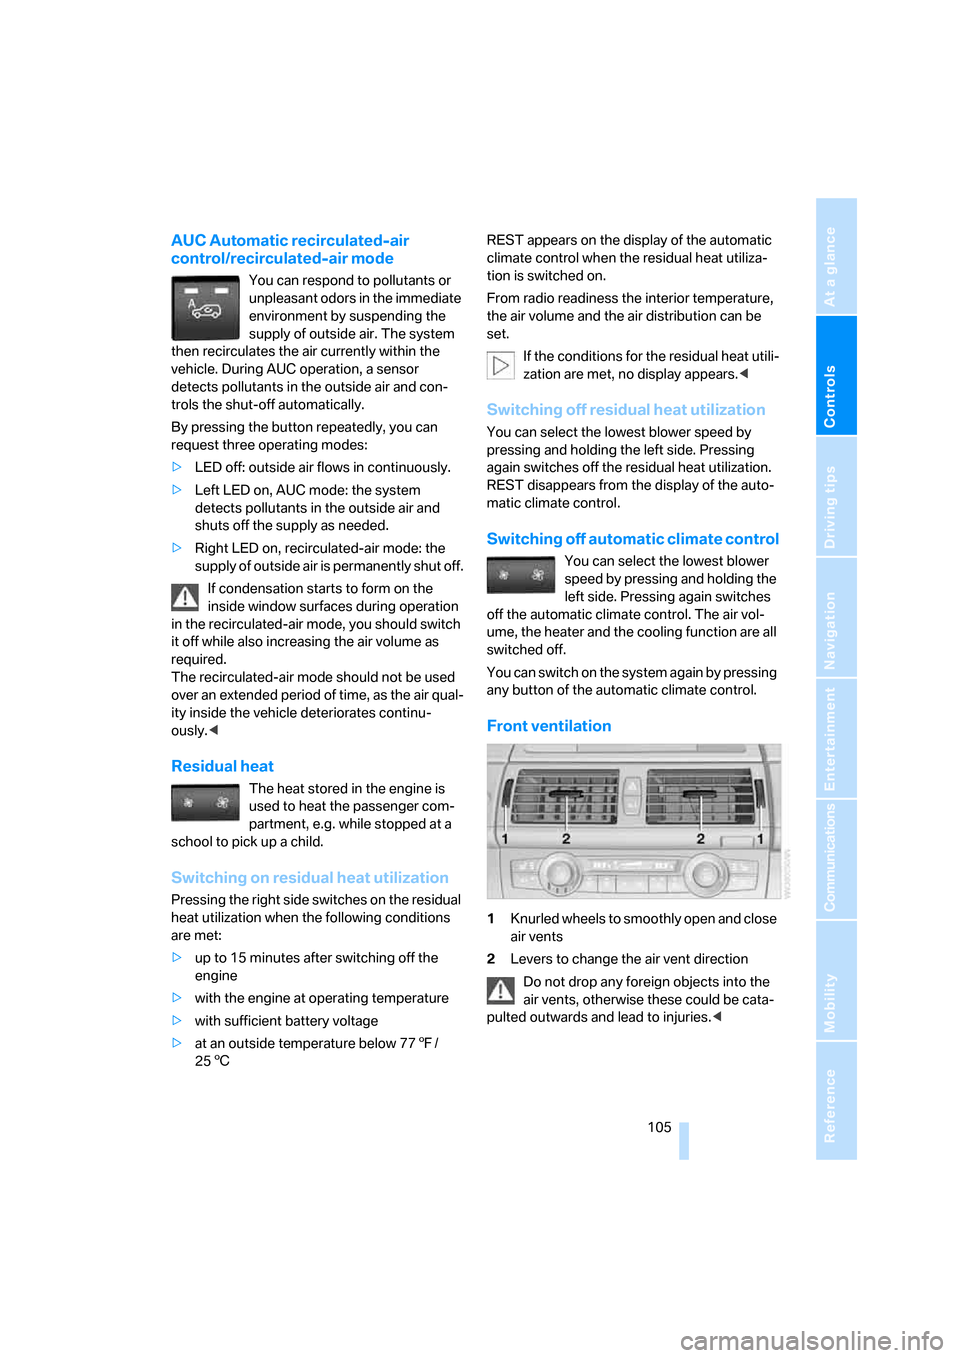
1Knurled wheels to smoothly open and close
air vents
2Levers to change the air vent direction
Do not drop any foreign objects into the
air vents, otherwise these could be cata-
pulted outwards and lead to injuries.<
Page 108 of 272
Climate
106
Ventilation for cooling
Adjust the air vents to direct the flow of cool air
in your direction, for instance, if the interior has
become too warm, etc.
Draft-free ventilation
Set the air vents so that the air flows past you
and is not directed straight at you.
Ventilation in rear
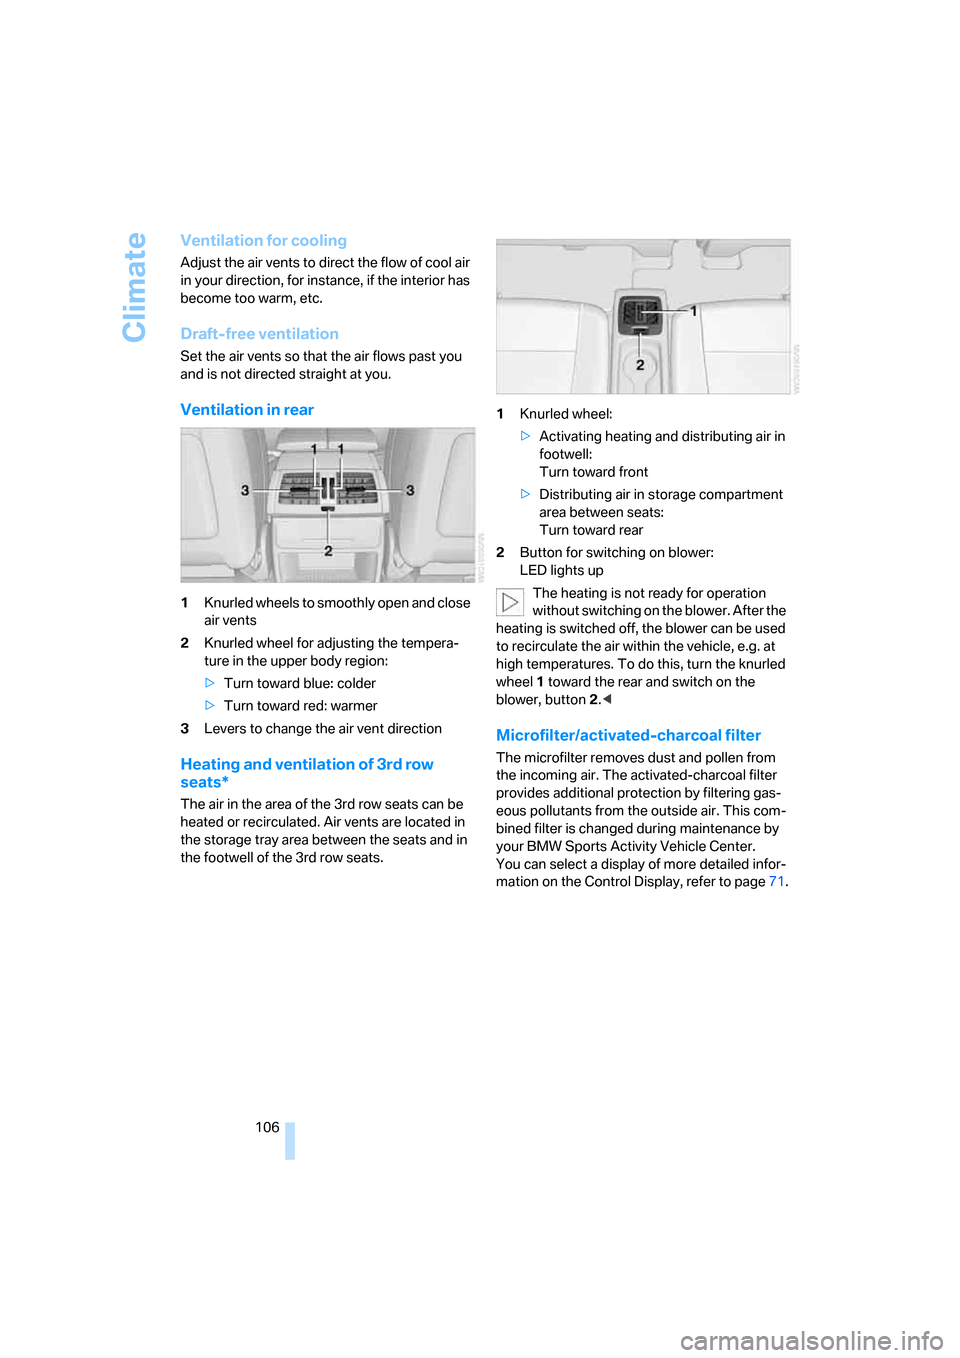
1Knurled wheels to smoothly open and close
air vents
2Knurled wheel for adjusting the tempera-
ture in the upper body region:
>Turn toward blue: colder
>Turn toward red: warmer
3Levers to change the air vent direction
Heating and ventilation of 3rd row
seats*
The air in the area of the 3rd row seats can be
heated or recirculated. Air vents are located in
the storage tray area between the seats and in
the footwell of the 3rd row seats.1Knurled wheel:
>Activating heating and distributing air in
footwell:
Turn toward front
>Distributing air in storage compartment
area between seats:
Turn toward rear
2Button for switching on blower:
LED lights up
The heating is not ready for operation
without switching on the blower. After the
heating is switched off, the blower can be used
to recirculate the air within the vehicle, e.g. at
high temperatures. To do this, turn the knurled
wheel1 toward the rear and switch on the
blower, button2.<
Microfilter/activated-charcoal filter
The microfilter removes dust and pollen from
the incoming air. The activated-charcoal filter
provides additional protection by filtering gas-
eous pollutants from the outside air. This com-
bined filter is changed during maintenance by
your BMW Sports Activity Vehicle Center.
You can select a display of more detailed infor-
mation on the Control Display, refer to page71.
Page 109 of 272
Controls
107Reference
At a glance
Driving tips
Communications
Navigation
Entertainment
Mobility
Rear automatic climate
control*
The control unit of the rear automatic climate
control is located in the center console in the
rear. The following settings and operating
modes can be selected and adjusted separately
for the left and right rear seating area:
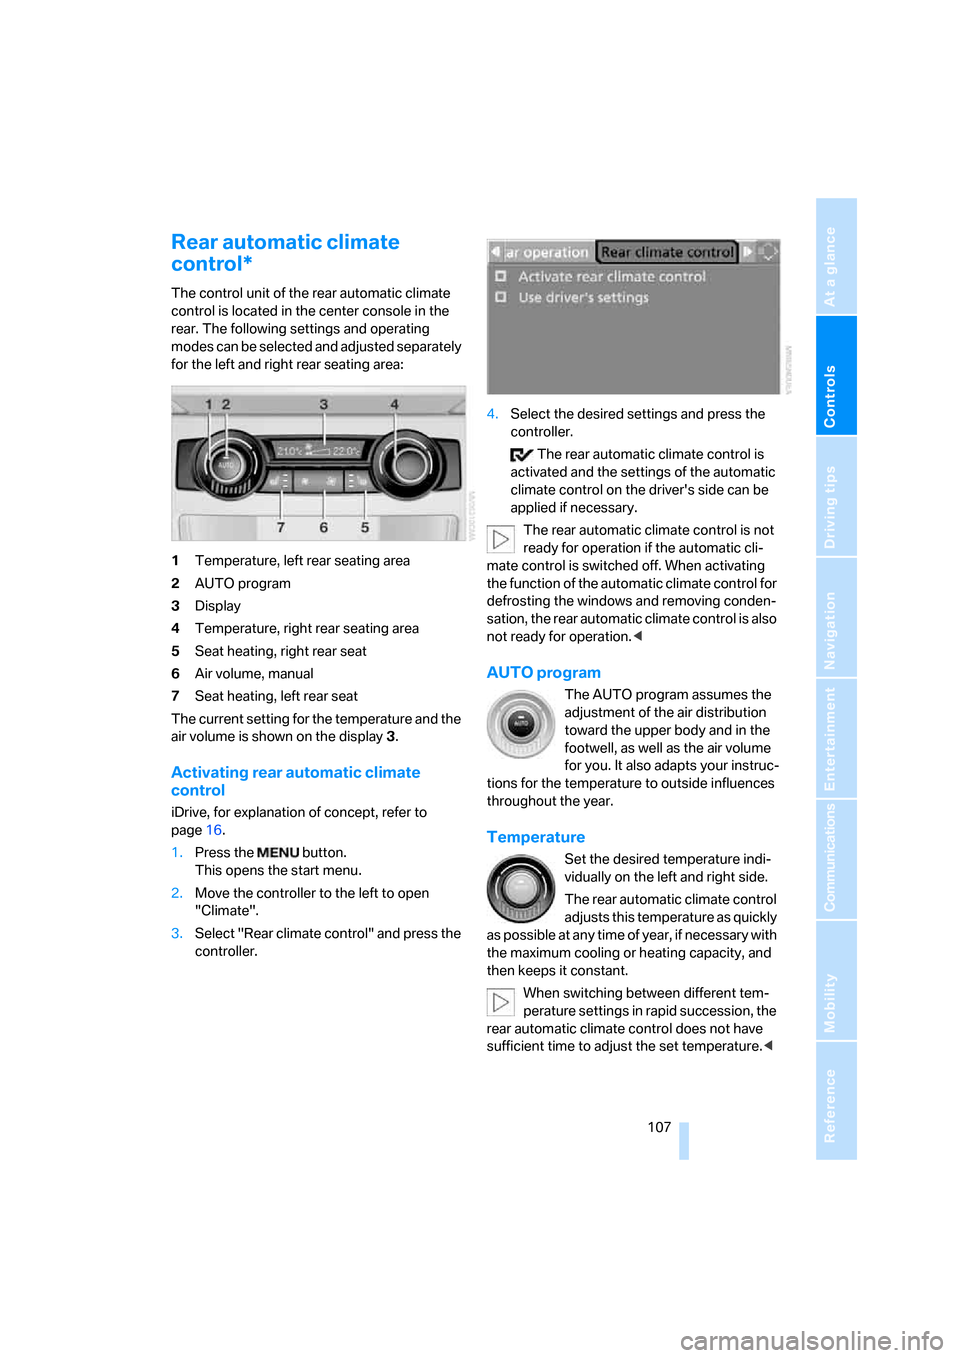
1Temperature, left rear seating area
2AUTO program
3Display
4Temperature, right rear seating area
5Seat heating, right rear seat
6Air volume, manual
7Seat heating, left rear seat
The current setting for the temperature and the
air volume is shown on the display3.
Activating rear automatic climate
control
iDrive, for explanation of concept, refer to
page16.
1.Press the button.
This opens the start menu.
2.Move the controller to the left to open
"Climate".
3.Select "Rear climate control" and press the
controller.4.Select the desired settings and press the
controller.
The rear automatic climate control is
activated and the settings of the automatic
climate control on the driver's side can be
applied if necessary.
The rear automatic climate control is not
ready for operation if the automatic cli-
mate control is switched off. When activating
the function of the automatic climate control for
defrosting the windows and removing conden-
sation, the rear automatic climate control is also
not ready for operation.<
AUTO program
The AUTO program assumes the
adjustment of the air distribution
toward the upper body and in the
footwell, as well as the air volume
for you. It also adapts your instruc-
tions for the temperature to outside influences
throughout the year.
Temperature
Set the desired temperature indi-
vidually on the left and right side.
The rear automatic climate control
adjusts this temperature as quickly
as possible at any time of year, if necessary with
the maximum cooling or heating capacity, and
then keeps it constant.
When switching between different tem-
perature settings in rapid succession, the
rear automatic climate control does not have
sufficient time to adjust the set temperature.<
Page 111 of 272
Controls
109Reference
At a glance
Driving tips
Communications
Navigation
Entertainment
Mobility
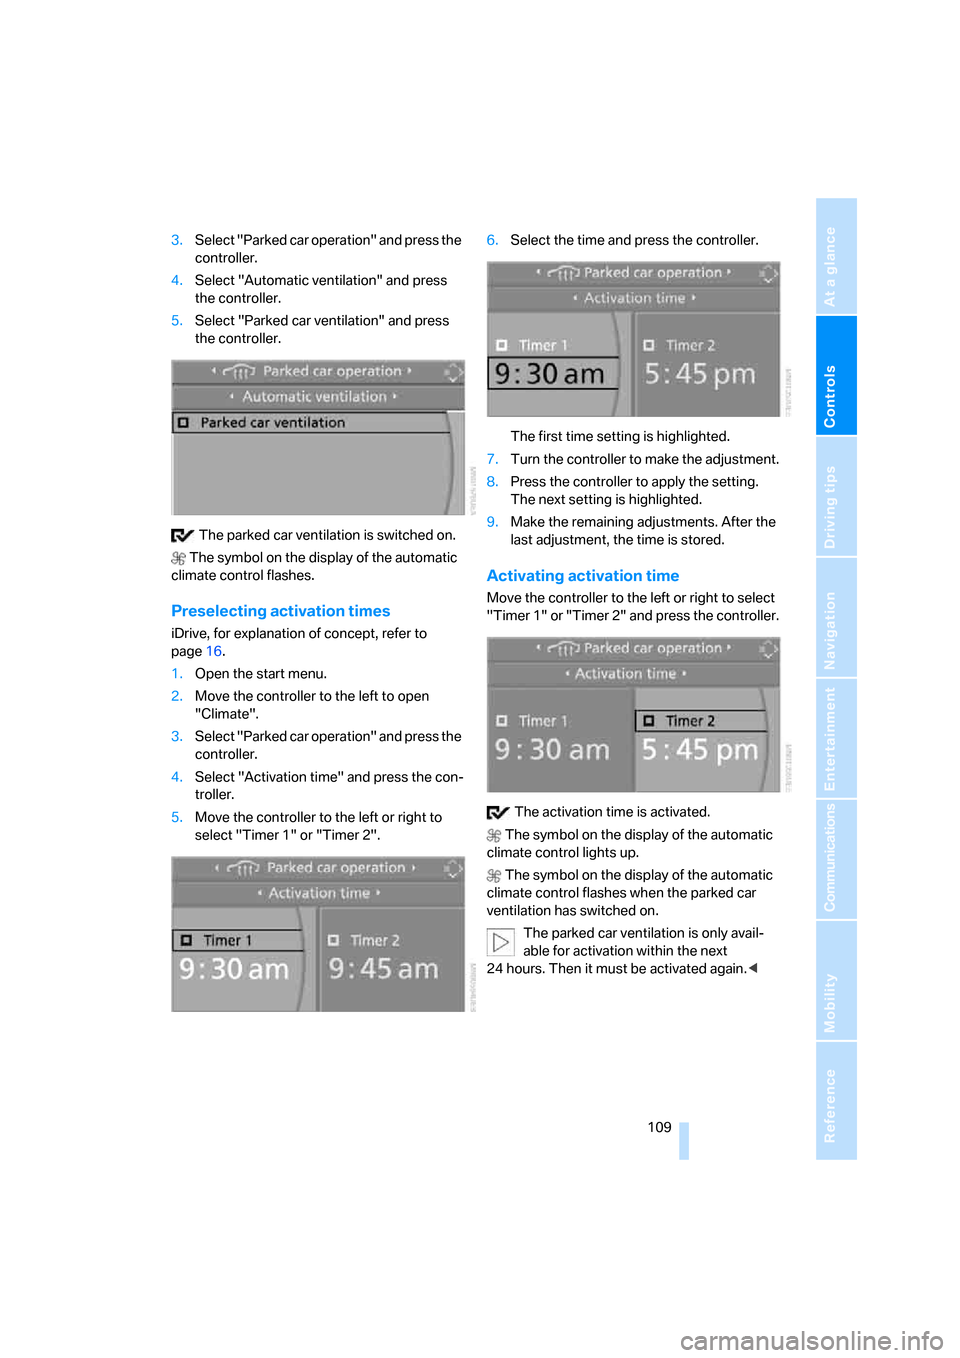
3.Select "Parked car operation" and press the
controller.
4.Select "Automatic ventilation" and press
the controller.
5.Select "Parked car ventilation" and press
the controller.
The parked car ventilation is switched on.
The symbol on the display of the automatic
climate control flashes.
Preselecting activation times
iDrive, for explanation of concept, refer to
page16.
1.Open the start menu.
2.Move the controller to the left to open
"Climate".
3.Select "Parked car operation" and press the
controller.
4.Select "Activation time" and press the con-
troller.
5.Move the controller to the left or right to
select "Timer 1" or "Timer 2".6.Select the time and press the controller.
The first time setting is highlighted.
7.Turn the controller to make the adjustment.
8.Press the controller to apply the setting.
The next setting is highlighted.
9.Make the remaining adjustments. After the
last adjustment, the time is stored.
Activating activation time
Move the controller to the left or right to select
"Timer 1" or "Timer 2" and press the controller.
The activation time is activated.
The symbol on the display of the automatic
climate control lights up.
The symbol on the display of the automatic
climate control flashes when the parked car
ventilation has switched on.
The parked car ventilation is only avail-
able for activation within the next
24 hours. Then it must be activated again.<
Page 113 of 272
Controls
111Reference
At a glance
Driving tips
Communications
Navigation
Entertainment
Mobility
The corresponding memory button 1 is now
programmed with the signal of the original
hand-held transmitter.
You can operate the device when the engine is
running or when the ignition is switched on.
If the device cannot be used after
repeated programming, check whether
the original hand-held transmitter uses an alter-
nating-code system. To do so, either read the
instructions for the original hand-held transmit-
ter or hold down the programmed memory
button1 of the integrated universal remote
control. If the LED2 on the integrated universal
remote control flashes rapidly for a short time
and then remains lit for approx. 2 seconds, this
indicates that the original hand-held transmitter
uses an alternating-code system. In the case of
an alternating-code system, program the mem-
ory buttons1 as described at Alternating-code
hand-held transmitters.<
Alternating-code hand-held
transmitters
To program the integrated universal remote
control, consult the operating instructions for
the equipment to be set. You will find informa-
tion there on the possibilities for synchroniza-
tion.
When programming hand-held transmitters
that employ an alternating code, please observe
the following supplementary instructions:
P r o g ra m m in g w i ll b e ea s i er w it h t h e a i d o f
a second person.<
1.Park your vehicle within the range of the
remote-controlled device.
2.Program the integrated universal remote
control as described above in the section
Fixed-code hand-held transmitters.
3.Locate the button on the receiver of the
device to be set, e. g. on the drive unit.
4.Press the button on the receiver of the
device to be set. After step 4, you have
approx. 30 seconds for step 5.
5.Press the programmed memory button1
of the integrated universal remote control
three times.The corresponding memory button 1 is now
programmed with the signal of the original
hand-held transmitter.
Should you have questions, please con-
tact your BMW Sports Activity Vehicle
Center.<
Deleting stored programs
Press both outer memory buttons1 for approx.
20 seconds until the LED2 flashes:
All stored programs are deleted.
Individual programs cannot be deleted.
Digital compass*
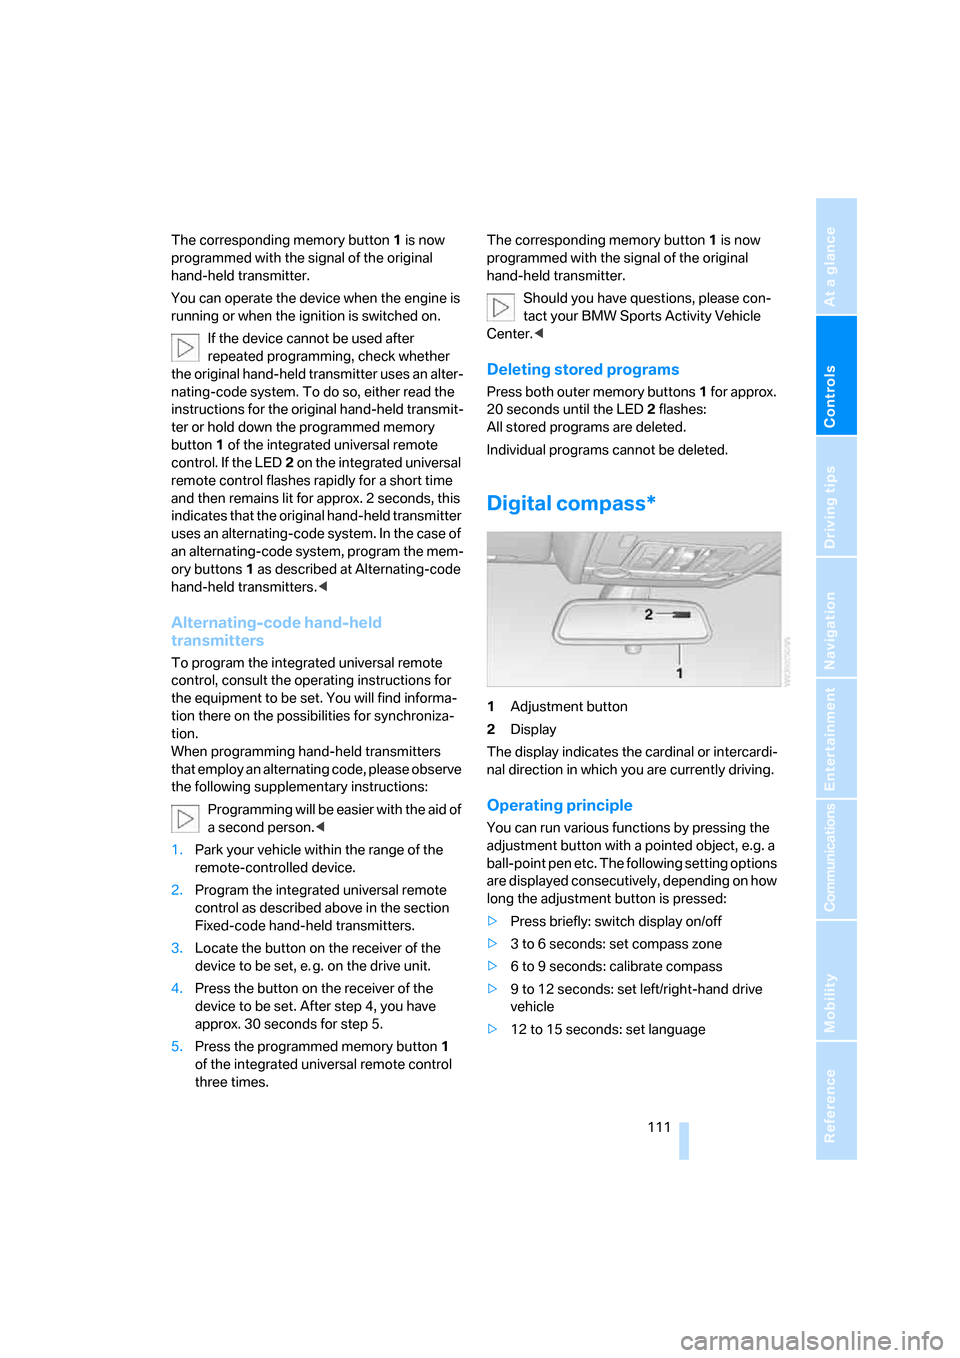
1Adjustment button
2Display
The display indicates the cardinal or intercardi-
nal direction in which you are currently driving.
Operating principle
You can run various functions by pressing the
adjustment button with a pointed object, e.g. a
ball-point pen etc. The following setting options
are displayed consecutively, depending on how
long the adjustment button is pressed:
>Press briefly: switch display on/off
>3 to 6 seconds: set compass zone
>6 to 9 seconds: calibrate compass
>9 to 12 seconds: set left/right-hand drive
vehicle
>12 to 15 seconds: set language
Page 114 of 272
Practical interior accessories
112
Setting compass zones
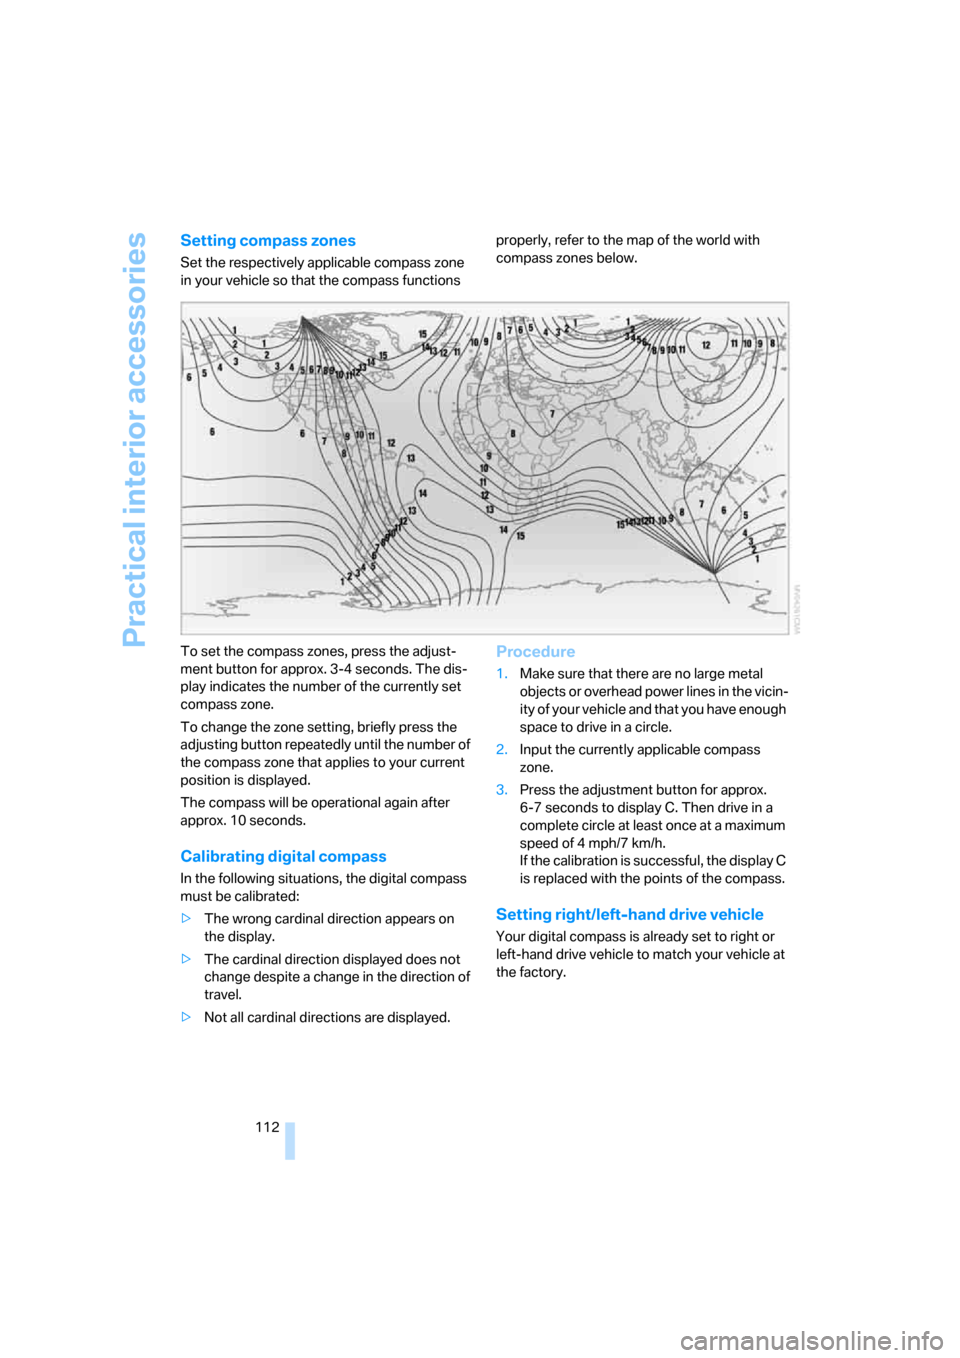
Set the respectively applicable compass zone
in your vehicle so that the compass functions properly, refer to the map of the world with
compass zones below.
To set the compass zones, press the adjust-
ment button for approx. 3-4 seconds. The dis-
play indicates the number of the currently set
compass zone.
To change the zone setting, briefly press the
adjusting button repeatedly until the number of
the compass zone that applies to your current
position is displayed.
The compass will be operational again after
approx. 10 seconds.
Calibrating digital compass
In the following situations, the digital compass
must be calibrated:
>The wrong cardinal direction appears on
the display.
>The cardinal direction displayed does not
change despite a change in the direction of
travel.
>Not all cardinal directions are displayed.
Procedure
1.Make sure that there are no large metal
objects or overhead power lines in the vicin-
ity of your vehicle and that you have enough
space to drive in a circle.
2.Input the currently applicable compass
zone.
3.Press the adjustment button for approx.
6-7 seconds to display C. Then drive in a
complete circle at least once at a maximum
speed of 4 mph/7 km/h.
If the calibration is successful, the display C
is replaced with the points of the compass.
Setting right/left-hand drive vehicle
Your digital compass is already set to right or
left-hand drive vehicle to match your vehicle at
the factory.
Page 115 of 272
Controls
113Reference
At a glance
Driving tips
Communications
Navigation
Entertainment
Mobility
Setting language
You can set the language of the display.
Press the adjustment button for approx.
12-13 seconds. Briefly press the adjustment
button again to switch between English "E" and
German "O".
The setting is automatically stored after approx.
10 seconds.
Roller sun blinds for rear side
windows*
Pull the loop of the roller sun blind and hook
onto bracket.
With roller sun blinds attached, do not
open the windows during travel. The
blinds may otherwise be damaged by the
wind.<
Glove compartment
Opening
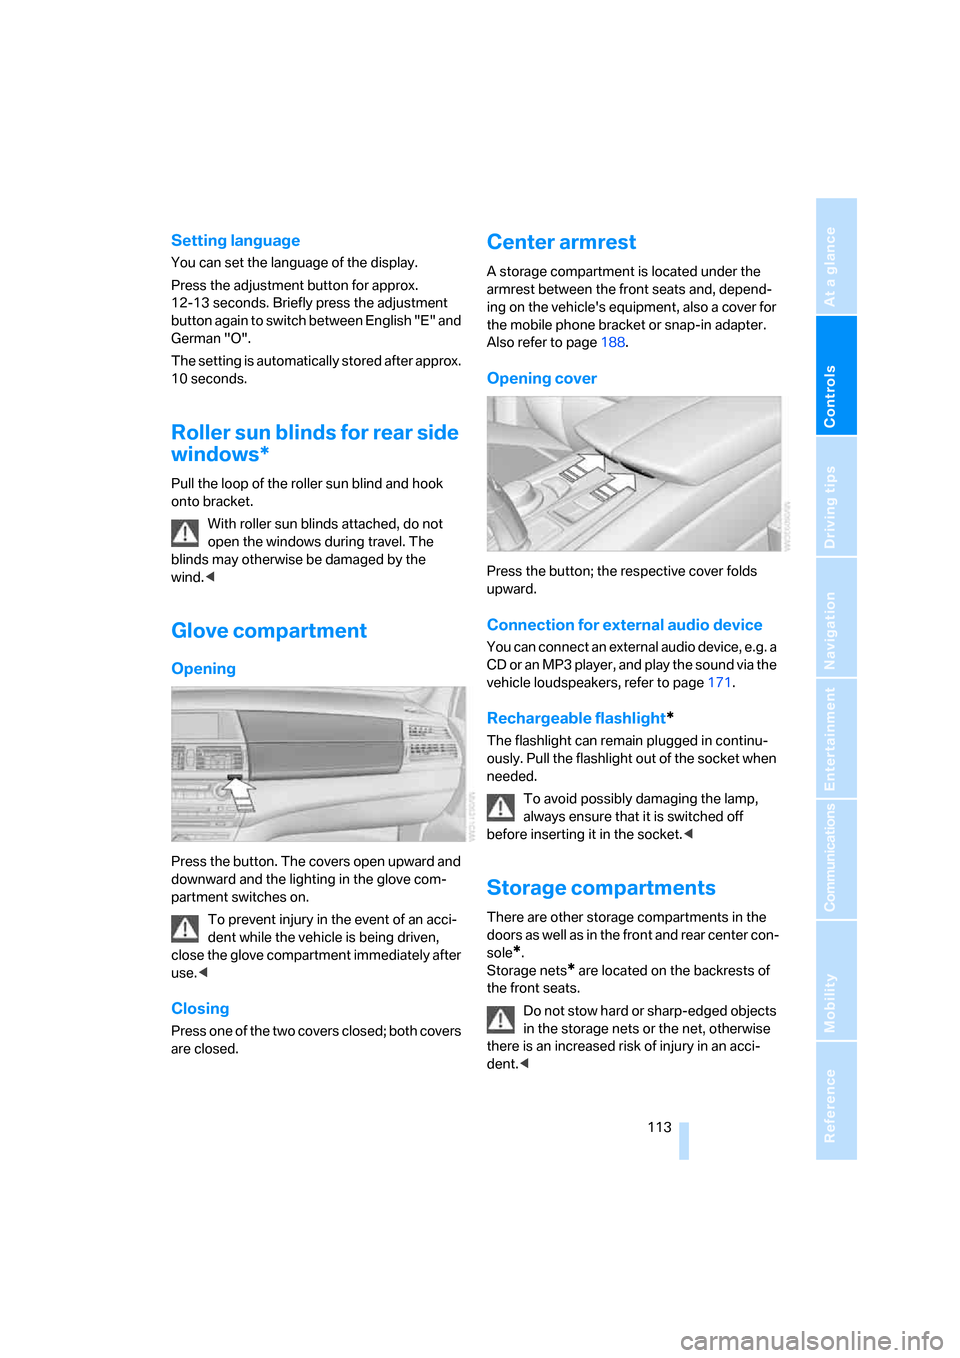
Press the button. The covers open upward and
downward and the lighting in the glove com-
partment switches on.
To prevent injury in the event of an acci-
dent while the vehicle is being driven,
close the glove compartment immediately after
use.<
Closing
Press one of the two covers closed; both covers
are closed.
Center armrest
A storage compartment is located under the
armrest between the front seats and, depend-
ing on the vehicle's equipment, also a cover for
the mobile phone bracket or snap-in adapter.
Also refer to page188.
Opening cover
Press the button; the respective cover folds
upward.
Connection for external audio device
You can connect an external audio device, e.g. a
CD or an MP3 player, and play the sound via the
vehicle loudspeakers, refer to page171.
Rechargeable flashlight*
The flashlight can remain plugged in continu-
ously. Pull the flashlight out of the socket when
needed.
To avoid possibly damaging the lamp,
always ensure that it is switched off
before inserting it in the socket.<
Storage compartments
There are other storage compartments in the
doors as well as in the front and rear center con-
sole
*.
Storage nets
* are located on the backrests of
the front seats.
Do not stow hard or sharp-edged objects
in the storage nets or the net, otherwise
there is an increased risk of injury in an acci-
dent.<
Page 120 of 272
Practical interior accessories
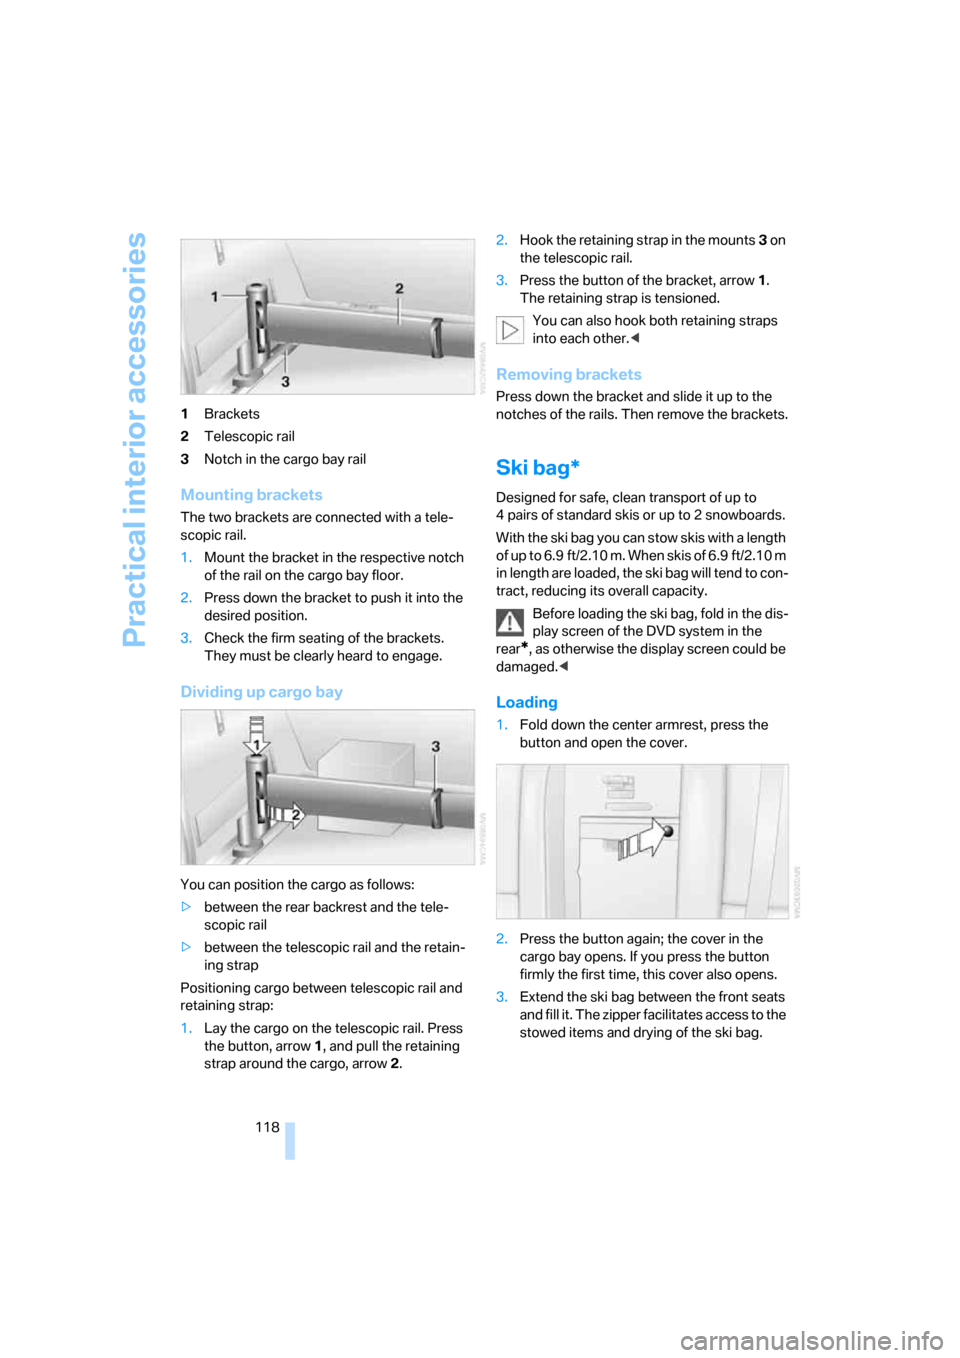
118 1Brackets
2Telescopic rail
3Notch in the cargo bay rail
Mounting brackets
The two brackets are connected with a tele-
scopic rail.
1.Mount the bracket in the respective notch
of the rail on the cargo bay floor.
2.Press down the bracket to push it into the
desired position.
3.Check the firm seating of the brackets.
They must be clearly heard to engage.
Dividing up cargo bay
You can position the cargo as follows:
>between the rear backrest and the tele-
scopic rail
>between the telescopic rail and the retain-
ing strap
Positioning cargo between telescopic rail and
retaining strap:
1.Lay the cargo on the telescopic rail. Press
the button, arrow1, and pull the retaining
strap around the cargo, arrow2.2.Hook the retaining strap in the mounts3 on
the telescopic rail.
3.Press the button of the bracket, arrow1.
The retaining strap is tensioned.
You can also hook both retaining straps
into each other.<
Removing brackets
Press down the bracket and slide it up to the
notches of the rails. Then remove the brackets.
Ski bag*
Designed for safe, clean transport of up to
4 pairs of standard skis or up to 2 snowboards.
With the ski bag you can stow skis with a length
o f u p t o 6 . 9 f t / 2 . 1 0 m . W h e n s k i s o f 6 . 9 f t / 2 . 1 0 m
in length are loaded, the ski bag will tend to con-
tract, reducing its overall capacity.
Before loading the ski bag, fold in the dis-
play screen of the DVD system in the
rear
*, as otherwise the display screen could be
damaged.<
Loading
1.Fold down the center armrest, press the
button and open the cover.
2.Press the button again; the cover in the
cargo bay opens. If you press the button
firmly the first time, this cover also opens.
3.Extend the ski bag between the front seats
and fill it. The zipper facilitates access to the
stowed items and drying of the ski bag.
Page 132 of 272
Starting navigation system
130
Starting navigation system
Your navigation system can use satellites to
ascertain the precise position of your vehicle
and guide you reliably to any destination you
enter.
Navigation DVD
The navigation system requires a special navi-
gation DVD. The latest version is available at
your BMW Sports Activity Vehicle Center.
Inserting navigation DVD
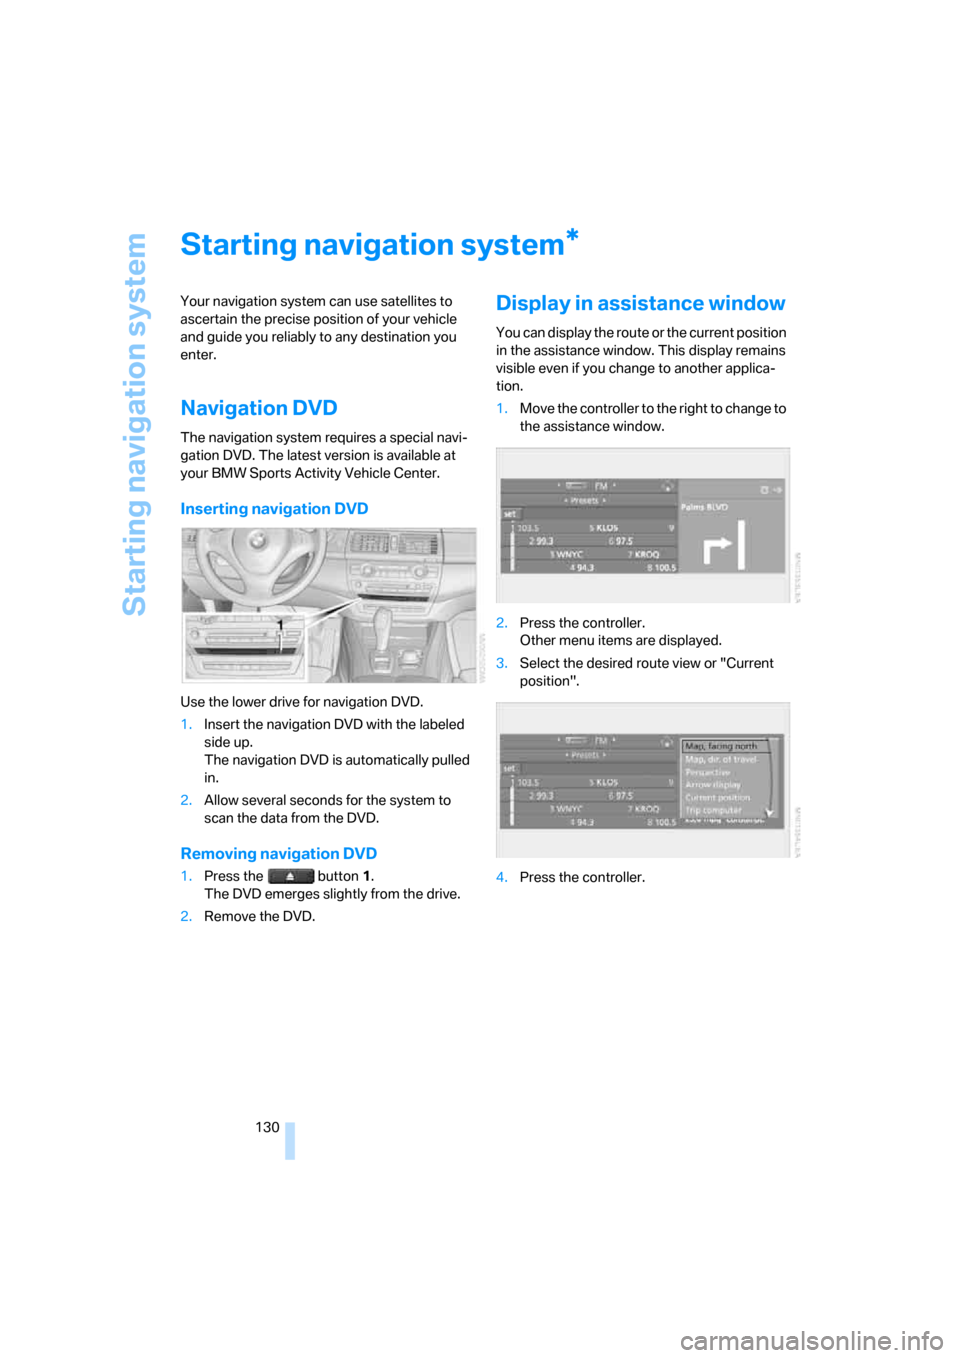
Use the lower drive for navigation DVD.
1.Insert the navigation DVD with the labeled
side up.
The navigation DVD is automatically pulled
in.
2.Allow several seconds for the system to
scan the data from the DVD.
Removing navigation DVD
1.Press the button 1.
The DVD emerges slightly from the drive.
2.Remove the DVD.
Display in assistance window
You can display the route or the current position
in the assistance window. This display remains
visible even if you change to another applica-
tion.
1.Move the controller to the right to change to
the assistance window.
2.Press the controller.
Other menu items are displayed.
3.Select the desired route view or "Current
position".
4.Press the controller.
*
Page 134 of 272
Destination entry
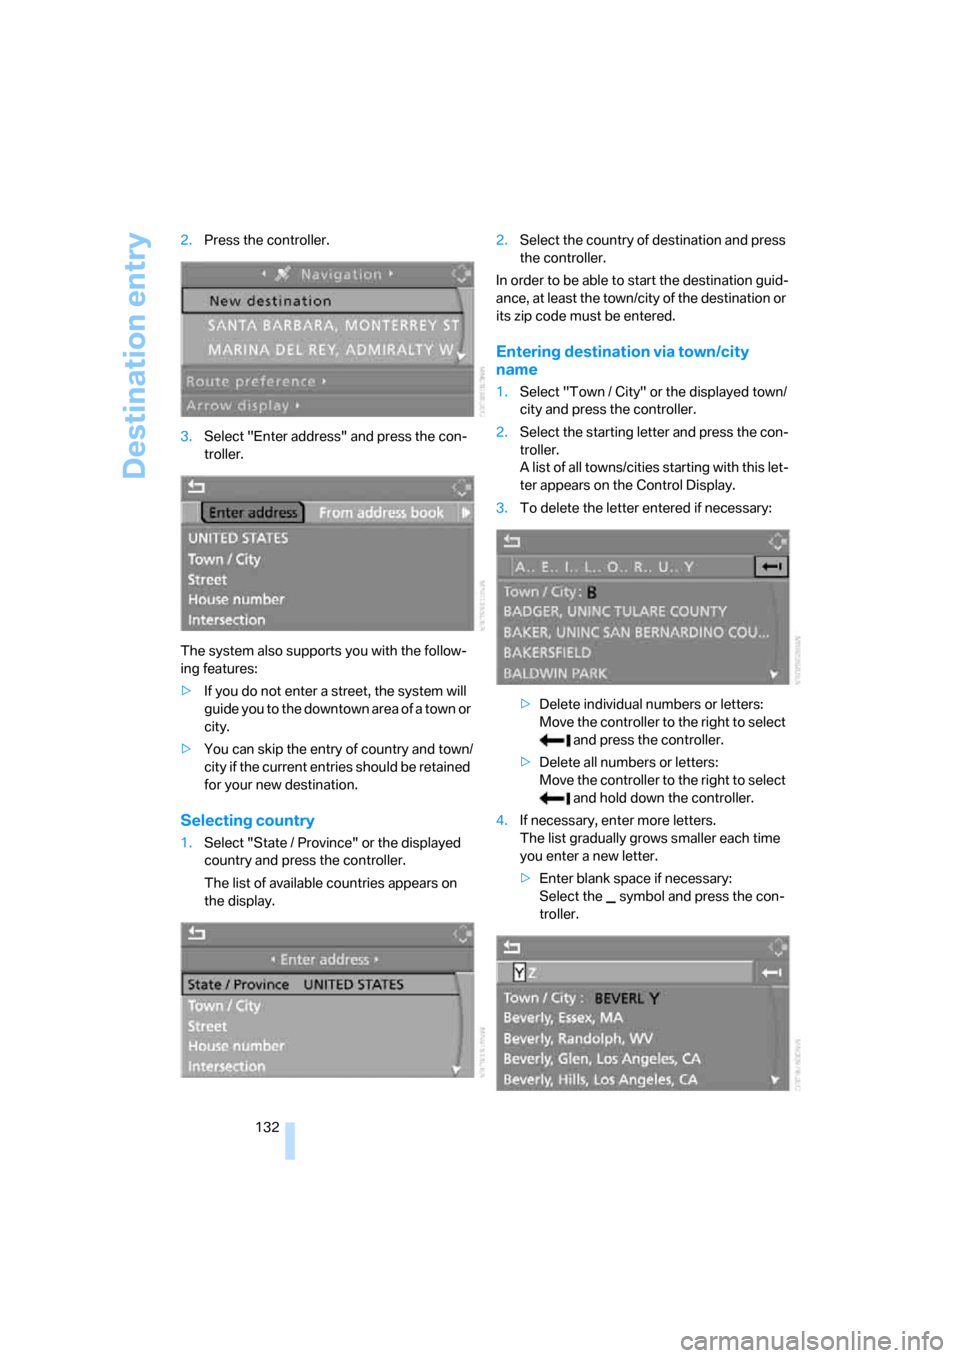
132 2.Press the controller.
3.Select "Enter address" and press the con-
troller.
The system also supports you with the follow-
ing features:
>If you do not enter a street, the system will
guide you to the downtown area of a town or
city.
>You can skip the entry of country and town/
city if the current entries should be retained
for your new destination.
Selecting country
1.Select "State / Province" or the displayed
country and press the controller.
The list of available countries appears on
the display.2.Select the country of destination and press
the controller.
In order to be able to start the destination guid-
ance, at least the town/city of the destination or
its zip code must be entered.
Entering destination via town/city
name
1.Select "Town / City" or the displayed town/
city and press the controller.
2.Select the starting letter and press the con-
troller.
A list of all towns/cities starting with this let-
ter appears on the Control Display.
3.To delete the letter entered if necessary:
>Delete individual numbers or letters:
Move the controller to the right to select
and press the controller.
>Delete all numbers or letters:
Move the controller to the right to select
and hold down the controller.
4.If necessary, enter more letters.
The list gradually grows smaller each time
you enter a new letter.
>Enter blank space if necessary:
Select the symbol and press the con-
troller.