change time BMW X5 3.0I 2007 E70 Owner's Manual
[x] Cancel search | Manufacturer: BMW, Model Year: 2007, Model line: X5 3.0I, Model: BMW X5 3.0I 2007 E70Pages: 272, PDF Size: 9.03 MB
Page 22 of 272
iDrive
20
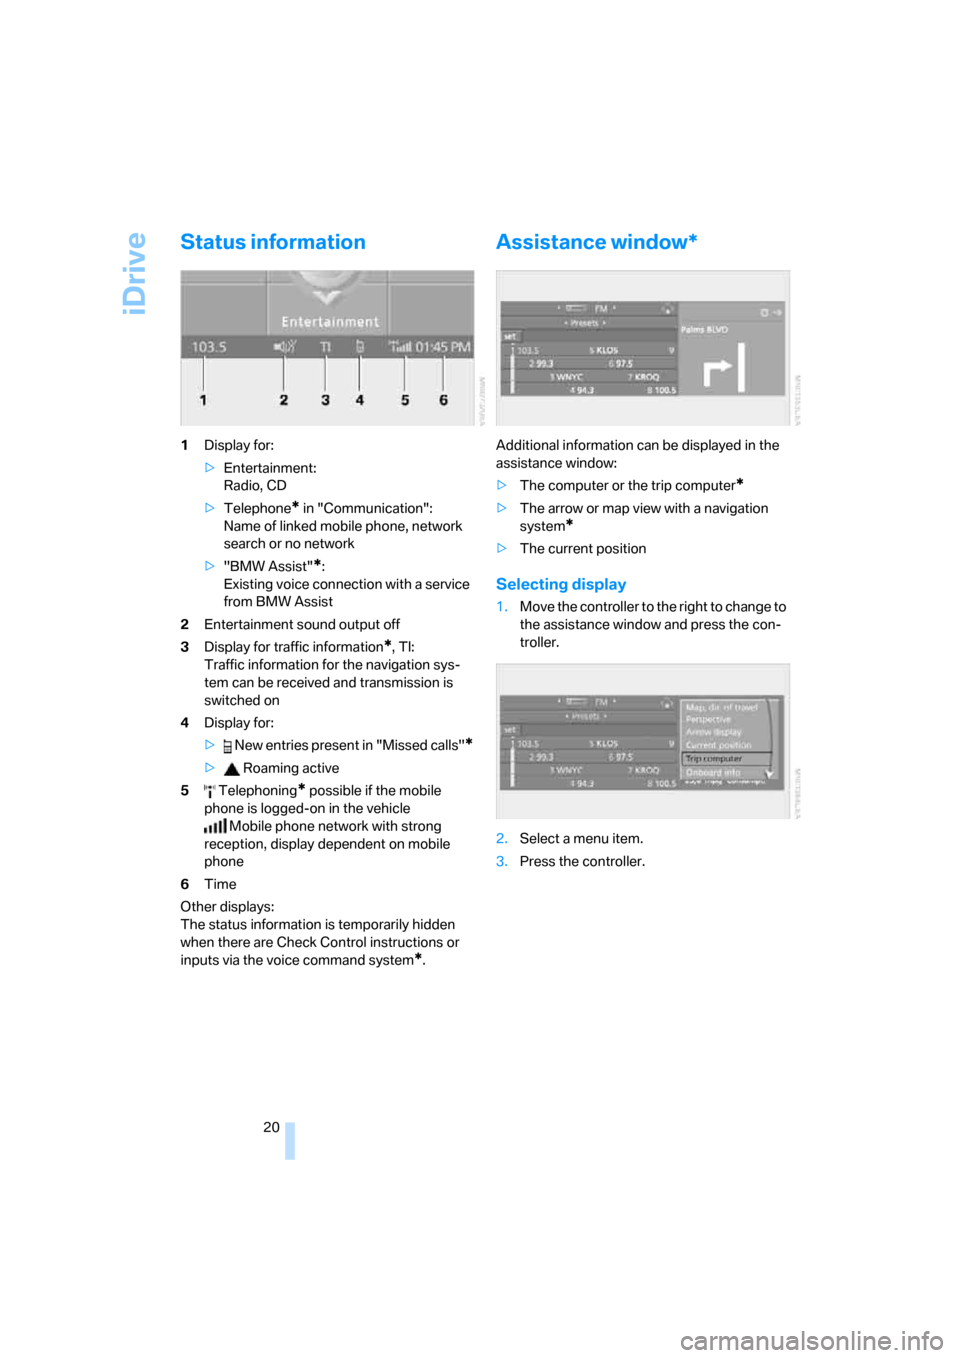
Status information
1Display for:
>Entertainment:
Radio, CD
>Telephone
* in "Communication":
Name of linked mobile phone, network
search or no network
>"BMW Assist"
*:
Existing voice connection with a service
from BMW Assist
2Entertainment sound output off
3Display for traffic information
*, TI:
Traffic information for the navigation sys-
tem can be received and transmission is
switched on
4Display for:
> New entries present in "Missed calls"
*
> Roaming active
5 Telephoning
* possible if the mobile
phone is logged-on in the vehicle
Mobile phone network with strong
reception, display dependent on mobile
phone
6Time
Other displays:
The status information is temporarily hidden
when there are Check Control instructions or
inputs via the voice command system
*.
Assistance window*
Additional information can be displayed in the
assistance window:
>The computer or the trip computer
*
>The arrow or map view with a navigation
system
*
>The current position
Selecting display
1.Move the controller to the right to change to
the assistance window and press the con-
troller.
2.Select a menu item.
3.Press the controller.
Page 23 of 272
At a glance
21Reference
Controls
Driving tips
Communications
Navigation
Entertainment
Mobility
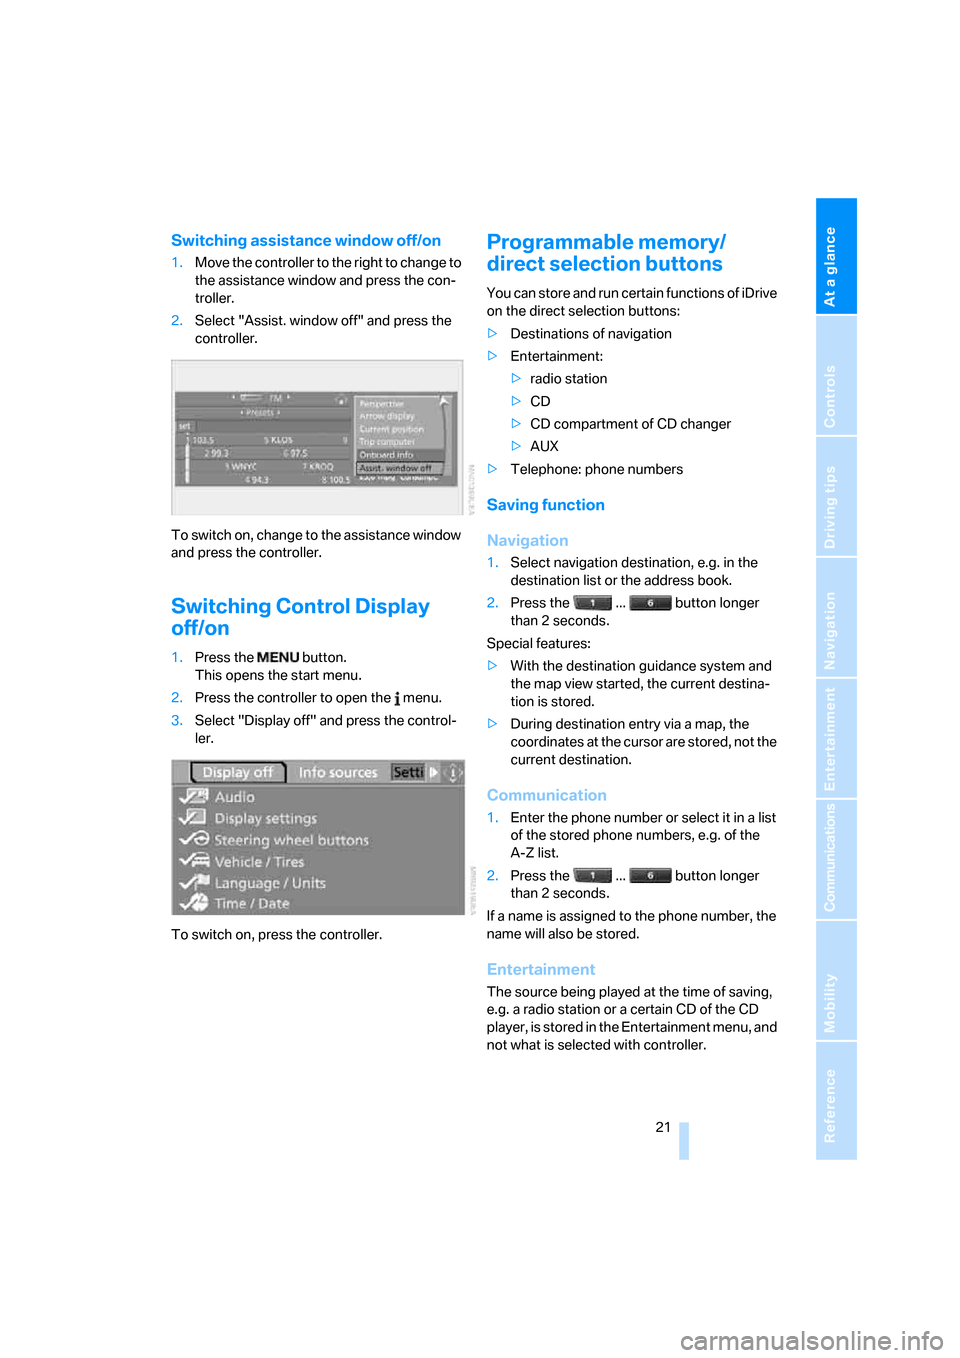
Switching assistance window off/on
1.Move the controller to the right to change to
the assistance window and press the con-
troller.
2.Select "Assist. window off" and press the
controller.
To switch on, change to the assistance window
and press the controller.
Switching Control Display
off/on
1.Press the button.
This opens the start menu.
2.Press the controller to open the menu.
3.Select "Display off" and press the control-
ler.
To switch on, press the controller.
Programmable memory/
direct selection buttons
You can store and run certain functions of iDrive
on the direct selection buttons:
>Destinations of navigation
>Entertainment:
>radio station
>CD
>CD compartment of CD changer
>AUX
>Telephone: phone numbers
Saving function
Navigation
1.Select navigation destination, e.g. in the
destination list or the address book.
2.Press the ... button longer
than 2 seconds.
Special features:
>With the destination guidance system and
the map view started, the current destina-
tion is stored.
>During destination entry via a map, the
coordinates at the cursor are stored, not the
current destination.
Communication
1.Enter the phone number or select it in a list
of the stored phone numbers, e.g. of the
A-Z list.
2.Press the ... button longer
than 2 seconds.
If a name is assigned to the phone number, the
name will also be stored.
Entertainment
The source being played at the time of saving,
e.g. a radio station or a certain CD of the CD
player, is stored in the Entertainment menu, and
not what is selected with controller.
Page 34 of 272
Opening and closing
32 2.Turning the key a second time unlocks the
remaining doors and the liftgate.
Comfort operation
You also operate the windows and the pan-
orama glass sunroof
* from the driver's door
lock.
Turn and hold the key in the positions for
unlocking or locking.
Watch during the closing process to be
sure that no one is injured. Releasing the
key stops the operation.<
Manual operation
In the event of an electrical malfunction, you can
turn a key all the way to the right or left in the
door lock to lock or unlock the driver's door.
Opening and closing: from
inside
This button serves to unlock or lock doors and
the liftgate, with the front doors closed. It does
not activate the anti-theft system. The fuel filler
door remains unlocked.
You can also set the situations in which the
vehicle is locked.
iDrive, for explanation of concept, refer to
page16.
1.Press the button.
This opens the start menu.
2.Press the controller to open the menu.
3.Select "Settings" and press the controller.
4.Select "Vehicle / Tires" and press the con-
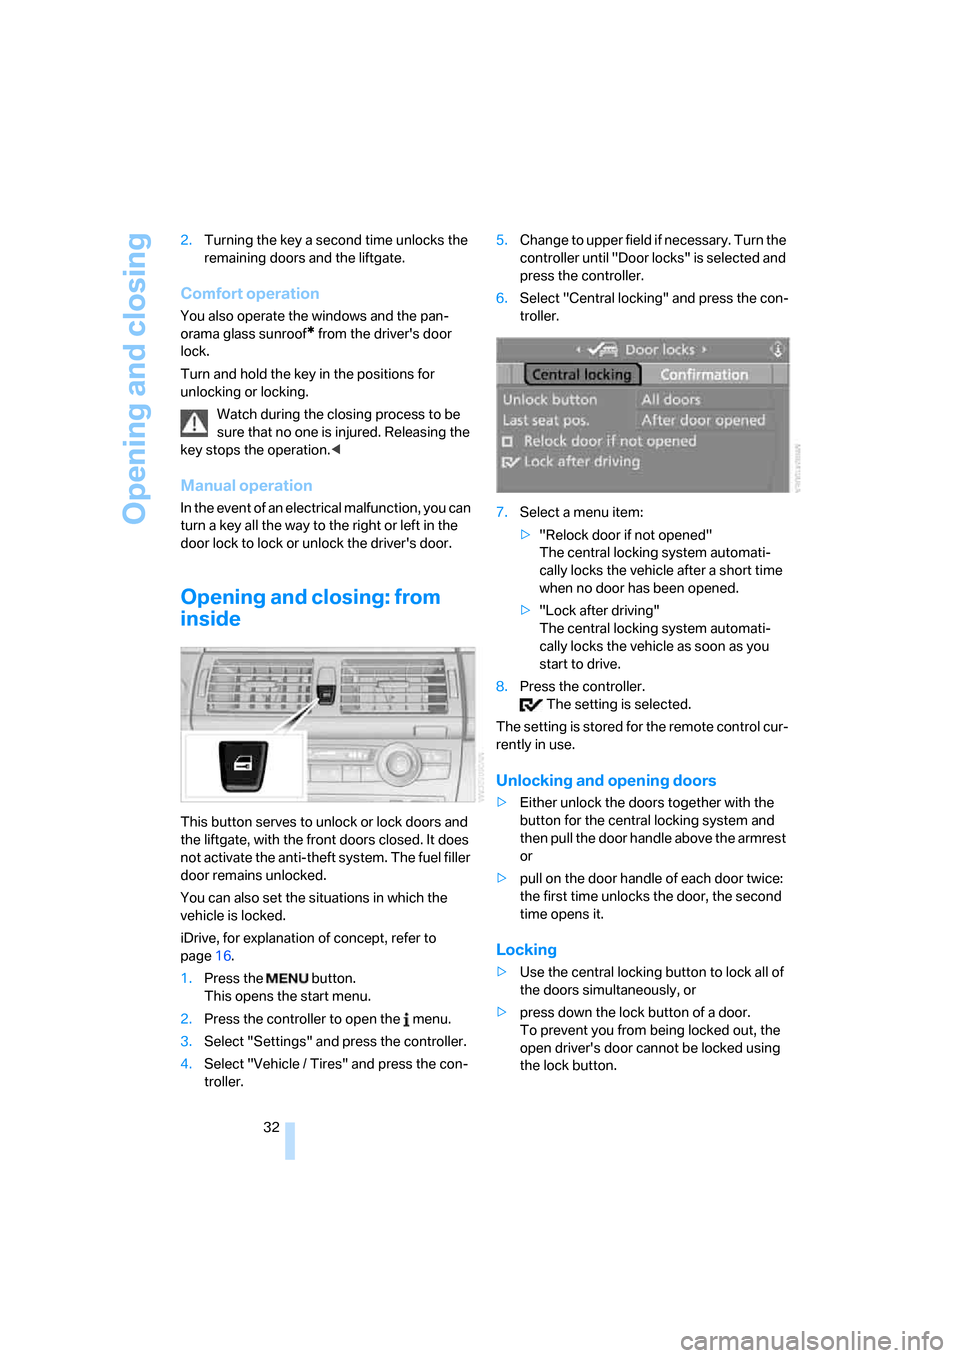
troller.5.Change to upper field if necessary. Turn the
controller until "Door locks" is selected and
press the controller.
6.Select "Central locking" and press the con-
troller.
7.Select a menu item:
>"Relock door if not opened"
The central locking system automati-
cally locks the vehicle after a short time
when no door has been opened.
>"Lock after driving"
The central locking system automati-
cally locks the vehicle as soon as you
start to drive.
8.Press the controller.
The setting is selected.
The setting is stored for the remote control cur-
rently in use.
Unlocking and opening doors
>Either unlock the doors together with the
button for the central locking system and
then pull the door handle above the armrest
or
>pull on the door handle of each door twice:
the first time unlocks the door, the second
time opens it.
Locking
>Use the central locking button to lock all of
the doors simultaneously, or
>press down the lock button of a door.
To prevent you from being locked out, the
open driver's door cannot be locked using
the lock button.
Page 36 of 272
Opening and closing
34
Tailgate
Opening
Pull lever.
You can fold the tailgate down.
When opened, the tailgate can accept
loads of up to 550lbs./250kg. When the
vehicle is stationary you may, for example, uti-
lize the tailgate as a seat or as a loading platform
for luggage or recreation gear.
Closing
Fold the tailgate up and press closed.
Alarm system
The concept
The vehicle alarm system responds:
>When a door, the hood or the liftgate is
opened
>To movements in the vehicle: interior
motion sensor, refer to page35
>To changes in the vehicle's tilt if someone
attempts to steal the wheels or tow the
vehicle
>To interruptions in battery voltage
Unauthorized operations are briefly signaled by
the alarm system:
>with an acoustic alarm
>by switching on
the hazard warning flashers
>by flashing the high beams
Arming and disarming alarm system
When you lock or unlock the vehicle, either with
the remote control or at the door lock, the alarm
system is armed or disarmed at the same time.
The liftgate can also be opened with the system
armed with the button on the remote con-
trol, refer to page30. When the liftgate is
closed, it is locked and monitored again.
Switching off alarm
>Unlock the vehicle using the remote control,
refer to page30.
>Insert the remote control all the way into the
ignition lock.
Indicator lamp displays
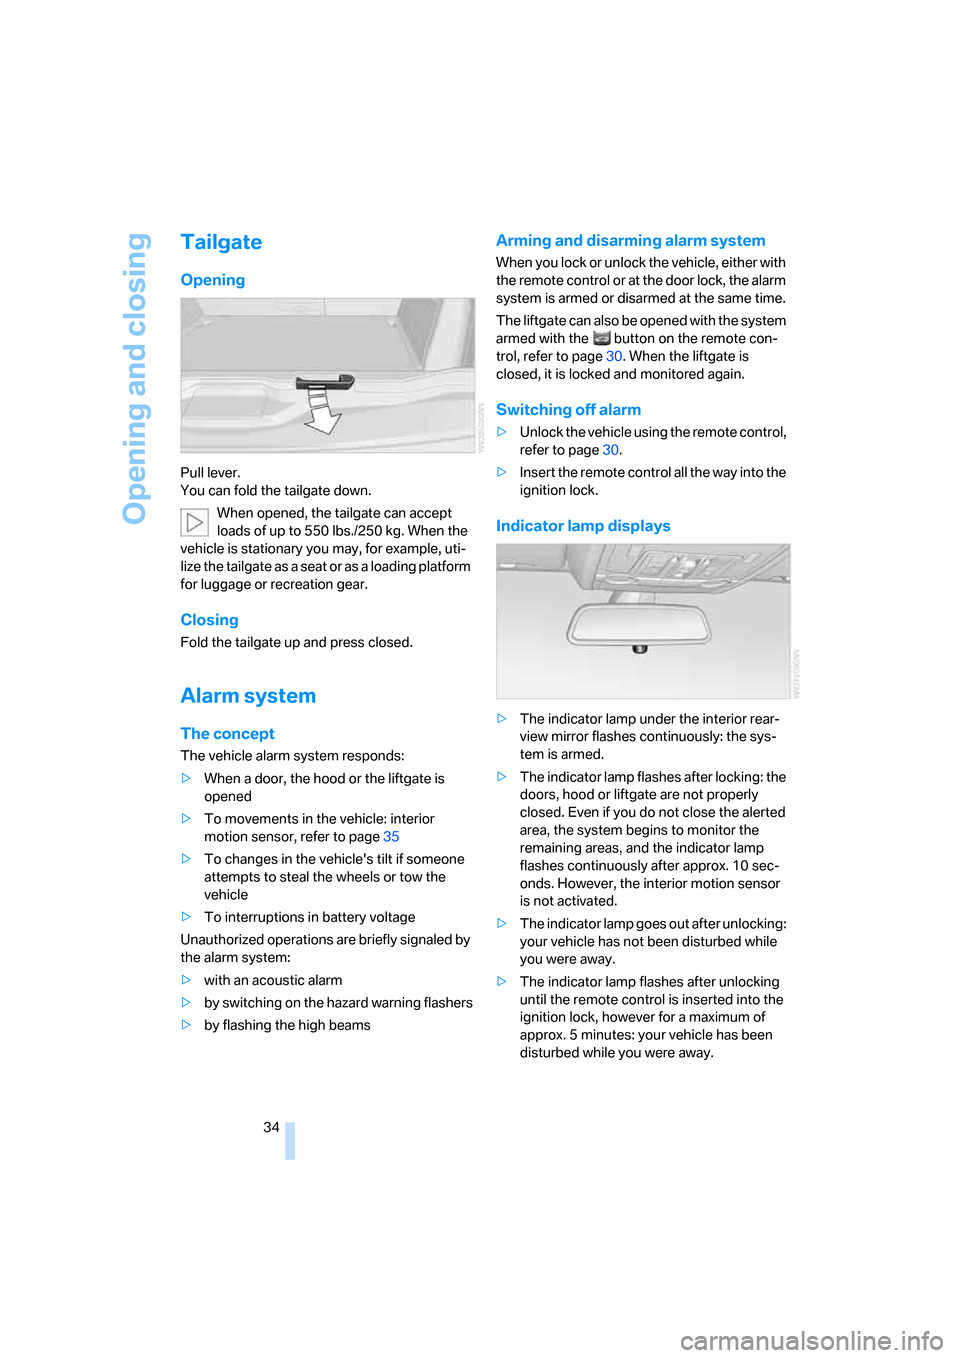
>The indicator lamp under the interior rear-
view mirror flashes continuously: the sys-
tem is armed.
>The indicator lamp flashes after locking: the
doors, hood or liftgate are not properly
closed. Even if you do not close the alerted
area, the system begins to monitor the
remaining areas, and the indicator lamp
flashes continuously after approx. 10 sec-
onds. However, the interior motion sensor
is not activated.
>The indicator lamp goes out after unlocking:
your vehicle has not been disturbed while
you were away.
>The indicator lamp flashes after unlocking
until the remote control is inserted into the
ignition lock, however for a maximum of
approx. 5 minutes: your vehicle has been
disturbed while you were away.
Page 49 of 272
Controls
47Reference
At a glance
Driving tips
Communications
Navigation
Entertainment
Mobility
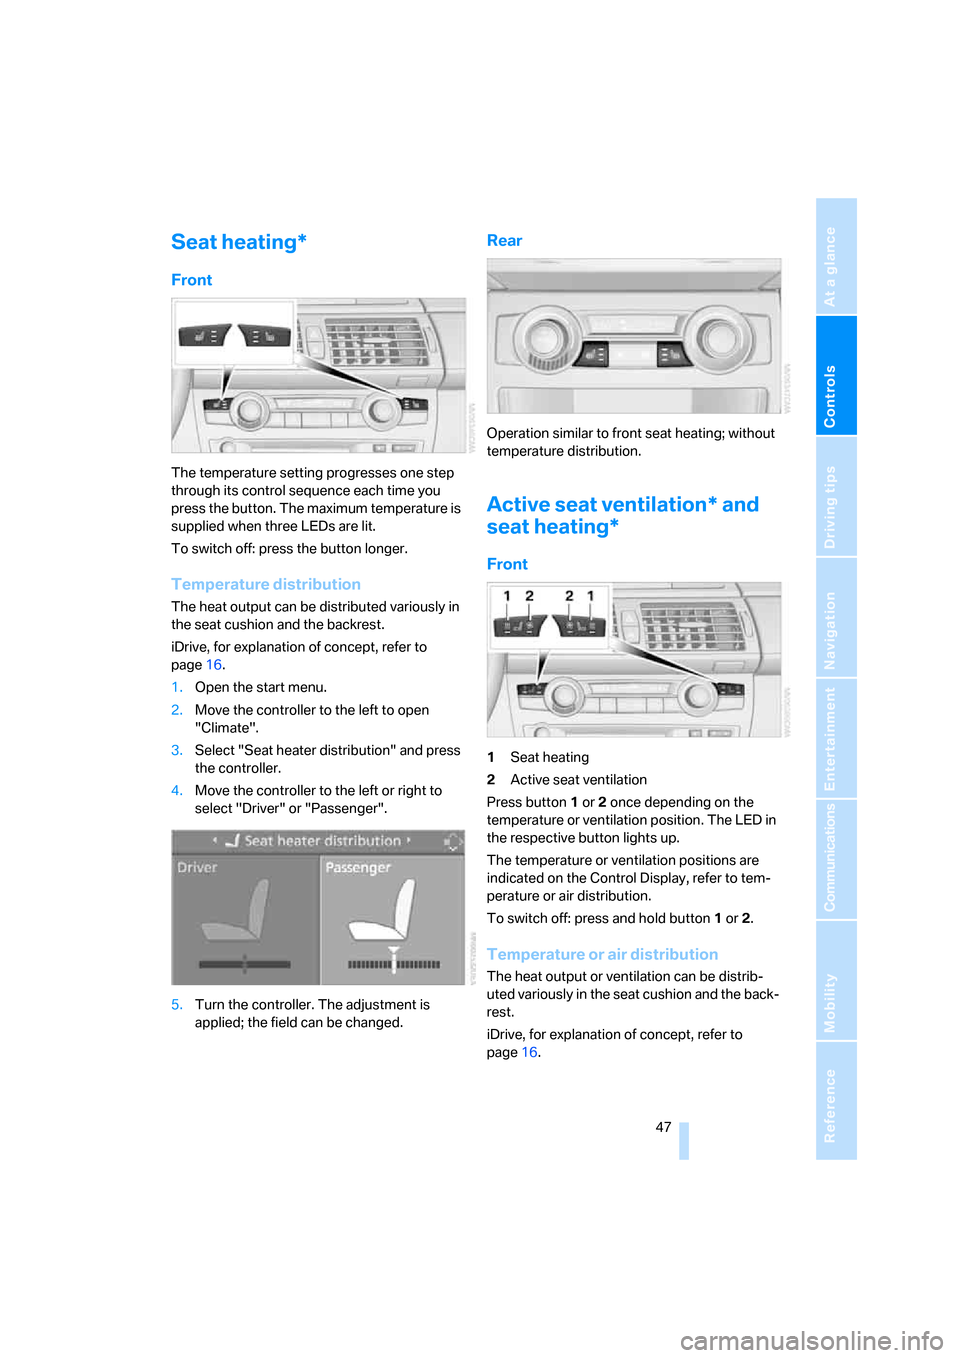
Seat heating*
Front
The temperature setting progresses one step
through its control sequence each time you
press the button. The maximum temperature is
supplied when three LEDs are lit.
To switch off: press the button longer.
Temperature distribution
The heat output can be distributed variously in
the seat cushion and the backrest.
iDrive, for explanation of concept, refer to
page16.
1.Open the start menu.
2.Move the controller to the left to open
"Climate".
3.Select "Seat heater distribution" and press
the controller.
4.Move the controller to the left or right to
select "Driver" or "Passenger".
5.Turn the controller. The adjustment is
applied; the field can be changed.
Rear
Operation similar to front seat heating; without
temperature distribution.
Active seat ventilation* and
seat heating*
Front
1Seat heating
2Active seat ventilation
Press button1 or 2 once depending on the
temperature or ventilation position. The LED in
the respective button lights up.
The temperature or ventilation positions are
indicated on the Control Display, refer to tem-
perature or air distribution.
To switch off: press and hold button1 or 2.
Temperature or air distribution
The heat output or ventilation can be distrib-
uted variously in the seat cushion and the back-
rest.
iDrive, for explanation of concept, refer to
page16.
Page 64 of 272
Driving
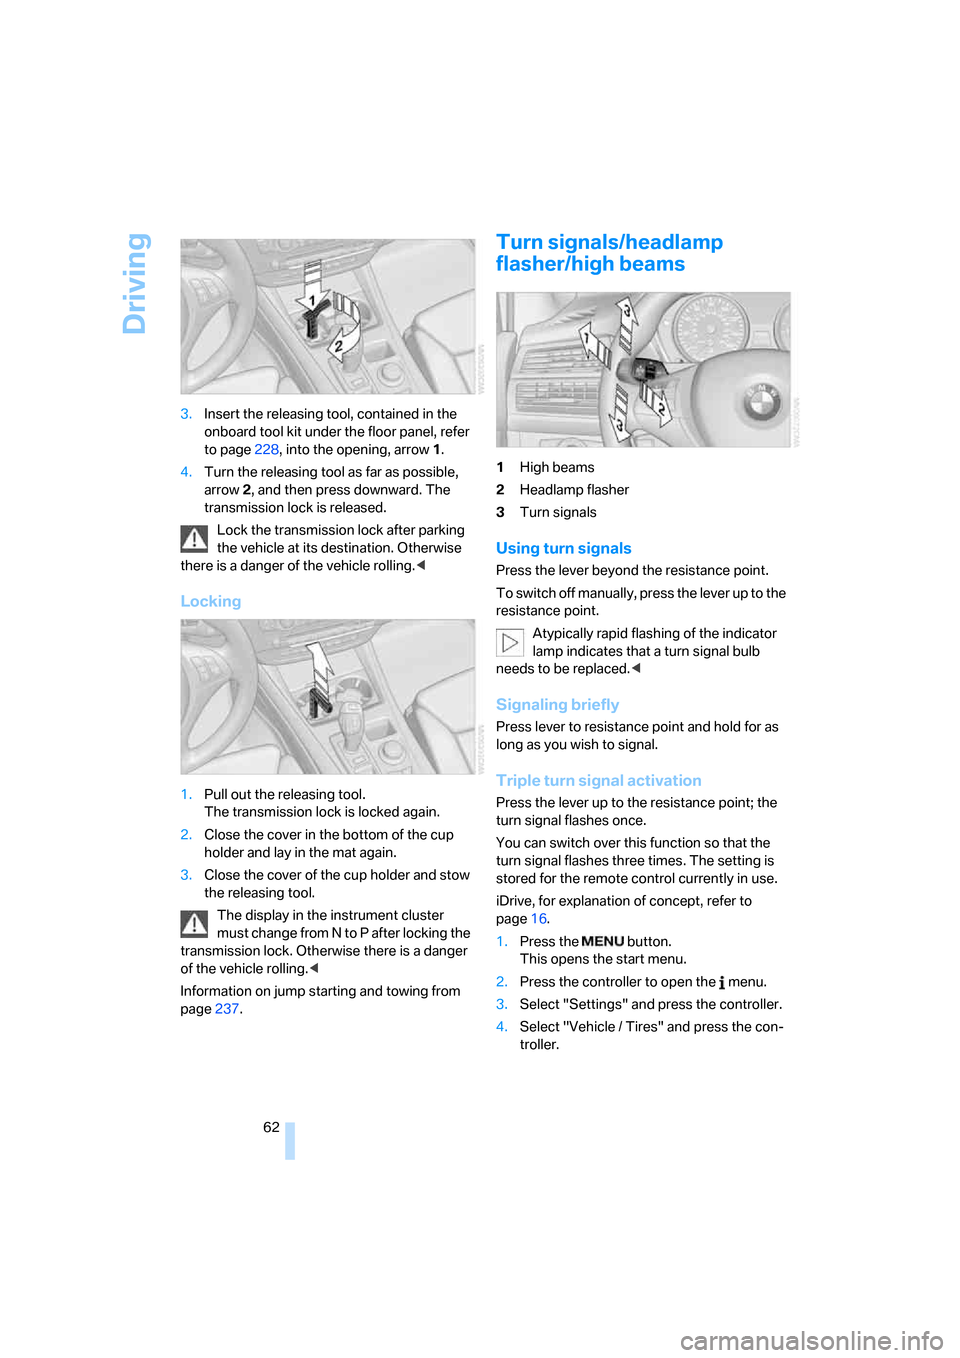
62 3.Insert the releasing tool, contained in the
onboard tool kit under the floor panel, refer
to page228, into the opening, arrow1.
4.Turn the releasing tool as far as possible,
arrow2, and then press downward. The
transmission lock is released.
Lock the transmission lock after parking
the vehicle at its destination. Otherwise
there is a danger of the vehicle rolling.<
Locking
1.Pull out the releasing tool.
The transmission lock is locked again.
2.Close the cover in the bottom of the cup
holder and lay in the mat again.
3.Close the cover of the cup holder and stow
the releasing tool.
The display in the instrument cluster
must change from N to P after locking the
transmission lock. Otherwise there is a danger
of the vehicle rolling.<
Information on jump starting and towing from
page237.
Turn signals/headlamp
flasher/high beams
1High beams
2Headlamp flasher
3Turn signals
Using turn signals
Press the lever beyond the resistance point.
To switch off manually, press the lever up to the
resistance point.
Atypically rapid flashing of the indicator
lamp indicates that a turn signal bulb
needs to be replaced.<
Signaling briefly
Press lever to resistance point and hold for as
long as you wish to signal.
Triple turn signal activation
Press the lever up to the resistance point; the
turn signal flashes once.
You can switch over this function so that the
turn signal flashes three times. The setting is
stored for the remote control currently in use.
iDrive, for explanation of concept, refer to
page16.
1.Press the button.
This opens the start menu.
2.Press the controller to open the menu.
3.Select "Settings" and press the controller.
4.Select "Vehicle / Tires" and press the con-
troller.
Page 69 of 272
Controls
67Reference
At a glance
Driving tips
Communications
Navigation
Entertainment
Mobility
Everything under control
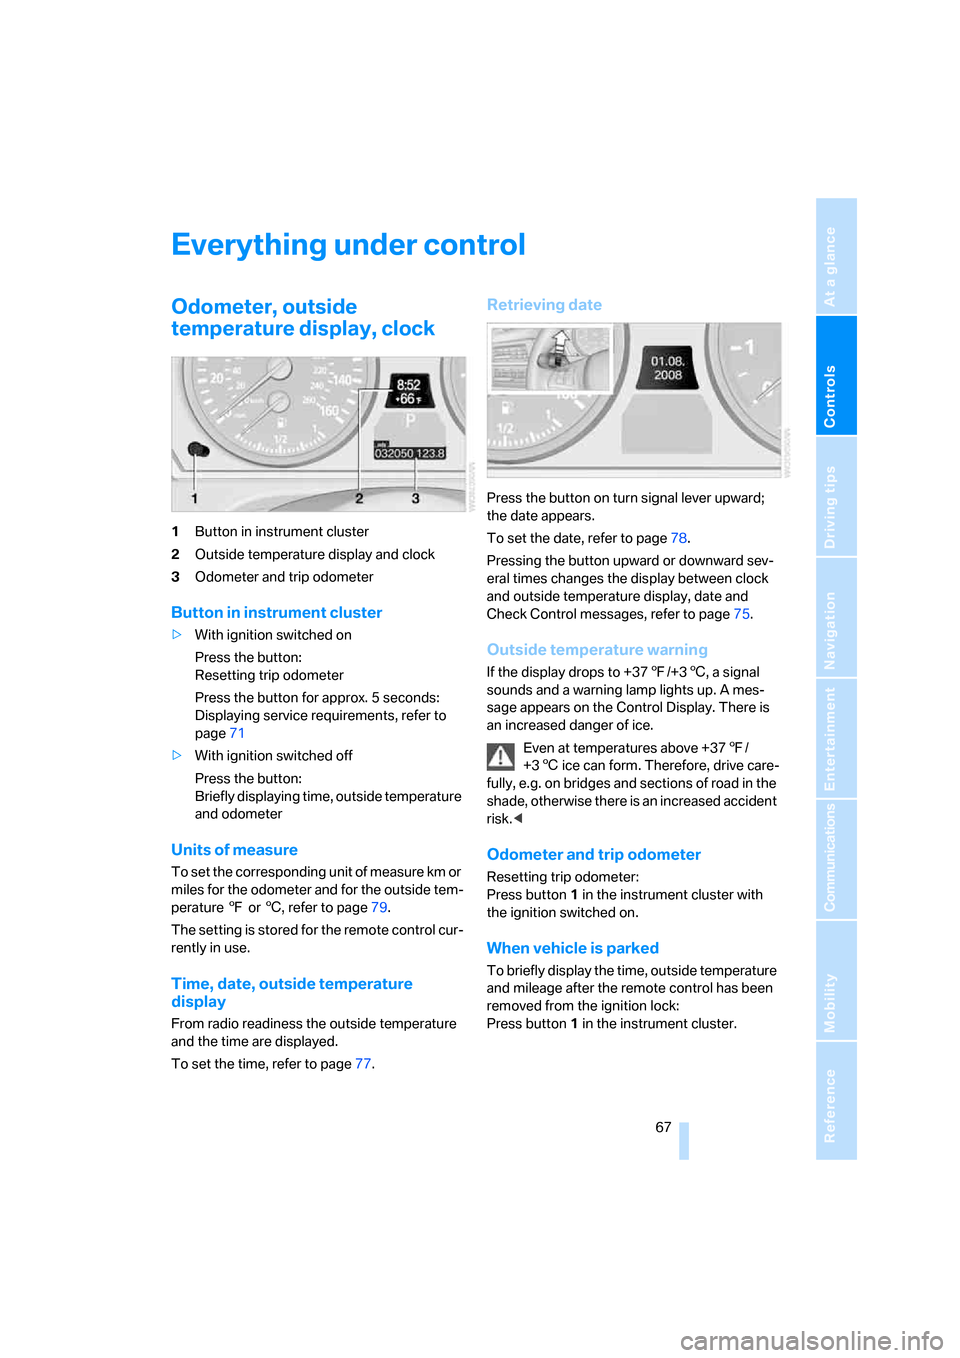
Odometer, outside
temperature display, clock
1Button in instrument cluster
2Outside temperature display and clock
3Odometer and trip odometer
Button in instrument cluster
>With ignition switched on
Press the button:
Resetting trip odometer
Press the button for approx. 5 seconds:
Displaying service requirements, refer to
page71
>With ignition switched off
Press the button:
Briefly displaying time, outside temperature
and odometer
Units of measure
To set the corresponding unit of measure km or
miles for the odometer and for the outside tem-
perature 7 or 6, refer to page79.
The setting is stored for the remote control cur-
rently in use.
Time, date, outside temperature
display
From radio readiness the outside temperature
and the time are displayed.
To set the time, refer to page77.
Retrieving date
Press the button on turn signal lever upward;
the date appears.
To set the date, refer to page78.
Pressing the button upward or downward sev-
eral times changes the display between clock
and outside temperature display, date and
Check Control messages, refer to page75.
Outside temperature warning
If the display drops to +377/+36, a signal
sounds and a warning lamp lights up. A mes-
sage appears on the Control Display. There is
an increased danger of ice.
Even at temperatures above +377/
+36 ice can form. Therefore, drive care-
fully, e.g. on bridges and sections of road in the
shade, otherwise there is an increased accident
risk.<
Odometer and trip odometer
Resetting trip odometer:
Press button 1 in the instrument cluster with
the ignition switched on.
When vehicle is parked
To briefly display the time, outside temperature
and mileage after the remote control has been
removed from the ignition lock:
Press button1 in the instrument cluster.
Page 72 of 272
Everything under control
70 >Average speed
>Average fuel consumption
Resetting values
You can reset the values for the average speed
and average fuel consumption:
1.Select the respective menu item and press
the controller.
2.To confirm your selection, press the con-
troller again.
Entering a distance manually
1.Select "Distance to dest." and press the
controller.
2.Turn the controller to select the distance to
your destination.
3.Press the controller to apply the setting.
The distance is automatically preset during the
destination guidance of the navigation sys-
tem
*.
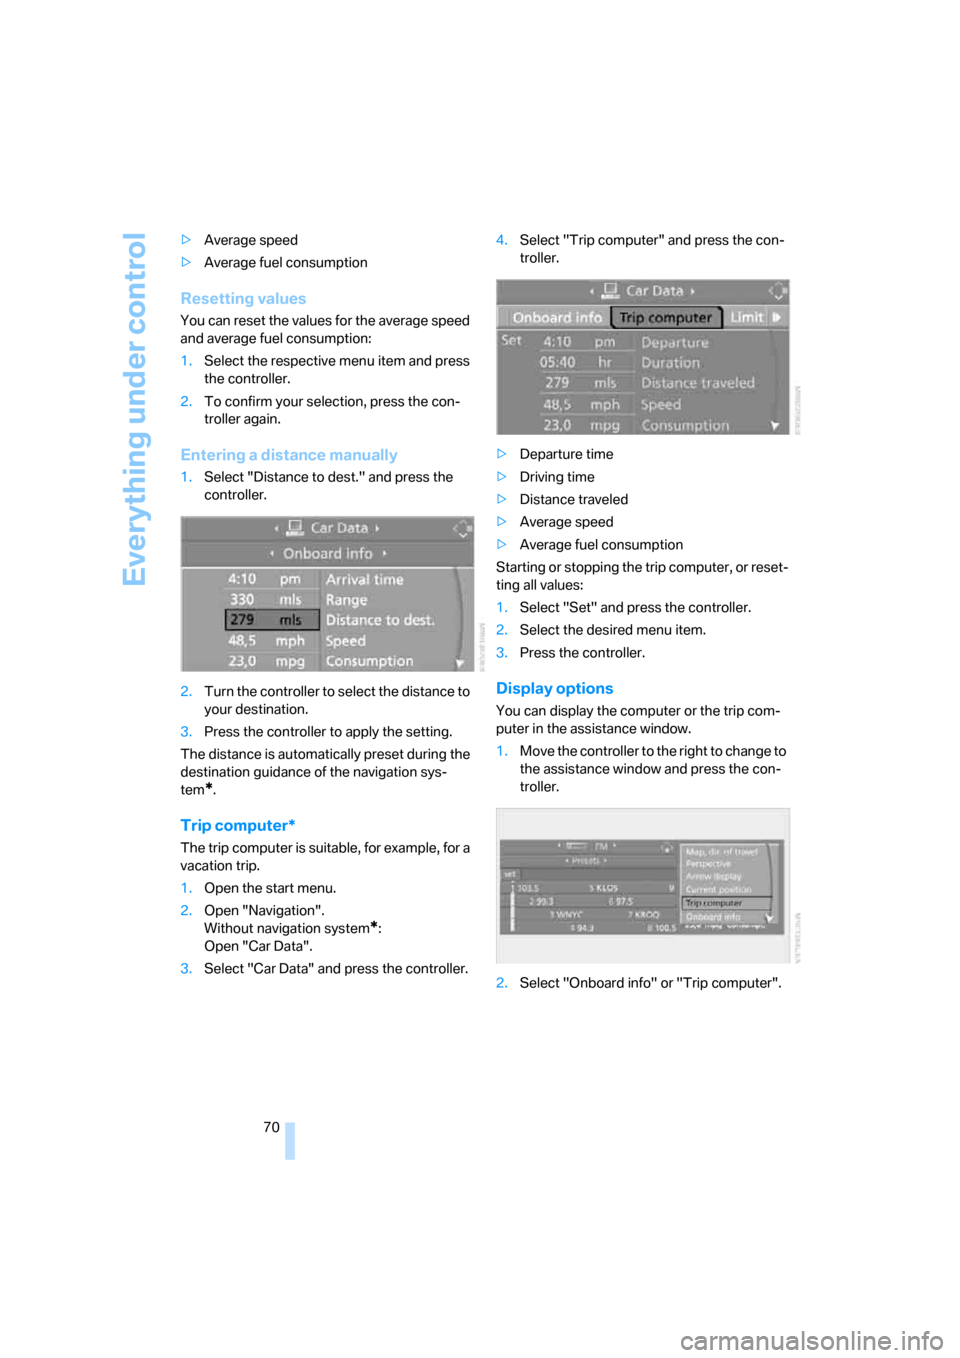
Trip computer*
The trip computer is suitable, for example, for a
vacation trip.
1.Open the start menu.
2.Open "Navigation".
Without navigation system
*:
Open "Car Data".
3.Select "Car Data" and press the controller.4.Select "Trip computer" and press the con-
troller.
>Departure time
>Driving time
>Distance traveled
>Average speed
>Average fuel consumption
Starting or stopping the trip computer, or reset-
ting all values:
1.Select "Set" and press the controller.
2.Select the desired menu item.
3.Press the controller.
Display options
You can display the computer or the trip com-
puter in the assistance window.
1.Move the controller to the right to change to
the assistance window and press the con-
troller.
2.Select "Onboard info" or "Trip computer".
Page 77 of 272
Controls
75Reference
At a glance
Driving tips
Communications
Navigation
Entertainment
Mobility
cannot be hidden. If a number of malfunctions
occur simultaneously, they are displayed in
succession.
Other messages are automatically hidden after
approx. 20 seconds, but remain stored.
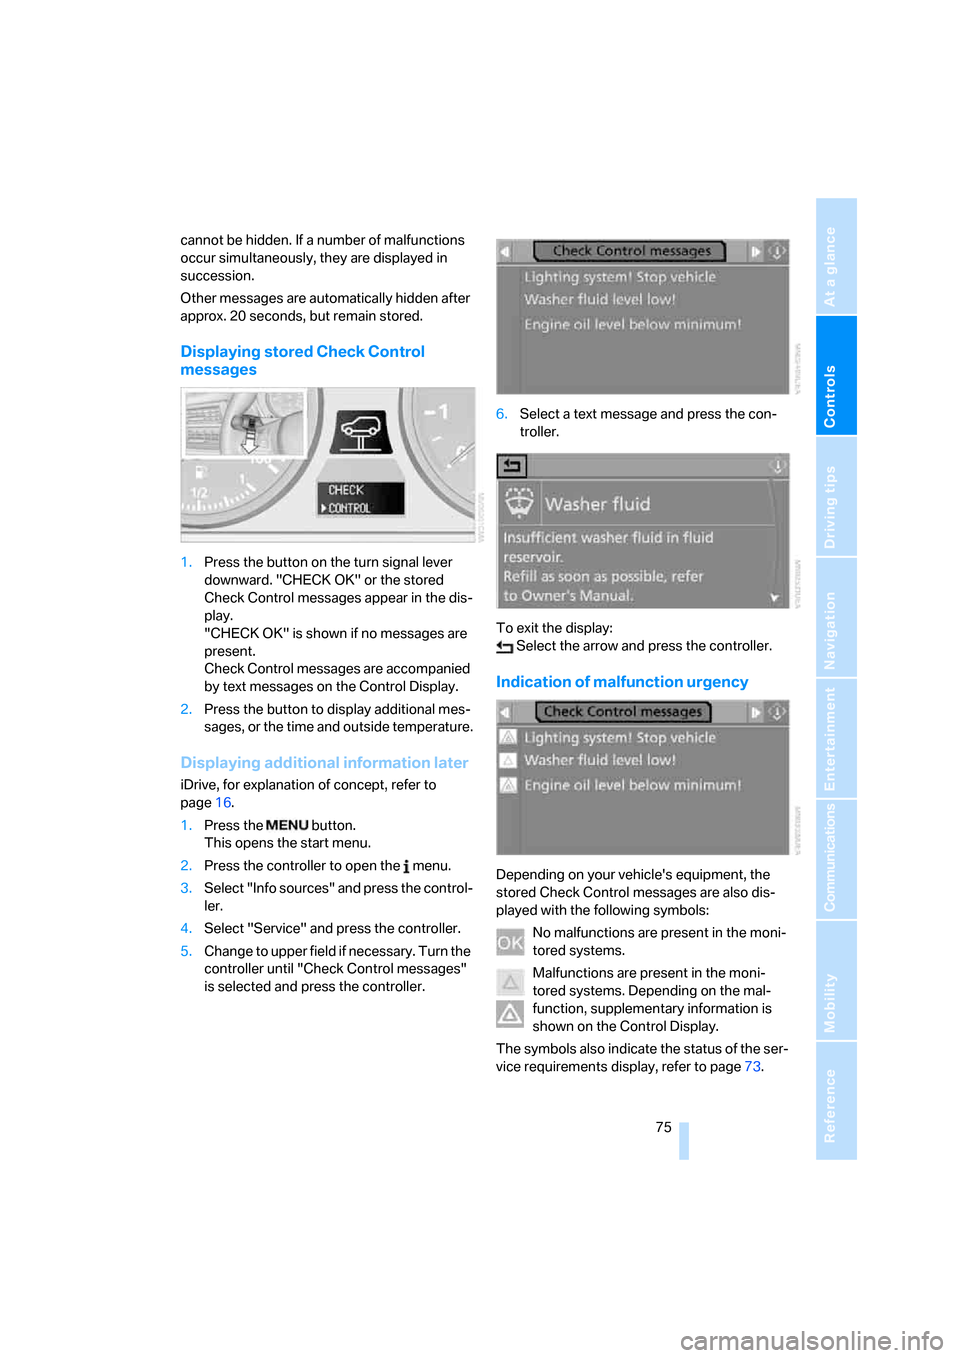
Displaying stored Check Control
messages
1.Press the button on the turn signal lever
downward. "CHECK OK" or the stored
Check Control messages appear in the dis-
play.
"CHECK OK" is shown if no messages are
present.
Check Control messages are accompanied
by text messages on the Control Display.
2.Press the button to display additional mes-
sages, or the time and outside temperature.
Displaying additional information later
iDrive, for explanation of concept, refer to
page16.
1.Press the button.
This opens the start menu.
2.Press the controller to open the menu.
3.Select "Info sources" and press the control-
ler.
4.Select "Service" and press the controller.
5.Change to upper field if necessary. Turn the
controller until "Check Control messages"
is selected and press the controller.6.Select a text message and press the con-
troller.
To exit the display:
Select the arrow and press the controller.
Indication of malfunction urgency
Depending on your vehicle's equipment, the
stored Check Control messages are also dis-
played with the following symbols:
No malfunctions are present in the moni-
tored systems.
Malfunctions are present in the moni-
tored systems. Depending on the mal-
function, supplementary information is
shown on the Control Display.
The symbols also indicate the status of the ser-
vice requirements display, refer to page73.
Page 79 of 272
Controls
77Reference
At a glance
Driving tips
Communications
Navigation
Entertainment
Mobility
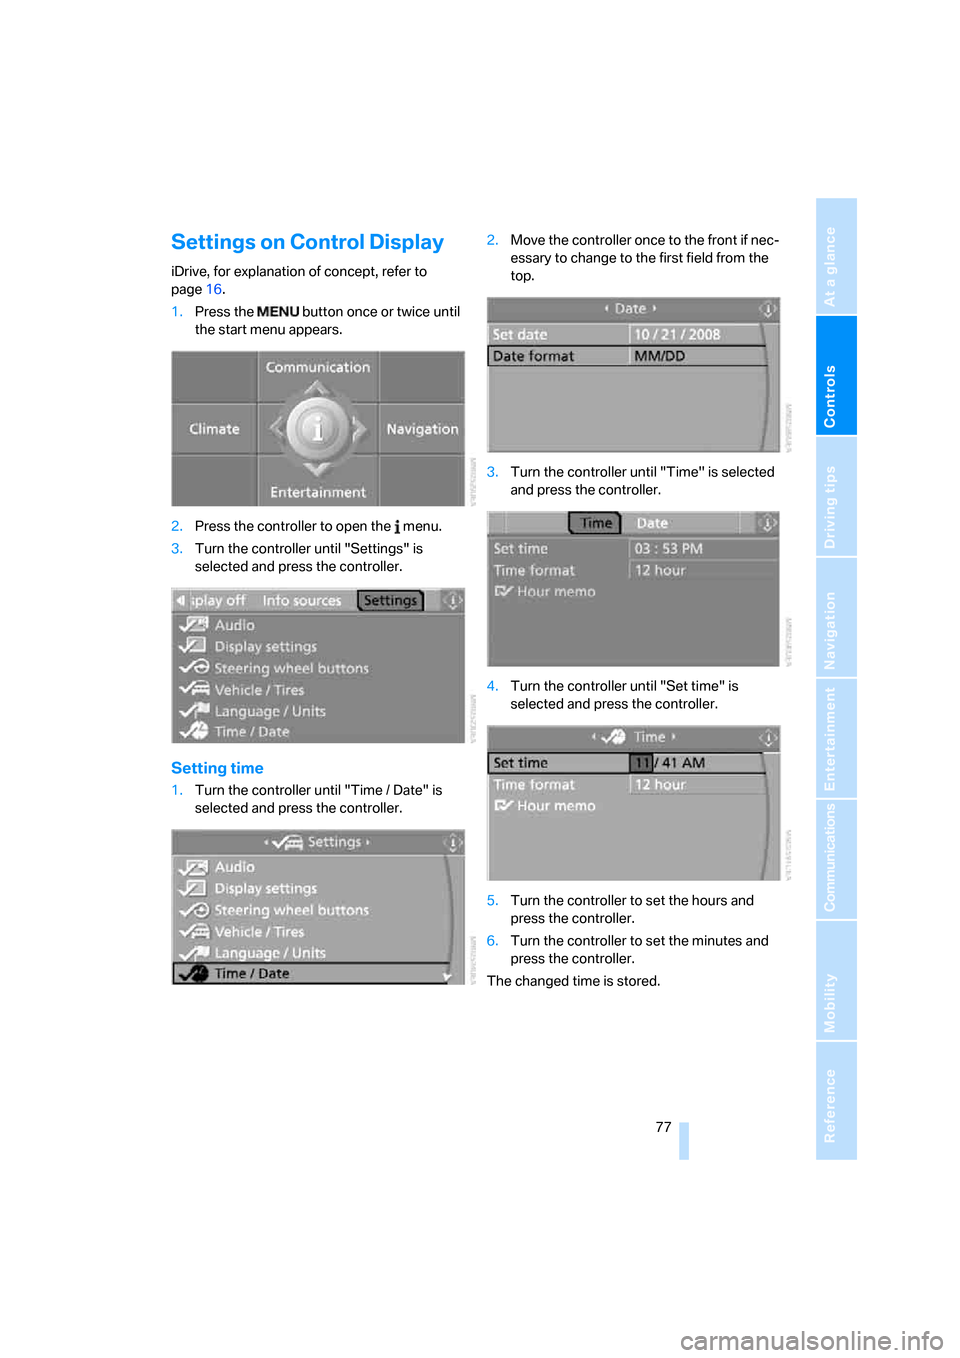
Settings on Control Display
iDrive, for explanation of concept, refer to
page16.
1.Press the button once or twice until
the start menu appears.
2.Press the controller to open the menu.
3.Turn the controller until "Settings" is
selected and press the controller.
Setting time
1.Turn the controller until "Time / Date" is
selected and press the controller.2.Move the controller once to the front if nec-
essary to change to the first field from the
top.
3.Turn the controller until "Time" is selected
and press the controller.
4.Turn the controller until "Set time" is
selected and press the controller.
5.Turn the controller to set the hours and
press the controller.
6.Turn the controller to set the minutes and
press the controller.
The changed time is stored.