temperature BMW X5 3.0Si 2008 E70 User Guide
[x] Cancel search | Manufacturer: BMW, Model Year: 2008, Model line: X5 3.0Si, Model: BMW X5 3.0Si 2008 E70Pages: 292, PDF Size: 9.32 MB
Page 93 of 292
Controls
91Reference
At a glance
Driving tips
Communications
Navigation
Entertainment
Mobility
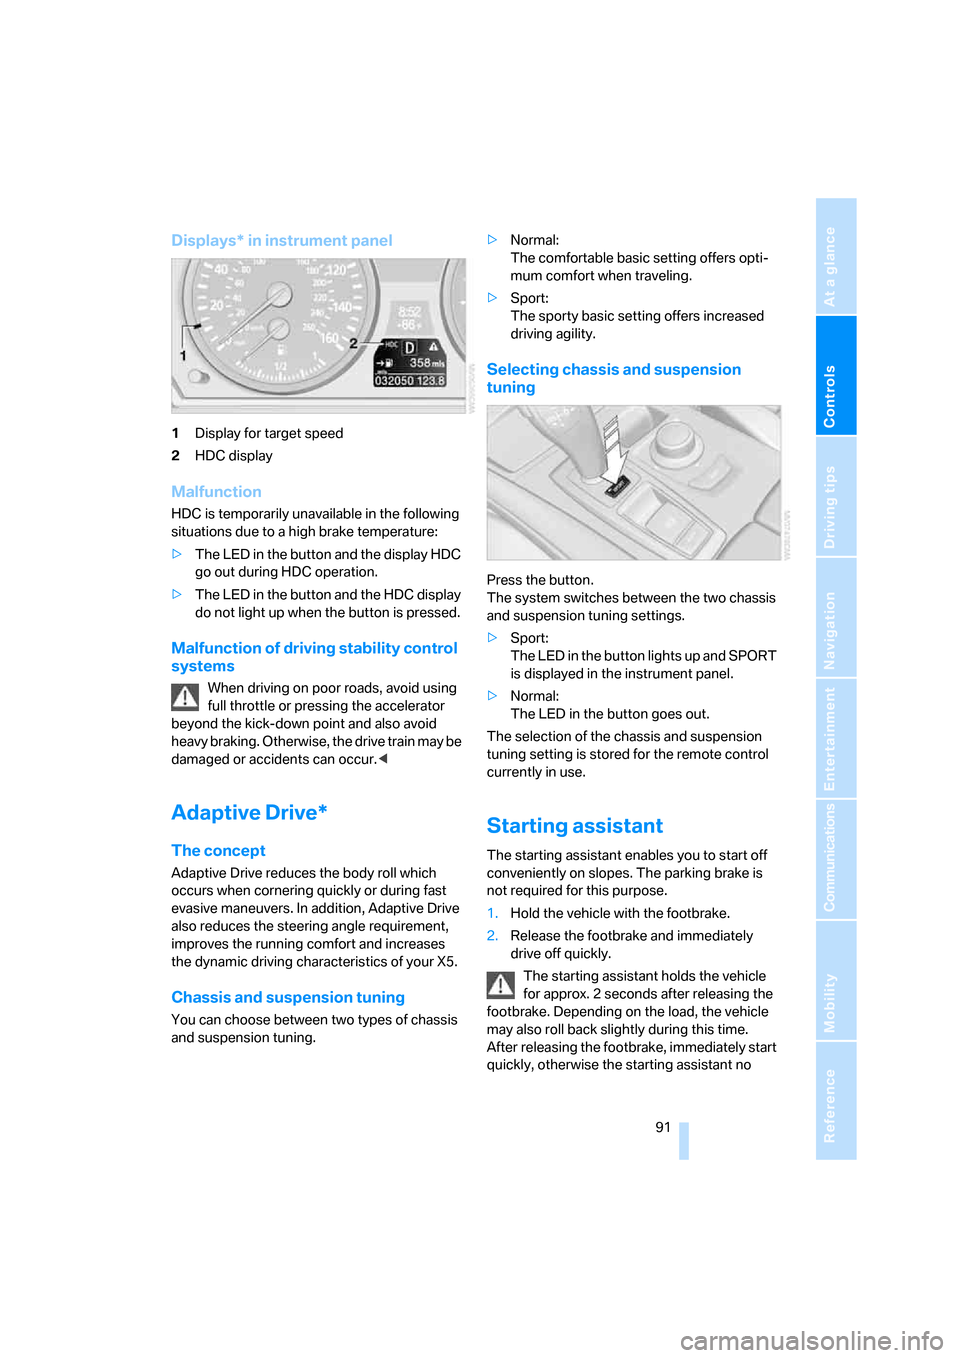
Displays* in instrument panel
1Display for target speed
2HDC display
Malfunction
HDC is temporarily unavailable in the following
situations due to a high brake temperature:
>The LED in the button and the display HDC
go out during HDC operation.
>The LED in the button and the HDC display
do not light up when the button is pressed.
Malfunction of driving stability control
systems
When driving on poor roads, avoid using
full throttle or pressing the accelerator
beyond the kick-down point and also avoid
heavy braking. Otherwise, the drive train may be
damaged or accidents can occur.<
Adaptive Drive*
The concept
Adaptive Drive reduces the body roll which
occurs when cornering quickly or during fast
evasive maneuvers. In addition, Adaptive Drive
also reduces the steering angle requirement,
improves the running comfort and increases
the dynamic driving characteristics of your X5.
Chassis and suspension tuning
You can choose between two types of chassis
and suspension tuning.>Normal:
The comfortable basic setting offers opti-
mum comfort when traveling.
>Sport:
The sporty basic setting offers increased
driving agility.
Selecting chassis and suspension
tuning
Press the button.
The system switches between the two chassis
and suspension tuning settings.
>Sport:
The LED in the button lights up and SPORT
is displayed in the instrument panel.
>Normal:
The LED in the button goes out.
The selection of the chassis and suspension
tuning setting is stored for the remote control
currently in use.
Starting assistant
The starting assistant enables you to start off
conveniently on slopes. The parking brake is
not required for this purpose.
1.Hold the vehicle with the footbrake.
2.Release the footbrake and immediately
drive off quickly.
The starting assistant holds the vehicle
for approx. 2 seconds after releasing the
footbrake. Depending on the load, the vehicle
may also roll back slightly during this time.
After releasing the footbrake, immediately start
quickly, otherwise the starting assistant no
Page 109 of 292
Controls
107Reference
At a glance
Driving tips
Communications
Navigation
Entertainment
Mobility
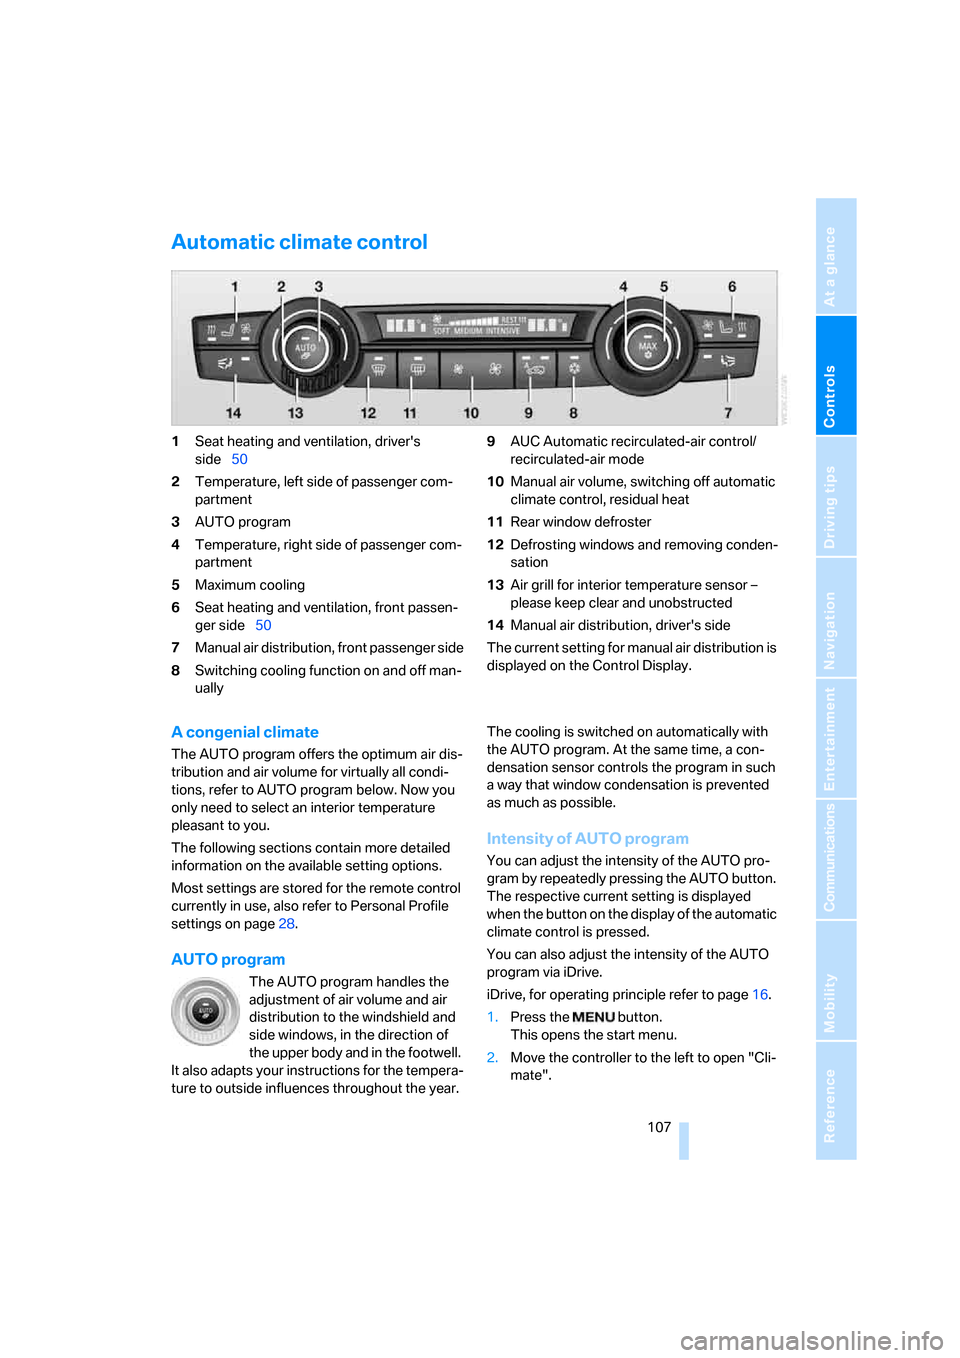
Automatic climate control
1Seat heating and ventilation, driver's
side50
2Temperature, left side of passenger com-
partment
3AUTO program
4Temperature, right side of passenger com-
partment
5Maximum cooling
6Seat heating
and ventilation, front passen-
ger side50
7Manual air distribution, front passenger side
8Switching cooling function on and off man-
ually9AUC Automatic recirculated-air control/
recirculated-air mode
10Manual air volume, switching off automatic
climate control, residual heat
11Rear window defroster
12Defrosting windows and removing conden-
sation
13Air grill for interior temperature sensor –
please keep clear and unobstructed
14Manual air distribution, driver's side
The current setting for manual air distribution is
displayed on the Control Display.
A congenial climate
The AUTO program offers the optimum air dis-
tribution and air volume for virtually all condi-
tions, refer to AUTO program below. Now you
only need to select an interior temperature
pleasant to you.
The following sections contain more detailed
information on the available setting options.
Most settings are stored for the remote control
currently in use, also refer to Personal Profile
settings on page28.
AUTO program
The AUTO program handles the
adjustment of air volume and air
distribution to the windshield and
side windows, in the direction of
the upper body and in the footwell.
It also adapts your instructions for the tempera-
ture to outside influences throughout the year.The cooling is switched on automatically with
the AUTO program. At the same time, a con-
densation sensor controls the program in such
a way that window condensation is prevented
as much as possible.
Intensity of AUTO program
You can adjust the intensity of the AUTO pro-
gram by repeatedly pressing the AUTO button.
The respective current setting is displayed
when the button on the display of the automatic
climate control is pressed.
You can also adjust the intensity of the AUTO
program via iDrive.
iDrive, for operating principle refer to page16.
1.Press the button.
This opens the start menu.
2.Move the controller to the left to open "Cli-
mate".
Page 110 of 292
Climate
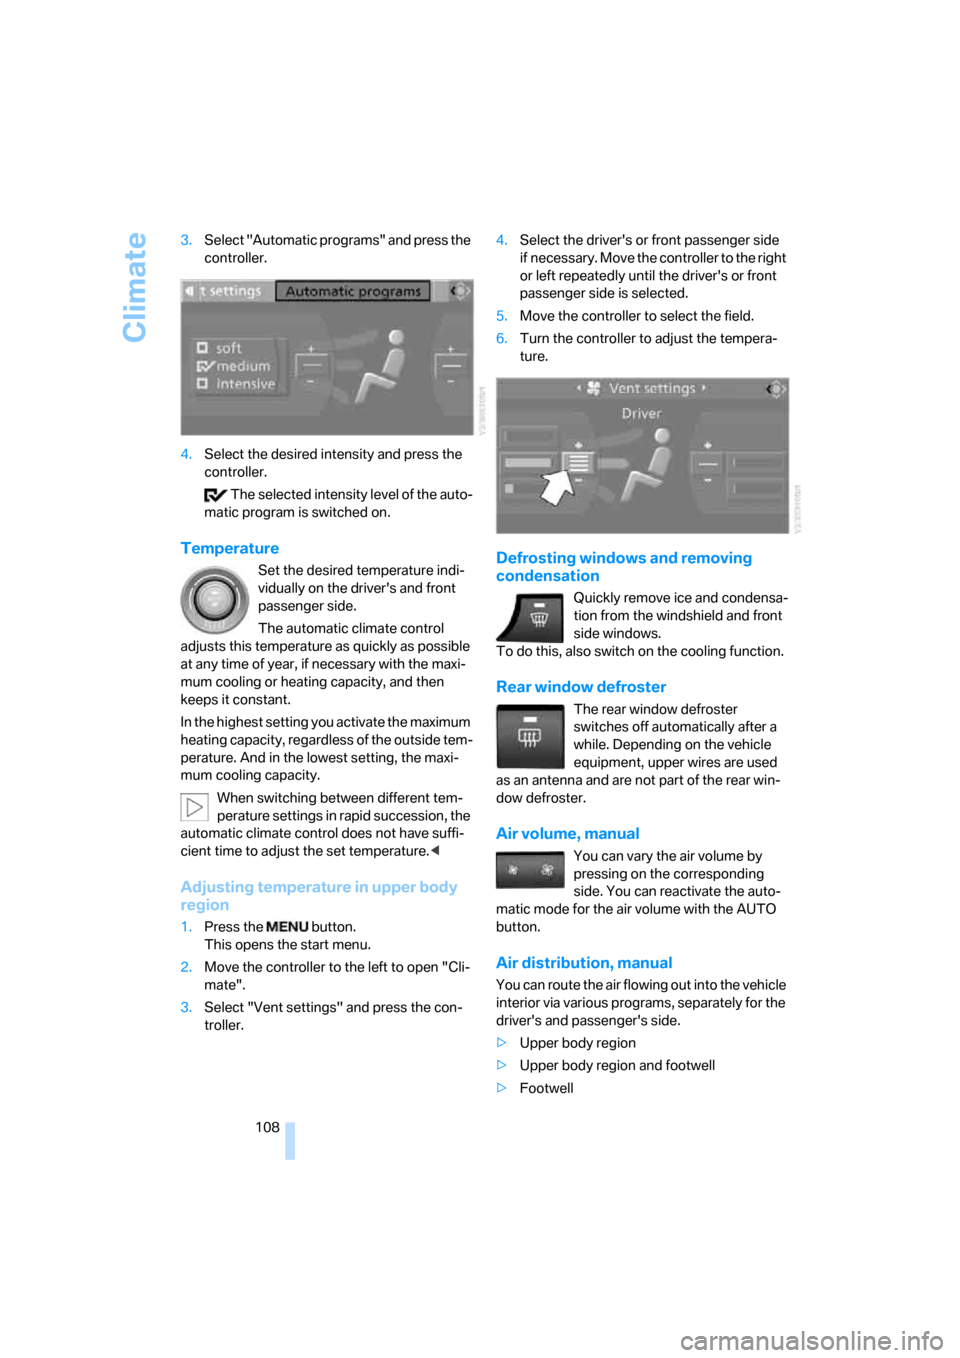
108 3.Select "Automatic programs" and press the
controller.
4.Select the desired intensity and press the
controller.
The selected intensity level of the auto-
matic program is switched on.
Temperature
Set the desired temperature indi-
vidually on the driver's and front
passenger side.
The automatic climate control
adjusts this temperature as quickly as possible
at any time of year, if necessary with the maxi-
mum cooling or heating capacity, and then
keeps it constant.
In the highest setting you activate the maximum
heating capacity, regardless of the outside tem-
perature. And in the lowest setting, the maxi-
mum cooling capacity.
When switching between different tem-
perature settings in rapid succession, the
automatic climate control does not have suffi-
cient time to adjust the set temperature.<
Adjusting temperature in upper body
region
1.Press the button.
This opens the start menu.
2.Move the controller to the left to open "Cli-
mate".
3.Select "Vent settings" and press the con-
troller.4.Select the driver's or front passenger side
if necessary. Move the controller to the right
or left repeatedly until the driver's or front
passenger side is selected.
5.Move the controller to select the field.
6.Turn the controller to adjust the tempera-
ture.
Defrosting windows and removing
condensation
Quickly remove ice and condensa-
tion from the windshield and front
side windows.
To do this, also switch on the cooling function.
Rear window defroster
The rear window defroster
switches off automatically after a
while. Depending on the vehicle
equipment, upper wires are used
as an antenna and are not part of the rear win-
dow defroster.
Air volume, manual
You can vary the air volume by
pressing on the corresponding
side. You can reactivate the auto-
matic mode for the air volume with the AUTO
button.
Air distribution, manual
You can route the air flowing out into the vehicle
interior via various programs, separately for the
driver's and passenger's side.
>Upper body region
>Upper body region and footwell
>Footwell
Page 111 of 292
Controls
109Reference
At a glance
Driving tips
Communications
Navigation
Entertainment
Mobility
>Driver's side: windows and footwell
>Individual program
Selecting program
Press the button repeatedly until
the desired program is shown on
the Control Display.
Adjusting air distribution individually –
individual program
The settings are stored in this program.
iDrive, for operating principle refer to page16.
1.Press the button.
This opens the start menu.
2.Move the controller to the left to open "Cli-
mate".
3.Select "Vent settings" and press the con-
troller.
The driver's and front passenger side can
be adjusted separately with the fields on the
right or left side.
4.Select the driver's or front passenger side
if necessary.
Move the controller to the right or left
repeatedly until the driver's or front passen-
ger side is selected.
5.Select the desired field by moving the con-
troller.
6.Turn the controller to adjust the air distribu-
tion.
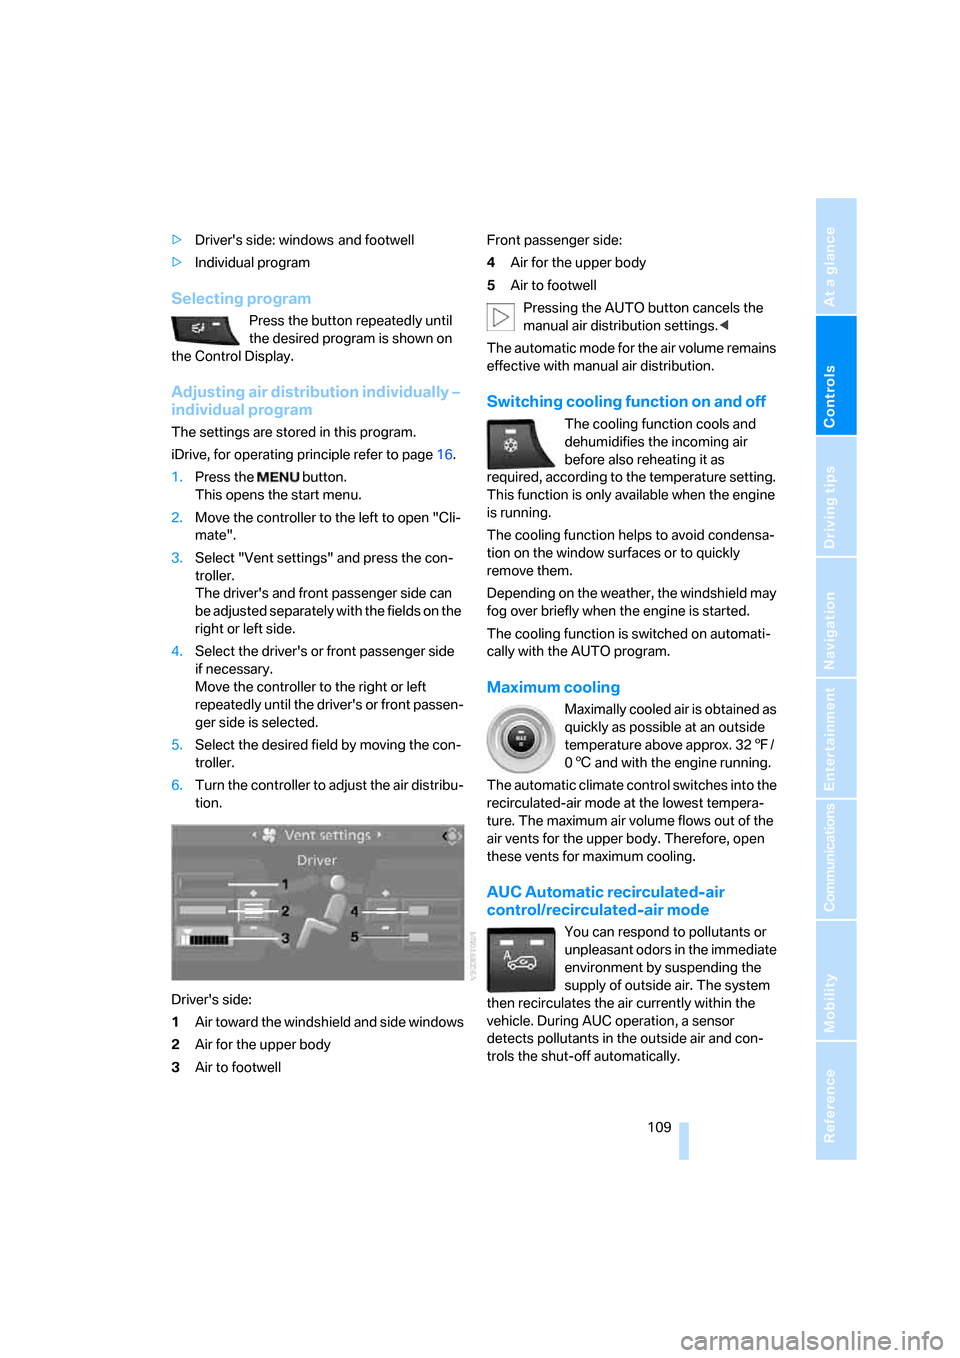
Driver's side:
1Air toward the windshield and side windows
2Air for the upper body
3Air to footwellFront passenger side:
4Air for the upper body
5Air to footwell
Pressing the AUTO button cancels the
manual air distribution settings.<
The automatic mode for the air volume remains
effective with manual air distribution.
Switching cooling function on and off
The cooling function cools and
dehumidifies the incoming air
before also reheating it as
required, according to the temperature setting.
This function is only available when the engine
is running.
The cooling function helps to avoid condensa-
tion on the window surfaces or to quickly
remove them.
Depending on the weather, the windshield may
fog over briefly when the engine is started.
The cooling function is switched on automati-
cally with the AUTO program.
Maximum cooling
Maximally cooled air is obtained as
quickly as possible at an outside
temperature above approx. 327/
06 and with the engine running.
The automatic climate control switches into the
recirculated-air mode at the lowest tempera-
ture. The maximum air volume flows out of the
air vents for the upper body. Therefore, open
these vents for maximum cooling.
AUC Automatic recirculated-air
control/recirculated-air mode
You can respond to pollutants or
unpleasant odors in the immediate
environment by suspending the
supply of outside air. The system
then recirculates the air currently within the
vehicle. During AUC operation, a sensor
detects pollutants in the outside air and con-
trols the shut-off automatically.
Page 112 of 292
Climate
110 By pressing the button repeatedly, you can
request three operating modes:
>LED off: outside air flows in continuously.
>Left LED on, AUC mode: the system
detects pollutants in the outside air and
shuts off the supply as needed.
>Right LED on, recirculated-air mode: the
supply of outside air is permanently shut off.
Should the windows fog up in the recircu-
lated-air mode, press the AUTO button or
switch off the recirculated-air mode and
increase the air volume if necessary.
The recirculated-air mode should not be used
without interruption over an extended period of
time, as the air quality inside the vehicle deteri-
orates continuously.<
Residual heat
The heat stored in the engine is used to heat the
passenger compartment, e.g. while stopped at
a school to pick up a child.
Switching on
Pressing the right side switches on
the residual heat utilization when
the following conditions are met:
>up to 15 minutes after switching off the
engine
>with the engine at operating temperature
>with sufficient battery voltage
>at an outside temperature below 777/
256
REST appears on the display of the automatic
climate control when the residual heat utiliza-
tion is switched on.
From radio readiness the interior temperature,
the air volume and the air distribution can be
set.
Switching off
You can select the lowest blower speed by
pressing and holding the left side. Pressing
again switches off the residual heat utilization.
REST disappears from the display of the auto-
matic climate control.
Switching automatic climate control on
and off
You can select the lowest blower
speed by pressing and holding the
left side. Pressing again switches
off the automatic climate control.
You switch on the system again by pressing any
button of the automatic climate control.
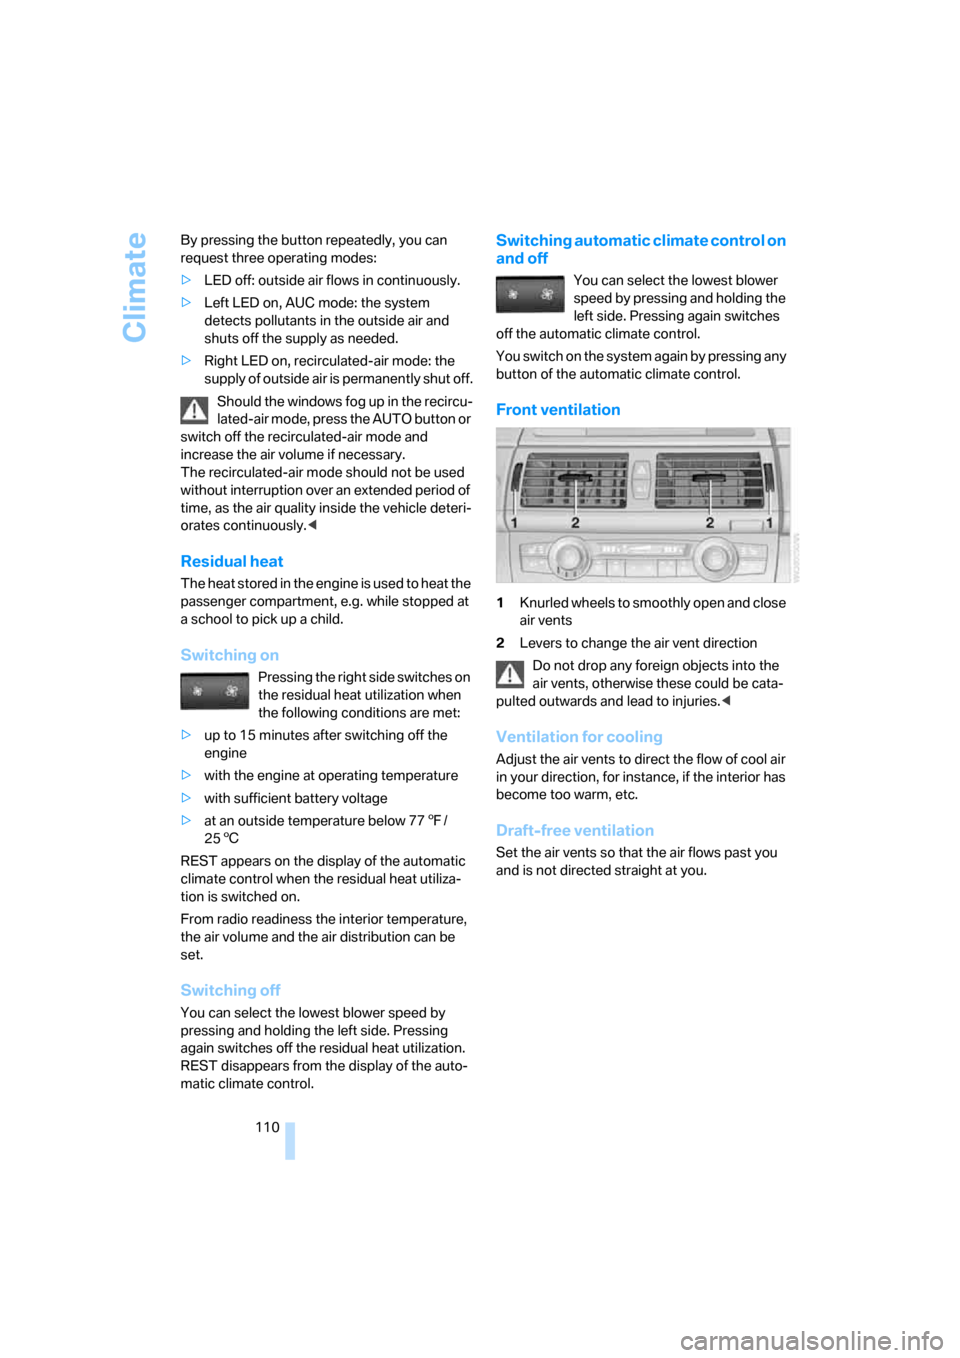
Front ventilation
1Knurled wheels to smoothly open and close
air vents
2Levers to change the air vent direction
Do not drop any foreign objects into the
air vents, otherwise these could be cata-
pulted outwards and lead to injuries.<
Ventilation for cooling
Adjust the air vents to direct the flow of cool air
in your direction, for instance, if the interior has
become too warm, etc.
Draft-free ventilation
Set the air vents so that the air flows past you
and is not directed straight at you.
Page 113 of 292
Controls
111Reference
At a glance
Driving tips
Communications
Navigation
Entertainment
Mobility
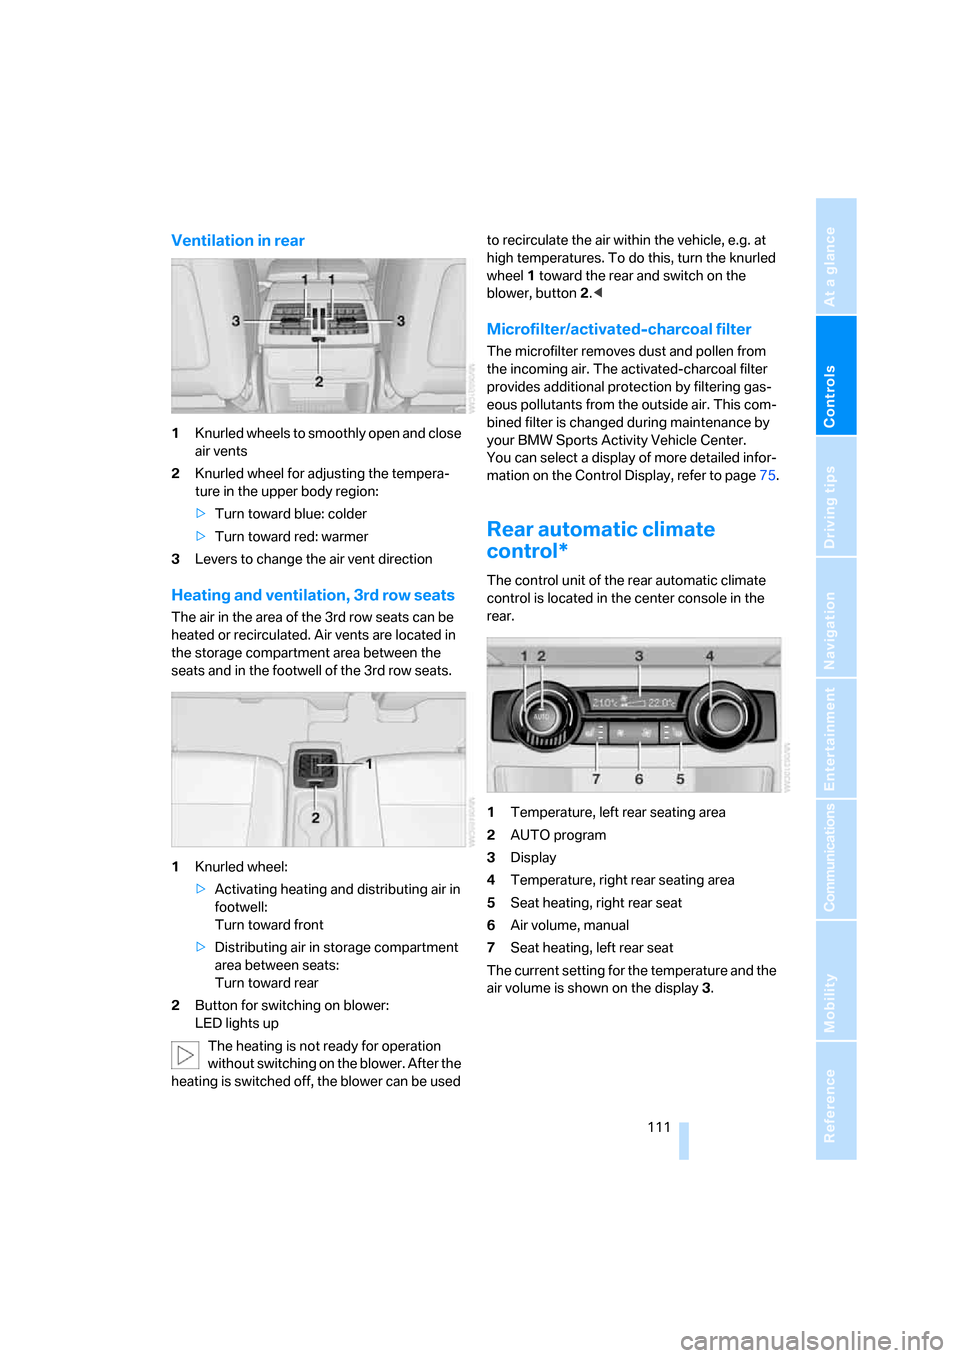
Ventilation in rear
1Knurled wheels to smoothly open and close
air vents
2Knurled wheel for adjusting the tempera-
ture in the upper body region:
>Turn toward blue: colder
>Turn toward red: warmer
3Levers to change the air vent direction
Heating and ventilation, 3rd row seats
The air in the area of the 3rd row seats can be
heated or recirculated. Air vents are located in
the storage compartment area between the
seats and in the footwell of the 3rd row seats.
1Knurled wheel:
>Activating heating and distributing air in
footwell:
Turn toward front
>Distributing air in storage compartment
area between seats:
Turn toward rear
2Button for switching on blower:
LED lights up
The heating is not ready for operation
without switching on the blower. After the
heating is switched off, the blower can be used to recirculate the air within the vehicle, e.g. at
high temperatures. To do this, turn the knurled
wheel1 toward the rear and switch on the
blower, button2.<
Microfilter/activated-charcoal filter
The microfilter removes dust and pollen from
the incoming air. The activated-charcoal filter
provides additional protection by filtering gas-
eous pollutants from the outside air. This com-
bined filter is changed during maintenance by
your BMW Sports Activity Vehicle Center.
You can select a display of more detailed infor-
mation on the Control Display, refer to page75.
Rear automatic climate
control*
The control unit of the rear automatic climate
control is located in the center console in the
rear.
1Temperature, left rear seating area
2AUTO program
3Display
4Temperature, right rear seating area
5Seat heating, right rear seat
6Air volume, manual
7Seat heating, left rear seat
The current setting for the temperature and the
air volume is shown on the display3.
Page 114 of 292
Climate
112
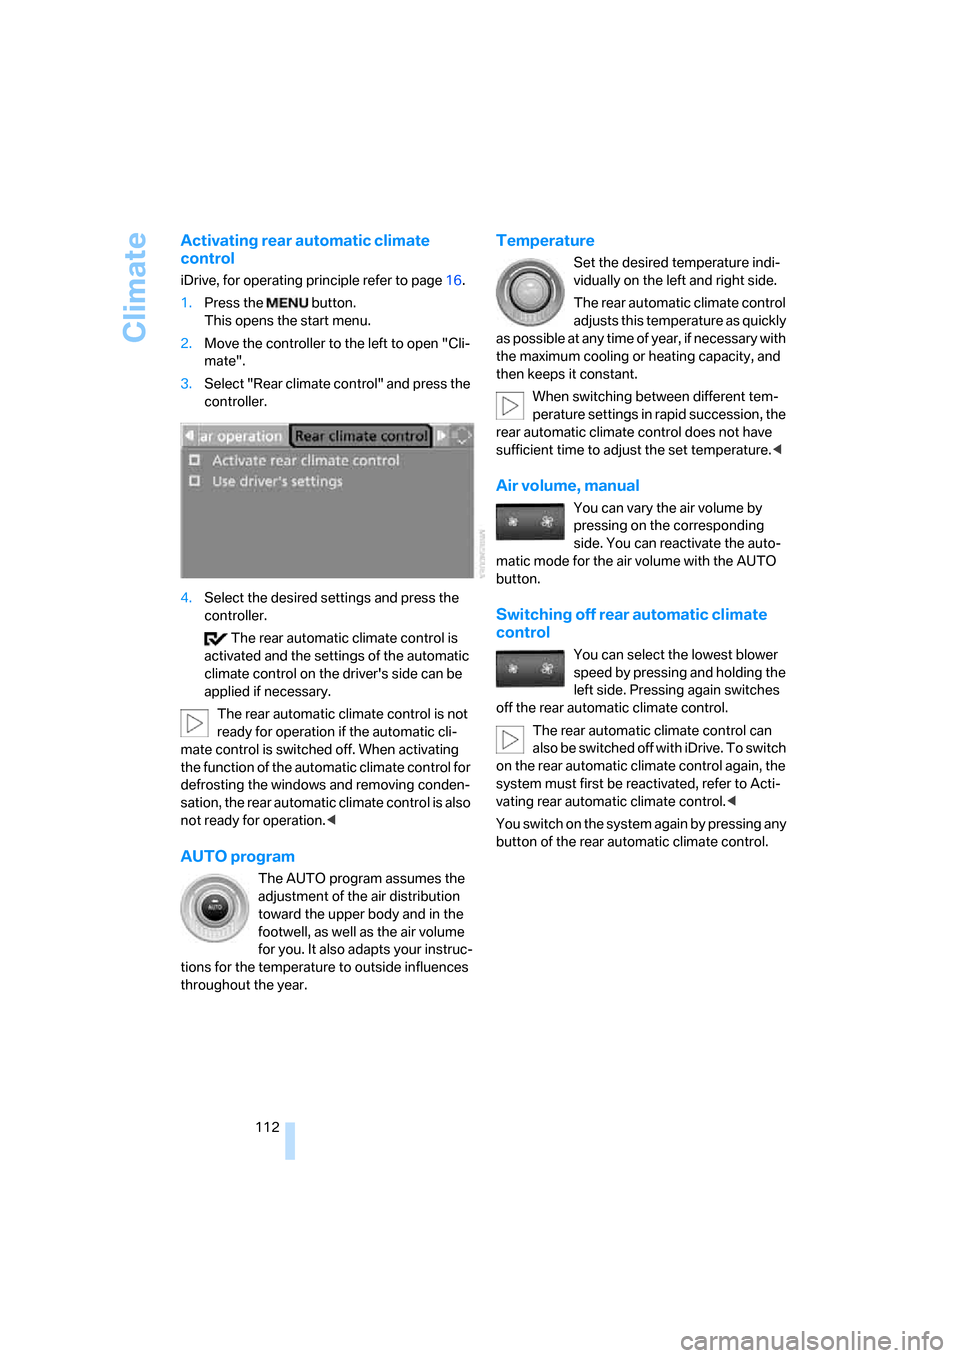
Activating rear automatic climate
control
iDrive, for operating principle refer to page16.
1.Press the button.
This opens the start menu.
2.Move the controller to the left to open "Cli-
mate".
3.Select "Rear climate control" and press the
controller.
4.Select the desired settings and press the
controller.
The rear automatic climate control is
activated and the settings of the automatic
climate control on the driver's side can be
applied if necessary.
The rear automatic climate control is not
ready for operation if the automatic cli-
mate control is switched off. When activating
the function of the automatic climate control for
defrosting the windows and removing conden-
sation, the rear automatic climate control is also
not ready for operation.<
AUTO program
The AUTO program assumes the
adjustment of the air distribution
toward the upper body and in the
footwell, as well as the air volume
for you. It also adapts your instruc-
tions for the temperature to outside influences
throughout the year.
Temperature
Set the desired temperature indi-
vidually on the left and right side.
The rear automatic climate control
adjusts this temperature as quickly
as possible at any time of year, if necessary with
the maximum cooling or heating capacity, and
then keeps it constant.
When switching between different tem-
perature settings in rapid succession, the
rear automatic climate control does not have
sufficient time to adjust the set temperature.<
Air volume, manual
You can vary the air volume by
pressing on the corresponding
side. You can reactivate the auto-
matic mode for the air volume with the AUTO
button.
Switching off rear automatic climate
control
You can select the lowest blower
speed by pressing and holding the
left side. Pressing again switches
off the rear automatic climate control.
The rear automatic climate control can
also be switched off with iDrive. To switch
on the rear automatic climate control again, the
system must first be reactivated, refer to Acti-
vating rear automatic climate control.<
You switch on the system again by pressing any
button of the rear automatic climate control.
Page 115 of 292
Controls
113Reference
At a glance
Driving tips
Communications
Navigation
Entertainment
Mobility
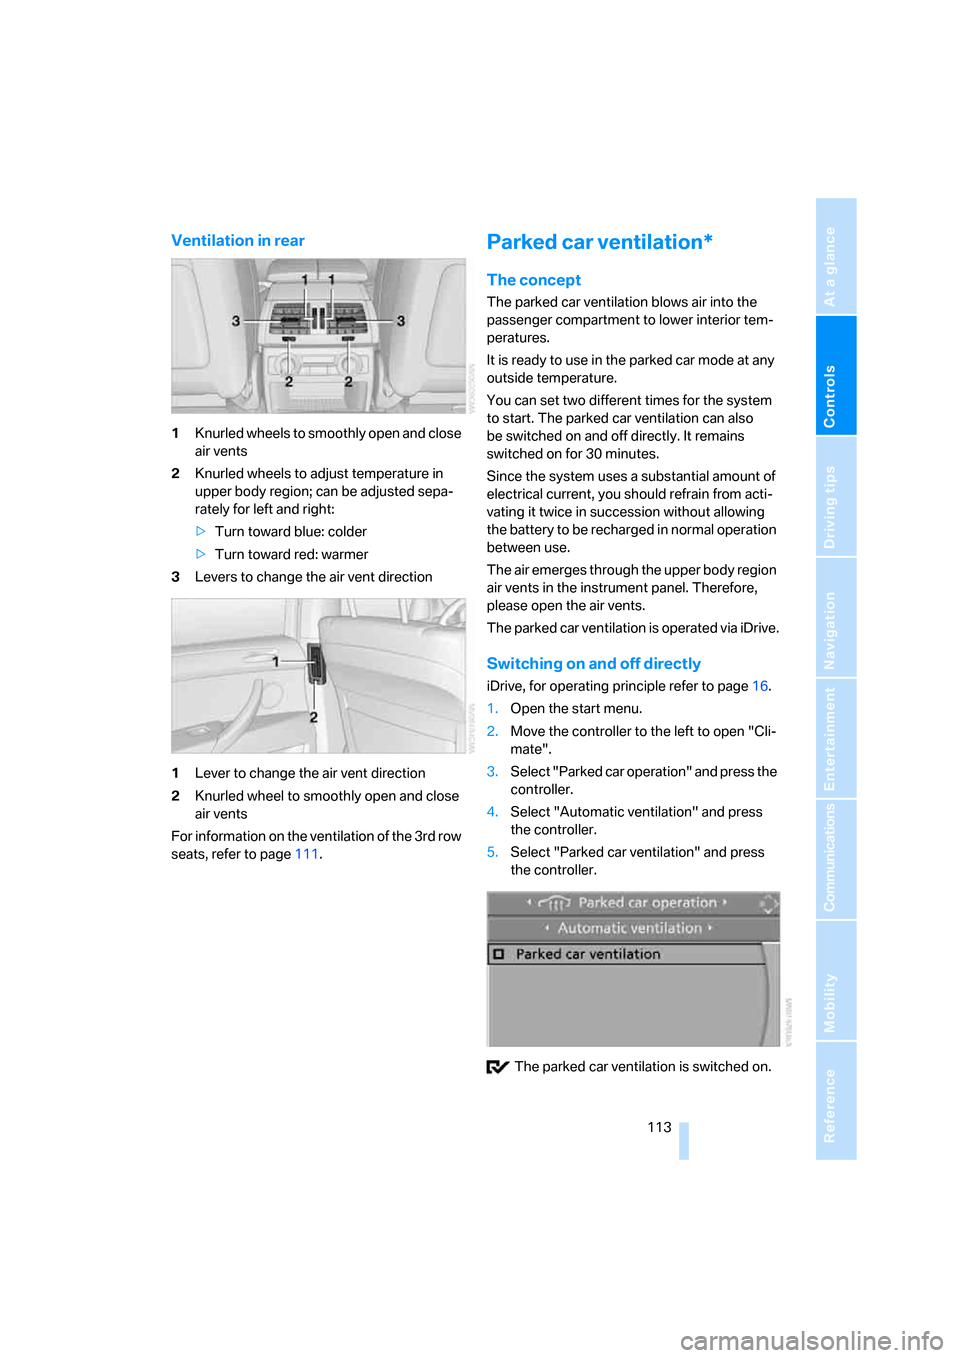
Ventilation in rear
1Knurled wheels to smoothly open and close
air vents
2Knurled wheels to adjust temperature in
upper body region; can be adjusted sepa-
rately for left and right:
>Turn toward blue: colder
>Turn toward red: warmer
3Levers to change the air vent direction
1Lever to change the air vent direction
2Knurled wheel to smoothly open and close
air vents
For information on the ventilation of the 3rd row
seats, refer to page111.
Parked car ventilation*
The concept
The parked car ventilation blows air into the
passenger compartment to lower interior tem-
peratures.
It is ready to use in the parked car mode at any
outside temperature.
You can set two different times for the system
to start. The parked car ventilation can also
be switched on and off directly. It remains
switched on for 30 minutes.
Since the system uses a substantial amount of
electrical current, you should refrain from acti-
vating it twice in succession without allowing
the battery to be recharged in normal operation
between use.
The air emerges through the upper body region
air vents in the instrument panel. Therefore,
please open the air vents.
The parked car ventilation is operated via iDrive.
Switching on and off directly
iDrive, for operating principle refer to page16.
1.Open the start menu.
2.Move the controller to the left to open "Cli-
mate".
3.Select "Parked car operation" and press the
controller.
4.Select "Automatic ventilation" and press
the controller.
5.Select "Parked car ventilation" and press
the controller.
The parked car ventilation is switched on.
Page 130 of 292
Things to remember when driving
128
Things to remember when driving
Break-in period
Moving parts need breaking-in time to adjust to
each other. To ensure that your vehicle contin-
ues to provide optimized economy of operation
throughout an extended service life, we request
that you devote careful attention to the follow-
ing section.
Engine and differential
Always obey all official speed limits.
Up to 1,200 miles/2,000 km
Drive at changing engine and vehicle speeds,
however do not exceed 4,500 rpm or 100 mph/
160 km/h.
Avoid full-throttle operation and use of the
transmission's kick-down mode during these
initial miles.
From 1,200 miles/2,000 km
The engine and vehicle speed can gradually be
increased.
Tires
Due to technical factors associated with their
manufacture, tires do not achieve their full trac-
tion potential until after an initial break-in
period. Therefore, drive reservedly during the
first 200 miles/300 km.
Brake system
Brakes require an initial break-in period of
approx. 300 miles/500 km to achieve optimized
contact and wear patterns between brake pads
and rotors. Drive in a reserved manner during
this break-in period.
Following part replacement
Observe the break-in instructions again if com-
ponents mentioned above must be replaced
after subsequent driving operation.
Saving fuel
The fuel consumption of your vehicle depends
on various factors. Through a few simple steps,
your driving style, and regular maintenance, you
can have a positive influence on your fuel con-
sumption and environmental impact.
Removing unnecessary cargo
Additional weight increases fuel consumption.
Removing add-on parts after use
Remove unneeded auxiliary mirrors, roof or rear
luggage racks after use. Add-on parts attached
to the vehicle impede the aerodynamics and
increase the fuel consumption.
Closing windows and panorama glass
sunroof
An open panorama glass sunroof or open win-
dows likewise increase the drag coefficient and
therefore the fuel consumption.
Check tire inflation pressures regularly
Check and correct the tire inflation pressure as
needed at least twice a month and before long
trips.
An insufficient tire inflation pressure increases
the rolling resistance and thus increases the
fuel consumption and tire wear.
Driving off immediately
Do not allow the engine to warm up by leaving it
running while the vehicle remains stationary.
Instead, begin to drive at a moderate engine
speed. This is the fastest way for the cold
engine to reach its operating temperature.
Thinking ahead when driving
Avoid unnecessary acceleration and braking.
To do so, maintain the appropriate distance
from the vehicle in front of you. An anticipatory
Page 132 of 292
Things to remember when driving
130 possible obstacles with a minimum of steering
effort.
Pulsation of the brake pedal, combined with
sounds from the hydraulic circuits, indicate that
ABS is in its active mode.
Do not drive with your foot resting on the
brake pedal. Even light but consistent
pedal pressure can lead to high temperatures,
brake wear and possibly even brake failure.<
Driving in wet conditions
When roads are wet or there is heavy rain,
briefly exert gentle pressure on the brake pedal
every few miles. Monitor traffic conditions to
ensure that this maneuver does not endanger
other road users. The heat generated in this
process helps dry the pads and rotors to ensure
that full braking efficiency will then be available
when you need it.
Hills
To prevent overheating and the resulting
reduced efficiency of the brake system,
drive long or steep downhill gradients in the
gear in which the least braking is required. Even
light but consistent pressure on the brake pedal
can lead to high temperatures, brake wear and
possibly even brake failure.<
The braking effect of the engine can be further
increased by downshifting in the manual mode
of the automatic transmission, if necessary into
first gear, refer to page65. This prevents an
excessive strain on the brakes.
Do not drive in idle or with the engine
stopped, otherwise there will be no
engine braking action or support of the braking
force and steering.
Never allow floor mats, carpets or any other
objects to protrude into the area of movement
of the pedals and impair their operation.<
Corrosion on brake rotors
When the vehicle is driven only occasionally,
during extended periods when the vehicle is not
used at all, and in operating conditions where
brake applications are less frequent, there is an
increased tendency for corrosion to form on rotors, while contaminants accumulate on the
brake pads. This occurs because the minimum
pressure which must be exerted by the pads
during brake applications to clean the rotors is
not reached.
Should corrosion form on the brake rotors, the
brakes will tend to respond with a pulsating
effect that even extended application will fail to
cure.
When vehicle is parked
Condensation forms in the automatic climate
control system during operation, and then exits
under the vehicle. Traces of condensed water
under the vehicle are therefore normal.
Before driving into a car wash
Fold in the exterior mirrors, refer to page51,
otherwise they could be damaged due to the
width of the vehicle.
Release the parking brake, particularly when
you have activated Automatic Hold, refer to
page61.
General information on the care and mainte-
nance of your BMW is contained in the Caring
for your vehicle brochure.
Mixed tires*
Before driving into a car wash, make sure
that the vehicle width is not too large for
the car wash, as otherwise the vehicle and the
car wash could be damaged.<
Rear window wiper
The rear window wiper can be damaged in car
washes. Take appropriate protective measures;
ask the car wash operator if necessary.
With comfort access*
Insert the remote control into the ignition lock.
The engine can be switched off in transmission
position N, also refer to page37.