temperature BMW X5 3.0Si 2008 E70 Owner's Manual
[x] Cancel search | Manufacturer: BMW, Model Year: 2008, Model line: X5 3.0Si, Model: BMW X5 3.0Si 2008 E70Pages: 292, PDF Size: 9.32 MB
Page 13 of 292
At a glance
11Reference
Controls
Driving tips
Communications
Navigation
Entertainment
Mobility
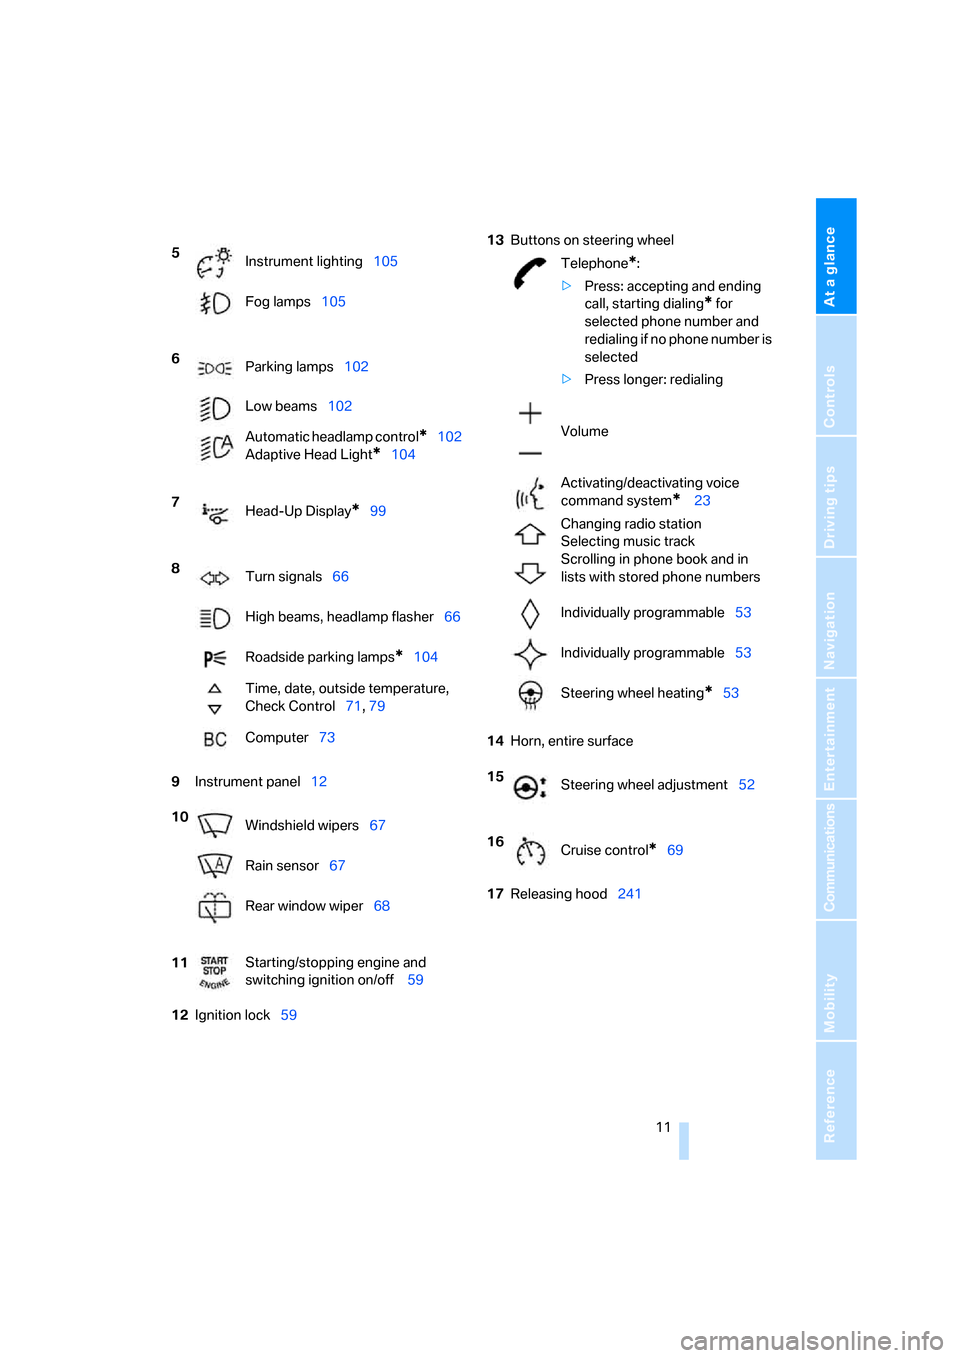
9Instrument panel12
12Ignition lock5913Buttons on steering wheel
14Horn, entire surface
17Releasing hood241 5
Instrument lighting105
Fog lamps105
6
Parking lamps102
Low beams102
Automatic headlamp control
*102
Adaptive Head Light
*104
7
Head-Up Display
*99
8
Turn signals66
High beams, headlamp flasher66
Roadside parking lamps
*104
Time, date, outside temperature,
Check Control71, 79
Computer73
10
Windshield wipers67
Rain sensor67
Rear window wiper68
11Starting/stopping engine and
switching ignition on/off 59
Telephone*:
>Press: accepting and ending
call, starting dialing
* for
selected phone number and
redialing if no phone number is
selected
>Press longer: redialing
Volume
Activating/deactivating voice
command system
* 23
Changing radio station
Selecting music track
Scrolling in phone book and in
lists with stored phone numbers
Individually programmable53
Individually programmable53
Steering wheel heating
*53
15
Steering wheel adjustment52
16
Cruise control
*69
Page 14 of 292
Cockpit
12
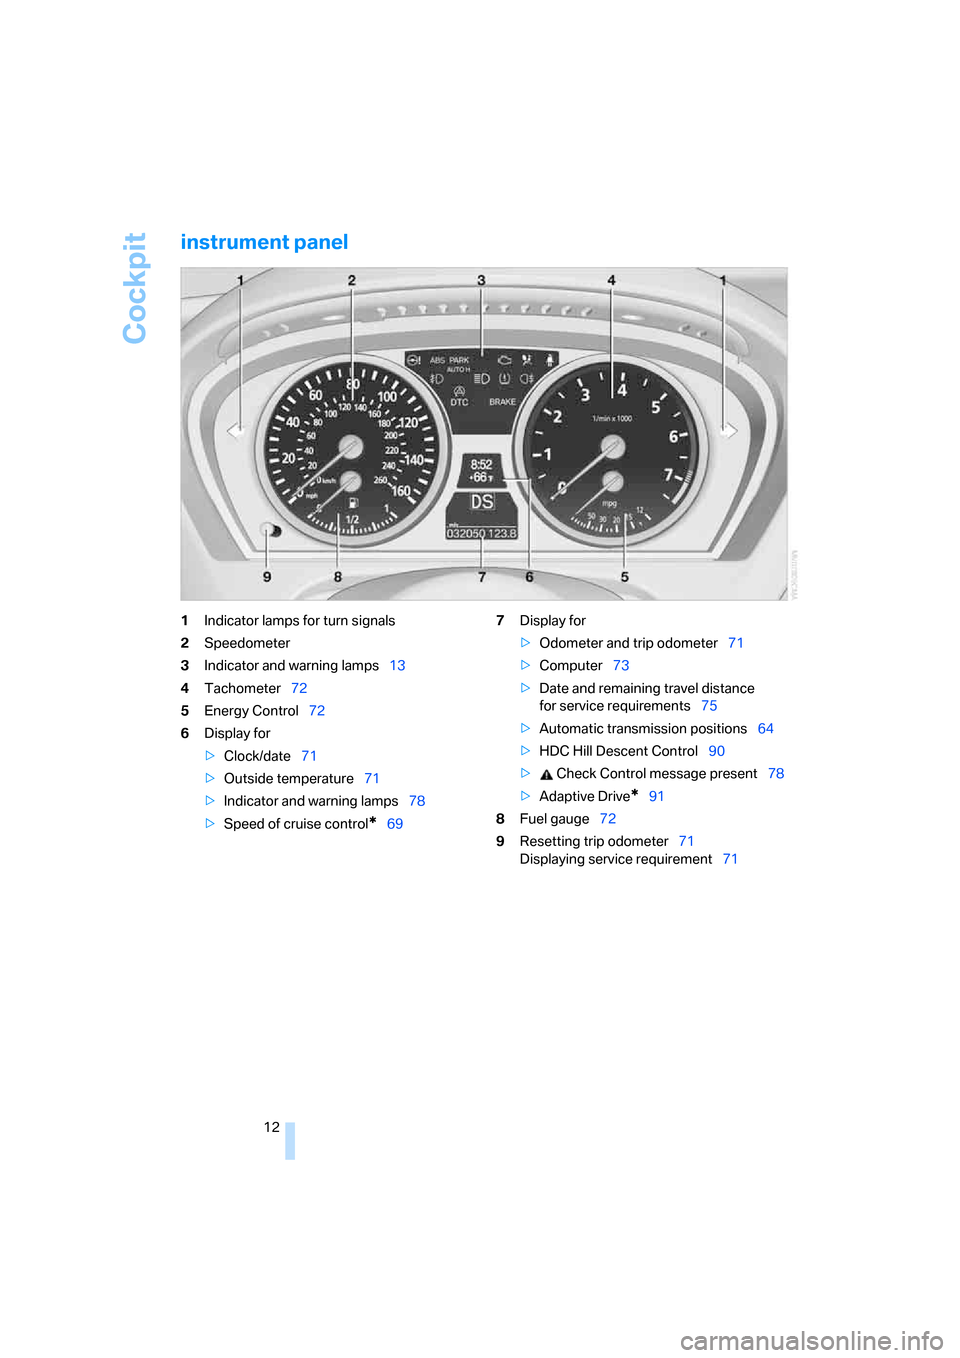
instrument panel
1Indicator lamps for turn signals
2Speedometer
3Indicator and warning lamps13
4Tachometer72
5Energy Control72
6Display for
>Clock/date71
>Outside temperature71
>Indicator and warning lamps78
>Speed of cruise control
*697Display for
>Odometer and trip odometer71
>Computer73
>Date and remaining travel distance
for service requirements75
>Automatic transmission positions64
>HDC Hill Descent Control90
> Check Control message present78
>Adaptive Drive
*91
8Fuel gauge72
9Resetting trip odometer71
Displaying service requirement71
Page 31 of 292
Controls
29Reference
At a glance
Driving tips
Communications
Navigation
Entertainment
Mobility
>Settings for the display on the Control Dis-
play:
>Brightness of the Control Display, refer
to page82
>Measuring units for consumption, route/
distances, temperature, and pressure,
refer to page82
>Language on Control Display, refer to
page83
>12h/24h mode of the clock, refer to
page82
>Date format, refer to page82
>Showing optical warning for PDC Park Dis-
tance Control
*, refer to page85
>Selection, brightness and position of dis-
play in Head-Up Display
*, refer to page99
>Settings of automatic climate control, refer
to page107
>Positions of driver's seat, exterior mirrors,
and steering wheel
*, refer to page44
>With Adaptive Drive
*, last selected chassis
and suspension tuning setting, refer to
page91
>Audio sources, volume and tone settings,
refer to page163
>Radio, displaying stored stations, refer to
page166
>Telephone, setting volume, refer to
pages214,220
>Pathway lighting, refer to page103, and
daytime running lamps
*, refer to page103
>Triple turn signal activation, refer to
page67
>With rear view camera
*, selection of func-
tions, refer to page86, and type of display,
refer to page88
>With programmable memory/direct selec-
tion buttons, selection of stored functions,
refer to page21
Central locking system
The concept
The central locking system is ready for opera-
tion whenever the driver's door is closed.
The system simultaneously engages and
releases the locks on the following:
>Doors
>Liftgate
>Fuel filler door
Operating from outside
>via the remote control
>via the door lock
>with comfort access
* via the door handles
At the same time, the anti-theft system is also
operated. It prevents the doors from being
unlocked using the lock buttons or door han-
dles. The interior lamps and the courtesy
lamps
* are also switched on and off with the
remote control. The alarm system
is armed/dis-
armed at the same time.
You can find more detailed information on the
alarm system
on page35.
Operating from inside
Via the button for central locking, refer to
page32. The fuel filler door is not locked.
In an accident of sufficient severity, the central
locking system automatically unlocks the vehi-
cle. In addition, the hazard warning flashers and
interior lamps come on.
Opening and closing:
Using remote control
Persons or animals left unattended in a
parked vehicle can lock the doors from
the inside. Always take along the remote control
when leaving the vehicle so that the vehicle can
then be opened from the outside.<
Page 52 of 292
Adjusting
50
Seat heating*
Front
The temperature setting progresses one step
through its control sequence each time you
press the button. The maximum temperature is
supplied when three LEDs are lit.
To switch off: press the button longer.
The temperature is reduced, if need be, down to
no heat in order to reduce the load on the bat-
tery. The LEDs remain lit.
Temperature distribution*
The heat output can be distributed variously in
the seat cushion and the backrest.
iDrive, for operating principle refer to page16.
1.Open the start menu.
2.Move the controller to the left to open "Cli-
mate".
3.Select "Seat heater distribution" and press
the controller.
4.Move the controller to the left or right to
select "Driver" or "Passenger".
5.Turn the controller. The adjustment is
applied; the field can be changed.
Rear
Operation similar to front seat heating; without
temperature distribution.
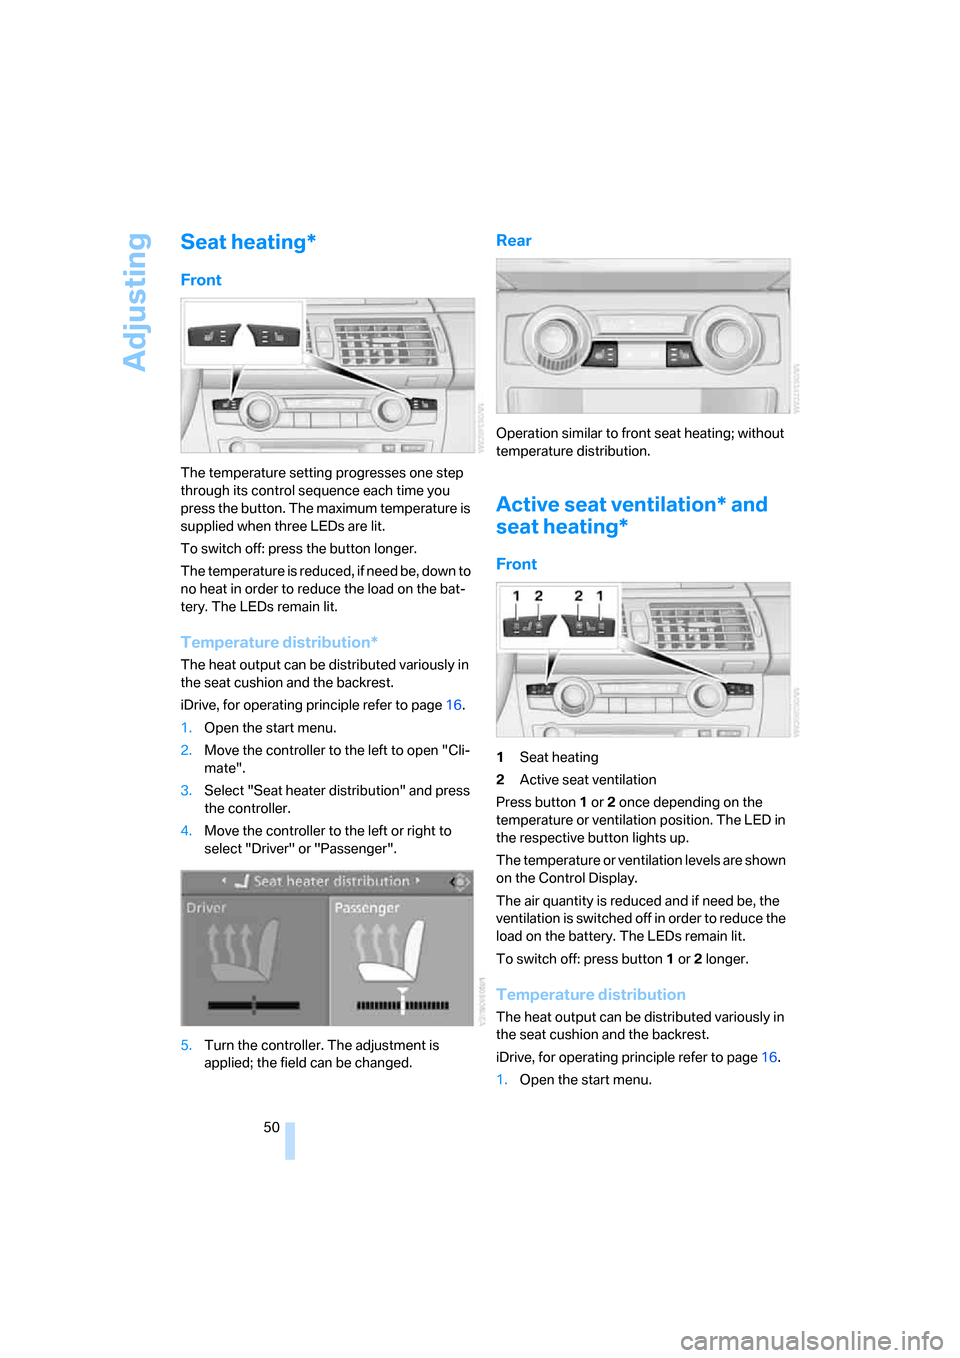
Active seat ventilation* and
seat heating*
Front
1Seat heating
2Active seat ventilation
Press button1 or 2 once depending on the
temperature or ventilation position. The LED in
the respective button lights up.
The temperature or ventilation levels are shown
on the Control Display.
The air quantity is reduced and if need be, the
ventilation is switched off in order to reduce the
load on the battery. The LEDs remain lit.
To switch off: press button1 or 2 longer.
Temperature distribution
The heat output can be distributed variously in
the seat cushion and the backrest.
iDrive, for operating principle refer to page16.
1.Open the start menu.
Page 53 of 292
Controls
51Reference
At a glance
Driving tips
Communications
Navigation
Entertainment
Mobility
2.Move the controller to the left to open "Cli-
mate".
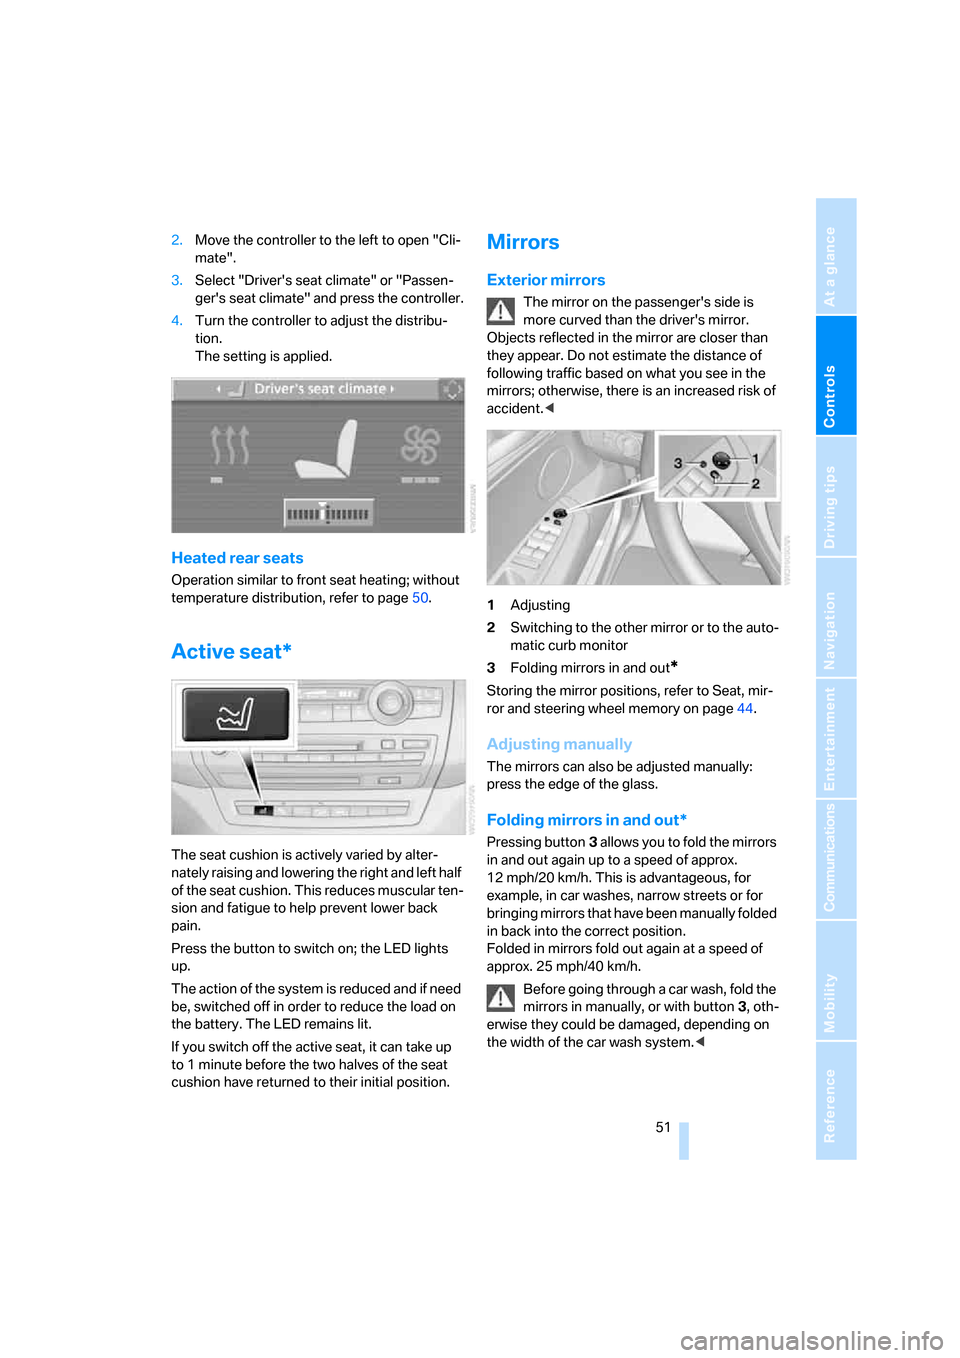
3.Select "Driver's seat climate" or "Passen-
ger's seat climate" and press the controller.
4.Turn the controller to adjust the distribu-
tion.
The setting is applied.
Heated rear seats
Operation similar to front seat heating; without
temperature distribution, refer to page50.
Active seat*
The seat cushion is actively varied by alter-
nately raising and lowering the right and left half
of the seat cushion. This reduces muscular ten-
sion and fatigue to help prevent lower back
pain.
Press the button to switch on; the LED lights
up.
The action of the system is reduced and if need
be, switched off in order to reduce the load on
the battery. The LED remains lit.
If you switch off the active seat, it can take up
to 1 minute before the two halves of the seat
cushion have returned to their initial position.
Mirrors
Exterior mirrors
The mirror on the passenger's side is
more curved than the driver's mirror.
Objects reflected in the mirror are closer than
they appear. Do not estimate the distance of
following traffic based on what you see in the
mirrors; otherwise, there is an increased risk of
accident.<
1Adjusting
2Switching to the other mirror or to the auto-
matic curb monitor
3Folding mirrors in and out
*
Storing the mirror positions, refer to Seat, mir-
ror and steering wheel memory on page44.
Adjusting manually
The mirrors can also be adjusted manually:
press the edge of the glass.
Folding mirrors in and out*
Pressing button3 allows you to fold the mirrors
in and out again up to a speed of approx.
12 mph/20 km/h. This is advantageous, for
example, in car washes, narrow streets or for
bringing mirrors that have been manually folded
in back into the correct position.
Folded in mirrors fold out again at a speed of
approx. 25 mph/40 km/h.
Before going through a car wash, fold the
mirrors in manually, or with button 3, oth-
erwise they could be damaged, depending on
the width of the car wash system.<
Page 54 of 292
Adjusting
52
Automatic heating
Below a certain outdoor temperature, both
exterior mirrors are automatically heated when
the motor is running or the ignition is switched
on.
Tilting down passenger-side exterior
mirror – automatic curb monitor*
Activating
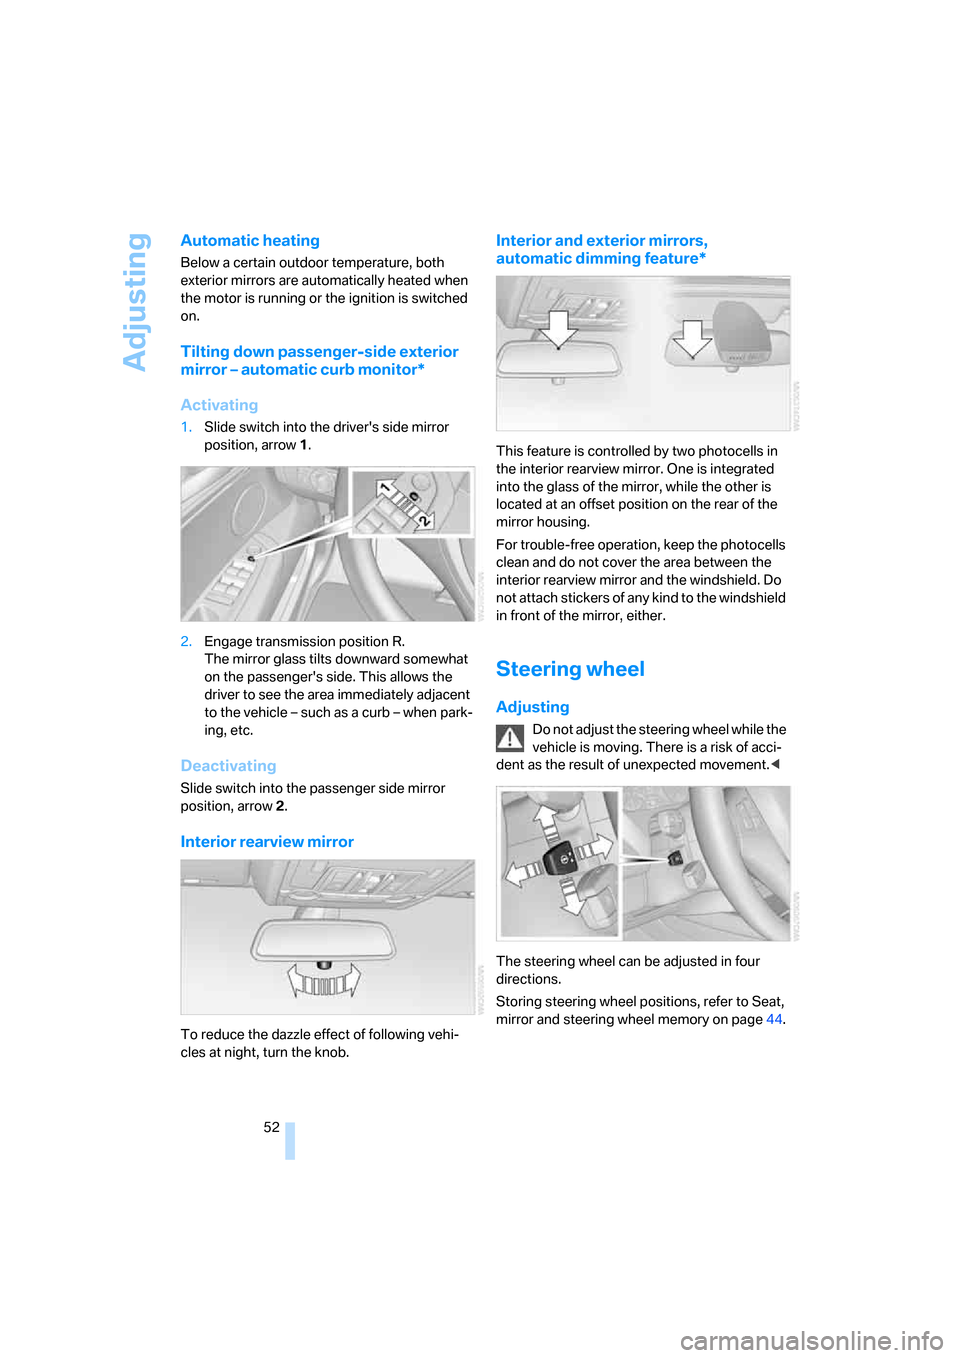
1.Slide switch into the driver's side mirror
position, arrow 1.
2.Engage transmission position R.
The mirror glass tilts downward somewhat
on the passenger's side. This allows the
driver to see the area immediately adjacent
to the vehicle – such as a curb – when park-
ing, etc.
Deactivating
Slide switch into the passenger side mirror
position, arrow 2.
Interior rearview mirror
To reduce the dazzle effect of following vehi-
cles at night, turn the knob.
Interior and exterior mirrors,
automatic dimming feature*
This feature is controlled by two photocells in
the interior rearview mirror. One is integrated
into the glass of the mirror, while the other is
located at an offset position on the rear of the
mirror housing.
For trouble-free operation, keep the photocells
clean and do not cover the area between the
interior rearview mirror and the windshield. Do
not attach stickers of any kind to the windshield
in front of the mirror, either.
Steering wheel
Adjusting
Do not adjust the steering wheel while the
vehicle is moving. There is a risk of acci-
dent as the result of unexpected movement.<
The steering wheel can be adjusted in four
directions.
Storing steering wheel positions, refer to Seat,
mirror and steering wheel memory on page44.
Page 73 of 292
Controls
71Reference
At a glance
Driving tips
Communications
Navigation
Entertainment
Mobility
Everything under control
Odometer, outside
temperature display, clock
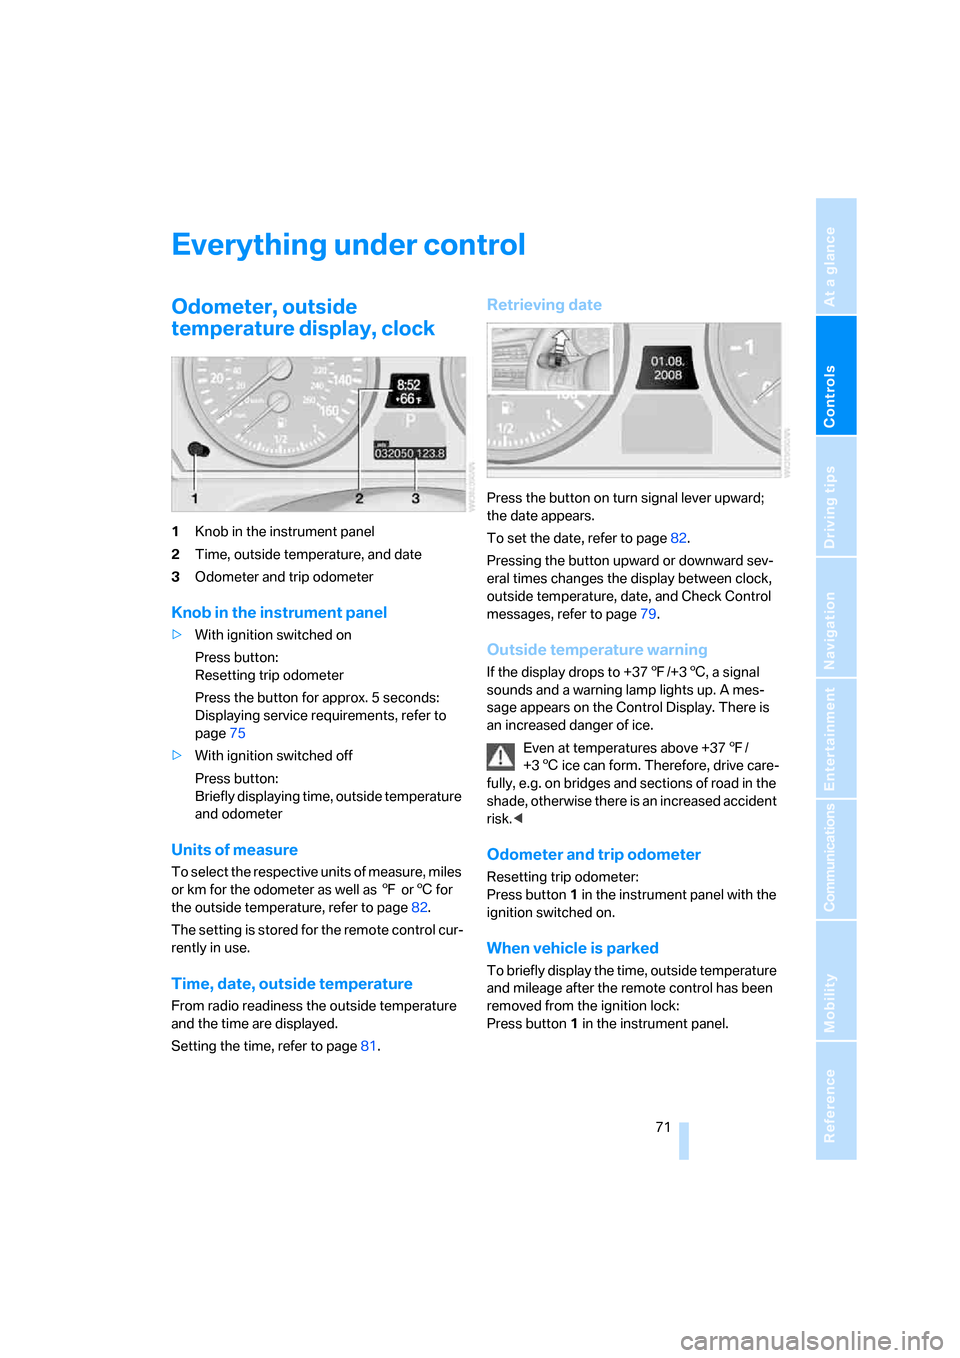
1Knob in the instrument panel
2Time, outside temperature, and date
3Odometer and trip odometer
Knob in the instrument panel
>With ignition switched on
Press button:
Resetting trip odometer
Press the button for approx. 5 seconds:
Displaying service requirements, refer to
page75
>With ignition switched off
Press button:
Briefly displaying time, outside temperature
and odometer
Units of measure
T o s e l e c t t h e r e s p e c t i v e u n i t s o f m e a s u r e , m i l e s
or km for the odometer as well as 7 or6 for
the outside temperature, refer to page82.
The setting is stored for the remote control cur-
rently in use.
Time, date, outside temperature
From radio readiness the outside temperature
and the time are displayed.
Setting the time, refer to page81.
Retrieving date
Press the button on turn signal lever upward;
the date appears.
To set the date, refer to page82.
Pressing the button upward or downward sev-
eral times changes the display between clock,
outside temperature, date, and Check Control
messages, refer to page79.
Outside temperature warning
If the display drops to +377/+36, a signal
sounds and a warning lamp lights up. A mes-
sage appears on the Control Display. There is
an increased danger of ice.
Even at temperatures above +377/
+36 ice can form. Therefore, drive care-
fully, e.g. on bridges and sections of road in the
shade, otherwise there is an increased accident
risk.<
Odometer and trip odometer
Resetting trip odometer:
Press button 1 in the instrument panel with the
ignition switched on.
When vehicle is parked
To briefly display the time, outside temperature
and mileage after the remote control has been
removed from the ignition lock:
Press button1 in the instrument panel.
Page 74 of 292
Everything under control
72
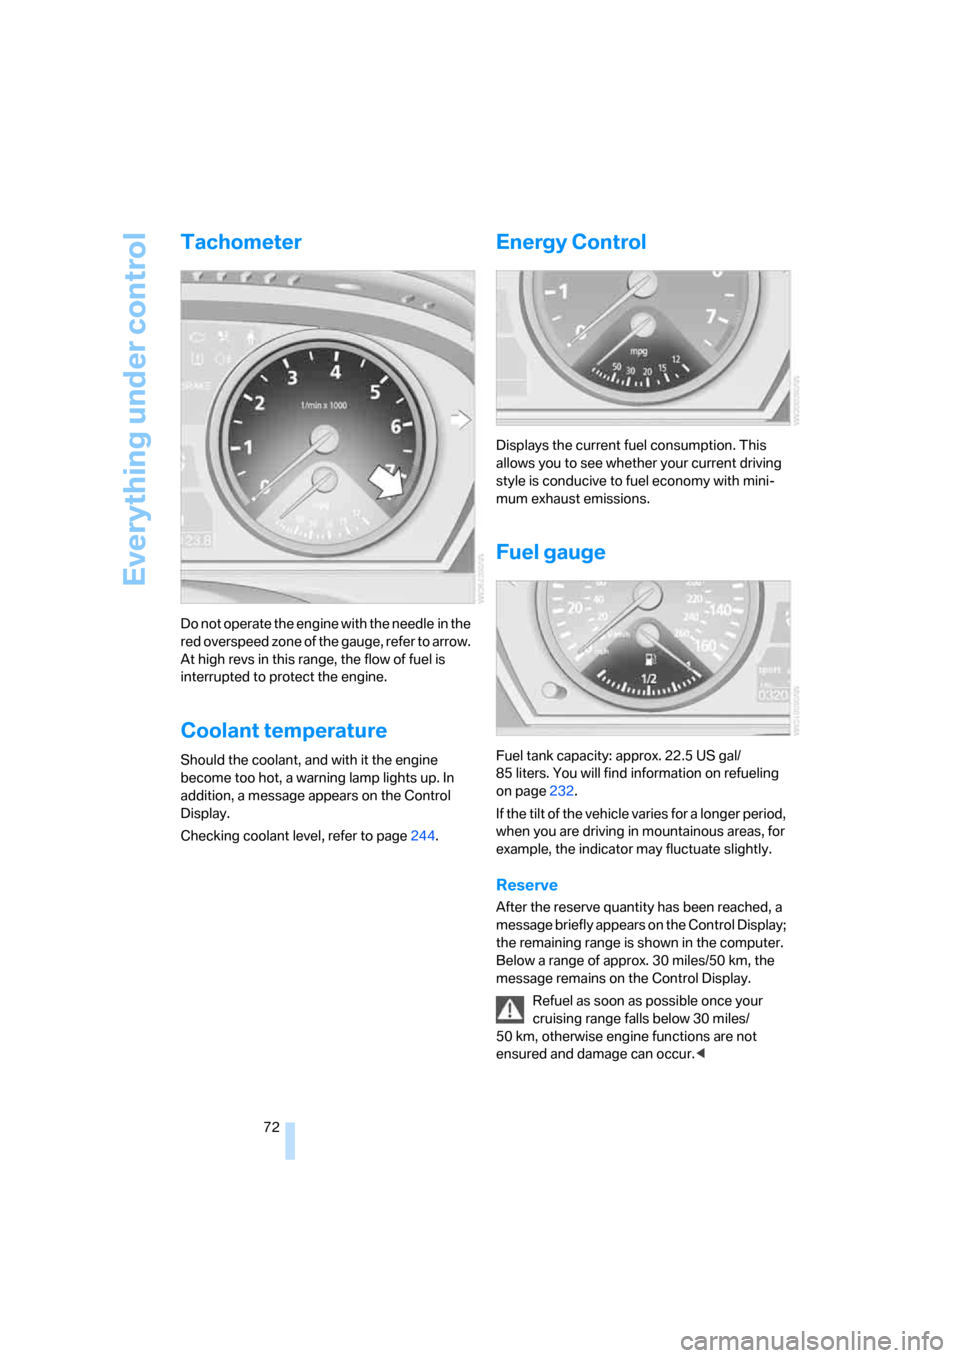
Tachometer
Do not operate the engine with the needle in the
red overspeed zone of the gauge, refer to arrow.
At high revs in this range, the flow of fuel is
interrupted to protect the engine.
Coolant temperature
Should the coolant, and with it the engine
become too hot, a warning lamp lights up. In
addition, a message appears on the Control
Display.
Checking coolant level, refer to page244.
Energy Control
Displays the current fuel consumption. This
allows you to see whether your current driving
style is conducive to fuel economy with mini-
mum exhaust emissions.
Fuel gauge
Fuel tank capacity: approx. 22.5 US gal/
85 liters. You will find information on refueling
on page232.
If the tilt of the vehicle varies for a longer period,
when you are driving in mountainous areas, for
example, the indicator may fluctuate slightly.
Reserve
After the reserve quantity has been reached, a
message briefly appears on the Control Display;
the remaining range is shown in the computer.
Below a range of approx. 30 miles/50 km, the
message remains on the Control Display.
Refuel as soon as possible once your
cruising range falls below 30 miles/
50 km, otherwise engine functions are not
ensured and damage can occur.<
Page 81 of 292
Controls
79Reference
At a glance
Driving tips
Communications
Navigation
Entertainment
Mobility
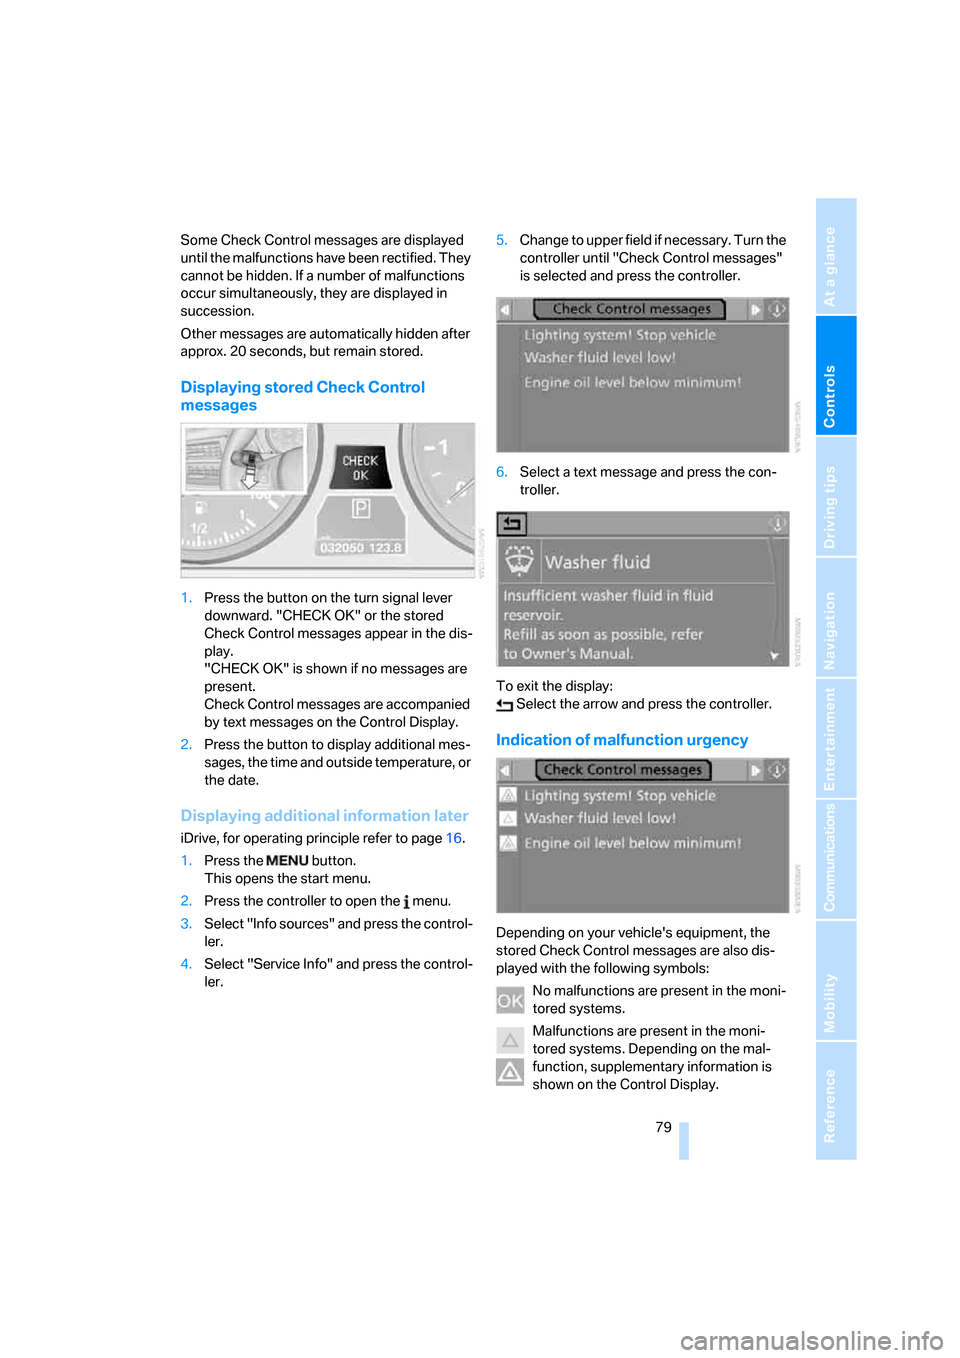
Some Check Control messages are displayed
until the malfunctions have been rectified. They
cannot be hidden. If a number of malfunctions
occur simultaneously, they are displayed in
succession.
Other messages are automatically hidden after
approx. 20 seconds, but remain stored.
Displaying stored Check Control
messages
1.Press the button on the turn signal lever
downward. "CHECK OK" or the stored
Check Control messages appear in the dis-
play.
"CHECK OK" is shown if no messages are
present.
Check Control messages are accompanied
by text messages on the Control Display.
2.Press the button to display additional mes-
sages, the time and outside temperature, or
the date.
Displaying additional information later
iDrive, for operating principle refer to page16.
1.Press the button.
This opens the start menu.
2.Press the controller to open the menu.
3.Select "Info sources" and press the control-
ler.
4.Select "Service Info" and press the control-
ler.5.Change to upper field if necessary. Turn the
controller until "Check Control messages"
is selected and press the controller.
6.Select a text message and press the con-
troller.
To exit the display:
Select the arrow and press the controller.
Indication of malfunction urgency
Depending on your vehicle's equipment, the
stored Check Control messages are also dis-
played with the following symbols:
No malfunctions are present in the moni-
tored systems.
Malfunctions are present in the moni-
tored systems. Depending on the mal-
function, supplementary information is
shown on the Control Display.
Page 84 of 292
Everything under control
82
Switching on hour signal*
You will hear tones just before each full hour.
Select "Hour memo" and press the controller.
The hour signal is activated.
The setting is stored for the remote control cur-
rently in use.
Setting time format
1.Select "Time format" and press the control-
ler.
2.Select the desired format and press the
controller.
The setting is stored for the remote control cur-
rently in use.
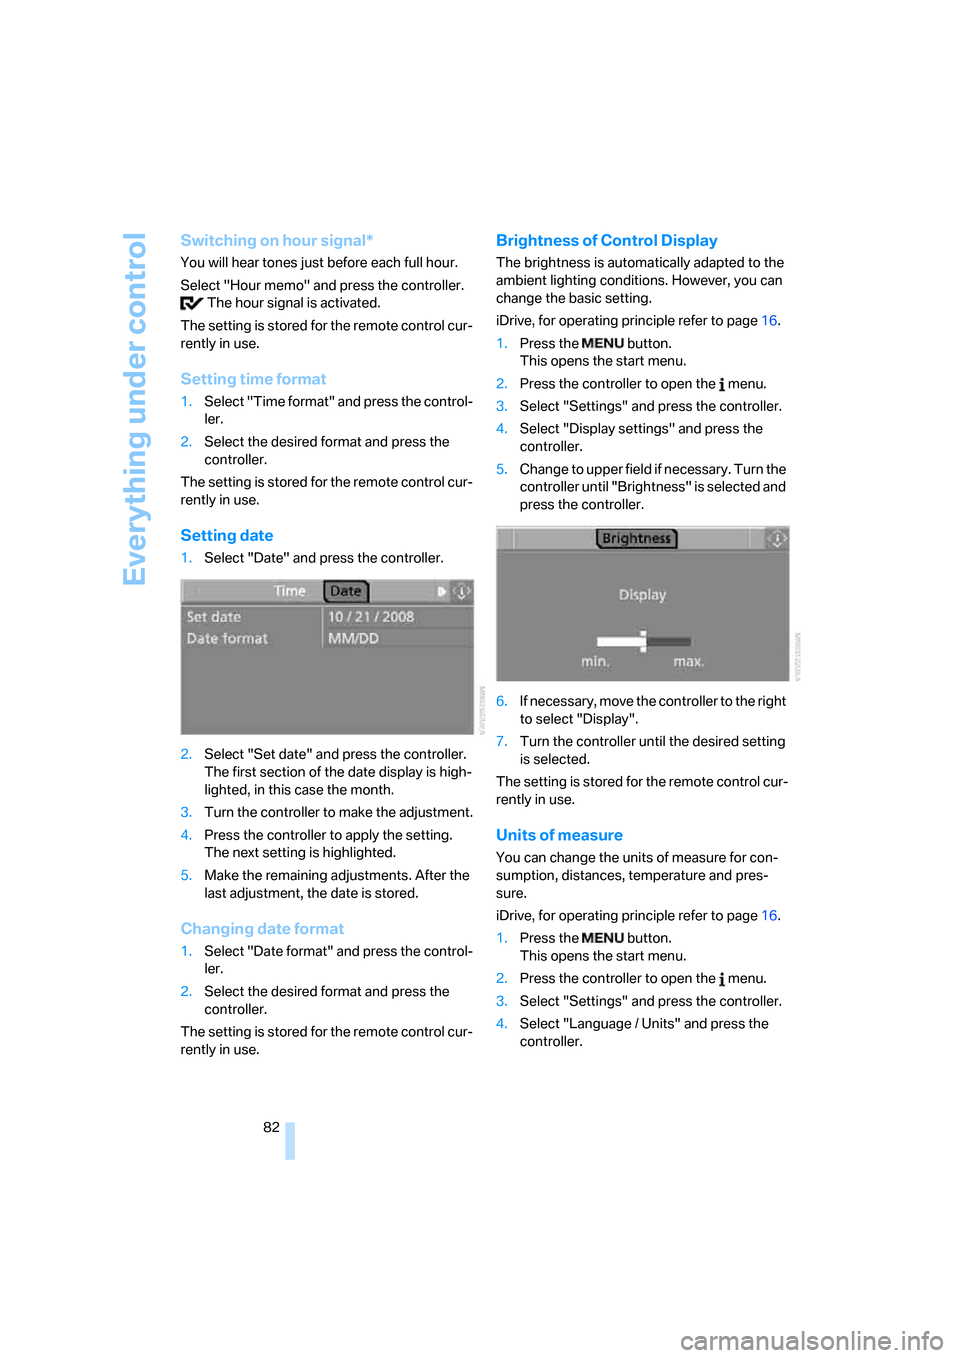
Setting date
1.Select "Date" and press the controller.
2.Select "Set date" and press the controller.
The first section of the date display is high-
lighted, in this case the month.
3.Turn the controller to make the adjustment.
4.Press the controller to apply the setting.
The next setting is highlighted.
5.Make the remaining adjustments. After the
last adjustment, the date is stored.
Changing date format
1.Select "Date format" and press the control-
ler.
2.Select the desired format and press the
controller.
The setting is stored for the remote control cur-
rently in use.
Brightness of Control Display
The brightness is automatically adapted to the
ambient lighting conditions. However, you can
change the basic setting.
iDrive, for operating principle refer to page16.
1.Press the button.
This opens the start menu.
2.Press the controller to open the menu.
3.Select "Settings" and press the controller.
4.Select "Display settings" and press the
controller.
5.Change to upper field if necessary. Turn the
controller until "Brightness" is selected and
press the controller.
6.If necessary, move the controller to the right
to select "Display".
7.Turn the controller until the desired setting
is selected.
The setting is stored for the remote control cur-
rently in use.
Units of measure
You can change the units of measure for con-
sumption, distances, temperature and pres-
sure.
iDrive, for operating principle refer to page16.
1.Press the button.
This opens the start menu.
2.Press the controller to open the menu.
3.Select "Settings" and press the controller.
4.Select "Language / Units" and press the
controller.