change wheel BMW X5 4.4I 2000 Owners Manual
[x] Cancel search | Manufacturer: BMW, Model Year: 2000, Model line: X5 4.4I, Model: BMW X5 4.4I 2000Pages: 201, PDF Size: 1.93 MB
Page 55 of 201
IndexDataTechnologyRepairsCar careControlsOverview
55n
Car Memory, Key Memory
Your BMW center can adjust your
vehicle's systems in such a man-
ner that your personalized settings are
automatically called up for the seat,
mirror and steering wheel positions
when you unlock the vehicle with your
personal remote control.<
If you make use of the Key Mem-
ory, be sure that the footwell
behind the driver's seat is unobstructed
before unlocking the vehicle. If you fail
to do so, persons or objects could be
injured or damaged if the seat should
move backward.<
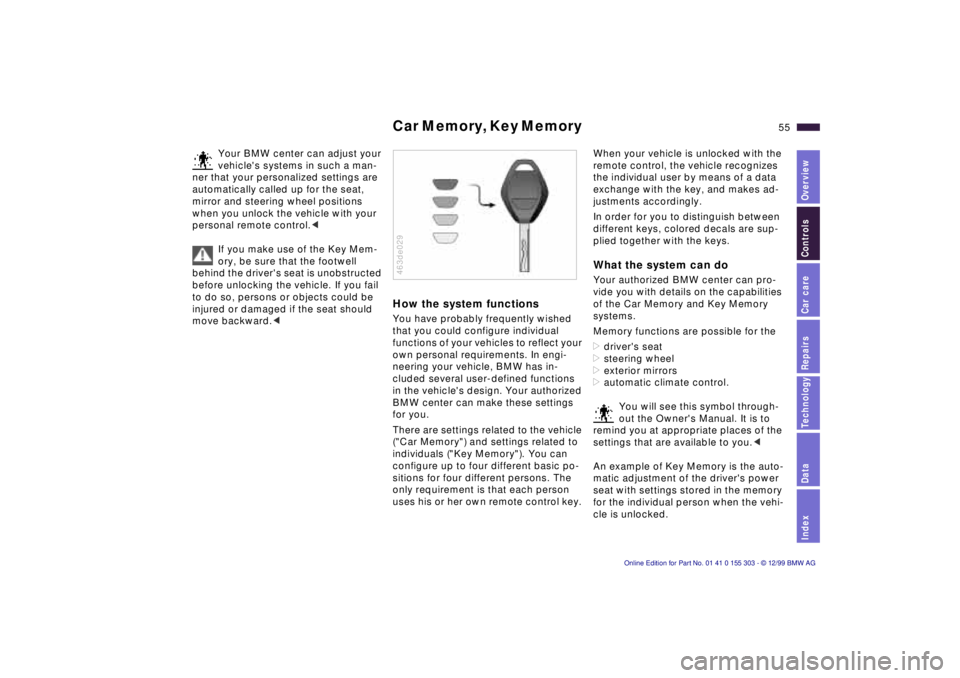
How the system functions You have probably frequently wished
that you could configure individual
functions of your vehicles to reflect your
own personal requirements. In engi-
neering your vehicle, BMW has in-
cluded several user-defined functions
in the vehicle's design. Your authorized
BMW center can make these settings
for you.
There are settings related to the vehicle
("Car Memory") and settings related to
individuals ("Key Memory"). You can
configure up to four different basic po-
sitions for four different persons. The
only requirement is that each person
uses his or her own remote control key. 463de029
When your vehicle is unlocked with the
remote control, the vehicle recognizes
the individual user by means of a data
exchange with the key, and makes ad-
justments accordingly.
In order for you to distinguish between
different keys, colored decals are sup-
plied together with the keys. What the system can do Your authorized BMW center can pro-
vide you with details on the capabilities
of the Car Memory and Key Memory
systems.
Memory functions are possible for the
>driver's seat
>steering wheel
>exterior mirrors
>automatic climate control.
You will see this symbol through-
out the Owner's Manual. It is to
remind you at appropriate places of the
settings that are available to you.<
An example of Key Memory is the auto-
matic adjustment of the driver's power
seat with settings stored in the memory
for the individual person when the vehi-
cle is unlocked.
Page 67 of 201
IndexDataTechnologyRepairsCar careControlsOverview
67n
Automatic transmission with Steptronic
If you leave the vehicle with the
engine running, move the selector
lever to the "Park" or "Neutral" position
and apply the parking brake. If you fail
to do this, the vehicle could move.
Do not leave the vehicle unattended
with the engine running. An unattended
vehicle with a running engine repre-
sents a potential safety hazard.<
P Ñ Park Select "Park" only when the vehicle is
completely stopped. The transmission
locks to prevent the rear wheels from
turning. R Ñ Reverse Select "Reverse" only when the vehicle
is completely stopped.
When you select "Reverse", the backup
lamps will turn on automatically when
the ignition key is in position 2. N Ñ Neutral Select "Neutral" only if your journey is
interrupted for a longer period.
D Ñ Drive
(automatic shift program) This position is designed for driving
under all normal operating conditions.
All forward gears are available. "Kickdown" In the "Kickdown" mode, you achieve
maximum performance.
Depress the accelerator pedal past the
increased resistance point at the full-
throttle position.
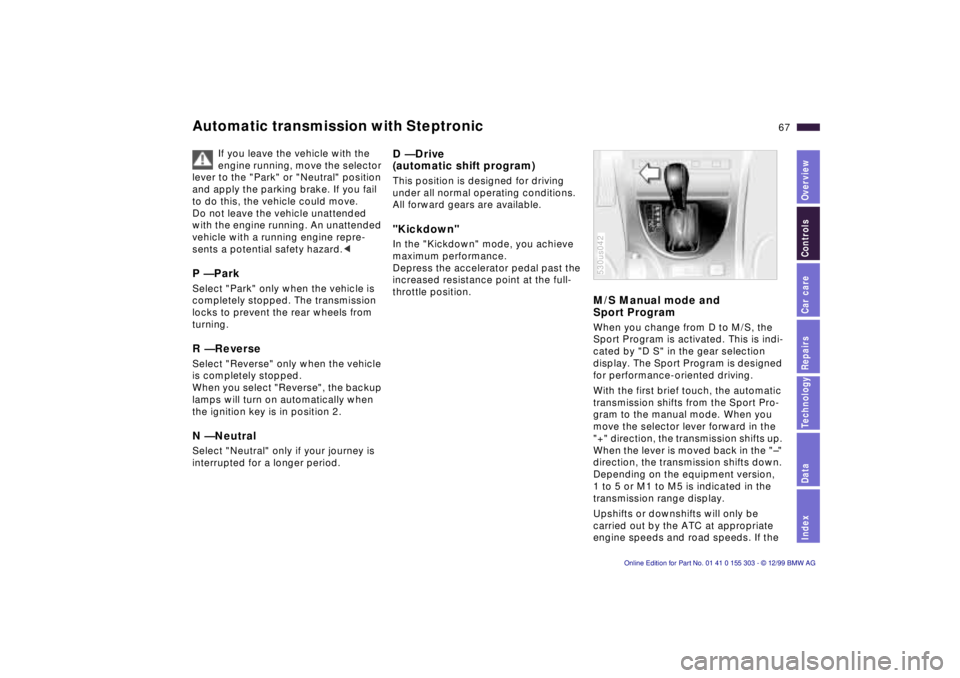
M/S Manual mode and
Sport Program When you change from D to M/S, the
Sport Program is activated. This is indi-
cated by "D S" in the gear selection
display. The Sport Program is designed
for performance-oriented driving.
With the first brief touch, the automatic
transmission shifts from the Sport Pro-
gram to the manual mode. When you
move the selector lever forward in the
"+" direction, the transmission shifts up.
When the lever is moved back in the "Ð"
direction, the transmission shifts down.
Depending on the equipment version,
1 to 5 or M1 to M5 is indicated in the
transmission range display.
Upshifts or downshifts will only be
carried out by the ATC at appropriate
engine speeds and road speeds. If the 530us042
Page 120 of 201
120n
Antilock Brake System (ABS) should adapt road speed to the road
conditions.
On road surfaces that have a loose sur-
face layer on a firm base with good
traction (on gravel, deep sand or snow,
for example), braking distances may be
longer than with locked wheels.This is
also true if snow chains are mounted.
However, ABS continues to provide en-
hanced vehicle stability and steering re-
sponse under these conditions. Information for your safety Not even ABS can suspend the laws of
physics. ABS alone cannot prevent
accidents when the brakes are applied
without an adequate safety distance
between vehicles, if the vehicle is
driven with excessive speed, or if aqua-
planing occurs. Responsibility for these
types of situations remains in the hands
(and at the feet) of the driver. You
should never allow the added safety of
ABS to lull you into a false sense of
security, or mislead you into taking
increased risks that could affect your
own safety and that of others.
Do not make any modifications to
the ABS system.
Service procedures on ABS are to be
performed by authorized technicians
only.<
Cornering Brake Control (CBC) CBC is an advanced engineering de-
sign of the ABS. When braking during
cornering with high lateral accelera-
tion, or when braking during a lane
change, vehicle stability is further im-
proved and the steering response is
enhanced. Electronic Brake Force Distribu-
tion (EBV) EBV governs brake application pres-
sure at the rear wheels to achieve sta-
ble brake response.
If the EBV fails (refer to the next
page), avoid full or "panic" brake
applications. Full or panic brake appli-
cations can result in overbraking at the
rear axle, and braking stability is no
longer ensured.<
Dynamic Brake Control (DBC)
If you apply the brakes rapidly, this sys-
tem automatically produces the maxi-
mum braking force boost and thus
helps to achieve the shortest possible
braking distance during "panic stops."
All of the benefits of the ABS system
are exploited under these circum-
stances.
Do not reduce the pressure on the
brake pedal for the duration of the
brake application. When the brake
pedal is released, the DBC is deacti-
vated.
In the event of a malfunction,
the yellow warning lamp comes
on. Have the system checked
and repaired at your BMW cen-
ter as soon as possible.
Refer to the "Information for your
safety" covering the ABS system.
This information also applies in general
for DBC.<
Page 131 of 201

IndexDataTechnologyRepairsCar careControlsOverview
131n
Winter tires Snow chains
*
Choosing the right tire BMW recommends special winter tires
(M+S radial tires) for driving in adverse
winter road conditions. While the All-
Season tires with M+S designation that
are mounted as standard equipment
provide better winter traction than sum-
mer tires, they generally do not achieve
the performance of winter tires.
For safe tracking and steering re-
sponse, install winter tires made by the
same manufacturer having the same
tread configuration on all four wheels.
Mount only winter tires approved by
BMW. Any BMW center will be glad to
provide you with information for select-
ing the best winter tires for your partic-
ular driving conditions.
Do not exceed specified
maximum speeds
Never exceed the maximum
speed for which winter tires are
rated.
Unprofessional attempts by laymen to
service tires can lead to damage and
accidents.
Have this work performed by skilled
professionals only. Any BMW center
has the required technical knowledge
and the proper equipment and will be
happy to assist you.<
Tire condition, tire pressure Once winter tires wear to a tread depth
below 0.16 in (4 mm), their performance
under winter driving conditions deterio-
rates noticeably. Worn tires should
therefore be replaced for safety consid-
erations.
Comply with the specified tire inflation
pressures Ñ and be sure to have the
wheel and tire assemblies balanced
every time you change the tires. Storage Store tires in a cool, dry place, away
from light whenever possible. Protect
the tires against contact with oil, grease
and fuel.
The use of narrow-link BMW snow
chains is approved only in pairs on the
rear wheels and only with tire size
235/65 R 17. Comply with all manufac-
turer's safety precautions when mount-
ing the chains.
Page 160 of 201
160n
Changing a wheel
Safety measures in the event of a
ßat tire or wheel change:
Stop the vehicle as far as possible from
passing trafÞc. Park on a Þrm, ßat, sur-
face. Switch on the hazard ßashers.
Turn the steering wheel to the straight-
ahead position, remove the key and en-
gage the steering lock. Select ÒParkÒ po-
sition and engage the parking brake. All
passengers should be outside the vehi-
cle and well away from your immediate
working area (behind a guardrail, for in-
stance). If a warning triangle or portable
hazard warning lamp is available, set it
up on the roadside at an appropriate
distance from the rear of the vehicle.
Comply with all safety guidelines and
regulations. Change the wheel only on a
level, Þrm surface which is not slippery.
Avoid jacking the vehicle up on a soft or
slippery surface (snow, ice, very smooth
surfaces, etc.), since it could slide side-
ways. Position the jack on a Þrm support
surface. Do not place wooden blocks or
similar objects under the jack. If this is
done, the jack might not be able to
reach its full support capacity because
of the limited height. Do not lie under
the vehicle or start the engine when the
vehicle is supported by the jack. Failure
to comply with this creates a risk of fatal
injury.<
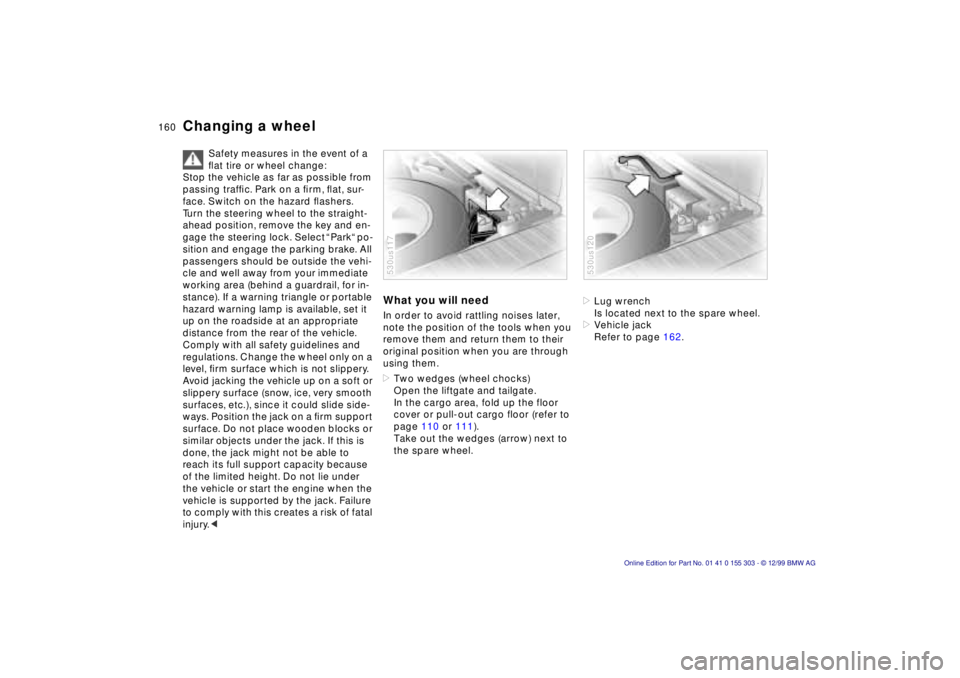
What you will need In order to avoid rattling noises later,
note the position of the tools when you
remove them and return them to their
original position when you are through
using them.
>Two wedges (wheel chocks)
Open the liftgate and tailgate.
In the cargo area, fold up the floor
cover or pull-out cargo floor (refer to
page 110 or 111).
Take out the wedges (arrow) next to
the spare wheel. 530us117
>Lug wrench
Is located next to the spare wheel.
>Vehicle jack
Refer to page 162.530us120
Page 162 of 201
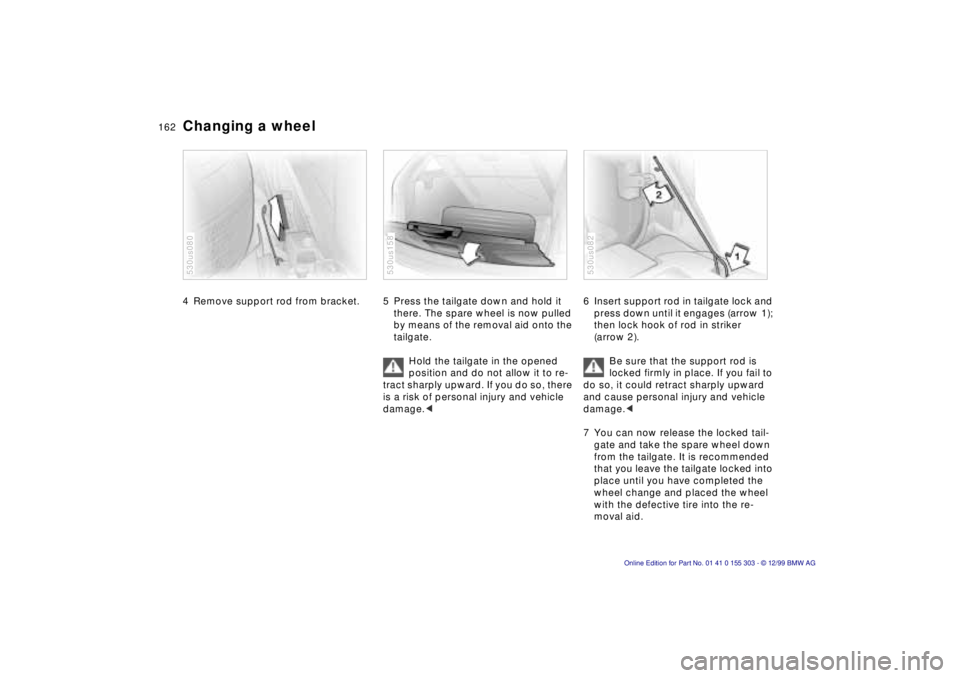
162n
Changing a wheel 4 Remove support rod from bracket. 530us080
5 Press the tailgate down and hold it
there. The spare wheel is now pulled
by means of the removal aid onto the
tailgate.
Hold the tailgate in the opened
position and do not allow it to re-
tract sharply upward. If you do so, there
is a risk of personal injury and vehicle
damage.< 530us158
6 Insert support rod in tailgate lock and
press down until it engages (arrow 1);
then lock hook of rod in striker
(arrow 2).
Be sure that the support rod is
locked firmly in place. If you fail to
do so, it could retract sharply upward
and cause personal injury and vehicle
damage.<
7 You can now release the locked tail-
gate and take the spare wheel down
from the tailgate. It is recommended
that you leave the tailgate locked into
place until you have completed the
wheel change and placed the wheel
with the defective tire into the re-
moval aid. 530us082
Page 163 of 201
IndexDataTechnologyRepairsCar careControlsOverview
163n
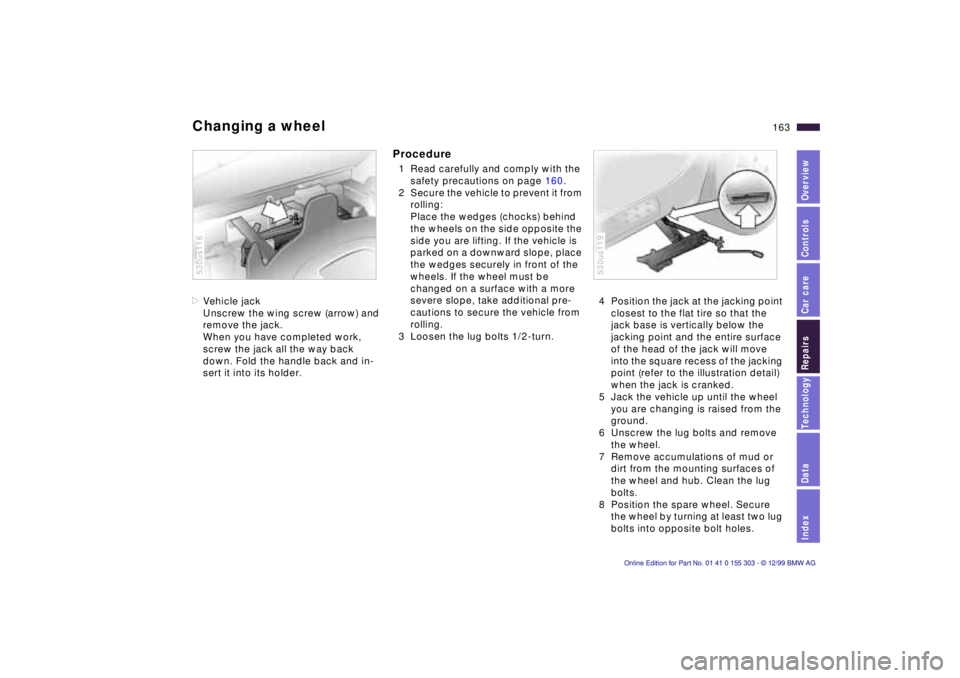
Changing a wheel >Vehicle jack
Unscrew the wing screw (arrow) and
remove the jack.
When you have completed work,
screw the jack all the way back
down. Fold the handle back and in-
sert it into its holder. 530us116
Procedure 1 Read carefully and comply with the
safety precautions on page 160.
2 Secure the vehicle to prevent it from
rolling:
Place the wedges (chocks) behind
the wheels on the side opposite the
side you are lifting. If the vehicle is
parked on a downward slope, place
the wedges securely in front of the
wheels. If the wheel must be
changed on a surface with a more
severe slope, take additional pre-
cautions to secure the vehicle from
rolling.
3 Loosen the lug bolts 1/2-turn. 4 Position the jack at the jacking point
closest to the flat tire so that the
jack base is vertically below the
jacking point and the entire surface
of the head of the jack will move
into the square recess of the jacking
point (refer to the illustration detail)
when the jack is cranked.
5 Jack the vehicle up until the wheel
you are changing is raised from the
ground.
6 Unscrew the lug bolts and remove
the wheel.
7 Remove accumulations of mud or
dirt from the mounting surfaces of
the wheel and hub. Clean the lug
bolts.
8 Position the spare wheel. Secure
the wheel by turning at least two lug
bolts into opposite bolt holes.
530us119
Page 195 of 201
Everything from A to Z
195n
IndexDataTechnologyRepairsCar careControlsOverview
Master key34
Memory54
Microfilter95
MID (Multi-Information
Display), refer to the Radio
Owner's Manual
Mirror52
Mirror defrosting52
Mirror memory54
Mobile phones126
Modifications,
technical6, 149
Multifunction steering
wheel26
Multi-Information Display
(MID), refer to the Radio
Owner's ManualNNavigation system, refer to
the separate Owner's
ManualOOBD interface socket150
Odometer74
Oil additives137
Oil change interval, see the
Service and Warranty
Information Booklet (US
models) or the Warranty
and Service Guide Booklet
(Canadian models)Oil consumption137
Oil dipstick137
Oil grades138
Oil level, indicator
lamp23, 24
Oil pressure, indicator
lamp22
OILSERVICE76
Onboard computer80
refer also to the Onboard
computer Owner's Manual
Onboard monitor
refer to the separate
Owner's Manual
Onboard tool kit154
Opening and closing
From the inside40
From the outside36
Operating range80
Outlets, ventilation90
Output184
Outside temperature
display74
Outside temperature in the
onboard computer80
PPaintwork, minor
repairs145
Paintwork, waxing145
Park Distance Control
(PDC)82
Parking aid82Parking brake23, 65
Parking in the winter125
Parking lamps87
Passenger side mirror tilt
function54
PDC (Park Distance
Control)82
Playing cassettes, refer to
the Radio Owner's
Manual126
Playing CDs, refer to the
Radio Owner's
Manual126
"Please wear your safety
belt" warning lamp23
Pocket flashlight101
Pollen95
Poor driving conditions117
Power rear-seat
backrests51
Power seat48
Power steering125
Power windows45
Safety switch46
Pressure, tires127
Pre-warmed seats96
Pull-out cargo floor111
RRadio reception126, 178
Radio, refer to the Radio
Owner's Manual126
Reading lamps88
Rear backrests, folding
down107
Rear lamps157
Rear passenger area climate
control94
Rear seats, power51
Rear view mirror52
Rear window
defroster71, 94
Rear window wiper71
Rear window wiper, wiper
blade replacement154
Rear-seat backrest, folding
down107
Rear-seat backrests,
power51
Recirculated air mode93
Reclining seat48
Refueling29
Remote control37
Removing condensation
from the windows93
Replacement key34
Replacement of tires128
Reservoir, washer
system136
Residual heat94