BMW X5 4.4I 2006 E53 Owner's Guide
Manufacturer: BMW, Model Year: 2006, Model line: X5 4.4I, Model: BMW X5 4.4I 2006 E53Pages: 202, PDF Size: 4.13 MB
Page 21 of 202
21n
OverviewControlsMaintenanceRepairsDataIndex
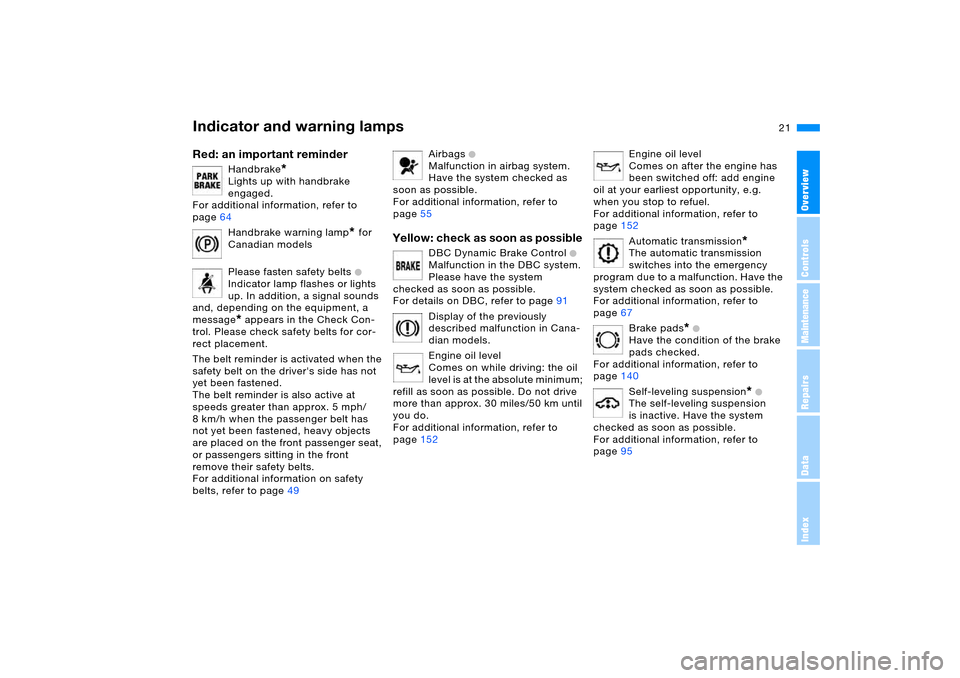
Indicator and warning lamps Red: an important reminder
Handbrake
*
Lights up with handbrake
engaged.
For additional information, refer to
page64
Handbrake warning lamp
* for
Canadian models
Please fasten safety belts +
Indicator lamp flashes or lights
up. In addition, a signal sounds
and, depending on the equipment, a
message* appears in the Check Con-
trol. Please check safety belts for cor-
rect placement.
The belt reminder is activated when the
safety belt on the driver's side has not
yet been fastened.
The belt reminder is also active at
speeds greater than approx. 5 mph/
8 km/h when the passenger belt has
not yet been fastened, heavy objects
are placed on the front passenger seat,
or passengers sitting in the front
remove their safety belts.
For additional information on safety
belts, refer to page49
Airbags
+
Malfunction in airbag system.
Have the system checked as
soon as possible.
For additional information, refer to
page55
Yellow: check as soon as possible
DBC Dynamic Brake Control
+
Malfunction in the DBC system.
Please have the system
checked as soon as possible.
For details on DBC, refer to page91
Display of the previously
described malfunction in Cana-
dian models.
Engine oil level
Comes on while driving: the oil
level is at the absolute minimum;
refill as soon as possible. Do not drive
more than approx. 30 miles/50 km until
you do.
For additional information, refer to
page152
Engine oil level
Comes on after the engine has
been switched off: add engine
oil at your earliest opportunity, e.g.
when you stop to refuel.
For additional information, refer to
page152
Automatic transmission
*
The automatic transmission
switches into the emergency
program due to a malfunction. Have the
system checked as soon as possible.
For additional information, refer to
page67
Brake pads
* +
Have the condition of the brake
pads checked.
For additional information, refer to
page140
Self-leveling suspension
* +
The self-leveling suspension
is inactive. Have the system
checked as soon as possible.
For additional information, refer to
page95
Page 22 of 202
22n
Indicator and warning lamps
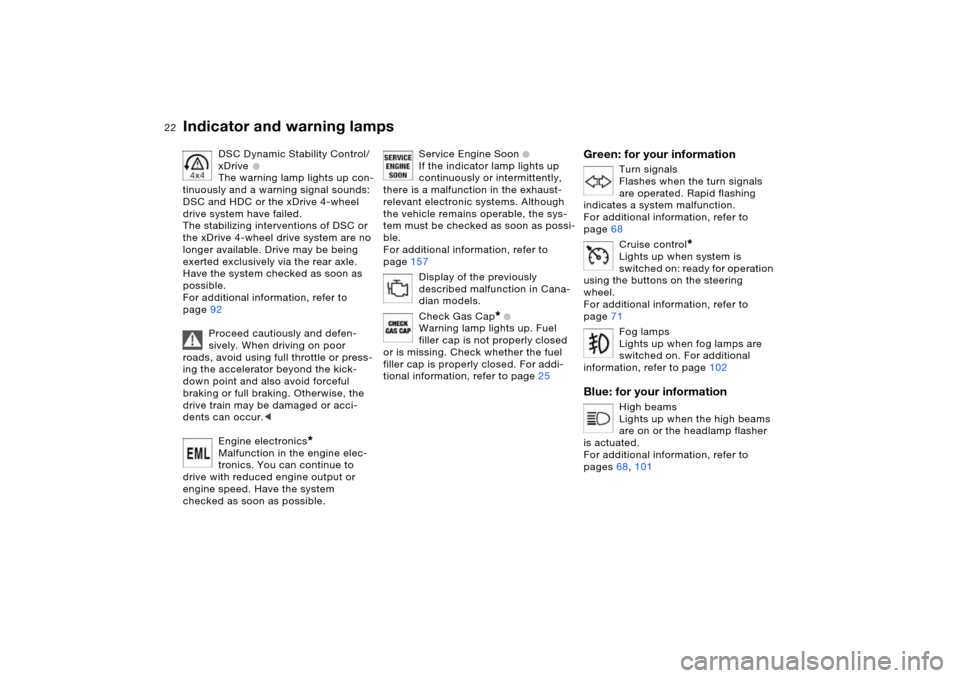
DSC Dynamic Stability Control/
xDrive
+
The warning lamp lights up con-
tinuously and a warning signal sounds:
DSC and HDC or the xDrive 4-wheel
drive system have failed.
The stabilizing interventions of DSC or
the xDrive 4-wheel drive system are no
longer available. Drive may be being
exerted exclusively via the rear axle.
Have the system checked as soon as
possible.
For additional information, refer to
page92
Proceed cautiously and defen-
sively. When driving on poor
roads, avoid using full throttle or press-
ing the accelerator beyond the kick-
down point and also avoid forceful
braking or full braking. Otherwise, the
drive train may be damaged or acci-
dents can occur.<
Engine electronics
*
Malfunction in the engine elec-
tronics. You can continue to
drive with reduced engine output or
engine speed. Have the system
checked as soon as possible.
Service Engine Soon
+
If the indicator lamp lights up
continuously or intermittently,
there is a malfunction in the exhaust-
relevant electronic systems. Although
the vehicle remains operable, the sys-
tem must be checked as soon as possi-
ble.
For additional information, refer to
page157
Display of the previously
described malfunction in Cana-
dian models.
Check Gas Cap
* +
Warning lamp lights up. Fuel
filler cap is not properly closed
or is missing. Check whether the fuel
filler cap is properly closed. For addi-
tional information, refer to page25
Green: for your information
Turn signals
Flashes when the turn signals
are operated. Rapid flashing
indicates a system malfunction.
For additional information, refer to
page68
Cruise control
*
Lights up when system is
switched on: ready for operation
using the buttons on the steering
wheel.
For additional information, refer to
page71
Fog lamps
Lights up when fog lamps are
switched on. For additional
information, refer to page102
Blue: for your information
High beams
Lights up when the high beams
are on or the headlamp flasher
is actuated.
For additional information, refer to
pages68, 101
Page 23 of 202
23n
OverviewControlsMaintenanceRepairsDataIndex
Buttons on steering wheel
*
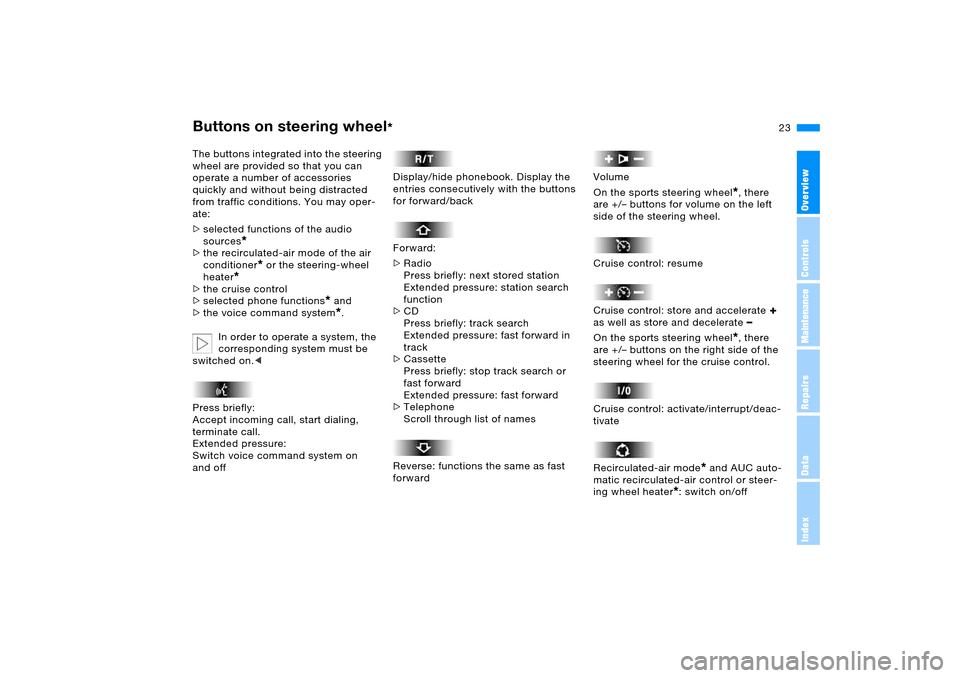
The buttons integrated into the steering
wheel are provided so that you can
operate a number of accessories
quickly and without being distracted
from traffic conditions. You may oper-
ate:
>selected functions of the audio
sources
*
>the recirculated-air mode of the air
conditioner
* or the steering-wheel
heater
*
>the cruise control
>selected phone functions
* and
>the voice command system*.
In order to operate a system, the
corresponding system must be
switched on.<
Press briefly:
Accept incoming call, start dialing,
terminate call.
Extended pressure:
Switch voice command system on
and off
Display/hide phonebook. Display the
entries consecutively with the buttons
for forward/back
Forward:
>Radio
Press briefly: next stored station
Extended pressure: station search
function
>CD
Press briefly: track search
Extended pressure: fast forward in
track
>Cassette
Press briefly: stop track search or
fast forward
Extended pressure: fast forward
>Telephone
Scroll through list of names
Reverse: functions the same as fast
forward
Volume
On the sports steering wheel
*, there
are +/– buttons for volume on the left
side of the steering wheel.
Cruise control: resume
Cruise control: store and accelerate
+
as well as store and decelerate
–
On the sports steering wheel
*, there
are +/– buttons on the right side of the
steering wheel for the cruise control.
Cruise control: activate/interrupt/deac-
tivate
Recirculated-air mode
* and AUC auto-
matic recirculated-air control or steer-
ing wheel heater
*: switch on/off
Page 24 of 202
24n
Warning triangle
*
First-aid kit
*
Refueling
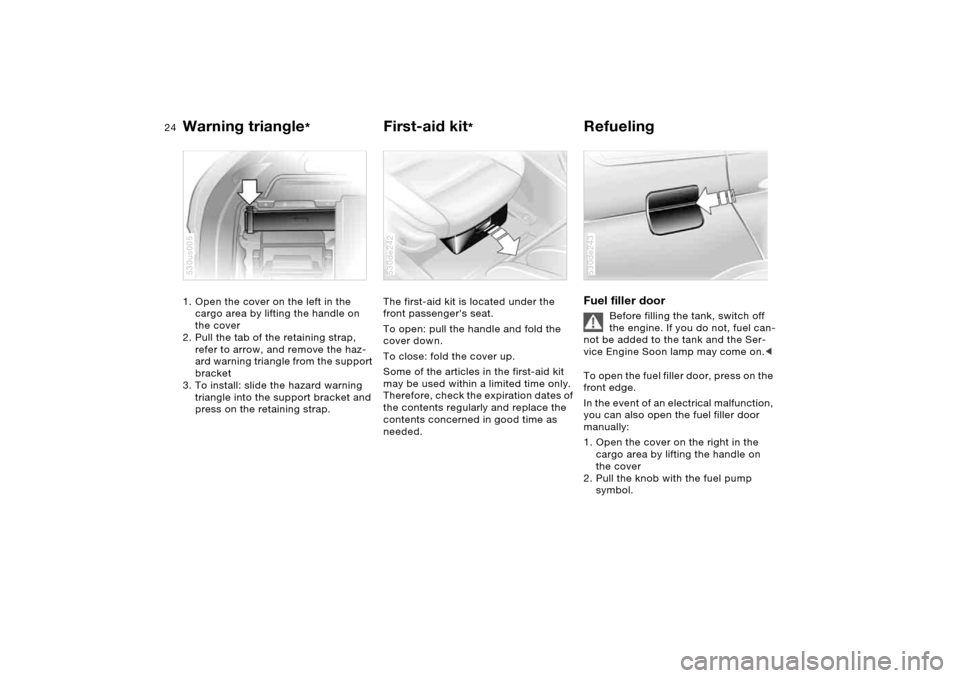
1. Open the cover on the left in the
cargo area by lifting the handle on
the cover
2. Pull the tab of the retaining strap,
refer to arrow, and remove the haz-
ard warning triangle from the support
bracket
3. To install: slide the hazard warning
triangle into the support bracket and
press on the retaining strap.530us005
The first-aid kit is located under the
front passenger's seat.
To open: pull the handle and fold the
cover down.
To close: fold the cover up.
Some of the articles in the first-aid kit
may be used within a limited time only.
Therefore, check the expiration dates of
the contents regularly and replace the
contents concerned in good time as
needed.530de242
Fuel filler door
Before filling the tank, switch off
the engine. If you do not, fuel can-
not be added to the tank and the Ser-
vice Engine Soon lamp may come on.<
To open the fuel filler door, press on the
front edge.
In the event of an electrical malfunction,
you can also open the fuel filler door
manually:
1. Open the cover on the right in the
cargo area by lifting the handle on
the cover
2. Pull the knob with the fuel pump
symbol.
530de243
Page 25 of 202
25n
OverviewControlsMaintenanceRepairsDataIndex
Refueling
When handling fuels, always
observe any safety guidelines
posted at the service station. Never
carry spare fuel containers in your vehi-
cle. Whether empty or full, these con-
tainers can leak, cause an explosion, or
lead to fire in the event of a collision.<
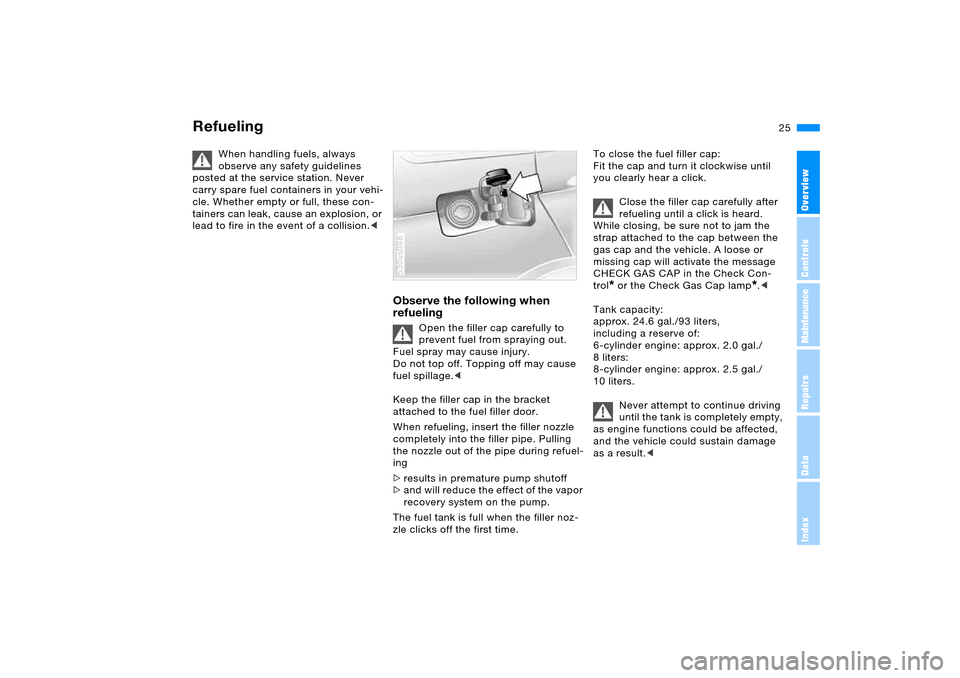
Observe the following when
refueling
Open the filler cap carefully to
prevent fuel from spraying out.
Fuel spray may cause injury.
Do not top off. Topping off may cause
fuel spillage.<
Keep the filler cap in the bracket
attached to the fuel filler door.
When refueling, insert the filler nozzle
completely into the filler pipe. Pulling
the nozzle out of the pipe during refuel-
ing
>results in premature pump shutoff
>and will reduce the effect of the vapor
recovery system on the pump.
The fuel tank is full when the filler noz-
zle clicks off the first time.
530us008
To close the fuel filler cap:
Fit the cap and turn it clockwise until
you clearly hear a click.
Close the filler cap carefully after
refueling until a click is heard.
While closing, be sure not to jam the
strap attached to the cap between the
gas cap and the vehicle. A loose or
missing cap will activate the message
CHECK GAS CAP in the Check Con-
trol
* or the Check Gas Cap lamp
*.<
Tank capacity:
approx. 24.6 gal./93 liters,
including a reserve of:
6-cylinder engine: approx. 2.0 gal./
8 liters:
8-cylinder engine: approx. 2.5 gal./
10 liters.
Never attempt to continue driving
until the tank is completely empty,
as engine functions could be affected,
and the vehicle could sustain damage
as a result.<
Page 26 of 202
26n
Fuel specifications The engine uses lead-free gasoline
only.Required fuelPremium Unleaded Gasoline,
Minimum Octane Rating: 91.
Minimum Octane Rating corresponds to
the Anti Knock Index AKI and is deter-
mined according to the so-called
(R+M)/2 method.
Do not use leaded gasoline: use of
leaded fuel will permanently dam-
age the lambda probe and catalytic
converter of your vehicle.<
Use high-quality brandsField experience has indicated signifi-
cant differences in fuel quality: volatility,
composition, additives, etc., among
gasolines offered for sale in the United
States and Canada. Fuels containing up
to and including 10 % ethanol or other
oxygenates with up to 2.8 % oxygen by
weight, that is, 15 % MTBE or 3 % meth-
anol plus an equivalent amount of co-
solvent, will not void the applicable
warranties with respect to defects in
materials or workmanship.The use of poor-quality fuels may
result in drivability, starting and
stalling problems, especially under cer-
tain environmental conditions such as
high ambient temperature and high alti-
tude.
Should you encounter drivability prob-
lems that you suspect could be related
to the fuel you are using, we recom-
mend that you respond by switching to
a recognized high-quality brand.
Failure to comply with these recom-
mendations may also result in unsched-
uled maintenance.<
Page 27 of 202
27n
OverviewControlsMaintenanceRepairsDataIndex
Page 28 of 202
28n
Page 29 of 202
29n
OverviewControlsMaintenanceRepairsDataIndex
Overview
Controls and features
Operation, maintenance
Index Technical data
Controls
Owner service procedures
Page 30 of 202
30n
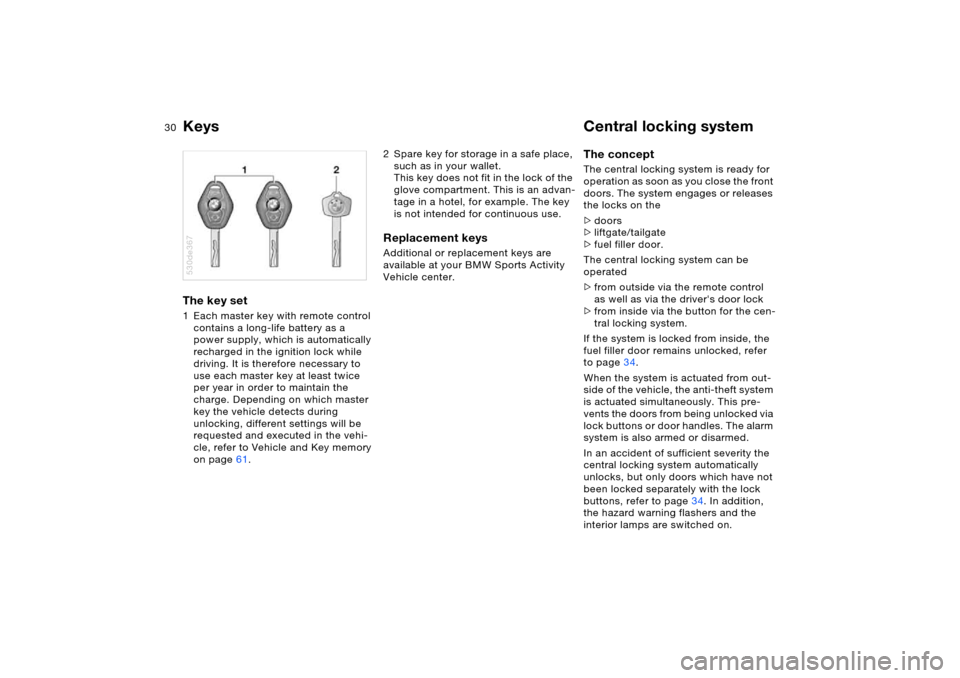
Keys Central locking system The key set 1 Each master key with remote control
contains a long-life battery as a
power supply, which is automatically
recharged in the ignition lock while
driving. It is therefore necessary to
use each master key at least twice
per year in order to maintain the
charge. Depending on which master
key the vehicle detects during
unlocking, different settings will be
requested and executed in the vehi-
cle, refer to Vehicle and Key memory
on page61.530de367
2 Spare key for storage in a safe place,
such as in your wallet.
This key does not fit in the lock of the
glove compartment. This is an advan-
tage in a hotel, for example. The key
is not intended for continuous use.Replacement keys Additional or replacement keys are
available at your BMW Sports Activity
Vehicle center.
The concept The central locking system is ready for
operation as soon as you close the front
doors. The system engages or releases
the locks on the
>doors
>liftgate/tailgate
>fuel filler door.
The central locking system can be
operated
>from outside via the remote control
as well as via the driver's door lock
>from inside via the button for the cen-
tral locking system.
If the system is locked from inside, the
fuel filler door remains unlocked, refer
to page34.
When the system is actuated from out-
side of the vehicle, the anti-theft system
is actuated simultaneously. This pre-
vents the doors from being unlocked via
lock buttons or door handles. The alarm
system is also armed or disarmed.
In an accident of sufficient severity the
central locking system automatically
unlocks, but only doors which have not
been locked separately with the lock
buttons, refer to page34. In addition,
the hazard warning flashers and the
interior lamps are switched on.