key BMW X5 4.6IS 2003 Owners Manual
[x] Cancel search | Manufacturer: BMW, Model Year: 2003, Model line: X5 4.6IS, Model: BMW X5 4.6IS 2003Pages: 183, PDF Size: 2.31 MB
Page 4 of 183
Contents
© 2002 Bayerische Motoren Werke
Aktiengesellschaft
Munich, Germany
Reprinting, including excerpts, only with the
written consent of BMW AG, Munich.
Order No. 01 41 0 157 098
US English IX/2002
Printed in Germany
Printed on environmentally friendly paper Ð
bleached without chlorine, suitable for recycling.
Notes
Overview
Controls and features
About this Owner's Manual 8
Symbols used 8
The individual vehicle 8
Status at time of printing 9
For your own safety 9
Symbol on vehicle parts 10
Service and Warranty 10
Reporting safety defects 10Cockpit
14
Instrument cluster 15
Indicator and warning lamps 19
Steering wheel with multifunction buttons 23
Warning triangle 24
First-aid kit 24
Refueling 24
Fuel specifications 26
Tire inflation pressures 26
Locks and security systems:
Keys30
Central locking system 30
Opening and closing Ð via the remote control 31
Opening and closing Ð via the door lock 34
Opening and closing Ð from the inside 35
Liftgate 36
Tailgate 37
Alarm system 39
Electric power windows 40
Sliding/tilt sunroof with glass moonroof 42
Adjustments:
Safe seating position 44
Seats 44
Mechanical seat 45
Power seat 46
Head restraints 47
Power rear-seat backrest adjustment 48
Safety belts 49
Seat, mirror and steering wheel
memory 50
Seat heating 51
Steering wheel 52
Steering wheel heating 53
Mirrors 53
Inhalt
Page 5 of 183
5n
OverviewControlsMaintenanceRepairsDataIndex
Controls and features
Passenger safety systems:
Airbags55
Transporting children safely58
Vehicle Memory, Key
Memory61
Driving:
Ignition lock62
Starting the engine62
Switching off the engine63
Parking brake64
Manual transmission64
Automatic transmission with
Steptronic65
Indicator/Headlamp flasher68
Washer/Wiper system/Rain
sensor68
Cruise control71
Everything under control:
Odometer, outside temperature
display73
Tachometer74
Energy control74
Temperature gauge75
Fuel gauge75
Coolant temperature gauge76
Service Interval Display76
Check Control77
Computer80
Multi-Information Display
MID81
Digital clock in the MID82
Computer in the MID85
Technology for safety and
driving convenience:
Park Distance Control PDC90
Dynamic Stability Control
DSC91
Hill Descent Control HDC93
Self-leveling suspension94
2-axle self-leveling
suspension94
Tire Pressure Monitor RDC97
Adaptive brake light98
Lamps:
Parking lamps/Low beams99
Instrument lighting100
High beams/Standing
lamps100
Fog lamps100
Interior lamps101
Controlling the climate for
pleasant driving:
Air conditioner102
Automatic climate control105
Roller sun blinds111
Independent ventilation
system111
Cabin convenience:
BMW Universal Transmitter112
Glove compartment115
Storage compartments116
Cellular phone116
Beverage holder116
Glasses compartment117
Ashtray, front117
Ashtray, rear118
Cigarette lighter, rear118
Loading and transporting:
Ski bag119
Cargo area
Fold the rear backrests
down120
Cargo area cover121
Partition net122
Cover panels in the cargo
area123
Power outlets124
Pull-out cargo floor124
Cargo loading126
Roof-mounted luggage rack127
Page 8 of 183
8n
About this Owner's Manual
We have made every effort to ensure
that you are able to find what you need
in this Owner's Manual as quickly as
possible. The fastest way to find certain
topics is by using the detailed index at
the end. If you desire an initial overview
of your vehicle, this can be found in the
first chapter.
Should you wish to sell your BMW at
some time in the future, please
remember to hand over the Owner's
Manual to the new owner; it is an
important part of the vehicle.
If you have any questions, your
BMW Sports Activity Vehicle center
will be glad to advise you.
Symbols used
Indicates precautions that must
be followed precisely in order to
avoid the possibility of personal injury
and serious damage to the vehicle.
Contains information that will
assist you in gaining the optimum
benefit from your vehicle and enable
you to care more effectively for your
vehicle.
Refers to measures that can
be taken to help protect the
environment.
<
Marks the end of a specific item of
information.
*
Indicates special equipment,
country-specific equipment and
optional extras.
Identifies systems or components,
which can be activated or adapted
to suit an individual driver's require-
ments Ð Vehicle Memory, Key Memory,
refer to page 61.
Activation and adjustments on some of
these systems can be performed at
your BMW Sports Activity Vehicle
center.
The individual vehicle
On buying your BMW, you have
decided in favor of a model with individ-
ualized equipment and features. This
Owner's Manual describes all models
and equipment that BMW offers within
the same group.
We hope you will understand that
equipment and features are included
that you might not have chosen for your
vehicle. Any differences can easily be
identified, since all optional extras and
special equipment are marked with an
asterisk
*
.
If your BMW features equipment which
is not described in this Owner's
Manual, Supplementary Owner's Man-
uals are enclosed. We ask you to read
these manuals as well.
Notes
Symbols
The individual vehicle
Notes
Page 19 of 183
19n
OverviewControlsMaintenanceRepairsDataIndex
Indicator and warning lamps
Technology that monitors itself
Indicator and warning lamps that are
identified by
l
are tested for proper
functioning whenever the ignition key is
turned. They each light up once for
different periods of time.
If a fault should occur in one of these
systems, the corresponding lamp does
not go out after the engine is started or
it lights up while the vehicle is moving.
You will see how to react to this in the
following section.
Red: stop immediately
Battery charge current
l
The battery is no longer being
charged. There is a malfunction
of the alternator drive belt or in the
charging circuit of the alternator. Please
contact the nearest BMW Sports
Activity Vehicle center.
If the drive belt is defective, do not
continue driving. The engine could
be damaged due to overheating. If the
drive belt is defective, increased
steering effort is also required.
<
Engine oil pressure
l
Stop the vehicle immediately
and switch off the engine.
Check the engine oil level; top off as
required. If the oil level is correct:
please contact the nearest BMW Sports
Activity Vehicle center.
Do not continue driving. The
engine could be damaged
because of inadequate lubrication.
<
Parking brake
*
/
Brake hydraulic system
l
Comes on when you engage the
parking brake.
For additional information: refer to
page 64.
Comes on although the parking brake
is released: have the brake fluid level
checked. Before continuing your
journey, be sure to read the notes on
pages 132 and 144.
Also comes on in the Check Control
with the message CHECK BRAKE
LININGS.
Parking brake warning lamp
*
/
Brake hydraulic system warning
lamp for Canadian models.
Tire Pressure Monitor RDC
*
l
In addition, an acoustic signal is
sounded: a flat tire has
occurred. Reduce vehicle speed imme-
diately and stop the vehicle. Avoid hard
brake applications. As you steer the
vehicle, use caution and avoid overcor-
recting.
For additional information: refer to
page 96.
Page 30 of 183
30n
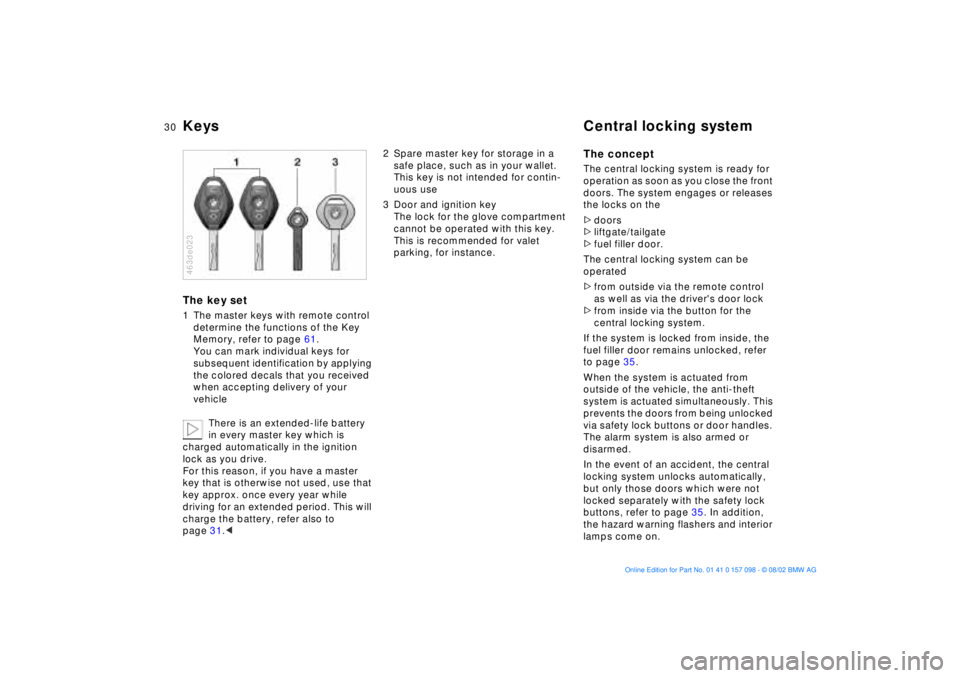
Keys Central locking system The key set1 The master keys with remote control
determine the functions of the Key
Memory, refer to page 61.
You can mark individual keys for
subsequent identification by applying
the colored decals that you received
when accepting delivery of your
vehicle
There is an extended-life battery
in every master key which is
charged automatically in the ignition
lock as you drive.
For this reason, if you have a master
key that is otherwise not used, use that
key approx. once every year while
driving for an extended period. This will
charge the battery, refer also to
page 31.< 463de023
2 Spare master key for storage in a
safe place, such as in your wallet.
This key is not intended for contin-
uous use
3 Door and ignition key
The lock for the glove compartment
cannot be operated with this key.
This is recommended for valet
parking, for instance.
The concept The central locking system is ready for
operation as soon as you close the front
doors. The system engages or releases
the locks on the
>doors
>liftgate/tailgate
>fuel filler door.
The central locking system can be
operated
>from outside via the remote control
as well as via the driver's door lock
>from inside via the button for the
central locking system.
If the system is locked from inside, the
fuel filler door remains unlocked, refer
to page 35.
When the system is actuated from
outside of the vehicle, the anti-theft
system is actuated simultaneously. This
prevents the doors from being unlocked
via safety lock buttons or door handles.
The alarm system is also armed or
disarmed.
In the event of an accident, the central
locking system unlocks automatically,
but only those doors which were not
locked separately with the safety lock
buttons, refer to page 35. In addition,
the hazard warning flashers and interior
lamps come on.
Page 31 of 183
31n
OverviewControlsMaintenanceRepairsDataIndex
Opening and closing Ð via the remote controlThe conceptThe remote control makes opening and
locking the doors of your vehicle very
convenient. Furthermore it provides
three additional functions that can only
be executed via the remote control:
>Switch on the interior lamps, refer to
page 32.
With this function, you can also
search for your vehicle Ñ when
parked in an underground garage, for
instance
>Open the liftgate, refer to page 32.
The liftgate will open slightly, regard-
less of whether it was previously
locked or unlocked
>Panic mode, refer to page 32.
In case of danger, you can trigger an
alarm.
Whenever you unlock or lock the
vehicle, you simultaneously deactivate/
activate the anti-theft system, disarm/
arm the alarm system and switch the
interior lamps on/off.
You can have an acknowledgment
signal set to confirm that the
vehicle is correctly locked.<
Since passengers or animals
remaining in the vehicle might be
able to lock the doors from the inside,
take the vehicle's keys with you so that
the vehicle can be opened again from
the outside at any time.<
If it is no longer possible to lock
the vehicle via the remote control,
the battery is discharged. Use this key
while driving for an extended period in
order to charge the battery. To prevent
unauthorized use of the remote control,
surrender only the door and ignition key
or the spare key when leaving the
vehicle for valet parking, for example,
refer to page 30.
In the event of a system malfunction,
please contact your BMW Sports
Activity Vehicle center. You can also
obtain replacement keys there.<
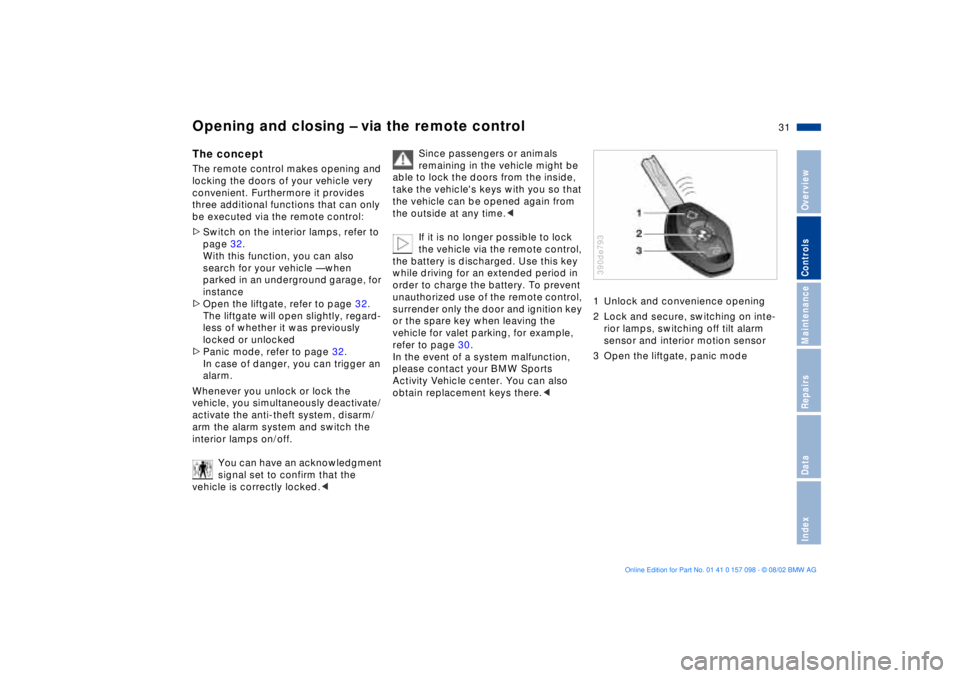
1 Unlock and convenience opening
2 Lock and secure, switching on inte-
rior lamps, switching off tilt alarm
sensor and interior motion sensor
3 Open the liftgate, panic mode390de793
Page 33 of 183
33n
OverviewControlsMaintenanceRepairsDataIndex
Opening and closing Ð via the remote controlSystem interferenceThe remote control system may be
affected by other units or equipment
operating in the immediate vicinity of
your vehicle.
If this should occur, you can unlock and
lock the vehicle via the door lock with a
master key.
For US owners onlyThe transmitter and receiver units
comply with part 15 of the FCC Ð
Federal Communication Commission Ð
regulations. Operation is governed by
the following:
FCC ID: LX8EWS
LX8FZVS
LX8FZVE
Compliance statement:
This device complies with part 15 of the
FCC Rules. Operation is subject to the
following two conditions:
>This device may not cause harmful
interference, and
>this device must accept any interfer-
ence received, including interference
that may cause undesired operation.
Any unauthorized modifications to
these devices could void the
user's authority to operate this equip-
ment.<
Page 34 of 183
34n
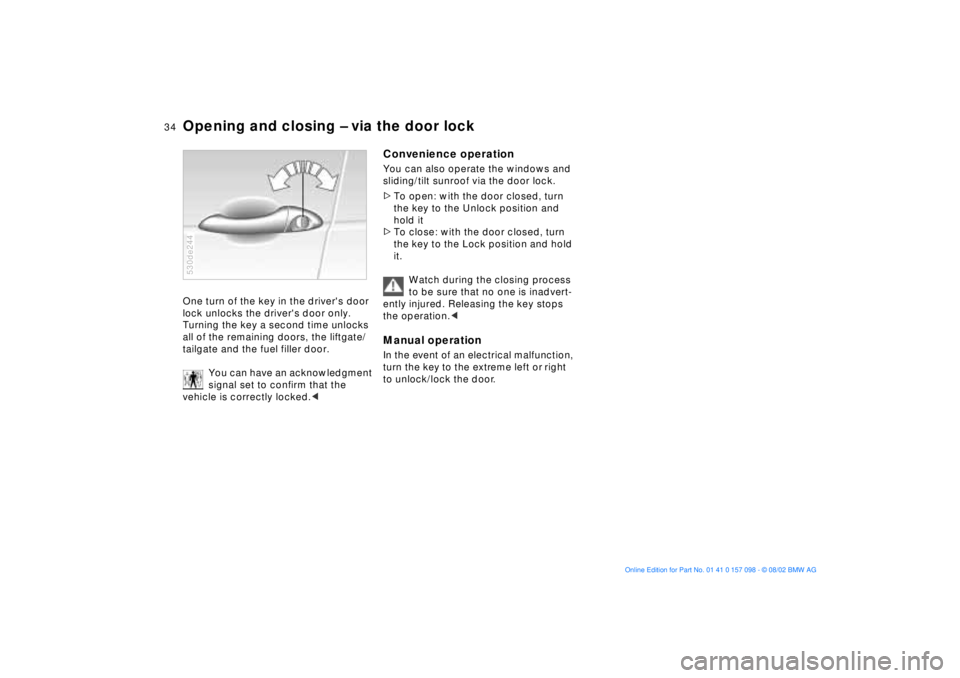
Opening and closing Ð via the door lockOne turn of the key in the driver's door
lock unlocks the driver's door only.
Turning the key a second time unlocks
all of the remaining doors, the liftgate/
tailgate and the fuel filler door.
You can have an acknowledgment
signal set to confirm that the
vehicle is correctly locked.< 530de244
Convenience operationYou can also operate the windows and
sliding/tilt sunroof via the door lock.
>To open: with the door closed, turn
the key to the Unlock position and
hold it
>To close: with the door closed, turn
the key to the Lock position and hold
it.
Watch during the closing process
to be sure that no one is inadvert-
ently injured. Releasing the key stops
the operation.< Manual operation In the event of an electrical malfunction,
turn the key to the extreme left or right
to unlock/lock the door.
Page 35 of 183
35n
OverviewControlsMaintenanceRepairsDataIndex
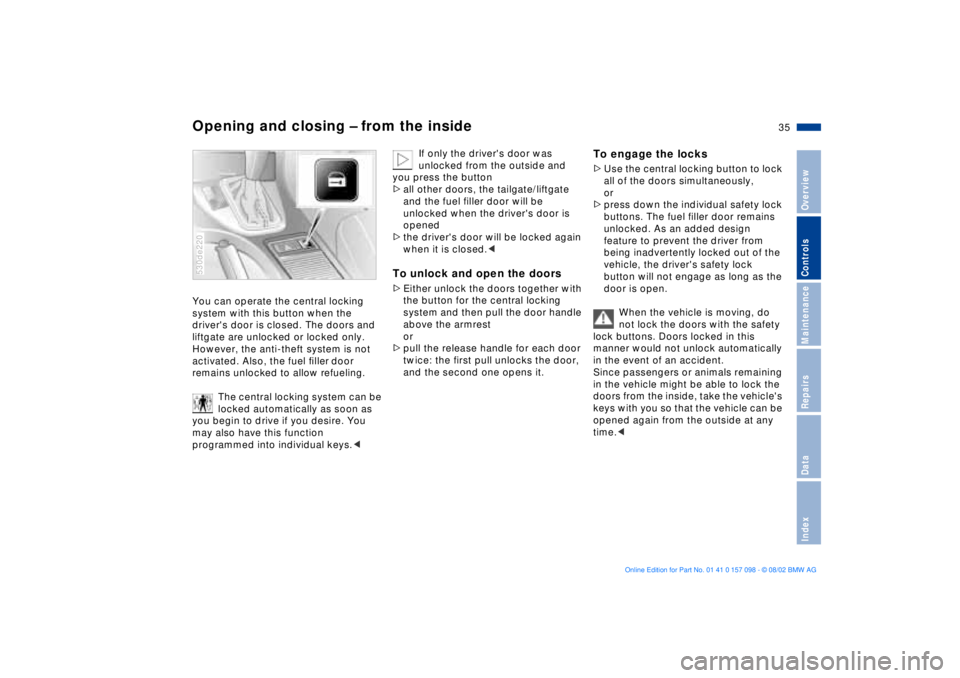
Opening and closing Ð from the insideYou can operate the central locking
system with this button when the
driver's door is closed. The doors and
liftgate are unlocked or locked only.
However, the anti-theft system is not
activated. Also, the fuel Þller door
remains unlocked to allow refueling.
The central locking system can be
locked automatically as soon as
you begin to drive if you desire. You
may also have this function
programmed into individual keys.<530de220
If only the driver's door was
unlocked from the outside and
you press the button
>all other doors, the tailgate/liftgate
and the fuel filler door will be
unlocked when the driver's door is
opened
>the driver's door will be locked again
when it is closed.<
To unlock and open the doors >Either unlock the doors together with
the button for the central locking
system and then pull the door handle
above the armrest
or
>pull the release handle for each door
twice: the first pull unlocks the door,
and the second one opens it.
To engage the locks >Use the central locking button to lock
all of the doors simultaneously,
or
>press down the individual safety lock
buttons. The fuel filler door remains
unlocked. As an added design
feature to prevent the driver from
being inadvertently locked out of the
vehicle, the driver's safety lock
button will not engage as long as the
door is open.
When the vehicle is moving, do
not lock the doors with the safety
lock buttons. Doors locked in this
manner would not unlock automatically
in the event of an accident.
Since passengers or animals remaining
in the vehicle might be able to lock the
doors from the inside, take the vehicle's
keys with you so that the vehicle can be
opened again from the outside at any
time.<
Page 38 of 183
38n
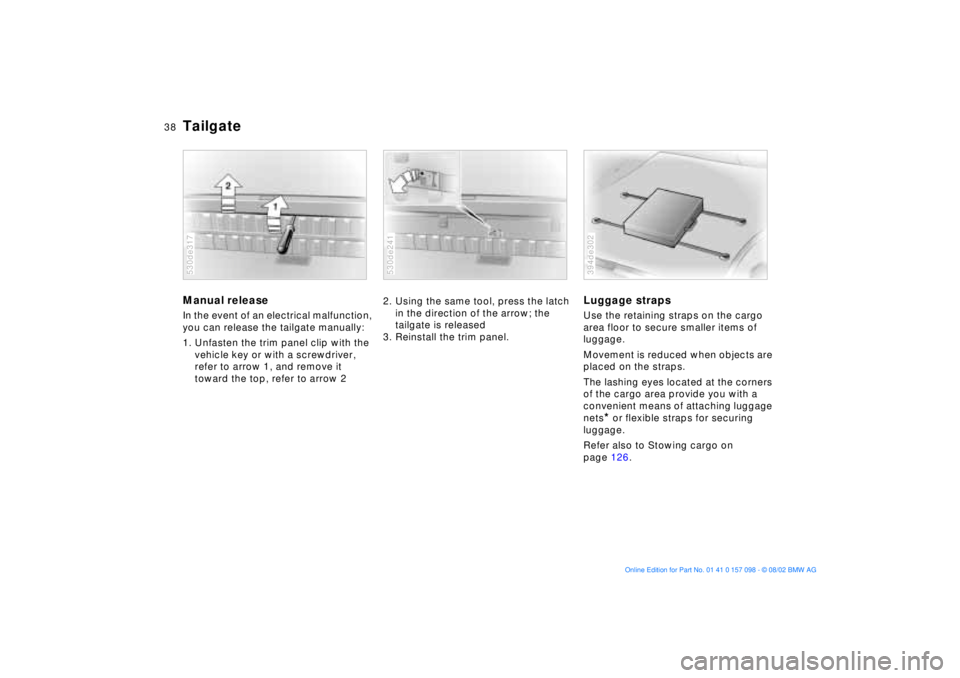
TailgateManual release In the event of an electrical malfunction,
you can release the tailgate manually:
1. Unfasten the trim panel clip with the
vehicle key or with a screwdriver,
refer to arrow 1, and remove it
toward the top, refer to arrow 2530de317
2. Using the same tool, press the latch
in the direction of the arrow; the
tailgate is released
3. Reinstall the trim panel. 530de241
Luggage strapsUse the retaining straps on the cargo
area floor to secure smaller items of
luggage.
Movement is reduced when objects are
placed on the straps.
The lashing eyes located at the corners
of the cargo area provide you with a
convenient means of attaching luggage
nets
* or flexible straps for securing
luggage.
Refer also to Stowing cargo on
page 126.
394de302