remote control BMW X5 4.8I 2007 E70 User Guide
[x] Cancel search | Manufacturer: BMW, Model Year: 2007, Model line: X5 4.8I, Model: BMW X5 4.8I 2007 E70Pages: 272, PDF Size: 9.03 MB
Page 40 of 272
Opening and closing
38 The window closes without the pinch pro-
tection system.
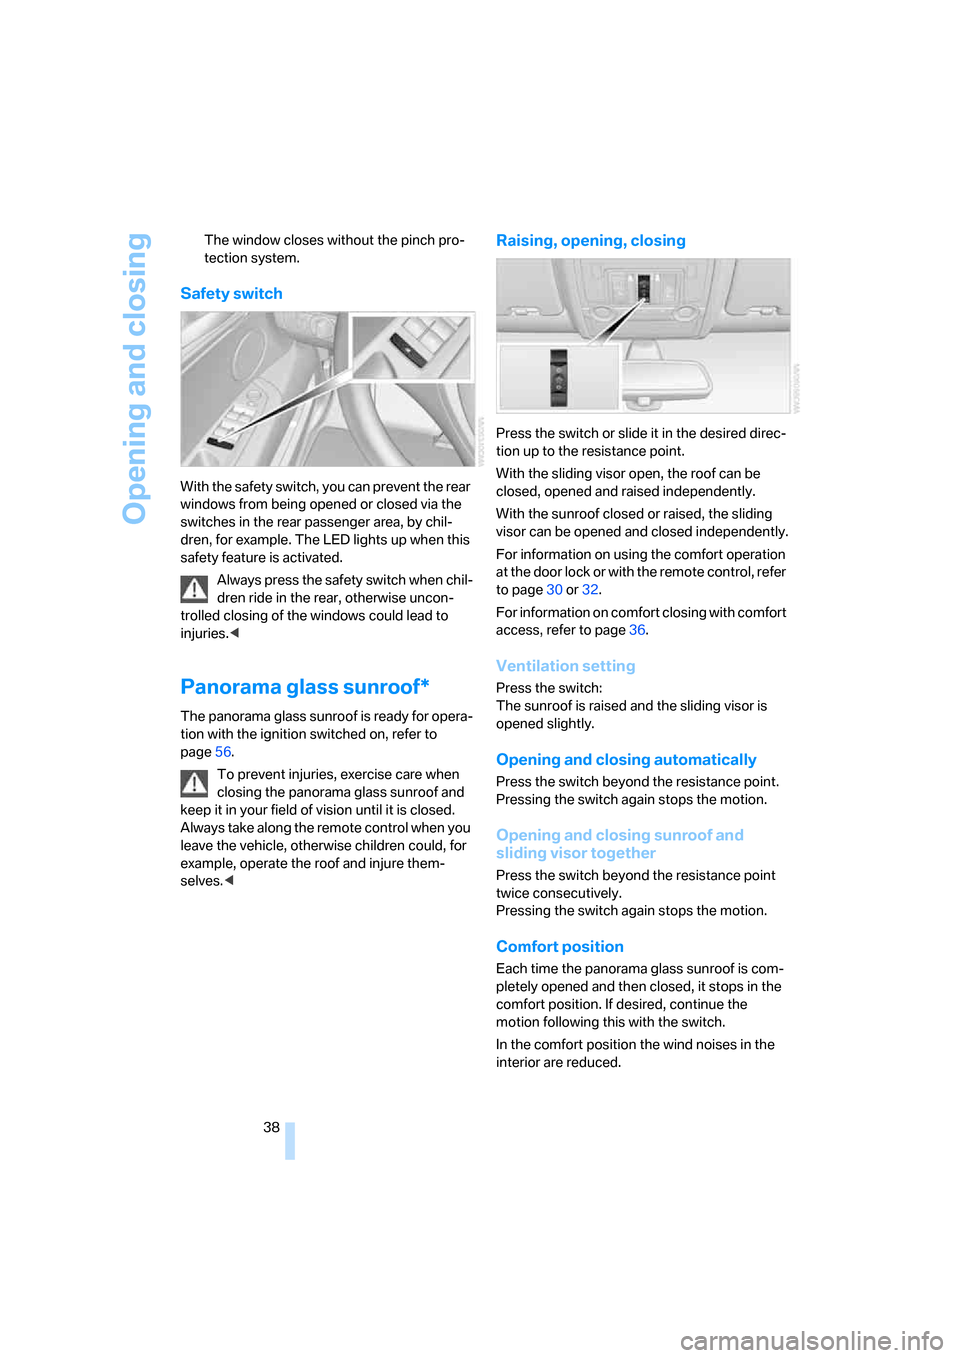
Safety switch
With the safety switch, you can prevent the rear
windows from being opened or closed via the
switches in the rear passenger area, by chil-
dren, for example. The LED lights up when this
safety feature is activated.
Always press the safety switch when chil-
dren ride in the rear, otherwise uncon-
trolled closing of the windows could lead to
injuries.<
Panorama glass sunroof*
The panorama glass sunroof is ready for opera-
tion with the ignition switched on, refer to
page56.
To prevent injuries, exercise care when
closing the panorama glass sunroof and
keep it in your field of vision until it is closed.
Always take along the remote control when you
leave the vehicle, otherwise children could, for
example, operate the roof and injure them-
selves.<
Raising, opening, closing
Press the switch or slide it in the desired direc-
tion up to the resistance point.
With the sliding visor open, the roof can be
closed, opened and raised independently.
With the sunroof closed or raised, the sliding
visor can be opened and closed independently.
For information on using the comfort operation
at the door lock or with the remote control, refer
to page30 or32.
For information on comfort closing with comfort
access, refer to page36.
Ventilation setting
Press the switch:
The sunroof is raised and the sliding visor is
opened slightly.
Opening and closing automatically
Press the switch beyond the resistance point.
Pressing the switch again stops the motion.
Opening and closing sunroof and
sliding visor together
Press the switch beyond the resistance point
twice consecutively.
Pressing the switch again stops the motion.
Comfort position
Each time the panorama glass sunroof is com-
pletely opened and then closed, it stops in the
comfort position. If desired, continue the
motion following this with the switch.
In the comfort position the wind noises in the
interior are reduced.
Page 44 of 272
Adjusting
42
Adjusting lumbar support*
You can also adjust the contour of the backrest
to obtain additional support in the lumbar
region.
The upper hips and spinal column receive sup-
plementary support to help you maintain a
relaxed, upright sitting position.
>Increase or decrease curvature: press front
or rear section of switch.
>Shift curvature up or down: press upper or
lower section of switch.
Seat, mirror and steering
wheel memory*
You can store and select two different adjust-
ment settings for the driver's seat, exterior mir-
rors and steering wheel.
The adjustment of the backrest width and lum-
bar support is not stored in the memory.
Storing
1.Switch on radio readiness or ignition, refer
to page56.
2.Set the desired seat, exterior mirror and
steering wheel positions.3.Press the button:
The LED in the button lights up.
4.Press the desired memory button1 or2:
The LED goes out.
The driver's seat and exterior mirror posi-
tions are stored for the remote control cur-
rently in use.
Calling up automatically
You can choose when the stored driver's seat
and exterior mirror positions are called up.
>Calling up when unlocking vehicle
>Calling up when opening driver's door
When using this feature, always make
sure that the footwell behind the driver's
seat is empty and unobstructed. Failure to do
so could cause injury to persons or damage to
objects behind the seat as a result of a rearward
movement of the seat.<
The system cancels the adjustment procedure
when you briefly press one of the seat adjust-
ment switches or one of the memory buttons.
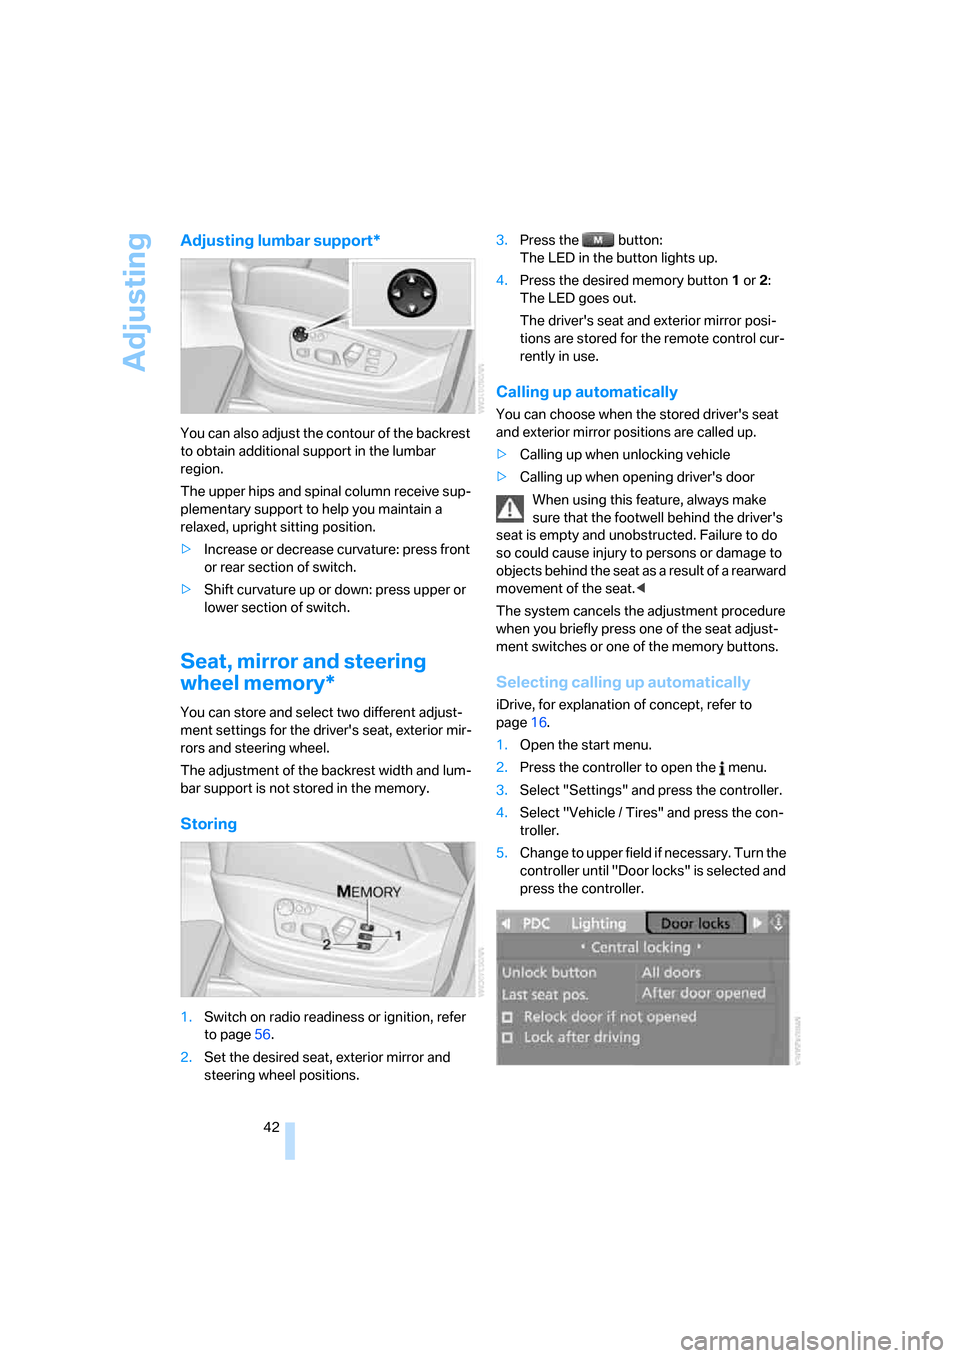
Selecting calling up automatically
iDrive, for explanation of concept, refer to
page16.
1.Open the start menu.
2.Press the controller to open the menu.
3.Select "Settings" and press the controller.
4.Select "Vehicle / Tires" and press the con-
troller.
5.Change to upper field if necessary. Turn the
controller until "Door locks" is selected and
press the controller.
Page 52 of 272
Adjusting
50
Easy entry/exit*
To facilitate entry and exit, the steering wheel
temporarily moves into the uppermost position.
Steering wheel heating*
Press the button with the ignition switched on;
the LED lights up.
Programmable buttons* on steering
wheel
You can program the buttons individually.
The setting is stored for the remote control cur-
rently in use.
iDrive, for explanation of concept, refer to
page16.
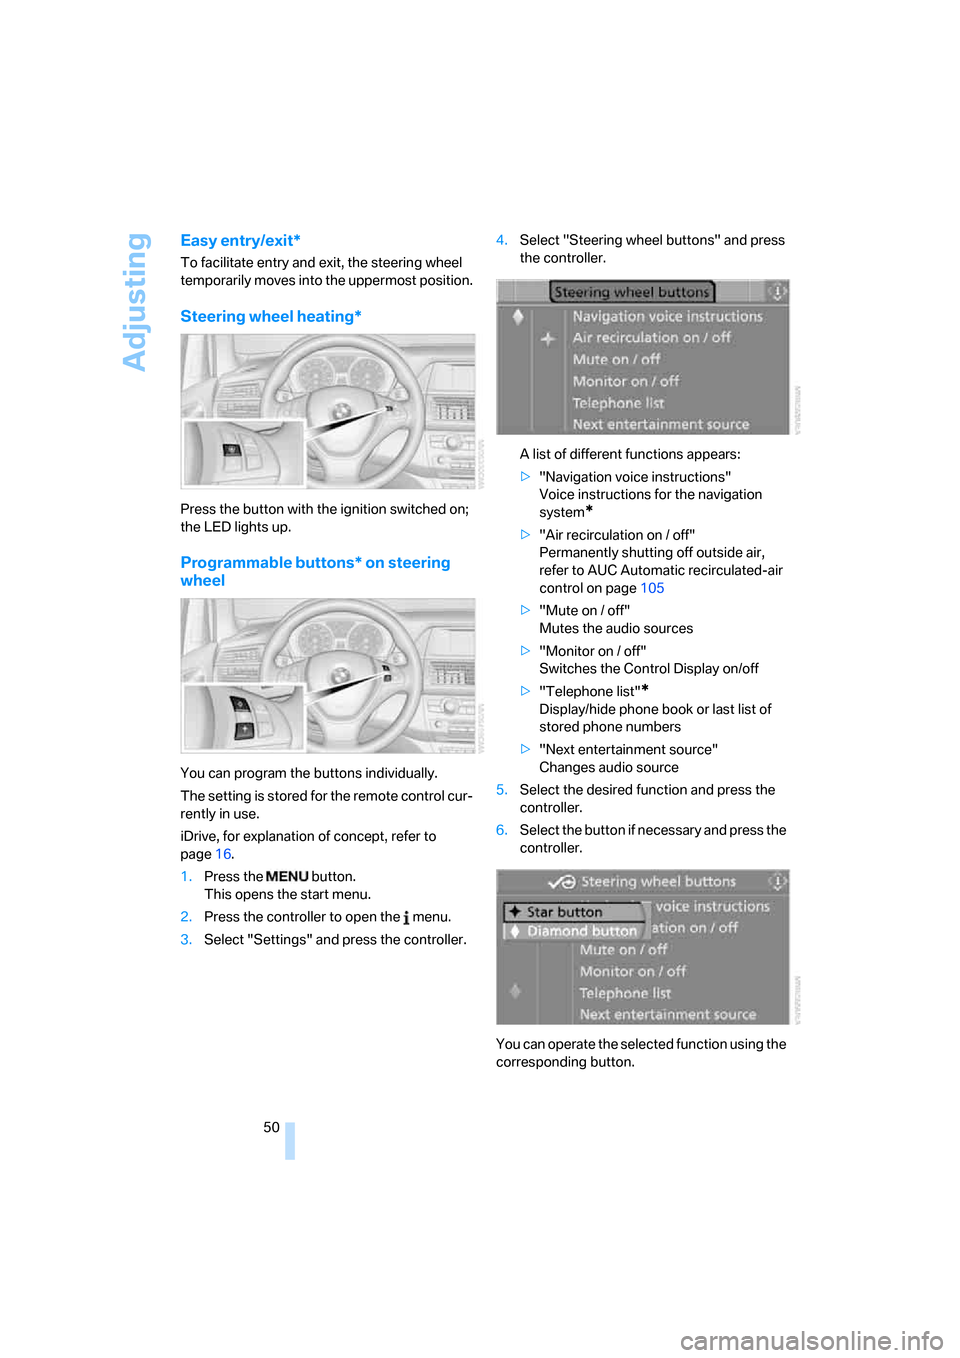
1.Press the button.
This opens the start menu.
2.Press the controller to open the menu.
3.Select "Settings" and press the controller.4.Select "Steering wheel buttons" and press
the controller.
A list of different functions appears:
>"Navigation voice instructions"
Voice instructions for the navigation
system
*
>"Air recirculation on / off"
Permanently shutting off outside air,
refer to AUC Automatic recirculated-air
control on page105
>"Mute on / off"
Mutes the audio sources
>"Monitor on / off"
Switches the Control Display on/off
>"Telephone list"
*
Display/hide phone book or last list of
stored phone numbers
>"Next entertainment source"
Changes audio source
5.Select the desired function and press the
controller.
6.Select the button if necessary and press the
controller.
You can operate the selected function using the
corresponding button.
Page 58 of 272
Driving
56
Driving
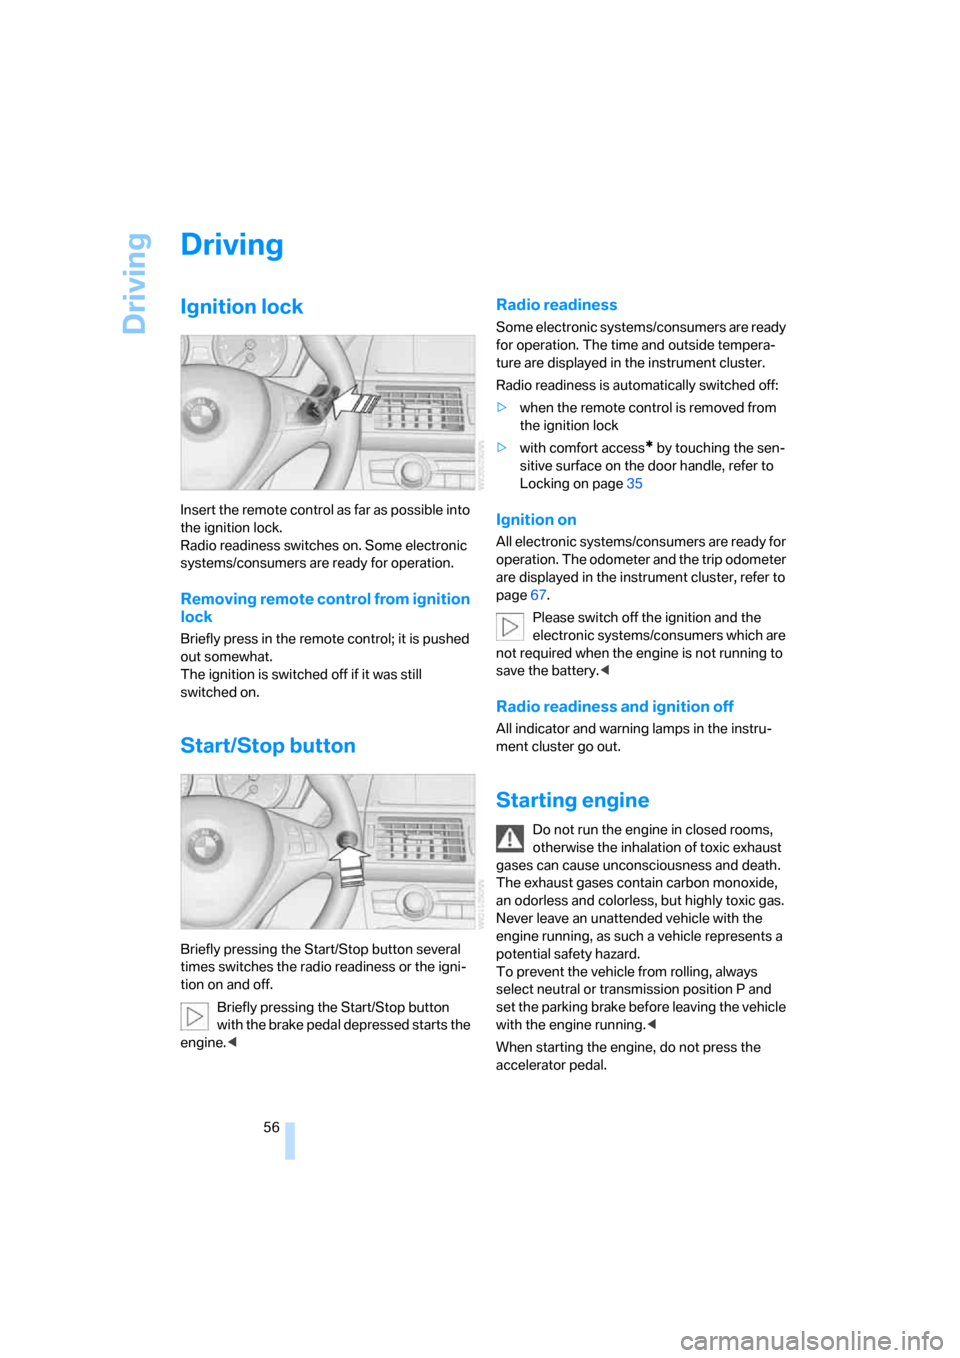
Ignition lock
Insert the remote control as far as possible into
the ignition lock.
Radio readiness switches on. Some electronic
systems/consumers are ready for operation.
Removing remote control from ignition
lock
Briefly press in the remote control; it is pushed
out somewhat.
The ignition is switched off if it was still
switched on.
Start/Stop button
Briefly pressing the Start/Stop button several
times switches the radio readiness or the igni-
tion on and off.
Briefly pressing the Start/Stop button
with the brake pedal depressed starts the
engine.<
Radio readiness
Some electronic systems/consumers are ready
for operation. The time and outside tempera-
ture are displayed in the instrument cluster.
Radio readiness is automatically switched off:
>when the remote control is removed from
the ignition lock
>with comfort access
* by touching the sen-
sitive surface on the door handle, refer to
Locking on page35
Ignition on
All electronic systems/consumers are ready for
operation. The odometer and the trip odometer
are displayed in the instrument cluster, refer to
page67.
Please switch off the ignition and the
electronic systems/consumers which are
not required when the engine is not running to
save the battery.<
Radio readiness and ignition off
All indicator and warning lamps in the instru-
ment cluster go out.
Starting engine
Do not run the engine in closed rooms,
otherwise the inhalation of toxic exhaust
gases can cause unconsciousness and death.
The exhaust gases contain carbon monoxide,
an odorless and colorless, but highly toxic gas.
Never leave an unattended vehicle with the
engine running, as such a vehicle represents a
potential safety hazard.
To prevent the vehicle from rolling, always
select neutral or transmission position P and
set the parking brake before leaving the vehicle
with the engine running.<
When starting the engine, do not press the
accelerator pedal.
Page 59 of 272
Controls
57Reference
At a glance
Driving tips
Communications
Navigation
Entertainment
Mobility
Do not allow the engine to warm up by leaving it
running while the vehicle remains stationary.
Instead, drive off at a moderate engine speed.
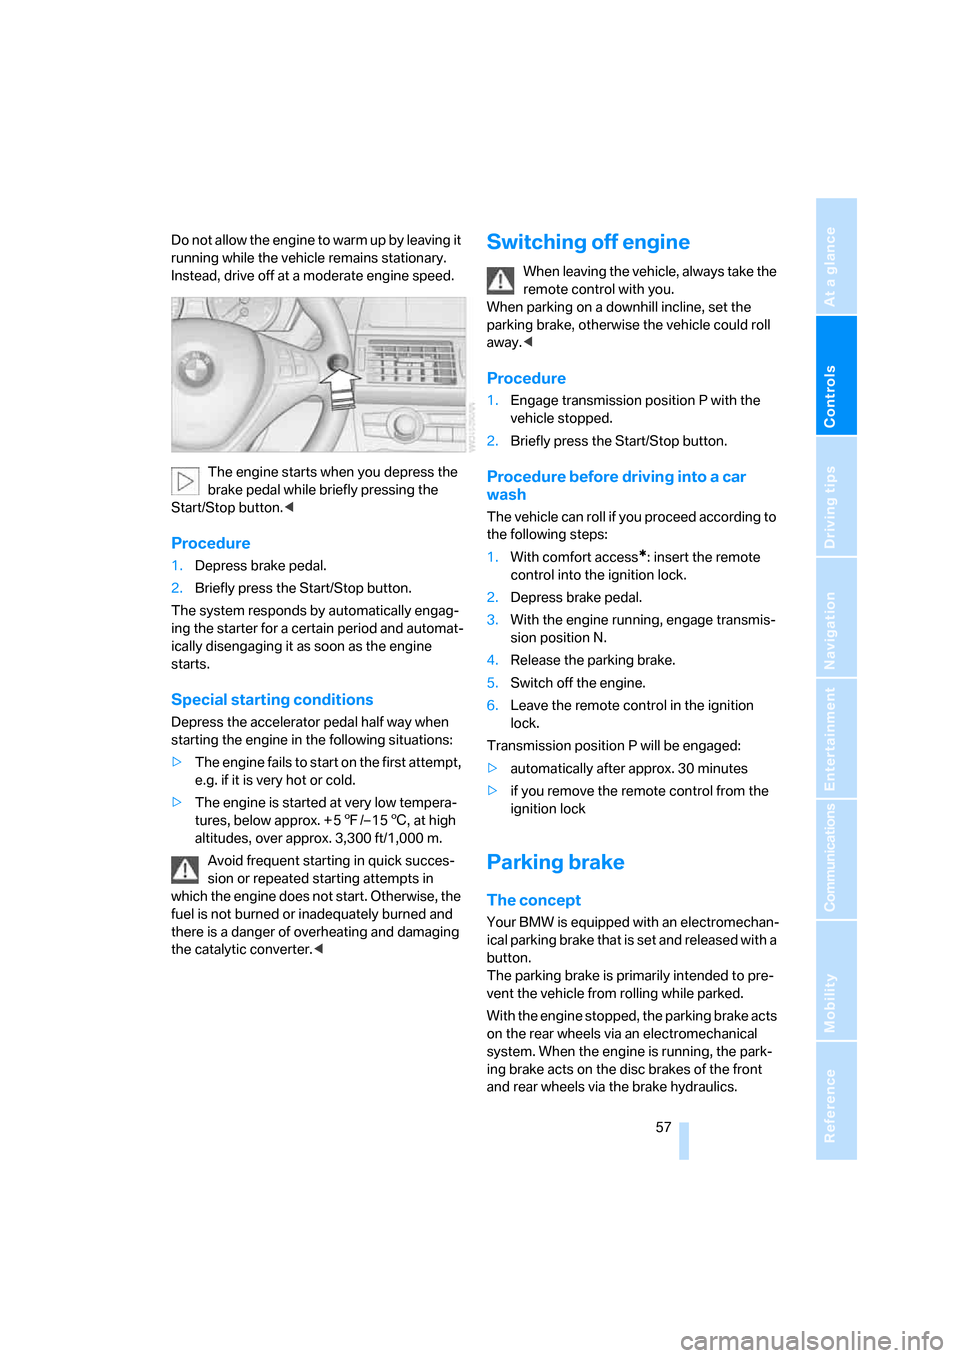
The engine starts when you depress the
brake pedal while briefly pressing the
Start/Stop button.<
Procedure
1.Depress brake pedal.
2.Briefly press the Start/Stop button.
The system responds by automatically engag-
ing the starter for a certain period and automat-
ically disengaging it as soon as the engine
starts.
Special starting conditions
Depress the accelerator pedal half way when
starting the engine in the following situations:
>The engine fails to start on the first attempt,
e.g. if it is very hot or cold.
>The engine is started at very low tempera-
tures, below approx. + 57/– 156, at high
altitudes, over approx. 3,300 ft/1,000 m.
Avoid frequent starting in quick succes-
sion or repeated starting attempts in
which the engine does not start. Otherwise, the
fuel is not burned or inadequately burned and
there is a danger of overheating and damaging
the catalytic converter.<
Switching off engine
When leaving the vehicle, always take the
remote control with you.
When parking on a downhill incline, set the
parking brake, otherwise the vehicle could roll
away.<
Procedure
1.Engage transmission position P with the
vehicle stopped.
2.Briefly press the Start/Stop button.
Procedure before driving into a car
wash
The vehicle can roll if you proceed according to
the following steps:
1.With comfort access
*: insert the remote
control into the ignition lock.
2.Depress brake pedal.
3.With the engine running, engage transmis-
sion position N.
4.Release the parking brake.
5.Switch off the engine.
6.Leave the remote control in the ignition
lock.
Transmission position P will be engaged:
>automatically after approx. 30 minutes
>if you remove the remote control from the
ignition lock
Parking brake
The concept
Your BMW is equipped with an electromechan-
ical parking brake that is set and released with a
button.
The parking brake is primarily intended to pre-
vent the vehicle from rolling while parked.
With the engine stopped, the parking brake acts
on the rear wheels via an electromechanical
system. When the engine is running, the park-
ing brake acts on the disc brakes of the front
and rear wheels via the brake hydraulics.
Page 60 of 272
Driving
58
Setting
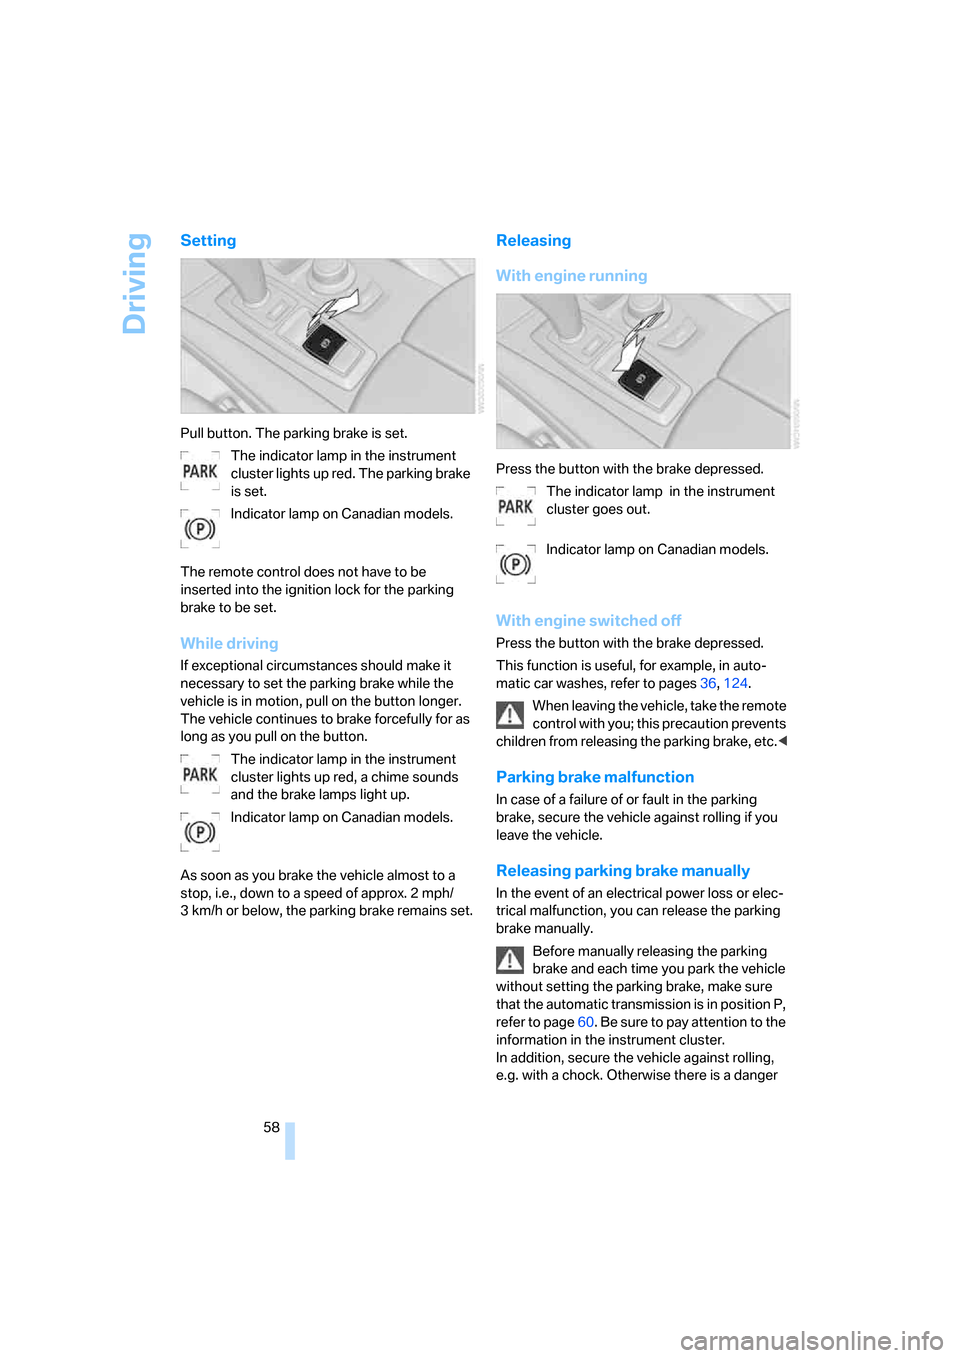
Pull button. The parking brake is set.
The indicator lamp in the instrument
cluster lights up red. The parking brake
is set.
Indicator lamp on Canadian models.
The remote control does not have to be
inserted into the ignition lock for the parking
brake to be set.
While driving
If exceptional circumstances should make it
necessary to set the parking brake while the
vehicle is in motion, pull on the button longer.
The vehicle continues to brake forcefully for as
long as you pull on the button.
The indicator lamp in the instrument
cluster lights up red, a chime sounds
and the brake lamps light up.
Indicator lamp on Canadian models.
As soon as you brake the vehicle almost to a
stop, i.e., down to a speed of approx. 2 mph/
3 km/h or below, the parking brake remains set.
Releasing
With engine running
Press the button with the brake depressed.
The indicator lamp in the instrument
cluster goes out.
Indicator lamp on Canadian models.
With engine switched off
Press the button with the brake depressed.
This function is useful, for example, in auto-
matic car washes, refer to pages36,124.
When leaving the vehicle, take the remote
control with you; this precaution prevents
children from releasing the parking brake, etc.<
Parking brake malfunction
In case of a failure of or fault in the parking
brake, secure the vehicle against rolling if you
leave the vehicle.
Releasing parking brake manually
In the event of an electrical power loss or elec-
trical malfunction, you can release the parking
brake manually.
Before manually releasing the parking
brake and each time you park the vehicle
without setting the parking brake, make sure
that the automatic transmission is in position P,
refer to page60. Be sure to pay attention to the
information in the instrument cluster.
In addition, secure the vehicle against rolling,
e.g. with a chock. Otherwise there is a danger
Page 62 of 272
Driving
60
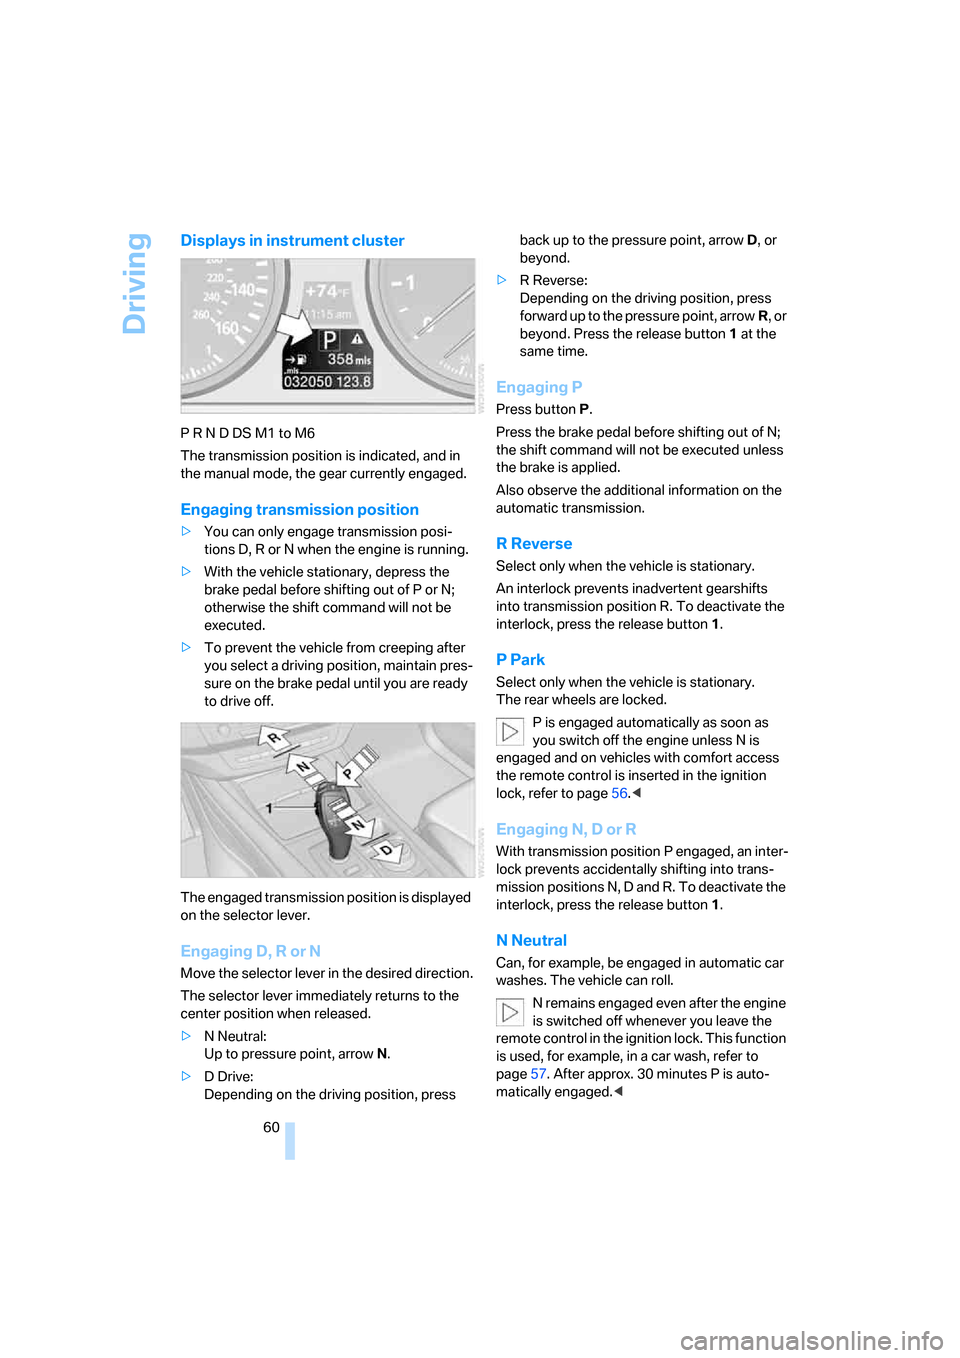
Displays in instrument cluster
P R N D DS M1 to M6
The transmission position is indicated, and in
the manual mode, the gear currently engaged.
Engaging transmission position
>You can only engage transmission posi-
tions D, R or N when the engine is running.
>With the vehicle stationary, depress the
brake pedal before shifting out of P or N;
otherwise the shift command will not be
executed.
>To prevent the vehicle from creeping after
you select a driving position, maintain pres-
sure on the brake pedal until you are ready
to drive off.
The engaged transmission position is displayed
on the selector lever.
Engaging D, R or N
Move the selector lever in the desired direction.
The selector lever immediately returns to the
center position when released.
>N Neutral:
Up to pressure point, arrowN.
>D Drive:
Depending on the driving position, press back up to the pressure point, arrowD, or
beyond.
>R Reverse:
Depending on the driving position, press
forward up to the pressure point, arrowR, or
beyond. Press the release button1 at the
same time.
Engaging P
Press buttonP.
Press the brake pedal before shifting out of N;
the shift command will not be executed unless
the brake is applied.
Also observe the additional information on the
automatic transmission.
R Reverse
Select only when the vehicle is stationary.
An interlock prevents inadvertent gearshifts
into transmission position R. To deactivate the
interlock, press the release button1.
P Park
Select only when the vehicle is stationary.
The rear wheels are locked.
P is engaged automatically as soon as
you switch off the engine unless N is
engaged and on vehicles with comfort access
the remote control is inserted in the ignition
lock, refer to page56.<
Engaging N, D or R
With transmission position P engaged, an inter-
lock prevents accidentally shifting into trans-
mission positions N, D and R. To deactivate the
interlock, press the release button1.
N Neutral
Can, for example, be engaged in automatic car
washes. The vehicle can roll.
N remains engaged even after the engine
is switched off whenever you leave the
remote control in the ignition lock. This function
is used, for example, in a car wash, refer to
page57. After approx. 30 minutes P is auto-
matically engaged.<
Page 64 of 272
Driving
62 3.Insert the releasing tool, contained in the
onboard tool kit under the floor panel, refer
to page228, into the opening, arrow1.
4.Turn the releasing tool as far as possible,
arrow2, and then press downward. The
transmission lock is released.
Lock the transmission lock after parking
the vehicle at its destination. Otherwise
there is a danger of the vehicle rolling.<
Locking
1.Pull out the releasing tool.
The transmission lock is locked again.
2.Close the cover in the bottom of the cup
holder and lay in the mat again.
3.Close the cover of the cup holder and stow
the releasing tool.
The display in the instrument cluster
must change from N to P after locking the
transmission lock. Otherwise there is a danger
of the vehicle rolling.<
Information on jump starting and towing from
page237.
Turn signals/headlamp
flasher/high beams
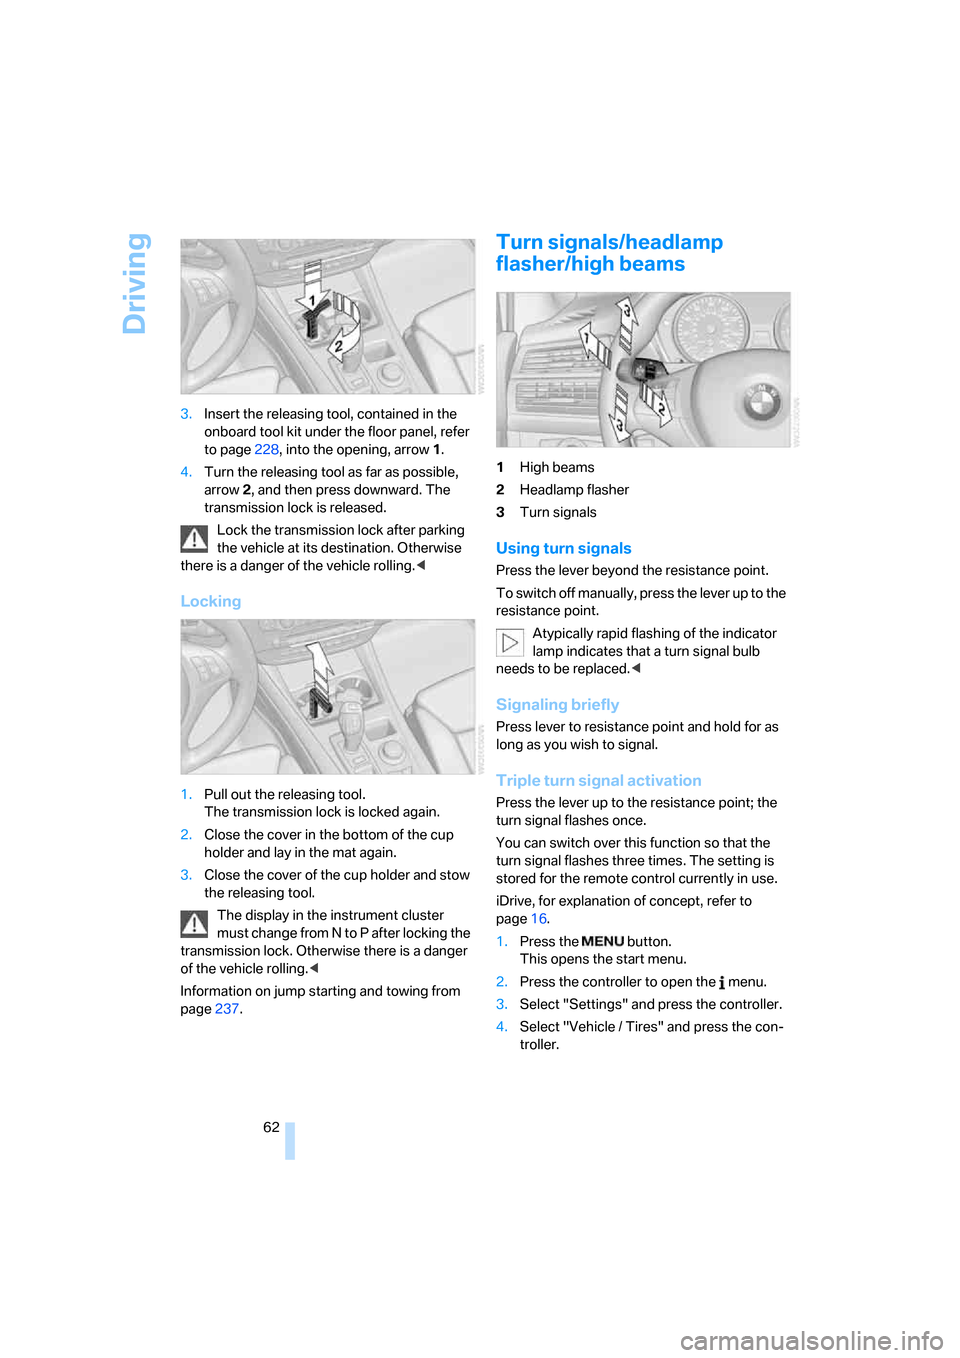
1High beams
2Headlamp flasher
3Turn signals
Using turn signals
Press the lever beyond the resistance point.
To switch off manually, press the lever up to the
resistance point.
Atypically rapid flashing of the indicator
lamp indicates that a turn signal bulb
needs to be replaced.<
Signaling briefly
Press lever to resistance point and hold for as
long as you wish to signal.
Triple turn signal activation
Press the lever up to the resistance point; the
turn signal flashes once.
You can switch over this function so that the
turn signal flashes three times. The setting is
stored for the remote control currently in use.
iDrive, for explanation of concept, refer to
page16.
1.Press the button.
This opens the start menu.
2.Press the controller to open the menu.
3.Select "Settings" and press the controller.
4.Select "Vehicle / Tires" and press the con-
troller.
Page 69 of 272
Controls
67Reference
At a glance
Driving tips
Communications
Navigation
Entertainment
Mobility
Everything under control
Odometer, outside
temperature display, clock
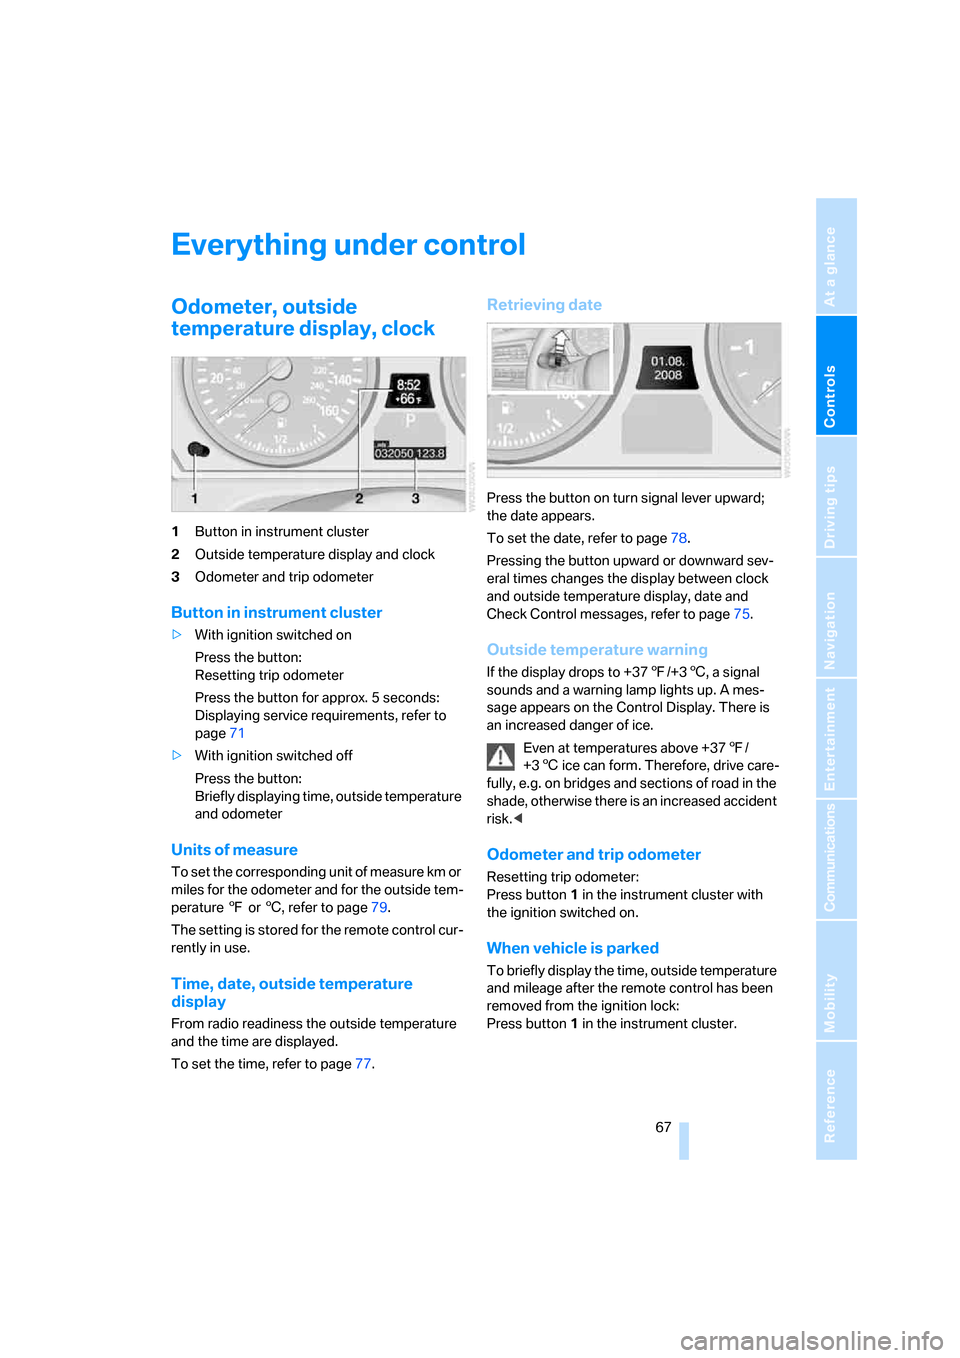
1Button in instrument cluster
2Outside temperature display and clock
3Odometer and trip odometer
Button in instrument cluster
>With ignition switched on
Press the button:
Resetting trip odometer
Press the button for approx. 5 seconds:
Displaying service requirements, refer to
page71
>With ignition switched off
Press the button:
Briefly displaying time, outside temperature
and odometer
Units of measure
To set the corresponding unit of measure km or
miles for the odometer and for the outside tem-
perature 7 or 6, refer to page79.
The setting is stored for the remote control cur-
rently in use.
Time, date, outside temperature
display
From radio readiness the outside temperature
and the time are displayed.
To set the time, refer to page77.
Retrieving date
Press the button on turn signal lever upward;
the date appears.
To set the date, refer to page78.
Pressing the button upward or downward sev-
eral times changes the display between clock
and outside temperature display, date and
Check Control messages, refer to page75.
Outside temperature warning
If the display drops to +377/+36, a signal
sounds and a warning lamp lights up. A mes-
sage appears on the Control Display. There is
an increased danger of ice.
Even at temperatures above +377/
+36 ice can form. Therefore, drive care-
fully, e.g. on bridges and sections of road in the
shade, otherwise there is an increased accident
risk.<
Odometer and trip odometer
Resetting trip odometer:
Press button 1 in the instrument cluster with
the ignition switched on.
When vehicle is parked
To briefly display the time, outside temperature
and mileage after the remote control has been
removed from the ignition lock:
Press button1 in the instrument cluster.
Page 80 of 272
Everything under control
78
Switching on hour signal*
You will hear three tones just before each full
hour.
Select "Hour memo" and press the controller.
The hour signal is activated.
The setting is stored for the remote control cur-
rently in use.
Setting time format
1.Select "Time format" and press the control-
ler.
2.Select the desired format and press the
controller.
The setting is stored for the remote control cur-
rently in use.
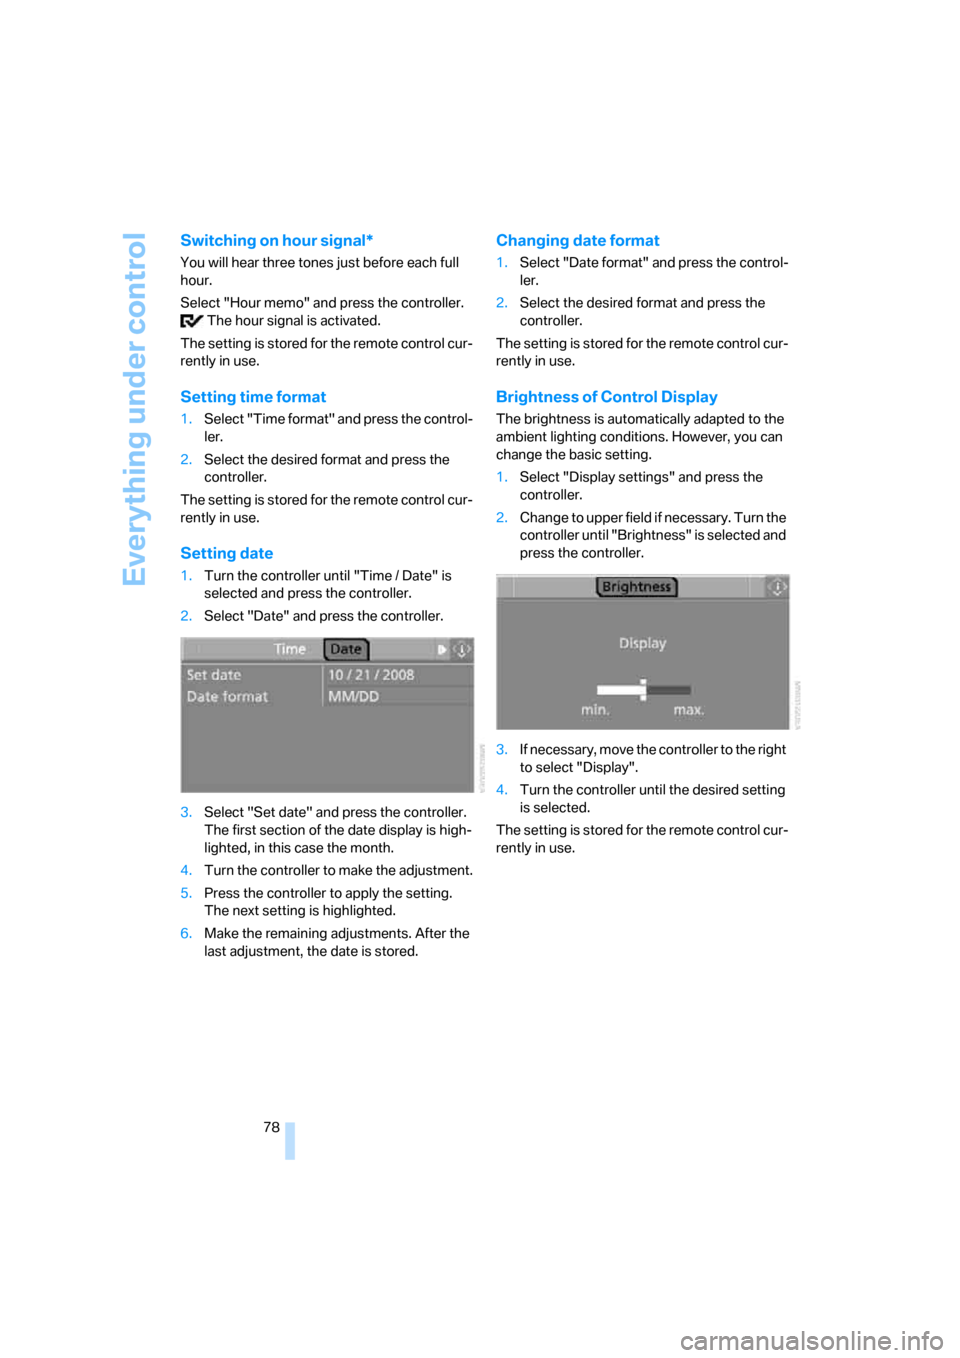
Setting date
1.Turn the controller until "Time / Date" is
selected and press the controller.
2.Select "Date" and press the controller.
3.Select "Set date" and press the controller.
The first section of the date display is high-
lighted, in this case the month.
4.Turn the controller to make the adjustment.
5.Press the controller to apply the setting.
The next setting is highlighted.
6.Make the remaining adjustments. After the
last adjustment, the date is stored.
Changing date format
1.Select "Date format" and press the control-
ler.
2.Select the desired format and press the
controller.
The setting is stored for the remote control cur-
rently in use.
Brightness of Control Display
The brightness is automatically adapted to the
ambient lighting conditions. However, you can
change the basic setting.
1.Select "Display settings" and press the
controller.
2.Change to upper field if necessary. Turn the
controller until "Brightness" is selected and
press the controller.
3.If necessary, move the controller to the right
to select "Display".
4.Turn the controller until the desired setting
is selected.
The setting is stored for the remote control cur-
rently in use.