remote control BMW X5 4.8I 2007 E70 Owner's Guide
[x] Cancel search | Manufacturer: BMW, Model Year: 2007, Model line: X5 4.8I, Model: BMW X5 4.8I 2007 E70Pages: 272, PDF Size: 9.03 MB
Page 81 of 272
Controls
79Reference
At a glance
Driving tips
Communications
Navigation
Entertainment
Mobility
Units of measure
You can change the units of measure for con-
sumption, distances, temperature and pres-
sure.
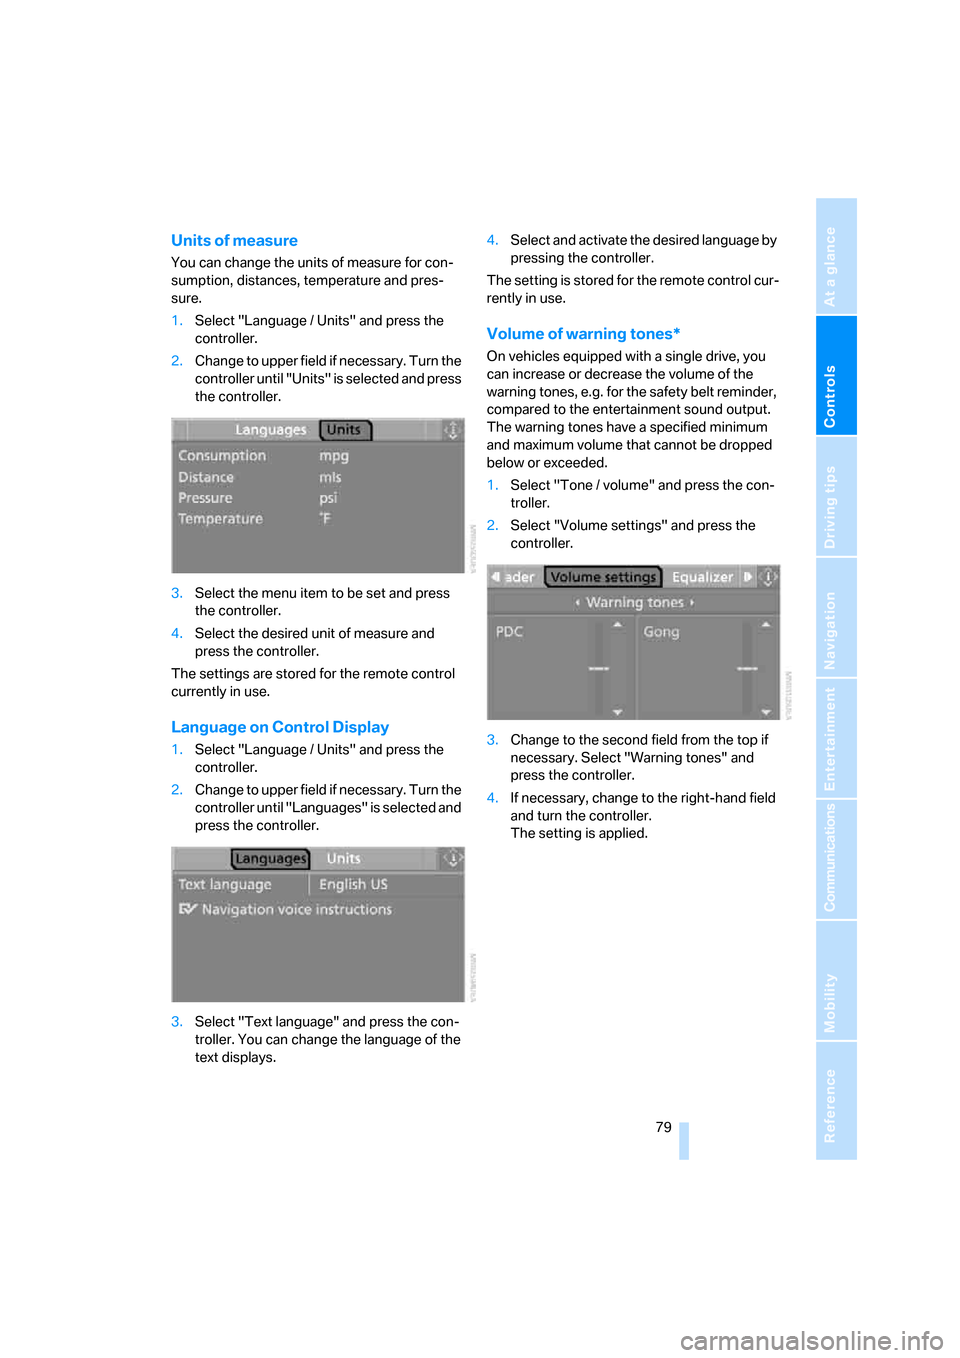
1.Select "Language / Units" and press the
controller.
2.Change to upper field if necessary. Turn the
controller until "Units" is selected and press
the controller.
3.Select the menu item to be set and press
the controller.
4.Select the desired unit of measure and
press the controller.
The settings are stored for the remote control
currently in use.
Language on Control Display
1.Select "Language / Units" and press the
controller.
2.Change to upper field if necessary. Turn the
controller until "Languages" is selected and
press the controller.
3.Select "Text language" and press the con-
troller. You can change the language of the
text displays.4.Select and activate the desired language by
pressing the controller.
The setting is stored for the remote control cur-
rently in use.
Volume of warning tones*
On vehicles equipped with a single drive, you
can increase or decrease the volume of the
warning tones, e.g. for the safety belt reminder,
compared to the entertainment sound output.
The warning tones have a specified minimum
and maximum volume that cannot be dropped
below or exceeded.
1.Select "Tone / volume" and press the con-
troller.
2.Select "Volume settings" and press the
controller.
3.Change to the second field from the top if
necessary. Select "Warning tones" and
press the controller.
4.If necessary, change to the right-hand field
and turn the controller.
The setting is applied.
Page 83 of 272
Controls
81Reference
At a glance
Driving tips
Communications
Navigation
Entertainment
Mobility
PDC with visual warning*
You can also have the system show distances
to objects on the Control Display. Objects that
are farther away are already shown there before
a signal tone sounds.
The setting is stored for the remote control cur-
rently in use.
If the vehicle is equipped with a backup camera,
refer to the display of the backup camera on
page83.
iDrive, for explanation of concept, refer to
page16.
1.Open the start menu.
2.Press the controller to open the menu.
3.Select "Settings" and press the controller.
4.Select "Vehicle / Tires" and press the con-
troller.
5.Change to upper field if necessary. Turn the
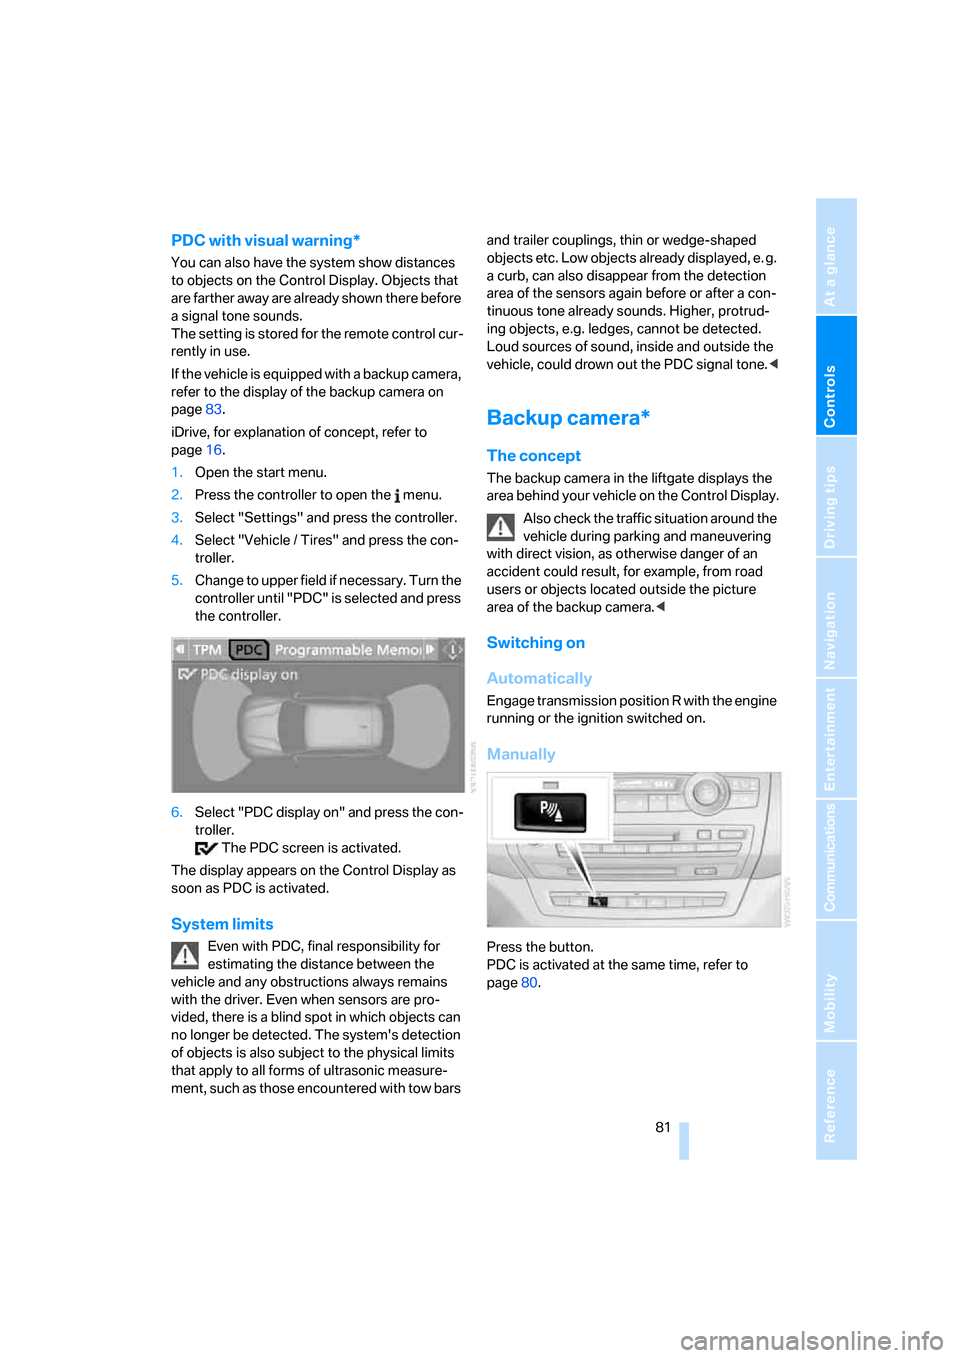
controller until "PDC" is selected and press
the controller.
6.Select "PDC display on" and press the con-
troller.
The PDC screen is activated.
The display appears on the Control Display as
soon as PDC is activated.
System limits
Even with PDC, final responsibility for
estimating the distance between the
vehicle and any obstructions always remains
with the driver. Even when sensors are pro-
vided, there is a blind spot in which objects can
no longer be detected. The system's detection
of objects is also subject to the physical limits
that apply to all forms of ultrasonic measure-
ment, such as those encountered with tow bars and trailer couplings, thin or wedge-shaped
objects etc. Low objects already displayed, e. g.
a curb, can also disappear from the detection
area of the sensors again before or after a con-
tinuous tone already sounds. Higher, protrud-
ing objects, e.g. ledges, cannot be detected.
Loud sources of sound, inside and outside the
vehicle, could drown out the PDC signal tone.<
Backup camera*
The concept
The backup camera in the liftgate displays the
area behind your vehicle on the Control Display.
Also check the traffic situation around the
vehicle during parking and maneuvering
with direct vision, as otherwise danger of an
accident could result, for example, from road
users or objects located outside the picture
area of the backup camera.<
Switching on
Automatically
Engage transmission position R with the engine
running or the ignition switched on.
Manually
Press the button.
PDC is activated at the same time, refer to
page80.
Page 85 of 272
Controls
83Reference
At a glance
Driving tips
Communications
Navigation
Entertainment
Mobility
Activating driver assistance functions
With backup camera switched on
iDrive, for explanation of concept, refer to
page16.
1.Press the controller.
2.Select the desired function and press the
controller.
With backup camera switched off
1.Open the start menu.
2.Press the controller to open the menu.
3.Select "Settings" and press the controller.
4.Select "Vehicle / Tires" and press the con-
troller.
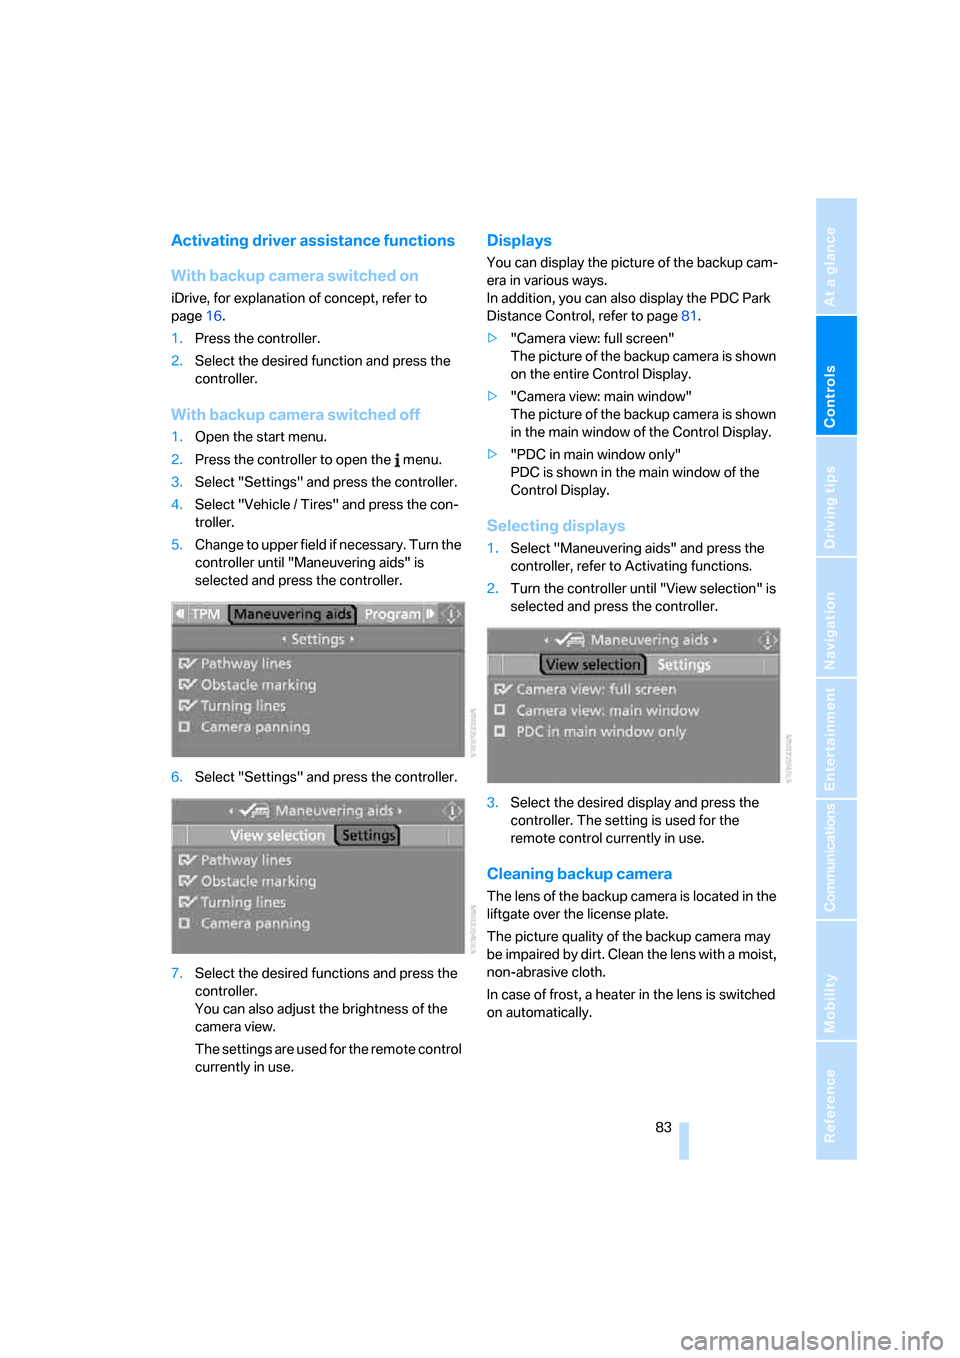
5.Change to upper field if necessary. Turn the
controller until "Maneuvering aids" is
selected and press the controller.
6.Select "Settings" and press the controller.
7.Select the desired functions and press the
controller.
You can also adjust the brightness of the
camera view.
The settings are used for the remote control
currently in use.
Displays
You can display the picture of the backup cam-
era in various ways.
In addition, you can also display the PDC Park
Distance Control, refer to page81.
>"Camera view: full screen"
The picture of the backup camera is shown
on the entire Control Display.
>"Camera view: main window"
The picture of the backup camera is shown
in the main window of the Control Display.
>"PDC in main window only"
PDC is shown in the main window of the
Control Display.
Selecting displays
1.Select "Maneuvering aids" and press the
controller, refer to Activating functions.
2.Turn the controller until "View selection" is
selected and press the controller.
3.Select the desired display and press the
controller. The setting is used for the
remote control currently in use.
Cleaning backup camera
The lens of the backup camera is located in the
liftgate over the license plate.
The picture quality of the backup camera may
be impaired by dirt. Clean the lens with a moist,
non-abrasive cloth.
In case of frost, a heater in the lens is switched
on automatically.
Page 89 of 272
Controls
87Reference
At a glance
Driving tips
Communications
Navigation
Entertainment
Mobility
>Normal:
The LED in the button goes out.
The selection of the chassis and suspension
tuning setting is stored for the remote control
currently in use.
Self-leveling suspension*
Malfunction
The warning lamp for self-leveling
suspension lights up yellow and a
message is shown on the Control
Display. A malfunction has occurred in the self-
leveling suspension. Stop and check the vehi-
cle. If it is considerably lower at the rear than at
the front, and possibly also on one side – rear
left compared to rear right –, proceed to the
nearest BMW Sports Activity Vehicle Center or
a workshop that works according to BMW
repair procedures with correspondingly trained
personnel. Drive with appropriate caution in the
meantime. The vehicle has reduced ground
clearance and driving comfort may be notice-
ably reduced. Even if the orientation of the vehi-
cle is normal, when a malfunction is indicated
on the display, you should proceed to the near-
est BMW Sports Activity Vehicle Center or a
workshop that works according to BMW guide-
lines and uses appropriately trained personnel.
FTM Flat Tire Monitor*
The concept
The Flat Tire Monitor keeps track of the infla-
tion pressures in the tires as you drive. The sys-
tem provides an alert whenever the inflation
pressure drops significantly in relation to the
pressure in another tire.
In the event of a pressure loss, the rolling radius
and therefore the rotation speed of the wheels
change. This change is detected and is
reported as a flat tire.
Functional requirement
In order to assure the reliable reporting of a flat
tire, the system must be initialized for the cor-
rect tire inflation pressure.
The initialization must be repeated after
each time the tire inflation pressure is cor-
rected and after every tire or wheel change.<
System limits
The Flat Tire Monitor cannot indicate
sudden severe tire damage caused by
outside factors and does not detect a natural,
even pressure drop in all four tires.<
In the following situations, the system could be
delayed or malfunction:
>System has not been initialized
>Driving on snowy or slippery road surface
>Sporty driving style: slip in the drive wheels,
high lateral acceleration
>Driving with snow chains
*
When you are driving with the compact wheel*
the Flat Tire Monitor is unable to function.
Initializing system
The initialization finishes during driving,
which can be interrupted at any time.
When driving resumes, the initialization is con-
tinued automatically. Do not initialize the sys-
tem when driving with snow chains
* or with the
compact wheel
*.<
iDrive, for explanation of concept, refer to
page16.
1.Press the button.
This opens the start menu.
2.Press the controller to open the menu.
3.Select "Settings" and press the controller.
4.Select "Vehicle / Tires" and press the con-
troller.
Page 97 of 272
Controls
95Reference
At a glance
Driving tips
Communications
Navigation
Entertainment
Mobility
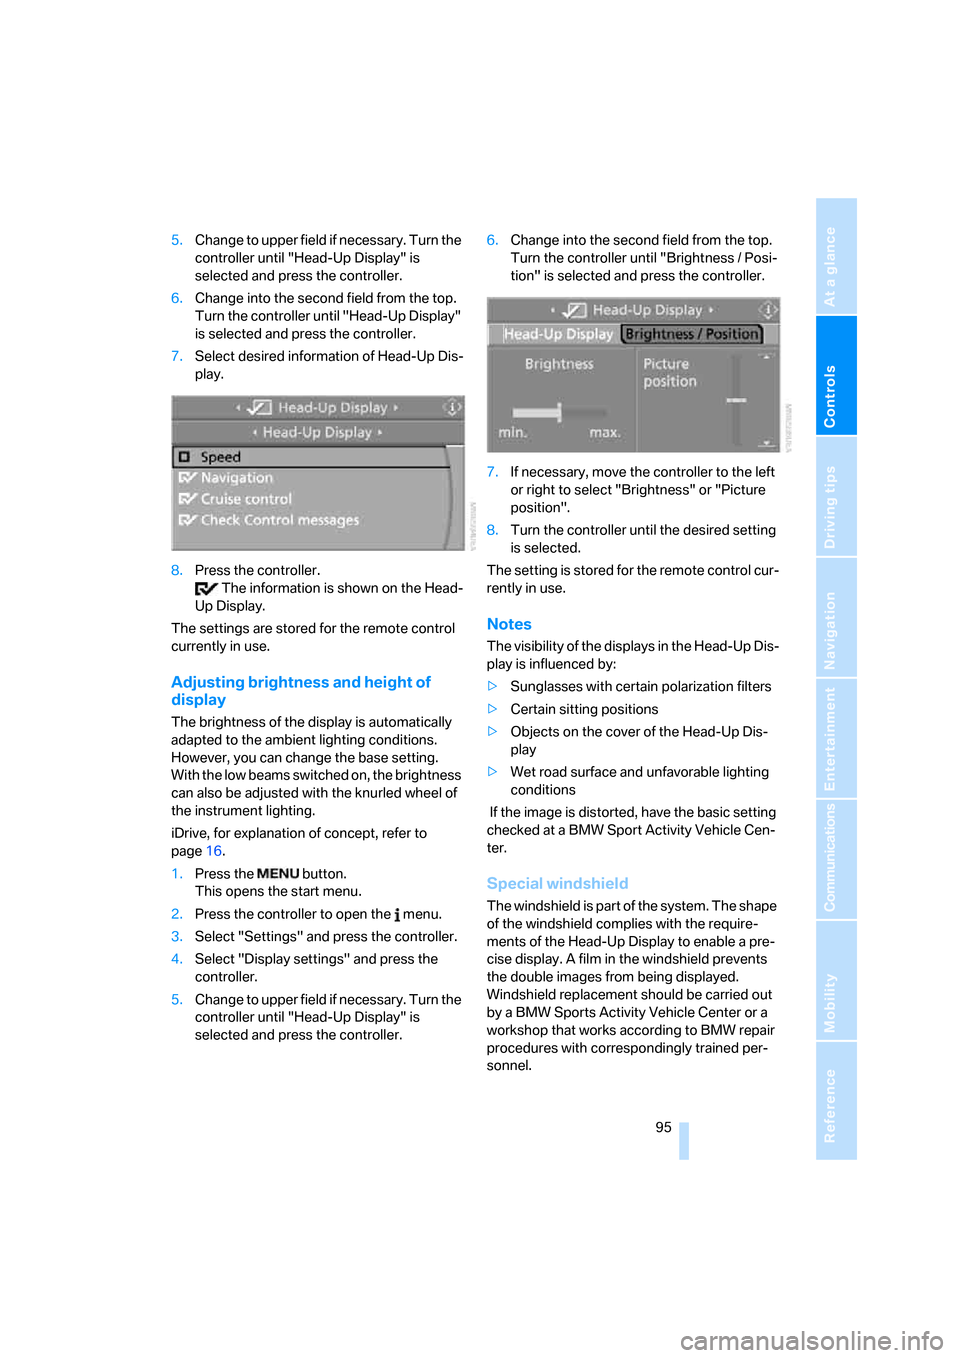
5.Change to upper field if necessary. Turn the
controller until "Head-Up Display" is
selected and press the controller.
6.Change into the second field from the top.
Turn the controller until "Head-Up Display"
is selected and press the controller.
7.Select desired information of Head-Up Dis-
play.
8.Press the controller.
The information is shown on the Head-
Up Display.
The settings are stored for the remote control
currently in use.
Adjusting brightness and height of
display
The brightness of the display is automatically
adapted to the ambient lighting conditions.
However, you can change the base setting.
With the low beams switched on, the brightness
can also be adjusted with the knurled wheel of
the instrument lighting.
iDrive, for explanation of concept, refer to
page16.
1.Press the button.
This opens the start menu.
2.Press the controller to open the menu.
3.Select "Settings" and press the controller.
4.Select "Display settings" and press the
controller.
5.Change to upper field if necessary. Turn the
controller until "Head-Up Display" is
selected and press the controller.6.Change into the second field from the top.
Turn the controller until "Brightness / Posi-
tion" is selected and press the controller.
7.If necessary, move the controller to the left
or right to select "Brightness" or "Picture
position".
8.Turn the controller until the desired setting
is selected.
The setting is stored for the remote control cur-
rently in use.
Notes
The visibility of the displays in the Head-Up Dis-
play is influenced by:
>Sunglasses with certain polarization filters
>Certain sitting positions
>Objects on the cover of the Head-Up Dis-
play
>Wet road surface and unfavorable lighting
conditions
If the image is distorted, have the basic setting
checked at a BMW Sport Activity Vehicle Cen-
ter.
Special windshield
The windshield is part of the system. The shape
of the windshield complies with the require-
ments of the Head-Up Display to enable a pre-
cise display. A film in the windshield prevents
the double images from being displayed.
Windshield replacement should be carried out
by a BMW Sports Activity Vehicle Center or a
workshop that works according to BMW repair
procedures with correspondingly trained per-
sonnel.
Page 100 of 272
Lamps
98 iDrive, for explanation of concept, refer to
page16.
1.Press the button.
This opens the start menu.
2.Press the controller to open the menu.
3.Select "Settings" and press the controller.
4.Select "Vehicle / Tires" and press the con-
troller.
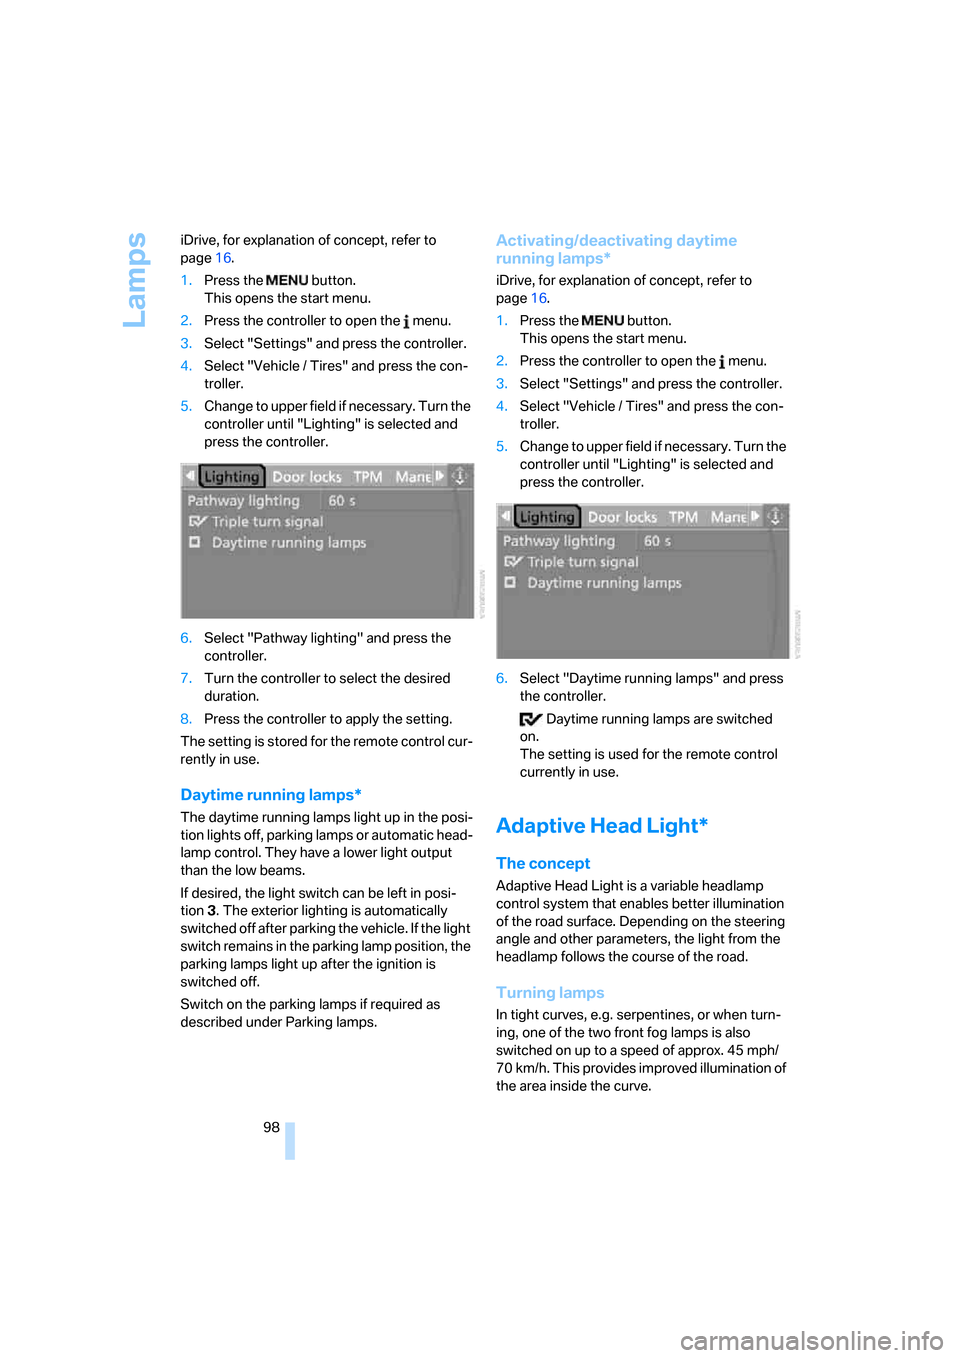
5.Change to upper field if necessary. Turn the
controller until "Lighting" is selected and
press the controller.
6.Select "Pathway lighting" and press the
controller.
7.Turn the controller to select the desired
duration.
8.Press the controller to apply the setting.
The setting is stored for the remote control cur-
rently in use.
Daytime running lamps*
The daytime running lamps light up in the posi-
tion lights off, parking lamps or automatic head-
lamp control. They have a lower light output
than the low beams.
If desired, the light switch can be left in posi-
tion3. The exterior lighting is automatically
switched off after parking the vehicle. If the light
switch remains in the parking lamp position, the
parking lamps light up after the ignition is
switched off.
Switch on the parking lamps if required as
described under Parking lamps.
Activating/deactivating daytime
running lamps*
iDrive, for explanation of concept, refer to
page16.
1.Press the button.
This opens the start menu.
2.Press the controller to open the menu.
3.Select "Settings" and press the controller.
4.Select "Vehicle / Tires" and press the con-
troller.
5.Change to upper field if necessary. Turn the
controller until "Lighting" is selected and
press the controller.
6.Select "Daytime running lamps" and press
the controller.
Daytime running lamps are switched
on.
The setting is used for the remote control
currently in use.
Adaptive Head Light*
The concept
Adaptive Head Light is a variable headlamp
control system that enables better illumination
of the road surface. Depending on the steering
angle and other parameters, the light from the
headlamp follows the course of the road.
Turning lamps
In tight curves, e.g. serpentines, or when turn-
ing, one of the two front fog lamps is also
switched on up to a speed of approx. 45 mph/
70 km/h. This provides improved illumination of
the area inside the curve.
Page 104 of 272
Climate
102
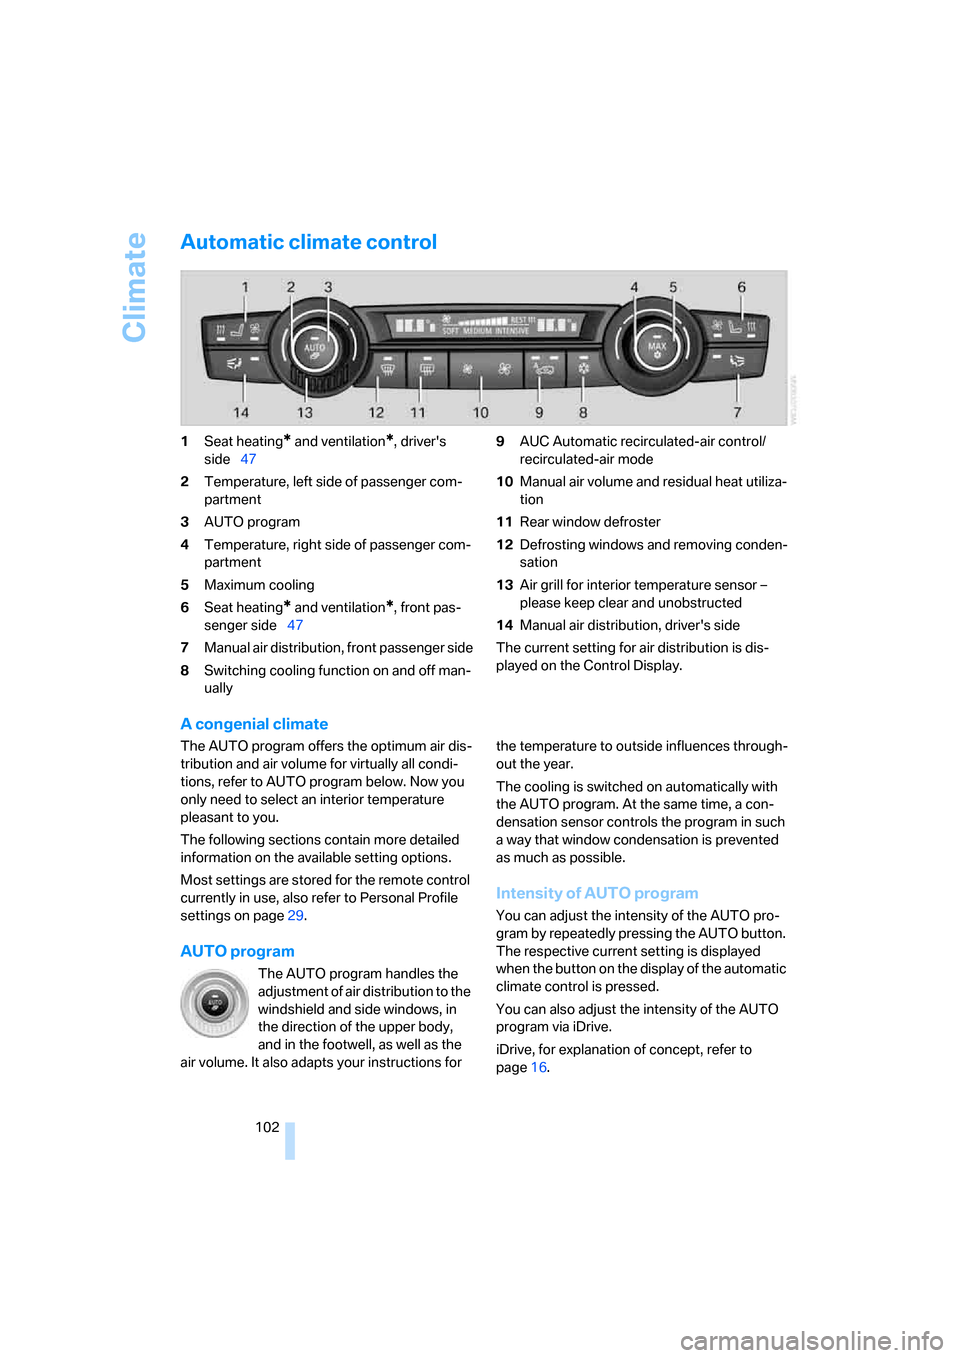
Automatic climate control
1Seat heating* and ventilation*, driver's
side47
2Temperature, left side of passenger com-
partment
3AUTO program
4Temperature, right side of passenger com-
partment
5Maximum cooling
6Seat heating
* and ventilation*, front pas-
senger side47
7Manual air distribution, front passenger side
8Switching cooling function on and off man-
ually9AUC Automatic recirculated-air control/
recirculated-air mode
10Manual air volume and residual heat utiliza-
tion
11Rear window defroster
12Defrosting windows and removing conden-
sation
13Air grill for interior temperature sensor –
please keep clear and unobstructed
14Manual air distribution, driver's side
The current setting for air distribution is dis-
played on the Control Display.
A congenial climate
The AUTO program offers the optimum air dis-
tribution and air volume for virtually all condi-
tions, refer to AUTO program below. Now you
only need to select an interior temperature
pleasant to you.
The following sections contain more detailed
information on the available setting options.
Most settings are stored for the remote control
currently in use, also refer to Personal Profile
settings on page29.
AUTO program
The AUTO program handles the
adjustment of air distribution to the
windshield and side windows, in
the direction of the upper body,
and in the footwell, as well as the
air volume. It also adapts your instructions for the temperature to outside influences through-
out the year.
The cooling is switched on automatically with
the AUTO program. At the same time, a con-
densation sensor controls the program in such
a way that window condensation is prevented
as much as possible.
Intensity of AUTO program
You can adjust the intensity of the AUTO pro-
gram by repeatedly pressing the AUTO button.
The respective current setting is displayed
when the button on the display of the automatic
climate control is pressed.
You can also adjust the intensity of the AUTO
program via iDrive.
iDrive, for explanation of concept, refer to
page16.
Page 112 of 272
Practical interior accessories
110
Practical interior accessories
Integrated universal remote
control*
The concept
The integrated universal remote control can
replace as many as three hand-held transmit-
ters for various remote-controlled accessories,
such as door openers and house alarm sys-
tems. The integrated universal remote control
registers and stores signals from the original
hand-held transmitters.
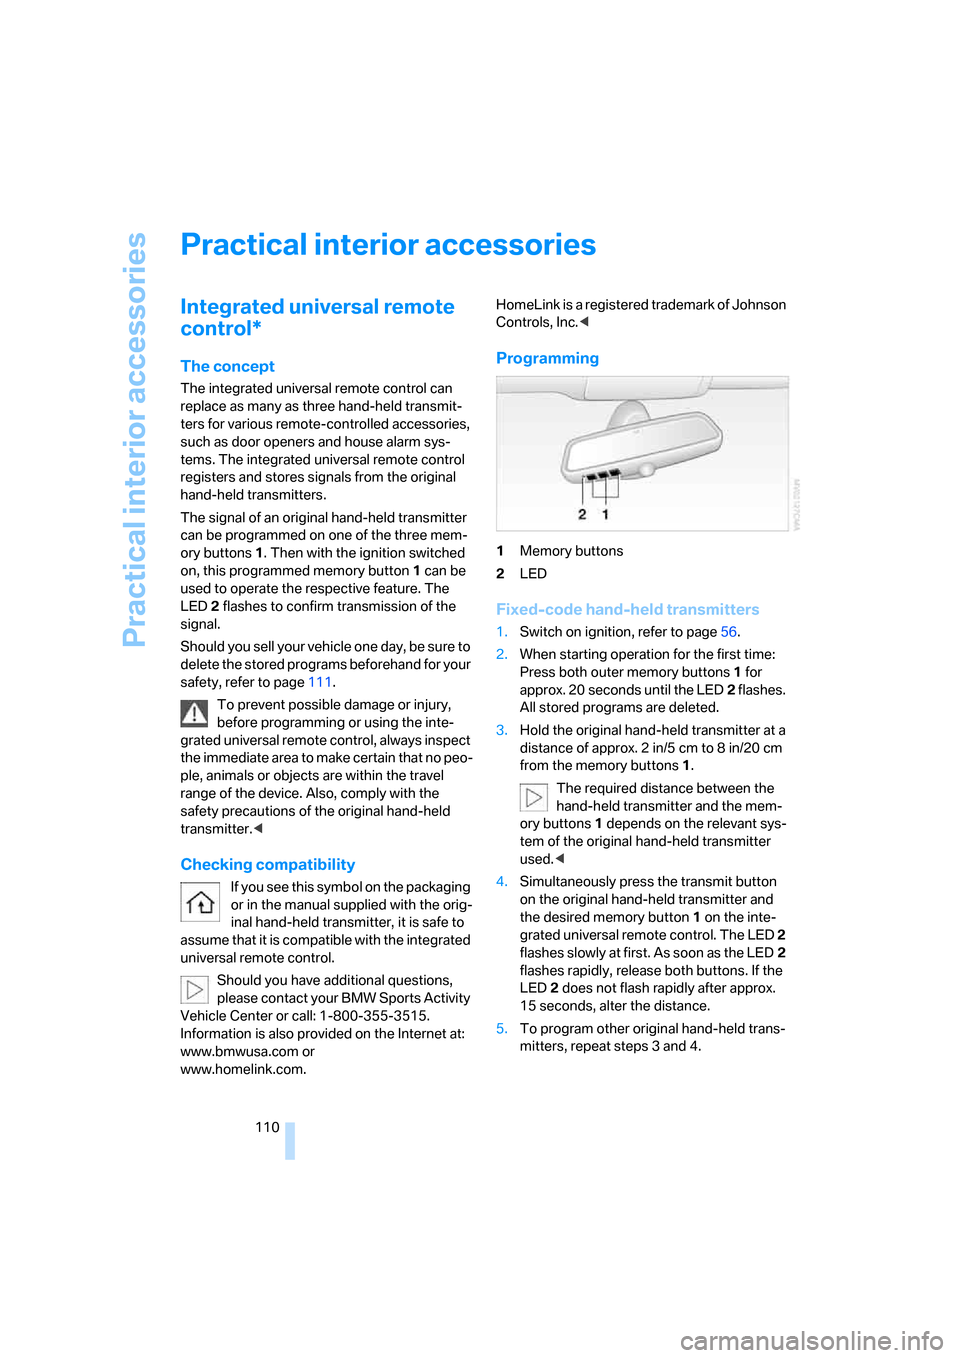
The signal of an original hand-held transmitter
can be programmed on one of the three mem-
ory buttons1. Then with the ignition switched
on, this programmed memory button1 can be
used to operate the respective feature. The
LED2 flashes to confirm transmission of the
signal.
Should you sell your vehicle one day, be sure to
delete the stored programs beforehand for your
safety, refer to page111.
To prevent possible damage or injury,
before programming or using the inte-
grated universal remote control, always inspect
the immediate area to make certain that no peo-
ple, animals or objects are within the travel
range of the device. Also, comply with the
safety precautions of the original hand-held
transmitter.<
Checking compatibility
If you see this symbol on the packaging
or in the manual supplied with the orig-
inal hand-held transmitter, it is safe to
assume that it is compatible with the integrated
universal remote control.
Should you have additional questions,
please contact your BMW Sports Activity
Vehicle Center or call: 1-800-355-3515.
Information is also provided on the Internet at:
www.bmwusa.com or
www.homelink.com.HomeLink is a registered trademark of Johnson
Controls, Inc.<
Programming
1Memory buttons
2LED
Fixed-code hand-held transmitters
1.Switch on ignition, refer to page56.
2.When starting operation for the first time:
Press both outer memory buttons1 for
approx. 20 seconds until the LED2 flashes.
All stored programs are deleted.
3.Hold the original hand-held transmitter at a
distance of approx. 2 in/5 cm to 8 in/20 cm
from the memory buttons1.
The required distance between the
hand-held transmitter and the mem-
ory buttons1 depends on the relevant sys-
tem of the original hand-held transmitter
used.<
4.Simultaneously press the transmit button
on the original hand-held transmitter and
the desired memory button 1 on the inte-
grated universal remote control. The LED 2
flashes slowly at first. As soon as the LED2
flashes rapidly, release both buttons. If the
LED2 does not flash rapidly after approx.
15 seconds, alter the distance.
5.To program other original hand-held trans-
mitters, repeat steps 3 and 4.
Page 113 of 272
Controls
111Reference
At a glance
Driving tips
Communications
Navigation
Entertainment
Mobility
The corresponding memory button 1 is now
programmed with the signal of the original
hand-held transmitter.
You can operate the device when the engine is
running or when the ignition is switched on.
If the device cannot be used after
repeated programming, check whether
the original hand-held transmitter uses an alter-
nating-code system. To do so, either read the
instructions for the original hand-held transmit-
ter or hold down the programmed memory
button1 of the integrated universal remote
control. If the LED2 on the integrated universal
remote control flashes rapidly for a short time
and then remains lit for approx. 2 seconds, this
indicates that the original hand-held transmitter
uses an alternating-code system. In the case of
an alternating-code system, program the mem-
ory buttons1 as described at Alternating-code
hand-held transmitters.<
Alternating-code hand-held
transmitters
To program the integrated universal remote
control, consult the operating instructions for
the equipment to be set. You will find informa-
tion there on the possibilities for synchroniza-
tion.
When programming hand-held transmitters
that employ an alternating code, please observe
the following supplementary instructions:
P r o g ra m m in g w i ll b e ea s i er w it h t h e a i d o f
a second person.<
1.Park your vehicle within the range of the
remote-controlled device.
2.Program the integrated universal remote
control as described above in the section
Fixed-code hand-held transmitters.
3.Locate the button on the receiver of the
device to be set, e. g. on the drive unit.
4.Press the button on the receiver of the
device to be set. After step 4, you have
approx. 30 seconds for step 5.
5.Press the programmed memory button1
of the integrated universal remote control
three times.The corresponding memory button 1 is now
programmed with the signal of the original
hand-held transmitter.
Should you have questions, please con-
tact your BMW Sports Activity Vehicle
Center.<
Deleting stored programs
Press both outer memory buttons1 for approx.
20 seconds until the LED2 flashes:
All stored programs are deleted.
Individual programs cannot be deleted.
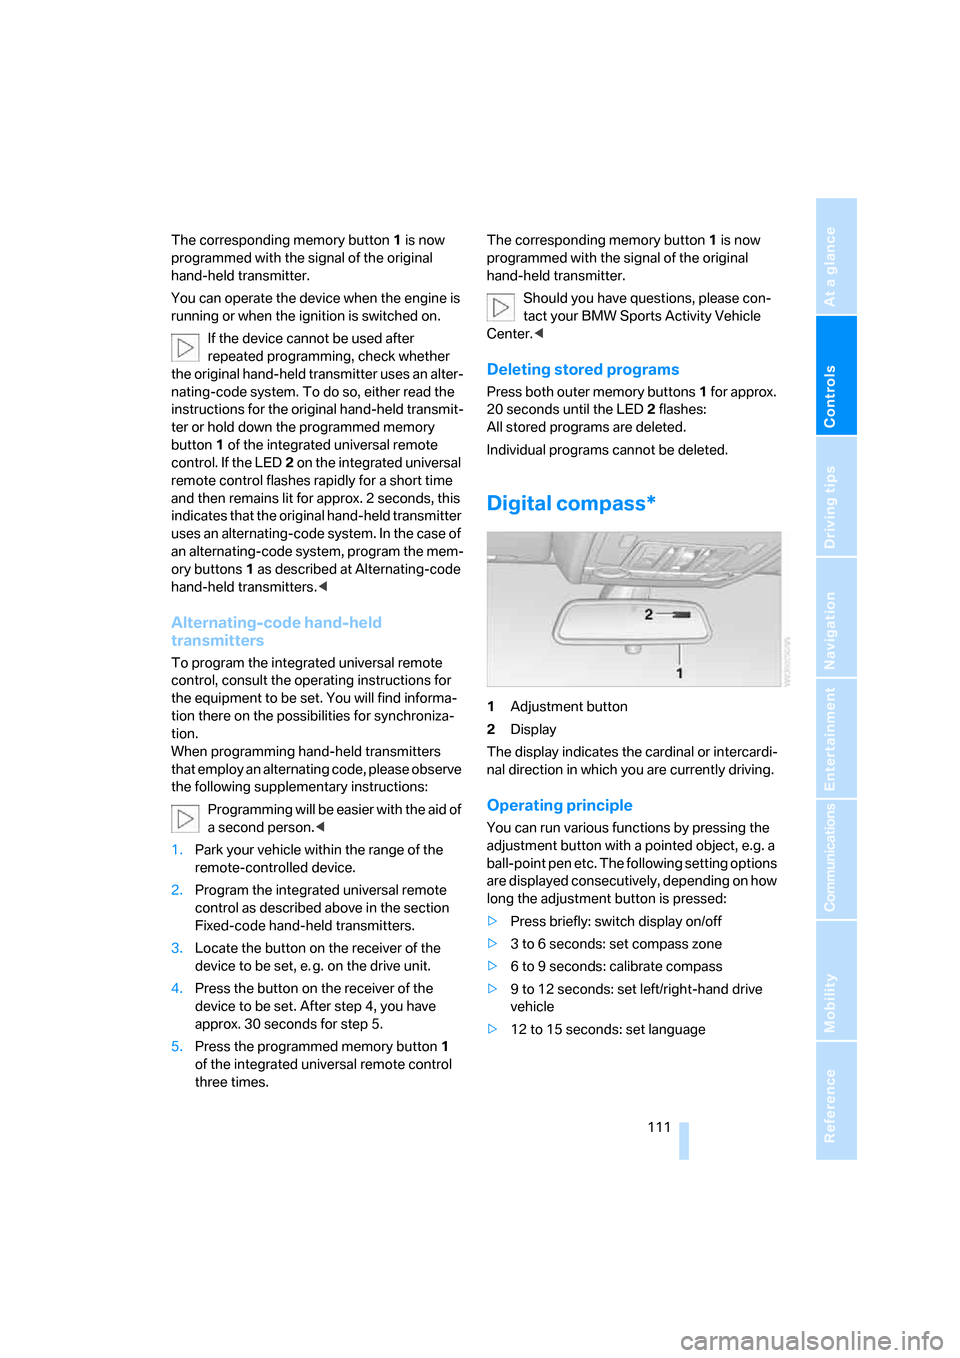
Digital compass*
1Adjustment button
2Display
The display indicates the cardinal or intercardi-
nal direction in which you are currently driving.
Operating principle
You can run various functions by pressing the
adjustment button with a pointed object, e.g. a
ball-point pen etc. The following setting options
are displayed consecutively, depending on how
long the adjustment button is pressed:
>Press briefly: switch display on/off
>3 to 6 seconds: set compass zone
>6 to 9 seconds: calibrate compass
>9 to 12 seconds: set left/right-hand drive
vehicle
>12 to 15 seconds: set language
Page 117 of 272
Controls
115Reference
At a glance
Driving tips
Communications
Navigation
Entertainment
Mobility
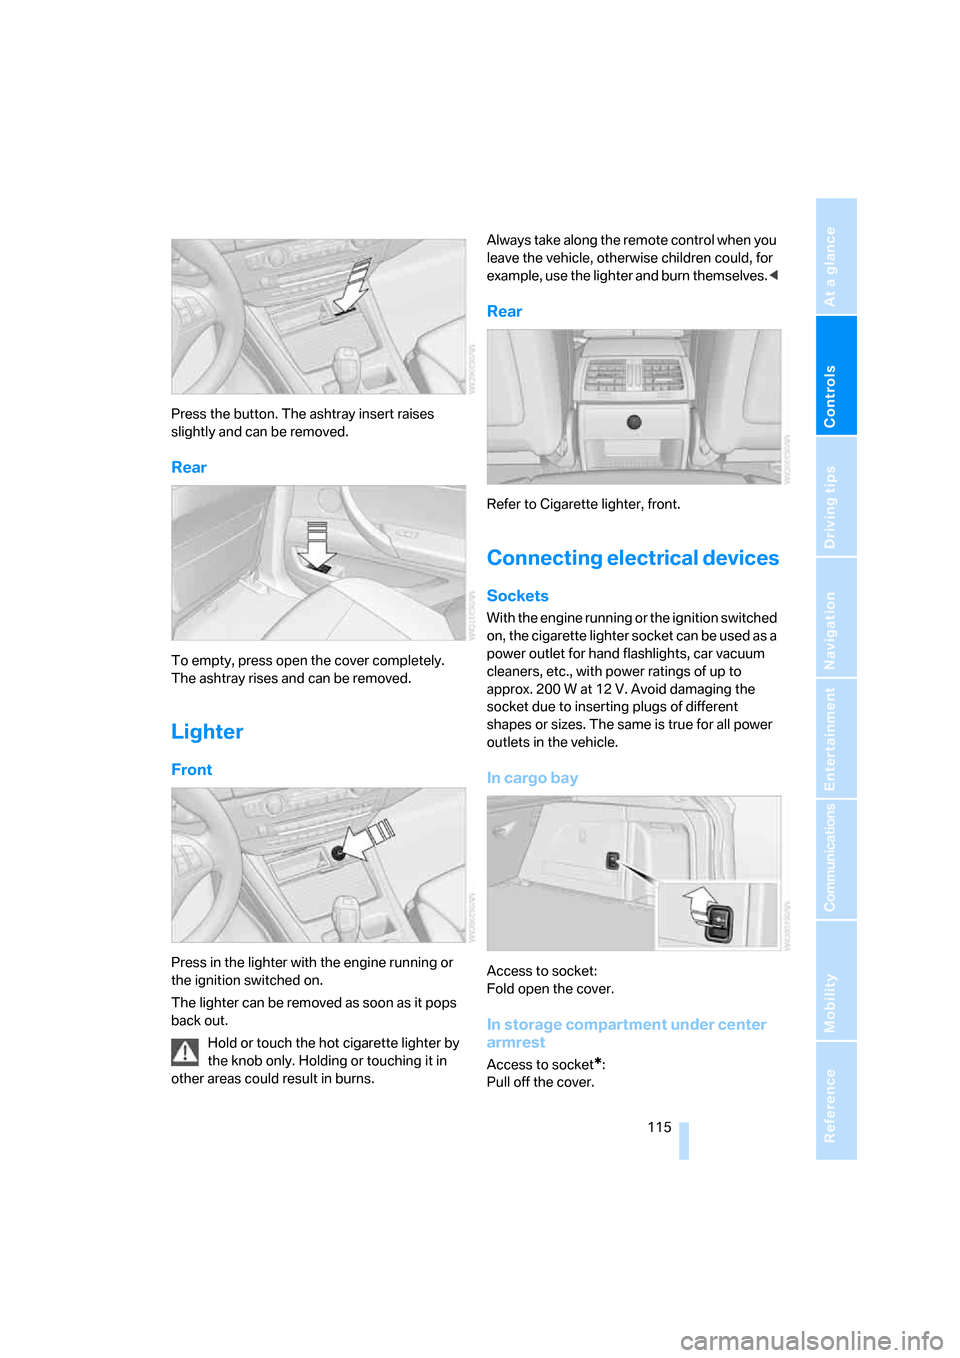
Press the button. The ashtray insert raises
slightly and can be removed.
Rear
To empty, press open the cover completely.
The ashtray rises and can be removed.
Lighter
Front
Press in the lighter with the engine running or
the ignition switched on.
The lighter can be removed as soon as it pops
back out.
Hold or touch the hot cigarette lighter by
the knob only. Holding or touching it in
other areas could result in burns.Always take along the remote control when you
leave the vehicle, otherwise children could, for
example, use the lighter and burn themselves.<
Rear
Refer to Cigarette lighter, front.
Connecting electrical devices
Sockets
With the engine running or the ignition switched
on, the cigarette lighter socket can be used as a
power outlet for hand flashlights, car vacuum
cleaners, etc., with power ratings of up to
approx. 200 W at 12 V. Avoid damaging the
socket due to inserting plugs of different
shapes or sizes. The same is true for all power
outlets in the vehicle.
In cargo bay
Access to socket:
Fold open the cover.
In storage compartment under center
armrest
Access to socket*:
Pull off the cover.