tow BMW X5 4.8I 2008 E70 User Guide
[x] Cancel search | Manufacturer: BMW, Model Year: 2008, Model line: X5 4.8I, Model: BMW X5 4.8I 2008 E70Pages: 292, PDF Size: 9.32 MB
Page 89 of 292
Controls
87Reference
At a glance
Driving tips
Communications
Navigation
Entertainment
Mobility
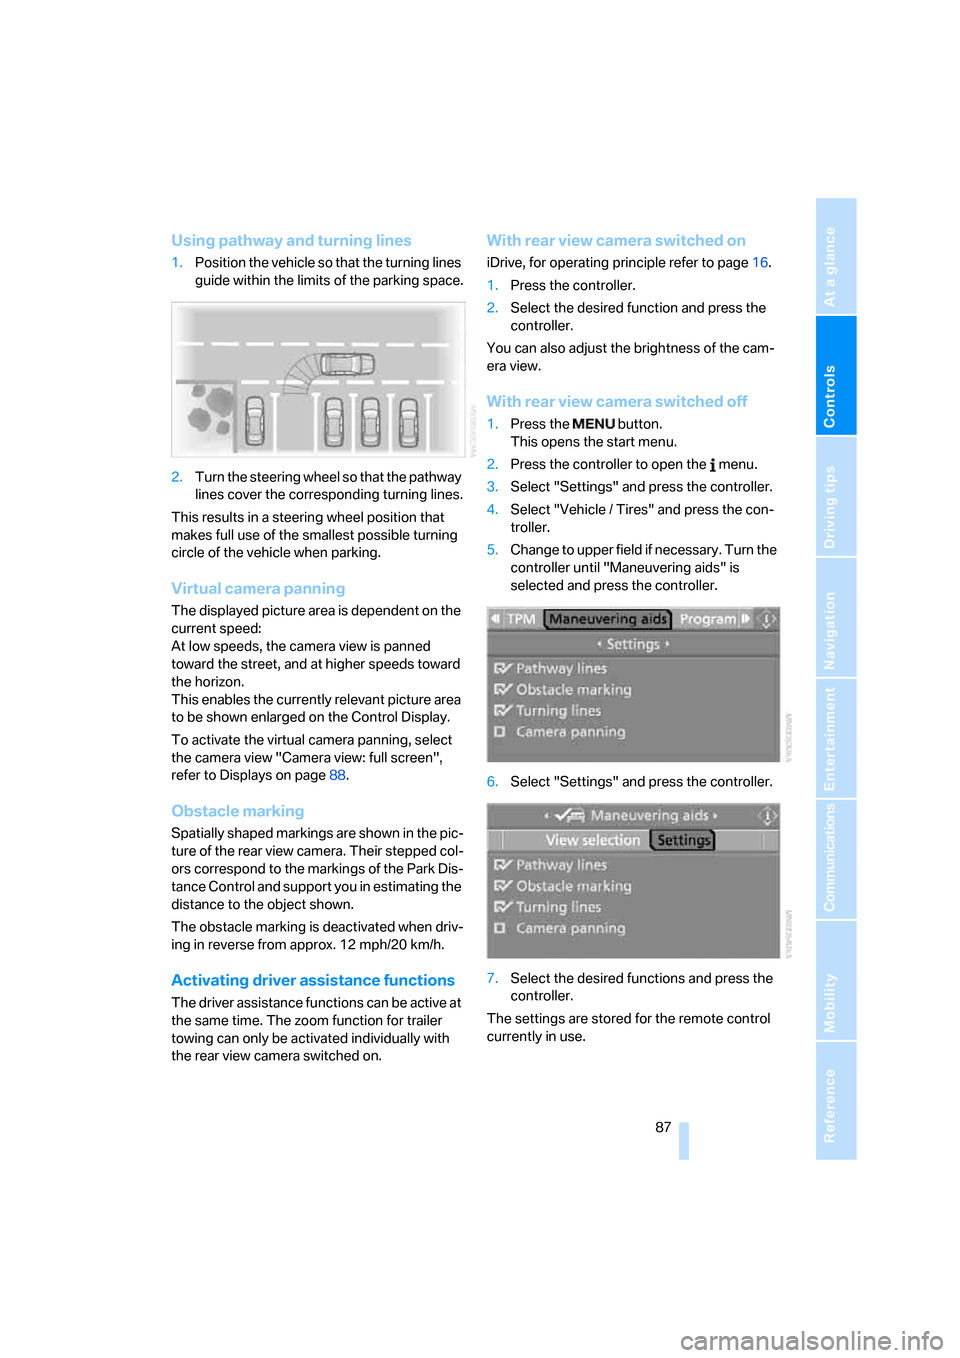
Using pathway and turning lines
1.Position the vehicle so that the turning lines
guide within the limits of the parking space.
2.Turn the steering wheel so that the pathway
lines cover the corresponding turning lines.
This results in a steering wheel position that
makes full use of the smallest possible turning
circle of the vehicle when parking.
Virtual camera panning
The displayed picture area is dependent on the
current speed:
At low speeds, the camera view is panned
toward the street, and at higher speeds toward
the horizon.
This enables the currently relevant picture area
to be shown enlarged on the Control Display.
To activate the virtual camera panning, select
the camera view "Camera view: full screen",
refer to Displays on page88.
Obstacle marking
Spatially shaped markings are shown in the pic-
ture of the rear view camera. Their stepped col-
ors correspond to the markings of the Park Dis-
tance Control and support you in estimating the
distance to the object shown.
The obstacle marking is deactivated when driv-
ing in reverse from approx. 12 mph/20 km/h.
Activating driver assistance functions
The driver assistance functions can be active at
the same time. The zoom function for trailer
towing can only be activated individually with
the rear view camera switched on.
With rear view camera switched on
iDrive, for operating principle refer to page16.
1.Press the controller.
2.Select the desired function and press the
controller.
You can also adjust the brightness of the cam-
era view.
With rear view camera switched off
1.Press the button.
This opens the start menu.
2.Press the controller to open the menu.
3.Select "Settings" and press the controller.
4.Select "Vehicle / Tires" and press the con-
troller.
5.Change to upper field if necessary. Turn the
controller until "Maneuvering aids" is
selected and press the controller.
6.Select "Settings" and press the controller.
7.Select the desired functions and press the
controller.
The settings are stored for the remote control
currently in use.
Page 98 of 292
Technology for comfort, convenience and safety
96 A message like this is displayed in the following
situations:
>In case of a malfunction:
Have the system checked
>If a wheel without TPM electronics is
mounted, e.g. a compact wheel
*
>If TPM is temporarily interfered with by
other systems or devices which use the
same radio frequency
Explanation according to the NHTSA/
FMVSS 138 Tire Pressure Monitoring
Systems
Each tire, including the spare*, should be
checked monthly when cold and inflated to the
inflation pressure recommended by the vehicle
manufacturer on the vehicle placard or tire infla-
tion pressure label. If your vehicle has tires of a
different size than the size indicated on the
vehicle placard or tire inflation pressure label,
you should determine the proper tire inflation
pressure for those tires. As an added safety fea-
ture, your vehicle has been equipped with a tire
pressure monitoring system, TPMS, that illumi-
nates a low tire pressure telltale when one or
more of your tires are significantly under-
inflated. Accordingly, when the low tire pres-
sure telltale illuminates, you should stop and
check your tires as soon as possible, and inflate
them to the proper pressure. Driving on a signif-
icantly underinflated tire causes the tire to over-
heat and can lead to tire failure. Under-inflation
also reduces fuel efficiency and tire tread life,
and may affect the vehicle's handling and stop-
ping ability. Please note that the TPMS is not a
substitute for proper tire maintenance, and it is
the driver's responsibility to maintain correct
tire pressure, even if under-inflation has not
reached the level to trigger illumination of the
TPMS low tire pressure telltale.
The TPMS malfunction indicator is combined
with the low tire pressure telltale. When the sys-
tem detects a malfunction, the telltale will flash
for approximately one minute and then remain
continuously illuminated. This sequence will
continue upon subsequent vehicle startups as
long as the malfunction exists. When the mal-function indicator is illuminated, the system
may not be able to detect or signal low tire pres-
sure as intended. TPMS malfunctions may
occur for a variety of reasons, including the
installation of replacement or alternate tires or
wheels on the vehicle that prevent the TPMS
from functioning properly. Always check the
TPMS malfunction telltale after replacing one or
more tires or wheels on your vehicle to ensure
that the replacement or alternate tires and
wheels allow the TPMS to continue to function
properly.Active steering*
The concept
The active steering actively varies the steering
angle of the front wheels in relation to the steer-
ing wheel movements. In addition, it also varies
the steering force required for steering depend-
ing on the vehicle's speed.
When you are driving in the low road speed
range, e. g. in a town or when parking, the steer-
ing angle increases, i.e. the steering becomes
very direct. In the higher speed range, on the
other hand, the steering angle is reduced more
and more. This improves the handling capability
of your BMW over the entire speed range.
In critical situations, the system can make tar-
geted corrections to the steering angle pro-
vided by the driver and thus stabilize the vehicle
before the driver intervenes.
Malfunction
The warning lamp lights up yellow
and a message is shown on the Con-
trol Display. The active steering is no
longer operational. At low speeds,
greater steering wheel movements are
required, whereas at higher speeds, the vehicle
reacts more sensitively to steering wheel move-
ments. The stability-promoting intervention
can also be deactivated. Proceed cautiously
and drive defensively. Have the system
checked.
Page 106 of 292
Lamps
104
Adaptive Head Light*
The concept
Adaptive Head Light is a variable headlamp
control system that enables better illumination
of the road surface. Depending on the steering
angle and other parameters, the light from the
headlamp follows the course of the road.
In tight curves, e.g. serpentines, or when turn-
ing, one of the two front fog lamps is also
switched on up to a speed of approx. 45 mph/
70 km/h. This provides improved illumination of
the area inside the curve.
Activating Adaptive Head Light
With the ignition switched on, turn the light
switch into the automatic headlamp control
position, refer to page102.
The turning lamps are automatically switched
on depending on the steering angle or the use
of turn signals.
To avoid blinding oncoming traffic, the Adaptive
Head Light directs light towards the front pas-
senger side when the vehicle is at a standstill.
When driving in reverse, both turning lamps are
active.
Malfunction
The LED next to the symbol for automatic head-
lamp control flashes. Adaptive Head Light is
malfunctioning or has failed. Have the system
checked as soon as possible.
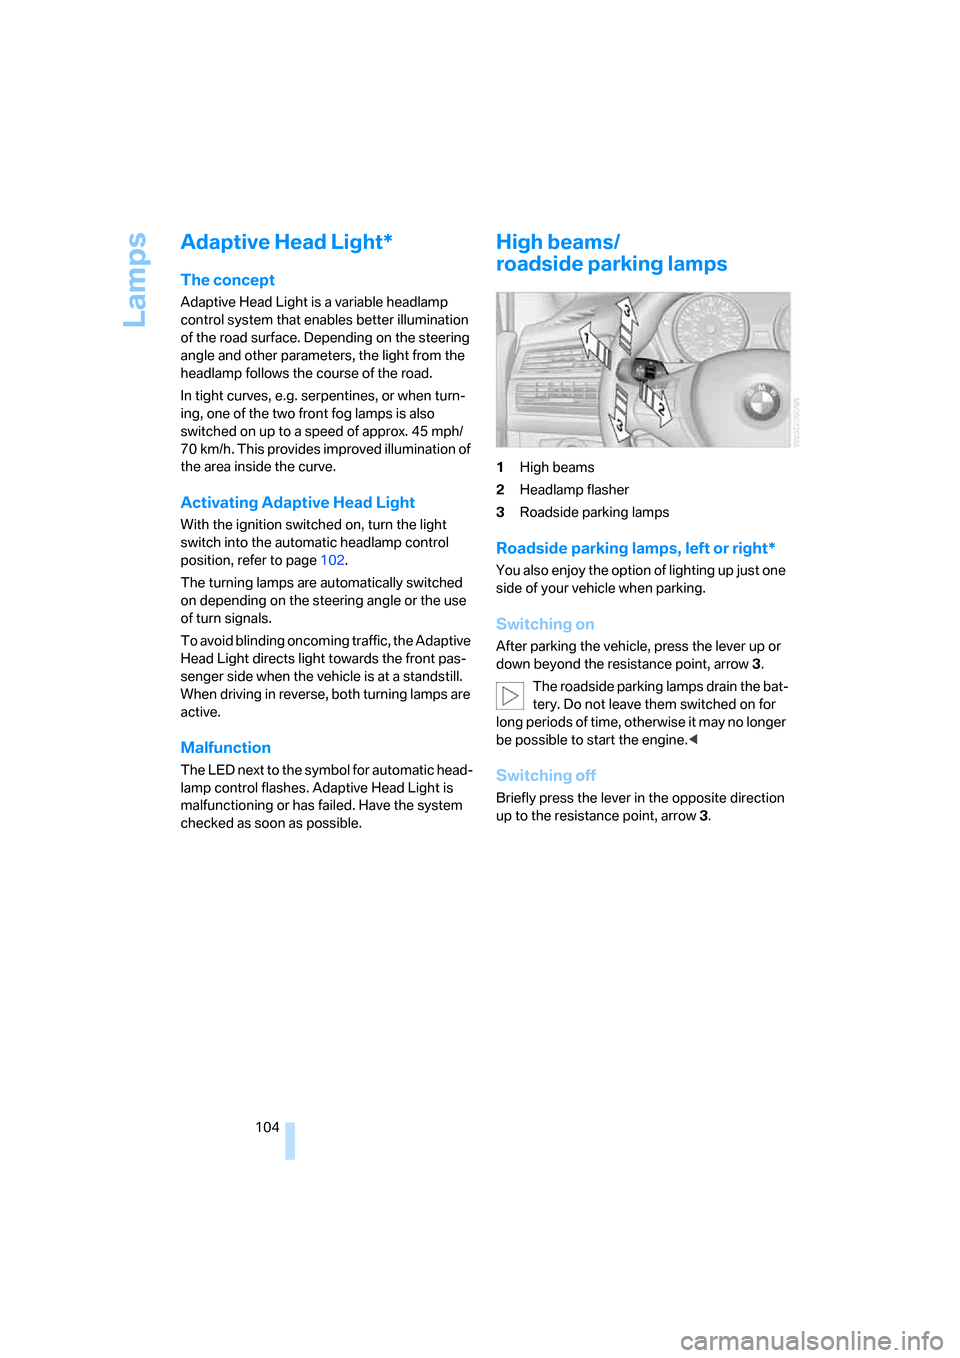
High beams/
roadside parking lamps
1High beams
2Headlamp flasher
3Roadside parking lamps
Roadside parking lamps, left or right*
You also enjoy the option of lighting up just one
side of your vehicle when parking.
Switching on
After parking the vehicle, press the lever up or
down beyond the resistance point, arrow 3.
The roadside parking lamps drain the bat-
tery. Do not leave them switched on for
long periods of time, otherwise it may no longer
be possible to start the engine.<
Switching off
Briefly press the lever in the opposite direction
up to the resistance point, arrow 3.
Page 108 of 292
Climate
106
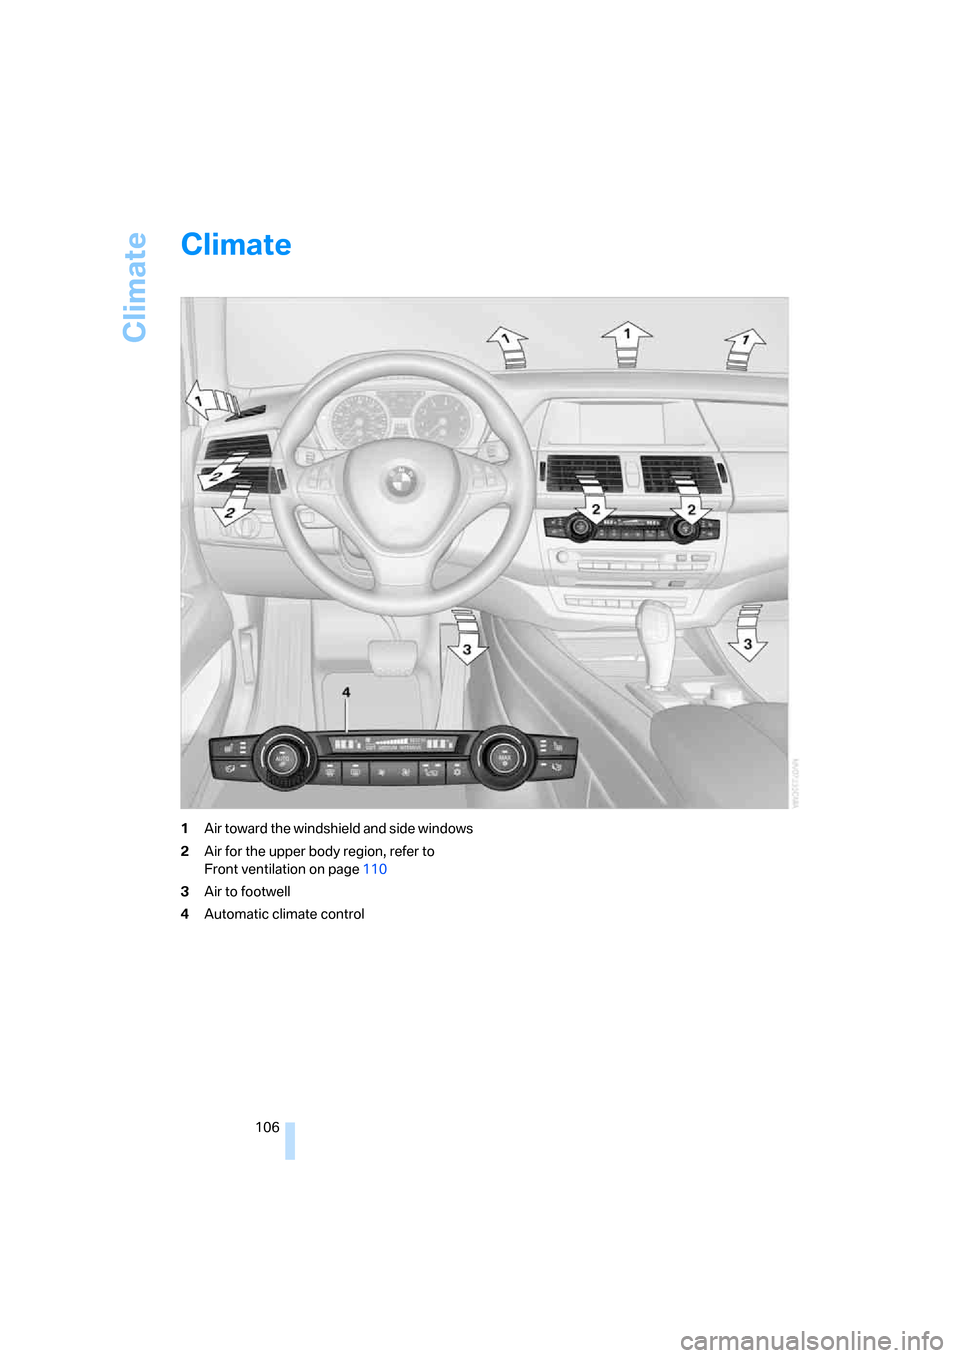
Climate
1Air toward the windshield and side windows
2Air for the upper body region, refer to
Front ventilation on page110
3Air to footwell
4Automatic climate control
Page 111 of 292
Controls
109Reference
At a glance
Driving tips
Communications
Navigation
Entertainment
Mobility
>Driver's side: windows and footwell
>Individual program
Selecting program
Press the button repeatedly until
the desired program is shown on
the Control Display.
Adjusting air distribution individually –
individual program
The settings are stored in this program.
iDrive, for operating principle refer to page16.
1.Press the button.
This opens the start menu.
2.Move the controller to the left to open "Cli-
mate".
3.Select "Vent settings" and press the con-
troller.
The driver's and front passenger side can
be adjusted separately with the fields on the
right or left side.
4.Select the driver's or front passenger side
if necessary.
Move the controller to the right or left
repeatedly until the driver's or front passen-
ger side is selected.
5.Select the desired field by moving the con-
troller.
6.Turn the controller to adjust the air distribu-
tion.
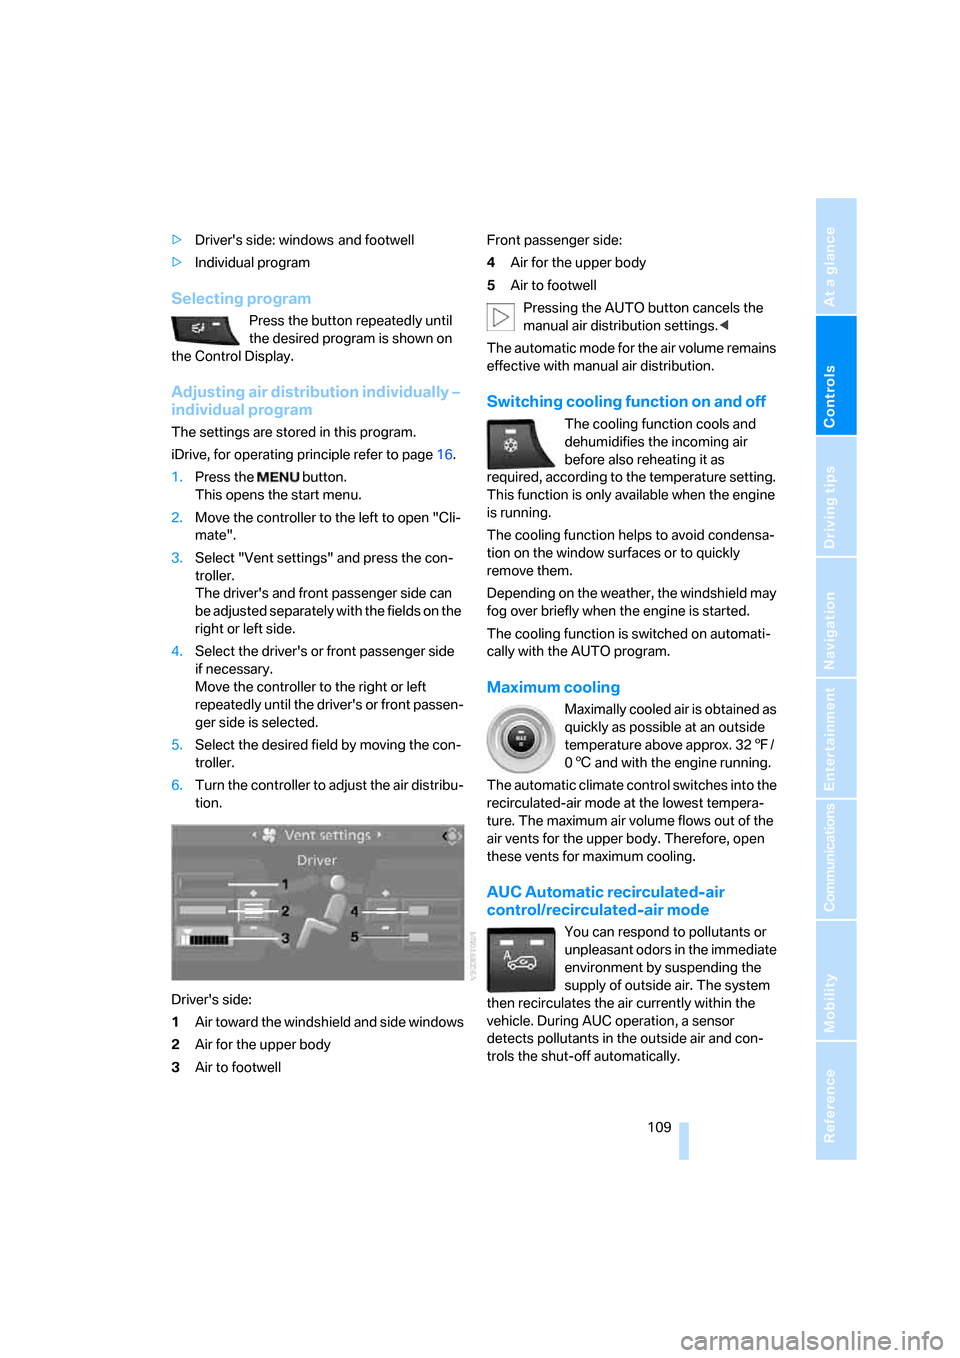
Driver's side:
1Air toward the windshield and side windows
2Air for the upper body
3Air to footwellFront passenger side:
4Air for the upper body
5Air to footwell
Pressing the AUTO button cancels the
manual air distribution settings.<
The automatic mode for the air volume remains
effective with manual air distribution.
Switching cooling function on and off
The cooling function cools and
dehumidifies the incoming air
before also reheating it as
required, according to the temperature setting.
This function is only available when the engine
is running.
The cooling function helps to avoid condensa-
tion on the window surfaces or to quickly
remove them.
Depending on the weather, the windshield may
fog over briefly when the engine is started.
The cooling function is switched on automati-
cally with the AUTO program.
Maximum cooling
Maximally cooled air is obtained as
quickly as possible at an outside
temperature above approx. 327/
06 and with the engine running.
The automatic climate control switches into the
recirculated-air mode at the lowest tempera-
ture. The maximum air volume flows out of the
air vents for the upper body. Therefore, open
these vents for maximum cooling.
AUC Automatic recirculated-air
control/recirculated-air mode
You can respond to pollutants or
unpleasant odors in the immediate
environment by suspending the
supply of outside air. The system
then recirculates the air currently within the
vehicle. During AUC operation, a sensor
detects pollutants in the outside air and con-
trols the shut-off automatically.
Page 113 of 292
Controls
111Reference
At a glance
Driving tips
Communications
Navigation
Entertainment
Mobility
Ventilation in rear
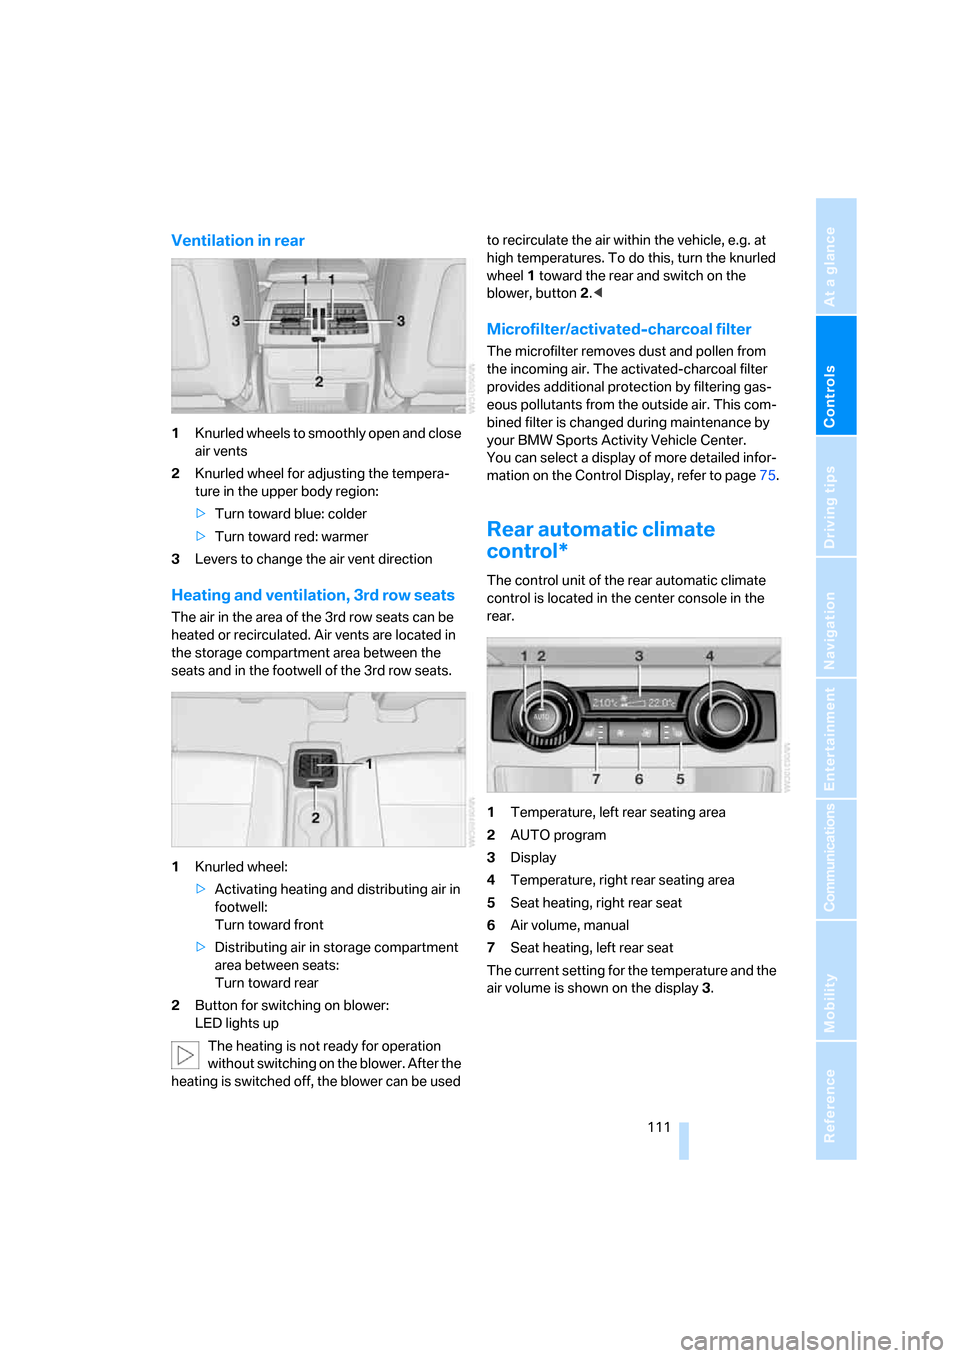
1Knurled wheels to smoothly open and close
air vents
2Knurled wheel for adjusting the tempera-
ture in the upper body region:
>Turn toward blue: colder
>Turn toward red: warmer
3Levers to change the air vent direction
Heating and ventilation, 3rd row seats
The air in the area of the 3rd row seats can be
heated or recirculated. Air vents are located in
the storage compartment area between the
seats and in the footwell of the 3rd row seats.
1Knurled wheel:
>Activating heating and distributing air in
footwell:
Turn toward front
>Distributing air in storage compartment
area between seats:
Turn toward rear
2Button for switching on blower:
LED lights up
The heating is not ready for operation
without switching on the blower. After the
heating is switched off, the blower can be used to recirculate the air within the vehicle, e.g. at
high temperatures. To do this, turn the knurled
wheel1 toward the rear and switch on the
blower, button2.<
Microfilter/activated-charcoal filter
The microfilter removes dust and pollen from
the incoming air. The activated-charcoal filter
provides additional protection by filtering gas-
eous pollutants from the outside air. This com-
bined filter is changed during maintenance by
your BMW Sports Activity Vehicle Center.
You can select a display of more detailed infor-
mation on the Control Display, refer to page75.
Rear automatic climate
control*
The control unit of the rear automatic climate
control is located in the center console in the
rear.
1Temperature, left rear seating area
2AUTO program
3Display
4Temperature, right rear seating area
5Seat heating, right rear seat
6Air volume, manual
7Seat heating, left rear seat
The current setting for the temperature and the
air volume is shown on the display3.
Page 114 of 292
Climate
112
Activating rear automatic climate
control
iDrive, for operating principle refer to page16.
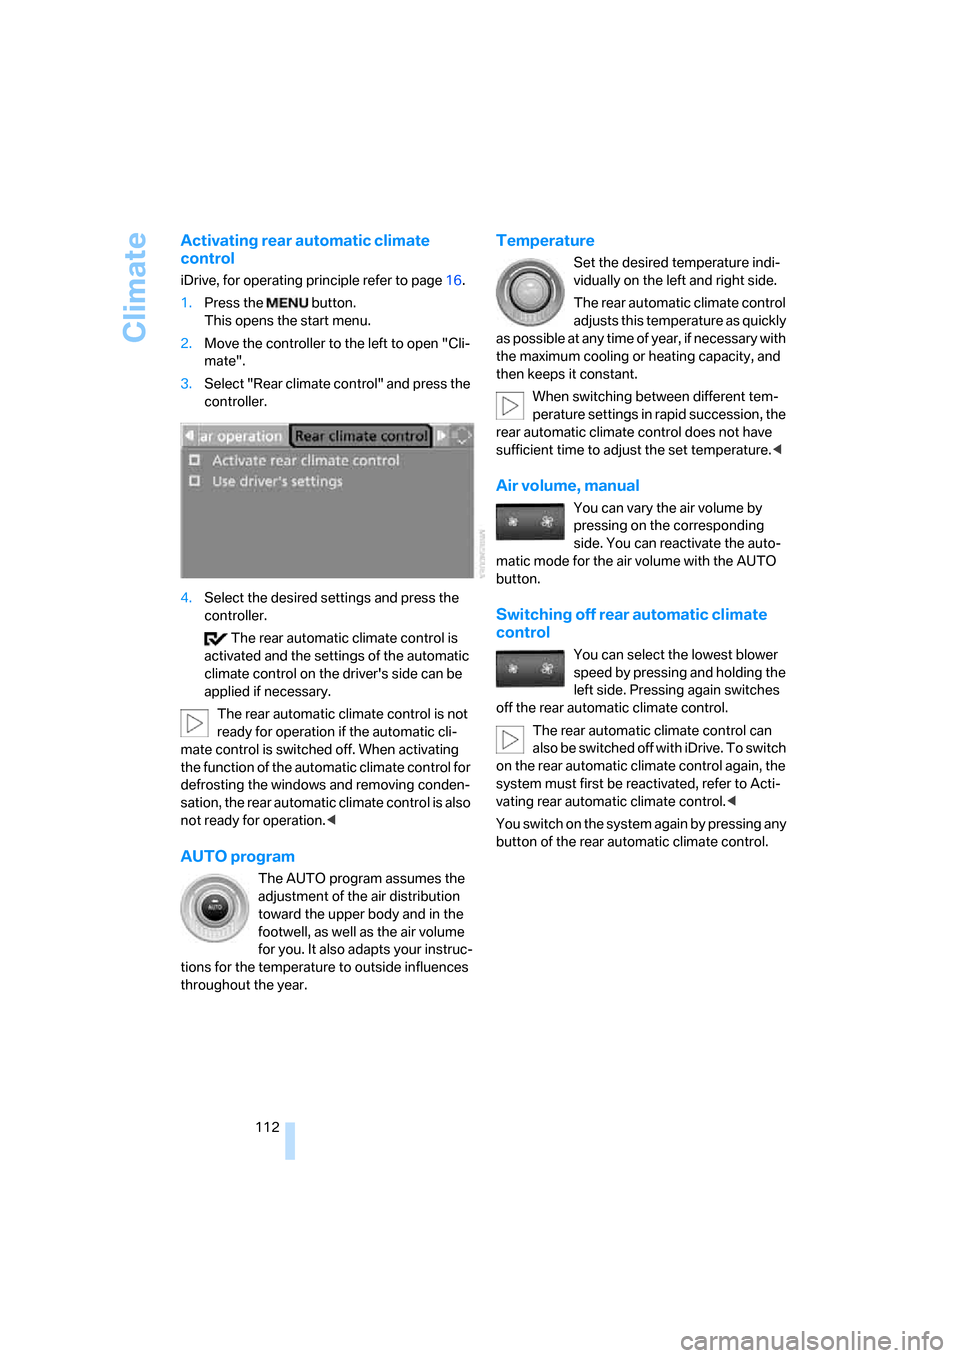
1.Press the button.
This opens the start menu.
2.Move the controller to the left to open "Cli-
mate".
3.Select "Rear climate control" and press the
controller.
4.Select the desired settings and press the
controller.
The rear automatic climate control is
activated and the settings of the automatic
climate control on the driver's side can be
applied if necessary.
The rear automatic climate control is not
ready for operation if the automatic cli-
mate control is switched off. When activating
the function of the automatic climate control for
defrosting the windows and removing conden-
sation, the rear automatic climate control is also
not ready for operation.<
AUTO program
The AUTO program assumes the
adjustment of the air distribution
toward the upper body and in the
footwell, as well as the air volume
for you. It also adapts your instruc-
tions for the temperature to outside influences
throughout the year.
Temperature
Set the desired temperature indi-
vidually on the left and right side.
The rear automatic climate control
adjusts this temperature as quickly
as possible at any time of year, if necessary with
the maximum cooling or heating capacity, and
then keeps it constant.
When switching between different tem-
perature settings in rapid succession, the
rear automatic climate control does not have
sufficient time to adjust the set temperature.<
Air volume, manual
You can vary the air volume by
pressing on the corresponding
side. You can reactivate the auto-
matic mode for the air volume with the AUTO
button.
Switching off rear automatic climate
control
You can select the lowest blower
speed by pressing and holding the
left side. Pressing again switches
off the rear automatic climate control.
The rear automatic climate control can
also be switched off with iDrive. To switch
on the rear automatic climate control again, the
system must first be reactivated, refer to Acti-
vating rear automatic climate control.<
You switch on the system again by pressing any
button of the rear automatic climate control.
Page 115 of 292
Controls
113Reference
At a glance
Driving tips
Communications
Navigation
Entertainment
Mobility
Ventilation in rear
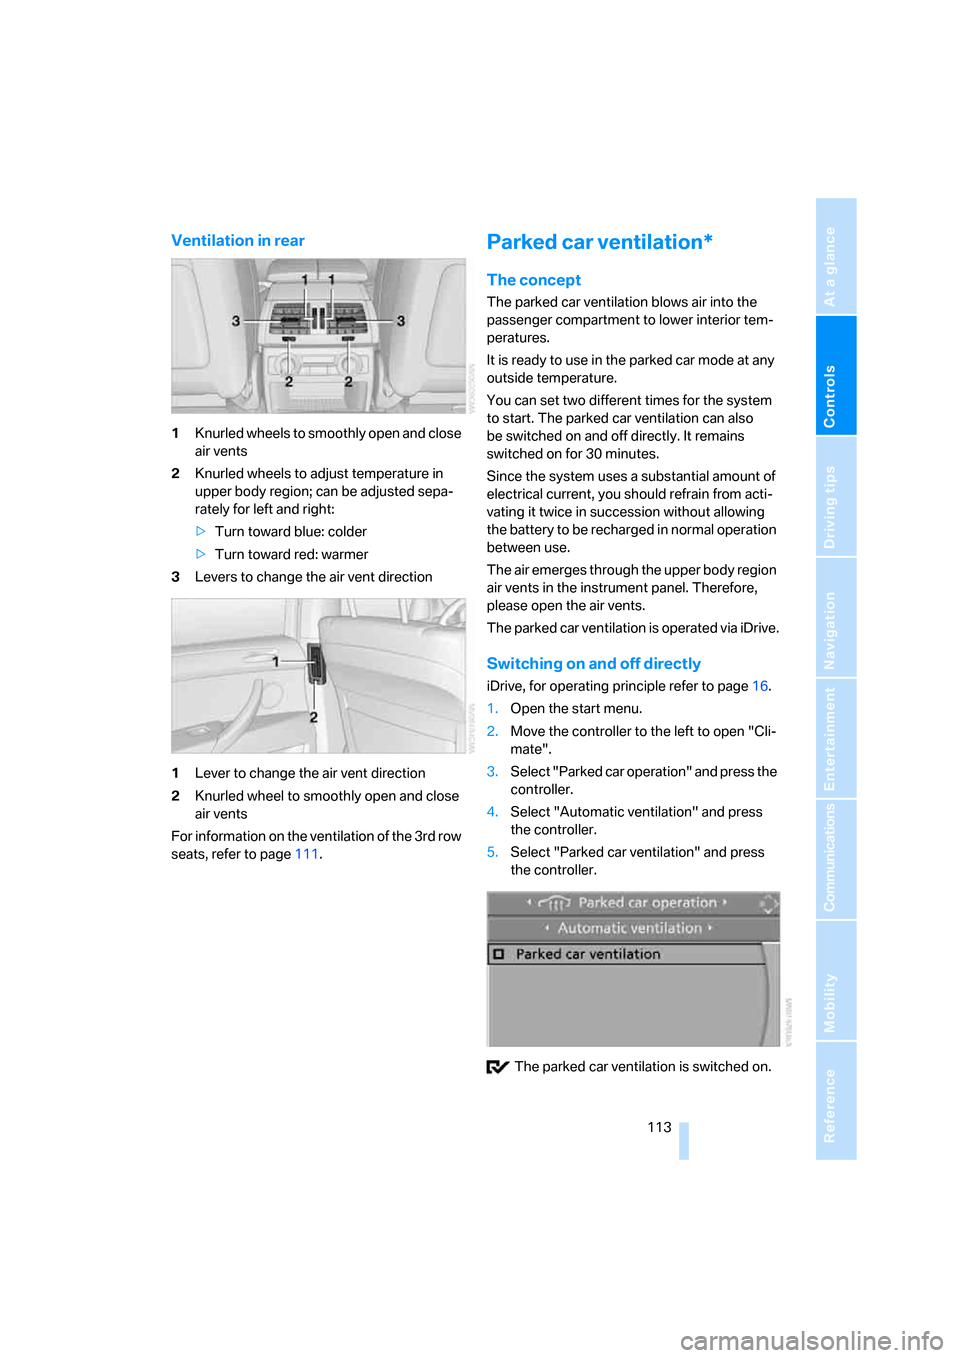
1Knurled wheels to smoothly open and close
air vents
2Knurled wheels to adjust temperature in
upper body region; can be adjusted sepa-
rately for left and right:
>Turn toward blue: colder
>Turn toward red: warmer
3Levers to change the air vent direction
1Lever to change the air vent direction
2Knurled wheel to smoothly open and close
air vents
For information on the ventilation of the 3rd row
seats, refer to page111.
Parked car ventilation*
The concept
The parked car ventilation blows air into the
passenger compartment to lower interior tem-
peratures.
It is ready to use in the parked car mode at any
outside temperature.
You can set two different times for the system
to start. The parked car ventilation can also
be switched on and off directly. It remains
switched on for 30 minutes.
Since the system uses a substantial amount of
electrical current, you should refrain from acti-
vating it twice in succession without allowing
the battery to be recharged in normal operation
between use.
The air emerges through the upper body region
air vents in the instrument panel. Therefore,
please open the air vents.
The parked car ventilation is operated via iDrive.
Switching on and off directly
iDrive, for operating principle refer to page16.
1.Open the start menu.
2.Move the controller to the left to open "Cli-
mate".
3.Select "Parked car operation" and press the
controller.
4.Select "Automatic ventilation" and press
the controller.
5.Select "Parked car ventilation" and press
the controller.
The parked car ventilation is switched on.
Page 121 of 292
Controls
119Reference
At a glance
Driving tips
Communications
Navigation
Entertainment
Mobility
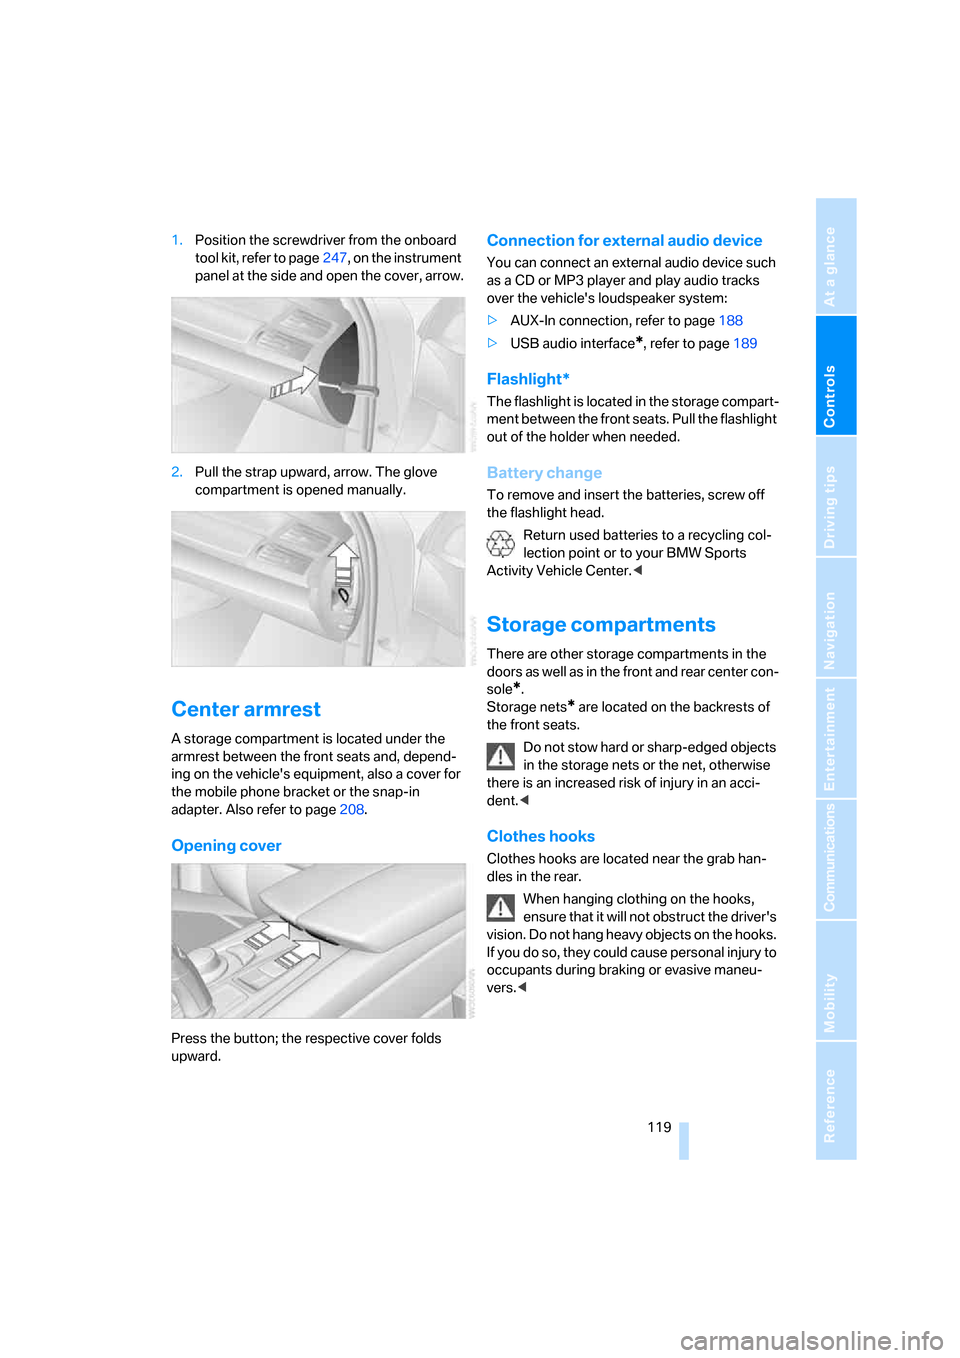
1.Position the screwdriver from the onboard
tool kit, refer to page247, on the instrument
panel at the side and open the cover, arrow.
2.Pull the strap upward, arrow. The glove
compartment is opened manually.
Center armrest
A storage compartment is located under the
armrest between the front seats and, depend-
ing on the vehicle's equipment, also a cover for
the mobile phone bracket or the snap-in
adapter. Also refer to page208.
Opening cover
Press the button; the respective cover folds
upward.
Connection for external audio device
You can connect an external audio device such
as a CD or MP3 player and play audio tracks
over the vehicle's loudspeaker system:
>AUX-In connection, refer to page188
>USB audio interface
*, refer to page189
Flashlight*
The flashlight is located in the storage compart-
ment between the front seats. Pull the flashlight
out of the holder when needed.
Battery change
To remove and insert the batteries, screw off
the flashlight head.
Return used batteries to a recycling col-
lection point or to your BMW Sports
Activity Vehicle Center.<
Storage compartments
There are other storage compartments in the
doors as well as in the front and rear center con-
sole
*.
Storage nets
* are located on the backrests of
the front seats.
Do not stow hard or sharp-edged objects
in the storage nets or the net, otherwise
there is an increased risk of injury in an acci-
dent.<
Clothes hooks
Clothes hooks are located near the grab han-
dles in the rear.
When hanging clothing on the hooks,
ensure that it will not obstruct the driver's
vision. Do not hang heavy objects on the hooks.
If you do so, they could cause personal injury to
occupants during braking or evasive maneu-
vers.<
Page 125 of 292
Controls
123Reference
At a glance
Driving tips
Communications
Navigation
Entertainment
Mobility
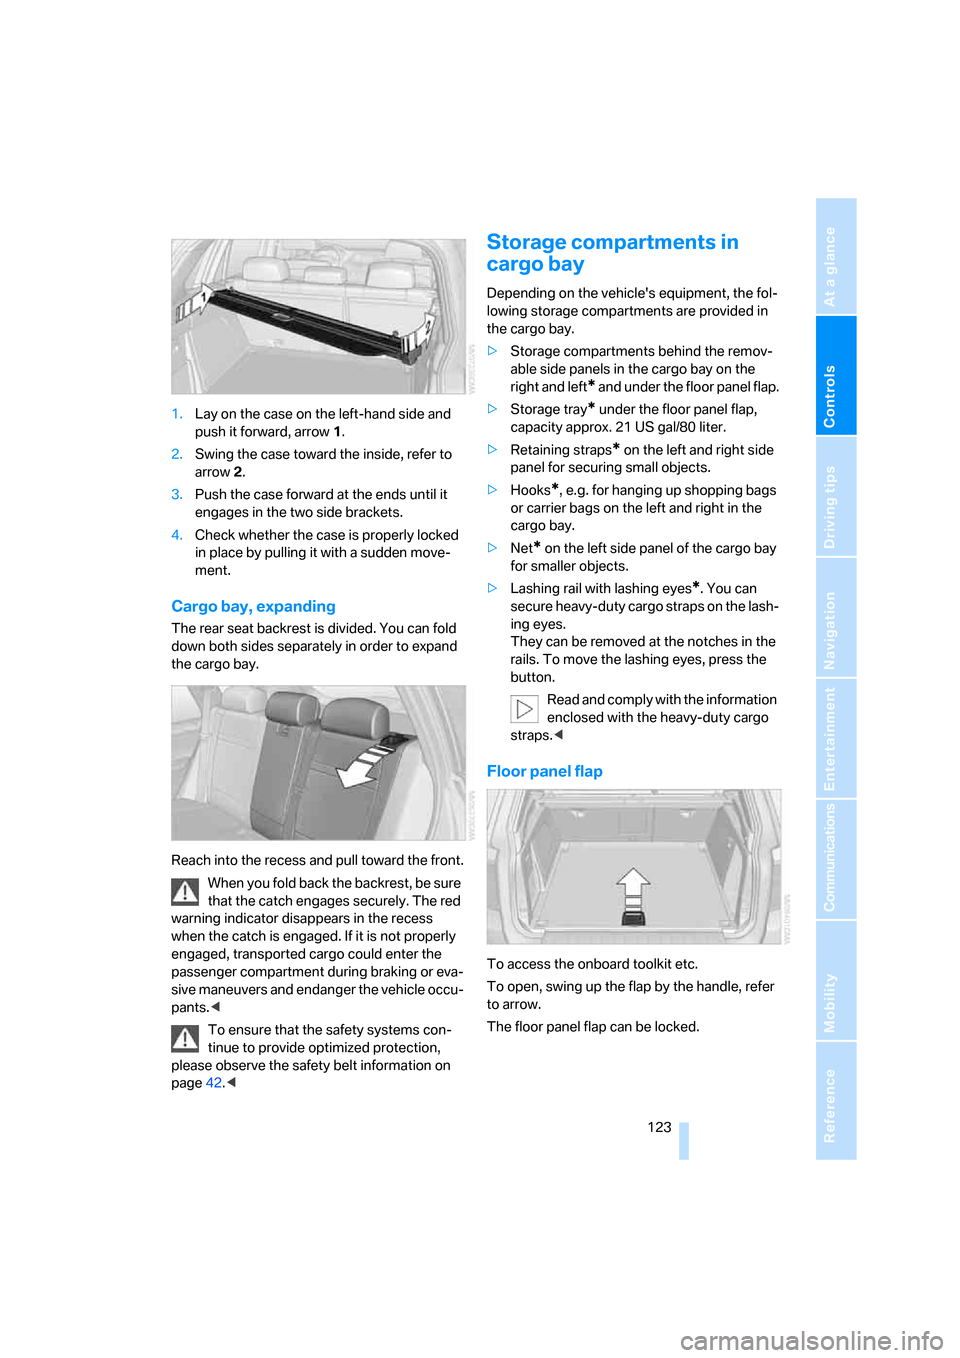
1.Lay on the case on the left-hand side and
push it forward, arrow1.
2.Swing the case toward the inside, refer to
arrow2.
3.Push the case forward at the ends until it
engages in the two side brackets.
4.Check whether the case is properly locked
in place by pulling it with a sudden move-
ment.
Cargo bay, expanding
The rear seat backrest is divided. You can fold
down both sides separately in order to expand
the cargo bay.
Reach into the recess and pull toward the front.
When you fold back the backrest, be sure
that the catch engages securely. The red
warning indicator disappears in the recess
when the catch is engaged. If it is not properly
engaged, transported cargo could enter the
passenger compartment during braking or eva-
sive maneuvers and endanger the vehicle occu-
pants.<
To ensure that the safety systems con-
tinue to provide optimized protection,
please observe the safety belt information on
page42.<
Storage compartments in
cargo bay
Depending on the vehicle's equipment, the fol-
lowing storage compartments are provided in
the cargo bay.
>Storage compartments behind the remov-
able side panels in the cargo bay on the
right and left
* and under the floor panel flap.
>Storage tray
* under the floor panel flap,
capacity approx. 21 US gal/80 liter.
>Retaining straps
* on the left and right side
panel for securing small objects.
>Hooks
*, e.g. for hanging up shopping bags
or carrier bags on the left and right in the
cargo bay.
>Net
* on the left side panel of the cargo bay
for smaller objects.
>Lashing rail with lashing eyes
*. You can
secure heavy-duty cargo straps on the lash-
ing eyes.
They can be removed at the notches in the
rails. To move the lashing eyes, press the
button.
Read and comply with the information
enclosed with the heavy-duty cargo
straps.<
Floor panel flap
To access the onboard toolkit etc.
To open, swing up the flap by the handle, refer
to arrow.
The floor panel flap can be locked.