tow BMW X5 4.8I 2008 E70 Owner's Guide
[x] Cancel search | Manufacturer: BMW, Model Year: 2008, Model line: X5 4.8I, Model: BMW X5 4.8I 2008 E70Pages: 292, PDF Size: 9.32 MB
Page 151 of 292
Navigation
Driving tips
149Reference
At a glance
Controls
Communications
Entertainment
Mobility
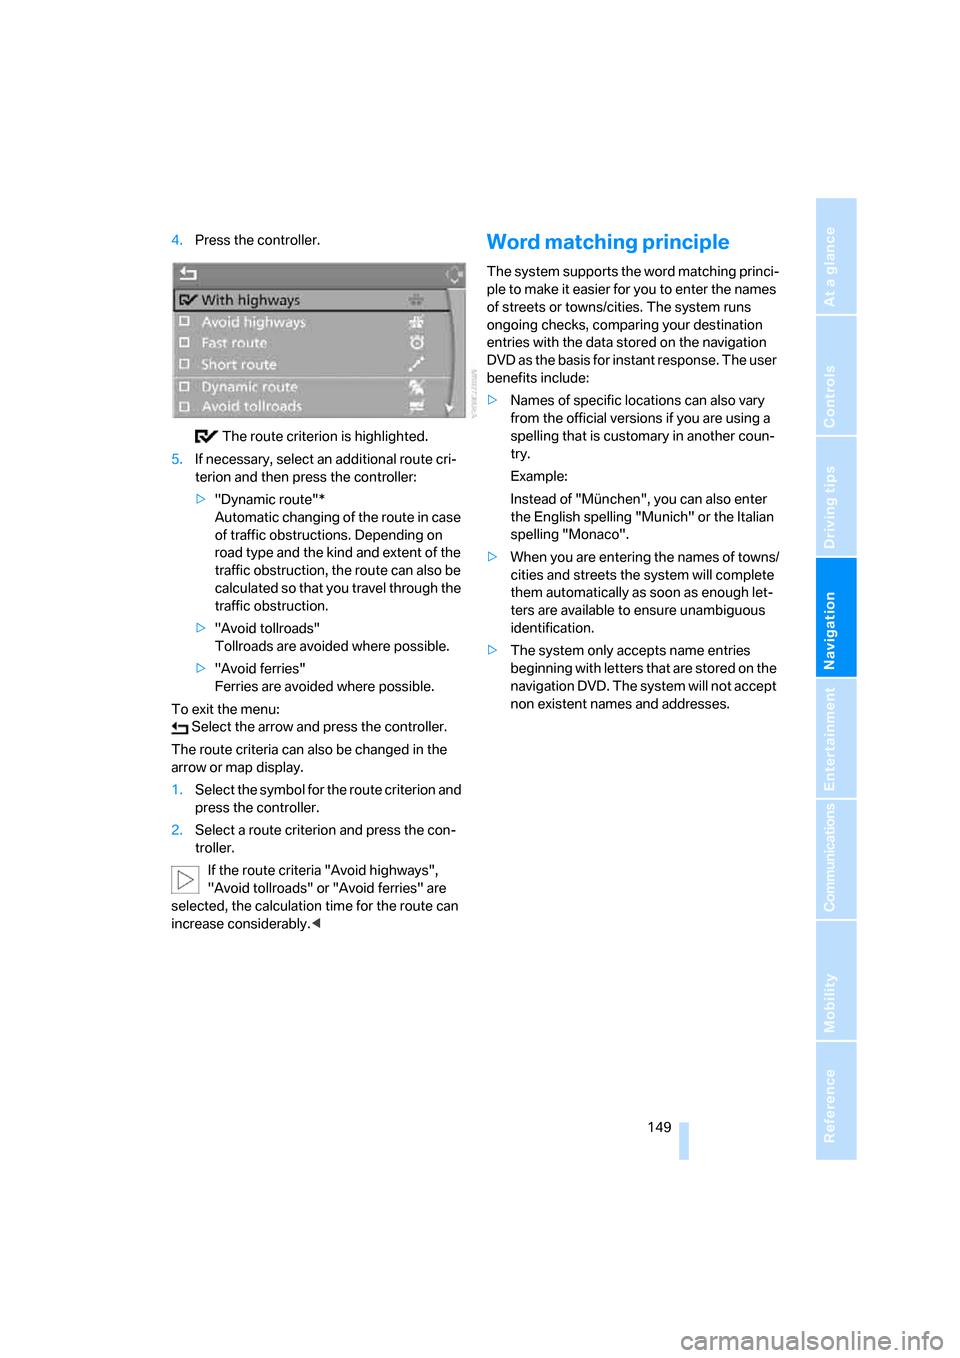
4.Press the controller.
The route criterion is highlighted.
5.If necessary, select an additional route cri-
terion and then press the controller:
>"Dynamic route"*
Automatic changing of the route in case
of traffic obstructions. Depending on
road type and the kind and extent of the
traffic obstruction, the route can also be
calculated so that you travel through the
traffic obstruction.
>"Avoid tollroads"
Tollroads are avoided where possible.
>"Avoid ferries"
Ferries are avoided where possible.
To exit the menu:
Select the arrow and press the controller.
The route criteria can also be changed in the
arrow or map display.
1.Select the symbol for the route criterion and
press the controller.
2.Select a route criterion and press the con-
troller.
If the route criteria "Avoid highways",
"Avoid tollroads" or "Avoid ferries" are
selected, the calculation time for the route can
increase considerably.
ple to make it easier for you to enter the names
of streets or towns/cities. The system runs
ongoing checks, comparing your destination
entries with the data stored on the navigation
DVD as the basis for instant response. The user
benefits include:
>Names of specific locations can also vary
from the official versions if you are using a
spelling that is customary in another coun-
try.
Example:
Instead of "München", you can also enter
the English spelling "Munich" or the Italian
spelling "Monaco".
>When you are entering the names of towns/
cities and streets the system will complete
them automatically as soon as enough let-
ters are available to ensure unambiguous
identification.
>The system only accepts name entries
beginning with letters that are stored on the
navigation DVD. The system will not accept
non existent names and addresses.
Page 154 of 292
Destination guidance
152 To exit the menu:
Select the arrow and press the controller.
Displaying map view
You can have your current position displayed on
a map. After starting the destination guidance,
the planned route is shown on the map.
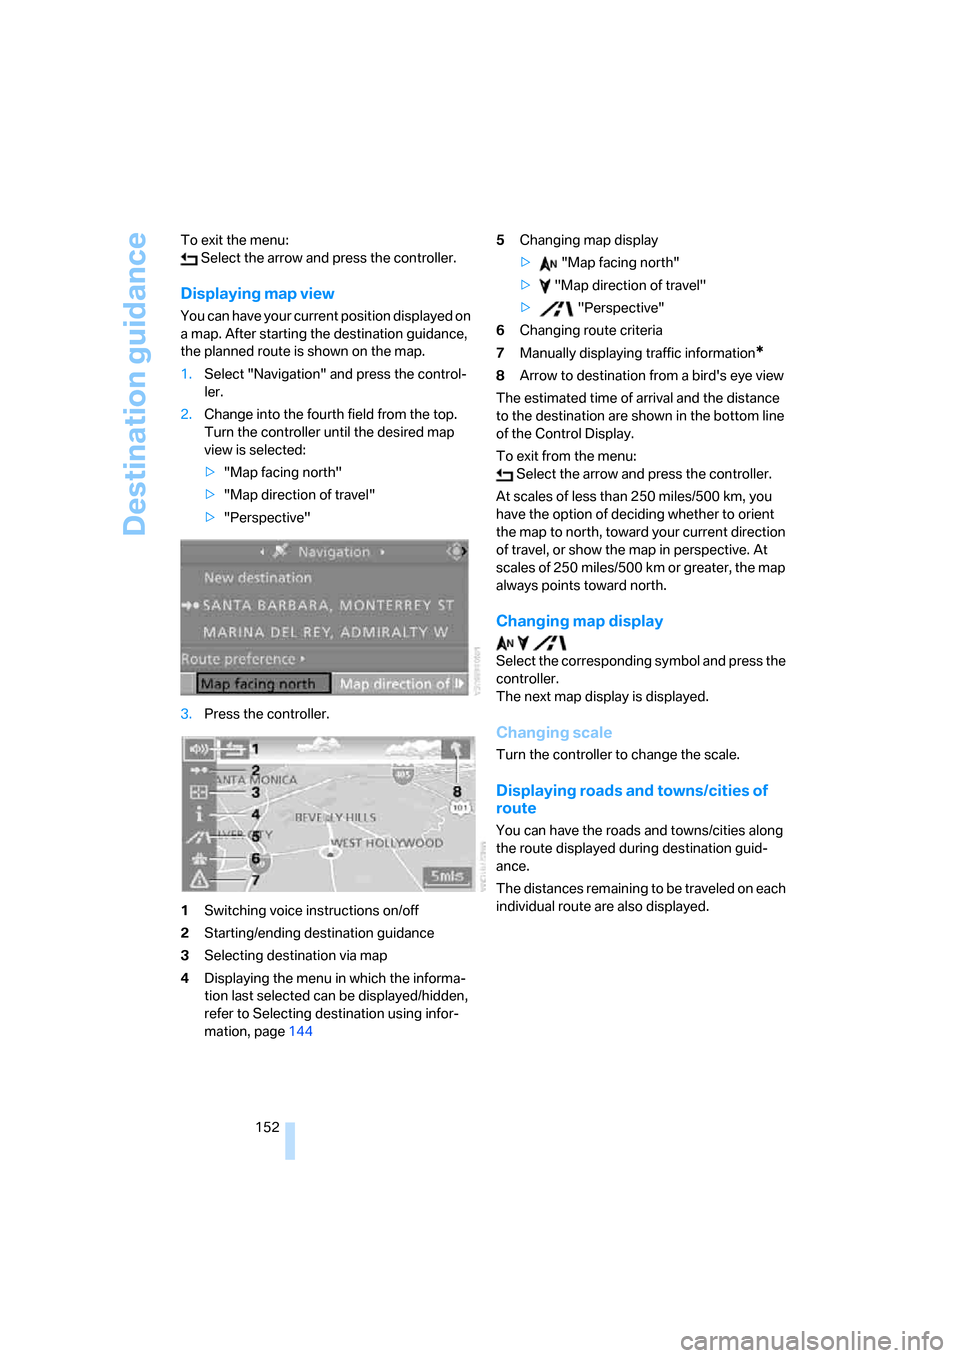
1.Select "Navigation" and press the control-
ler.
2.Change into the fourth field from the top.
Turn the controller until the desired map
view is selected:
>"Map facing north"
>"Map direction of travel"
>"Perspective"
3.Press the controller.
1Switching voice instructions on/off
2Starting/ending destination guidance
3Selecting destination via map
4Displaying the menu in which the informa-
tion last selected can be displayed/hidden,
refer to Selecting destination using infor-
mation, page1445Changing map display
> "Map facing north"
> "Map direction of travel"
> "Perspective"
6Changing route criteria
7Manually displaying traffic information
*
8Arrow to destination from a bird's eye view
The estimated time of arrival and the distance
to the destination are shown in the bottom line
of the Control Display.
To exit from the menu:
Select the arrow and press the controller.
At scales of less than 250 miles/500 km, you
have the option of deciding whether to orient
the map to north, toward your current direction
of travel, or show the map in perspective. At
scales of 250 miles/500 km or greater, the map
always points toward north.
Changing map display
Select the corresponding symbol and press the
controller.
The next map display is displayed.
Changing scale
Turn the controller to change the scale.
Displaying roads and towns/cities of
route
You can have the roads and towns/cities along
the route displayed during destination guid-
ance.
The distances remaining to be traveled on each
individual route are also displayed.
Page 160 of 292
Destination guidance
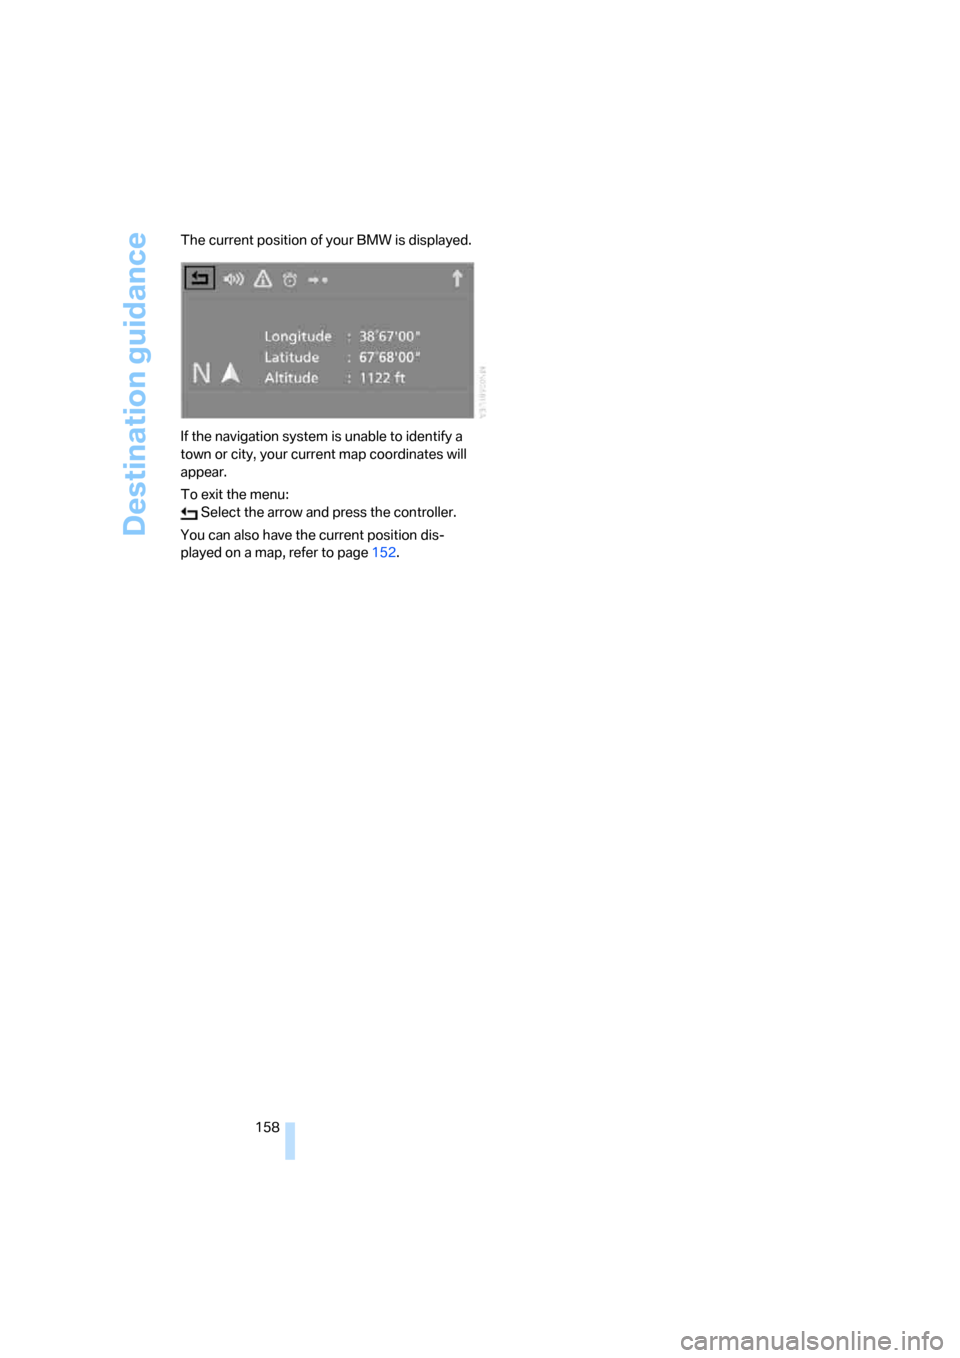
158 The current position of your BMW is displayed.
If the navigation system is unable to identify a
town or city, your current map coordinates will
appear.
To exit the menu:
Select the arrow and press the controller.
You can also have the current position dis-
played on a map, refer to page152.
Page 161 of 292
Navigation
Driving tips
159Reference
At a glance
Controls
Communications
Entertainment
Mobility
What to do if …
What to do if …
>a navigation DVD is inserted, but an instruc-
tion to insert the DVD appears on the Con-
trol Display?
The navigation DVD may not be the correct
DVD for the navigation system. This infor-
mation is indicated on the DVD label.
>you request the current position of your
vehicle, but do not receive a precise dis-
play?
The system is unable to receive enough
GPS signals at your current position due to
obstructions, your position is not yet avail-
able on your navigation DVD, or the system
is in the process of calculating your posi-
tion. Reception is best when you have an
unobstructed view to the sky.
>the destination guidance does not accept a
destination?
The data of the destination is not stored on
the navigation DVD that is loaded. Select a
destination that is as close as possible to
the original.
>the destination guidance does not accept
an address without the street name?
On the navigation DVD, no downtown area
can be determined for the city or town
entered. Enter any street, or a destination
such as the railway station in the selected
town, and then start the destination guid-
ance.
>you want to enter a destination for the des-
tination guidance, but it is not possible to
select the letters for your desired entry?
The data of the destination is not stored on
the navigation DVD that is loaded. In this
case, the system will not offer you any let-
ters to choose from. Select a destination
that is as close as possible to the original.>the system stops furnishing directions on
which way to turn as you approach intersec-
tions?
You are driving in an area that has not yet
been completely recorded on the naviga-
tion DVD. Instead of an arrow indicating a
turn, you will see an arrow which indicates
the general direction of your planned route.
Or you have left the recommended route
and the system requires a few seconds to
calculate a new recommended route.
>the navigation system does not react to
entries?
If the battery was disconnected, it takes
about 10 minutes before the system is once
again operational.
Page 217 of 292
215
Entertainment
Reference
At a glance
Controls
Driving tips Communications
Navigation
Mobility
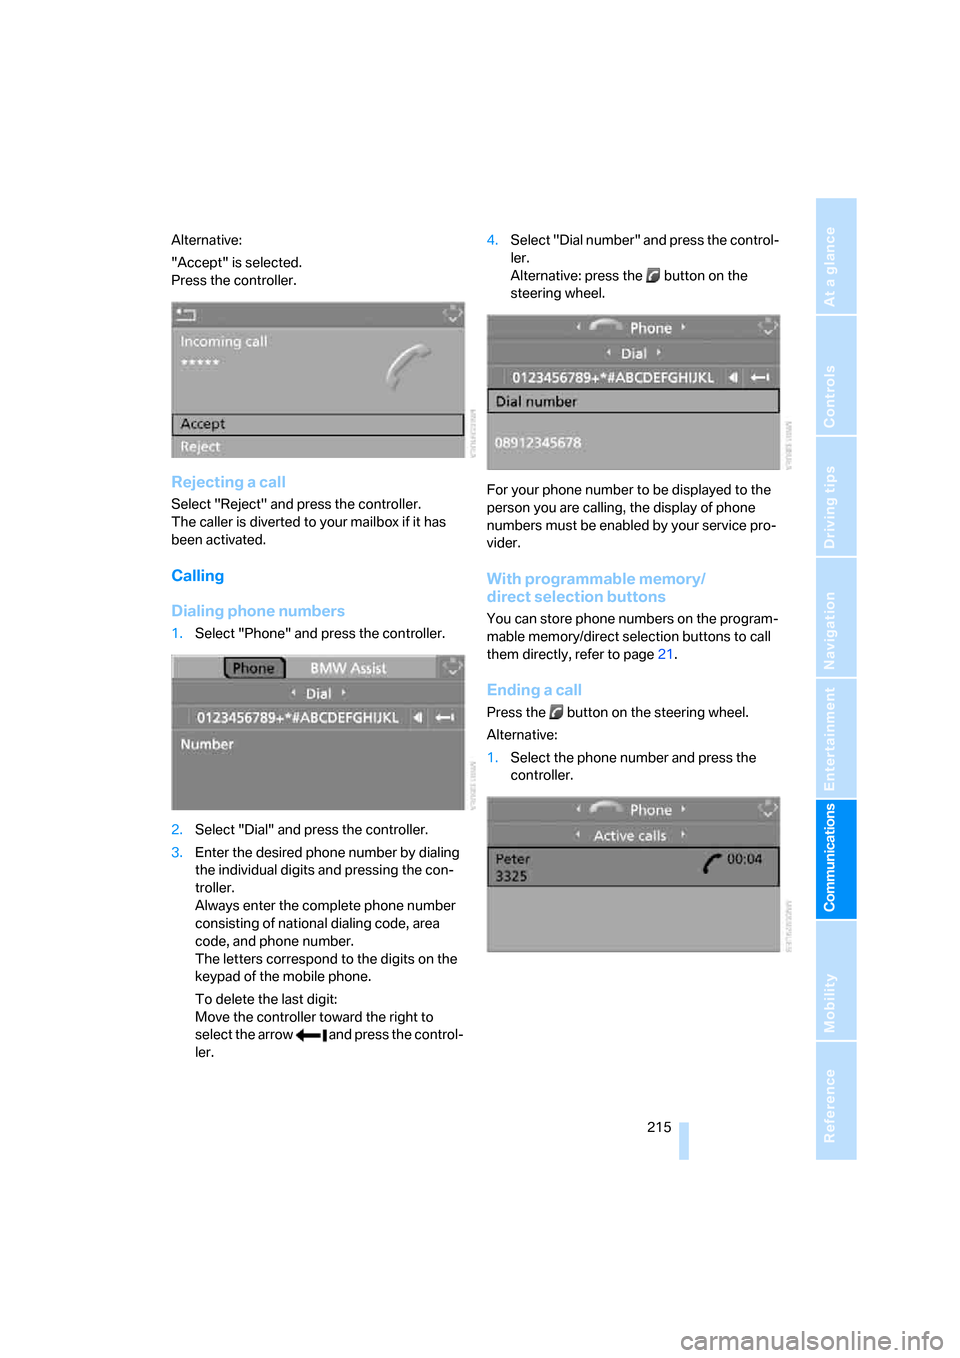
Alternative:
"Accept" is selected.
Press the controller.
Rejecting a call
Select "Reject" and press the controller.
The caller is diverted to your mailbox if it has
been activated.
Calling
Dialing phone numbers
1.Select "Phone" and press the controller.
2.Select "Dial" and press the controller.
3.Enter the desired phone number by dialing
the individual digits and pressing the con-
troller.
Always enter the complete phone number
consisting of national dialing code, area
code, and phone number.
The letters correspond to the digits on the
keypad of the mobile phone.
To delete the last digit:
Move the controller toward the right to
select the arrow and press the control-
ler.4.Select "Dial number" and press the control-
ler.
Alternative: press the button on the
steering wheel.
For your phone number to be displayed to the
person you are calling, the display of phone
numbers must be enabled by your service pro-
vider.
With programmable memory/
direct selection buttons
You can store phone numbers on the program-
mable memory/direct selection buttons to call
them directly, refer to page21.
Ending a call
Press the button on the steering wheel.
Alternative:
1.Select the phone number and press the
controller.
Page 224 of 292
Telephoning
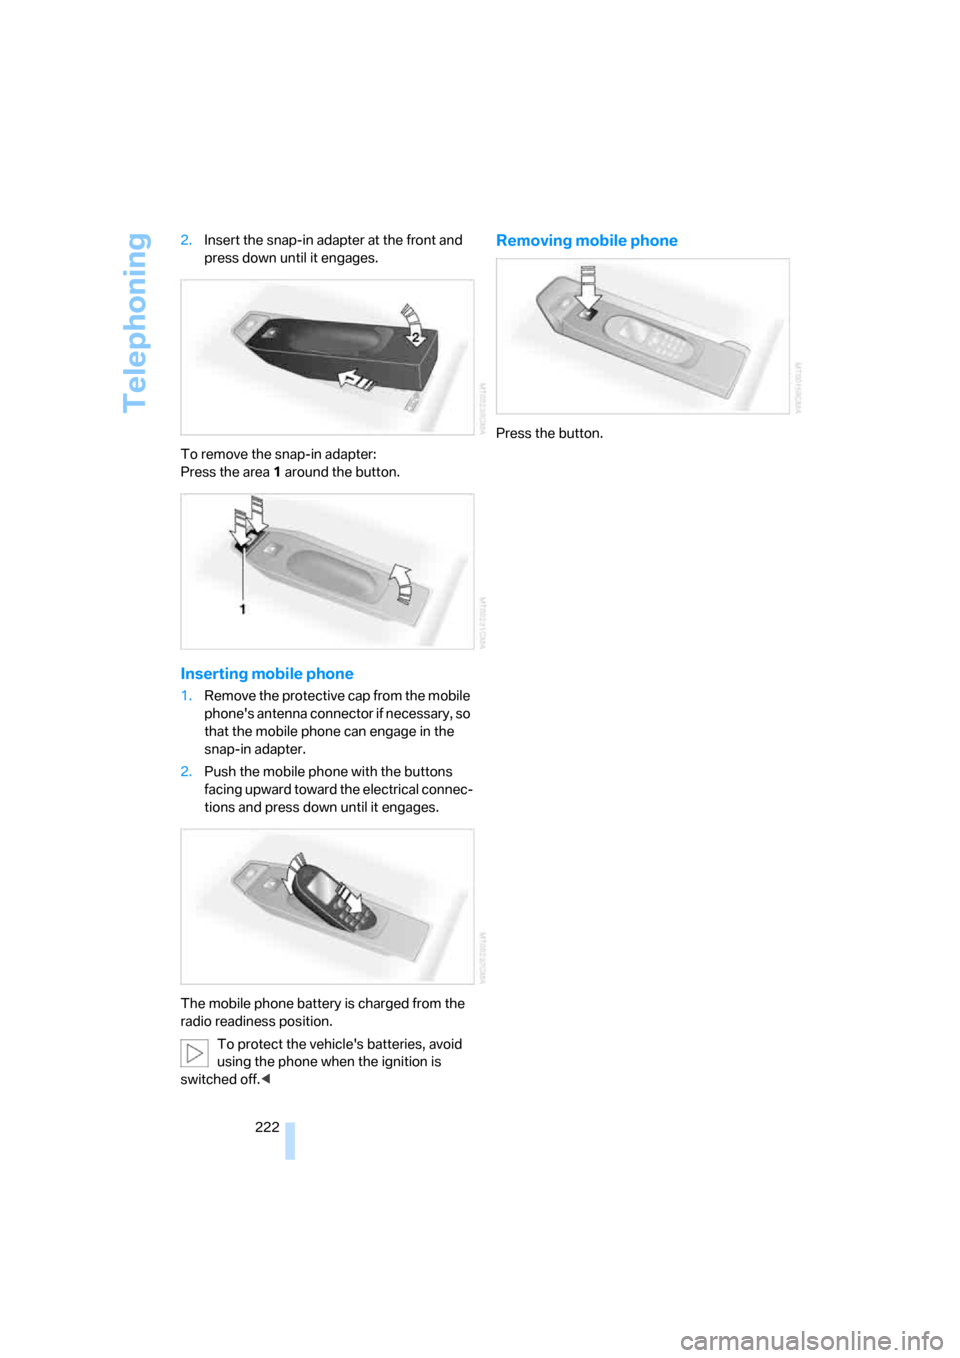
222 2.Insert the snap-in adapter at the front and
press down until it engages.
To remove the snap-in adapter:
Press the area 1 around the button.
Inserting mobile phone
1.Remove the protective cap from the mobile
phone's antenna connector if necessary, so
that the mobile phone can engage in the
snap-in adapter.
2.Push the mobile phone with the buttons
facing upward toward the electrical connec-
tions and press down until it engages.
The mobile phone battery is charged from the
radio readiness position.
To protect the vehicle's batteries, avoid
using the phone when the ignition is
switched off.<
Removing mobile phone
Press the button.
Page 240 of 292
Wheels and tires
238
Temperature
The temperature grades are A, the highest, B,
and C, representing the tire's resistance to the
generation of heat and its ability to dissipate
heat when tested under controlled conditions
on a specified indoor laboratory test wheel.
Sustained high temperature can cause the
material of the tire to degenerate and reduce
tire life, and excessive temperature can lead to
sudden tire failure. The grade C corresponds to
a level of performance which all passenger car
tires must meet under the Federal Motor Vehi-
cle Safety Standard No. 109. Grades B and A
represent higher levels of performance on the
laboratory test wheel than the minimum
required by law.
The temperature grade for this tire is
established for a tire that is properly
inflated and not overloaded. Excessive speed,
underinflation, or excessive loading, either sep-
arately or in combination, can cause heat
buildup and possible tire failure.<
RSC – run-flat tires
You will recognize run-flat tires by a circular
symbol containing the letters RSC on the side
of the tire, refer to page239.
M+S
Winter and all-season tires.
These have better winter properties than sum-
mer tires.
XL
Indicates specially reinforced tires.
Tire condition
Inspect your tires frequently for tread wear,
signs of damage and for foreign objects lodged
in the tread. Check the tread depth.
Minimum tread depth
The tread depth should not drop below 0.12 in/
3 mm, although, for example, European legisla-
tion only specifies a minimum tread depth of 0.063 in/1.6 mm. At tread depths below 0.12 in/
3 mm there is an increased risk of high-speed
hydroplaning, even when only small amounts of
water are present on the road surface.
When winter tires wear down past a tread depth
of 0.16 in/4 mm, they become perceptibly less
suitable for winter conditions. For the sake of
safety, new tires should be installed.
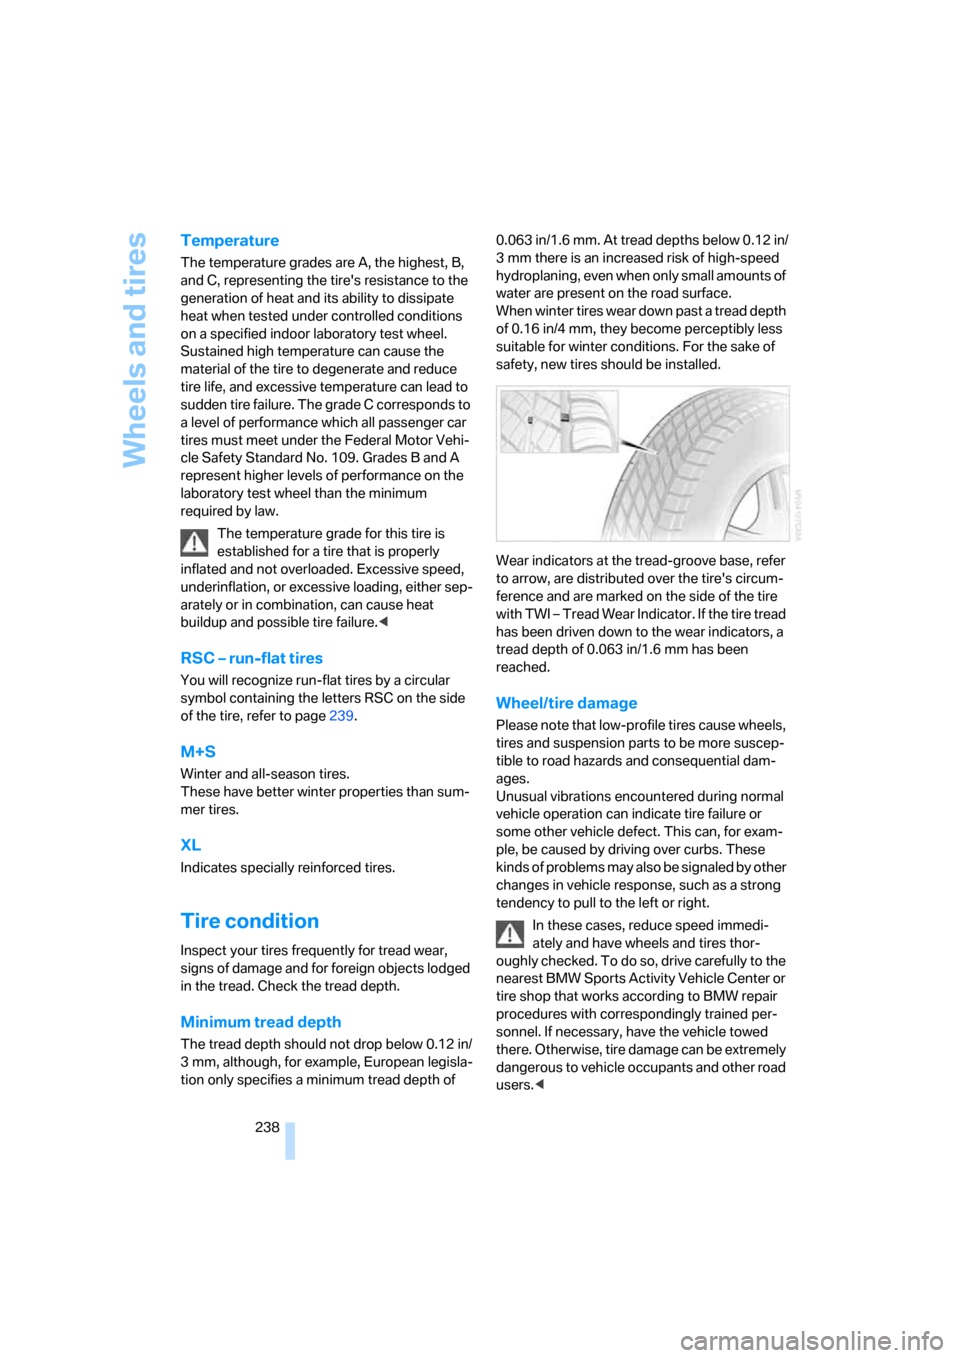
Wear indicators at the tread-groove base, refer
to arrow, are distributed over the tire's circum-
ference and are marked on the side of the tire
with TWI – Tread Wear Indicator. If the tire tread
has been driven down to the wear indicators, a
tread depth of 0.063 in/1.6 mm has been
reached.
Wheel/tire damage
Please note that low-profile tires cause wheels,
tires and suspension parts to be more suscep-
tible to road hazards and consequential dam-
ages.
Unusual vibrations encountered during normal
vehicle operation can indicate tire failure or
some other vehicle defect. This can, for exam-
ple, be caused by driving over curbs. These
kinds of problems may also be signaled by other
changes in vehicle response, such as a strong
tendency to pull to the left or right.
In these cases, reduce speed immedi-
ately and have wheels and tires thor-
oughly checked. To do so, drive carefully to the
nearest BMW Sports Activity Vehicle Center or
tire shop that works according to BMW repair
procedures with correspondingly trained per-
sonnel. If necessary, have the vehicle towed
there. Otherwise, tire damage can be extremely
dangerous to vehicle occupants and other road
users.<
Page 249 of 292
Mobility
247Reference
At a glance
Controls
Driving tips
Communications
Navigation
Entertainment
Replacing components
Onboard toolkit
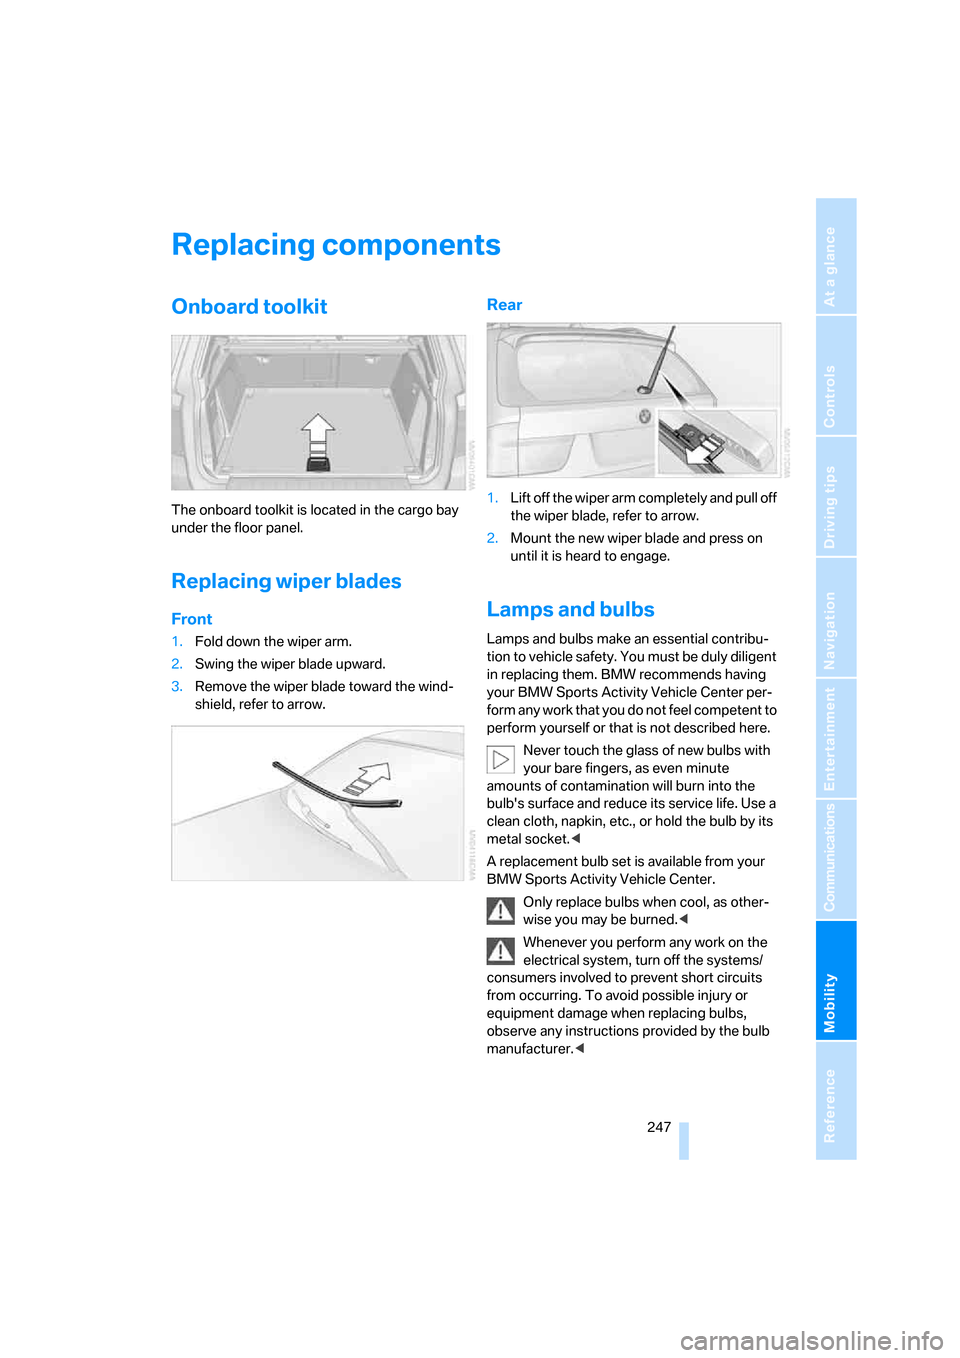
The onboard toolkit is located in the cargo bay
under the floor panel.
Replacing wiper blades
Front
1.Fold down the wiper arm.
2.Swing the wiper blade upward.
3.Remove the wiper blade toward the wind-
shield, refer to arrow.
Rear
1.Lift off the wiper arm completely and pull off
the wiper blade, refer to arrow.
2.Mount the new wiper blade and press on
until it is heard to engage.
Lamps and bulbs
Lamps and bulbs make an essential contribu-
tion to vehicle safety. You must be duly diligent
in replacing them. BMW recommends having
your BMW Sports Activity Vehicle Center per-
form any work that you do not feel competent to
perform yourself or that is not described here.
Never touch the glass of new bulbs with
your bare fingers, as even minute
amounts of contamination will burn into the
bulb's surface and reduce its service life. Use a
clean cloth, napkin, etc., or hold the bulb by its
metal socket.<
A replacement bulb set is available from your
BMW Sports Activity Vehicle Center.
Only replace bulbs when cool, as other-
wise you may be burned.<
Whenever you perform any work on the
electrical system, turn off the systems/
consumers involved to prevent short circuits
from occurring. To avoid possible injury or
equipment damage when replacing bulbs,
observe any instructions provided by the bulb
manufacturer.<
Page 254 of 292
Replacing components
252
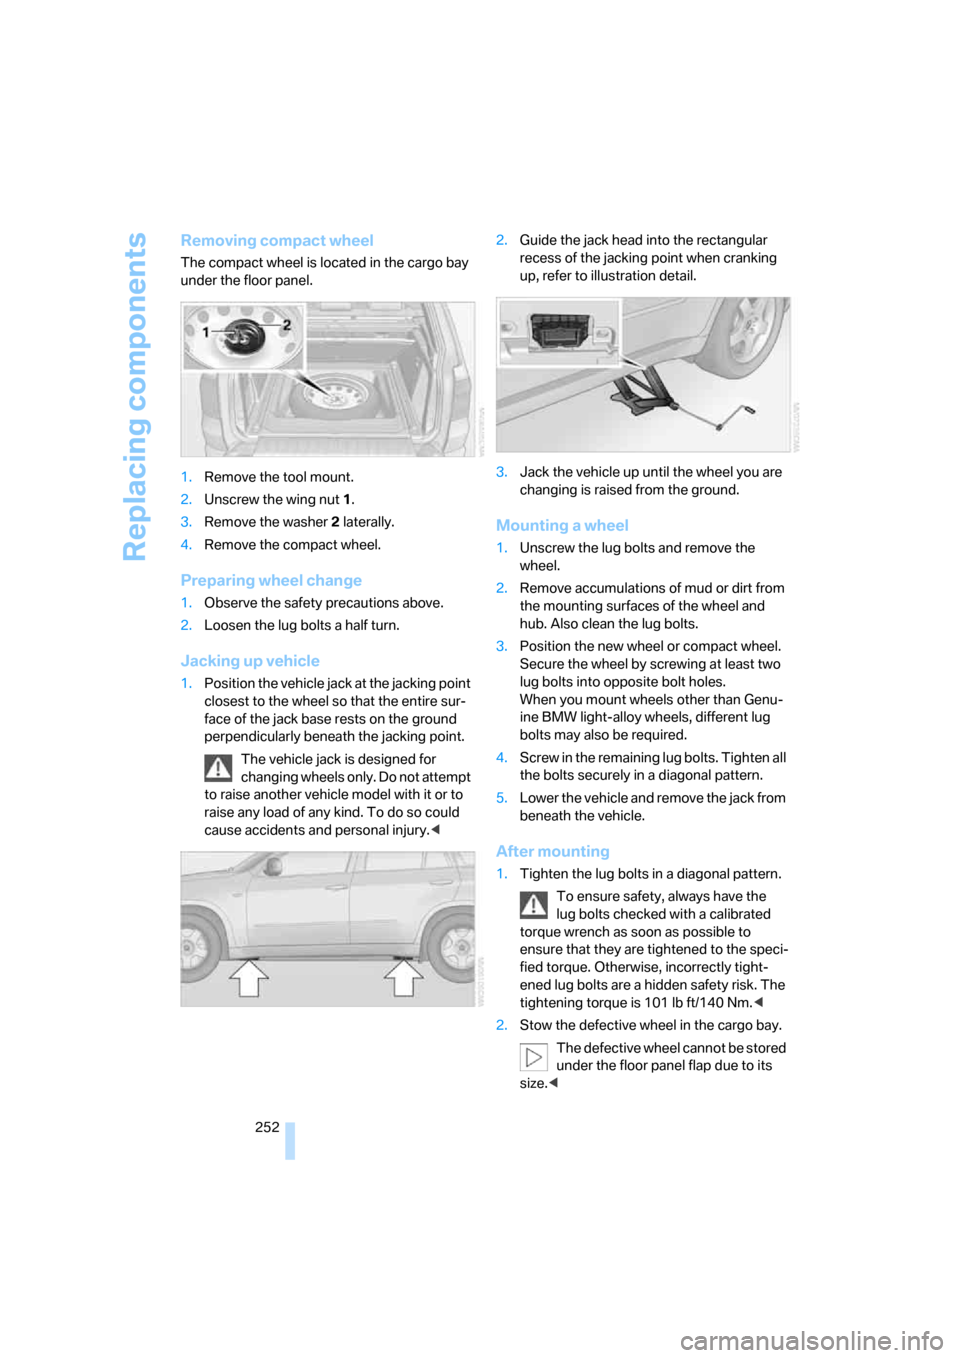
Removing compact wheel
The compact wheel is located in the cargo bay
under the floor panel.
1.Remove the tool mount.
2.Unscrew the wing nut 1.
3.Remove the washer 2 laterally.
4.Remove the compact wheel.
Preparing wheel change
1.Observe the safety precautions above.
2.Loosen the lug bolts a half turn.
Jacking up vehicle
1.Position the vehicle jack at the jacking point
closest to the wheel so that the entire sur-
face of the jack base rests on the ground
perpendicularly beneath the jacking point.
The vehicle jack is designed for
changing wheels only. Do not attempt
to raise another vehicle model with it or to
raise any load of any kind. To do so could
cause accidents and personal injury.<2.Guide the jack head into the rectangular
recess of the jacking point when cranking
up, refer to illustration detail.
3.Jack the vehicle up until the wheel you are
changing is raised from the ground.
Mounting a wheel
1.Unscrew the lug bolts and remove the
wheel.
2.Remove accumulations of mud or dirt from
the mounting surfaces of the wheel and
hub. Also clean the lug bolts.
3.Position the new wheel or compact wheel.
Secure the wheel by screwing at least two
lug bolts into opposite bolt holes.
When you mount wheels other than Genu-
ine BMW light-alloy wheels, different lug
bolts may also be required.
4.Screw in the remaining lug bolts. Tighten all
the bolts securely in a diagonal pattern.
5.Lower the vehicle and remove the jack from
beneath the vehicle.
After mounting
1.Tighten the lug bolts in a diagonal pattern.
To ensure safety, always have the
lug bolts checked with a calibrated
torque wrench as soon as possible to
ensure that they are tightened to the speci-
fied torque. Otherwise, incorrectly tight-
ened lug bolts are a hidden safety risk. The
tightening torque is 101 lb ft/140 Nm.<
2.Stow the defective wheel in the cargo bay.
The defective wheel cannot be stored
under the floor panel flap due to its
size.<
Page 259 of 292
Mobility
257Reference
At a glance
Controls
Driving tips
Communications
Navigation
Entertainment
3.Attach the second end of the cable to the
positive terminal of the battery or to a start-
ing-aid terminal of the vehicle to be started.
4.Attach one end of the jumper cable minus/–
to the negative terminal of the battery or to
an engine or body ground of the assisting
vehicle.
Your BMW has a special nut as body ground
or negative pole.
5.Attach the second end of the cable to the
negative terminal of the battery or to the
engine or body ground of the vehicle to be
started.
Starting engine
1.Start the engine on the assisting vehicle
and allow it to run at idle for several minutes
at slightly increased speed.
2.Start the engine on the other vehicle in the
usual way.
If the first starting attempt is not successful,
wait a few minutes before another attempt
in order to allow the discharged battery to
recharge.
3.Let the engines run for a few minutes.
4.Disconnect the jumper cables by reversing
the connection sequence.
Check the battery and recharge if necessary.
Never use spray fluids to start the
engine.<
Tow-starting and towing
Observe applicable laws and regulations
for tow-starting and towing.<
Do not transport any passengers other
than the driver in a vehicle that is being
towed.
Using tow fitting
The screw-on tow-fitting must always be car-
ried in the vehicle. It can be screwed in at the
front or rear of the BMW.
It is located in the toolkit under the floor panel
flap in the cargo bay, refer to page247.
Use only the tow fitting provided with the
vehicle and screw it all the way in. Use the
tow fitting for towing only on roads. Avoid lateral
loading of the tow fitting, e.g. do not lift the vehi-
cle by the tow fitting. Otherwise damage to the
tow fitting and the vehicle can occur.<
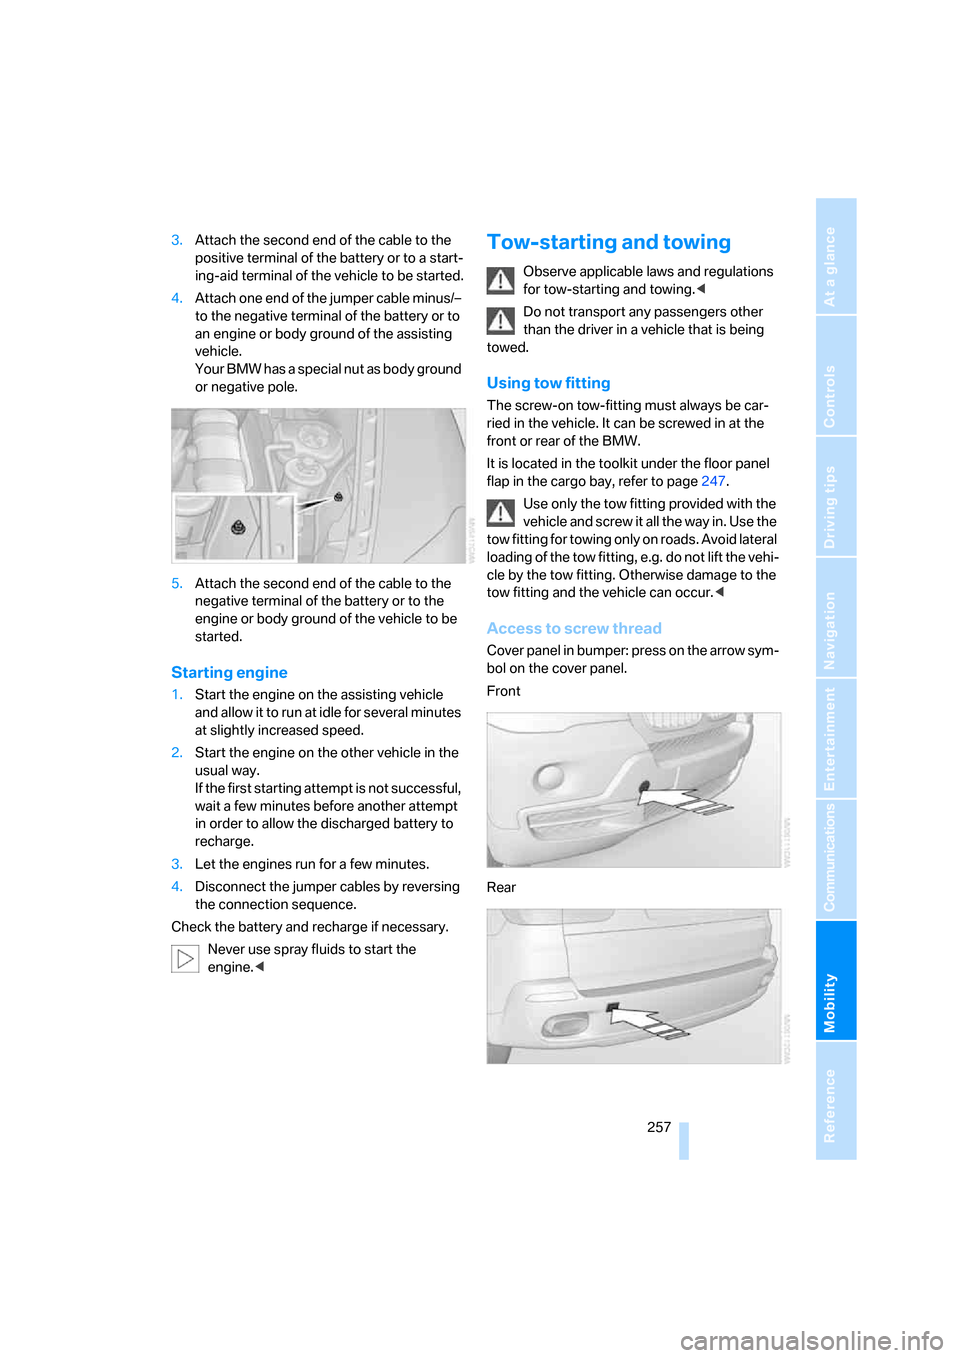
Access to screw thread
Cover panel in bumper: press on the arrow sym-
bol on the cover panel.
Front
Rear