navigation BMW X5 4.8I 2008 E70 Repair Manual
[x] Cancel search | Manufacturer: BMW, Model Year: 2008, Model line: X5 4.8I, Model: BMW X5 4.8I 2008 E70Pages: 292, PDF Size: 9.32 MB
Page 115 of 292
Controls
113Reference
At a glance
Driving tips
Communications
Navigation
Entertainment
Mobility
Ventilation in rear
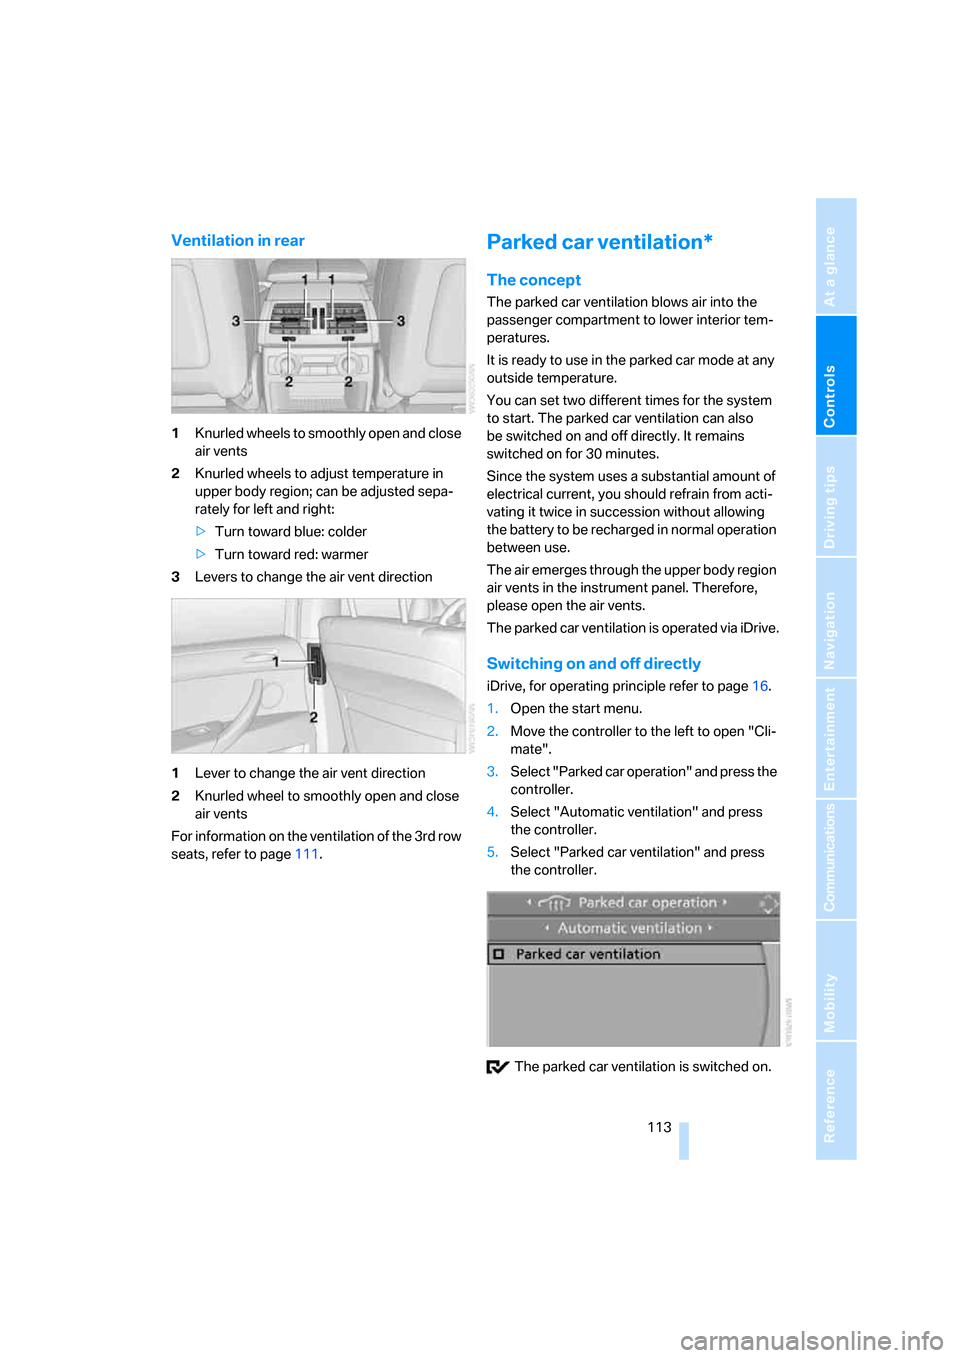
1Knurled wheels to smoothly open and close
air vents
2Knurled wheels to adjust temperature in
upper body region; can be adjusted sepa-
rately for left and right:
>Turn toward blue: colder
>Turn toward red: warmer
3Levers to change the air vent direction
1Lever to change the air vent direction
2Knurled wheel to smoothly open and close
air vents
For information on the ventilation of the 3rd row
seats, refer to page111.
Parked car ventilation*
The concept
The parked car ventilation blows air into the
passenger compartment to lower interior tem-
peratures.
It is ready to use in the parked car mode at any
outside temperature.
You can set two different times for the system
to start. The parked car ventilation can also
be switched on and off directly. It remains
switched on for 30 minutes.
Since the system uses a substantial amount of
electrical current, you should refrain from acti-
vating it twice in succession without allowing
the battery to be recharged in normal operation
between use.
The air emerges through the upper body region
air vents in the instrument panel. Therefore,
please open the air vents.
The parked car ventilation is operated via iDrive.
Switching on and off directly
iDrive, for operating principle refer to page16.
1.Open the start menu.
2.Move the controller to the left to open "Cli-
mate".
3.Select "Parked car operation" and press the
controller.
4.Select "Automatic ventilation" and press
the controller.
5.Select "Parked car ventilation" and press
the controller.
The parked car ventilation is switched on.
Page 117 of 292
Controls
115Reference
At a glance
Driving tips
Communications
Navigation
Entertainment
Mobility
Practical interior accessories
Integrated universal remote
control*
The concept
The integrated universal remote control can
replace as many as three hand-held transmit-
ters for various remote-controlled accessories,
such as garage and gate or lighting systems.
The integrated universal remote control regis-
ters and stores signals from the original hand-
held transmitters.
The signal of an original hand-held transmitter
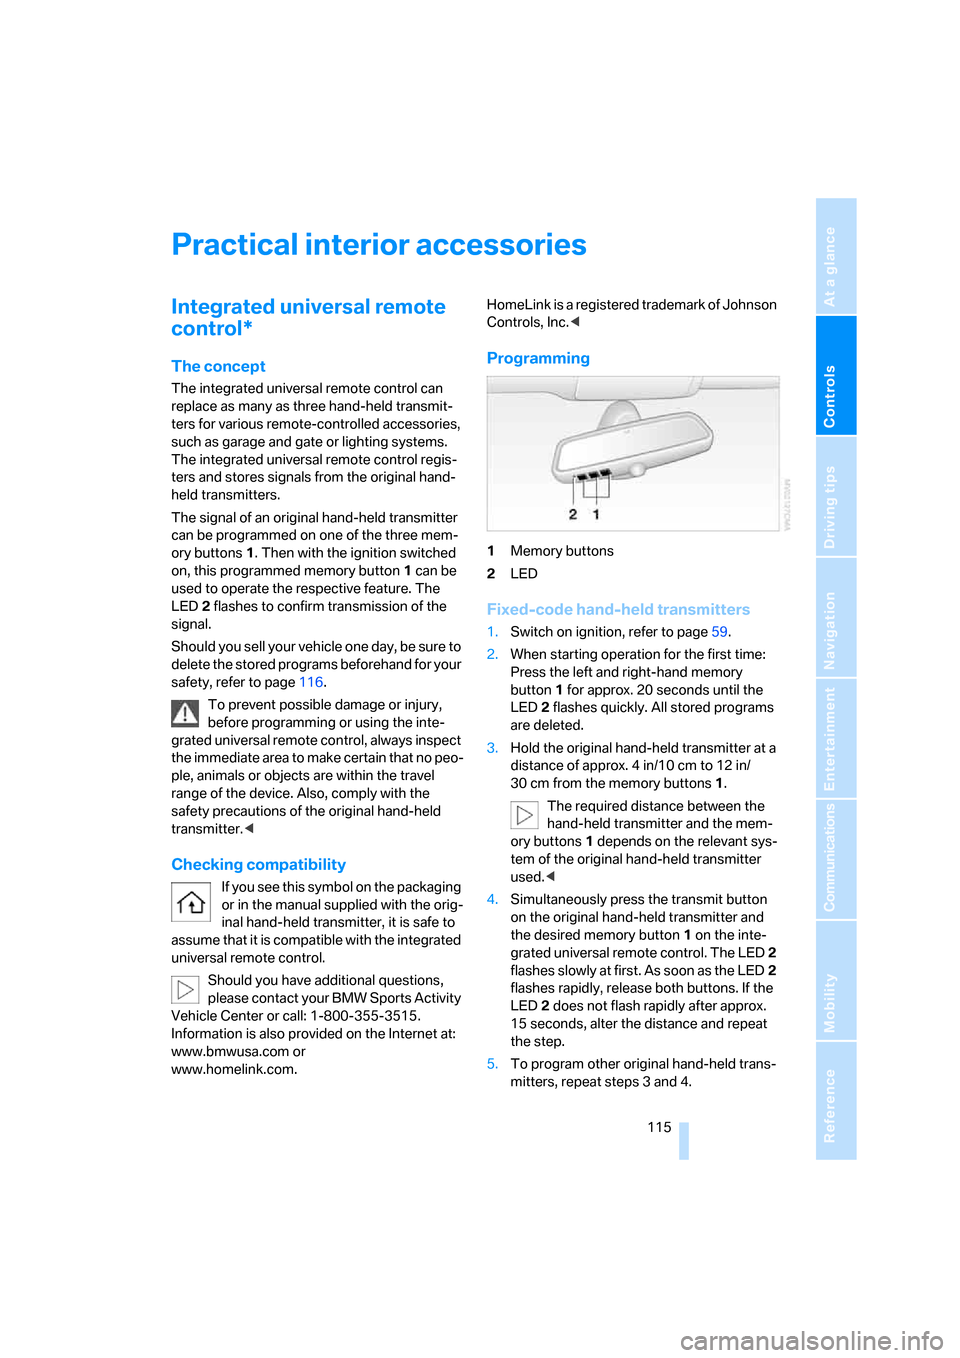
can be programmed on one of the three mem-
ory buttons1. Then with the ignition switched
on, this programmed memory button1 can be
used to operate the respective feature. The
LED2 flashes to confirm transmission of the
signal.
Should you sell your vehicle one day, be sure to
delete the stored programs beforehand for your
safety, refer to page116.
To prevent possible damage or injury,
before programming or using the inte-
grated universal remote control, always inspect
the immediate area to make certain that no peo-
ple, animals or objects are within the travel
range of the device. Also, comply with the
safety precautions of the original hand-held
transmitter.<
Checking compatibility
If you see this symbol on the packaging
or in the manual supplied with the orig-
inal hand-held transmitter, it is safe to
assume that it is compatible with the integrated
universal remote control.
Should you have additional questions,
please contact your BMW Sports Activity
Vehicle Center or call: 1-800-355-3515.
Information is also provided on the Internet at:
www.bmwusa.com or
www.homelink.com.HomeLink is a registered trademark of Johnson
Controls, Inc.<
Programming
1Memory buttons
2LED
Fixed-code hand-held transmitters
1.Switch on ignition, refer to page59.
2.When starting operation for the first time:
Press the left and right-hand memory
button1 for approx. 20 seconds until the
LED2 flashes quickly. All stored programs
are deleted.
3.Hold the original hand-held transmitter at a
distance of approx. 4 in/10 cm to 12 in/
30 cm from the memory buttons1.
The required distance between the
hand-held transmitter and the mem-
ory buttons1 depends on the relevant sys-
tem of the original hand-held transmitter
used.<
4.Simultaneously press the transmit button
on the original hand-held transmitter and
the desired memory button 1 on the inte-
grated universal remote control. The LED 2
flashes slowly at first. As soon as the LED2
flashes rapidly, release both buttons. If the
LED2 does not flash rapidly after approx.
15 seconds, alter the distance and repeat
the step.
5.To program other original hand-held trans-
mitters, repeat steps 3 and 4.
Page 119 of 292
Controls
117Reference
At a glance
Driving tips
Communications
Navigation
Entertainment
Mobility
Digital compass*
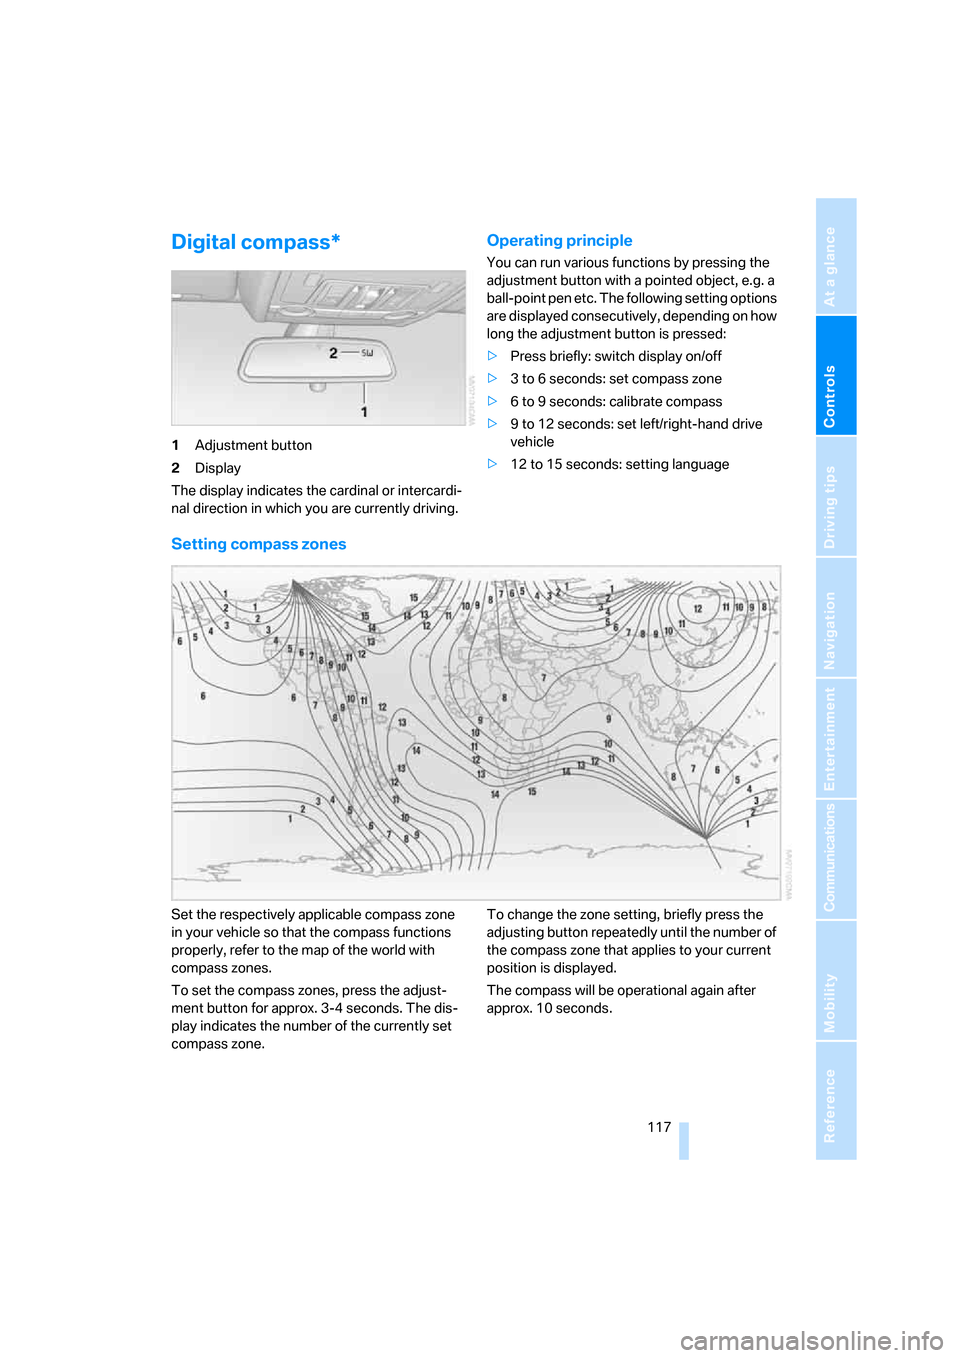
1Adjustment button
2Display
The display indicates the cardinal or intercardi-
nal direction in which you are currently driving.
Operating principle
You can run various functions by pressing the
adjustment button with a pointed object, e.g. a
ball-point pen etc. The following setting options
are displayed consecutively, depending on how
long the adjustment button is pressed:
>Press briefly: switch display on/off
>3 to 6 seconds: set compass zone
>6 to 9 seconds: calibrate compass
>9 to 12 seconds: set left/right-hand drive
vehicle
>12 to 15 seconds: setting language
Setting compass zones
Set the respectively applicable compass zone
in your vehicle so that the compass functions
properly, refer to the map of the world with
compass zones.
To set the compass zones, press the adjust-
ment button for approx. 3-4 seconds. The dis-
play indicates the number of the currently set
compass zone.To change the zone setting, briefly press the
adjusting button repeatedly until the number of
the compass zone that applies to your current
position is displayed.
The compass will be operational again after
approx. 10 seconds.
Page 121 of 292
Controls
119Reference
At a glance
Driving tips
Communications
Navigation
Entertainment
Mobility
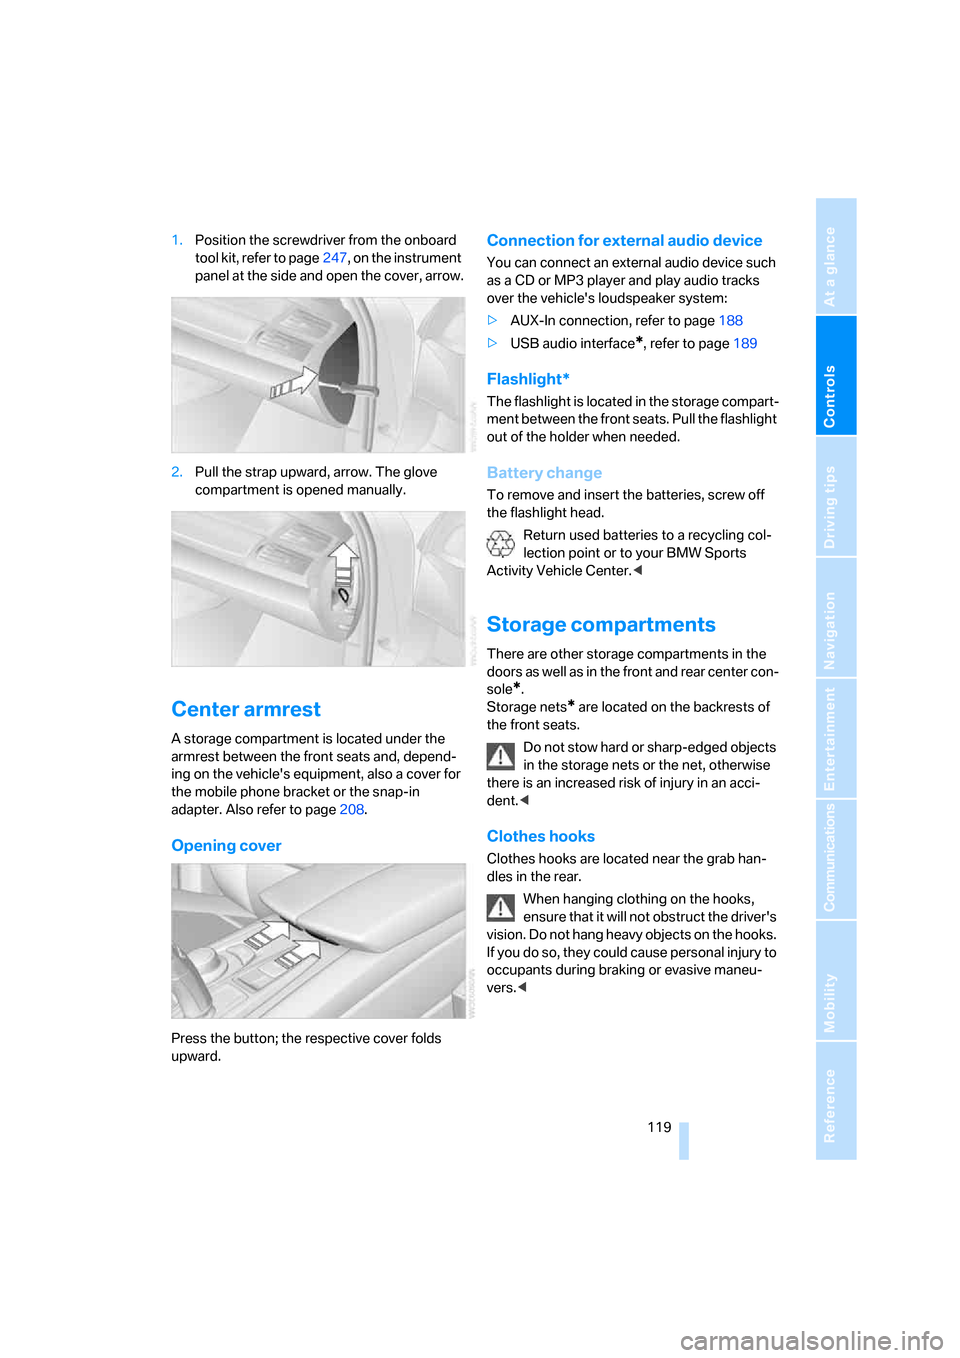
1.Position the screwdriver from the onboard
tool kit, refer to page247, on the instrument
panel at the side and open the cover, arrow.
2.Pull the strap upward, arrow. The glove
compartment is opened manually.
Center armrest
A storage compartment is located under the
armrest between the front seats and, depend-
ing on the vehicle's equipment, also a cover for
the mobile phone bracket or the snap-in
adapter. Also refer to page208.
Opening cover
Press the button; the respective cover folds
upward.
Connection for external audio device
You can connect an external audio device such
as a CD or MP3 player and play audio tracks
over the vehicle's loudspeaker system:
>AUX-In connection, refer to page188
>USB audio interface
*, refer to page189
Flashlight*
The flashlight is located in the storage compart-
ment between the front seats. Pull the flashlight
out of the holder when needed.
Battery change
To remove and insert the batteries, screw off
the flashlight head.
Return used batteries to a recycling col-
lection point or to your BMW Sports
Activity Vehicle Center.<
Storage compartments
There are other storage compartments in the
doors as well as in the front and rear center con-
sole
*.
Storage nets
* are located on the backrests of
the front seats.
Do not stow hard or sharp-edged objects
in the storage nets or the net, otherwise
there is an increased risk of injury in an acci-
dent.<
Clothes hooks
Clothes hooks are located near the grab han-
dles in the rear.
When hanging clothing on the hooks,
ensure that it will not obstruct the driver's
vision. Do not hang heavy objects on the hooks.
If you do so, they could cause personal injury to
occupants during braking or evasive maneu-
vers.<
Page 123 of 292
Controls
121Reference
At a glance
Driving tips
Communications
Navigation
Entertainment
Mobility
Rear
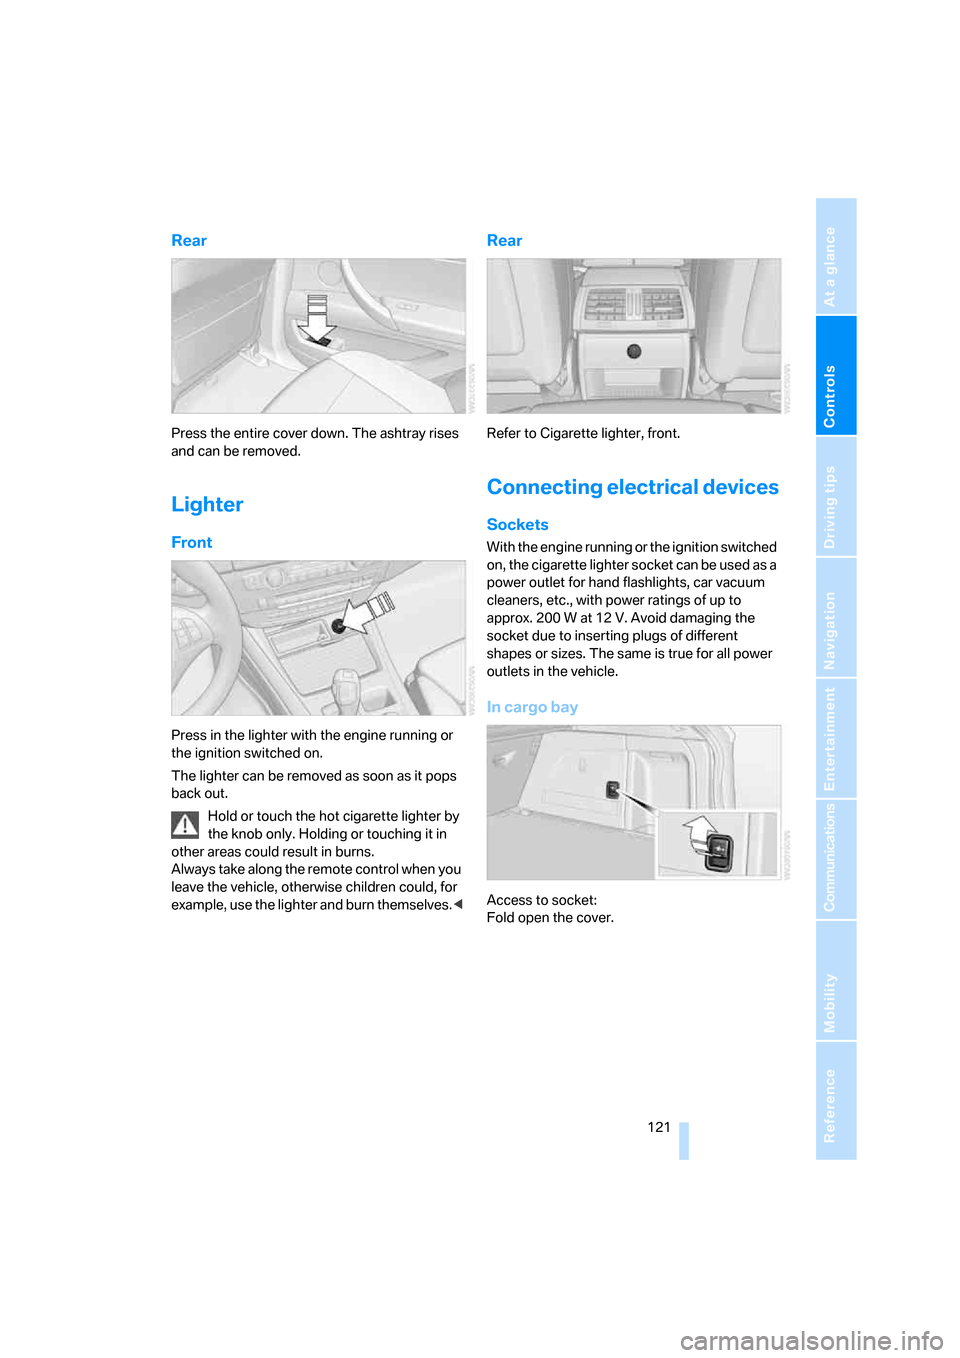
Press the entire cover down. The ashtray rises
and can be removed.
Lighter
Front
Press in the lighter with the engine running or
the ignition switched on.
The lighter can be removed as soon as it pops
back out.
Hold or touch the hot cigarette lighter by
the knob only. Holding or touching it in
other areas could result in burns.
Always take along the remote control when you
leave the vehicle, otherwise children could, for
example, use the lighter and burn themselves.<
Rear
Refer to Cigarette lighter, front.
Connecting electrical devices
Sockets
With the engine running or the ignition switched
on, the cigarette lighter socket can be used as a
power outlet for hand flashlights, car vacuum
cleaners, etc., with power ratings of up to
approx. 200 W at 12 V. Avoid damaging the
socket due to inserting plugs of different
shapes or sizes. The same is true for all power
outlets in the vehicle.
In cargo bay
Access to socket:
Fold open the cover.
Page 125 of 292
Controls
123Reference
At a glance
Driving tips
Communications
Navigation
Entertainment
Mobility
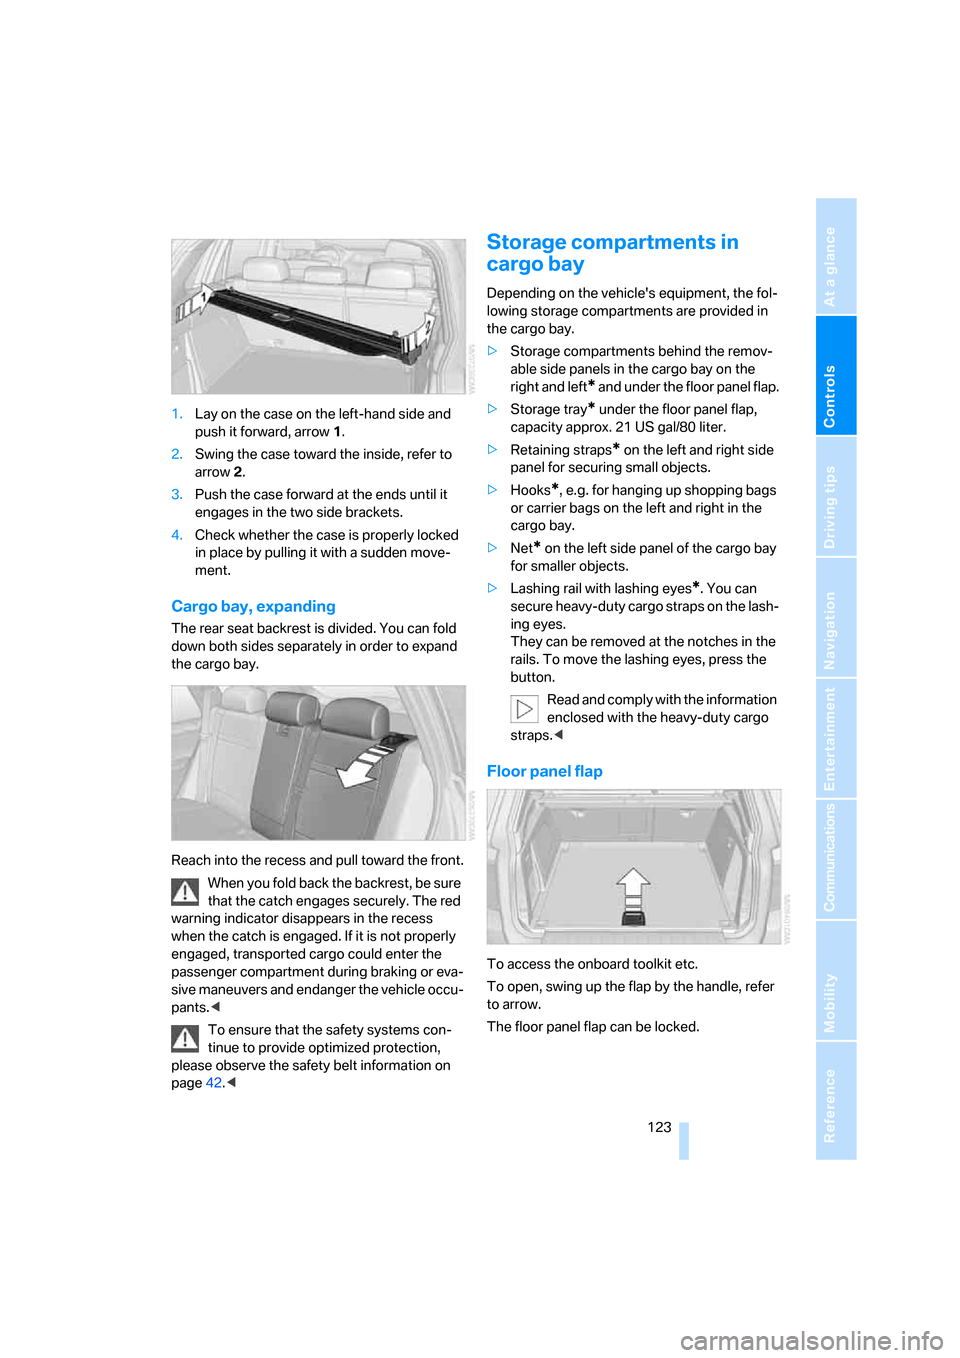
1.Lay on the case on the left-hand side and
push it forward, arrow1.
2.Swing the case toward the inside, refer to
arrow2.
3.Push the case forward at the ends until it
engages in the two side brackets.
4.Check whether the case is properly locked
in place by pulling it with a sudden move-
ment.
Cargo bay, expanding
The rear seat backrest is divided. You can fold
down both sides separately in order to expand
the cargo bay.
Reach into the recess and pull toward the front.
When you fold back the backrest, be sure
that the catch engages securely. The red
warning indicator disappears in the recess
when the catch is engaged. If it is not properly
engaged, transported cargo could enter the
passenger compartment during braking or eva-
sive maneuvers and endanger the vehicle occu-
pants.<
To ensure that the safety systems con-
tinue to provide optimized protection,
please observe the safety belt information on
page42.<
Storage compartments in
cargo bay
Depending on the vehicle's equipment, the fol-
lowing storage compartments are provided in
the cargo bay.
>Storage compartments behind the remov-
able side panels in the cargo bay on the
right and left
* and under the floor panel flap.
>Storage tray
* under the floor panel flap,
capacity approx. 21 US gal/80 liter.
>Retaining straps
* on the left and right side
panel for securing small objects.
>Hooks
*, e.g. for hanging up shopping bags
or carrier bags on the left and right in the
cargo bay.
>Net
* on the left side panel of the cargo bay
for smaller objects.
>Lashing rail with lashing eyes
*. You can
secure heavy-duty cargo straps on the lash-
ing eyes.
They can be removed at the notches in the
rails. To move the lashing eyes, press the
button.
Read and comply with the information
enclosed with the heavy-duty cargo
straps.<
Floor panel flap
To access the onboard toolkit etc.
To open, swing up the flap by the handle, refer
to arrow.
The floor panel flap can be locked.
Page 127 of 292
Controls
125Reference
At a glance
Driving tips
Communications
Navigation
Entertainment
Mobility
Ski bag*
The ski bag is designed for safe, clean transport
of up to 4 pa irs of s tandard s kis or up to 2 snow-
boards.
With the ski bag you can stow skis with a length
of up to 6.9 ft/2.10 m. When skis of 6.9 ft/2.10 m
in length are loaded, the ski bag will tend to con-
tract, reducing its overall capacity.
Before loading the ski bag, fold in the dis-
play screen of the DVD system in the
rear
*, as otherwise the display screen could be
damaged.<
Loading
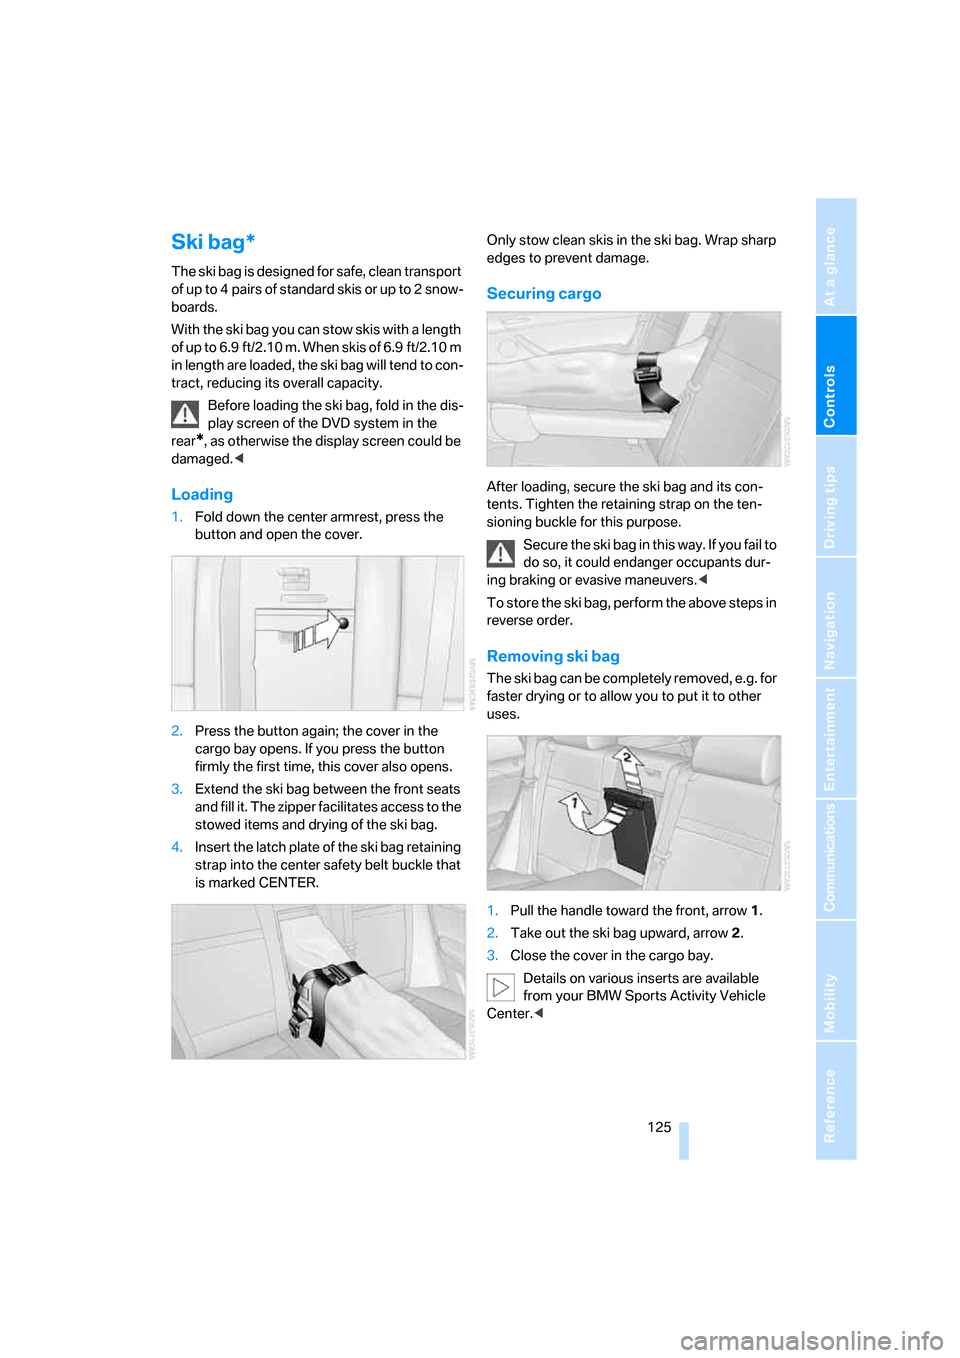
1.Fold down the center armrest, press the
button and open the cover.
2.Press the button again; the cover in the
cargo bay opens. If you press the button
firmly the first time, this cover also opens.
3.Extend the ski bag between the front seats
and fill it. The zipper facilitates access to the
stowed items and drying of the ski bag.
4.Insert the latch plate of the ski bag retaining
strap into the center safety belt buckle that
is marked CENTER.Only stow clean skis in the ski bag. Wrap sharp
edges to prevent damage.
Securing cargo
After loading, secure the ski bag and its con-
tents. Tighten the retaining strap on the ten-
sioning buckle for this purpose.
Secure the ski bag in this way. If you fail to
do so, it could endanger occupants dur-
ing braking or evasive maneuvers.<
To store the ski bag, perform the above steps in
reverse order.
Removing ski bag
The ski bag can be completely removed, e.g. for
faster drying or to allow you to put it to other
uses.
1.Pull the handle toward the front, arrow1.
2.Take out the ski bag upward, arrow2.
3.Close the cover in the cargo bay.
Details on various inserts are available
from your BMW Sports Activity Vehicle
Center.<
Page 131 of 292
Driving tips
129Reference
At a glance
Controls
Communications
Navigation
Entertainment
Mobility
and smooth driving style reduces fuel con-
sumption.
Avoiding high engine speeds
Driving at a low engine speed reduces fuel con-
sumption and minimizes wear.
Taking advantage of coasting
The flow of fuel is interrupted when coasting.
Switching off engine during longer
stops
Switch off the engine at longer stops such as
traffic signals, railroad crossings, or in traffic
jams. Even having the engine switched off for
approx. 4 seconds results in fuel savings.
Switching off functions currently not
required
Functions such as air conditioning, seat heat-
ing, or rear window defrosting consume a lot of
energy and require additional fuel. Their influ-
ence is particularly pronounced in city traffic
and stop & go operation. For this reason, it is a
good idea to switch these functions off when
they are not really needed.
Having maintenance carried out
Have the vehicle serviced regularly in order to
achieve the optimum economy and service life
of your vehicle. BMW recommends having the
maintenance performed by a BMW Sports
Activity Vehicle Center. Also please pay atten-
tion to the BMW maintenance system, refer to
page245.
General driving notes
Closing liftgate/tailgate
Operate the vehicle only when the tail-
gate and liftgate are completely closed.
Otherwise, exhaust fumes could enter into the
passenger compartment.
1.Close all windows and the panorama glass
sunroof.
2.Increase the air volume of the automatic
climate control to a high level, refer to
page108.
Hot exhaust system
As in all vehicles, extremely high temper-
atures are generated on the exhaust sys-
tem. Do not remove the heat shields installed
adjacent to it, and never apply undercoating to
them. When driving, standing at idle and while
parking take care to avoid possible contact
between the hot exhaust system and any highly
flammable materials such as hay, leaves, grass,
etc. Such contact could lead to a fire, and with it
the risk of serious property damage as well as
personal injury. Do not touch hot tailpipes, as
otherwise there is a danger of burns.<
Hydroplaning
When driving on wet or slushy roads,
reduce road speed. If you do not, a wedge
of water can form between tires and road sur-
face. This phenomenon is referred to as hydro-
planing, and is characterized by a partial or
complete loss of contact between the tires and
the road surface, ultimately undermining your
ability to steer and brake the vehicle.<
The risk of hydroplaning increases as the tread
depth of the tires decreases, also refer to Mini-
mum tread depth on page238.
Driving through water
Do not drive through water on the road if it
is deeper than 20 in/50 cm, and then only
at walking speed at the most. Otherwise, the
vehicle's engine, the electrical systems and the
transmission may be damaged.<
Braking safely
Your BMW is equipped with ABS as a standard
feature. In situations that require it, it is best to
brake with full force. Since the vehicle maintains
steering responsiveness, you can still avoid
Page 133 of 292
Driving tips
131Reference
At a glance
Controls
Communications
Navigation
Entertainment
Mobility
Loading
To avoid loading the tires beyond their
approved carrying capacity, never over-
load the vehicle. Overloading can lead to over-
heating and increases the rate at which damage
develops inside the tires. The ultimate result
can assume the form of a sudden blow-out.<
Make sure that no fluids leak in the cargo
bay; otherwise the vehicle could be dam-
aged.<
Determining loading limit
1.Locate the following statement on your
vehicle's placard
*:
The combined weight of occupants
and cargo should never exceed
YYY lbs. or XXX kg. Otherwise, this could
damage the vehicle and produce unstable
vehicle operating conditions.<
2.Determine the combined weight of the
driver and passengers that will be riding in
your vehicle.
3.Subtract the combined weight of the driver
and passengers from YYY lbs. or XXX kg.
4.The resulting figure equals the available
amount of cargo and luggage load capacity.
For example, if the YYY amount equals
1,400 lbs. and there will be five 150 lbs.
passengers in your vehicle, the amount of
available cargo and luggage load capacity is
650 lbs.:
1,400 lbs. minus 750 lbs. = 650 lbs.
5.Determine the combined weight of luggage
and cargo being loaded on the vehicle. That
weight may not safely exceed the available cargo and luggage load capacity calculated
in step 4.
6.If your vehicle will be towing a trailer, part of
the load from your trailer will be transferred
to your vehicle. Consult the manual for
transporting a trailer to determine how this
may reduce the available cargo and luggage
load capacity of your vehicle.
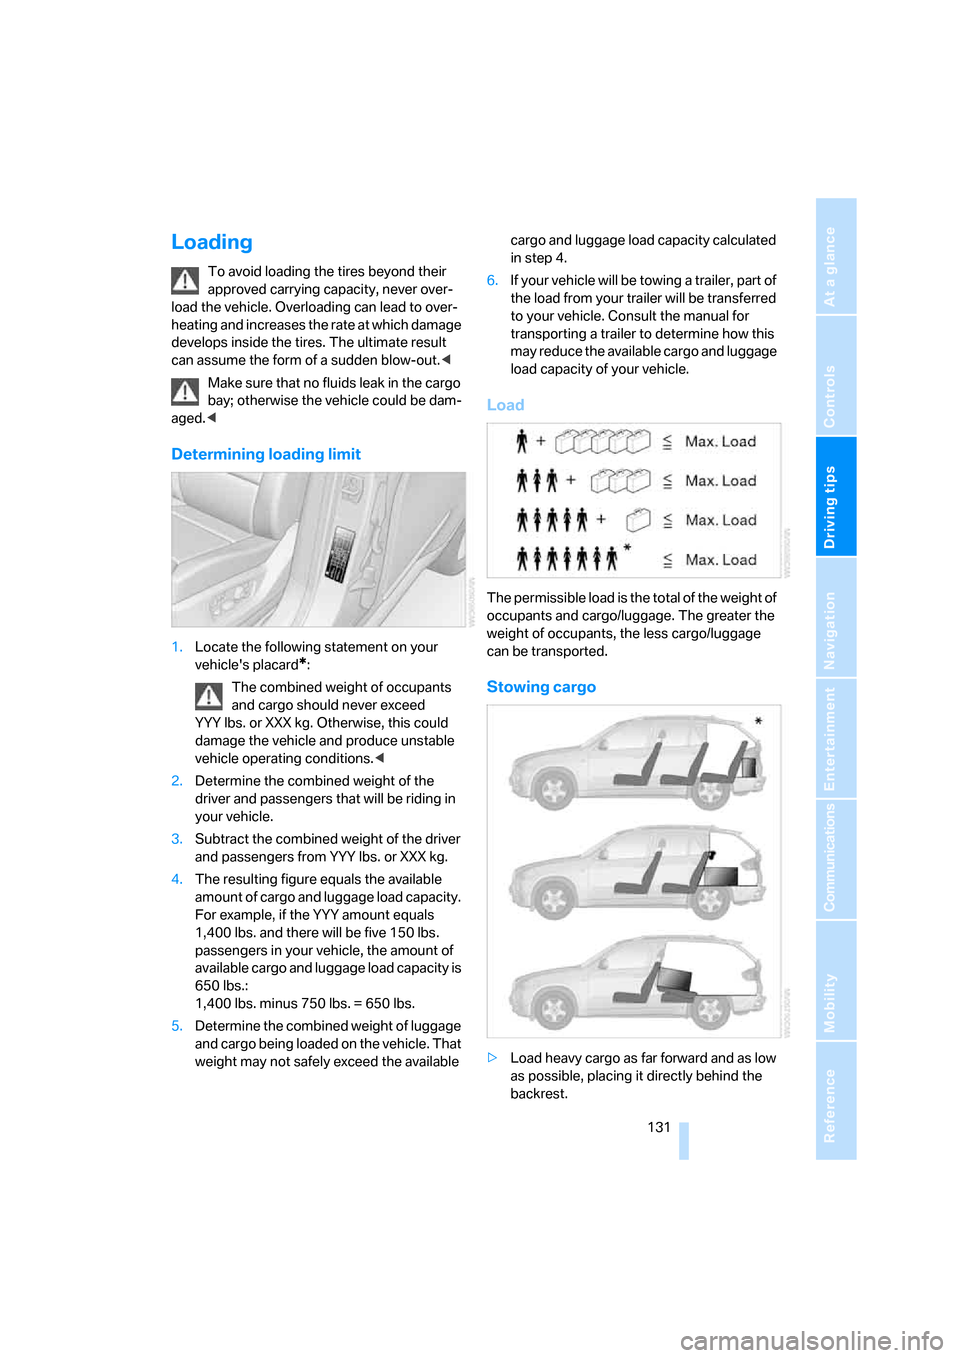
Load
The permissible load is the total of the weight of
occupants and cargo/luggage. The greater the
weight of occupants, the less cargo/luggage
can be transported.
Stowing cargo
>Load heavy cargo as far forward and as low
as possible, placing it directly behind the
backrest.
Page 135 of 292
Driving tips
133Reference
At a glance
Controls
Communications
Navigation
Entertainment
Mobility
Driving on poor roads
Your X5 is at home on all roads and surfaces.
It combines a 4-wheel drive system with the
advantages of a normal passenger car.
Do not drive on unpaved terrain, as other-
wise the vehicle may be damaged.<
When you are driving on poor roads, there are a
few points which you should strictly observe for
your own safety, for that of your passengers,
and for the safety of the vehicle:
>Familiarize yourself with the vehicle before
driving off and avoid taking risks at all costs.
>Adapt your driving speed to the road condi-
tions. The steeper and rougher the road
surface is, the lower the speed should be.
>You can operate your vehicle on uphill and
downhill gradients with a maximum slope of
50 %. If you want to drive on uphill or down-
hill gradients of this kind, make sure before-
hand that the engine oil and coolant levels
are near the MAX mark, refer to page242.
>Use the HDC Hill Descent Control when
driving down extremely steep grades, refer
to page90. It is possible to start off on
grades of up to 33 %.
The permissible body roll is 50 %.
>While driving, watch carefully for obstacles
such as rocks or holes. Try to avoid these
obstacles whenever possible.
>Please make sure that the undercarriage
does not touch the ground, for example on
crests and bumpy roads. The ground clear-
ance of the vehicle is a maximum of approx.
8 in/20 cm. Please note that the ground
clearance can vary depending on loading
and the driving conditions of the vehicle.
>Only drive through water on roads up to a
maximum depth of 20 in/50 cm and only at
walking speed, making sure not to stop in
the process.
>After driving through water at low speed,
lightly press the brake pedal several times
to dry the brakes and to prevent the braking
effect from being reduced by wetness.>Depending on the condition of the surface,
it may be practical to briefly activate DTC,
refer to DTC Dynamic Traction Control on
page89.
>If the drive wheels spin on one side, depress
the accelerator pedal sufficiently so that the
driving stability control systems can distrib-
ute the drive forces to the individual wheels.
Please note the following points after driving on
poor roads to maintain the driving safety of your
BMW:
>Clean the coarsest dirt from the body.
>Clean mud, snow, ice etc. from the wheels
and tires and check the tires for damage.