navigation system BMW X5 XDRIVE 30I 2010 E70 Owner's Manual
[x] Cancel search | Manufacturer: BMW, Model Year: 2010, Model line: X5 XDRIVE 30I, Model: BMW X5 XDRIVE 30I 2010 E70Pages: 300, PDF Size: 12.41 MB
Page 5 of 300
Reference
At a glance
Controls
Driving tips
Communications
Navigation
Entertainment
Mobility
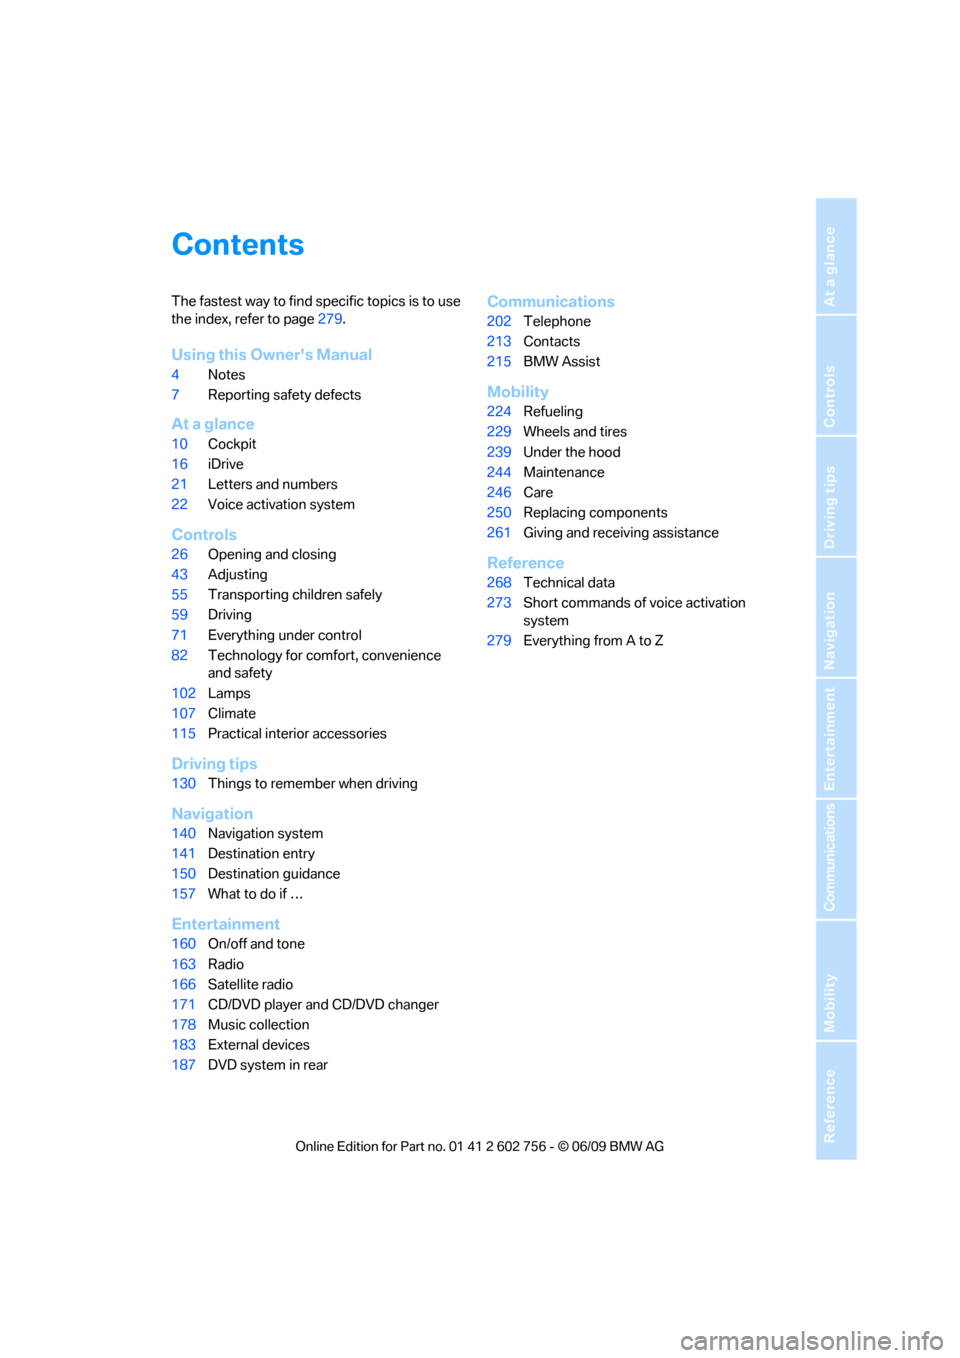
Contents
The fastest way to find specific topics is to use
the index, refer to page279.
Using this Owner's Manual
4Notes
7Reporting safety defects
At a glance
10Cockpit
16iDrive
21Letters and numbers
22Voice activation system
Controls
26Opening and closing
43Adjusting
55Transporting children safely
59Driving
71Everything under control
82Technology for comfort, convenience
and safety
102Lamps
107Climate
115Practical interior accessories
Driving tips
130Things to remember when driving
Navigation
140Navigation system
141Destination entry
150Destination guidance
157What to do if …
Entertainment
160On/off and tone
163Radio
166Satellite radio
171CD/DVD player and CD/DVD changer
178Music collection
183External devices
187DVD system in rear
Communications
202Telephone
213Contacts
215BMW Assist
Mobility
224Refueling
229Wheels and tires
239Under the hood
244Maintenance
246Care
250Replacing components
261Giving and receiving assistance
Reference
268Technical data
273Short commands of voice activation
system
279Everything from A to Z
ba8_e70ag.book Seite 3 Freitag, 5. Juni 2009 11:42 11
Page 7 of 300
5Reference
At a glance
Controls
Driving tips
Communications
Navigation
Entertainment
Mobility
The individual vehicle
When purchasing your BMW, you have decided
in favor of a model with individualized equip-
ment and features. This Owner's Manual
describes the entire array of options and equip-
ment available with a specific BMW model.
Please bear in mind that the manual may con-
tain information on accessories and equipment
that you have not specified for your own vehicle.
Sections describing options and special equip-
ment are marked by asterisks
* to assist you in
identifying possible differences between the
descriptions in this manual and your own vehi-
cle's equipment.
If equipment in your BMW is not described in
this Owner's Manual, please refer to the accom-
panying Supplementary Owner's Manuals.
Editorial notice
BMW pursues a policy of continuous, ongoing
development that is conceived to ensure that
our vehicles continue to embody the highest
quality and safety standards combined with
advanced, state-of-the-art technology. For this
reason, it is possible that the features described
in this Owner's Manual could differ from those
on your vehicle.
For your own safety
Maintenance and repairs
Advanced technology, e.g. the use of
modern materials and high-performance
electronics, requires specially adapted mainte-
nance and repair methods. Therefore, have cor-
responding work on your BMW performed only
by your BMW Sports Activity Vehicle Center or
a workshop that works according to BMW
repair procedures with correspondingly trained
personnel. If this work is not carried out prop-
erly, there is a danger of subsequent damage
and related safety hazards.<
Parts and accessories
For your own safety, use genuine parts
and accessories approved by BMW.
When you purchase accessories tested and
approved by BMW and Genuine BMW Parts,
you simultaneously acquire the assurance that
they have been thoroughly tested by BMW to
ensure optimum performance when installed
on your vehicle.
BMW warrants these parts to be free from
defects in material and workmanship.
BMW will not accept any liability for damage
resulting from installation of parts and accesso-
ries not approved by BMW.
BMW cannot test every product made by other
manufacturers to verify if it can be used on a
BMW safely and without risk to either the vehi-
cle, its operation or its occupants.
Genuine BMW Parts, BMW Accessories and
other products approved by BMW, together
with professional advice on using these items,
are available from all BMW Sports Activity Vehi-
cle Centers.
Installation and operation of non-BMW
approved accessories such as alarms, radios,
amplifiers, radar detectors, wheels, suspension
components, brake dust shields, telephones,
including operation of any mobile phone from
within the vehicle without using an externally
mounted antenna, or transceiver equipment
such as CBs, walkie-talkies, ham radios, or sim-
ilar accessories may cause extensive damage
to the vehicle, compromise its safety, interfere
with the vehicle's electrical system or affect the
validity of the BMW Limited Warranty. Refer to
your BMW Sports Activity Vehicle Center for
additional information.<
Maintenance, replacement, or repair of
the emission control devices and sys-
tems may be performed by any automotive
repair establishment or individual using any cer-
tified automotive part.<
ba8_e70ag.book Seite 5 Freitag, 5. Juni 2009 11:42 11
Page 13 of 300
At a glance
11Reference
Controls
Driving tips
Communications
Navigation
Entertainment
Mobility
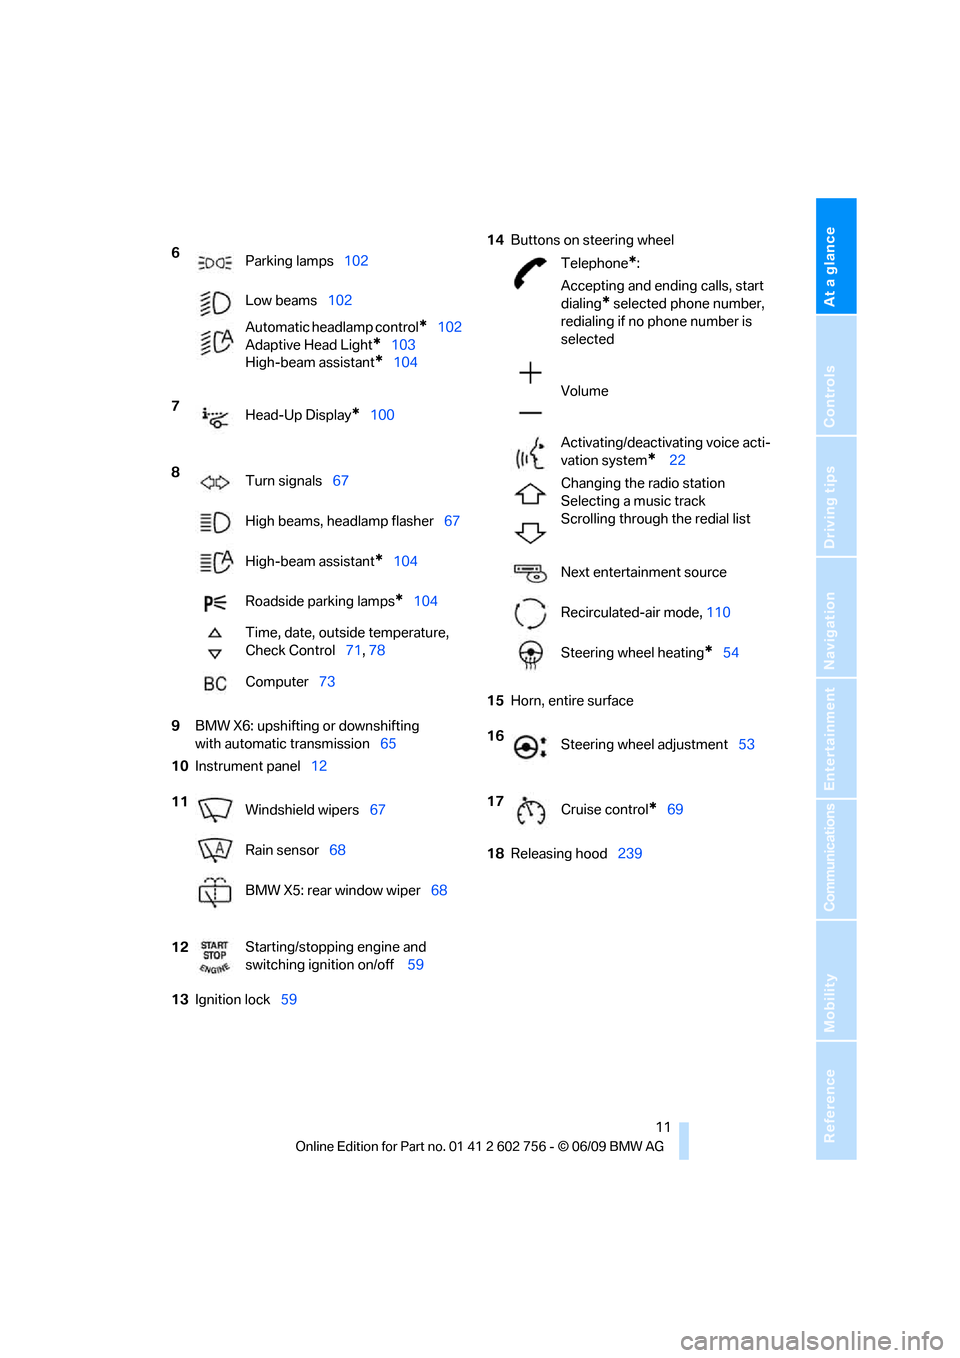
9BMW X6: upshifting or downshifting
with automatic transmission65
10Instrument panel12
13Ignition lock5914Buttons on steering wheel
15Horn, entire surface
18Releasing hood239 6
Parking lamps102
Low beams102
Automatic headlamp control
*102
Adaptive Head Light
*103
High-beam assistant
*104
7
Head-Up Display
*100
8
Turn signals67
High beams, headlamp flasher67
High-beam assistant
*104
Roadside parking lamps
*104
Time, date, outside temperature,
Check Control71, 78
Computer73
11
Windshield wipers67
Rain sensor68
BMW X5: rear window wiper68
12Starting/stopping engine and
switching ignition on/off 59
Telephone*:
Accepting and ending calls, start
dialing
* selected phone number,
redialing if no phone number is
selected
Volume
Activating/deactivating voice acti-
vation system
* 22
Changing the radio station
Selecting a music track
Scrolling through the redial list
Next entertainment source
Recirculated-air mode, 110
Steering wheel heating
*54
16
Steering wheel adjustment53
17
Cruise control
*69
ba8_e70ag.book Seite 11 Freitag, 5. Juni 2009 11:42 11
Page 17 of 300
At a glance
15Reference
Controls
Driving tips
Communications
Navigation
Entertainment
Mobility
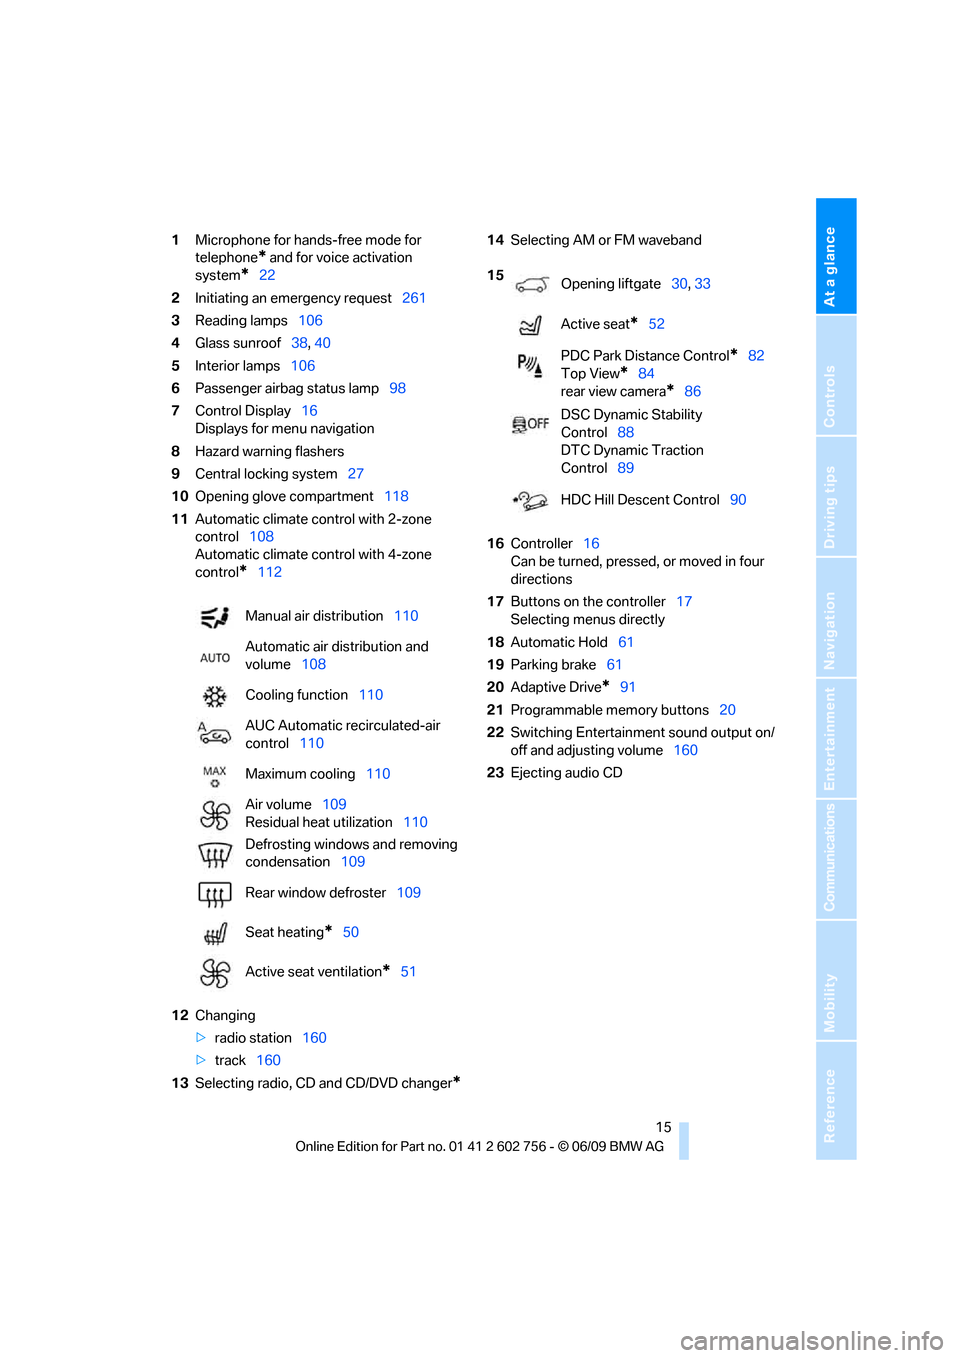
1Microphone for hands-free mode for
telephone
* and for voice activation
system
*22
2Initiating
an emergency request261
3Reading lamps106
4Glass sunroof38, 40
5Interior lamps106
6Passenger airbag status lamp98
7Control Display16
Displays for menu navigation
8Hazard warning flashers
9Central locking system27
10Opening glove compartment118
11Automatic climate control with 2-zone
control108
Automatic climate control with 4-zone
control
*112
12Changing
>radio station160
>track160
13Selecting radio, CD and CD/DVD changer
*
14Selecting AM or FM waveband
16Controller16
Can be turned, pressed, or moved in four
directions
17Buttons on the controller17
Selecting menus directly
18Automatic Hold61
19Parking brake61
20Adaptive Drive
*91
21Programmable memory buttons20
22Switching Entertainment sound output on/
off and adjusting volume160
23Ejecting audio CD Manual air distribution110
Automatic air distribution and
volume108
Cooling function110
AUC Automatic recirculated-air
control110
Maximum cooling110
Air volume109
Residual heat utilization110
Defrosting windows and removing
condensation109
Rear window defroster109
Seat heating
*50
Active seat ventilation
*51
15
Opening liftgate30, 33
Active seat
*52
PDC Park Distance Control
*82
Top View
*84
rear view camera
*86
DSC Dynamic Stability
Control88
DTC Dynamic Traction
Control89
HDC Hill Descent Control90
ba8_e70ag.book Seite 15 Freitag, 5. Juni 2009 11:42 11
Page 25 of 300
At a glance
23Reference
Controls
Driving tips
Communications
Navigation
Entertainment
Mobility
Example: selecting the track of a CD
1.Switch on Entertainment sound output if
necessary.
2.Press the button on the steering wheel.
Setting the voice dialog
You can set whether the system should use the
standard dialog or a shorter variant. In the
shorter variant of the voice dialog, the prompts
and responses from the system are abbrevi-
ated.
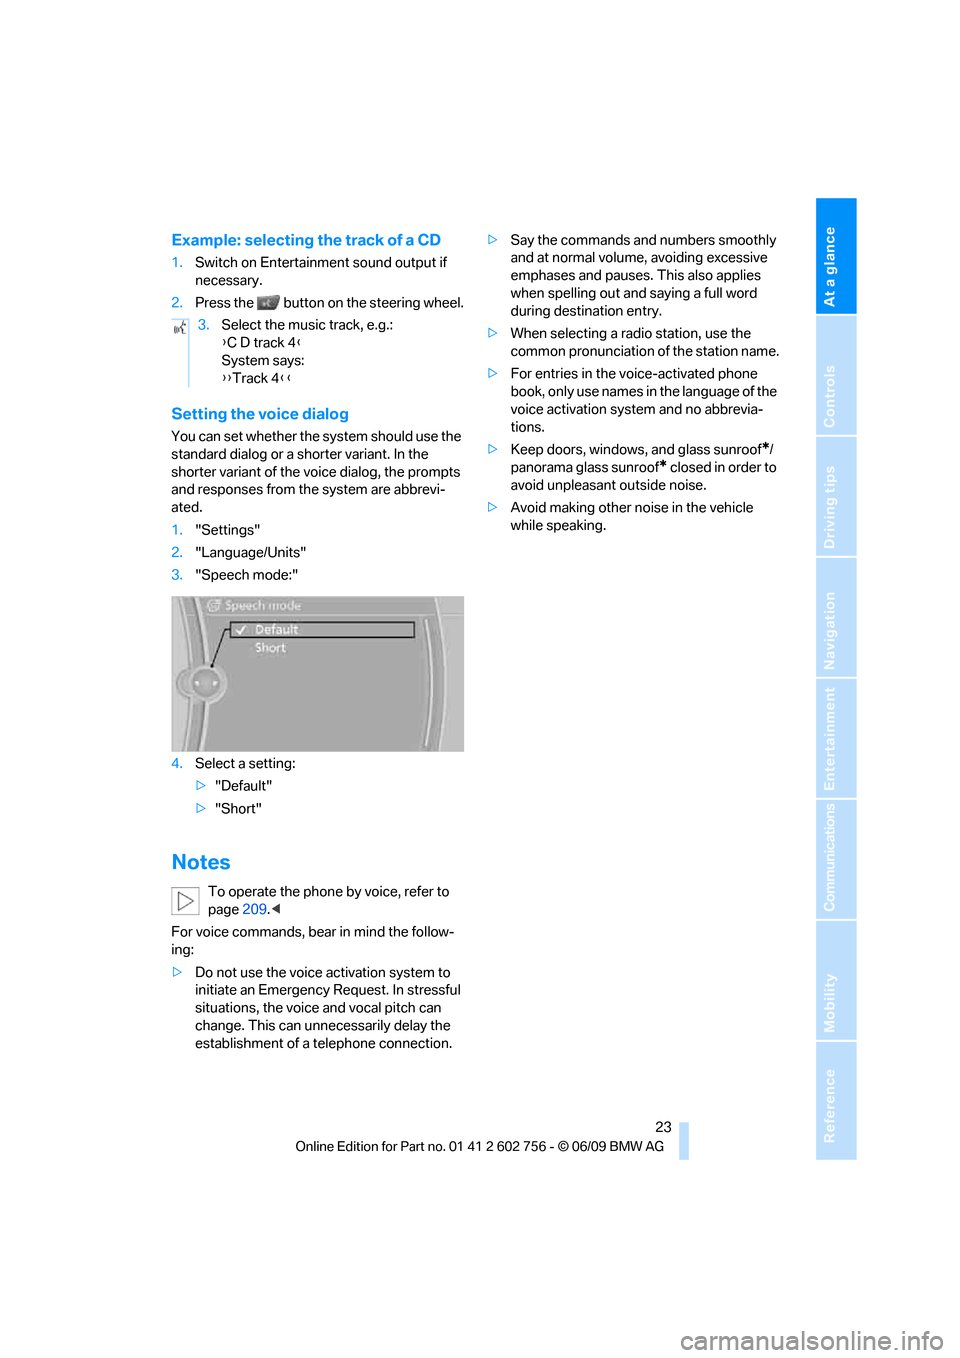
1."Settings"
2."Language/Units"
3."Speech mode:"
4.Select a setting:
>"Default"
>"Short"
Notes
To operate the phone by voice, refer to
page209.<
For voice commands, bear in mind the follow-
ing:
>Do not use the voice activation system to
initiate an Emergency Request. In stressful
situations, the voice and vocal pitch can
change. This can unnecessarily delay the
establishment of a telephone connection.>Say the commands and numbers smoothly
and at normal volume, avoiding excessive
emphases and pauses. This also applies
when spelling out and saying a full word
during destination entry.
>When selecting a radio station, use the
common pronunciation of the station name.
>For entries in the voice-activated phone
book, only use names in the language of the
voice activation system and no abbrevia-
tions.
>Keep doors, windows, and glass sunroof
*/
panorama glass sunroof
* closed in order to
avoid unpleasant outside noise.
>Avoid making other noise in the vehicle
while speaking. 3.Select the music track, e.g.:
{C D track 4}
System says:
{{Track 4}}
ba8_e70ag.book Seite 23 Freitag, 5. Juni 2009 11:42 11
Page 29 of 300
Controls
27Reference
At a glance
Driving tips
Communications
Navigation
Entertainment
Mobility
>12h/24h clock format, refer to page80
>Date format, refer to page80
>Lighting settings:
>Triple turn signal activation, refer to
page67
>Welcome lamps, refer to page102
>Pathway lighting, refer to page103
>Daytime driving lamps
*, refer to
page103
>High-beam assistant
*, refer to page104
>PDC Park Distance Control
*: optical warn-
ing, refer to page83
>Top View
*: optical warning, refer to
page85
>Rear view camera
*:
>Selecting functions, refer to page86
>Type of display, refer to page87
>Head-Up Display
*: selection, brightness
and position of display, refer to page100
>Automatic climate control: AUTO program
and intensity, cooling function, and auto-
matic recirculated-air control/recirculated-
air mode, temperature, air distribution, ven-
tilation temperature, starting on page108
>Programmable memory buttons: selecting
stored functions, refer to page20
>Positions of driver's seat, outside mirrors,
and steering wheel
*, refer to page45
>Adaptive Drive
*: selected chassis and sus-
pension tuning, refer to page91
>Audio sources: volume and tone settings,
refer to page160
>Radio:
>Display of stored stations, refer to
page165
>Switching RDS Radio Data System on/
off
*, refer to page164
>Phone: volume setting, refer to
pages205,210
Central locking system
The concept
The central locking system functions when the
driver's door is closed.
The system simultaneously engages and
releases the locks on the following:
>Doors
>liftgate
>Fuel filler door
Operating from outside
>using the remote control
>using the door lock
>with comfort access
* using the door han-
dles
The interior lamps and the courtesy lamps
* are
also switched on and off with the remote con-
trol. The alarm system
is armed/disarmed at the
same time.
You can find more detailed information on the
alarm system
on page34.
Operating from inside
Using the button for central locking, refer to
page30. The fuel filler door is not locked.
In an accident of sufficient severity, the central
locking system automatically unlocks the vehi-
cle. In addition, the hazard warning flashers and
interior lamps come on.
Opening and closing:
Using remote control
Persons or animals in a parked vehicle
could lock the doors from the inside.
Always take along the remote control when
leaving the vehicle so that the vehicle can then
be opened from the outside.<
Unlocking
Press the button.
This unlocks the vehicle.
ba8_e70ag.book Seite 27 Freitag, 5. Juni 2009 11:42 11
Page 37 of 300
Controls
35Reference
At a glance
Driving tips
Communications
Navigation
Entertainment
Mobility
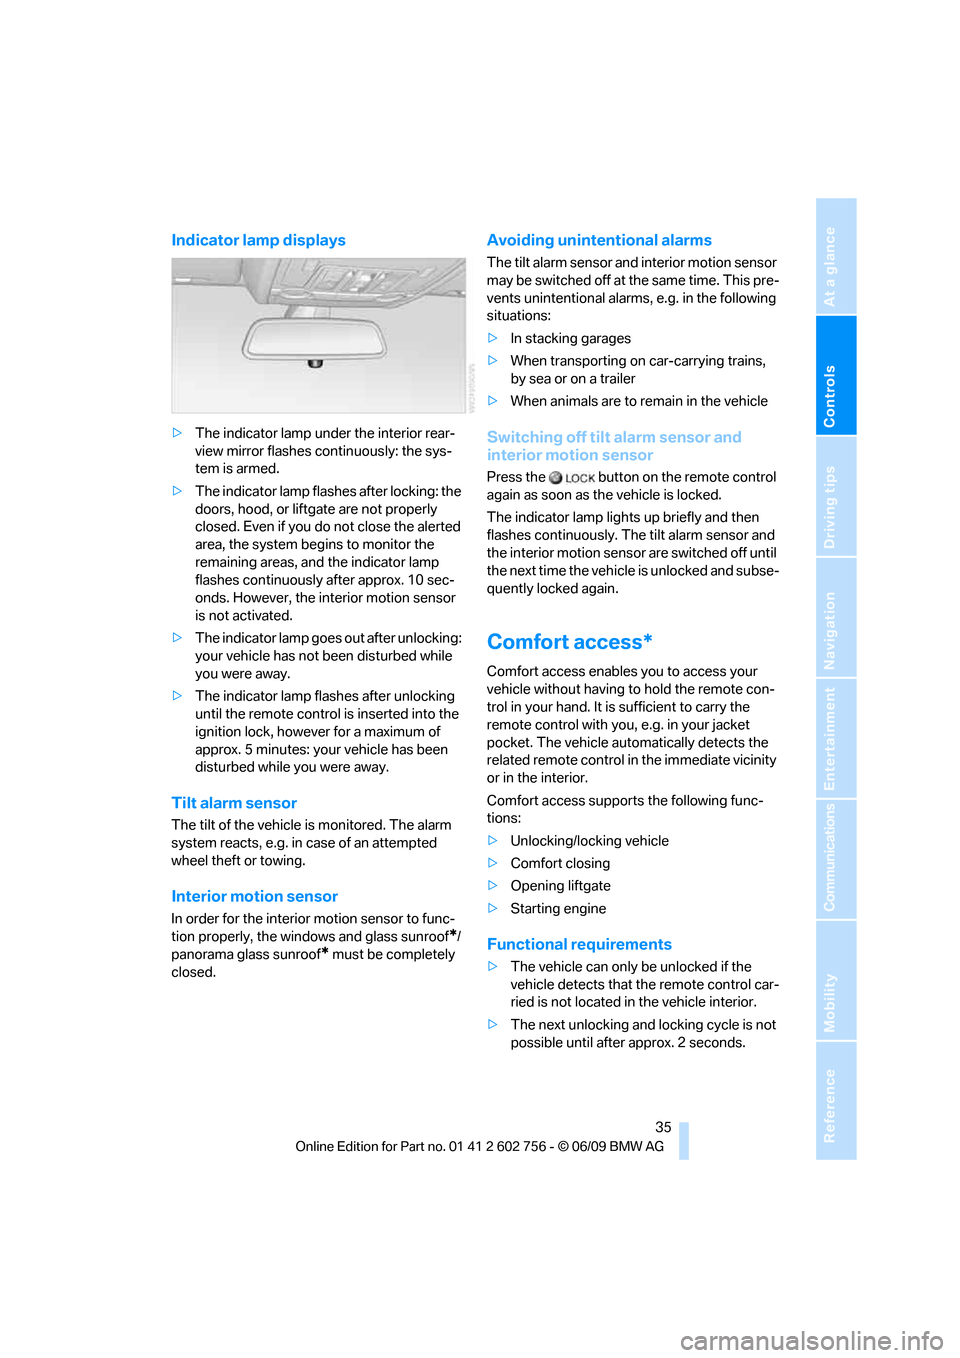
Indicator lamp displays
>The indicator lamp under the interior rear-
view mirror flashes continuously: the sys-
tem is armed.
>The indicator lamp flashes after locking: the
doors, hood, or liftgate are not properly
closed. Even if you do not close the alerted
area, the system begins to monitor the
remaining areas, and the indicator lamp
flashes continuously after approx. 10 sec-
onds. However, the interior motion sensor
is not activated.
>The indicator lamp goes out after unlocking:
your vehicle has not been disturbed while
you were away.
>The indicator lamp flashes after unlocking
until the remote control is inserted into the
ignition lock, however for a maximum of
approx. 5 minutes: your vehicle has been
disturbed while you were away.
Tilt alarm sensor
The tilt of the vehicle is monitored. The alarm
system reacts, e.g. in case of an attempted
wheel theft or towing.
Interior motion sensor
In order for the interior motion sensor to func-
tion properly, the windows and glass sunroof
*/
panorama glass sunroof
* must be completely
closed.
Avoiding unintentional alarms
The tilt alarm sensor and interior motion sensor
may be switched off at the same time. This pre-
vents unintentional alarms, e.g. in the following
situations:
>In stacking garages
>When transporting on car-carrying trains,
by sea or on a trailer
>When animals are to remain in the vehicle
Switching off tilt alarm sensor and
interior motion sensor
Press the button on the remote control
again as soon as the vehicle is locked.
The indicator lamp lights up briefly and then
flashes continuously. The tilt alarm sensor and
the interior motion sensor are switched off until
the next time the vehicle is unlocked and subse-
quently locked again.
Comfort access*
Comfort access enables you to access your
vehicle without having to hold the remote con-
trol in your hand. It is sufficient to carry the
remote control with you, e.g. in your jacket
pocket. The vehicle automatically detects the
related remote control in the immediate vicinity
or in the interior.
Comfort access supports the following func-
tions:
>Unlocking/locking vehicle
>Comfort closing
>Opening liftgate
>Starting engine
Functional requirements
>The vehicle can only be unlocked if the
vehicle detects that the remote control car-
ried is not located in the vehicle interior.
>The next unlocking and locking cycle is not
possible until after approx. 2 seconds.
ba8_e70ag.book Seite 35 Freitag, 5. Juni 2009 11:42 11
Page 41 of 300
Controls
39Reference
At a glance
Driving tips
Communications
Navigation
Entertainment
Mobility
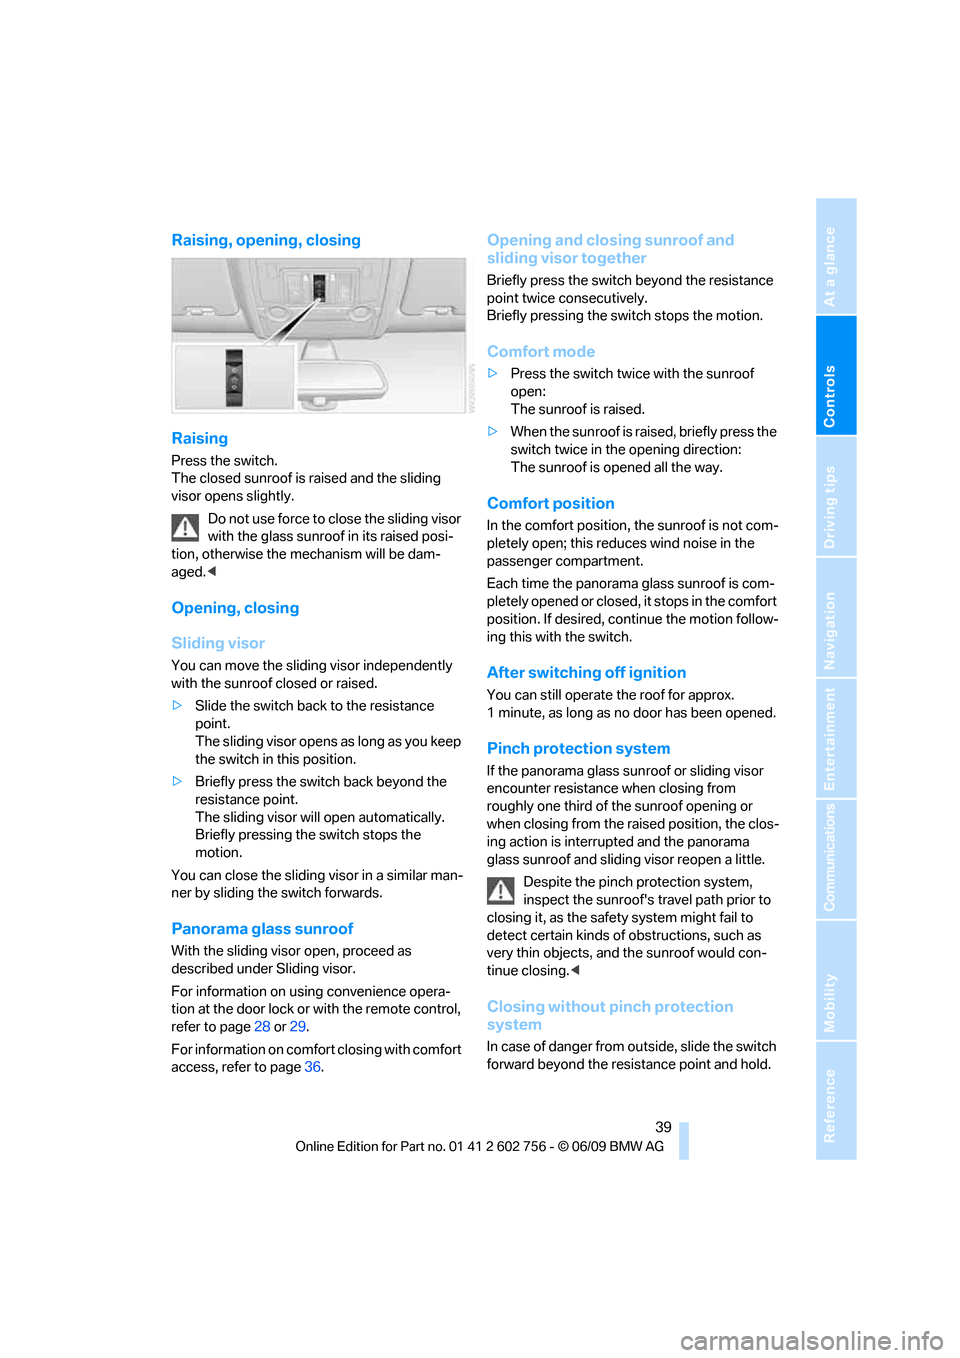
Raising, opening, closing
Raising
Press the switch.
The closed sunroof is raised and the sliding
visor opens slightly.
Do not use force to close the sliding visor
with the glass sunroof in its raised posi-
tion, otherwise the mechanism will be dam-
aged.<
Opening, closing
Sliding visor
You can move the sliding visor independently
with the sunroof closed or raised.
>Slide the switch back to the resistance
point.
The sliding visor opens as long as you keep
the switch in this position.
>Briefly press the switch back beyond the
resistance point.
The sliding visor will open automatically.
Briefly pressing the switch stops the
motion.
You can close the sliding visor in a similar man-
ner by sliding the switch forwards.
Panorama glass sunroof
With the sliding visor open, proceed as
described under Sliding visor.
For information on using convenience opera-
tion at the door lock or with the remote control,
refer to page28 or29.
For information on comfort closing with comfort
access, refer to page36.
Opening and closing sunroof and
sliding visor together
Briefly press the switch beyond the resistance
point twice consecutively.
Briefly pressing the switch stops the motion.
Comfort mode
>Press the switch twice with the sunroof
open:
The sunroof is raised.
>When the sunroof is raised, briefly press the
switch twice in the opening direction:
The sunroof is opened all the way.
Comfort position
In the comfort position, the sunroof is not com-
pletely open; this reduces wind noise in the
passenger compartment.
Each time the panorama glass sunroof is com-
pletely opened or closed, it stops in the comfort
position. If desired, continue the motion follow-
ing this with the switch.
After switching off ignition
You can still operate the roof for approx.
1 minute, as long as no door has been opened.
Pinch protection system
If the panorama glass sunroof or sliding visor
encounter resistance when closing from
roughly one third of the sunroof opening or
when closing from the raised position, the clos-
ing action is interrupted and the panorama
glass sunroof and sliding visor reopen a little.
Despite the pinch protection system,
inspect the sunroof's travel path prior to
closing it, as the safety system might fail to
detect certain kinds of obstructions, such as
very thin objects, and the sunroof would con-
tinue closing.<
Closing without pinch protection
system
In case of danger from outside, slide the switch
forward beyond the resistance point and hold.
ba8_e70ag.book Seite 39 Freitag, 5. Juni 2009 11:42 11
Page 43 of 300
Controls
41Reference
At a glance
Driving tips
Communications
Navigation
Entertainment
Mobility
leave the vehicle, otherwise children could, for
example, operate the roof and injure them-
selves.<
Raising
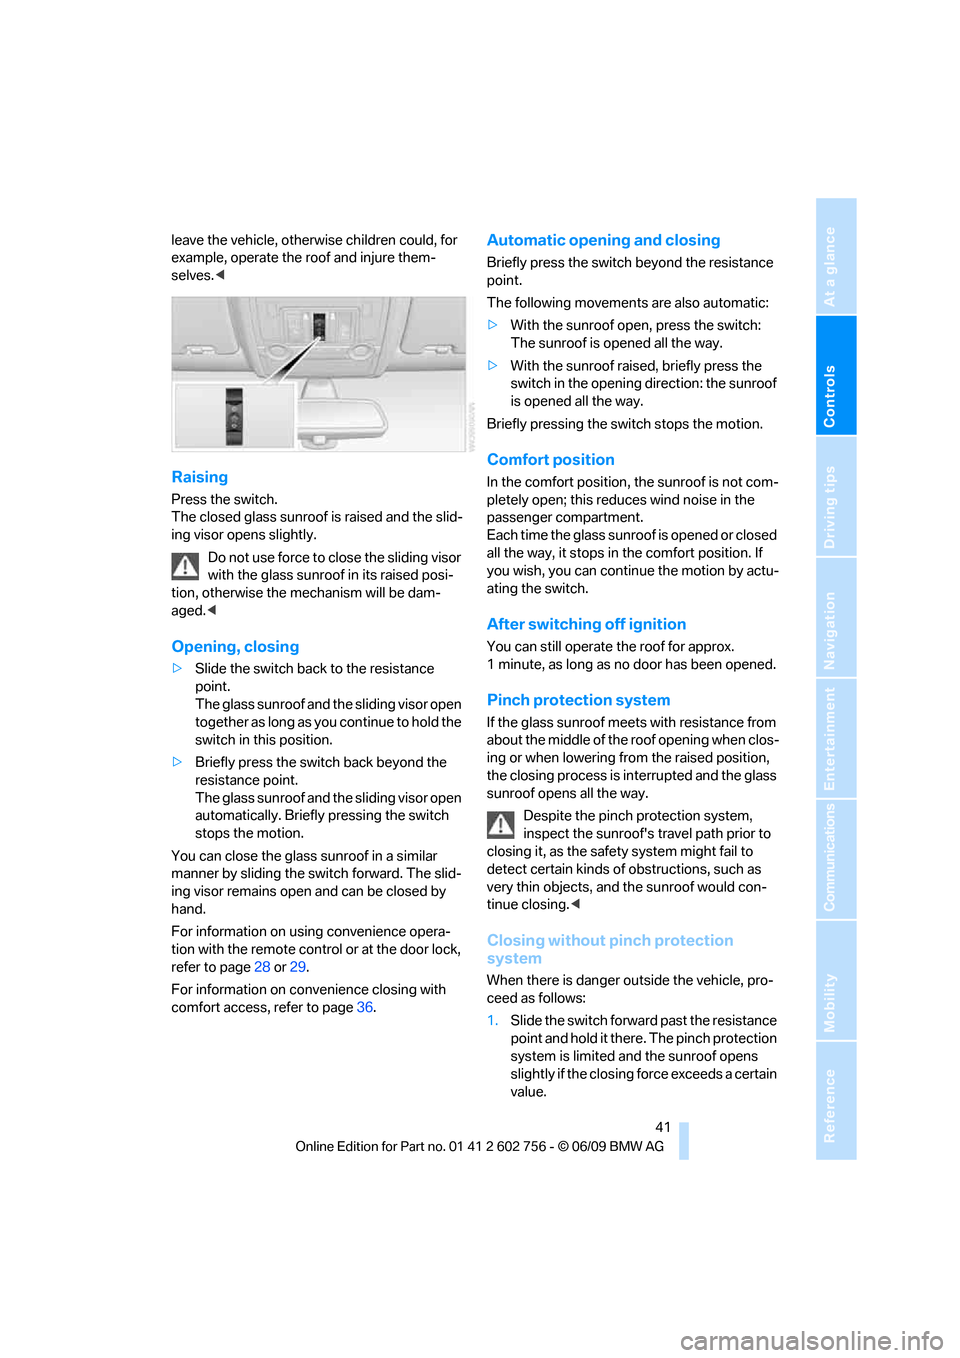
Press the switch.
The closed glass sunroof is raised and the slid-
ing visor opens slightly.
Do not use force to close the sliding visor
with the glass sunroof in its raised posi-
tion, otherwise the mechanism will be dam-
aged.<
Opening, closing
>Slide the switch back to the resistance
point.
The glass sunroof and the sliding visor open
together as long as you continue to hold the
switch in this position.
>Briefly press the switch back beyond the
resistance point.
The glass sunroof and the sliding visor open
automatically. Briefly pressing the switch
stops the motion.
You can close the glass sunroof in a similar
manner by sliding the switch forward. The slid-
ing visor remains open and can be closed by
hand.
For information on using convenience opera-
tion with the remote control or at the door lock,
refer to page28 or29.
For information on convenience closing with
comfort access, refer to page36.
Automatic opening and closing
Briefly press the switch beyond the resistance
point.
The following movements are also automatic:
>With the sunroof open, press the switch:
The sunroof is opened all the way.
>With the sunroof raised, briefly press the
switch in the opening direction: the sunroof
is opened all the way.
Briefly pressing the switch stops the motion.
Comfort position
In the comfort position, the sunroof is not com-
pletely open; this reduces wind noise in the
passenger compartment.
Each time the glass sunroof is opened or closed
all the way, it stops in the comfort position. If
you wish, you can continue the motion by actu-
ating the switch.
After switching off ignition
You can still operate the roof for approx.
1 minute, as long as no door has been opened.
Pinch protection system
If the glass sunroof meets with resistance from
about the middle of the roof opening when clos-
ing or when lowering from the raised position,
the closing process is interrupted and the glass
sunroof opens all the way.
Despite the pinch protection system,
inspect the sunroof's travel path prior to
closing it, as the safety system might fail to
detect certain kinds of obstructions, such as
very thin objects, and the sunroof would con-
tinue closing.<
Closing without pinch protection
system
When there is danger outside the vehicle, pro-
ceed as follows:
1.Slide the switch forward past the resistance
point and hold it there. The pinch protection
system is limited and the sunroof opens
slightly if the closing force exceeds a certain
value.
ba8_e70ag.book Seite 41 Freitag, 5. Juni 2009 11:42 11
Page 45 of 300
Controls
43Reference
At a glance
Driving tips
Communications
Navigation
Entertainment
Mobility
Adjusting
Sitting safely
The ideal sitting position can make a vital con-
tribution to relaxed, fatigue-free driving. In the
interaction with the safety belts, the head
restraints and the airbags, the seat position
plays an important role in an accident. To
ensure that the safety systems operate with
optimal efficiency, we strongly urge you to
observe the instructions contained in the fol-
lowing section.
For additional information on transporting chil-
dren safely, refer to page55.
Airbags
Always maintain an adequate distance
between yourself and the airbags. Always
hold the steering wheel by its rim with hands at
the 9 o'clock and 3 o'clock positions, to mini-
mize the risk of injuries to your hands and arms
in the event of airbag deployment.
No one and nothing is to come between the air-
bags and the seat occupant.
Do not use the cover of the front airbag on the
front passenger side as a storage area. Make
sure that the front passenger is sitting correctly
and does not rest feet or legs on the instrument
cluster, otherwise leg injuries can occur if the
front airbag is triggered.
Make sure that passengers keep their heads
away from the side airbag and do not lean
against the cover of the head airbag, otherwise
injuries can occur when the airbags are trig-
gered.<
Even if you adhere to all the instructions, inju-
ries resulting from contact with airbags cannot
be fully excluded, depending on the circum-
stances. The ignition and inflation noise may
provoke a mild hearing loss in extremely sensi-
tive individuals. This effect is usually only tem-
porary.
For airbag locations and additional information
on airbags, refer to page98.
Head restraint
A correctly adjusted head restraint reduces the
risk of spinal injury in the event of an accident.
Adjust the head restraint so that its center
is approx. at ear level. Otherwise there is
increased danger of injury in the event of an
accident.<
BMW X5: push the head restraints of the 3rd
row seats
* into the top position.
Head restraints, refer to page46.
Height
Adjust the head restraint so that its center is
approximately at ear level.
Distance
Adjust the distance so that the head restraint is
as close as possible to the back of the head.
Safety belts
Before every drive, make sure that safety belts
are being worn at all of the occupied seats. Air-
bags complement the safety belt as an addi-
tional safety device, but they do not represent a
substitute.
BMW X5: depending on its equipment, your
vehicle has either five or seven seats, which are
all provided with a safety belt.
Never allow more than one person to
wear a single safety belt. Never allow
infants or small children to ride in a passenger's
lap. Make sure that the belt lies low around the
hips in the lap area and does not press on the
abdomen. The safety belt may not lie across the
neck, rub on sharp edges, be routed over solid
or breakable objects or be pinched. Wear the
safety belt without twisting, snugly across the
lap and shoulders, as close to the body as pos-
sible. Otherwise the belt can slip over the hips
in the lap area in a frontal impact and injure the
abdomen. Avoid wearing clothing that prevents
the belt from fitting properly and pull the belt in
ba8_e70ag.book Seite 43 Freitag, 5. Juni 2009 11:42 11