Electronic BMW X5 XDRIVE 35D 2009 E70 Owner's Manual
[x] Cancel search | Manufacturer: BMW, Model Year: 2009, Model line: X5 XDRIVE 35D, Model: BMW X5 XDRIVE 35D 2009 E70Pages: 317, PDF Size: 9.56 MB
Page 7 of 317
5Reference
At a glance
Controls
Driving tips
Communications
Navigation
Entertainment
Mobility
The individual vehicle
When purchasing your BMW, you have decided
in favor of a model with individualized equip-
ment and features. This Owner's Manual
describes the entire array of options and equip-
ment available with a specific BMW model.
Please bear in mind th at the manual may con-
tain information on accessories and equipment
that you have not specifie d for your own vehicle.
Sections describing options and special equip-
ment are marked by asterisks
* to assist you in
identifying possible differences between the
descriptions in this ma nual and your own vehi-
cle's equipment.
If equipment in your BM W is not described in
this Owner's Manual, plea se refer to the accom-
panying Supplementary Owner's Manuals.
Editorial notice
BMW pursues a policy of continuous, ongoing
development that is conc eived to ensure that
our vehicles continue to embody the highest
quality and safety stan dards combined with
advanced, state-of-the-art technology. For this
reason, it is possible that the features described
in this Owner's Manual could differ from those
on your vehicle.
For your own safety
Maintenance and repairs
Advanced technology, e.g. the use of
modern materials and high-performance
electronics, requires sp ecially adapted mainte-
nance and repair methods. Therefore, have cor-
responding work on your BMW performed only
by your BMW Sports Activity Vehicle Center or
a workshop that works according to BMW
repair procedures with correspondingly trained
personnel. If this work is not carried out prop-
erly, there is a danger of subsequent damage
and related safety hazards. <
Page 42 of 317
Opening and closing
40
>
The engine can only be started if the vehicle
detects that the remote control is located in
the vehicle.
Comparison with ordinary remote
control
You can control the functions mentioned previ-
ously with the comfort access or by pressing
the buttons on the remote control. Therefore,
please familiarize yourself with the information
on opening and closing beginning on page 28
beforehand.
The special features when using comfort
access are described in the following.
Should a short delay occur when opening
or closing the windows or the glass sun-
roof
*/panorama glass sunroof*, the system
checks whether a remote control is located in
the vehicle. Please repeat opening or closing if
necessary. <
Releasing
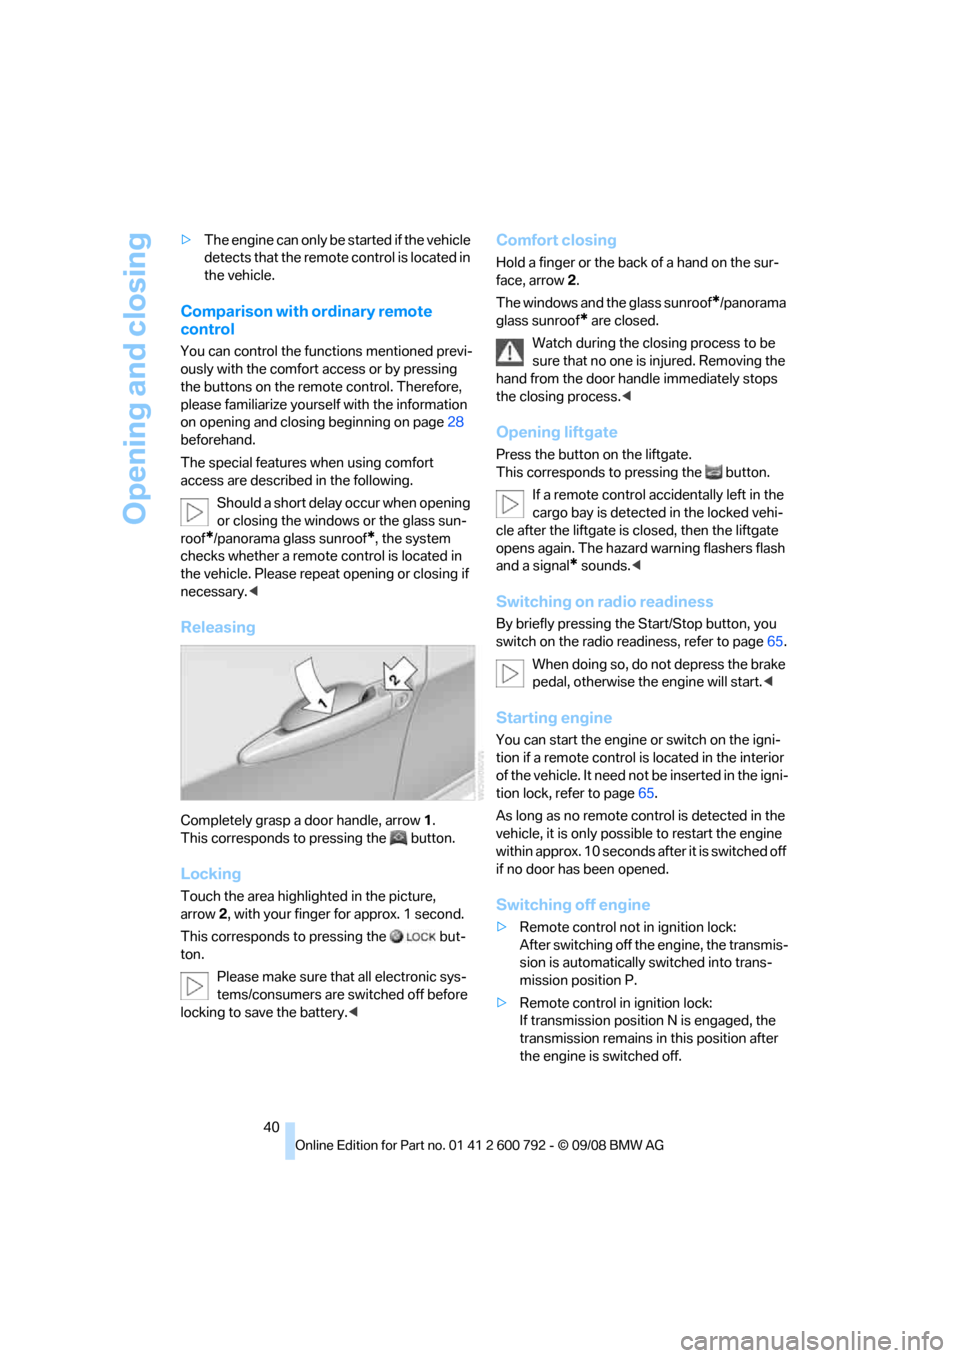
Completely grasp a door handle, arrow 1.
This corresponds to pressing the button.
Locking
Touch the area highlighted in the picture,
arrow 2, with your finger for approx. 1 second.
This corresponds to pressing the but-
ton.
Please make sure that all electronic sys-
tems/consumers are sw itched off before
locking to save the battery. <
Comfort closing
Hold a finger or the back of a hand on the sur-
face, arrow2.
The windows and the glass sunroof
*/panorama
glass sunroof
* are closed.
Watch during the closing process to be
sure that no one is injured. Removing the
hand from the door handle immediately stops
the closing process. <
Opening liftgate
Press the button on the liftgate.
This corresponds to pr essing the button.
If a remote control acci dentally left in the
cargo bay is detected in the locked vehi-
cle after the liftgate is closed, then the liftgate
opens again. The hazard warning flashers flash
and a signal
* sounds. <
Switching on radio readiness
By briefly pressing the Start/Stop button, you
switch on the radio readiness, refer to page 65.
When doing so, do not depress the brake
pedal, otherwise the engine will start.<
Starting engine
You can start the engine or switch on the igni-
tion if a remote control is located in the interior
of the vehicle. It need not be inserted in the igni-
tion lock, refer to page 65.
As long as no remote co ntrol is detected in the
vehicle, it is only possible to restart the engine
within approx. 10 seconds after it is switched off
if no door has been opened.
Switching off engine
> Remote control not in ignition lock:
After switching off the engine, the transmis-
sion is automatically switched into trans-
mission position P.
> Remote control in ignition lock:
If transmission position N is engaged, the
transmission remains in this position after
the engine is switched off.
Page 67 of 317
Controls
65Reference
At a glance
Driving tips
Communications
Navigation
Entertainment
Mobility
Driving
Ignition lock
Inserting remote control into ignition
lock
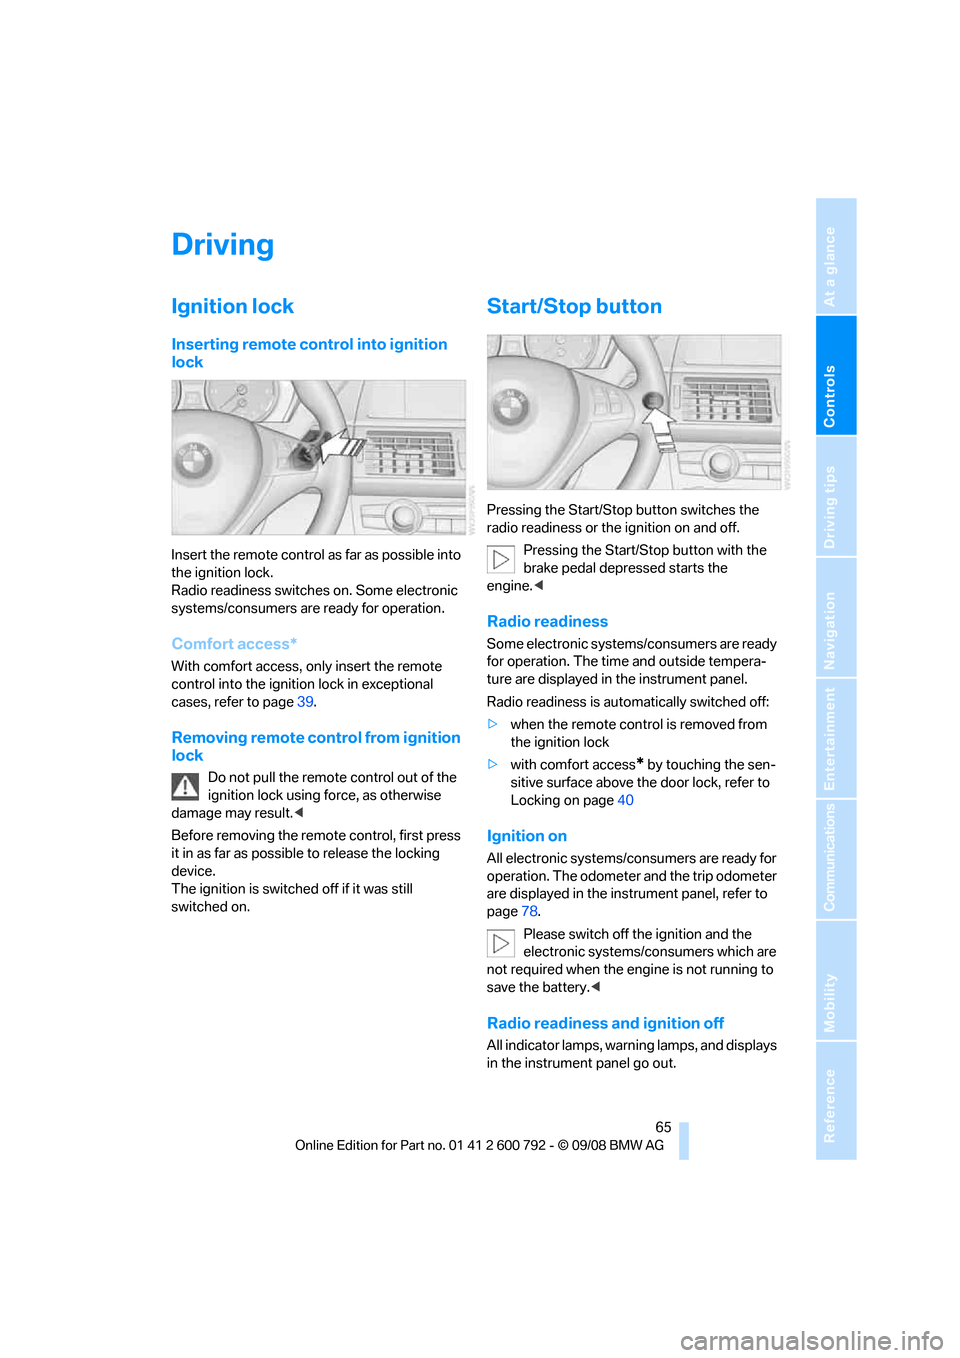
Insert the remote control as far as possible into
the ignition lock.
Radio readiness switches on. Some electronic
systems/consumers are ready for operation.
Comfort access*
With comfort access, only insert the remote
control into the ignition lock in exceptional
cases, refer to page 39.
Removing remote control from ignition
lock
Do not pull the remote control out of the
ignition lock using force, as otherwise
damage may result. <
Before removing the remo te control, first press
it in as far as possibl e to release the locking
device.
The ignition is switched off if it was still
switched on.
Start/Stop button
Pressing the Start/Stop button switches the
radio readiness or the ignition on and off.
Pressing the Start/Stop button with the
brake pedal depre ssed starts the
engine. <
Radio readiness
Some electronic systems/consumers are ready
for operation. The time and outside tempera-
ture are displayed in the instrument panel.
Radio readiness is auto matically switched off:
> when the remote control is removed from
the ignition lock
> with comfort access
* by touching the sen-
sitive surface above the door lock, refer to
Locking on page 40
Ignition on
All electronic systems/consumers are ready for
operation. The odometer and the trip odometer
are displayed in the instrument panel, refer to
page78.
Please switch off the ignition and the
electronic systems/consumers which are
not required when the engine is not running to
save the battery. <
Radio readiness and ignition off
All indicator lamps, warning lamps, and displays
in the instrument panel go out.
Page 98 of 317
Technology for comfort, convenience and safety
96
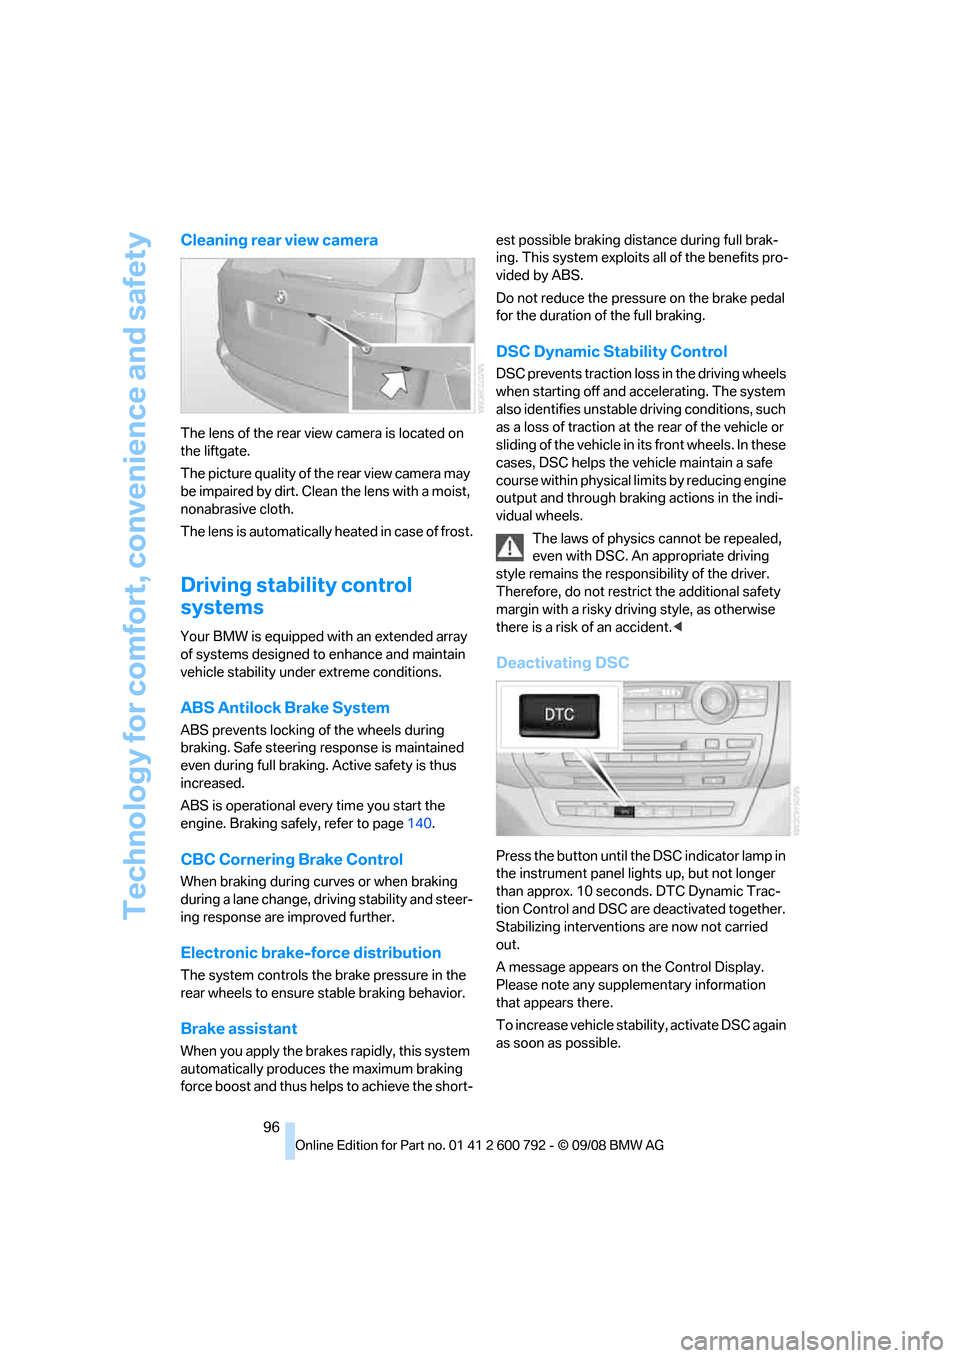
Cleaning rear view camera
The lens of the rear view camera is located on
the liftgate.
The picture quality of the rear view camera may
be impaired by dirt. Clean the lens with a moist,
nonabrasive cloth.
The lens is automatically heated in case of frost.
Driving stability control
systems
Your BMW is equipped wi th an extended array
of systems designed to enhance and maintain
vehicle stability under extreme conditions.
ABS Antilock Brake System
ABS prevents locking of the wheels during
braking. Safe steering response is maintained
even during full braking. Active safety is thus
increased.
ABS is operational every time you start the
engine. Braking safely, refer to page 140.
CBC Cornering Brake Control
When braking during curves or when braking
during a lane change, dr iving stability and steer-
ing response are improved further.
Electronic brake-force distribution
The system controls the brake pressure in the
rear wheels to ensure st able braking behavior.
Brake assistant
When you apply the brakes rapidly, this system
automatically produces the maximum braking
force boost and thus helps to achieve the short- est possible braking distance during full brak-
ing. This system exploits all of the benefits pro-
vided by ABS.
Do not reduce th
e pressure on the brake pedal
for the duration of the full braking.
DSC Dynamic Stability Control
DSC prevents traction lo ss in the driving wheels
when starting off and accelerating. The system
also identifies unstable driving conditions, such
as a loss of traction at the rear of the vehicle or
sliding of the vehicle in its front wheels. In these
cases, DSC helps the vehicle maintain a safe
course within physical lim its by reducing engine
output and through braking actions in the indi-
vidual wheels.
The laws of physics cannot be repealed,
even with DSC. An appropriate driving
style remains the responsibility of the driver.
Therefore, do not restrict the additional safety
margin with a risky driving style, as otherwise
there is a risk of an accident. <
Deactivating DSC
Press the button until the DSC indicator lamp in
the instrument panel lights up, but not longer
than approx. 10 seconds. DTC Dynamic Trac-
tion Control and DSC ar e deactivated together.
Stabilizing intervention s are now not carried
out.
A message appears on the Control Display.
Please note any supplementary information
that appears there.
To increase vehicle stability, activate DSC again
as soon as possible.
Page 104 of 317
Technology for comfort, convenience and safety
102
the tire inflation pressu
re has dropped consid-
erably in one or several tires.
Function requirements
In order to assure the re liable reporting of a flat
tire, the system must have been reset with the
correct tire inflation pressure.
Always use wheels with TPM electronics, oth-
erwise fault-free operation of the system is not
ensured.
Reset the system again after each correc-
tion of the tire inflation pressure and after
every tire or wheel change.<
System limits
TPM cannot announce sudden serious
tire damage caused by external influ-
ences. <
The system does not function properly if it has
n o t b e e n r e s e t , e . g . a f l a t t i r e i s r e p o r t e d d e s p i t e
correct tire inflation pressures.
The system is inactive and cannot display a flat
tire if a wheel has be en mounted without TPM
electronics, e.g. a compact wheel
*, or if TPM is
temporarily interfered wi th by other systems or
devices which use the same radio frequency.
Status display on Control Display
The tire and system stat us is indicated by the
color of the tires.
TPM takes the fact that the tire pressure
changes during driving in to account. A correc-
tion is only required if requested by TPM with
the color.
Green
The tire pressure matche s the learned set state.
"TPM active" is displayed on the Control Dis-
play.
One wheel is yellow
Flat tire or a major drop in inflation pressure in
the indicated tire. A me ssage appears on the
Control Display.
All wheels are yellow
Flat tire or a major drop in inflation pressure in
several tires. A message appears on the Control
Display.
Gray
The system cannot detect a flat tire.
Reasons for this can be:
> TPM is being reset
> Temporary interference due to systems or
devices which use the same radio fre-
quency
> Malfunction
Resetting system
Reset the system again after each correc-
tion of the tire inflation pressure and after
every tire or wheel change.<
Resetting finishes during driving, which can be
interrupted at any time. When driving resumes,
resetting is continued automatically. Do not
reset the system when driving with a compact
wheel
*.
iDrive, for operating pr inciple refer to page16.
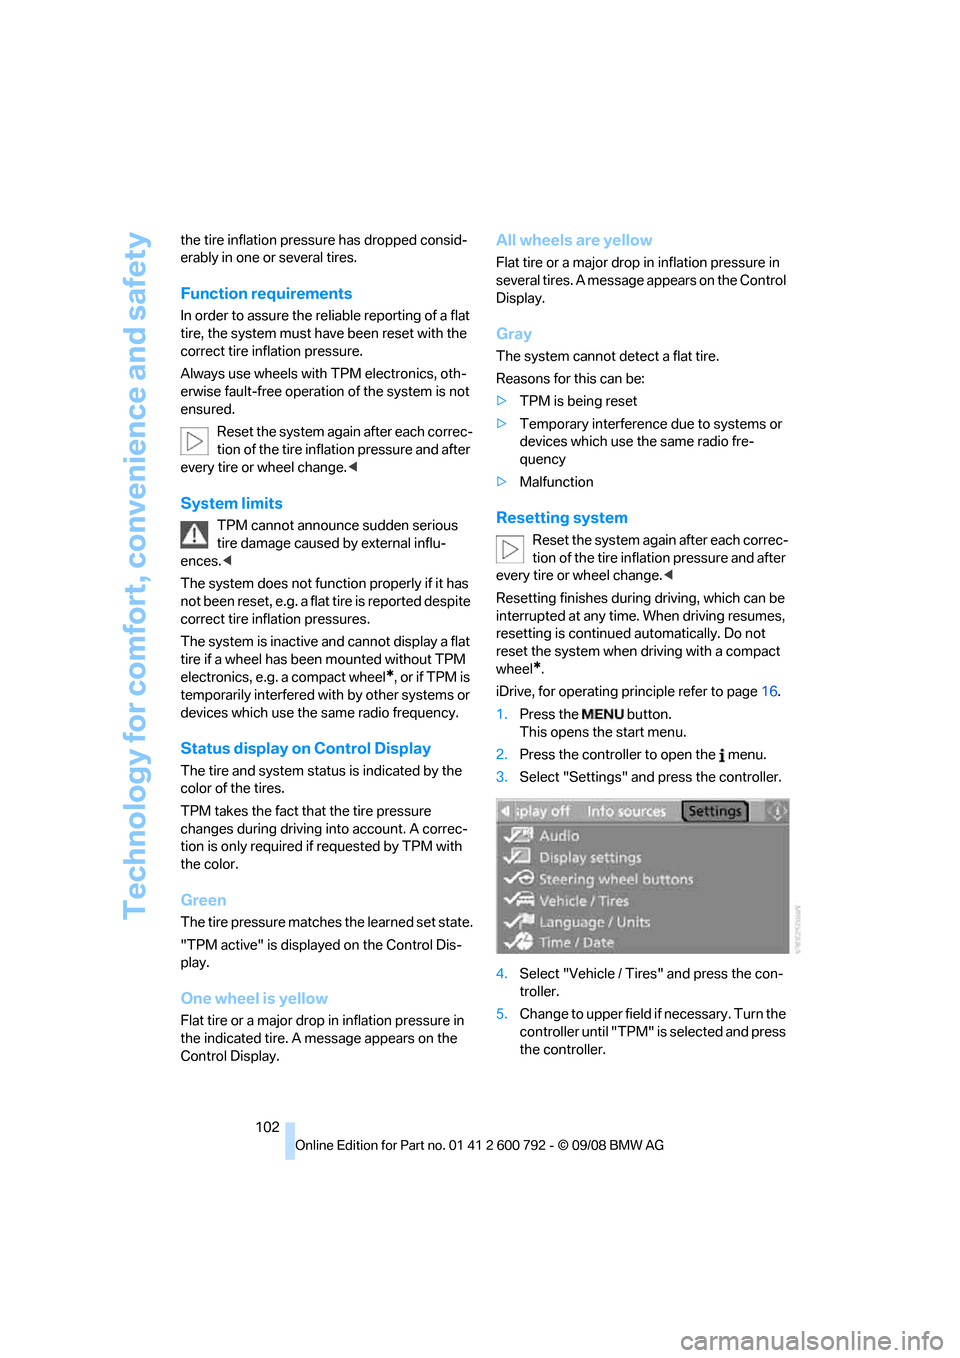
1. Press the button.
This opens the start menu.
2. Press the controller to open the menu.
3. Select "Settings" an d press the controller.
4. Select "Vehicle / Tire s" and press the con-
troller.
5. Change to upper field if necessary. Turn the
controller until "TPM" is selected and press
the controller.
Page 106 of 317
Technology for comfort, convenience and safety
104
>
If a wheel without TPM electronics is
mounted, e.g. a compact wheel
*
>If TPM is temporarily interfered with by
other systems or devices which use the
same radio frequency
Explanation according to the NHTSA/
FMVSS 138 Tire Pressure Monitoring
Systems
Each tire, including the spare (if provided),
should be checked monthly when cold and
inflated to the inflation pressure recommended
by the vehicle manufacturer on the vehicle plac-
ard or tire inflation pressu re label. (If your vehi-
cle has tires of a different size than the size indi-
cated on the vehicle plac ard or tire inflation
pressure label, you should determine the
proper tire inflation pr essure for those tires.)
As an added safety feature, your vehicle has
been equipped with a tire pressure monitoring
system (TPMS) that illumi nates a low tire pres-
sure telltale when one or more of your tires is
significantly underinflate d. Accordingly, when
the low tire pressure telltale illuminates, you
should stop and check your tires as soon as
possible, and inflate them to the proper pres-
sure. Driving on a significantly underinflated tire
causes the tire to overhe at and can lead to tire
failure. Underinflation also reduces fuel effi-
ciency and tire tread life, and may affect the
vehicle's handling and stopping ability.
Please note that the TP MS is not a substitute
for proper tire maintenance, and it is the driver's
responsibility to maintain correct tire pressure,
even if underinflation has not reached the level
to trigger illumination of the TPMS low tire
pressure telltale.
Your vehicle has also been equipped with a
TPMS malfunction indicator to indicate when
the system is not operating properly. The
TPMS malfunction indicator is combined with
the low tire pressure telltale. When the system
detects a malfunction, the telltale will flash for
approximately one minute and then remain con-
tinuously illuminated. Th is sequence will con-
tinue upon subsequent vehicle start-ups as
long as the malfunction exists. When the mal- function indicator is illuminated, the system
may not be able to detect or signal low tire pres-
sure as intended. TPMS malfunctions may
occur for a variety of reasons, including the
installation of replacement or alternate tires or
wheels on the vehicle that prevent the TPMS
from functioning properly. Always check the
TPMS malfunction telltale after replacing one or
more tires or wheels on your vehicle to ensure
that the replacement or alternate tires and
wheels allow the TPMS to
continue to function
properly.
Active steering*
The concept
The active steering active ly varies the steering
angle of the front wheels in relation to the steer-
ing wheel movements. In addition, it also varies
the steering force required for steering depend-
ing on the vehicle's speed.
When you are driving in the low road speed
range, e.g. in a town or when parking, the steer-
ing angle increases, i.e. the steering becomes
very direct. In the higher speed range, on the
other hand, the steering angle is reduced more
and more. This improves the handling capability
of your BMW over the entire speed range.
In critical situations, the system can make tar-
geted corrections to th e steering angle pro-
vided by the driver and thus stabilize the vehicle
before the driver intervenes.
Malfunction
The warning lamp lights up yellow
and a message is shown on the Con-
trol Display. The active steering is
defective or has been temporarily
deactivated. At low speeds, greater steering
wheel movements are required, whereas at
higher speeds, the vehicle reacts more sensi-
tively to steering wheel movements. The stabil-
ity-promoting intervention can also be deacti-
vated. Proceed cautiously and drive
defensively. If active st eering is defective, have
the system checked.
Page 186 of 317
Satellite radio
184
Satellite radio
You can receive over 100 different channels
with high sound quality.
The channels are offered to you in predefined
packages. To receive the channels of your
choice, you must have this package enabled.
With this new techno logy the signal may
fail, causing interruptions in reception. <
Enabling or disabling
channels
iDrive, for operating principle refer to page16.
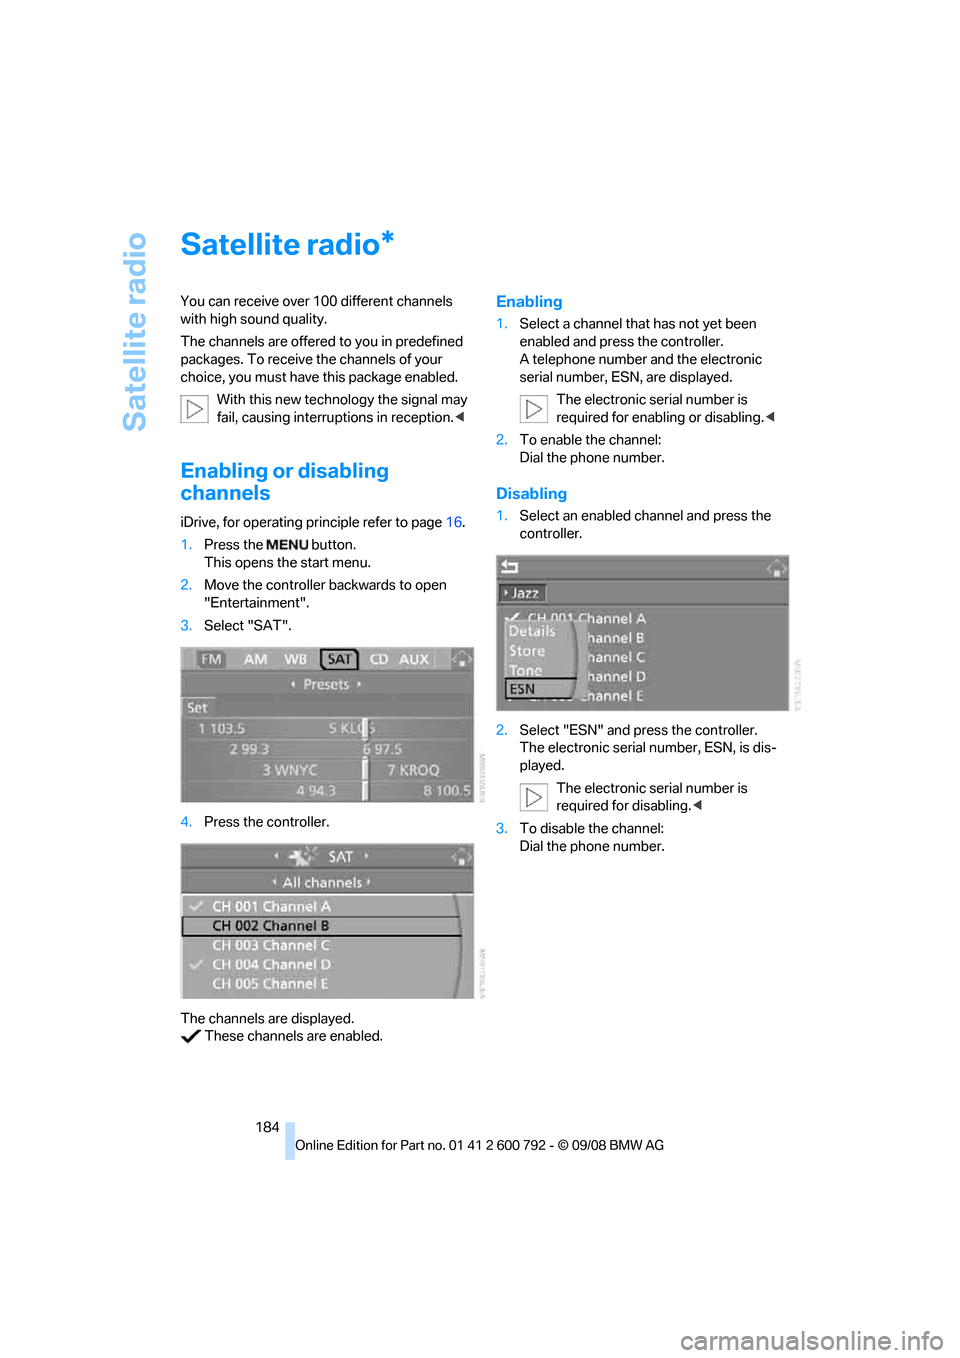
1. Press the button.
This opens the start menu.
2. Move the controller backwards to open
"Entertainment".
3. Select "SAT".
4. Press the controller.
The channels are displayed. These channels are enabled.
Enabling
1. Select a channel that has not yet been
enabled and press the controller.
A telephone number and the electronic
serial number, ESN, are displayed.
The electronic serial number is
required for enabling or disabling. <
2. To enable the channel:
Dial the phone number.
Disabling
1.Select an enabled channel and press the
controller.
2. Select "ESN" and press the controller.
The electronic serial number, ESN, is dis-
played.
The electronic serial number is
required for disabling. <
3. To disable the channel:
Dial the phone number.
*
Page 258 of 317
Wheels and tires
256
Run-flat tires
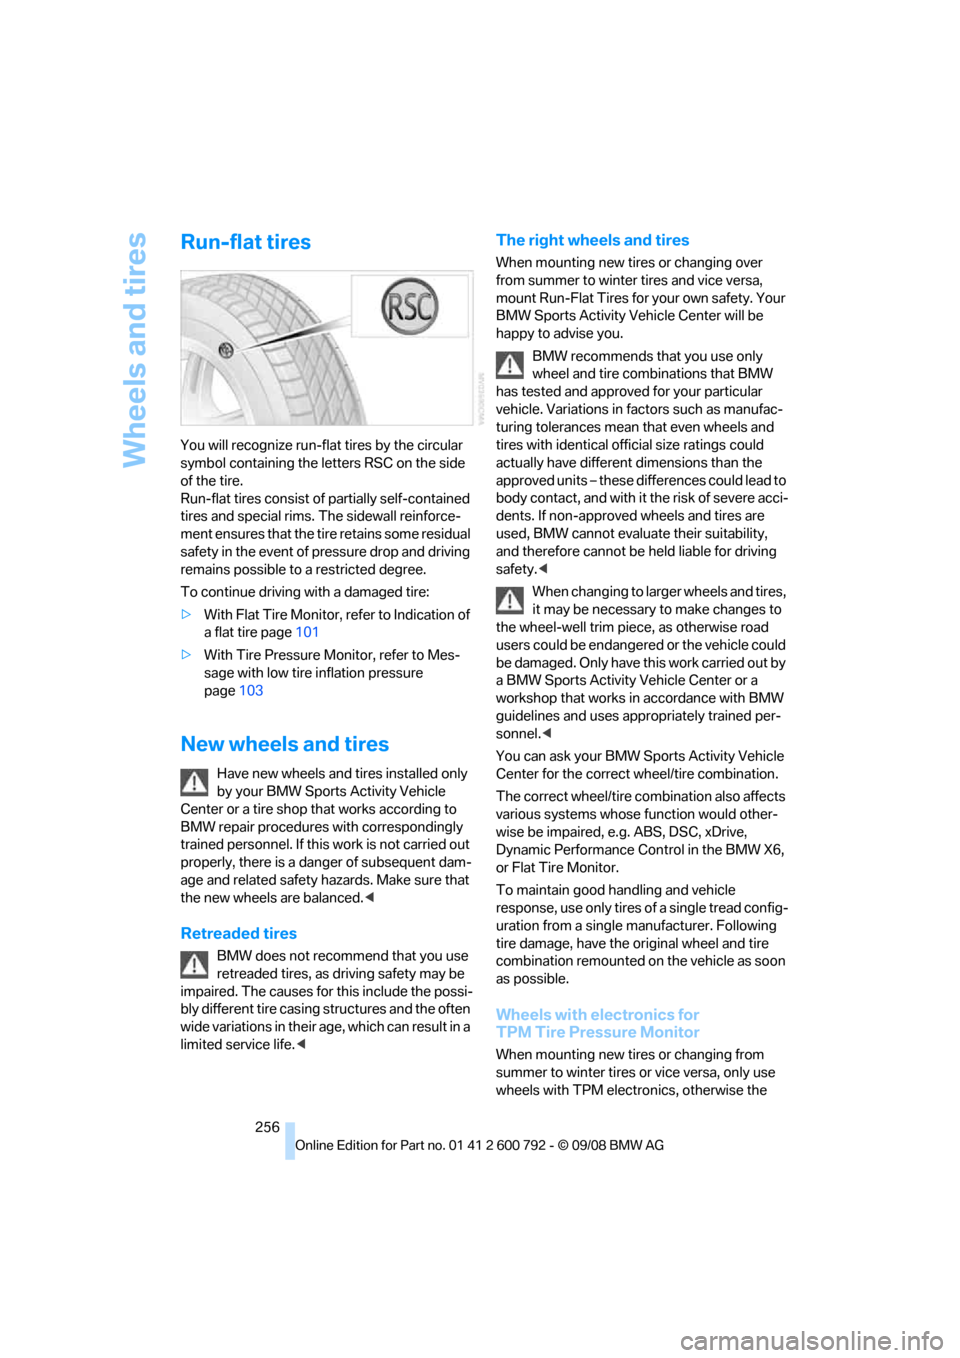
You will recognize run-flat tires by the circular
symbol containing the letters RSC on the side
of the tire.
Run-flat tires consist of partially self-contained
tires and special rims. The sidewall reinforce-
ment ensures that the tire retains some residual
safety in the event of pr essure drop and driving
remains possible to a restricted degree.
To continue driving with a damaged tire:
> With Flat Tire Monitor, refer to Indication of
a flat tire page 101
> With Tire Pressure Monitor, refer to Mes-
sage with low tire inflation pressure
page 103
New wheels and tires
Have new wheels and tires installed only
by your BMW Sports Activity Vehicle
Center or a tire shop that works according to
BMW repair procedures with correspondingly
trained personnel. If this work is not carried out
properly, there is a danger of subsequent dam-
age and related safety ha zards. Make sure that
the new wheels are balanced. <
Retreaded tires
BMW does not recommend that you use
retreaded tires, as driving safety may be
impaired. The causes for this include the possi-
bly different tire casing structures and the often
wide variations in their age, which can result in a
limited service life. <
The right wheels and tires
When mounting new tires or changing over
from summer to winter tires and vice versa,
mount Run-Flat Tires for your own safety. Your
BMW Sports Activity Vehicle Center will be
happy to advise you.
BMW recommends that you use only
wheel and tire combinations that BMW
has tested and approved for your particular
vehicle. Variations in factors such as manufac-
turing tolerances mean that even wheels and
tires with identical offi cial size ratings could
actually have different dimensions than the
approved units – these differences could lead to
body contact, and with it the risk of severe acci-
dents. If non-approved wheels and tires are
used, BMW cannot evaluate their suitability,
and therefore cannot be held liable for driving
safety. <
When changing to larger wheels and tires,
it may be necessary to make changes to
the wheel-well trim piec e, as otherwise road
users could be endangered or the vehicle could
be damaged. Only have th is work carried out by
a BMW Sports Activity Vehicle Center or a
workshop that works in accordance with BMW
guidelines and uses appropriately trained per-
sonnel. <
You can ask your BMW Sp orts Activity Vehicle
Center for the correct wheel/tire combination.
The correct wheel/tire combination also affects
various systems whose function would other-
wise be impaired, e.g. ABS, DSC, xDrive,
Dynamic Performance Control in the BMW X6,
or Flat Tire Monitor.
To maintain good handling and vehicle
response, use only tires of a single tread config-
uration from a single manufacturer. Following
tire damage, have the or iginal wheel and tire
combination remounted on the vehicle as soon
as possible.
Wheels with electronics for
TPM Tire Pressure Monitor
When mounting new tires or changing from
summer to winter tires or vice versa, only use
wheels with TPM electronics, otherwise the
Page 262 of 317
Under the hood
260
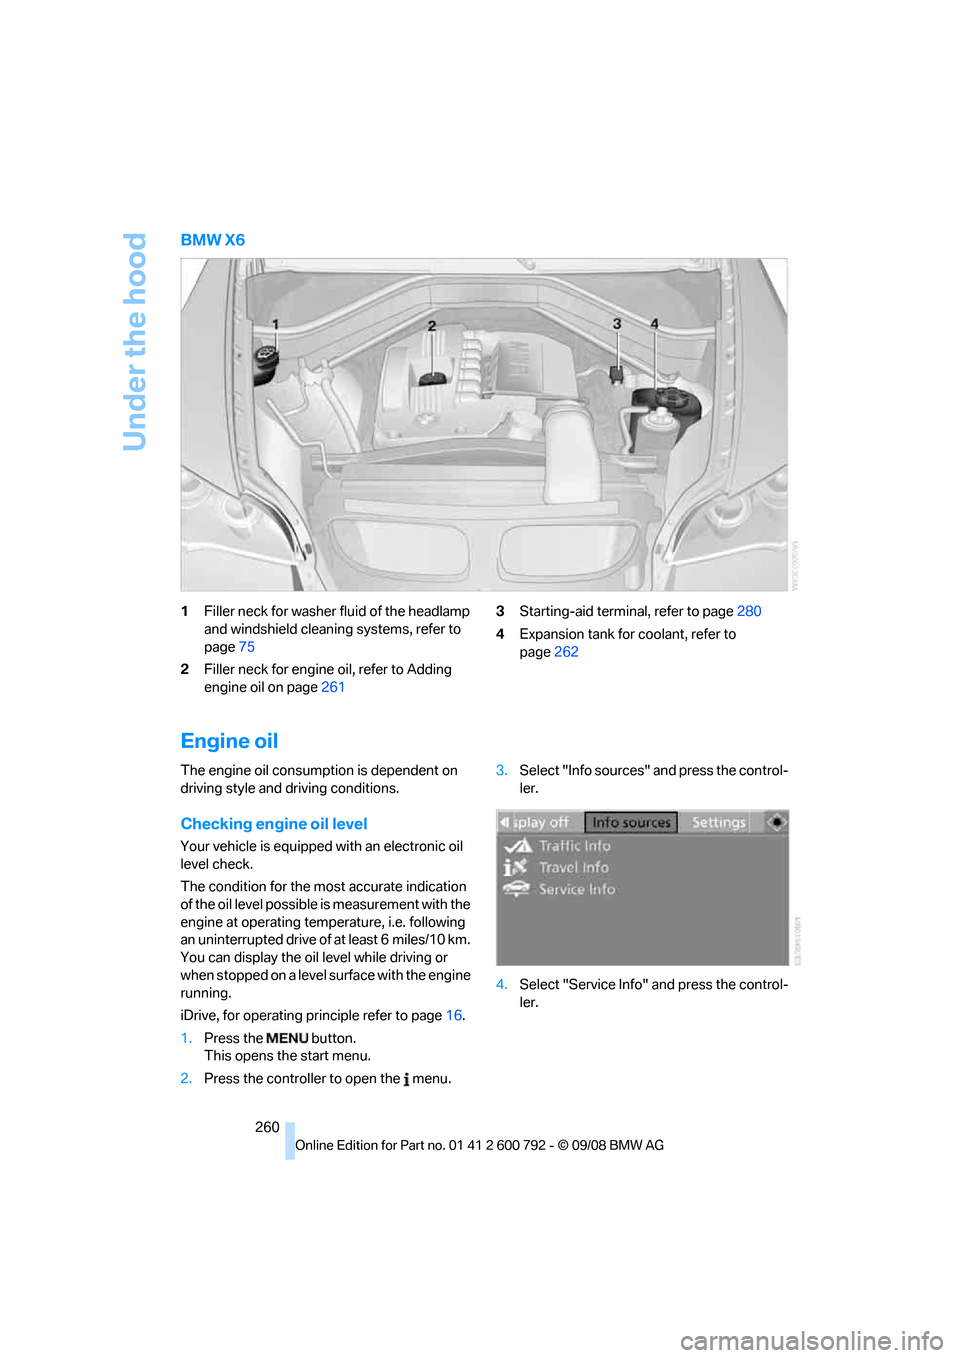
BMW X6
1Filler neck for washer fluid of the headlamp
and windshield cleaning systems, refer to
page 75
2 Filler neck for engine oil, refer to Adding
engine oil on page 261 3
Starting-aid termin al, refer to page280
4 Expansion tank for coolant, refer to
page 262
Engine oil
The engine oil consumption is dependent on
driving style and driving conditions.
Checking engine oil level
Your vehicle is equipped with an electronic oil
level check.
The condition for the most accurate indication
of the oil level possible is measurement with the
engine at operating temperature, i.e. following
an uninterrupted drive of at least 6 miles/10 km.
You can display the oil level while driving or
when stopped on a level surface with the engine
running.
iDrive, for operating pr inciple refer to page16.
1. Press the button.
This opens the start menu.
2. Press the controller to open the menu. 3.
Select "Info sources" and press the control-
ler.
4. Select "Service Info" and press the control-
ler.
Page 300 of 317
Everything from A to Z
298
"BMW
Assist" 236,237, 238, 239
BMW Assist
– activating 240
– concierge service 239
– contacting BMW Customer Relations 238
– offered services 235
– roadside assistance 236
– TeleServices 237
"BMW Contact" 230
"BMW Contact Numbers" 230
BMW homepage 4
BMW maintenance system 263
"BMW Service settings" 241
BMW Teleservice call
– automatic 237
– manual 237
BMW TeleServices 237
BMW TeleServices services
– displaying 238
– updating 238
BMW website 4
Bottle holder, refer to Cup holders 127
Brake assistant 96
Brake force display 105
Brake lamps
– brake force display 105
– replacing bulbs 270,273
Brake rotors 140
Brakes
– ABS Antilock Brake System 96
– brake assistant 96
– brake force display 105
– breaking-in 138
– CBC Cornering Brake
Control 96
– electronic brake-force distribution 96
– parking brake 67
– refer to Braking safely 140
– warning lamp 13 Brake system
138
– brake pads 138
– breaking-in 138
– disk brakes 140
Braking safely 140
Breakdown, Flat Tire Monitor 100
Breakdown services, refer to
Roadside Assistance 280
Breaking-in brake pads 138
Breaking-in d
ifferential 138
Break-in period 138
"Brightness" 89
– DVD changer 196
– DVD system in rear 208
Brightness
– of Control Display 89
– of the rear view camera 95
– on Head-Up Display 108
"Brightness / Position" 108
Button for starting engine 65
Buttons on steering wheel 11
Bypassing traffic congestion 169
C
Calibrating driver's seat 55
California Proposition 65 Warning 6
"Call" 228,239
Call
– accepting 226
– displaying accepted 229
– ending 227
– in absence 229
– starting 227
Calling
– from phone book 228
– from Top 8 list 229
– redialing 229
– refer to telephone operating instructions
Camera, refer to Rear view camera 93
"Camera picture and PDC" 95"Camera view
– full screen"
95
– main window" 95
Can holder, refer to Cup holders 127
Capacities 290
Capacity of cargo bay 289
Car battery, refer to Vehicle
battery 277
"Car Data" 81
Care 265
– car-care products 265
– carpets 267
– car washes 265
– CD/DVD-player 268
– chrome components 266
– displays 268
– exterior 265
– fine wooden
components 267
– hand washing 266
– headlamps 266
– high-pressure cleaning jets 266
– interior 267
– leather 267
– light-alloy wheels 267
– paint 266
– plastic components 267
– rubber gaskets 266
– running boards 267
– safety belts 268
– sensors and cameras 267,268
– upholstery materials and cloth-covered paneling 267
– windows 266
–
wiper blades 266
Cargo
– refer to Loading 141
– securing 143
– securing with ski bag 134
Cargo area, refer to Cargo
bay 130
Cargo area cover, refer to Roll- up cover 130