display BMW X5 XDRIVE 48I 2009 E70 Repair Manual
[x] Cancel search | Manufacturer: BMW, Model Year: 2009, Model line: X5 XDRIVE 48I, Model: BMW X5 XDRIVE 48I 2009 E70Pages: 317, PDF Size: 9.56 MB
Page 110 of 317
Technology for comfort, convenience and safety
108
5.
Change to upper field if necessary. Turn the
controller until "Head-Up Display" is
selected and press the controller.
6. Change into the second field from the top.
Turn the controller until "Head-Up Display"
is selected and pr ess the controller.
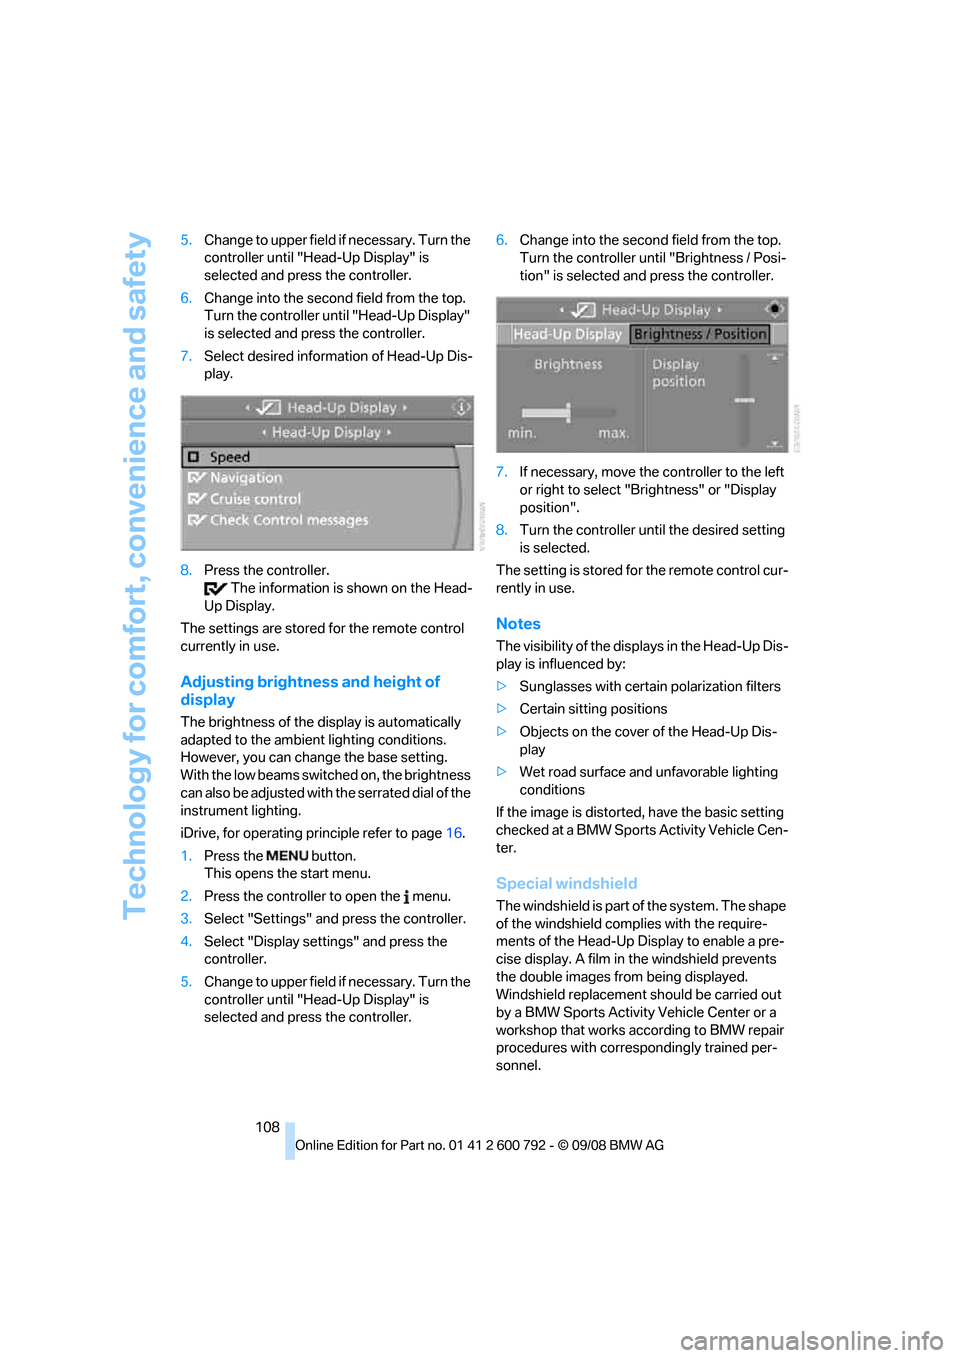
7. Select desired information of Head-Up Dis-
play.
8. Press the controller.
The information is shown on the Head-
Up Display.
The settings are stored for the remote control
currently in use.
Adjusting brightness and height of
display
The brightness of the di splay is automatically
adapted to the ambient lighting conditions.
However, you can change the base setting.
With the low beams switched on, the brightness
can also be adjusted with the serrated dial of the
instrument lighting.
iDrive, for operating pr inciple refer to page16.
1. Press the button.
This opens the start menu.
2. Press the controller to open the menu.
3. Select "Settings" and press the controller.
4. Select "Display settings" and press the
controller.
5. Change to upper field if necessary. Turn the
controller until "Head-Up Display" is
selected and press the controller. 6.
Change into the second field from the top.
Turn the controller until "Brightness / Posi-
tion" is selected and press the controller.
7. If necessary, move the controller to the left
or right to select "Brightness" or "Display
position".
8. Turn the controller until the desired setting
is selected.
The setting is stored fo r the remote control cur-
rently in use.
Notes
The visibility of the disp lays in the Head-Up Dis-
play is influenced by:
> Sunglasses with certain polarization filters
> Certain sitting positions
> Objects on the cover of the Head-Up Dis-
play
> Wet road surface and unfavorable lighting
conditions
If the image is distorted, have the basic setting
checked at a BMW Sports Activity Vehicle Cen-
ter.
Special windshield
The windshield is part of the system. The shape
of the windshield complies with the require-
ments of the Head-Up Display to enable a pre-
cise display. A film in the windshield prevents
the double images fr om being displayed.
Windshield replacement should be carried out
by a BMW Sports Activity Vehicle Center or a
workshop that works according to BMW repair
procedures with correspondingly trained per-
sonnel.
Page 111 of 317
Controls
109Reference
At a glance
Driving tips
Communications
Navigation
Entertainment
Mobility
Care instructions
Important information on this topic is provided
on page 268.
Only clean the cover of the Head-Up Dis-
play with a soft, lint-free cloth or with a
display cleaning cloth, otherwise damage may
result. <
Page 117 of 317
Controls
115Reference
At a glance
Driving tips
Communications
Navigation
Entertainment
Mobility
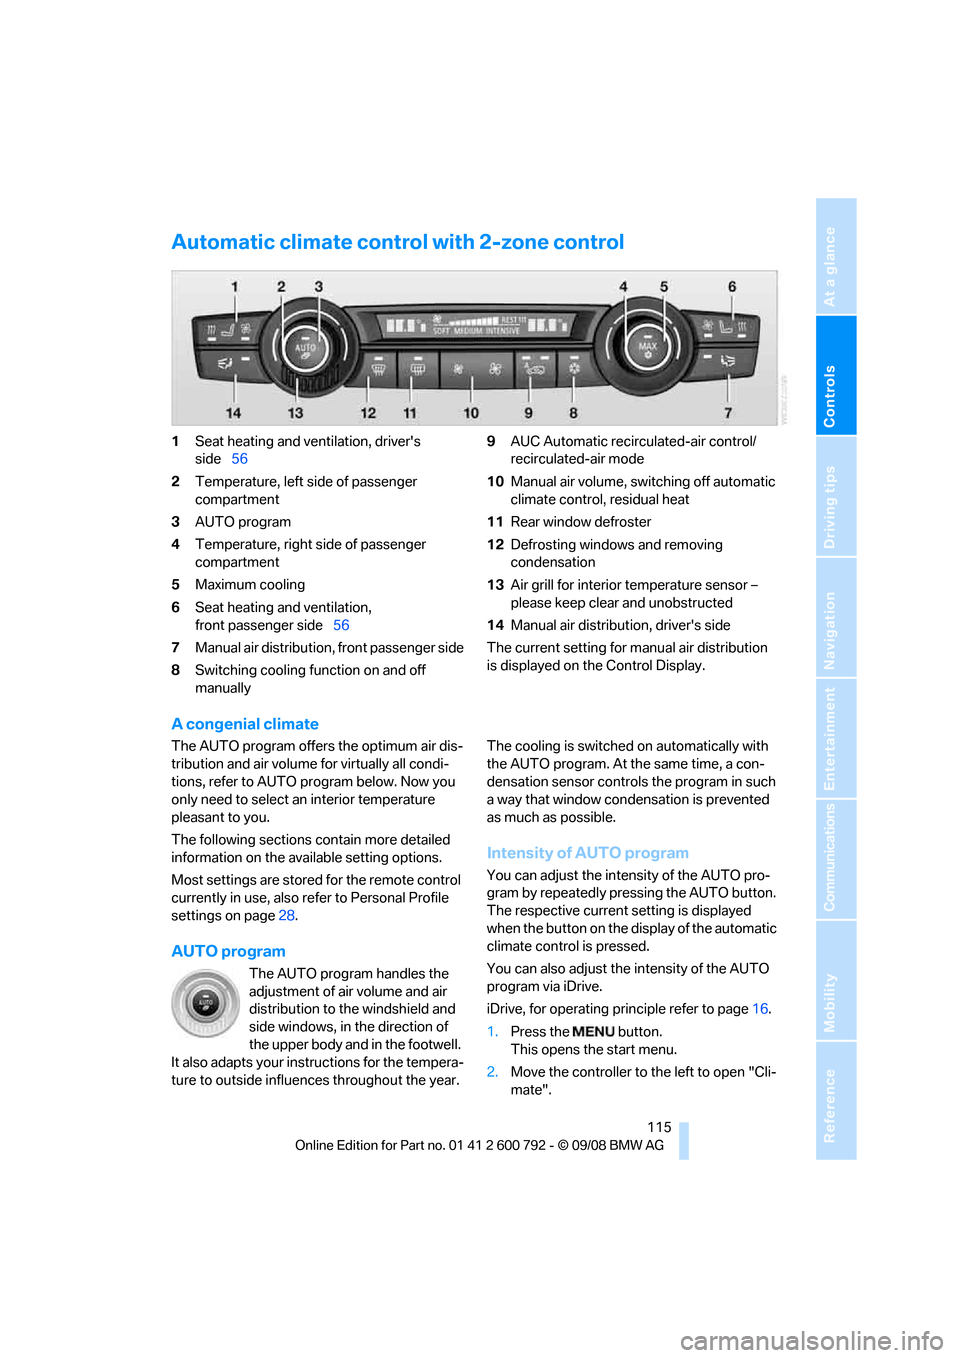
Automatic climate control with 2-zone control
1Seat heating and ventilation, driver's
side 56
2 Temperature, left side of passenger
compartment
3 AUTO program
4 Temperature, right side of passenger
compartment
5 Maximum cooling
6 Seat heating
and ventilation,
front passenger side 56
7 Manual air distribution, front passenger side
8 Switching cooling function on and off
manually 9
AUC Automatic recirculated-air control/
recirculated-air mode
10 Manual air volume, sw itching off automatic
climate control, residual heat
11 Rear window defroster
12 Defrosting windows and removing
condensation
13 Air grill for interior temperature sensor –
please keep clear and unobstructed
14 Manual air distribution, driver's side
The current setting for manual air distribution
is displayed on the Control Display.
A congenial climate
The AUTO program offers the optimum air dis-
tribution and air volume for virtually all condi-
tions, refer to AUTO pr ogram below. Now you
only need to select an interior temperature
pleasant to you.
The following sections contain more detailed
information on the available setting options.
Most settings are stored for the remote control
currently in use, also re fer to Personal Profile
settings on page 28.
AUTO program
The AUTO program handles the
adjustment of air volume and air
distribution to the windshield and
side windows, in the direction of
the upper body and in the footwell.
It also adapts your inst ructions for the tempera-
ture to outside influenc es throughout the year. The cooling is switched
on automatically with
the AUTO program. At the same time, a con-
densation sensor controls the program in such
a way that window condensation is prevented
as much as possible.
Intensity of AUTO program
You can adjust the intensity of the AUTO pro-
gram by repeatedly pr essing the AUTO button.
The respective current setting is displayed
when the button on the display of the automatic
climate control is pressed.
You can also adjust the intensity of the AUTO
program via iDrive.
iDrive, for operating pr inciple refer to page16.
1. Press the button.
This opens the start menu.
2. Move the controller to the left to open "Cli-
mate".
Page 119 of 317
Controls
117Reference
At a glance
Driving tips
Communications
Navigation
Entertainment
Mobility
>Individual program
Selecting program
Press the button repeatedly until
the desired program is shown on
the Control Display.
Adjusting air distribution individually –
individual program
The settings are stored in this program.
iDrive, for operating principle refer to page 16.
1. Press the button.
This opens the start menu.
2. Move the controller to the left to open "Cli-
mate".
3. Select "Vent settings" and press the con-
troller.
The driver's and front passenger side can
be adjusted separately with the fields on the
right or left side.
4. Select the driver's or front passenger side
if necessary.
Move the controller to the right or left
repeatedly until the driver's or front passen-
ger side is selected.
5. Select the desired field by moving the con-
troller.
6. Turn the controller to ad just the air distribu-
tion.
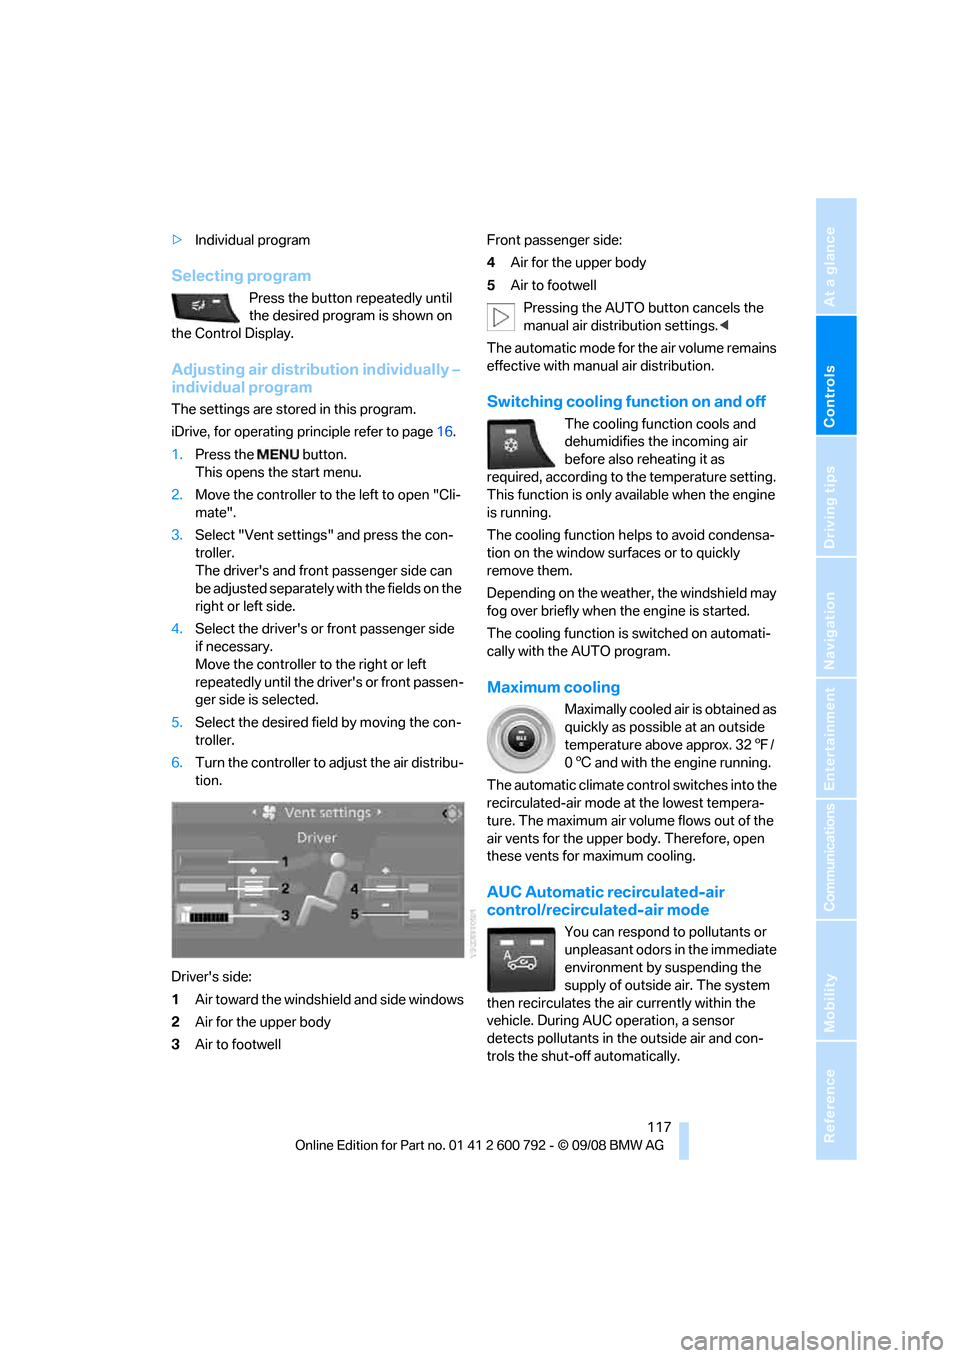
Driver's side:
1 Air toward the windshield and side windows
2 Air for the upper body
3 Air to footwell Front passenger side:
4
Air for the upper body
5 Air to footwell
Pressing the AUTO button cancels the
manual air distribution settings. <
The automatic mode for the air volume remains
effective with manual air distribution.Switching cooling function on and off
The cooling function cools and
dehumidifies the incoming air
before also reheating it as
required, according to the temperature setting.
This function is only available when the engine
is running.
The cooling function helps to avoid condensa-
tion on the window surfaces or to quickly
remove them.
Depending on the weathe r, the windshield may
fog over briefly when the engine is started.
The cooling function is switched on automati-
cally with the AUTO program.
Maximum cooling
Maximally cooled air is obtained as
quickly as possible at an outside
temperature above approx. 32 7/
0 6 and with the engine running.
The automatic climate cont rol switches into the
recirculated-air mode at the lowest tempera-
ture. The maximum air volume flows out of the
air vents for the upper body. Therefore, open
these vents for maximum cooling.
AUC Automatic re circulated-air
control/recirculated-air mode
You can respond to pollutants or
unpleasant odors in the immediate
environment by suspending the
supply of outside air. The system
then recirculates the air currently within the
vehicle. During AUC operation, a sensor
detects pollutants in the outside air and con-
trols the shut-off automatically.
Page 120 of 317
Climate
118
By pressing the button repeatedly, you can
request three operating modes:
>
LED off: outside air flows in continuously.
> Left LED on, AUC mode: the system
detects pollutants in the outside air and
shuts off the supply as needed.
> Right LED on, recirculated-air mode: the
supply of outside air is permanently shut off.
Should the windows fog up in the recircu-
lated-air mode, press the AUTO button or
switch off the recirc ulated-air mode and
increase the air volume if necessary.
The recirculated-air mode should not be used
without interruption over an extended period of
time, as the air quality inside the vehicle deteri-
orates continuously. <
Residual heat
The heat stored in the engine is used to heat the
passenger compartment, e.g. while stopped at
a school to pick up a child.
Switching on
Pressing the right side switches on
the residual heat utilization when
the following conditions are met:
> up to 15 minutes after switching off the
engine
> with the engine at operating temperature
> with sufficient battery voltage
> at an outside temperature below 77 7/
25 6
REST appears on the display of the automatic
climate control when the residual heat utiliza-
tion is switched on.
From radio readiness the interior temperature,
the air volume and the air distribution can be
set.
Switching off
You can select the lowe st blower speed by
pressing and holding th e left side. Pressing
again switches off the re sidual heat utilization.
REST disappears from the display of the auto-
matic climate control.
Switching automatic climate control on
and off
You can select the lowest blower
speed by pressing and holding the
left side. Pressing again switches
off the automatic climate control.
Y o u s w i t c h o n t h e s y s t e m a g a i n b y p r e s s i n g a n y
button of the automatic climate control.
Front ventilation
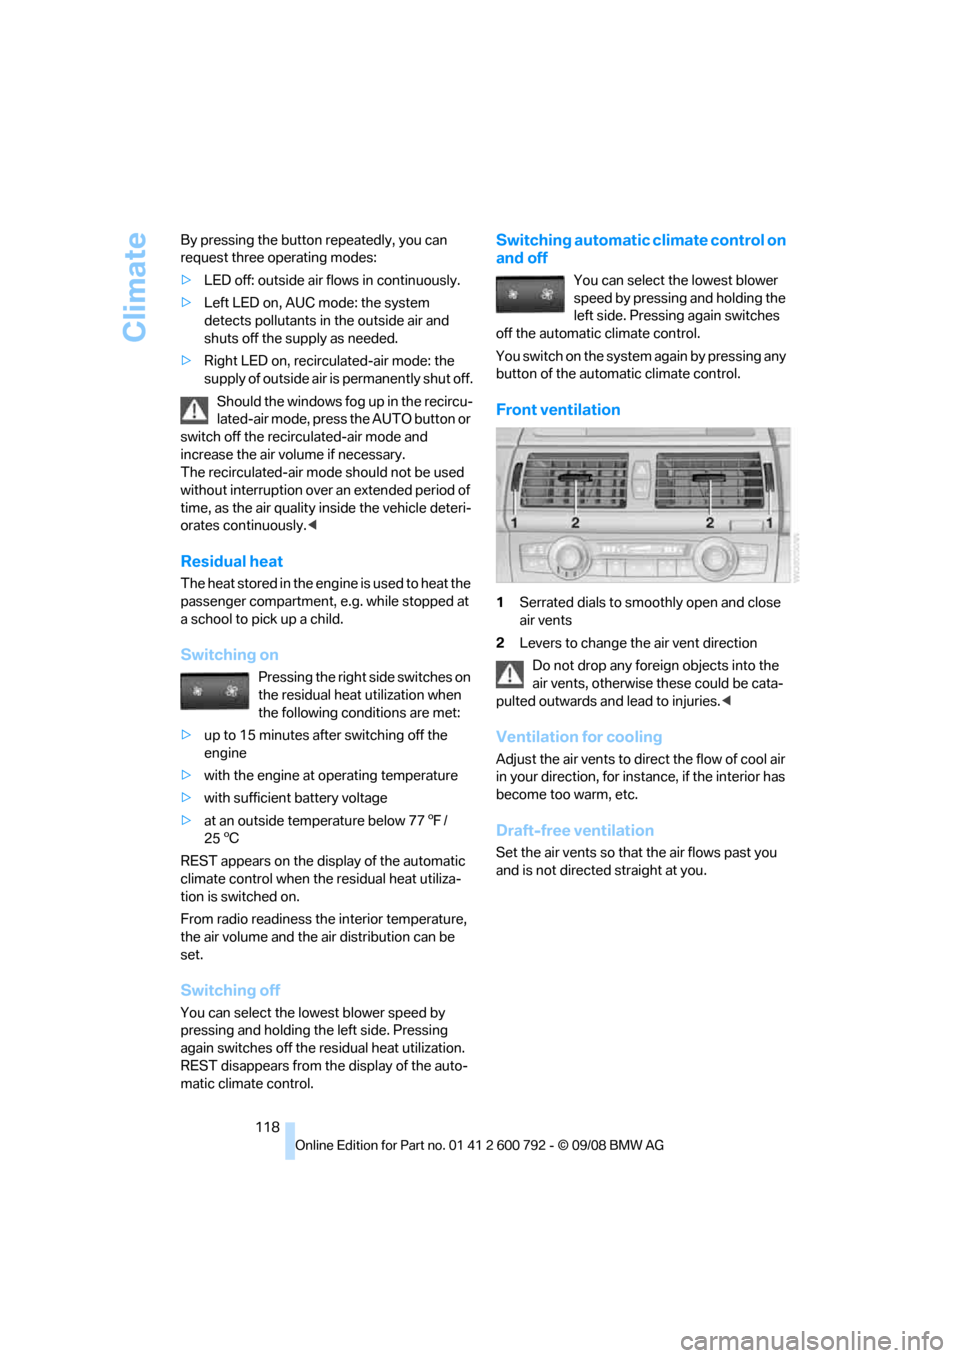
1 Serrated dials to smoothly open and close
air vents
2 Levers to change th e air vent direction
Do not drop any foreign objects into the
air vents, otherwise these could be cata-
pulted outwards and lead to injuries. <
Ventilation for cooling
Adjust the air vents to direct the flow of cool air
in your direction, for instance, if the interior has
become too warm, etc.
Draft-free ventilation
Set the air vents so that the air flows past you
and is not directed straight at you.
Page 121 of 317
Controls
119Reference
At a glance
Driving tips
Communications
Navigation
Entertainment
Mobility
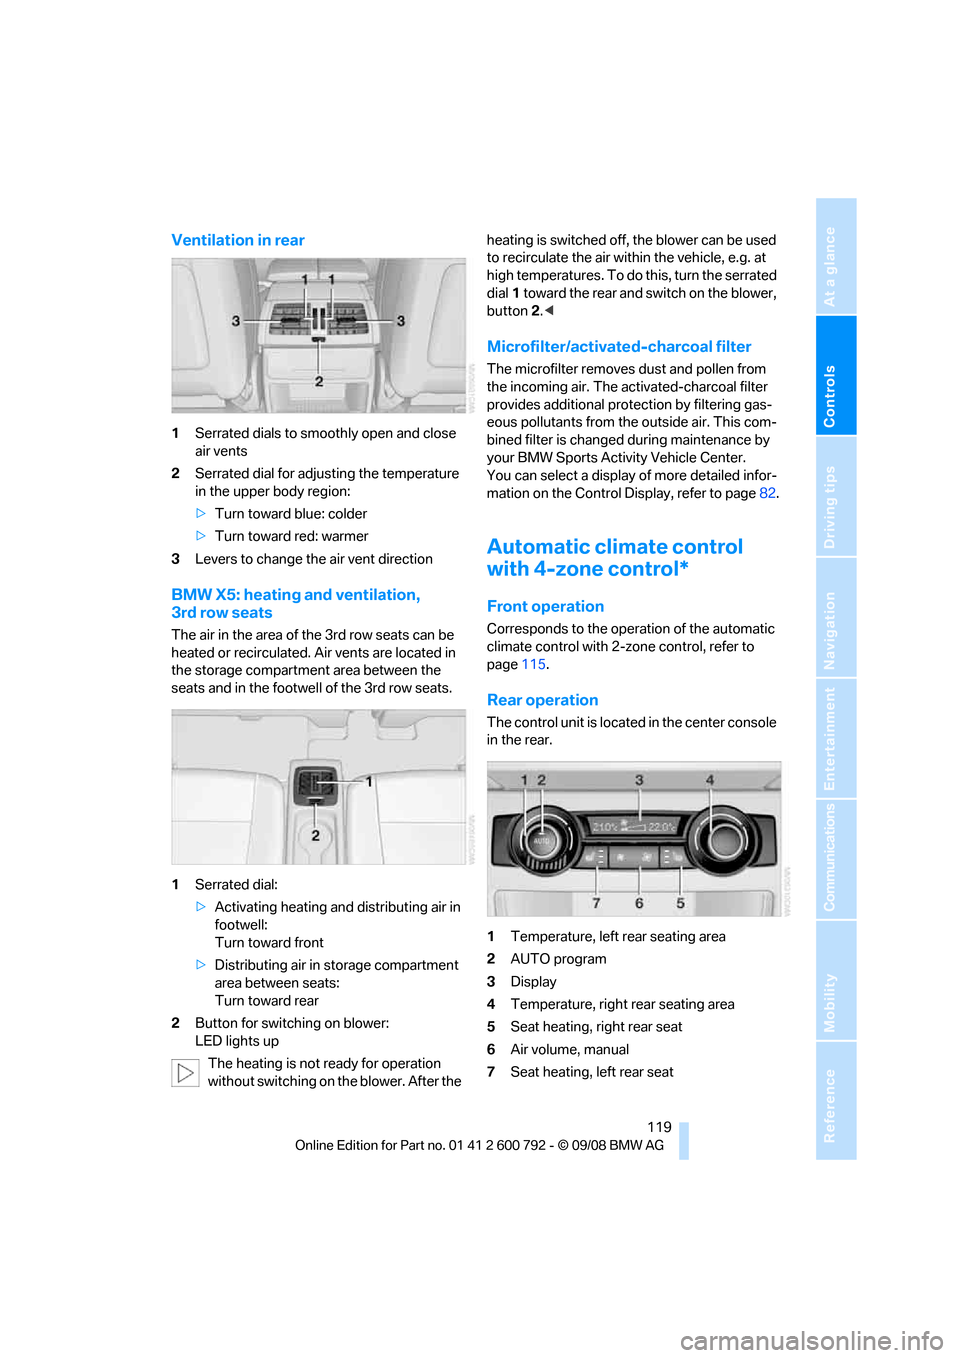
Ventilation in rear
1Serrated dials to smoothly open and close
air vents
2 Serrated dial for adjusting the temperature
in the upper body region:
>Turn toward blue: colder
> Turn toward red: warmer
3 Levers to change the air vent direction
BMW X5: heating and ventilation,
3rd row seats
The air in the area of the 3rd row seats can be
heated or recirculated. Air vents are located in
the storage compartmen t area between the
seats and in the footwell of the 3rd row seats.
1 Serrated dial:
>Activating heating and distributing air in
footwell:
Turn toward front
> Distributing air in storage compartment
area between seats:
Turn toward rear
2 Button for switching on blower:
LED lights up
The heating is not ready for operation
without switching on the blower. After the heating is switched off, the blower can be used
to recirculate the air within the vehicle, e.g. at
high temperatures. To do
this, turn the serrated
dial 1 toward the rear and switch on the blower,
button 2.<
Microfilter/activated-charcoal filter
The microfilter removes dust and pollen from
the incoming air. The activated-charcoal filter
provides additional protection by filtering gas-
eous pollutants from the outside air. This com-
bined filter is changed during maintenance by
your BMW Sports Activity Vehicle Center.
You can select a display of more detailed infor-
mation on the Control Display, refer to page 82.
Automatic climate control
with 4-zone control*
Front operation
Corresponds to the operation of the automatic
climate control with 2-zone control, refer to
page 115.
Rear operation
The control unit is located in the center console
in the rear.
1Temperature, left rear seating area
2 AUTO program
3 Display
4 Temperature, right rear seating area
5 Seat heating, right rear seat
6 Air volume, manual
7 Seat heating, left rear seat
Page 122 of 317
Climate
120
The current setting for the temperature and the
air volume is shown on display
3.
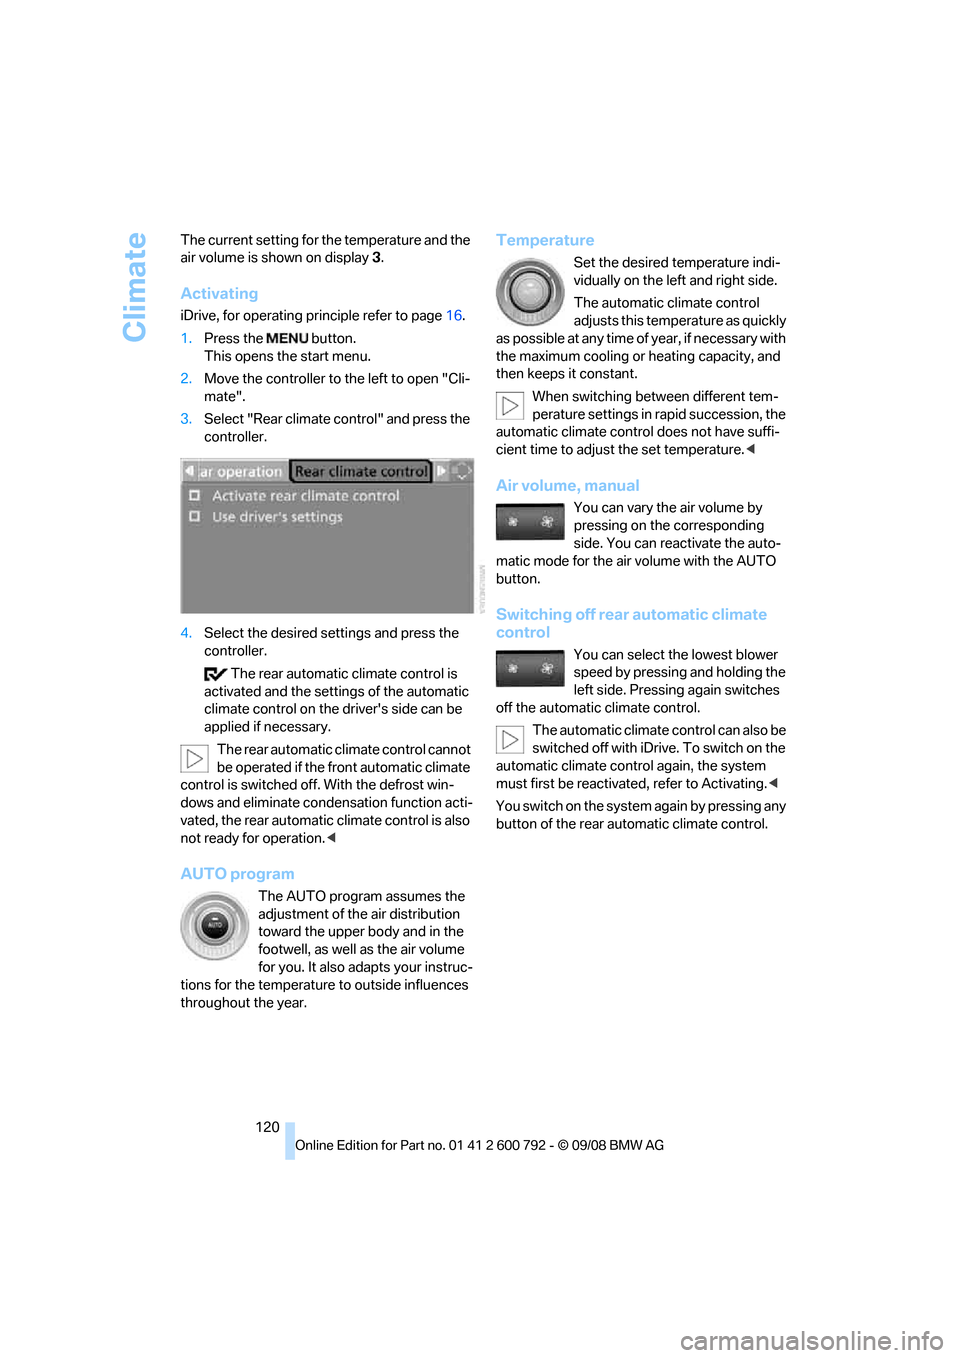
Activating
iDrive, for operating pr inciple refer to page16.
1. Press the button.
This opens the start menu.
2. Move the controller to the left to open "Cli-
mate".
3. Select "Rear climate control" and press the
controller.
4. Select the desired settings and press the
controller.
The rear automatic climate control is
activated and the setti ngs of the automatic
climate control on the driver's side can be
applied if necessary.
The rear automatic c limate control cannot
be operated if the front automatic climate
control is switched off. With the defrost win-
dows and eliminate condensation function acti-
vated, the rear automatic climate control is also
not ready for operation. <
AUTO program
The AUTO program assumes the
adjustment of the air distribution
toward the upper body and in the
footwell, as well as the air volume
for you. It also adapts your instruc-
tions for the temperature to outside influences
throughout the year.
Temperature
Set the desired temperature indi-
vidually on the left and right side.
The automatic climate control
adjusts this temperature as quickly
a s p o s s i b l e a t a n y t i m e o f y e a r , i f n e c e s s a r y w i t h
the maximum cooling or heating capacity, and
then keeps it constant.
When switching betw een different tem-
perature settings in rapid succession, the
automatic climate control does not have suffi-
cient time to adjust the set temperature. <
Air volume, manual
You can vary the air volume by
pressing on the corresponding
side. You can reactivate the auto-
matic mode for the air volume with the AUTO
button.
Switching off rear automatic climate
control
You can select the lowest blower
speed by pressing and holding the
left side. Pressing again switches
off the automatic climate control.
The automatic climate control can also be
switched off with iDrive. To switch on the
automatic climate control again, the system
must first be reactivate d, refer to Activating.<
Y o u s w i t c h o n t h e s y s t e m a g a i n b y p r e s s i n g a n y
button of the rear auto matic climate control.
Page 124 of 317
Climate
122
The symbol on the display of the automatic
climate control flashes.
Preselecting activation times
iDrive, for operating pr
inciple refer to page16.
1. Open the start menu.
2. Move the controller to the left to open "Cli-
mate".
3. Select "Parked car operation" and press the
controller.
4. Select "Activation time" and press the con-
troller.
5. Move the controller to the left or right to
select "Timer 1" or "Timer 2".
6. Select the time and press the controller.
The first time setting is highlighted.
7. Turn the controller to make the adjustment.
8. Press the controller to apply the setting.
The next setting is highlighted.
9. Make the remaining adjustments. After the
last adjustment, the time is stored.
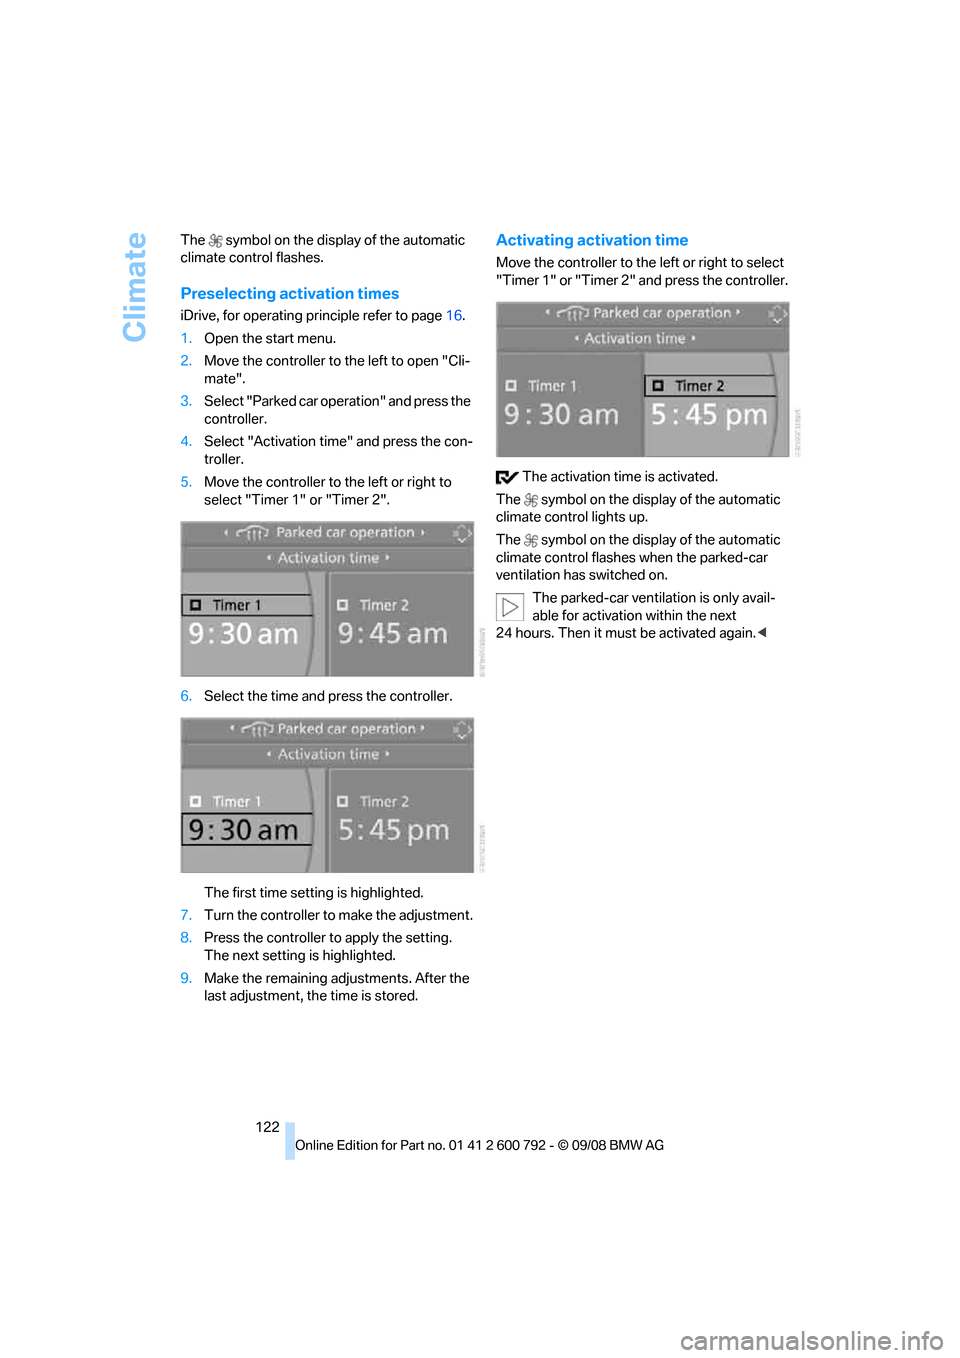
Activating activation time
Move the controller to the left or right to select
"Timer 1" or "Timer 2" and press the controller.
The activation time is activated.
The symbol on the display of the automatic
climate control lights up.
The symbol on the display of the automatic
climate control flashes when the parked-car
ventilation has switched on.
The parked-car ventilation is only avail-
able for activation within the next
24 hours. Then it must be activated again. <
Page 126 of 317
Practical interior accessories
124
The corresponding memory button
1 is now
programmed with the signal of the original
hand-held transmitter.
You can operate the device when the engine is
running or when the igni tion is switched on.
If the device cannot be used after
repeated programming, check whether
the original hand-held transmitter uses an alter-
nating-code system. To do so, either read the
instructions for the original hand-held transmit-
ter or hold down the programmed memory but-
ton 1 of the integrated universal remote control.
If the LED 2 on the integrated universal remote
control flashes rapidly for a short time and then
remains lit for approx. 2 seconds, this indicates
that the original hand-h eld transmitter uses an
alternating-code system. In the case of an alter-
nating-code system, program the memory but-
tons 1 as described at Alternating-code hand-
held transmitters. <
Alternating-code hand-held
transmitters
To program the integrated universal remote
control, consult the operating instructions for
the equipment to be set. You will find informa-
tion there on the possibilities for synchroniza-
tion.
When programming hand-held transmitters
that employ an alternating code, observe the
following supplementary instructions:
Programming will be easi er with the aid of
a second person. <
1. Park your vehicle within the range of the
remote-controlled device.
2. Program the integrated universal remote
control as described above in the section
Fixed-code hand-held transmitters.
3. Locate the button on the receiver of the
device to be set, e.g. on the drive unit.
4. Press the button on the receiver of the
device to be set. Af ter step 4, you have
approx. 30 seconds for step 5.
5. Press the programmed memory button 1
of the integrated universal remote control
three times. The corresponding memory button
1 is now
programmed with the signal of the original
hand-held transmitter.
Should you have questions, please con-
tact your BMW Sports Activity Vehicle
Center. <
Deleting all stored programs
Press the left and right-hand memory button 1
for approx. 20 seconds until the LED 2 flashes
quickly:
All stored programs are deleted.
Reassigning individual programs
1. Hold the original hand-held transmitter at
a distance of approx. 4 in/10 cm to 12 in/
30 cm from the memory buttons 1.
The required distance between the
hand-held transmitter and the mem-
ory buttons 1 depends on the relevant sys-
tem of the original hand-held transmitter
used. <
2. Press the desired memory button 1 of the
integrated universal remote control.
3. When the LED 2 flashes slowly after approx.
20 seconds, press the transmit button of
the original hand-held transmitter. Release
both buttons as soon as the LED 2 flashes
rapidly. If the LED 2 does not flash rapidly
after approx. 15 seconds, alter the distance
and repeat the step.
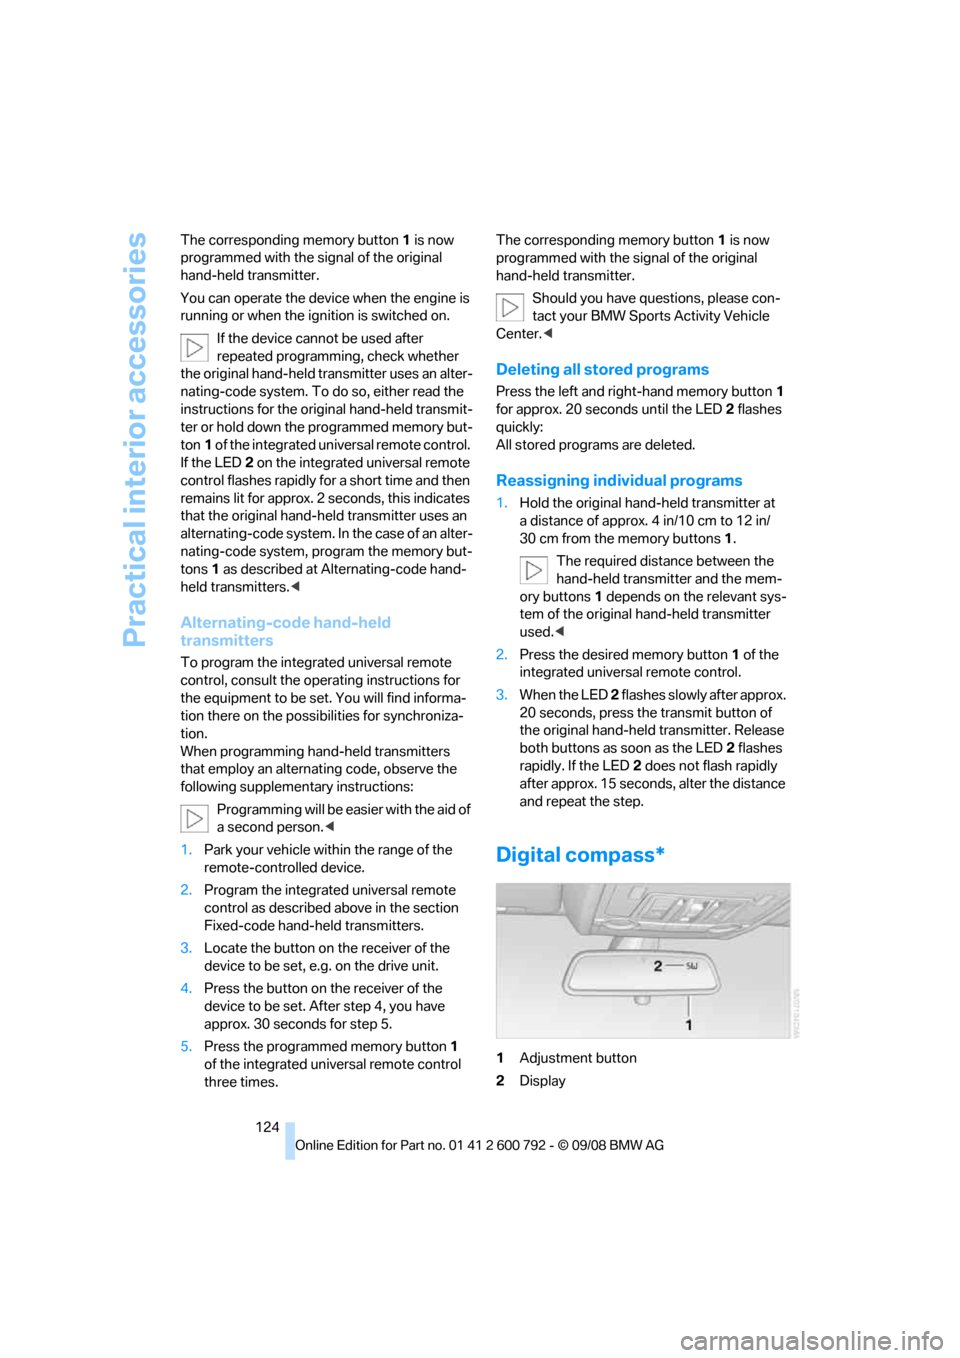
Digital compass*
1 Adjustment button
2 Display
Page 127 of 317
Controls
125Reference
At a glance
Driving tips
Communications
Navigation
Entertainment
Mobility
The display indicates the cardinal or intercardi-
nal direction in which you are currently driving.
Operating principle
You can run various functions by pressing the
adjustment button with a pointed object, e.g. a
ball-point pen etc. The following setting options
are displayed consecutively, depending on how
long the adjustment button is pressed:
> Press briefly: switch display on/off
> 3 to 6 seconds: set compass zone
> 6 to 9 seconds: calibrate compass
> 9 to 12 seconds: set left/right-hand drive
vehicle
> 12 to 15 seconds: set language
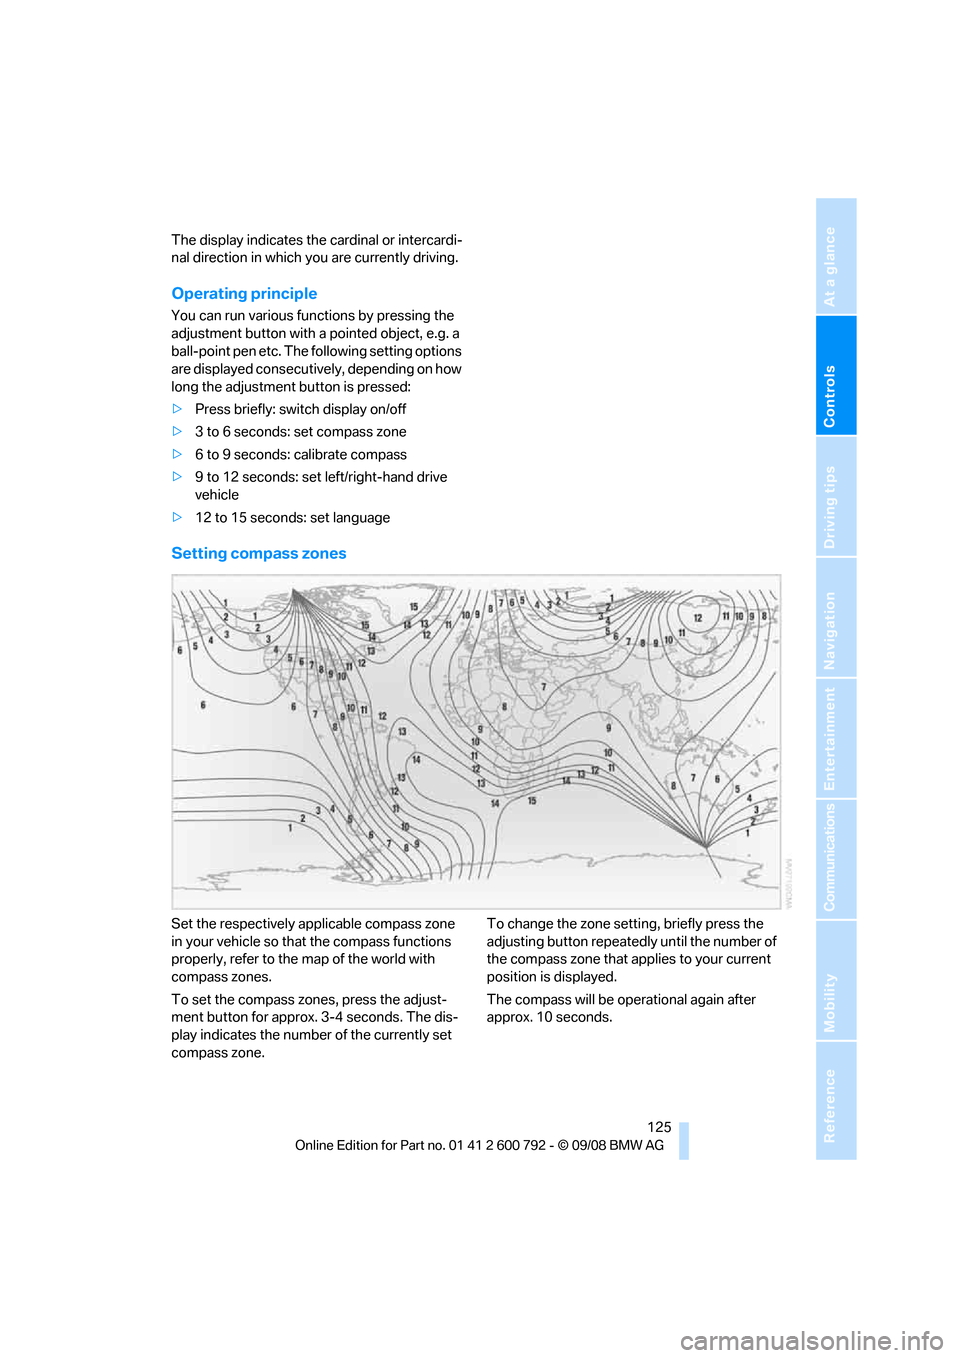
Setting compass zones
Set the respectively a pplicable compass zone
in your vehicle so that the compass functions
properly, refer to the map of the world with
compass zones.
To set the compass zones, press the adjust-
ment button for approx. 3-4 seconds. The dis-
play indicates the number of the currently set
compass zone. To change the zone setting, briefly press the
adjusting button repeatedly
until the number of
the compass zone that a pplies to your current
position is displayed.
The compass will be operational again after
approx. 10 seconds.